Difference between revisions of "Quick Start Guide/sk"
(Created page with "V časti 'Plán' <span style="font-size: 30px; vertical-align: middle;">②</span> môžete určiť časový plán, kedy sa daný prvok zapne alebo vypne, a to aj pomocou...") |
|||
| (23 intermediate revisions by 2 users not shown) | |||
| Line 76: | Line 76: | ||
Hlavná obrazovka aplikácie má niekoľko kľúčových prvkov. V ľavom hornom rohu sa nachádza ponuka "výber oblasti" <span style="font-size: 30px; vertical-align: middle;">①</span>. | Hlavná obrazovka aplikácie má niekoľko kľúčových prvkov. V ľavom hornom rohu sa nachádza ponuka "výber oblasti" <span style="font-size: 30px; vertical-align: middle;">①</span>. | ||
Stačí kliknúť na jednu z dostupných oblastí, aby ste ju mohli spravovať <span style="font-size: 30px; vertical-align: middle;">②</span>. | Stačí kliknúť na jednu z dostupných oblastí, aby ste ju mohli spravovať <span style="font-size: 30px; vertical-align: middle;">②</span>. | ||
| − | Ďalej sú tu ikony, ktoré umožňujú vybrať vykonávacie prvky, snímače, klímu, multimédiá, diaľkové ovládanie a kamery <span style="font-size: 30px; vertical-align: middle;">③</span>. V pravom rohu sa nachádza ikona pre doplnkovú ponuku <span style="font-size: 30px; vertical-align: middle;">④</span>. o vnútri ikony môžete vidieť aj stav aktuálneho pripojenia. | + | Ďalej sú tu ikony, ktoré umožňujú vybrať vykonávacie prvky, snímače, klímu, multimédiá, diaľkové ovládanie |
| + | |||
| + | a kamery <span style="font-size: 30px; vertical-align: middle;">③</span>. V pravom rohu sa nachádza ikona pre doplnkovú ponuku <span style="font-size: 30px; vertical-align: middle;">④</span>. o vnútri ikony môžete vidieť aj stav aktuálneho pripojenia. | ||
[[File:DemoCase7.png|1000x800px]] | [[File:DemoCase7.png|1000x800px]] | ||
<hr> | <hr> | ||
| Line 98: | Line 100: | ||
V časti 'Plán' <span style="font-size: 30px; vertical-align: middle;">②</span> môžete určiť časový plán, kedy sa daný prvok zapne alebo vypne, a to aj pomocou času západu a východu slnka. | V časti 'Plán' <span style="font-size: 30px; vertical-align: middle;">②</span> môžete určiť časový plán, kedy sa daný prvok zapne alebo vypne, a to aj pomocou času západu a východu slnka. | ||
| − | + | Na karte "Prepínače" <span style="font-size: 30px; vertical-align: middle;">③</span> môžete priradiť tlačidlo na ovládanie vykonávacieho prvku. | |
[[File:DemoCase11.png|1000x800px]] | [[File:DemoCase11.png|1000x800px]] | ||
<hr> | <hr> | ||
| − | + | Aby sme to mohli urobiť, stlačíme tlačidlo <span style="font-size: 30px; vertical-align: middle;">①</span>, ktoré potrebujeme priradiť. Systém ho zobrazí, načo stlačíme tlačidlo 'Priradiť' <span style="font-size: 30px; vertical-align: middle;">②</span> a zmeny uložíme. Teraz toto tlačidlo ovláda daný vykonávací prvok. | |
| − | + | Na karte 'Spínače' <span style="font-size: 30px; vertical-align: middle;">③</span> sa nachádzajú aj ďalšie možnosti nastavenia tlačidiel. Môžeme napríklad naprogramovať, aby sa vykonávací prvok ovládal dvojitým alebo trojitým kliknutím na tlačidlo, ako aj definovať akciu, ktorú toto tlačidlo vykonáva, napríklad "len zapnutie" alebo "len vypnutie" vykonávacieho prvku. V tomto prípade nastavujeme tlačidlo tak, aby robilo nasledovné: jedno kliknutie spôsobí prepnutie lampy, dvojité kliknutie ju zapne a trojité kliknutie ju vypne. Takto môže jedno tlačidlo vykonať až päť rôznych akcií. | |
[[File:DemoCase12.png|1000x800px]] | [[File:DemoCase12.png|1000x800px]] | ||
<hr> | <hr> | ||
| − | + | Okrem toho si nastavíme základnú automatizáciu zapínania a vypínania vykonávacieho prvku pomocou snímača pohybu. | |
| − | + | Možnosť "Automatická perióda" <span style="font-size: 30px; vertical-align: middle;">①</span> nastavuje čas, na ktorý je automatizácia vypnutá po manuálnom ovládaní vykonávacieho prvku. Na naše demonštračné účely ju nastavíme na nulu. | |
| − | + | Potom aktivujeme automatiku <span style="font-size: 30px; vertical-align: middle;">②</span>, aby sa vykonávací prvok zapol po zistení pohybu. Vyberieme snímač pohybu <span style="font-size: 30px; vertical-align: middle;">③</span> a úroveň pohybu <span style="font-size: 30px; vertical-align: middle;">④</span>. Môžeme vybrať aj svetelný senzor a jeho parametre. | |
[[File:DemoCase13.png|1000x800px]] | [[File:DemoCase13.png|1000x800px]] | ||
<hr> | <hr> | ||
| − | + | Teraz aktivujeme vypnutie vykonávacieho prvku <span style="font-size: 30px; vertical-align: middle;">①</span>, ak nie je zaznamenaný žiadny pohyb: vyberieme ten istý snímač, nastavíme nižšiu prahovú hodnotu a minimálny čas. Tieto zmeny uložíme. | |
| − | + | K ikone vykonávacieho prvku sa pridá dodatočná ikona "A" <span style="font-size: 30px; vertical-align: middle;">②</span>, čo znamená, že preň bola nastavená automatizácia. Teraz sa lampa zapne, keď sa zistí pohyb, a okamžite sa vypne, keď sa žiadny pohyb nezistí. | |
[[File:DemoCase14.png|1000x800px]] | [[File:DemoCase14.png|1000x800px]] | ||
<hr> | <hr> | ||
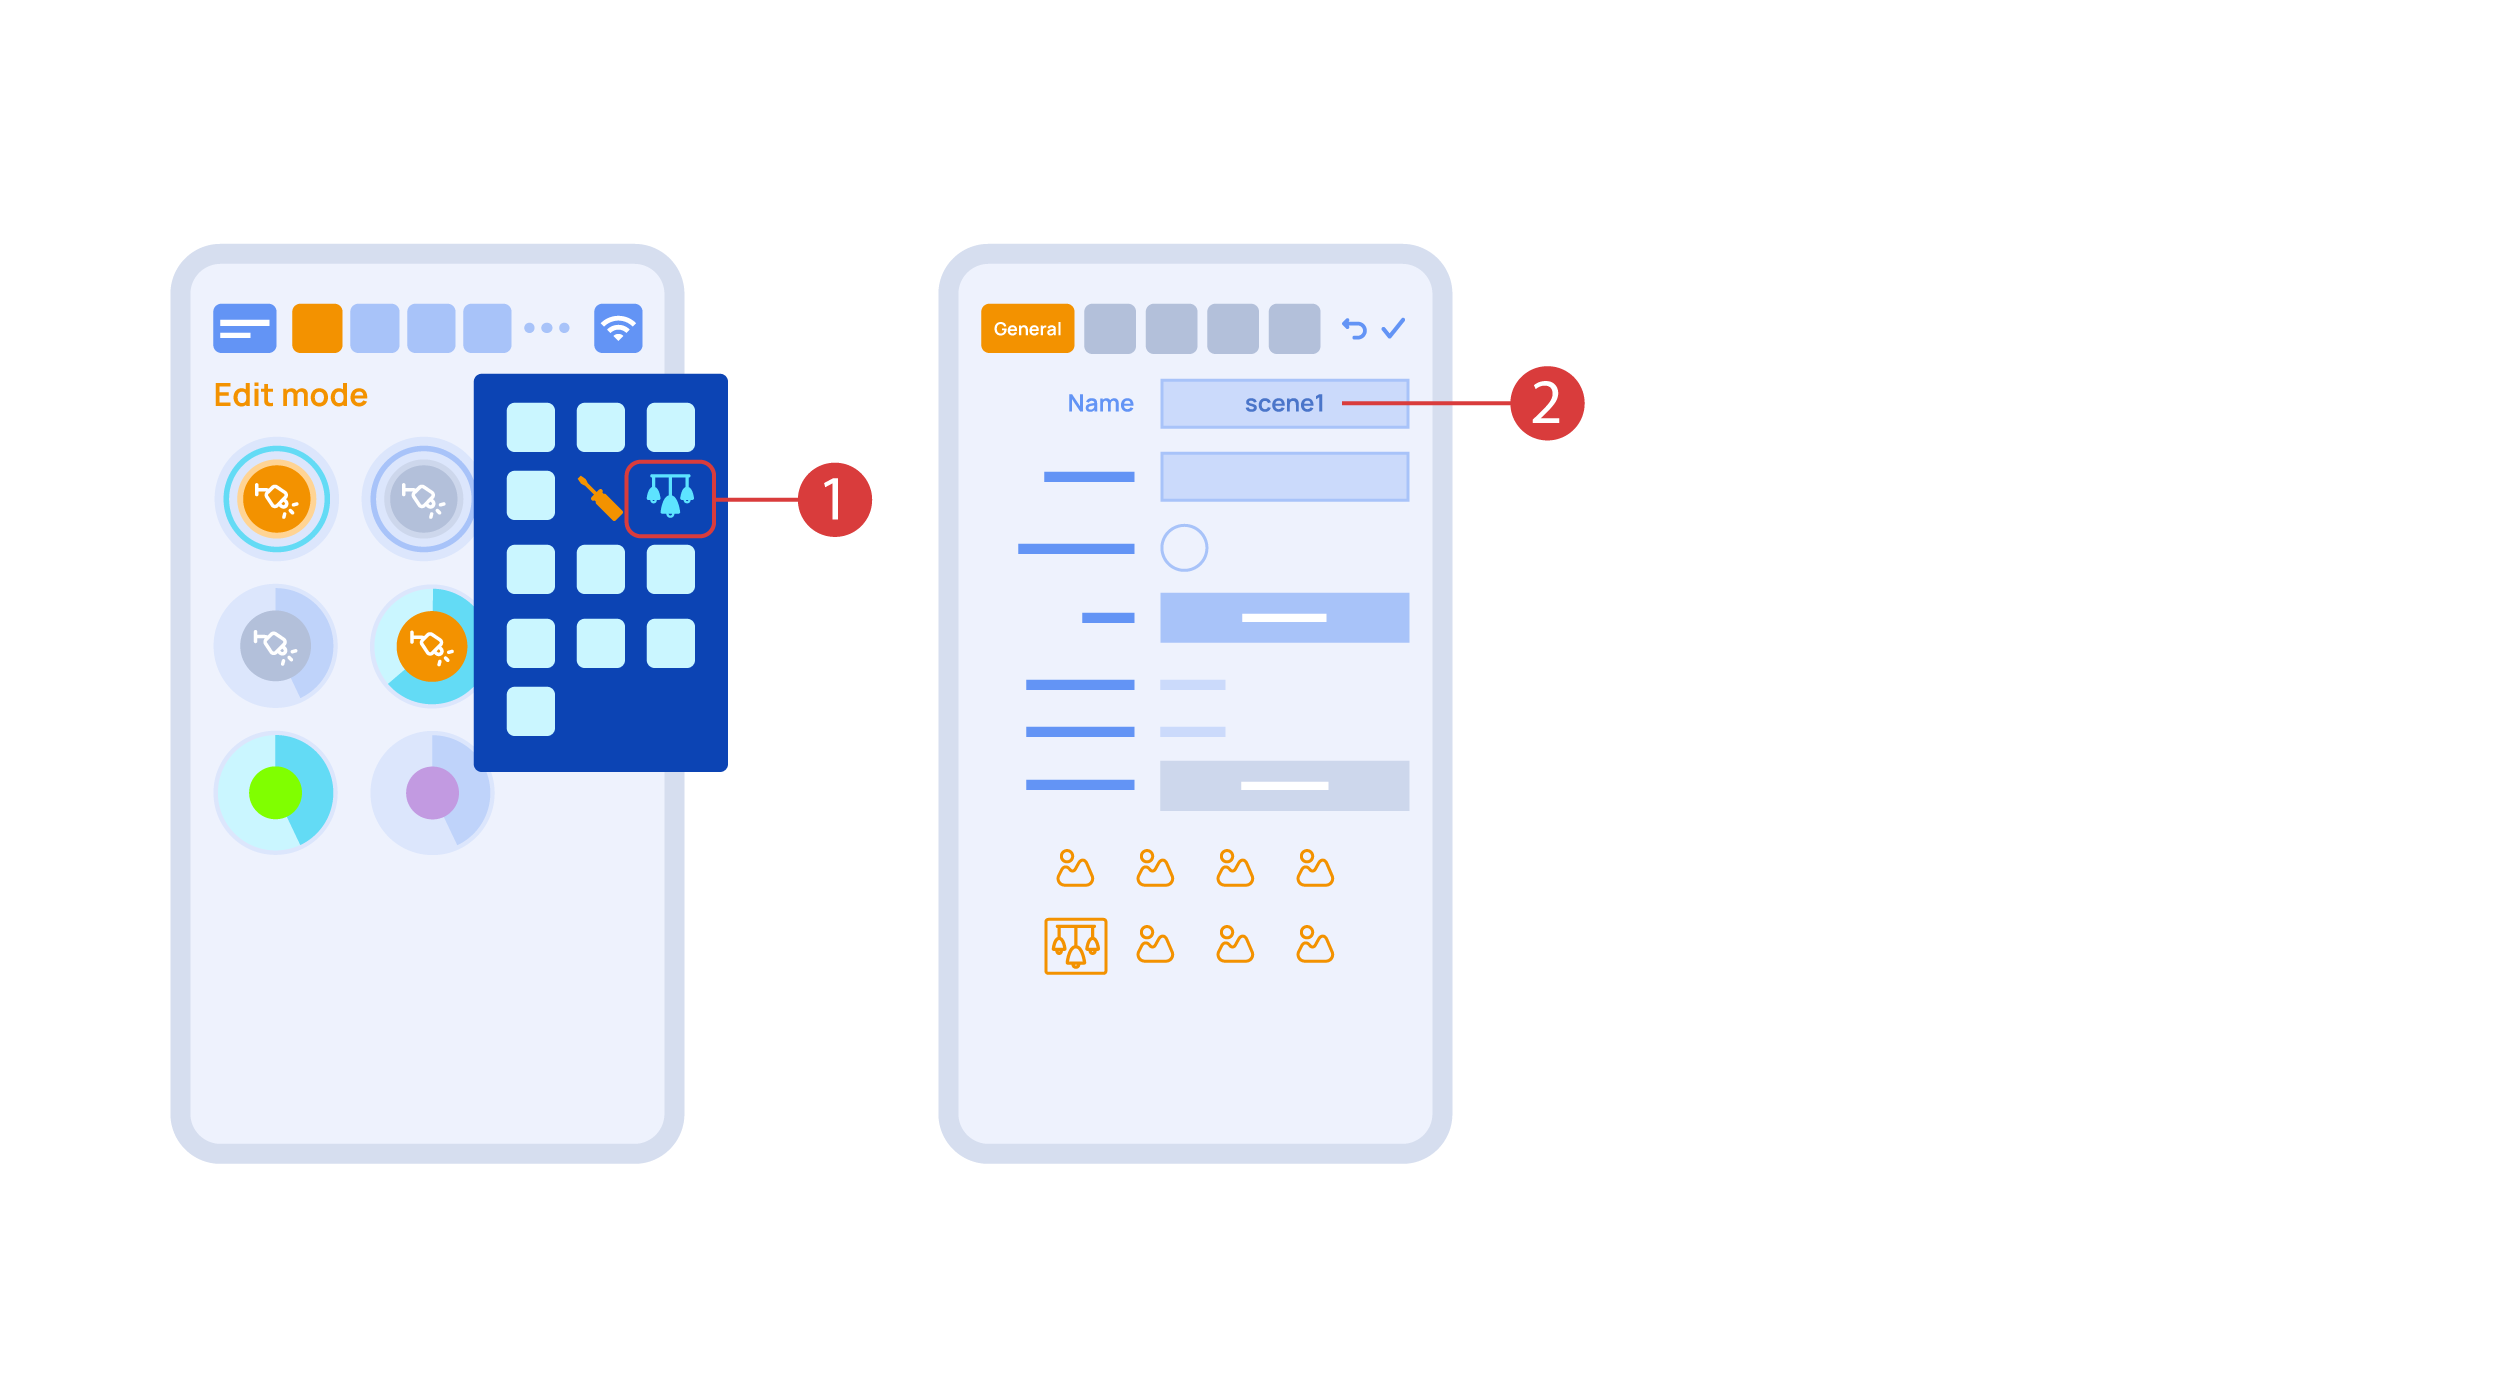
| − | + | Poďme si vytvoriť svetelnú schému. Na to musíme vybrať príslušnú položku v doplnkovej ponuke <span style="font-size: 30px; vertical-align: middle;">①</span>. Túto svetelnú schému pomenujte <span style="font-size: 30px; vertical-align: middle;">②</span>. | |
[[File:DemoCase15.png|1000x800px]] | [[File:DemoCase15.png|1000x800px]] | ||
<hr> | <hr> | ||
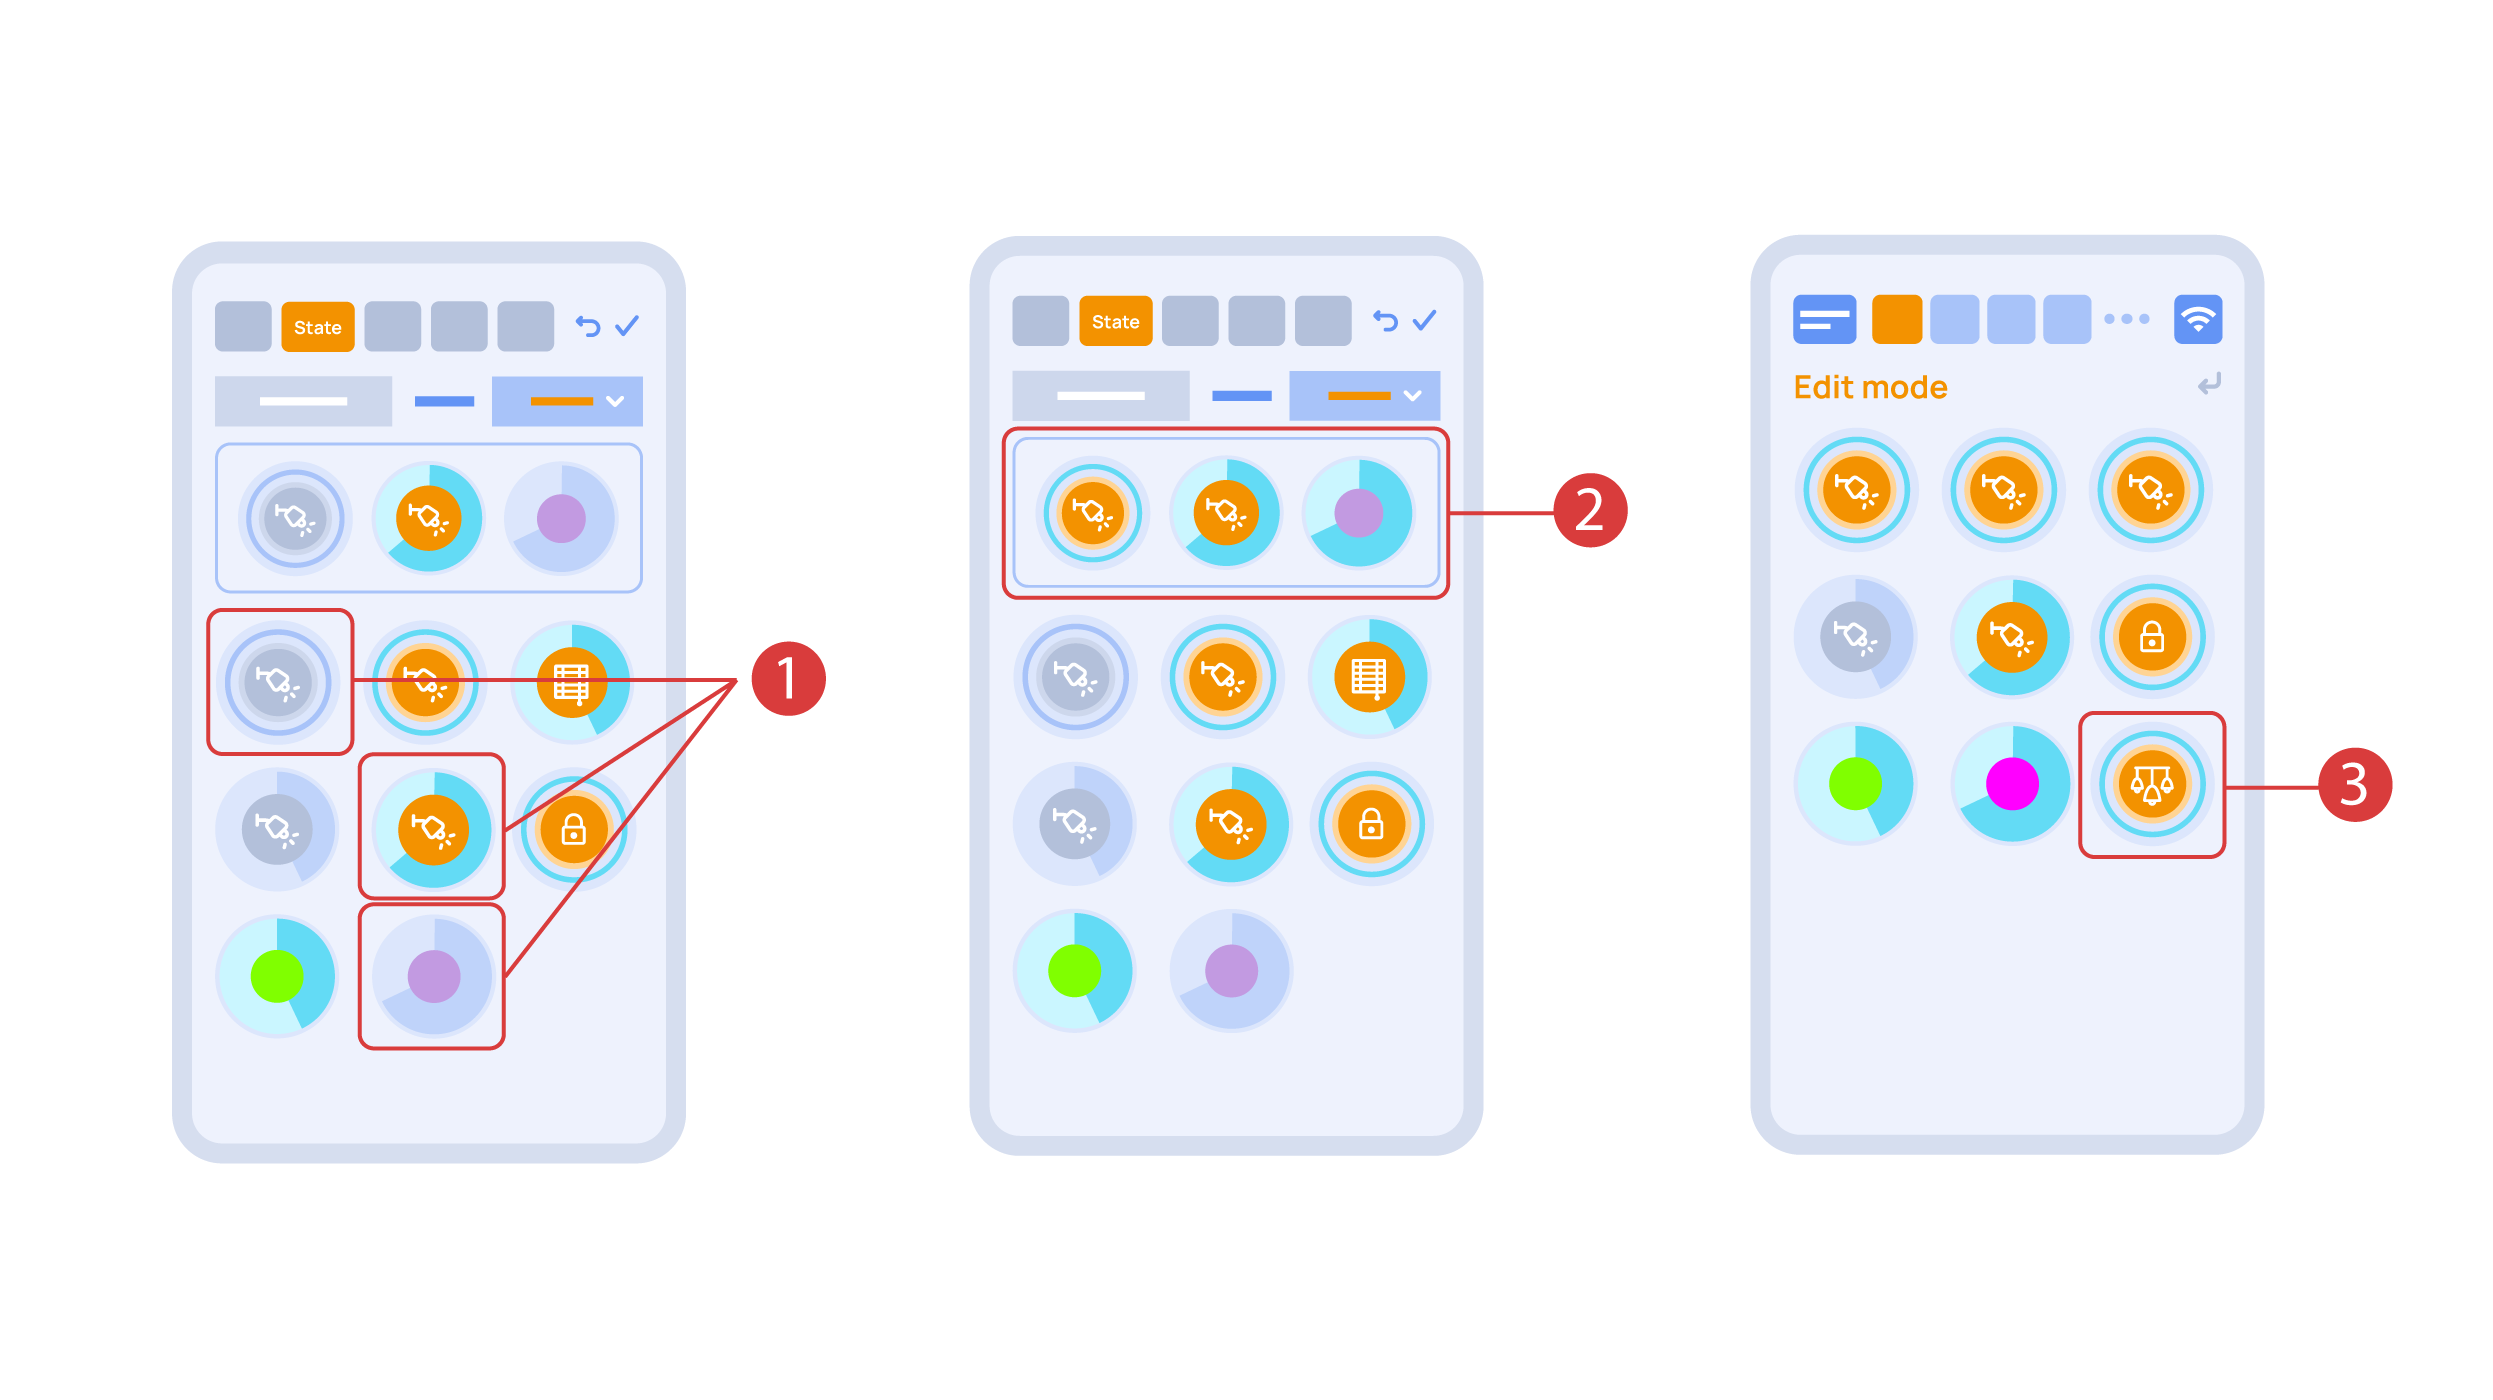
| − | + | Na karte "Stav" dlhým stlačením tlačidla pridajte svetlá, ktoré chceme využiť vo svetelnej scéne <span style="font-size: 30px; vertical-align: middle;">①</span>, a nastavte ich stav <span style="font-size: 30px; vertical-align: middle;">②</span>. Zmeny uložíme a novovytvorenú svetelnú schému <span style="font-size: 30px; vertical-align: middle;">③</span> môžeme ihneď používať. | |
| − | |||
[[File:DemoCase16.png|1000x800px]] | [[File:DemoCase16.png|1000x800px]] | ||
<hr> | <hr> | ||
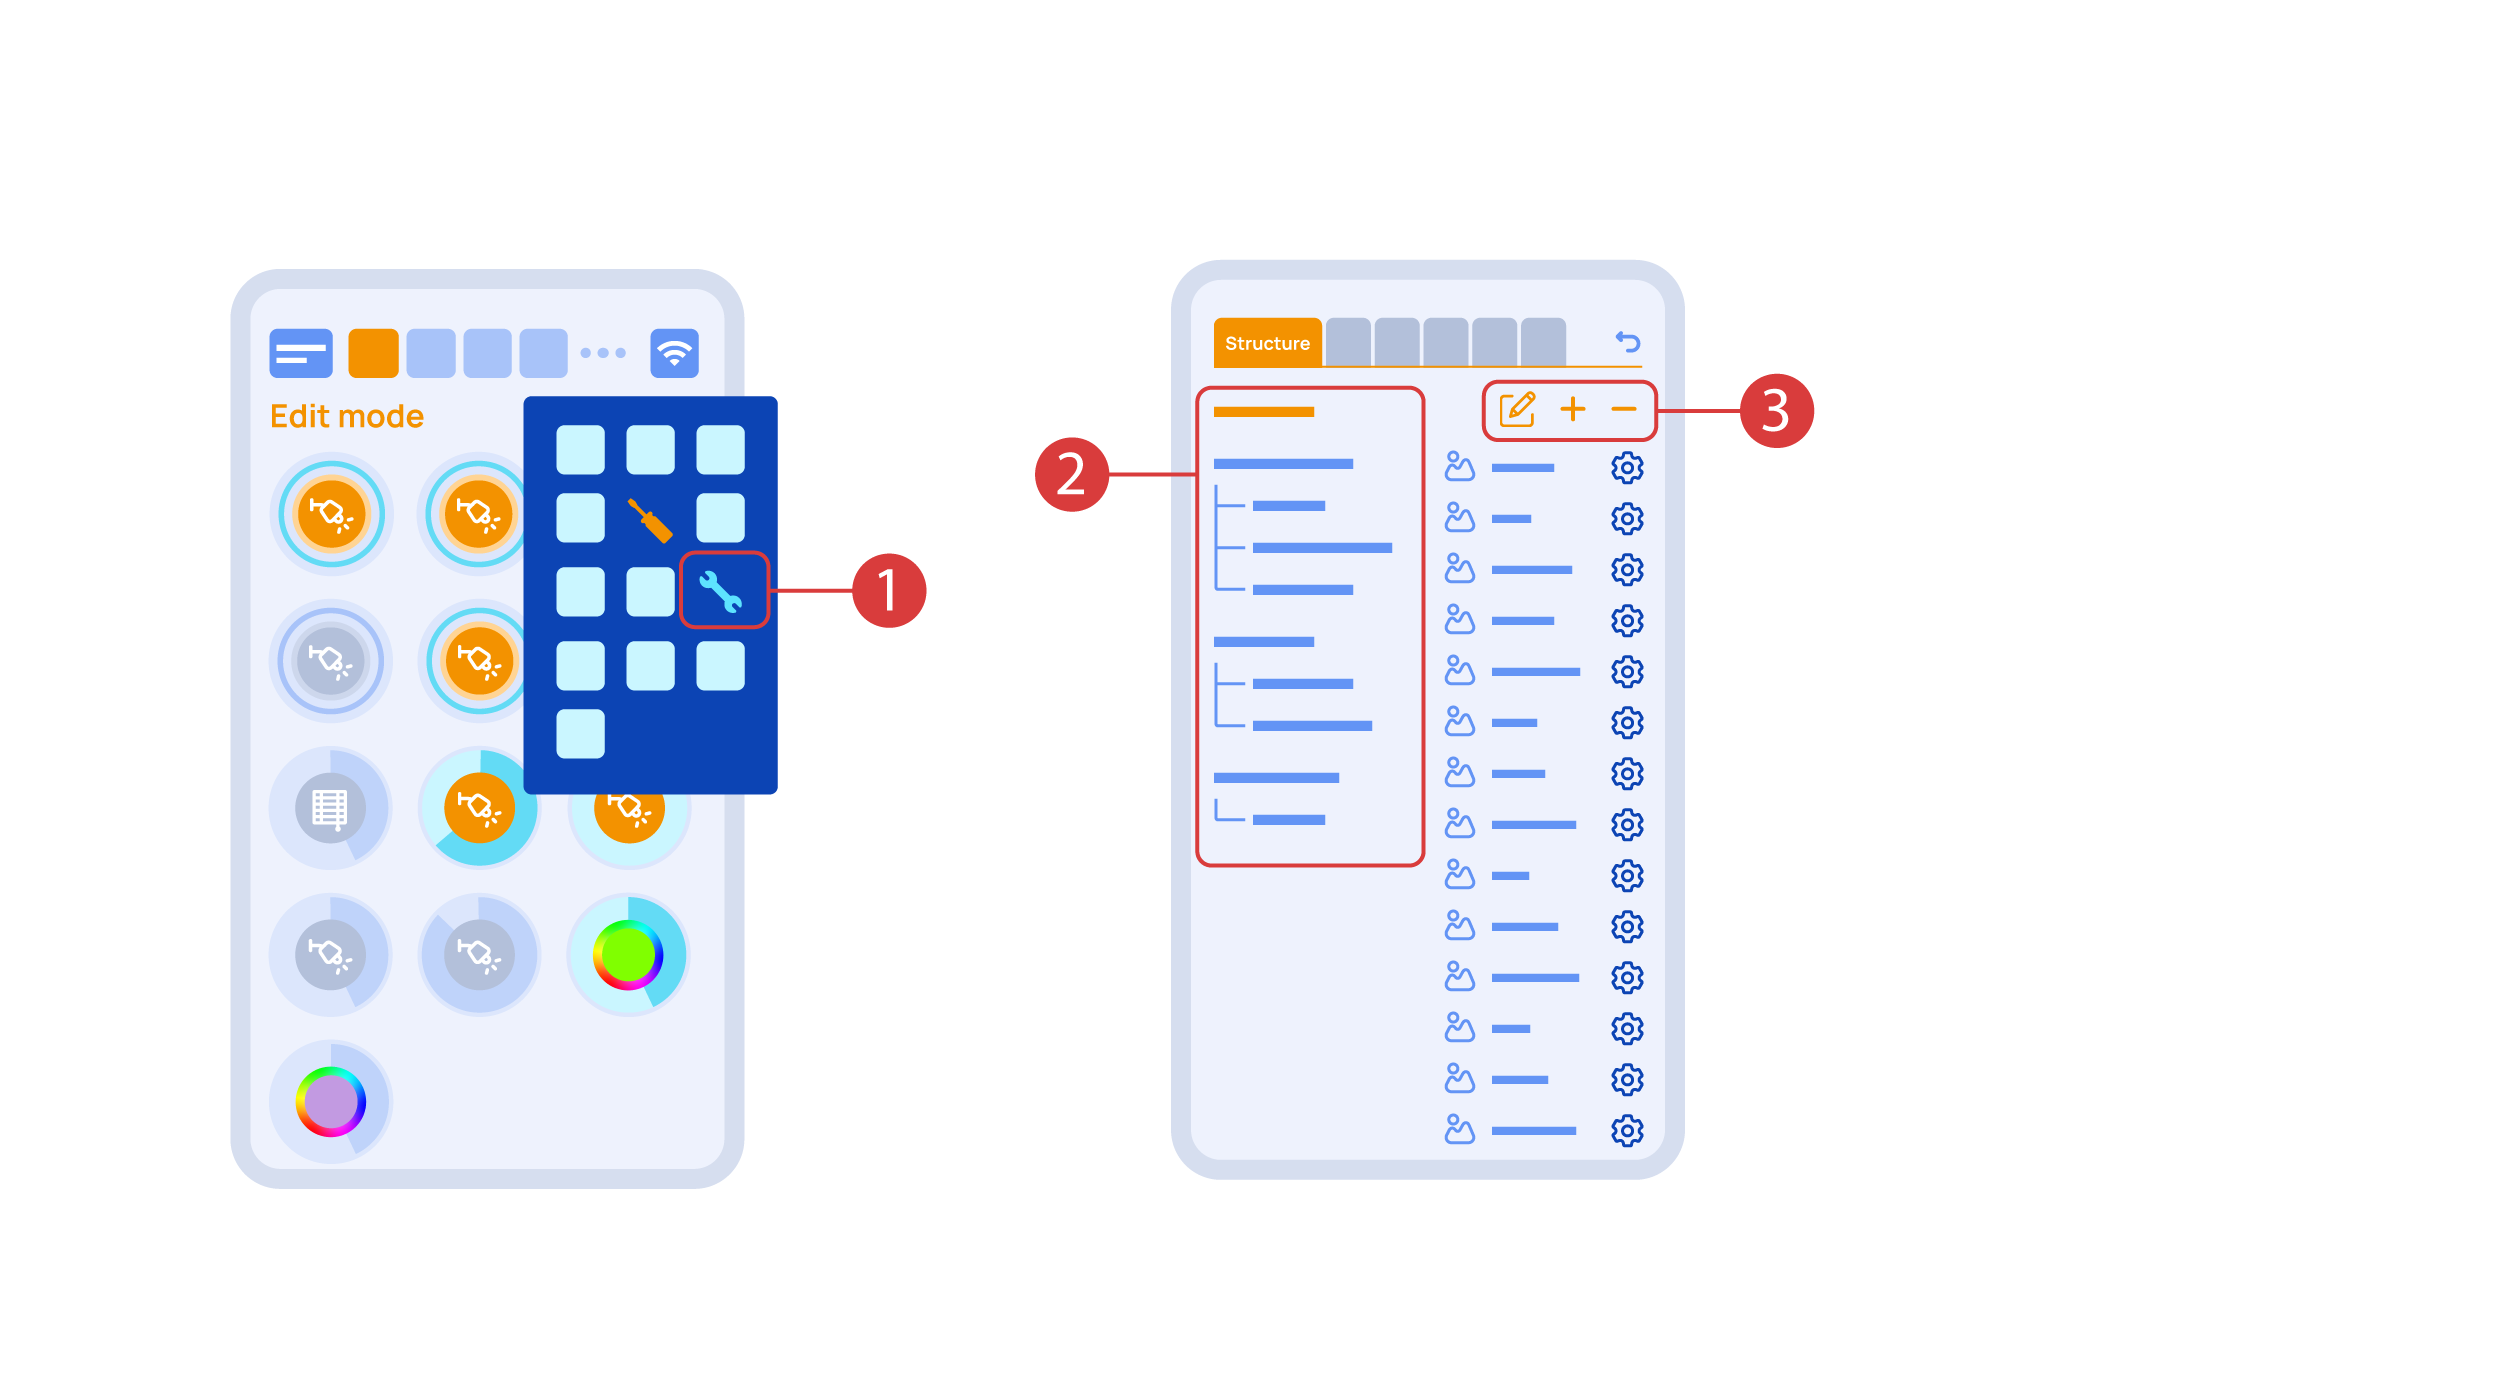
| − | + | Keď sa nachádzate v režime úprav <span style="font-size: 30px; vertical-align: middle;">①</span>, v doplnkovej ponuke sa nachádza ikona 'Nastavenie'. | |
| − | + | Tu na karte 'Štruktúra' <span style="font-size: 30px; vertical-align: middle;">②</span> vidíme všetky oblasti. | |
| − | + | Môžeme vytvárať nové <span style="font-size: 30px; vertical-align: middle;">③</span>, premenovávať ich a tiež prvky presúvať. | |
[[File:DemoCase17.png|1000x800px]] | [[File:DemoCase17.png|1000x800px]] | ||
<hr> | <hr> | ||
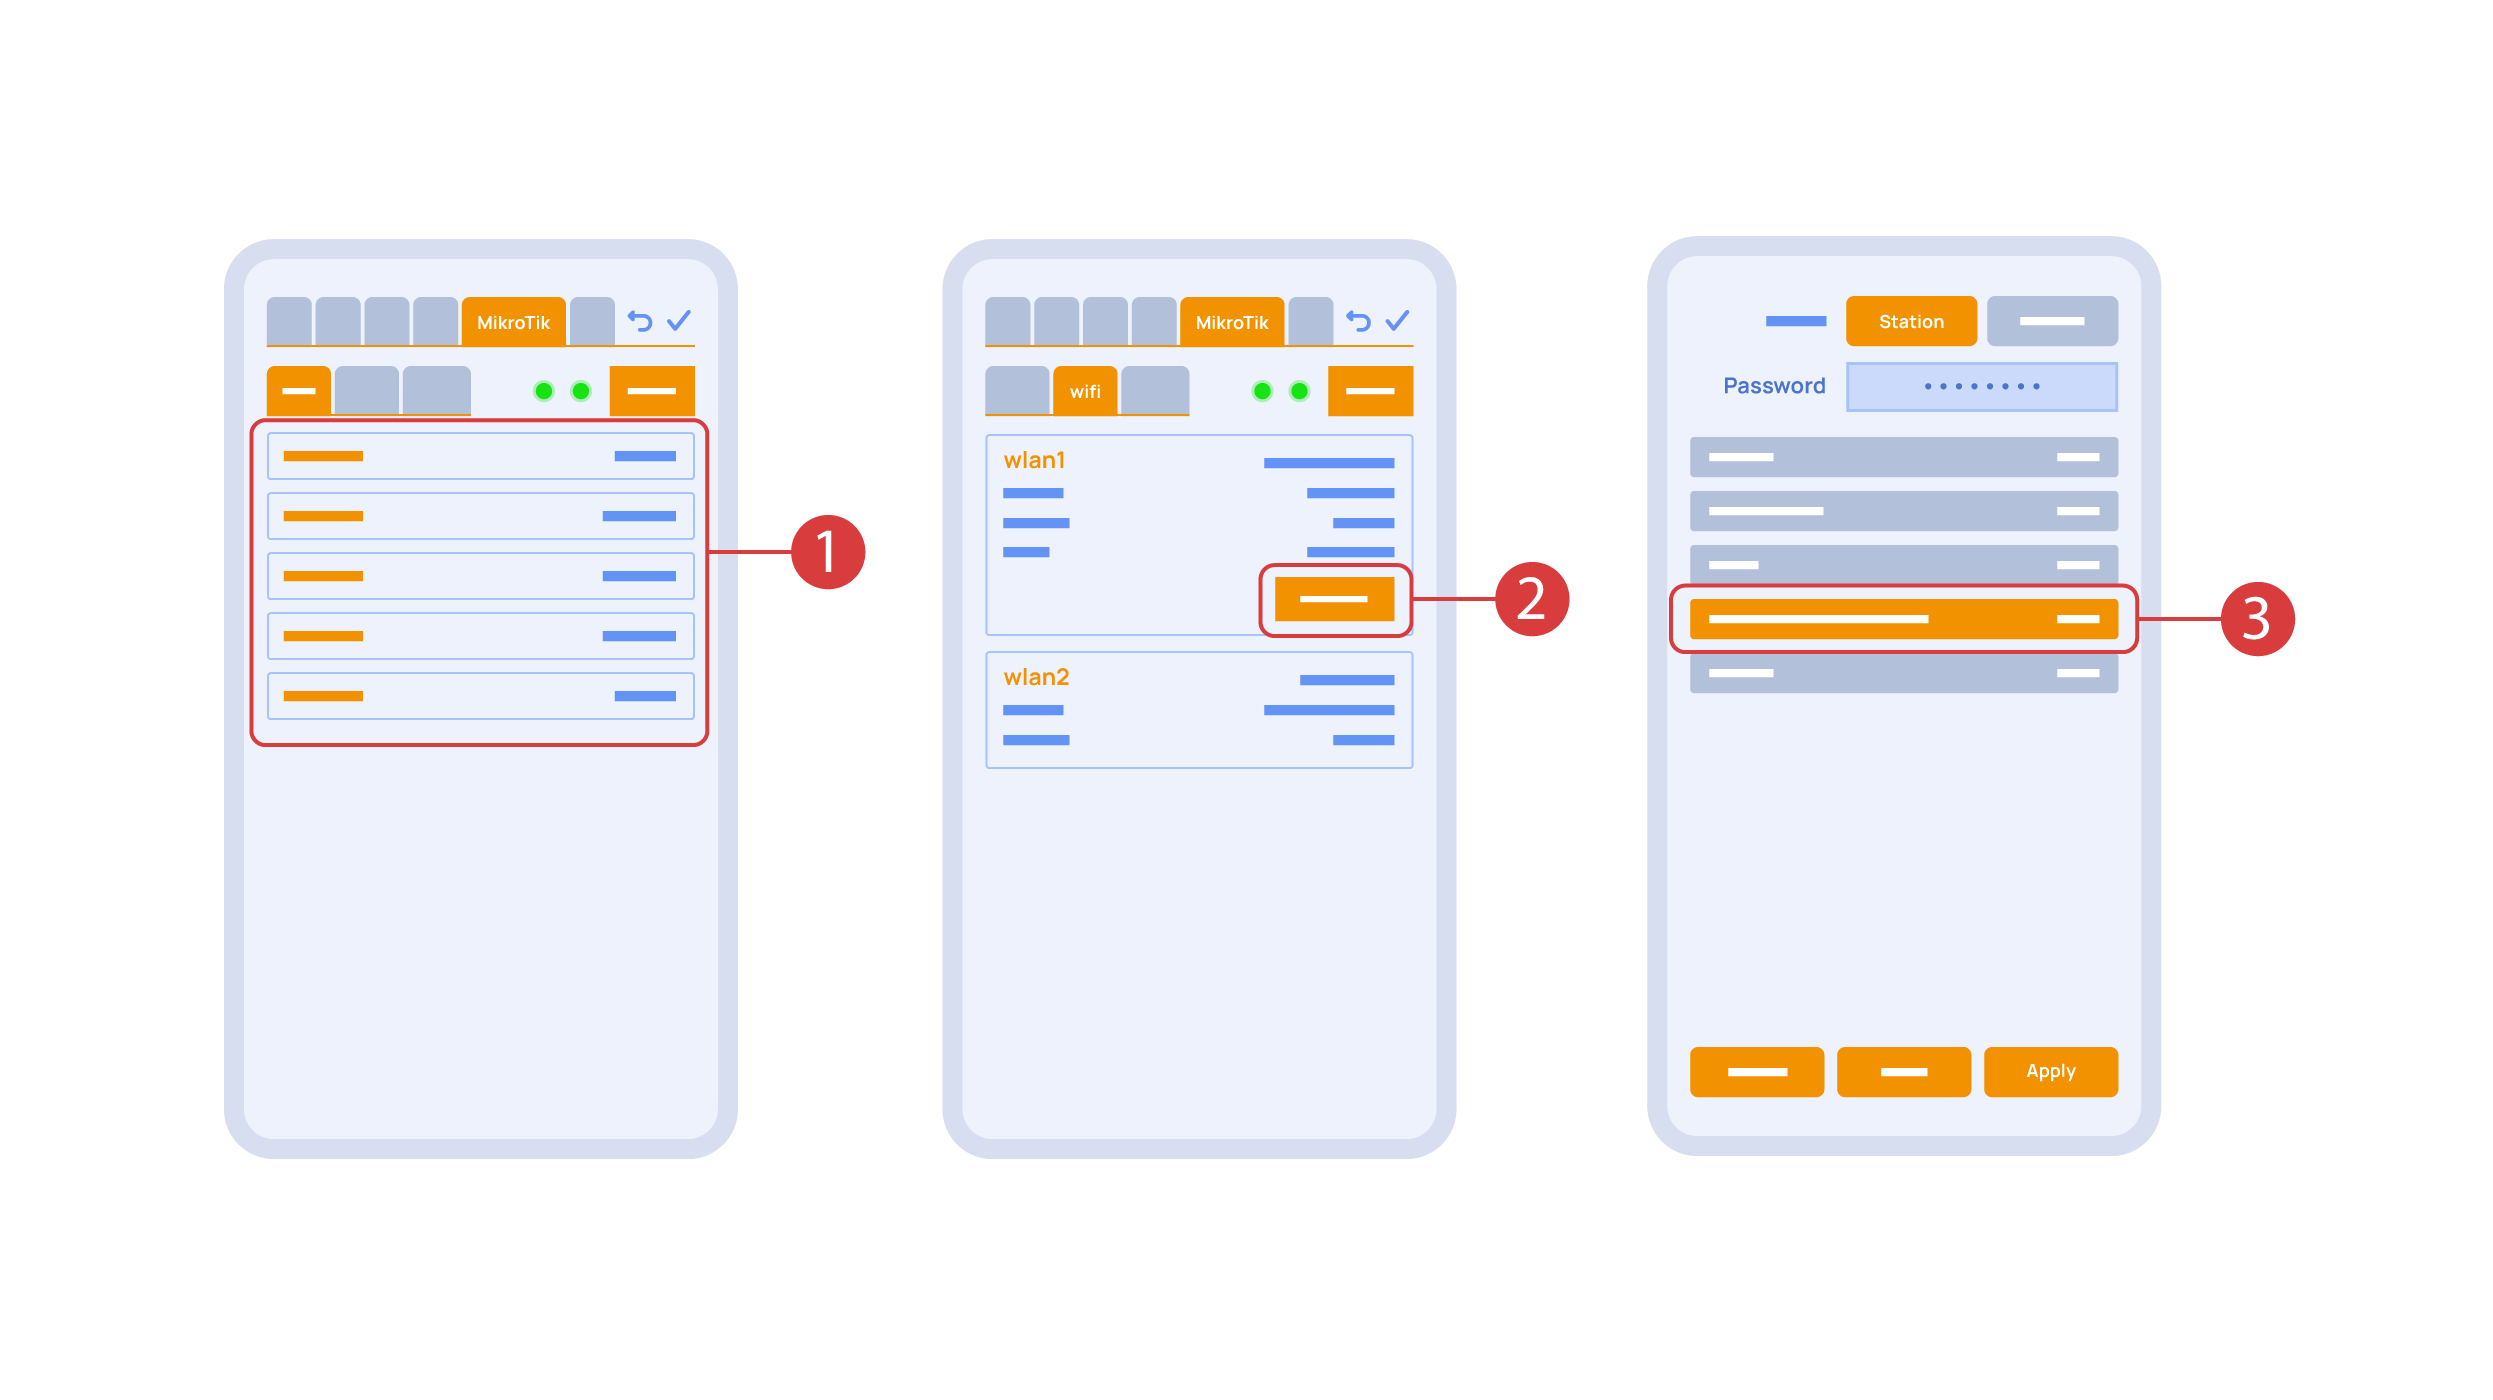
| − | + | Na karte "Mikrotik" <span style="font-size: 30px; vertical-align: middle;">①</span> môžete vidieť aktuálne parametre svojho smerovača, ktorý môžete tiež pripojiť k miestnej Wi-Fi sieti. | |
| − | + | Za týmto účelom vstúpte do vedľajšej ponuky Wi-Fi, kliknite na konfiguráciu rozhrania wlan1 <span style="font-size: 30px; vertical-align: middle;">②</span>, po ktorej vyberte režim "stanica" <span style="font-size: 30px; vertical-align: middle;">③</span>, vyberte sieť Wi-Fi zo zoznamu dostupných a zadajte heslo pripojenia. | |
[[File:DemoCase18.png|1000x800px]] | [[File:DemoCase18.png|1000x800px]] | ||
<hr> | <hr> | ||
| − | + | Na karte "Zálohy" <span style="font-size: 30px; vertical-align: middle;">①</span> si môžete pozrieť zoznam uložených konfigurácií, ktoré môžete v prípade potreby obnoviť. | |
[[File:DemoCase19.png|1000x800px]] | [[File:DemoCase19.png|1000x800px]] | ||
<hr> | <hr> | ||
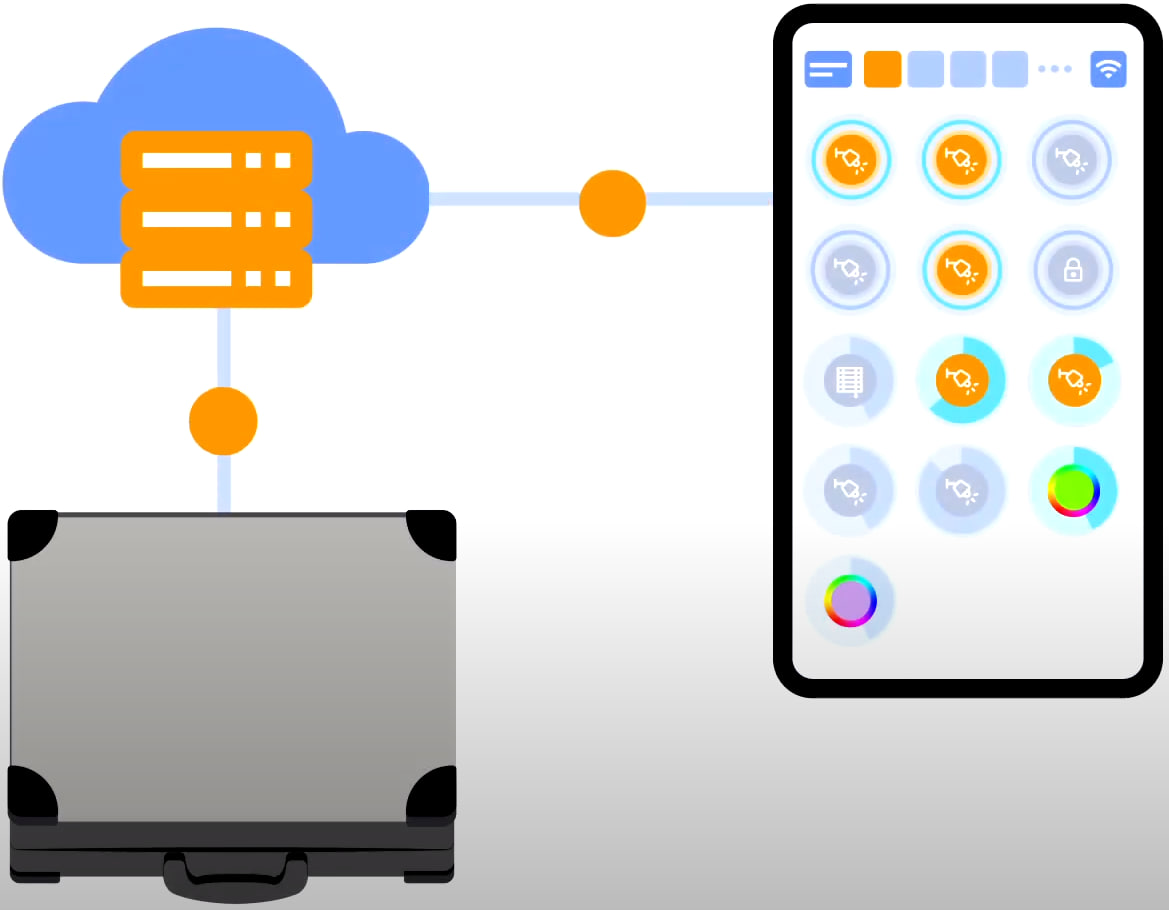
| − | + | Pre cloudový prístup k zariadeniu nepotrebujete žiadne ďalšie nastavenia. Aplikácia zistí neprítomnosť systému v miestnej sieti a automaticky vytvorí pripojenie prostredníctvom cloudu. | |
| + | |||
| + | |||
[[File:DemoCase20.jpg|800x600px]] | [[File:DemoCase20.jpg|800x600px]] | ||
<hr> | <hr> | ||
| − | <b> | + | <b>Ďakujeme vám za sledovanie tohto tutoriálu!</b> Ak máte ďalšie otázky alebo potrebujete akúkoľvek ďalšiu pomoc, neváhajte sa obrátiť na náš tím technickej podpory. Vidíme sa v ďalších epizódach! |
Latest revision as of 15:26, 3 November 2023
Quick start/unboxing.
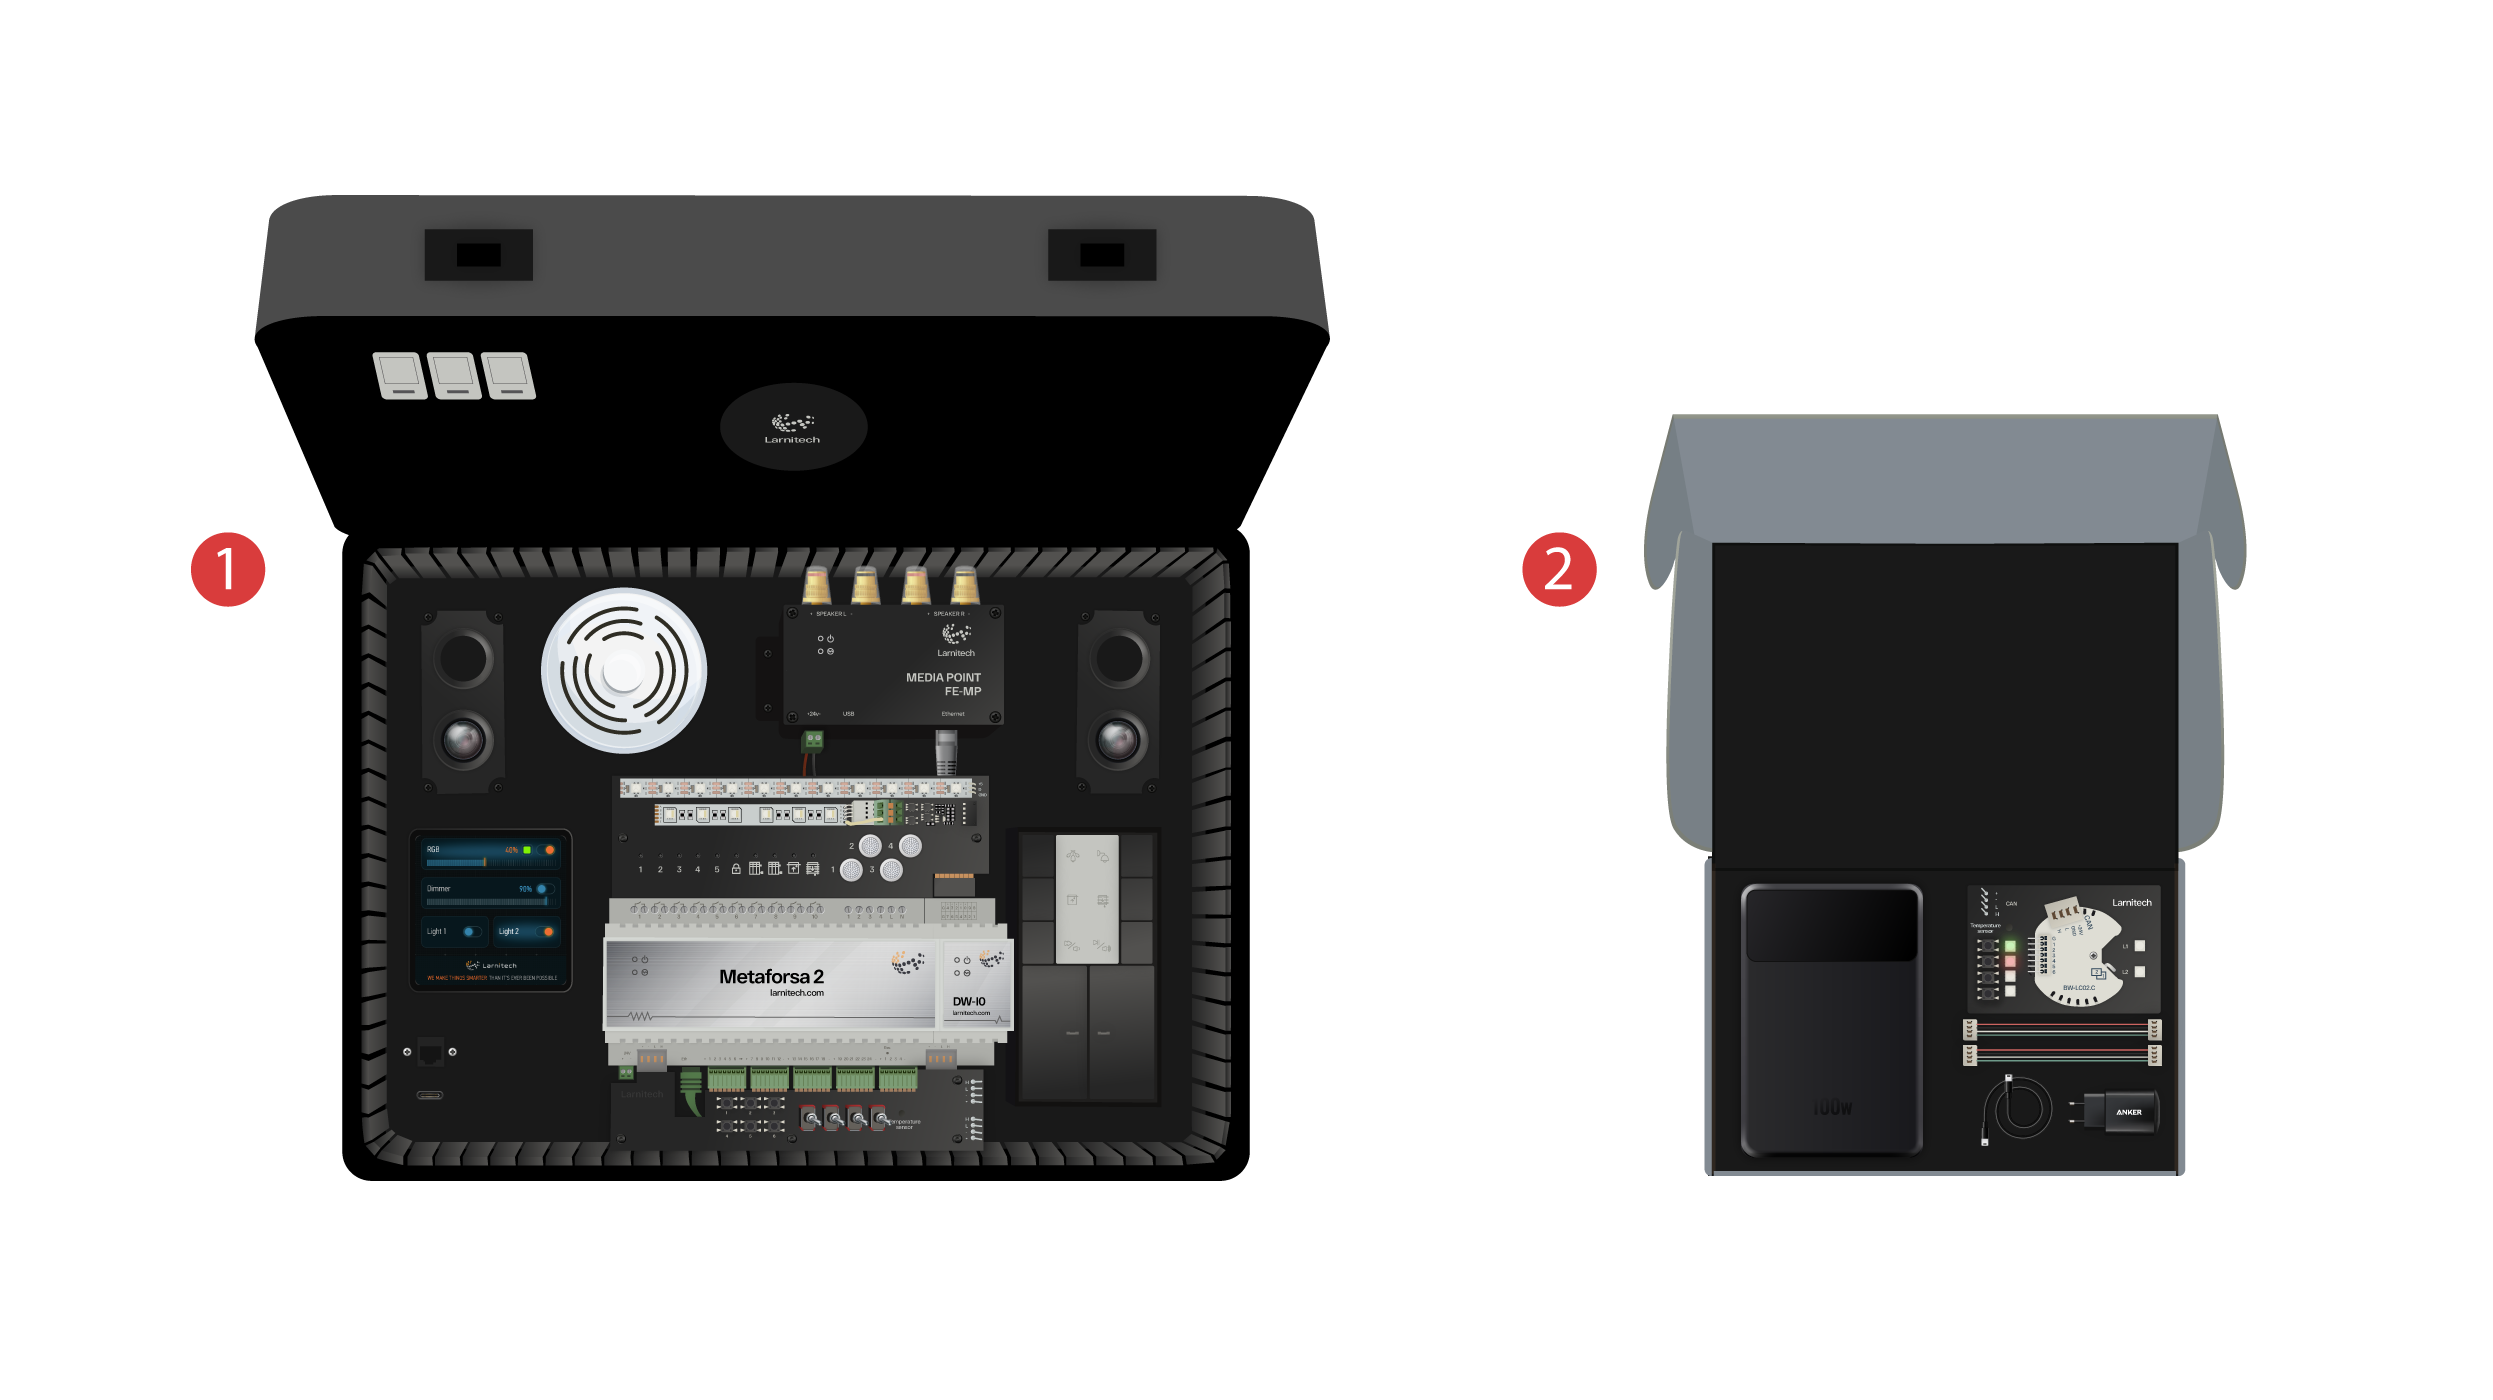
Vítame všetkých na našom kanáli! V tomto videu sa dozviete, ako rýchlo a bez námahy nastaviť systém Larnitech. Nastavenie sa bude vykonávať pomocou ukážkovej kazety. Tréningová súprava obsahuje demonštračný kufrík ① a škatuľu s niekoľkými dodatočnými súčasťami ②.
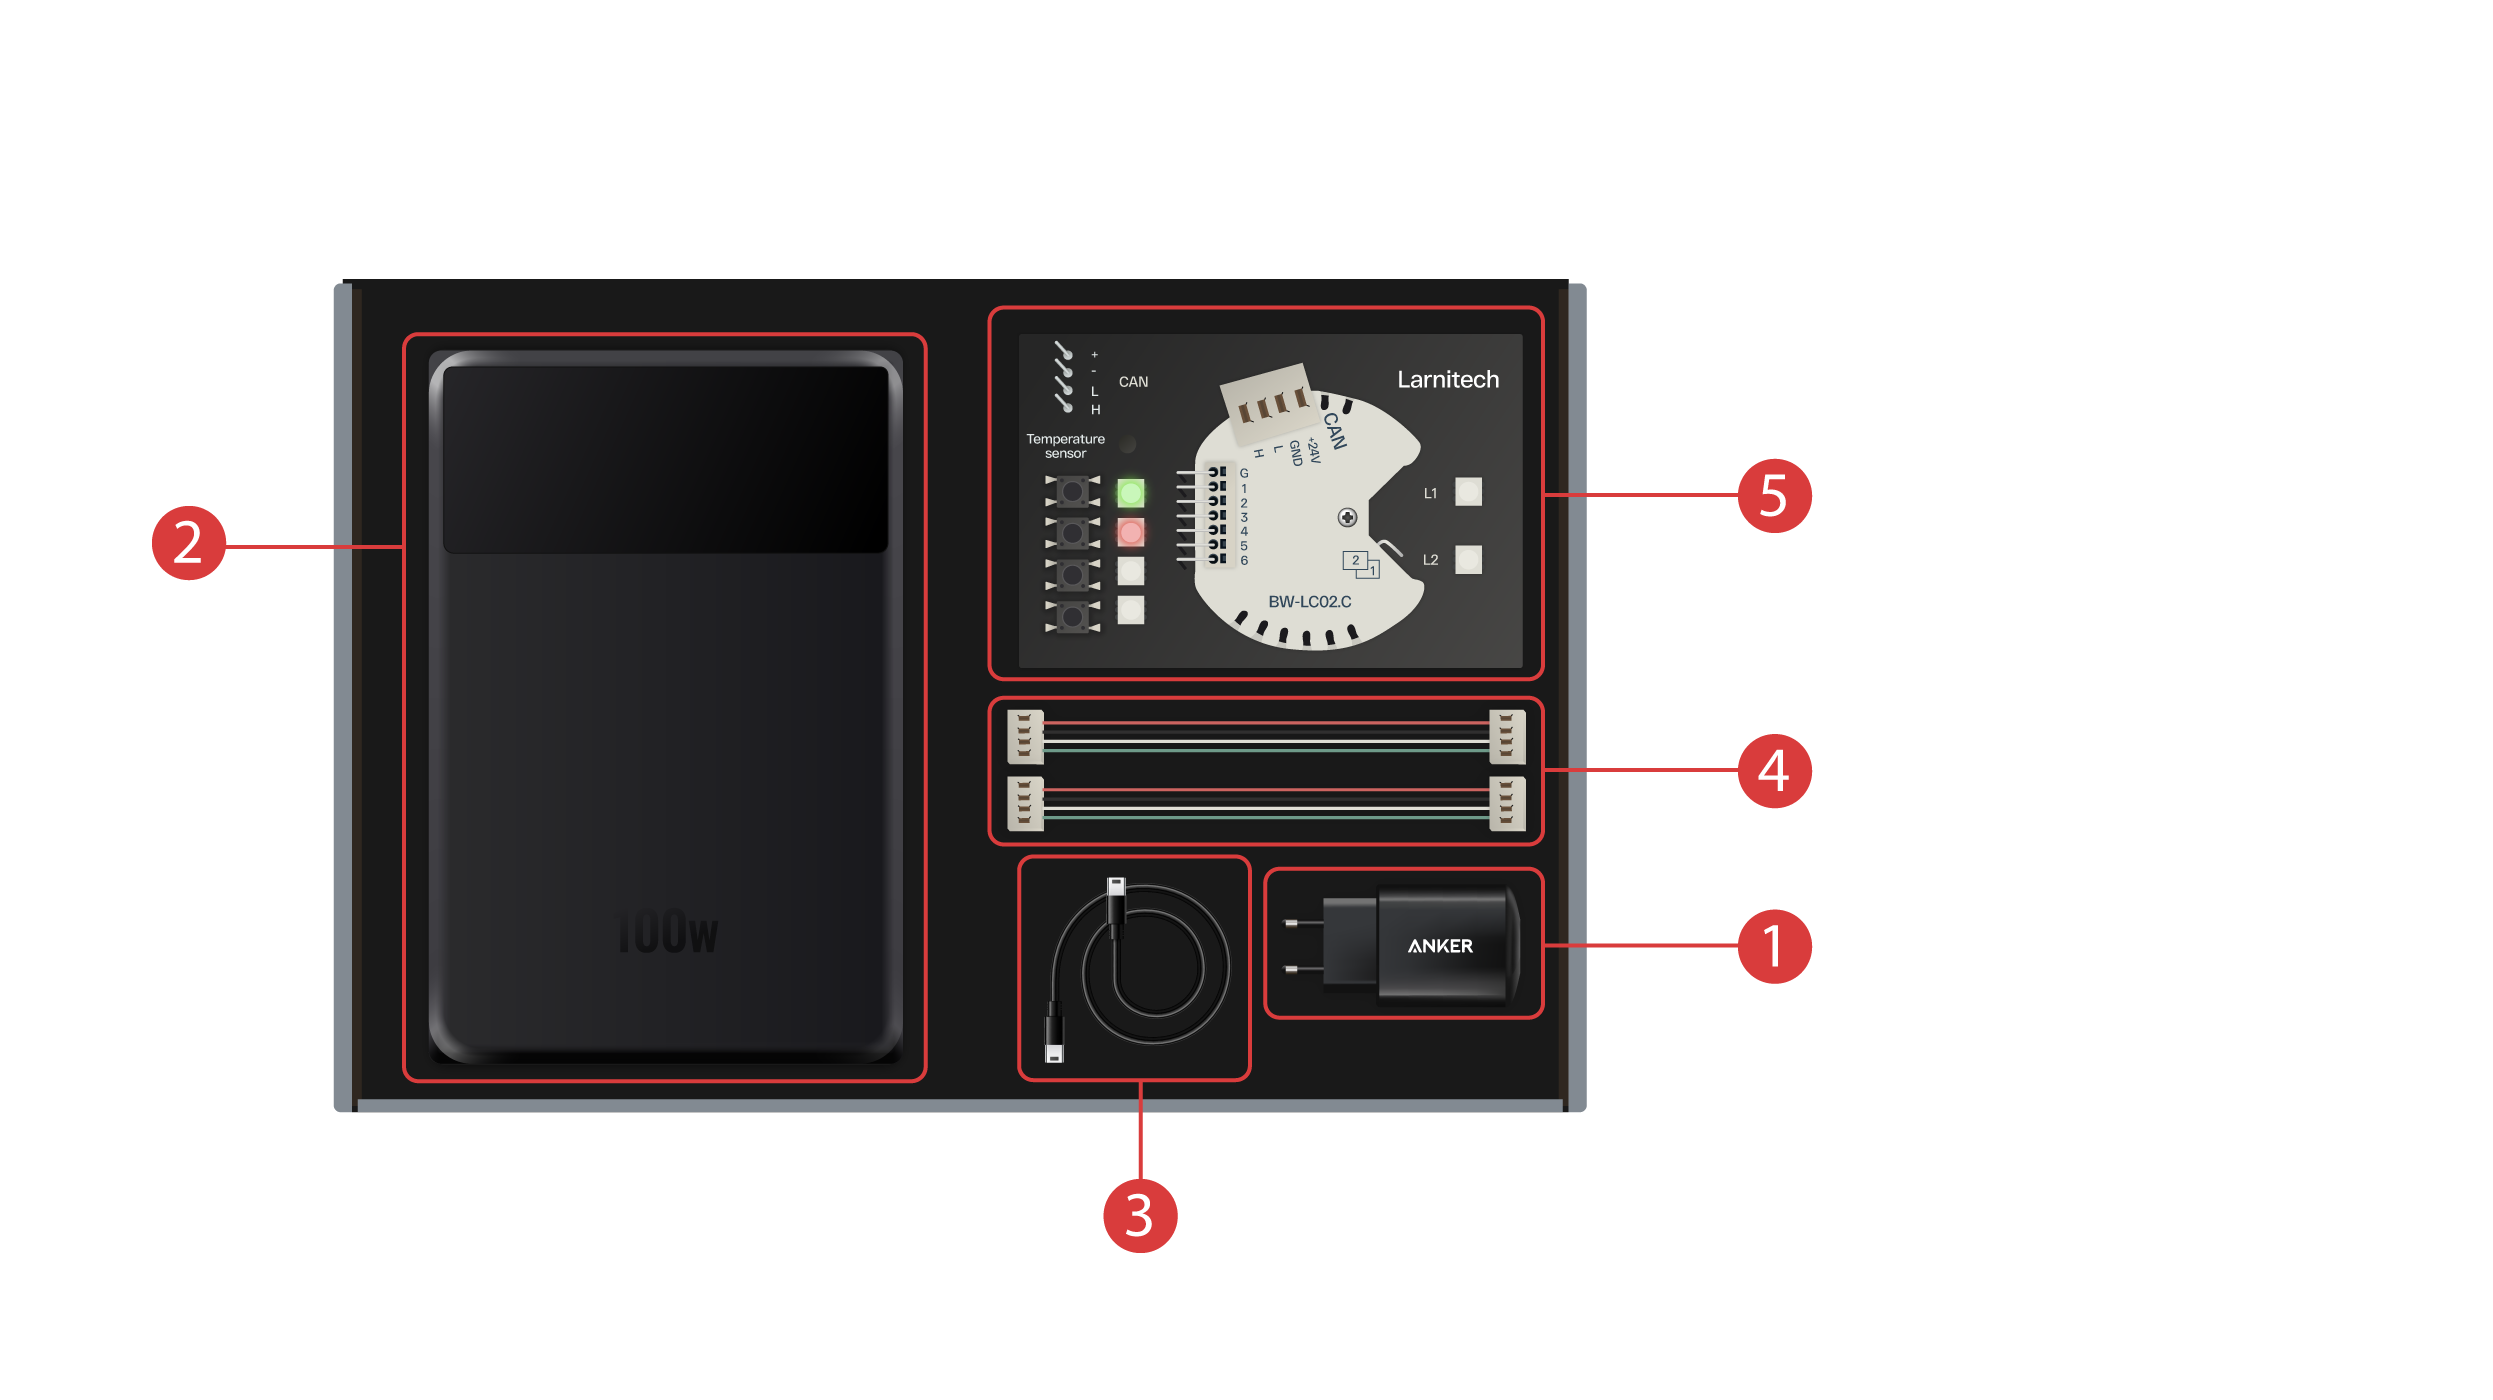
Škatuľa obsahuje nasledujúce komponenty:
① - Napájacia jednotka s USB portom typu C, ktorá podporuje technológiu Power Delivery;
② - powerbanka s displejom a výstupným portom typu C, ktorú možno použiť na napájanie demonštračného kufríka;
③ - Kábel typu C s indikátorom spotreby energie;
④ - 2 káble zbernice CAN;
⑤ - Demonštračná doska obsahujúca modul BW-LC02 s 2 LED svetlami, 4 tlačidlami s podsvietením a pripojeným snímačom teploty.
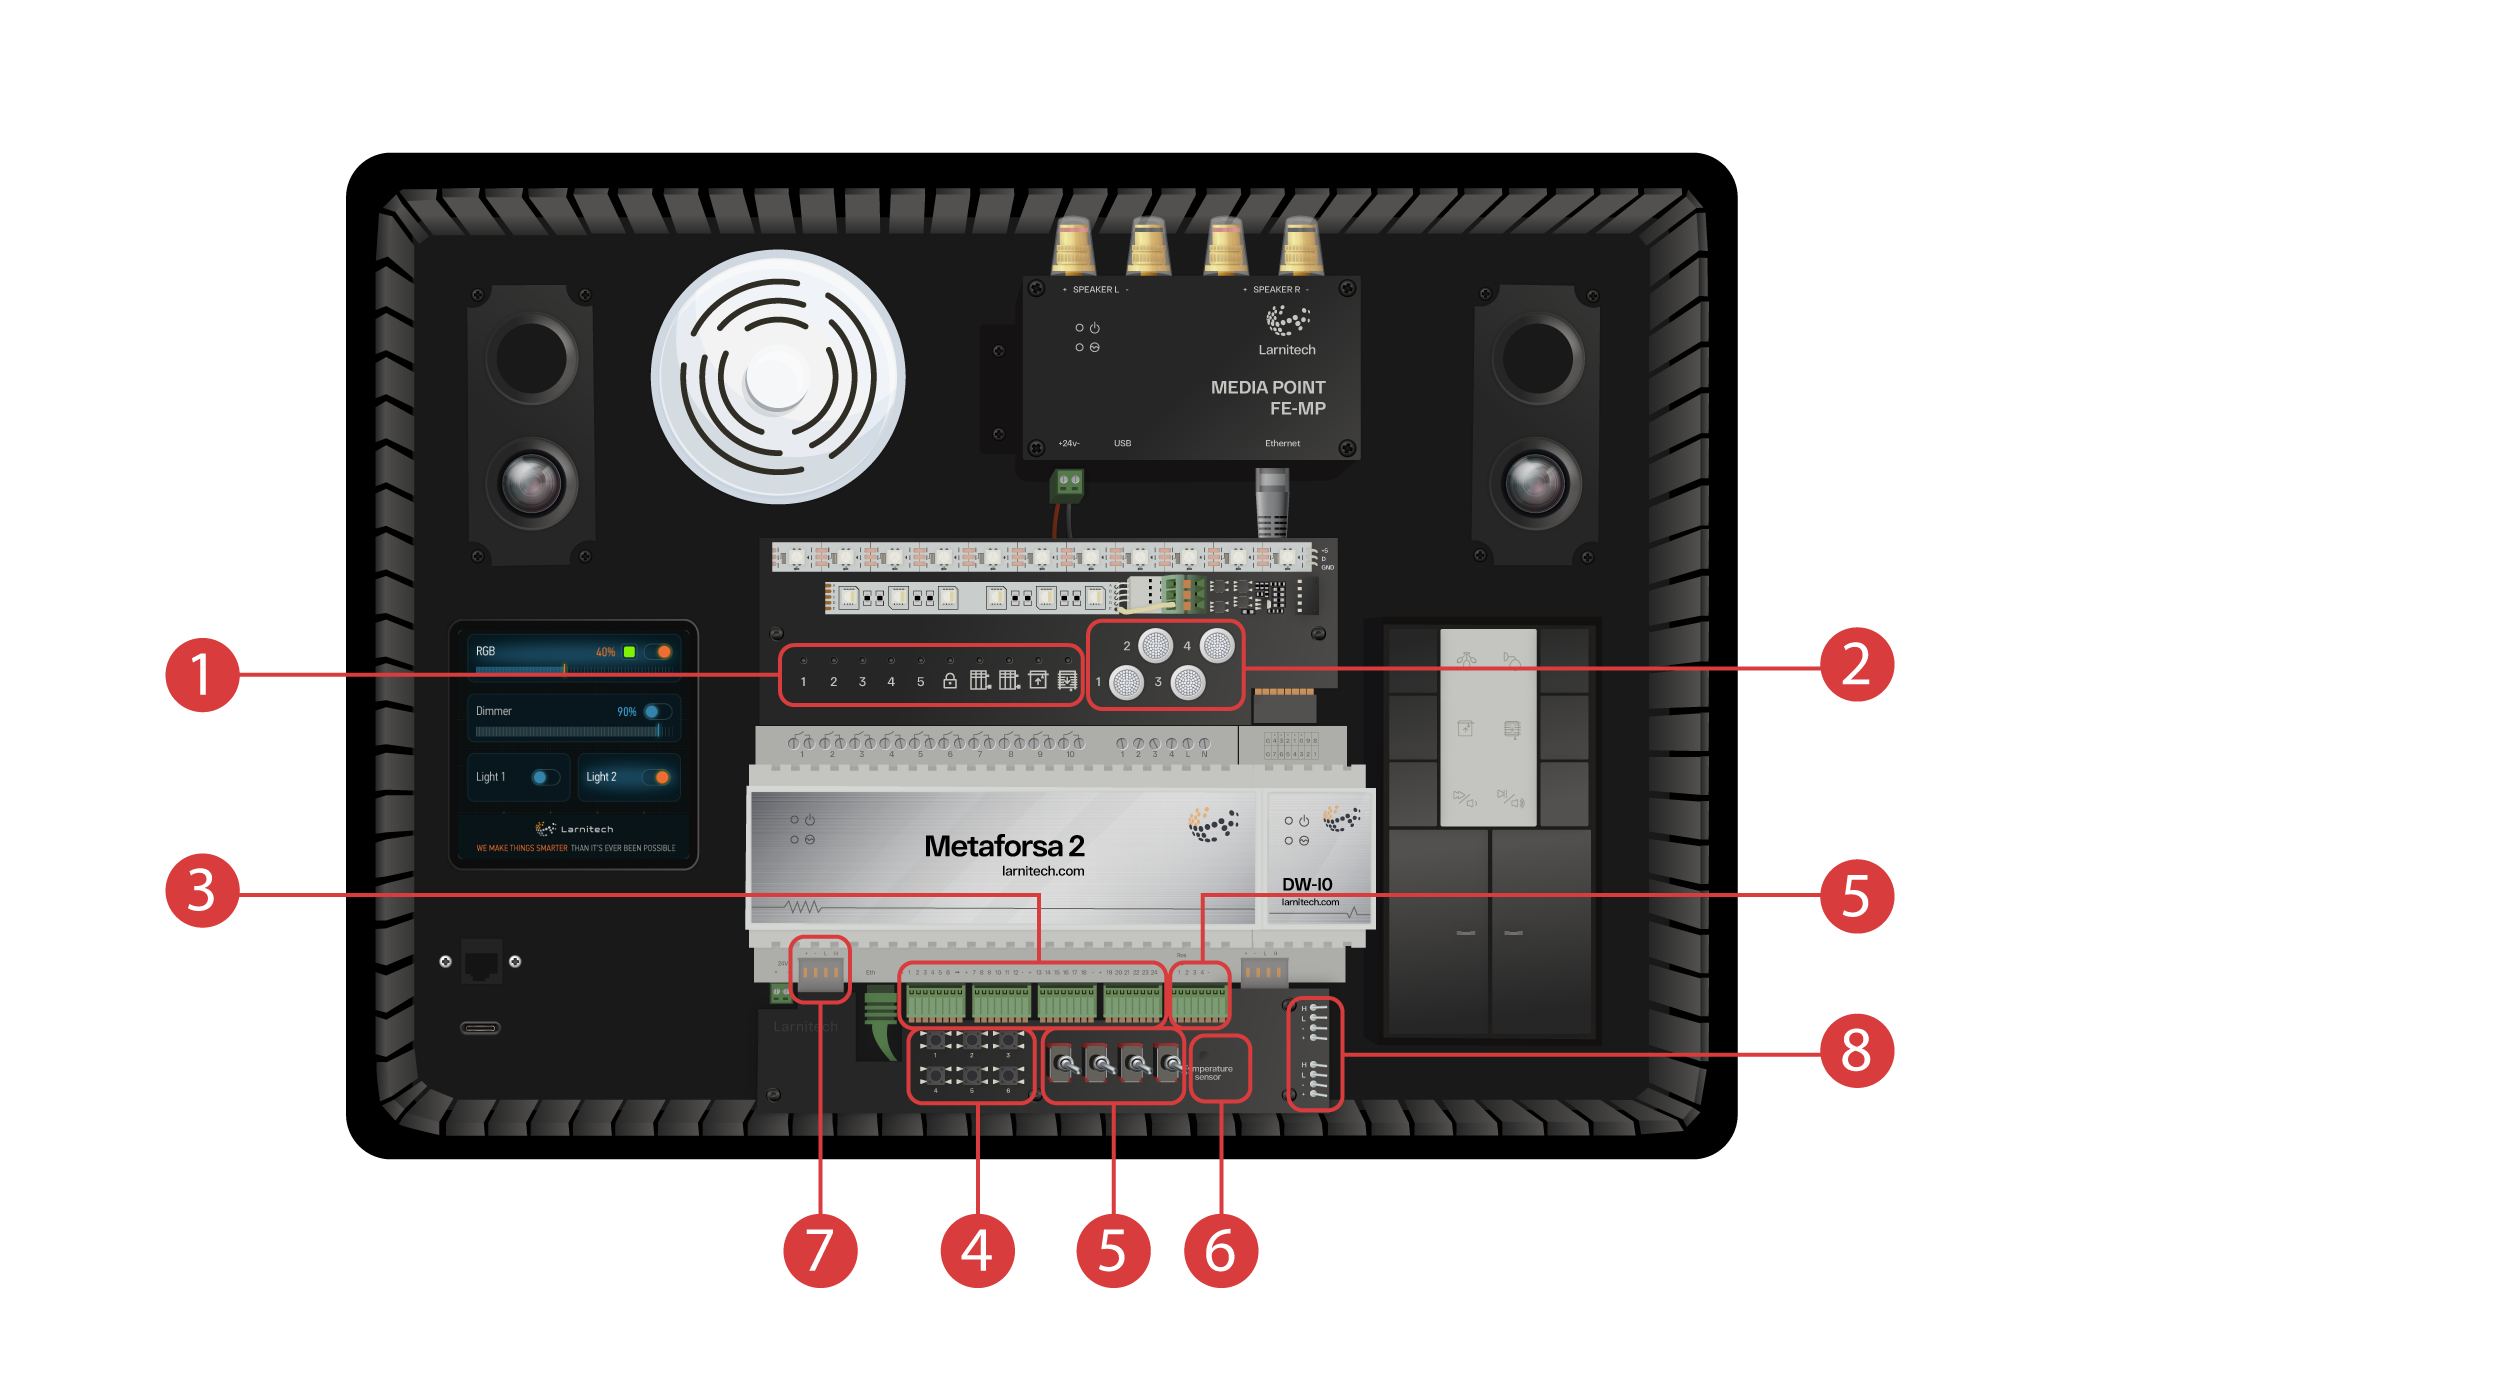
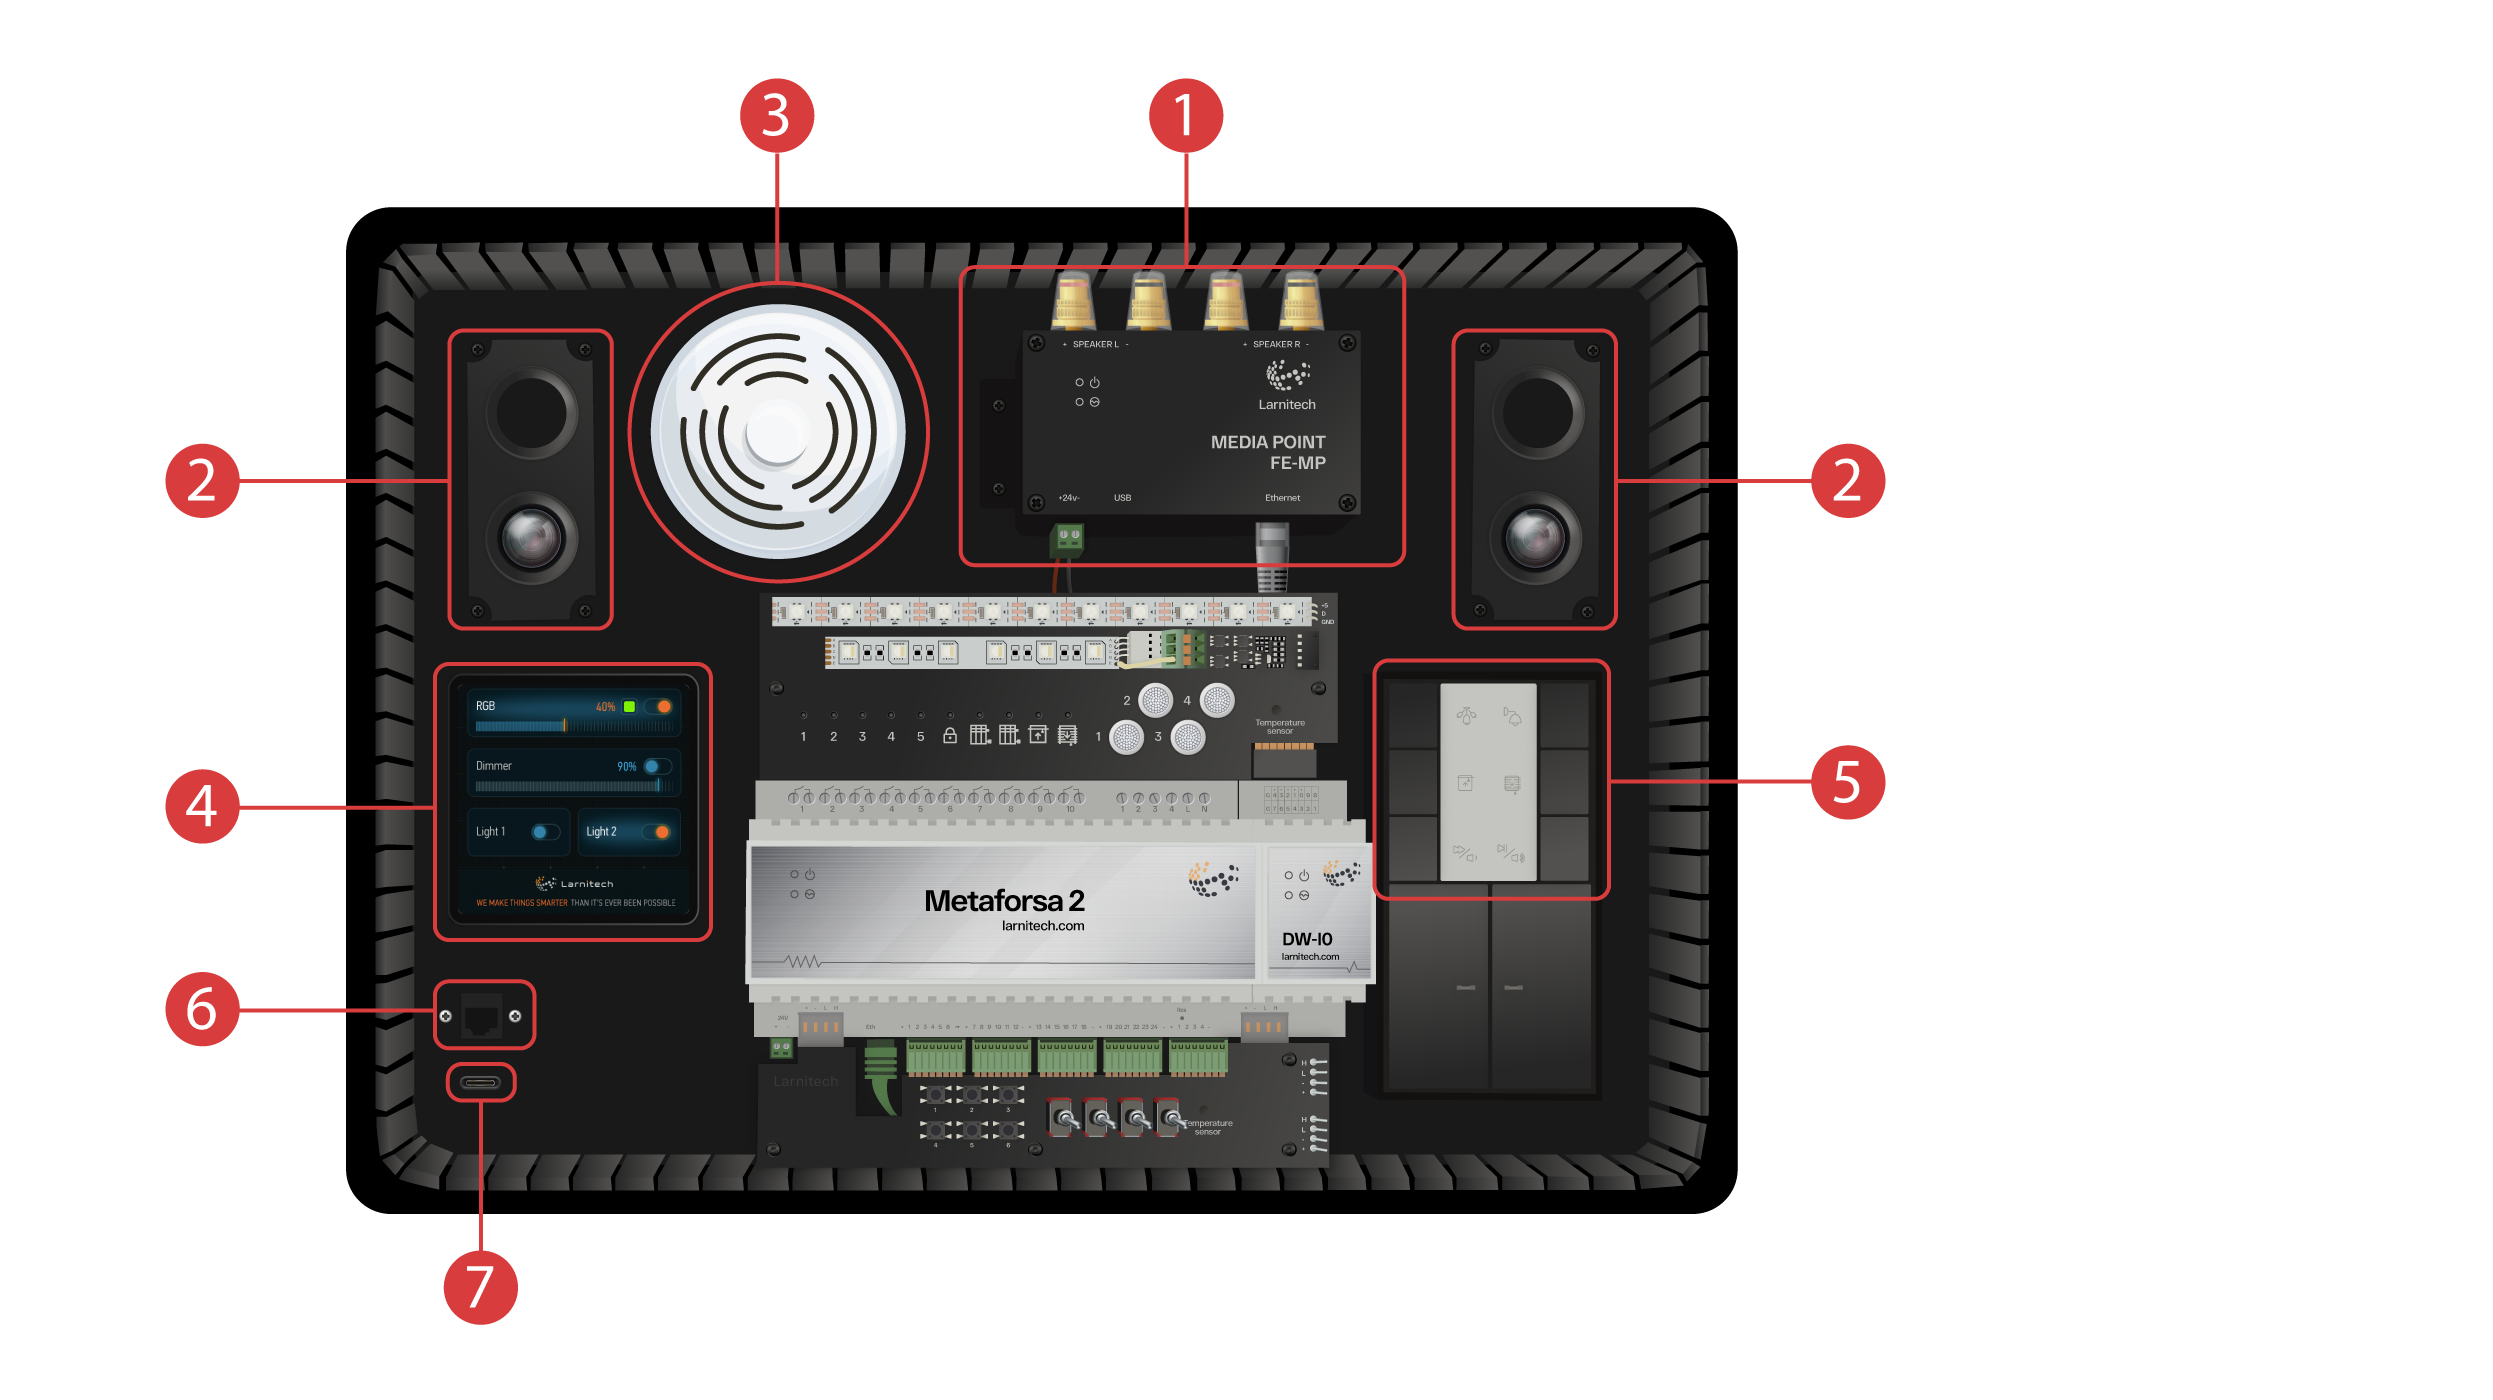
Ukážkový kufrík obsahuje nasledujúce komponenty: ‘Modul Metaforsa 2’.
‘Metaforsa 2’ obsahuje:
① - 10 kanálov relé s pripojenými kontrolkami LED, ktoré indikujú ich aktuálny stav;
② - 4 stmievateľné kanály s pripojenými stmievateľnými LED svetlami;
③ - 24 vstupných kanálov, ku ktorým je pripojených 6 tlačidiel ④ a 4 prepínače ⑤ na imitáciu rôznych senzorov;
⑥ - Vstupné kanály pre snímače teploty s jedným pripojeným snímačom;
⑦ - zbernica CAN na pripojenie ďalších zariadení. Sú k nej pripojené ďalšie moduly ukážkovej kazety, ako aj 2 porty ⑧ na pripojenie externých zariadení.
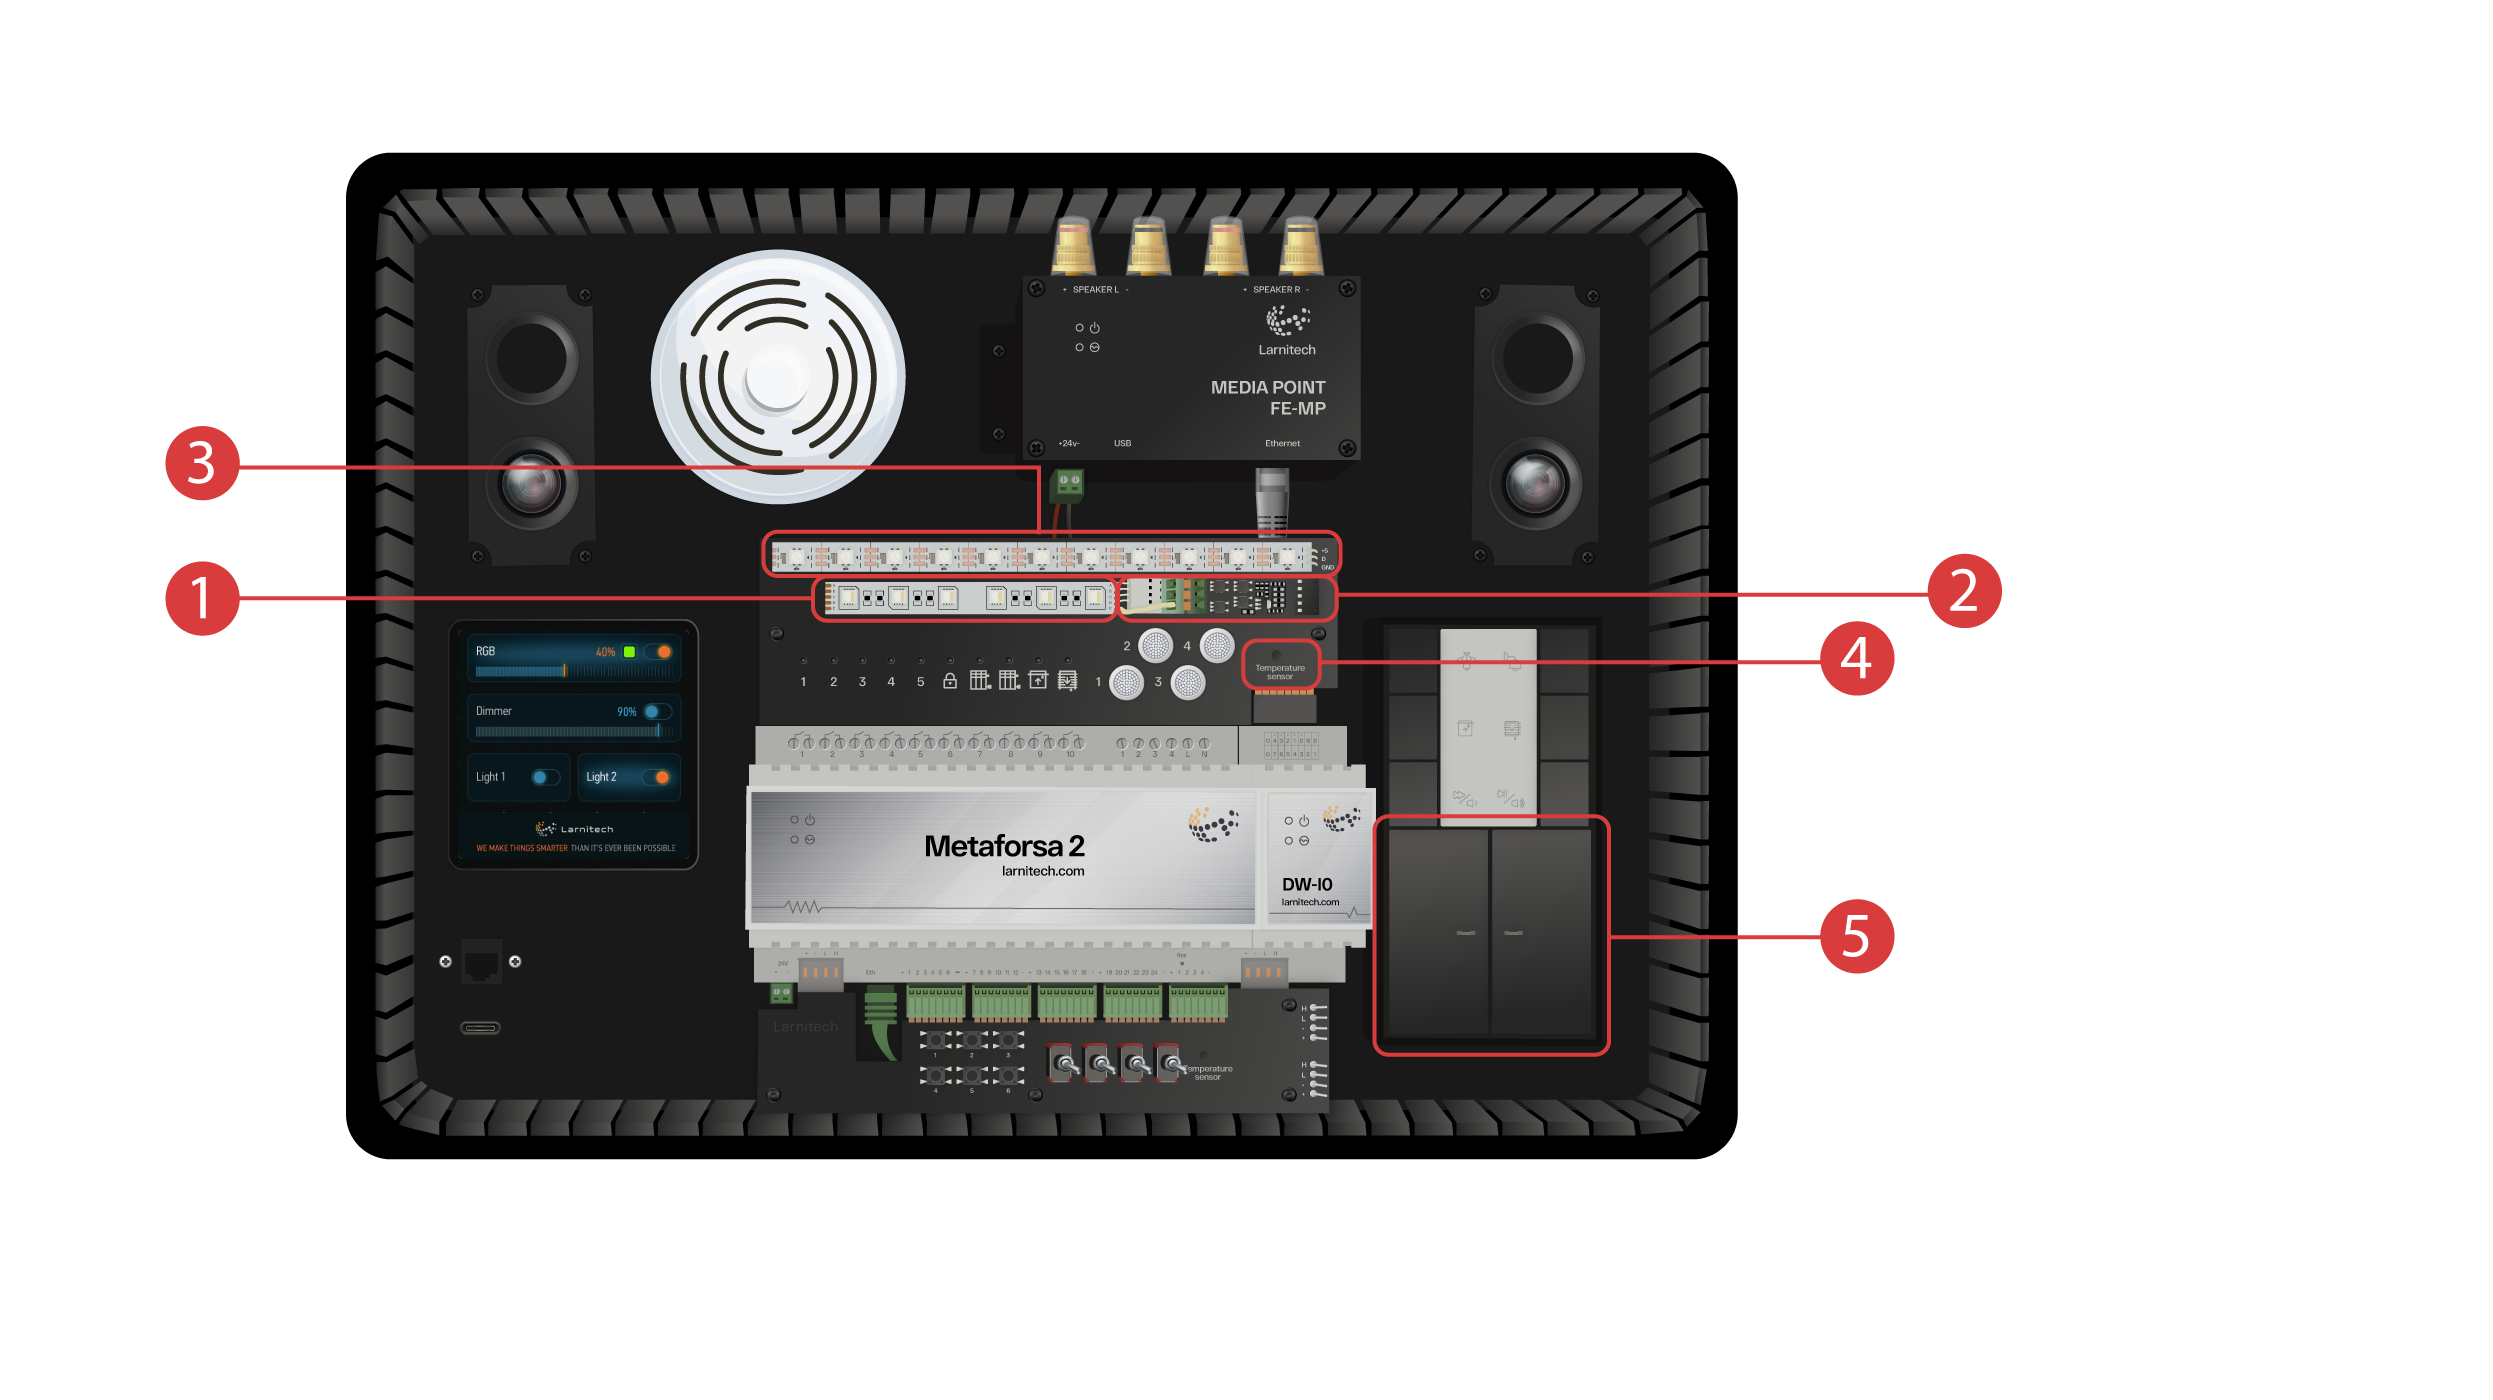
DW-IO modul
Tento modul má 14 univerzálnych vstupných/výstupných kanálov, ku ktorým sú pripojené tieto položky:
① - 4-kanálový pás RGBW, pripojený cez prúdový zosilňovač AMP5V-4②;
③ - Pásik s nasmerovanými svetlami LED. Každé z týchto LED svetiel môže svietiť vlastnou farbou;
④ - Snímač teploty;
⑤ - A dve tlačidlá s podsvietením.
Ukážková kazeta obsahuje tiež tieto komponenty:
① - Media Point FE-MP s ② dvoma reproduktormi;
③ - Senzor typu "šesť v jednom" CW-CO2, ktorý meria: Úroveň pohybu, Osvetlenie, Teplotu, Vlhkosť, Úroveň CO2 a ktorý má infračervený vysielač;
④ - 4-palcový panel senzorov LCP4, ktorý môže zobrazovať bežné rozhranie alebo rozhranie prispôsobené pre nástenné panely;
Vo vnútri skrine sa nachádza ovládací modul BW-SW24, ku ktorému je pripojená šesťtlačidlová 24-voltová klávesnica JUNG ⑤;
A router Wi-Fi, ktorý sa dá pripojiť k internetu buď cez ethernetový port na prednom paneli skrinky ⑥, alebo cez dostupnú Wi-Fi sieť;
Na napájanie slúži port typu C ⑦, ktorý sa nachádza na prednom paneli.
Všetky zariadenia nainštalované v ukážkovej kazete sú napájané napätím 20 V, ktoré je pre používateľa absolútne bezpečné.
Pripojte napájací kábel a ethernetový kábel. Ak nemáte možnosť pripojenia cez sieť Ethernet, neskôr vám v tomto videu ukážeme, ako pripojiť vstavaný smerovač k Wi-Fi sieti.
Aby ste mohli pokračovať, je potrebné nainštalovať aplikáciu Larnitech do smartfónu alebo tabletu. Stačí naskenovať prvý QR kód z hornej časti kazety.
Ak sa po inštalácii a spustení aplikácie pripojenie nevytvorí automaticky, musíte sa pripojiť k sieti Wi-Fi "Larnitech_case_5G" pomocou mobilného zariadenia. Následne spustite aplikáciu a naskenujte prvý QR kód v časti "Pripojenia".
Ak ukážková súprava nie je pripojená k internetu, je možné, že bude potrebné vypnúť prenos údajov v mobilnom zariadení.

Hlavná obrazovka aplikácie má niekoľko kľúčových prvkov. V ľavom hornom rohu sa nachádza ponuka "výber oblasti" ①. Stačí kliknúť na jednu z dostupných oblastí, aby ste ju mohli spravovať ②. Ďalej sú tu ikony, ktoré umožňujú vybrať vykonávacie prvky, snímače, klímu, multimédiá, diaľkové ovládanie
a kamery ③. V pravom rohu sa nachádza ikona pre doplnkovú ponuku ④. o vnútri ikony môžete vidieť aj stav aktuálneho pripojenia.
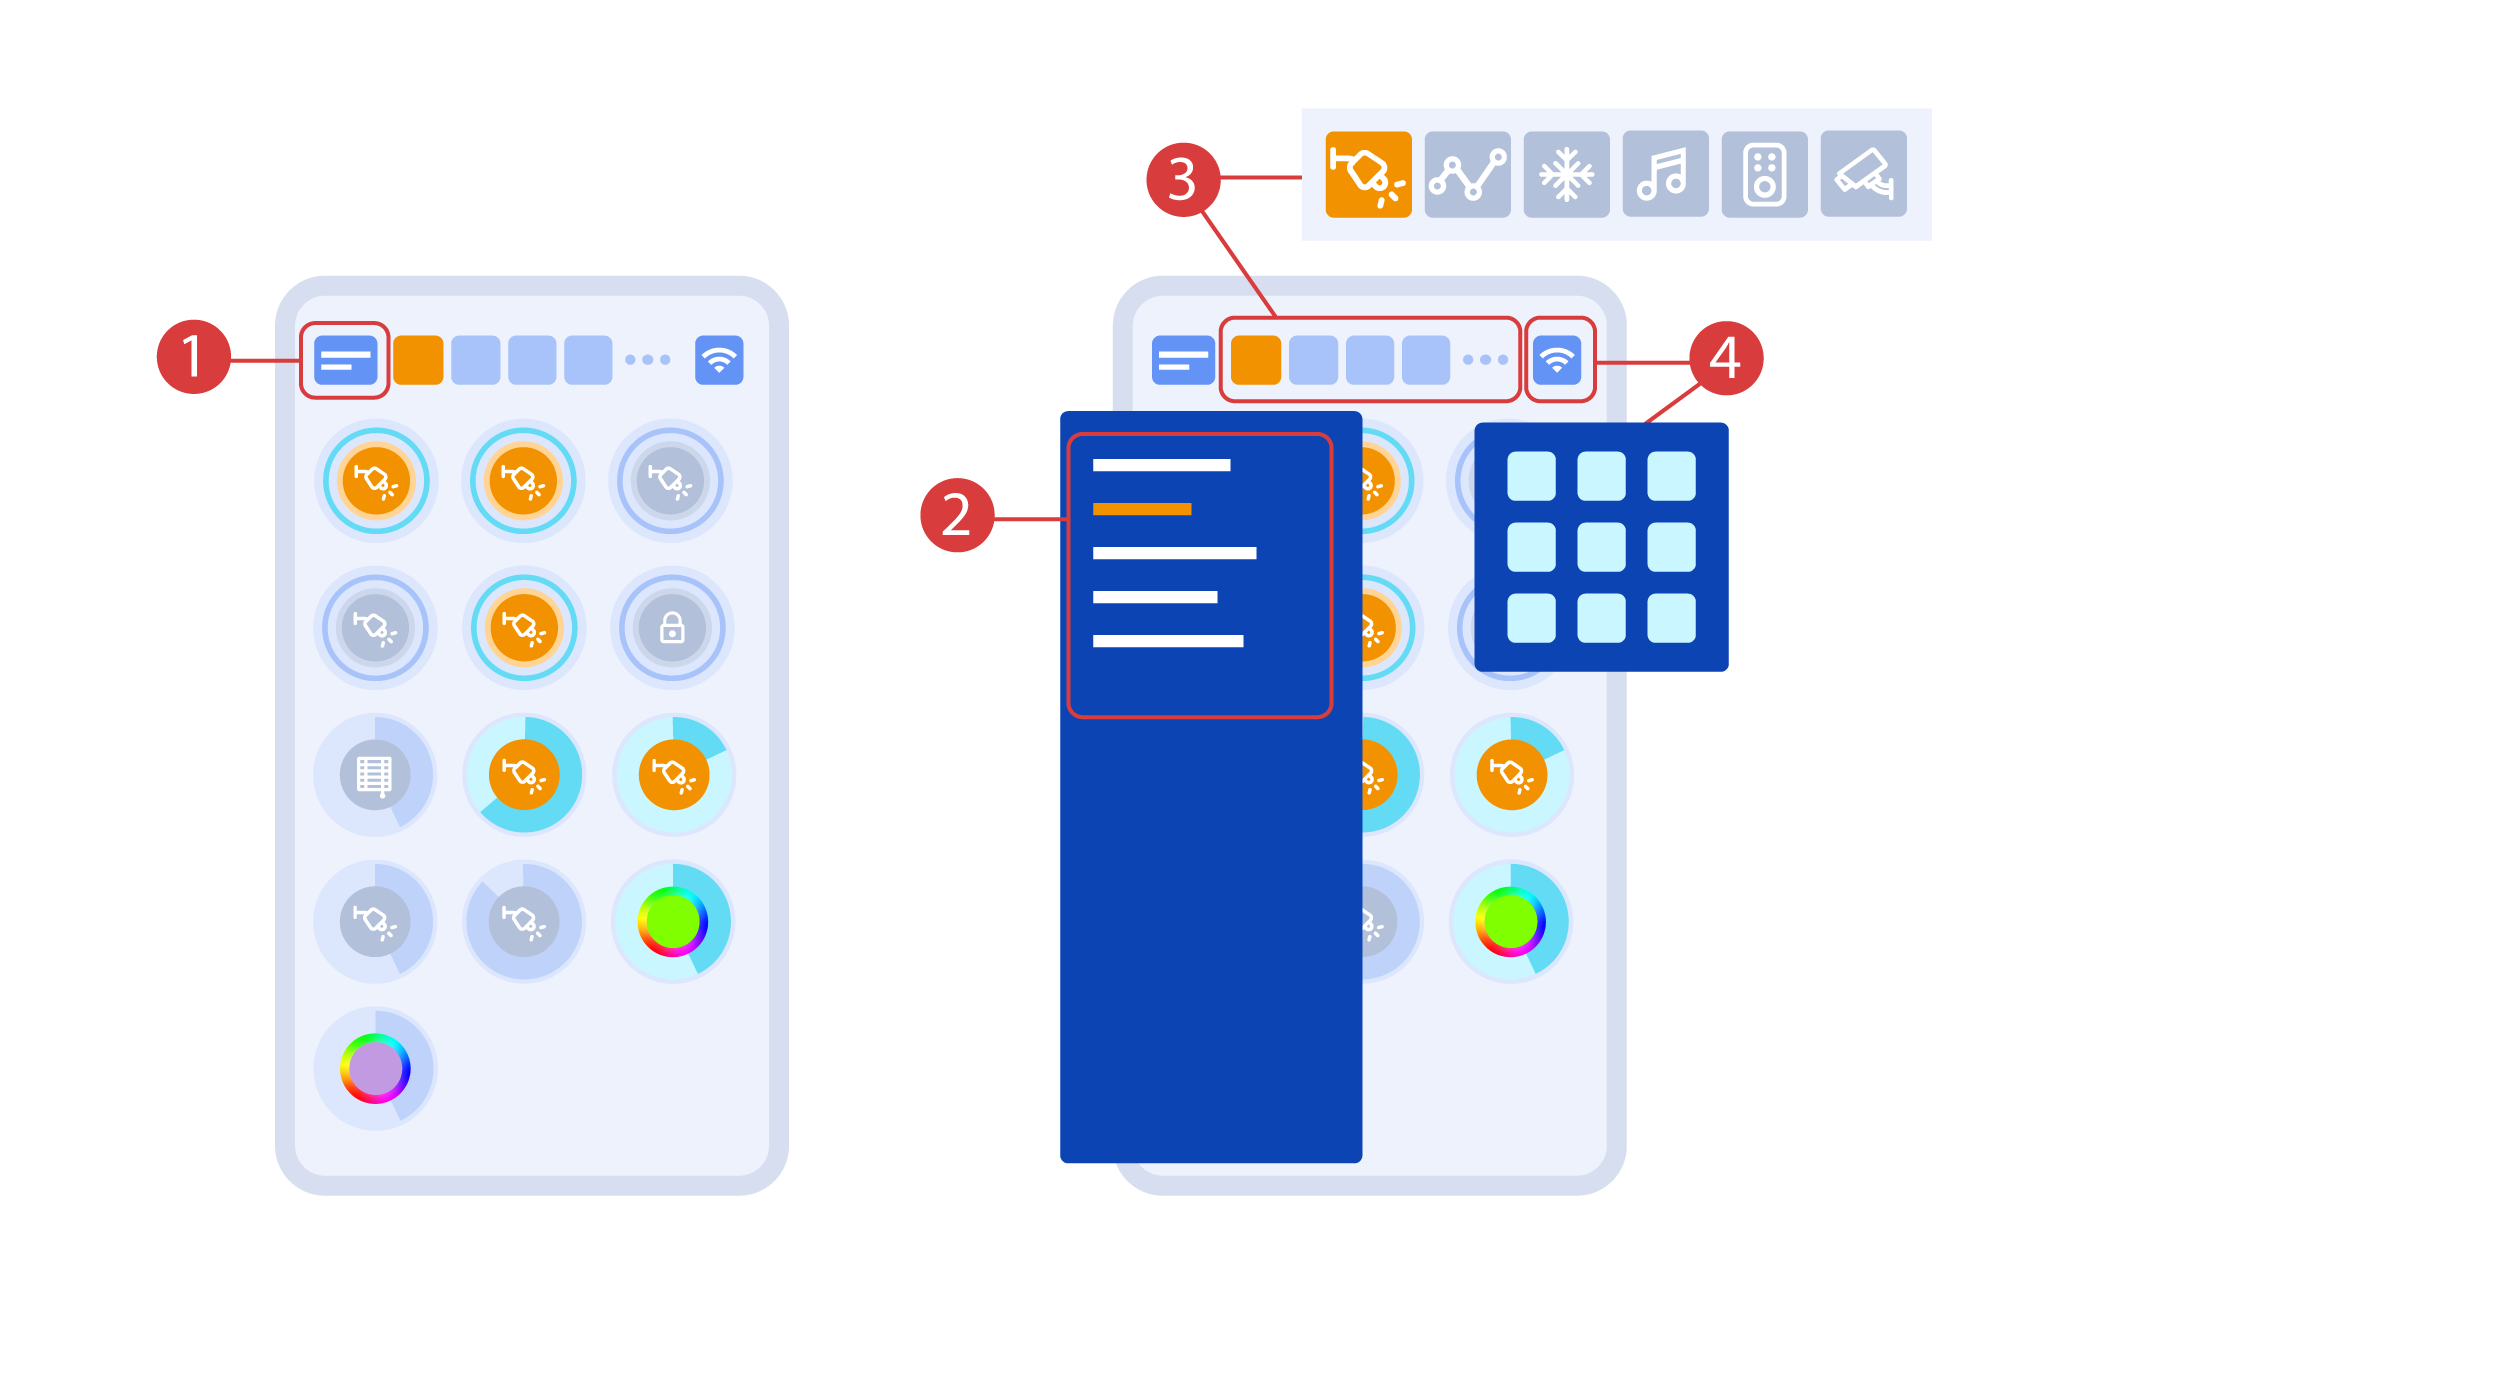
Zapnutie alebo vypnutie vykonávacích prvkov ① sa vykonáva jednoduchým kliknutím. Ak chcete zmeniť úroveň osvetlenia ②, farbu svetiel alebo polohu žalúzií, použite dvojité kliknutie. Ak chcete získať prístup k histórii stavu ③ tohto výkonného prvku alebo snímača, stlačte a podržte ikonu na jednu sekundu.
Krátkym stlačením fyzických tlačidiel na paneli sa rozsvieti alebo zhasne kontrolka. Stlačením a podržaním tlačidla zmeníte jas svetla.

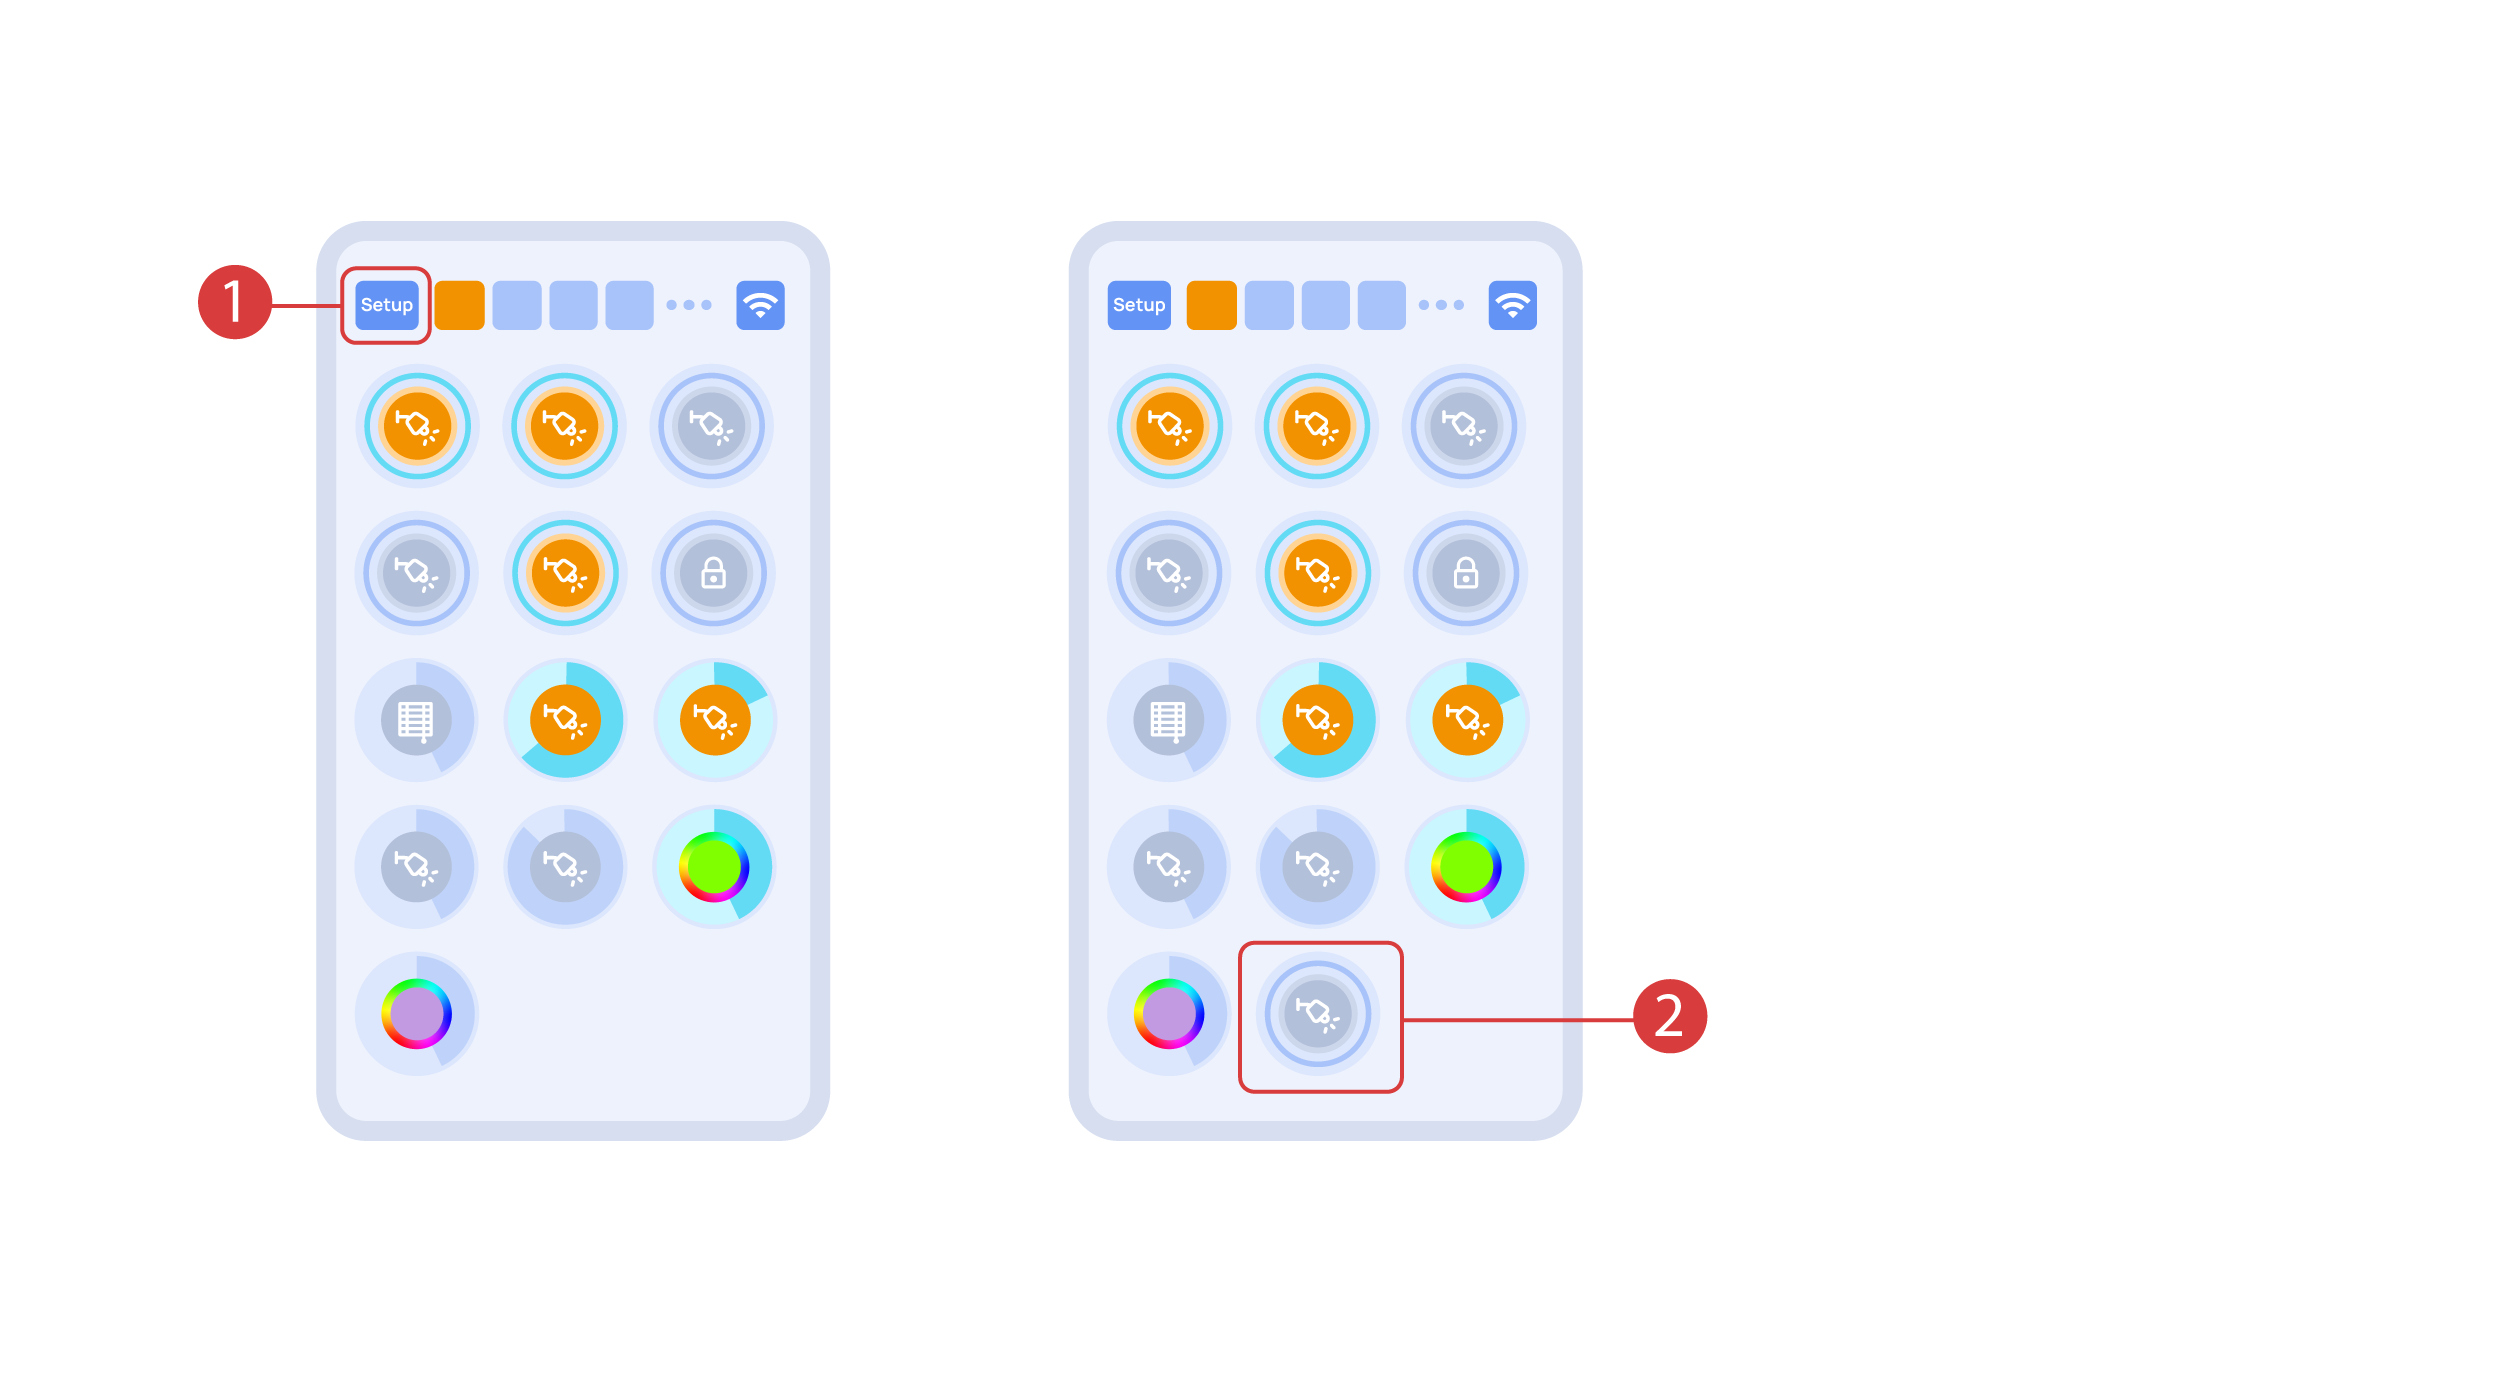
Aby sme demonštrovali funkciu Plug and Play, otvoríme vykonávacie prvky v oblasti nastavenia ① a pripojíme modul k zbernici CAN. Systém automaticky rozpozná nový modul a pridá ho do oblasti "Nastavenie" ②, kde môžeme nový modul okamžite ovládať.
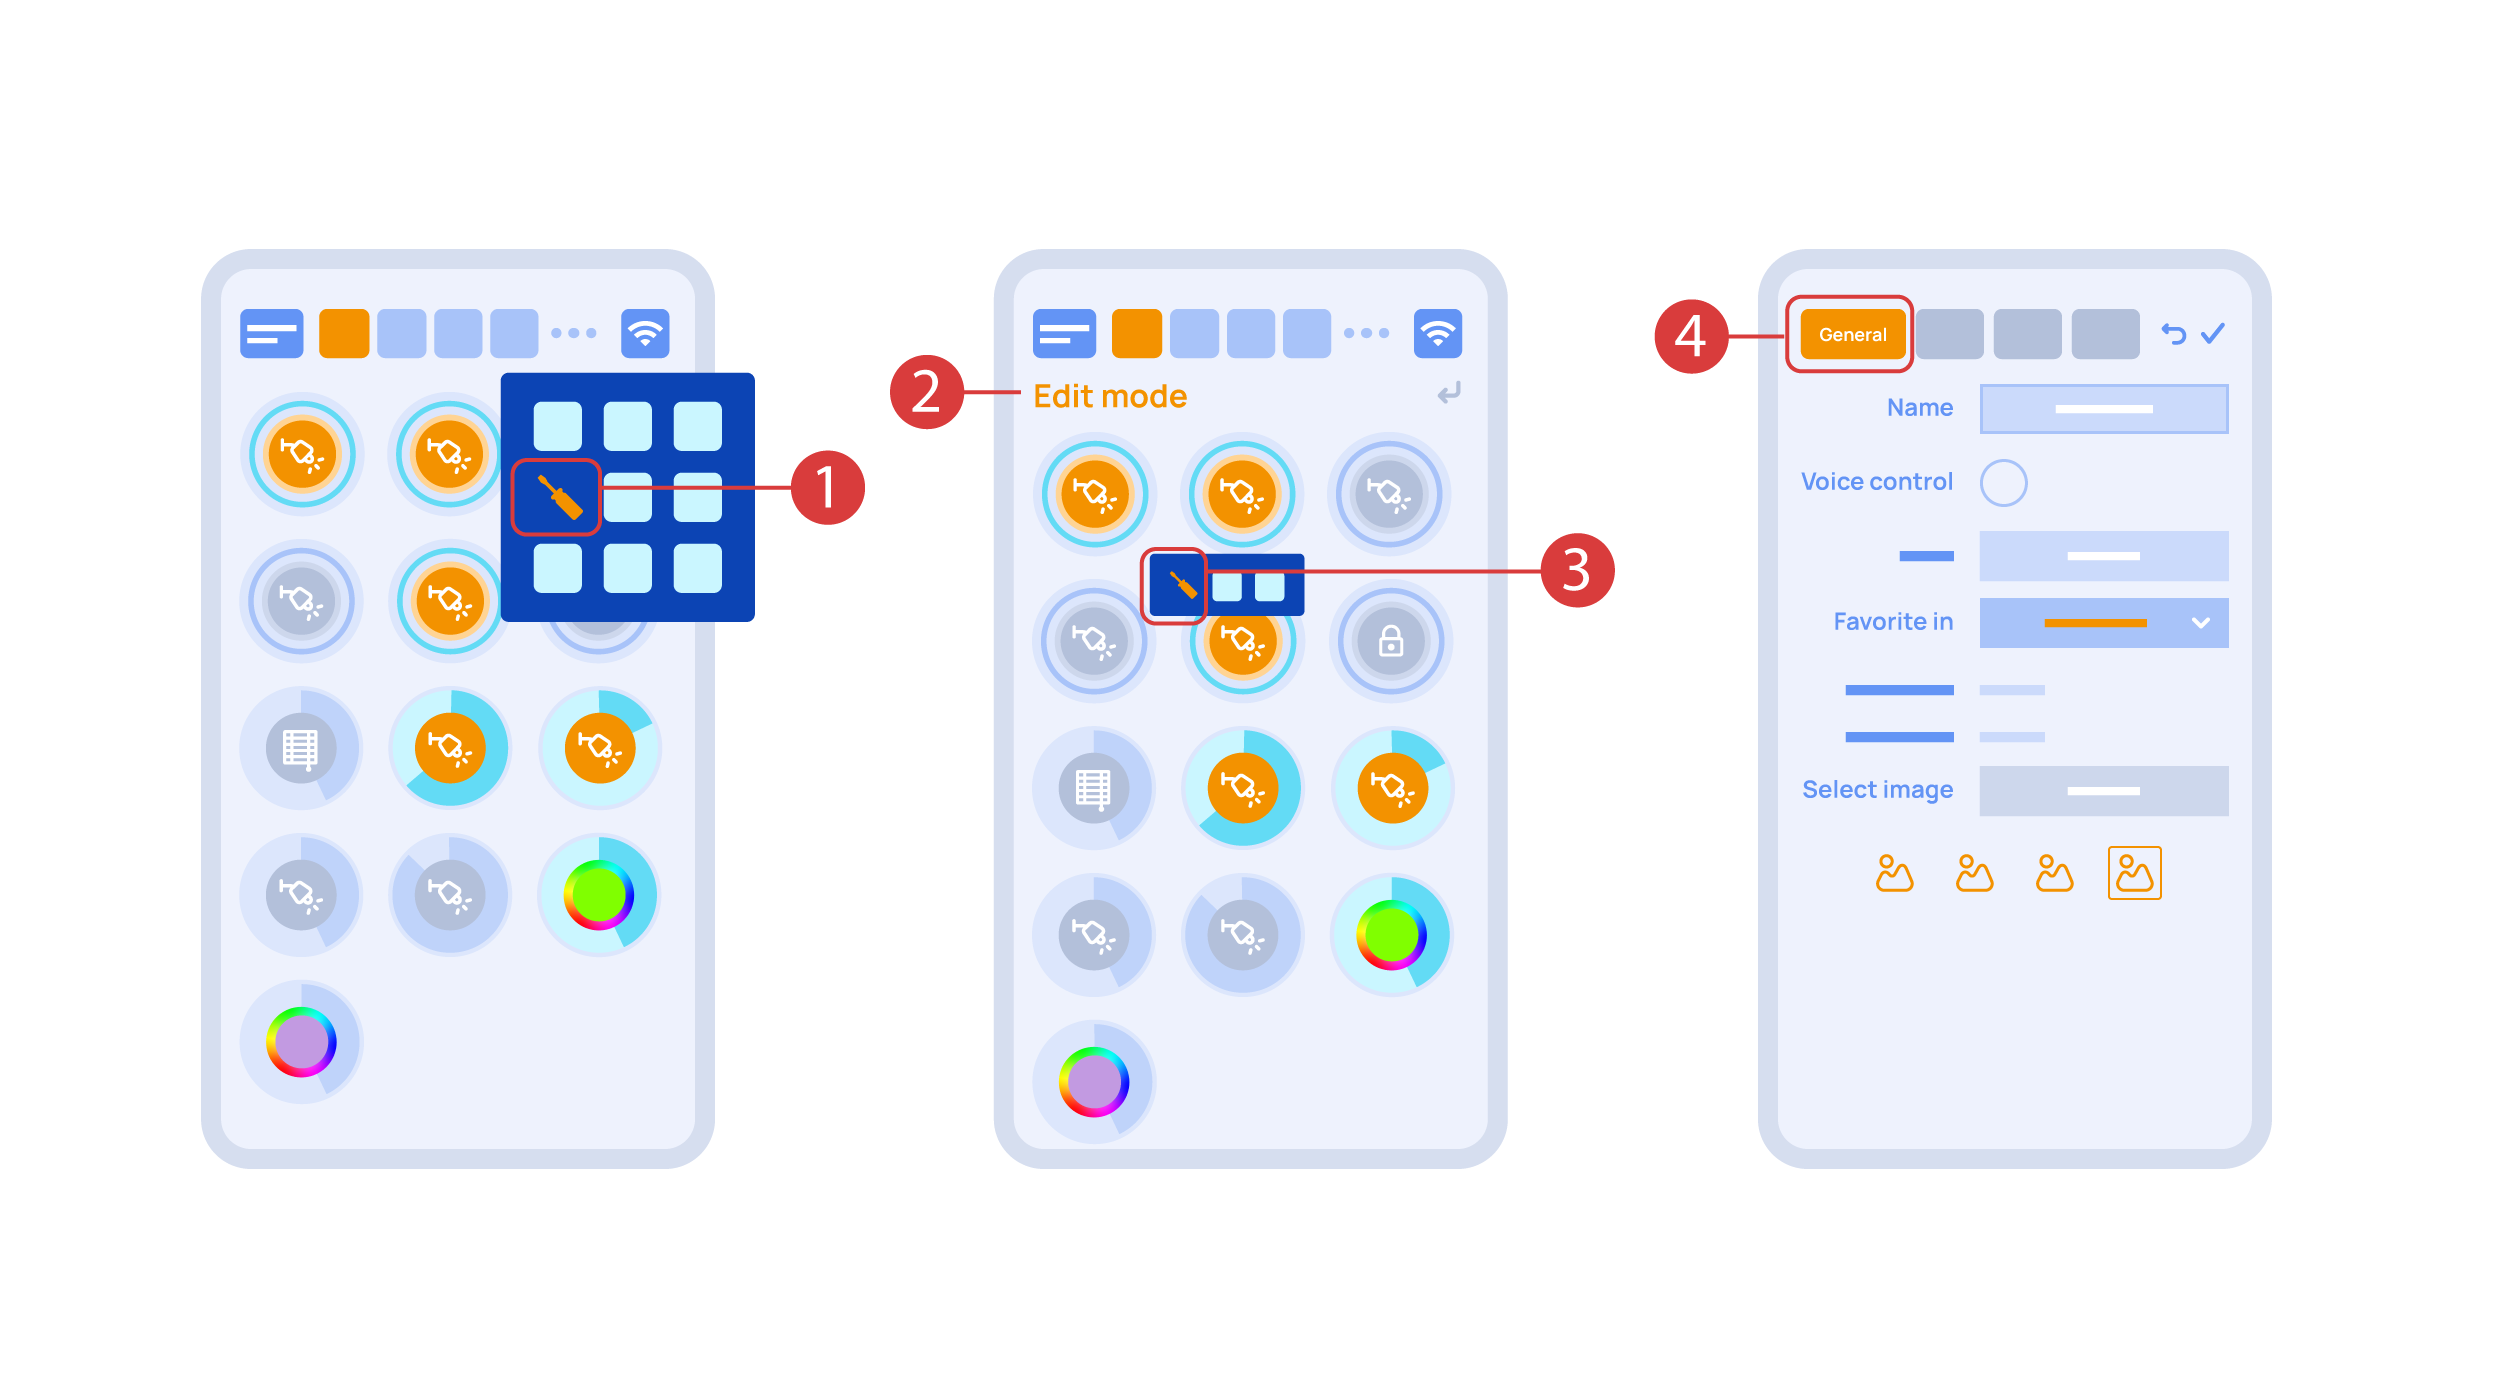
V tejto chvíli môžeme tieto vykonávacie prvky nastaviť. Pre tento účel vstúpte do doplnkového menu ① a aktivujte režim úprav stlačením príslušnej ikony.
Momentálne sa nachádzame v režime úprav ②, čo je vidieť z príslušného oznámenia v hornej časti obrazovky. Keď v tomto režime stlačíme a podržíme ikonu, môžeme ju presunúť medzi ostatné prvky a umiestniť ju do inej miestnosti tak, že ju umiestnime do ponuky Výber oblasti a potom vyberieme oblasť, ktorú potrebujeme. Dlhým stlačením ③ prvku sa spustí ponuka, v ktorej nastavíme aktuálny prvok. V časti "Všeobecné" ④ môžeme zmeniť názov prvku, pridať preň hlasový príkaz, zmeniť ikonu alebo pridať prvok do "Obľúbených".
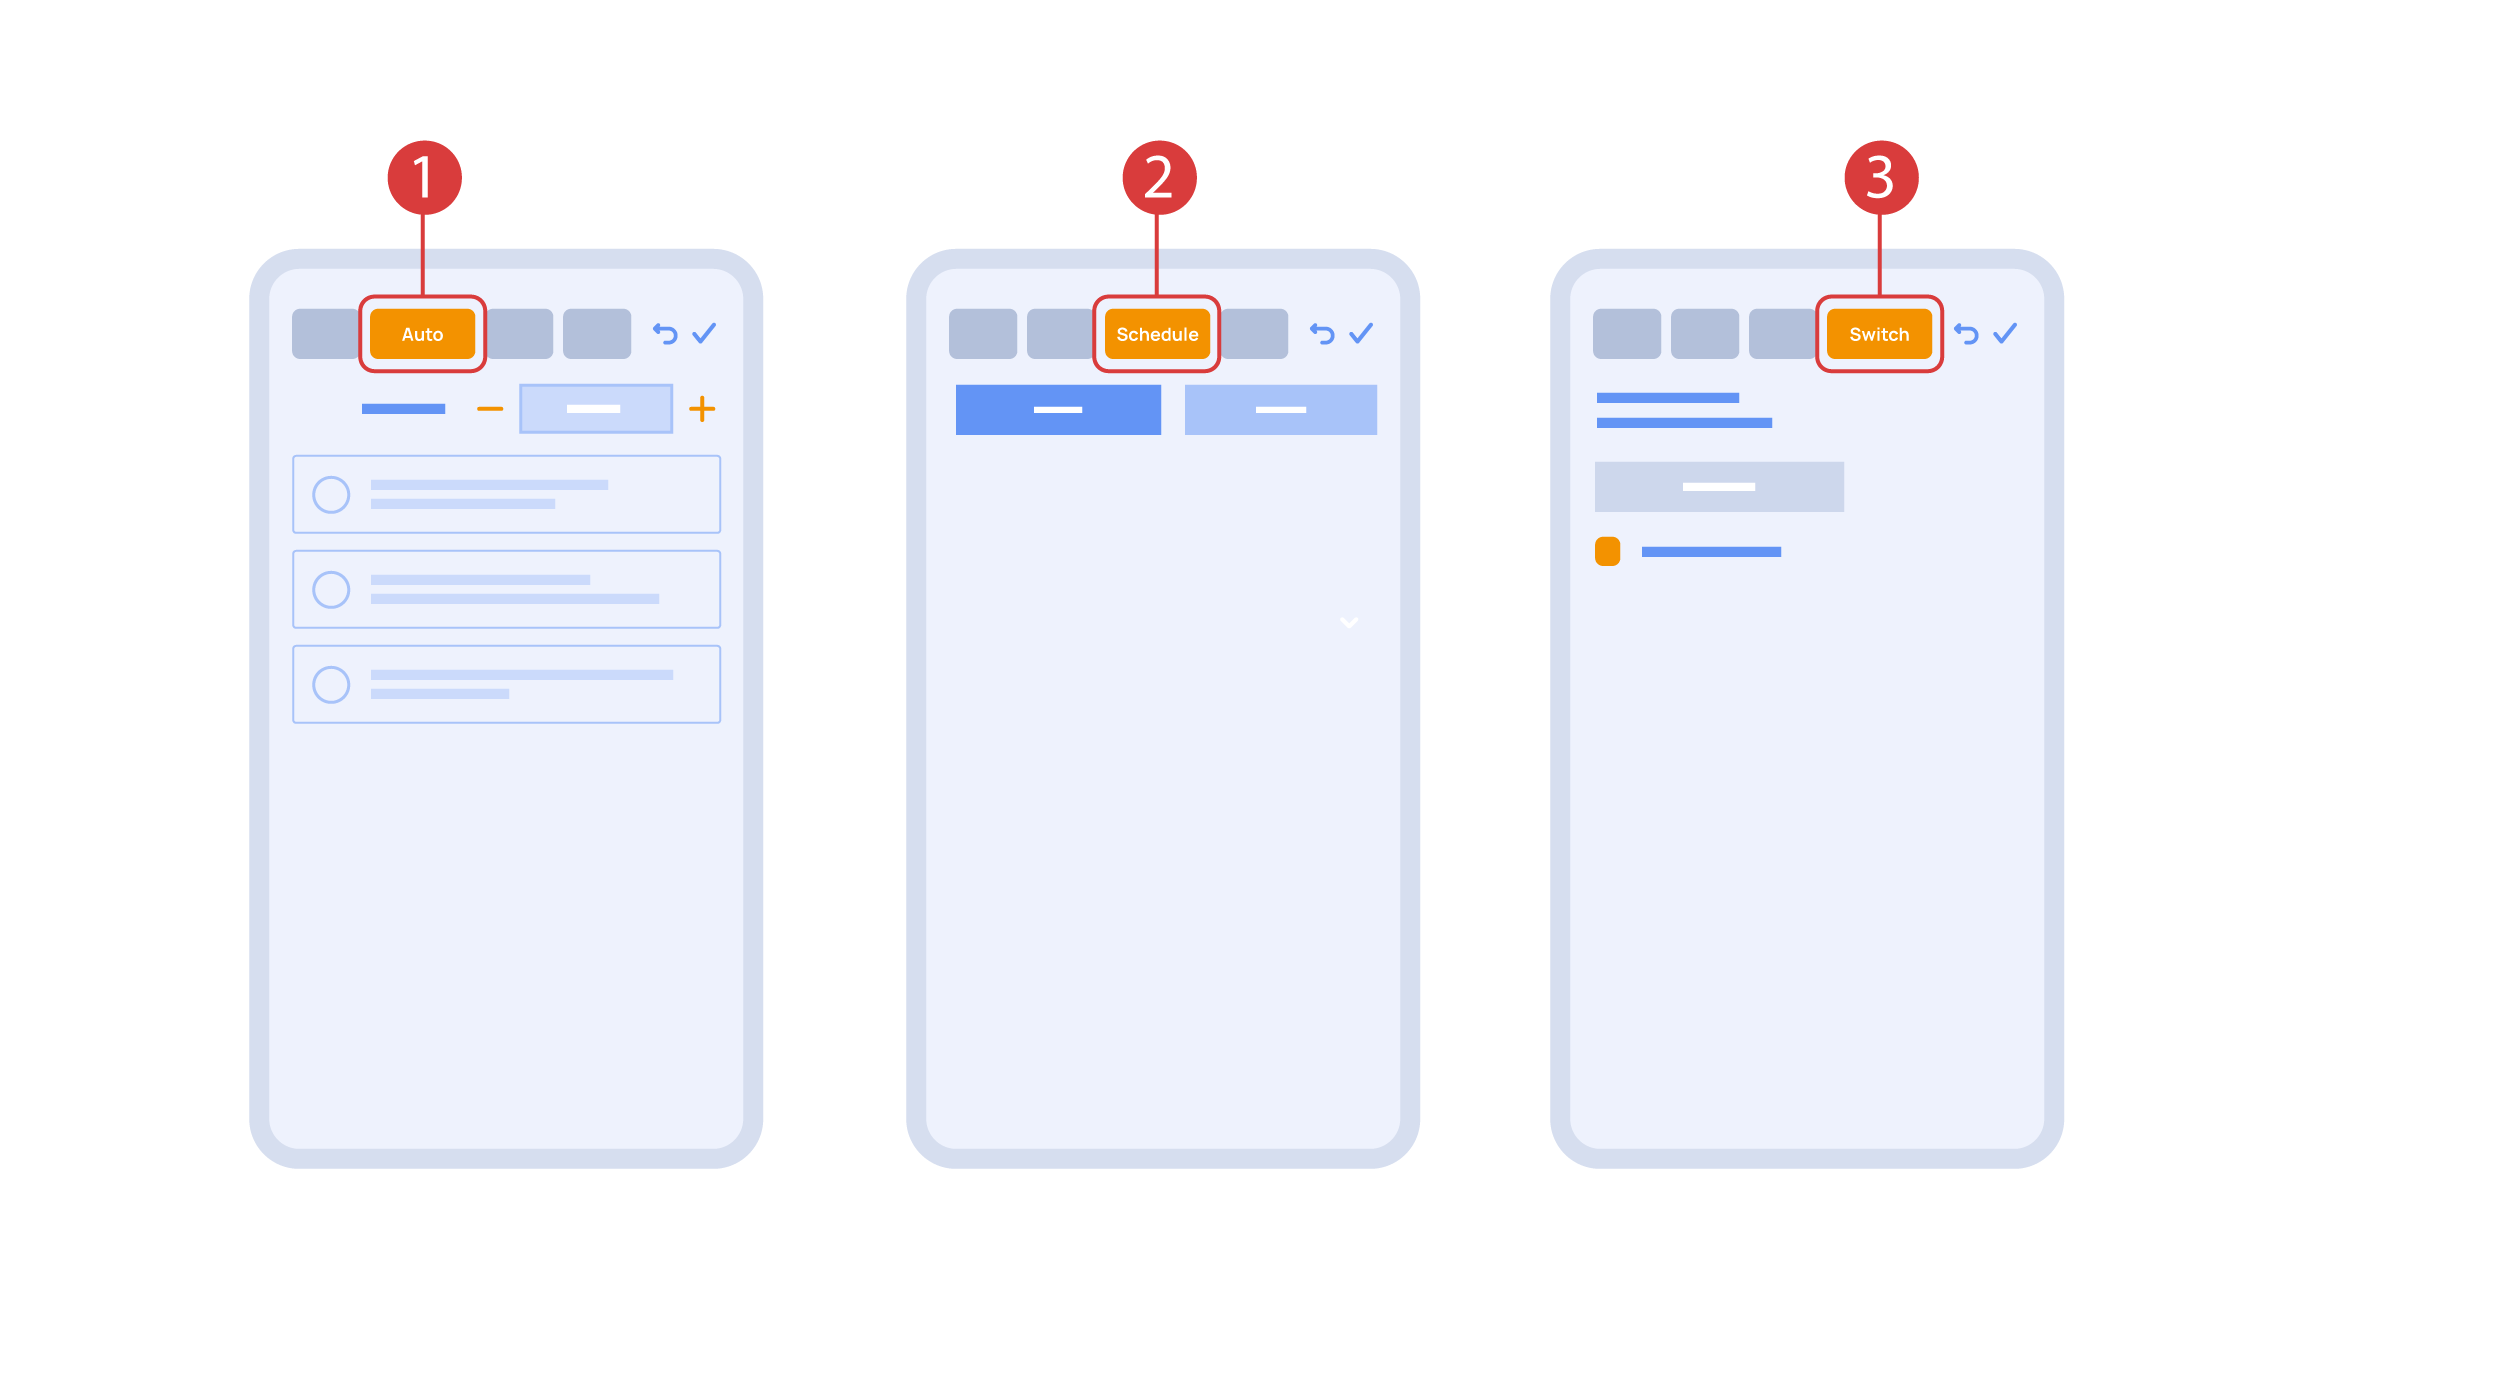
Sekcia 'Auto' ① nám umožňuje aktivovať automatizáciu niekoľkými kliknutiami, ako aj nastaviť jej parametre.
V časti 'Plán' ② môžete určiť časový plán, kedy sa daný prvok zapne alebo vypne, a to aj pomocou času západu a východu slnka.
Na karte "Prepínače" ③ môžete priradiť tlačidlo na ovládanie vykonávacieho prvku.
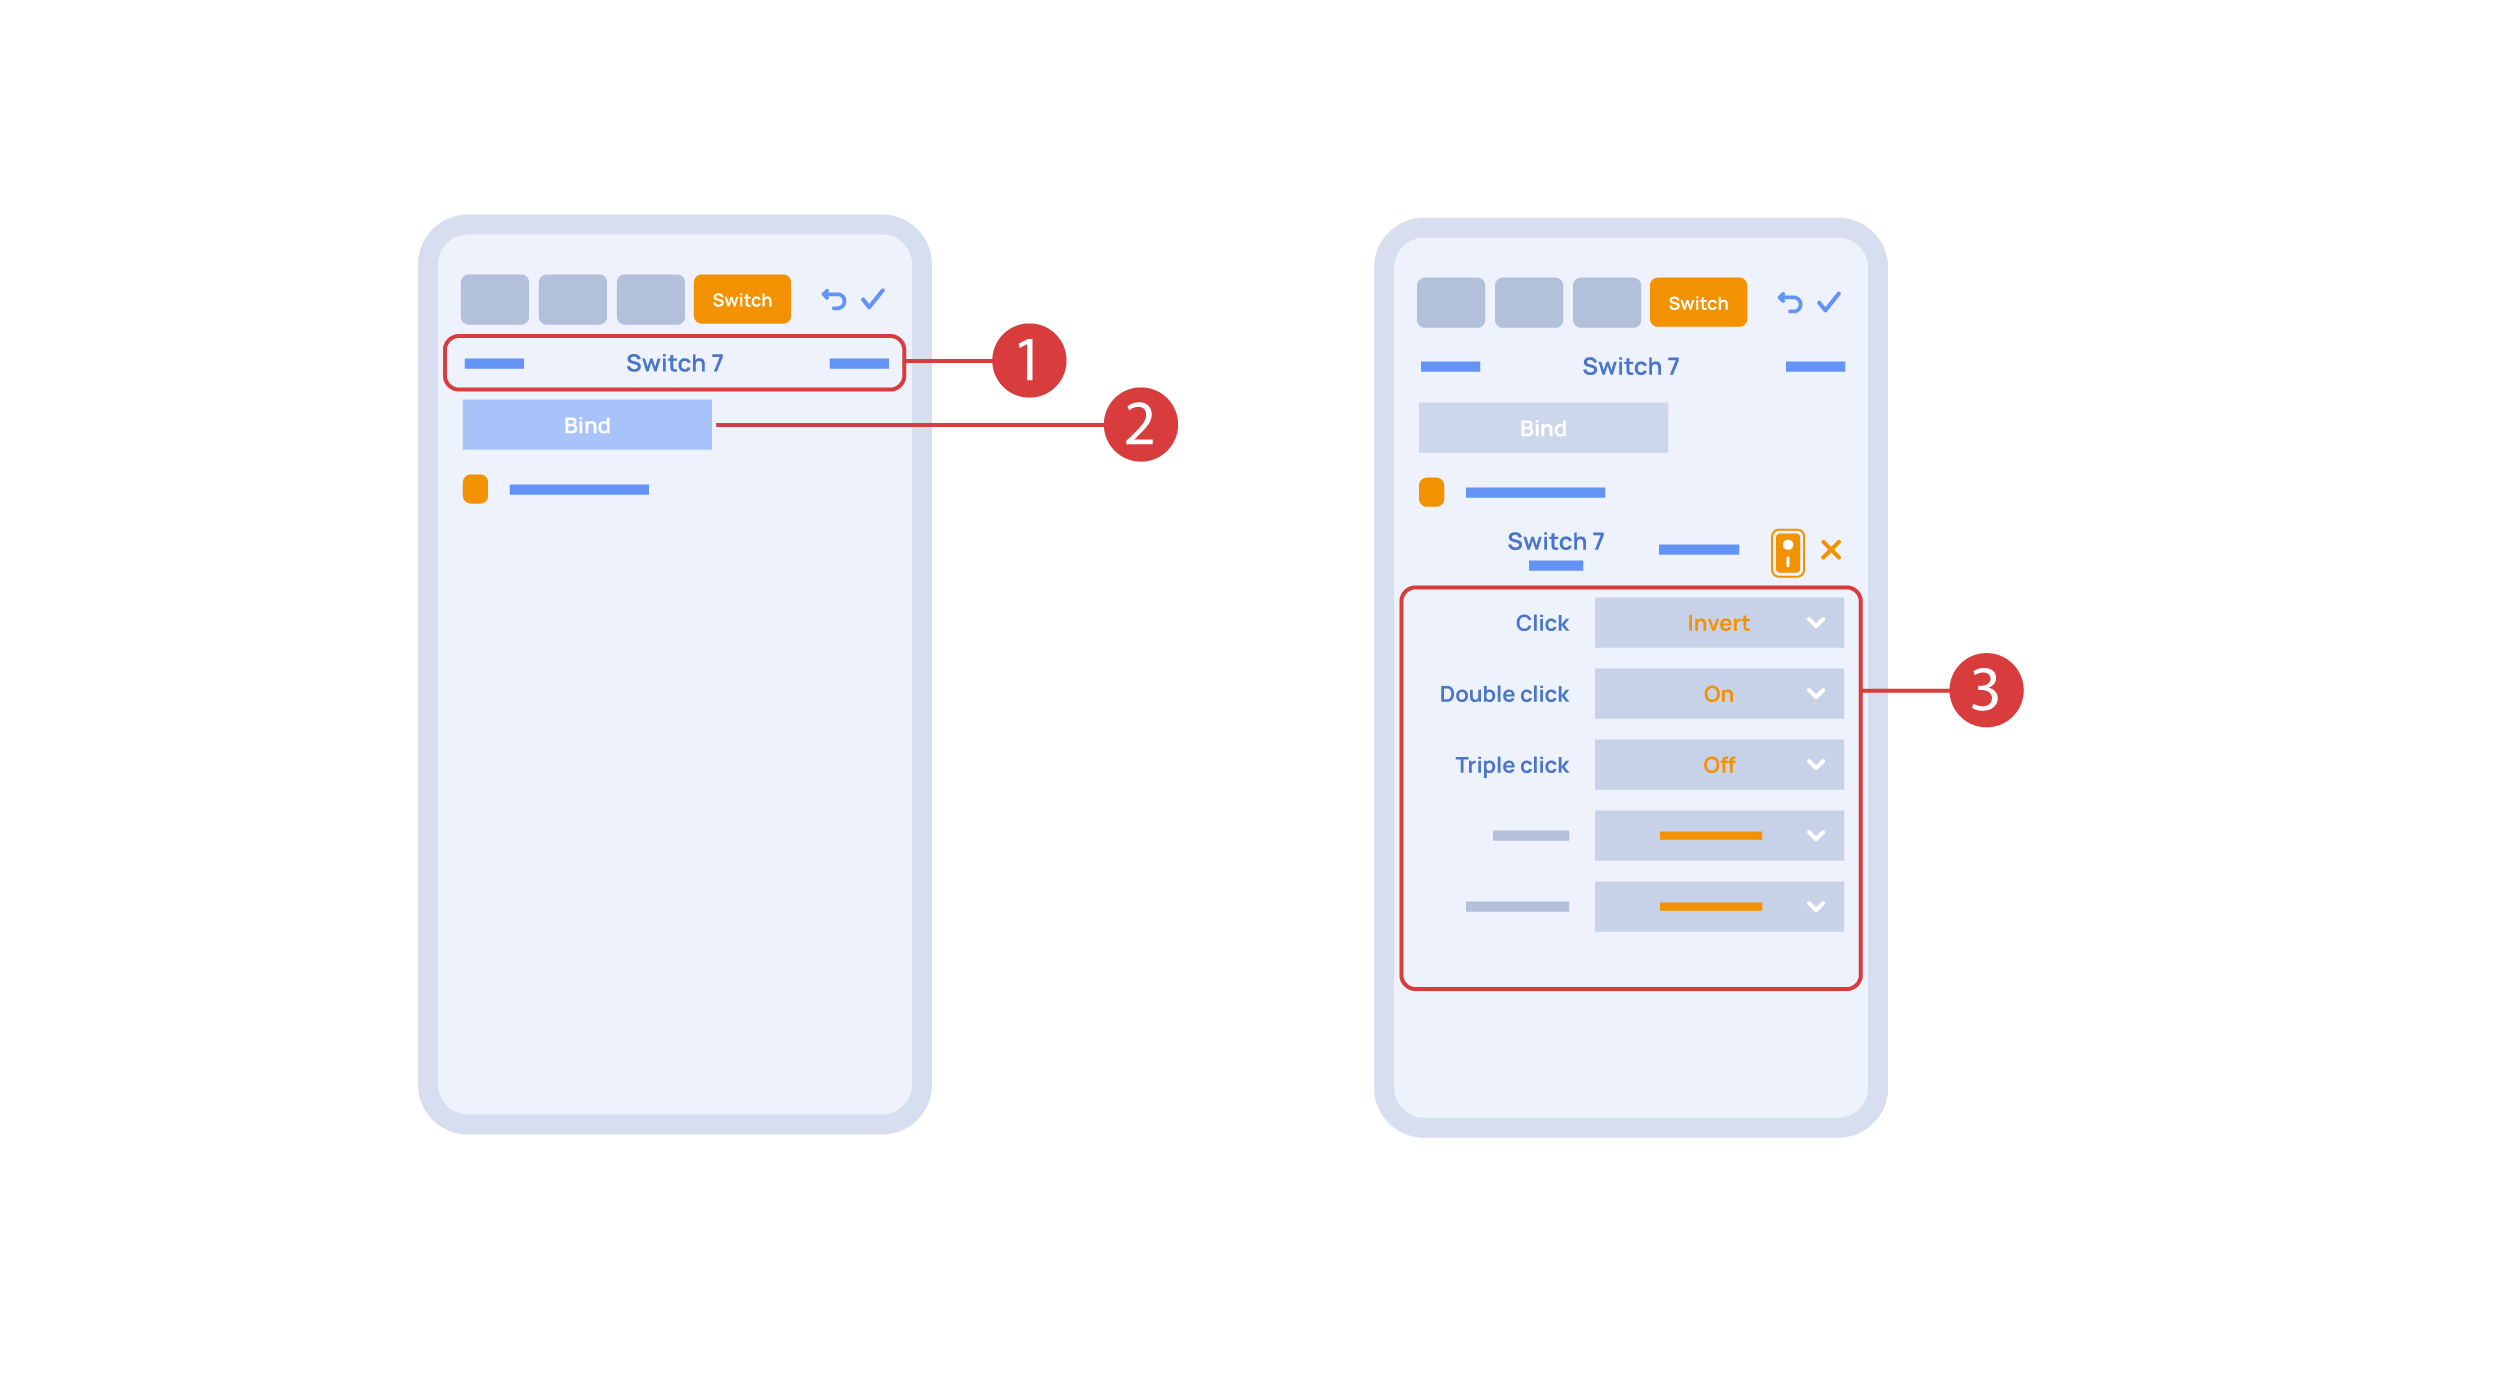
Aby sme to mohli urobiť, stlačíme tlačidlo ①, ktoré potrebujeme priradiť. Systém ho zobrazí, načo stlačíme tlačidlo 'Priradiť' ② a zmeny uložíme. Teraz toto tlačidlo ovláda daný vykonávací prvok.
Na karte 'Spínače' ③ sa nachádzajú aj ďalšie možnosti nastavenia tlačidiel. Môžeme napríklad naprogramovať, aby sa vykonávací prvok ovládal dvojitým alebo trojitým kliknutím na tlačidlo, ako aj definovať akciu, ktorú toto tlačidlo vykonáva, napríklad "len zapnutie" alebo "len vypnutie" vykonávacieho prvku. V tomto prípade nastavujeme tlačidlo tak, aby robilo nasledovné: jedno kliknutie spôsobí prepnutie lampy, dvojité kliknutie ju zapne a trojité kliknutie ju vypne. Takto môže jedno tlačidlo vykonať až päť rôznych akcií.
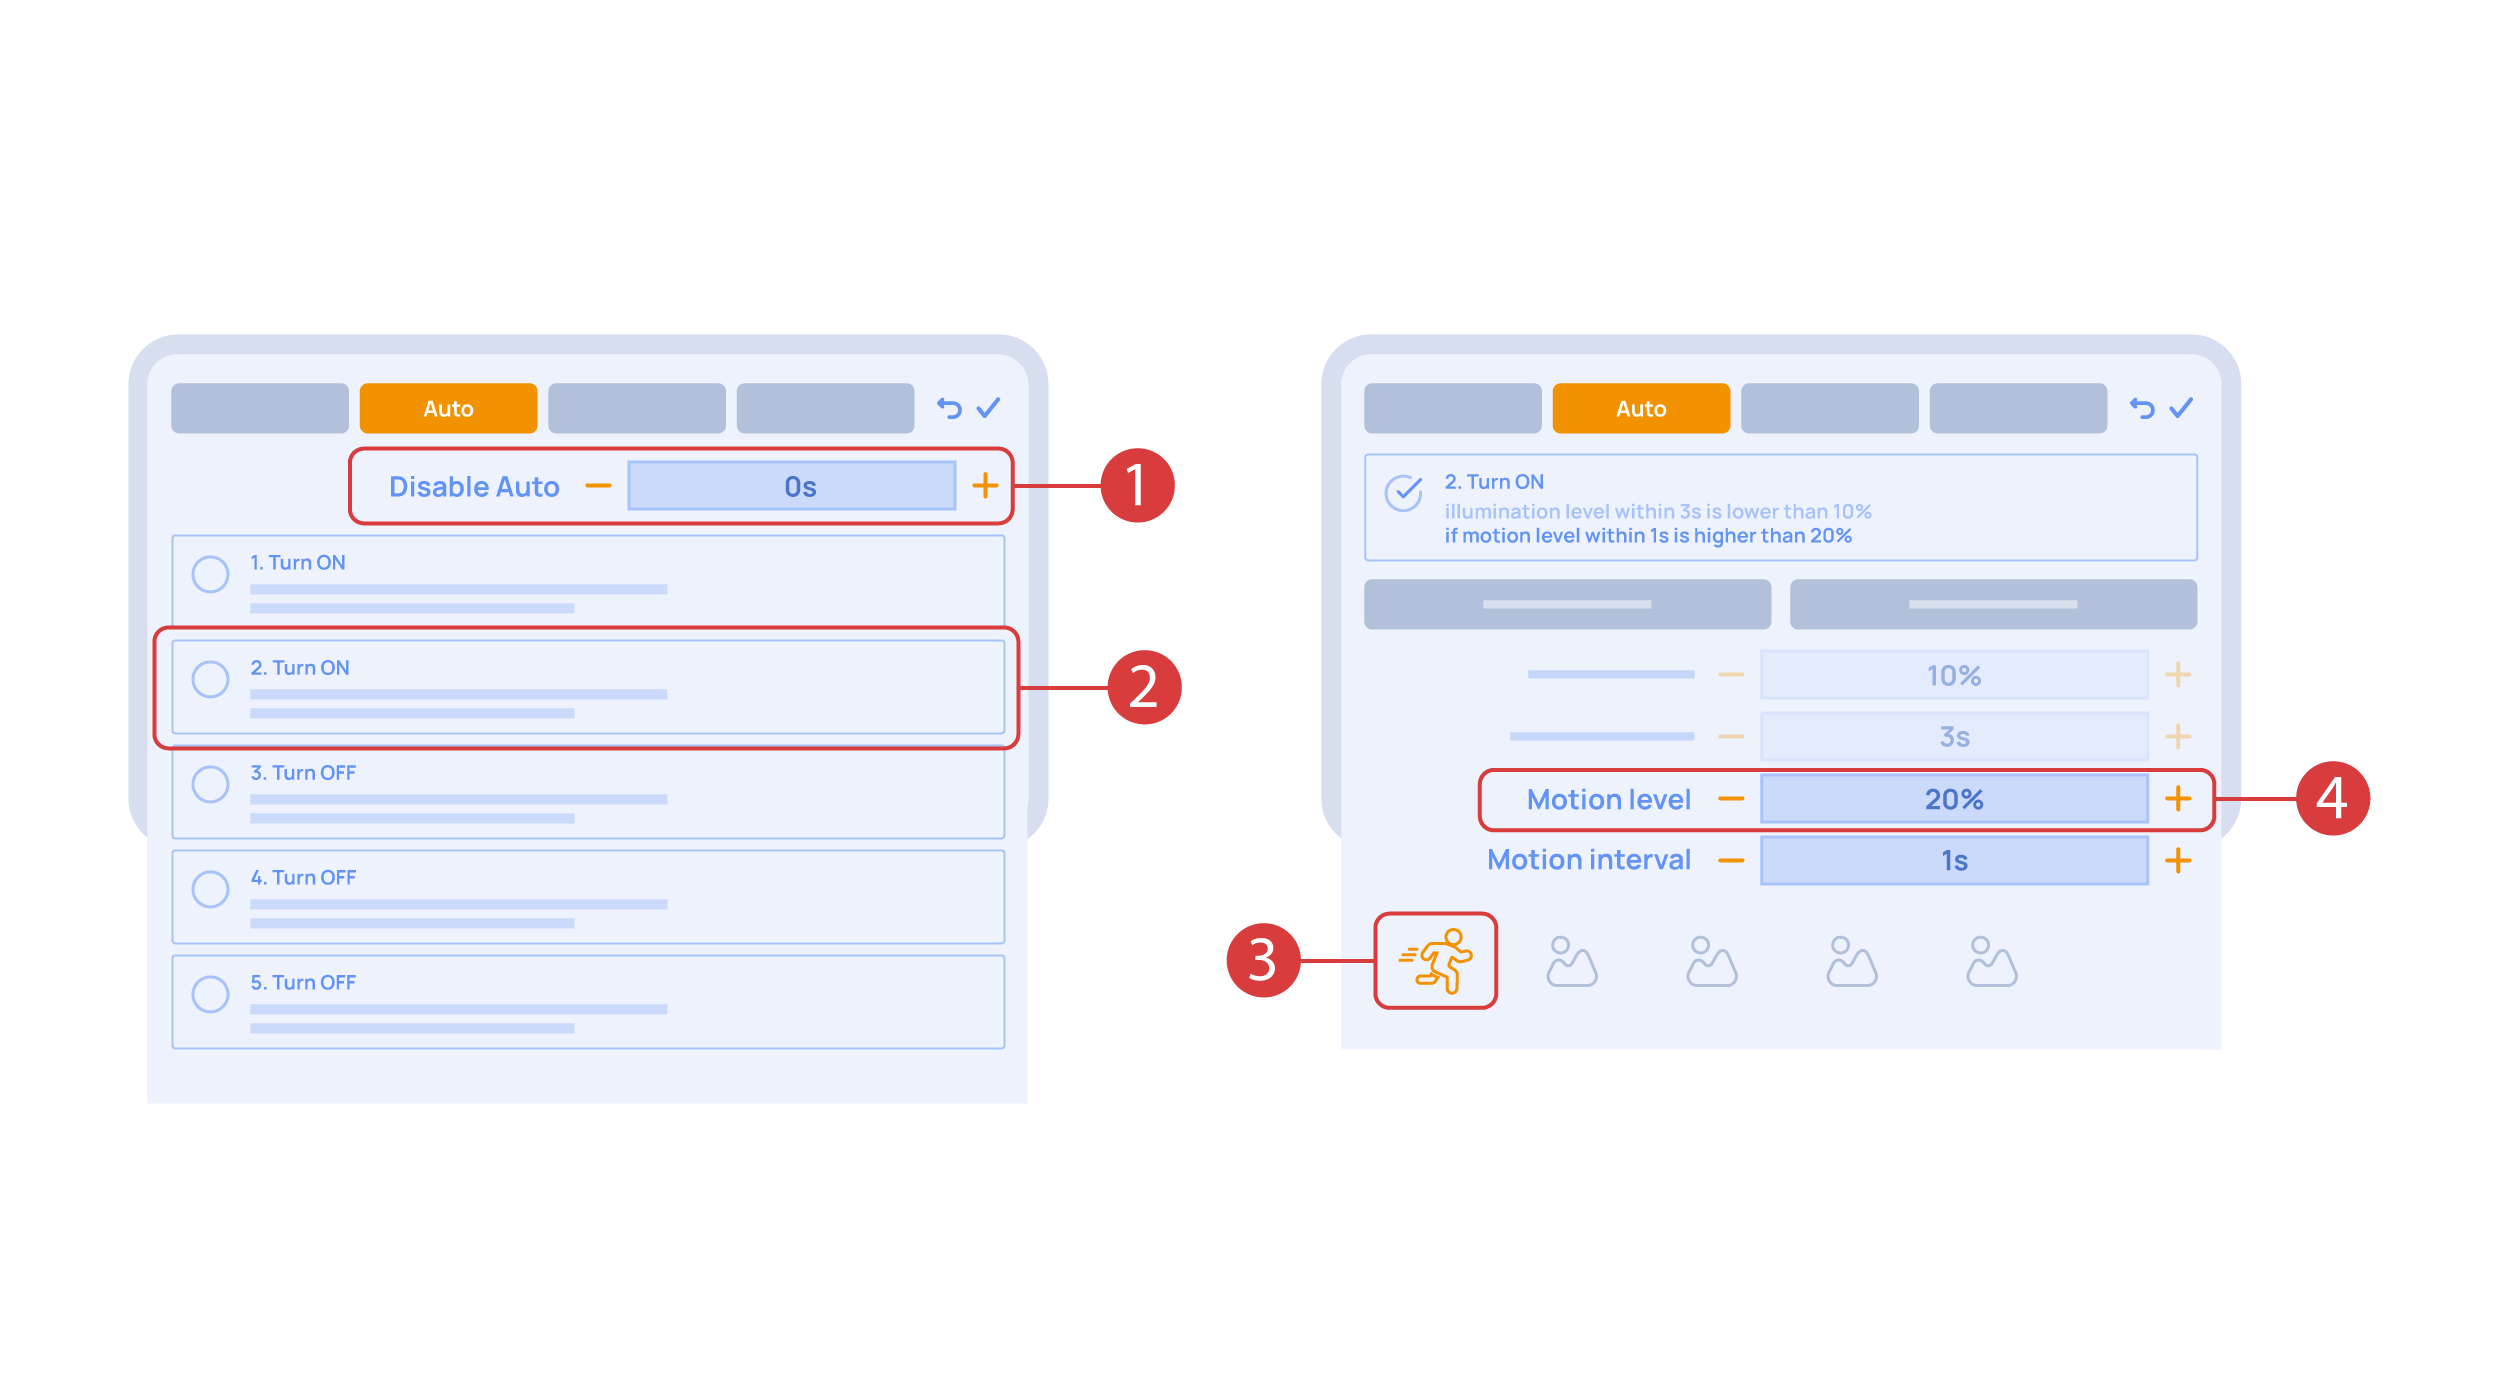
Okrem toho si nastavíme základnú automatizáciu zapínania a vypínania vykonávacieho prvku pomocou snímača pohybu.
Možnosť "Automatická perióda" ① nastavuje čas, na ktorý je automatizácia vypnutá po manuálnom ovládaní vykonávacieho prvku. Na naše demonštračné účely ju nastavíme na nulu.
Potom aktivujeme automatiku ②, aby sa vykonávací prvok zapol po zistení pohybu. Vyberieme snímač pohybu ③ a úroveň pohybu ④. Môžeme vybrať aj svetelný senzor a jeho parametre.
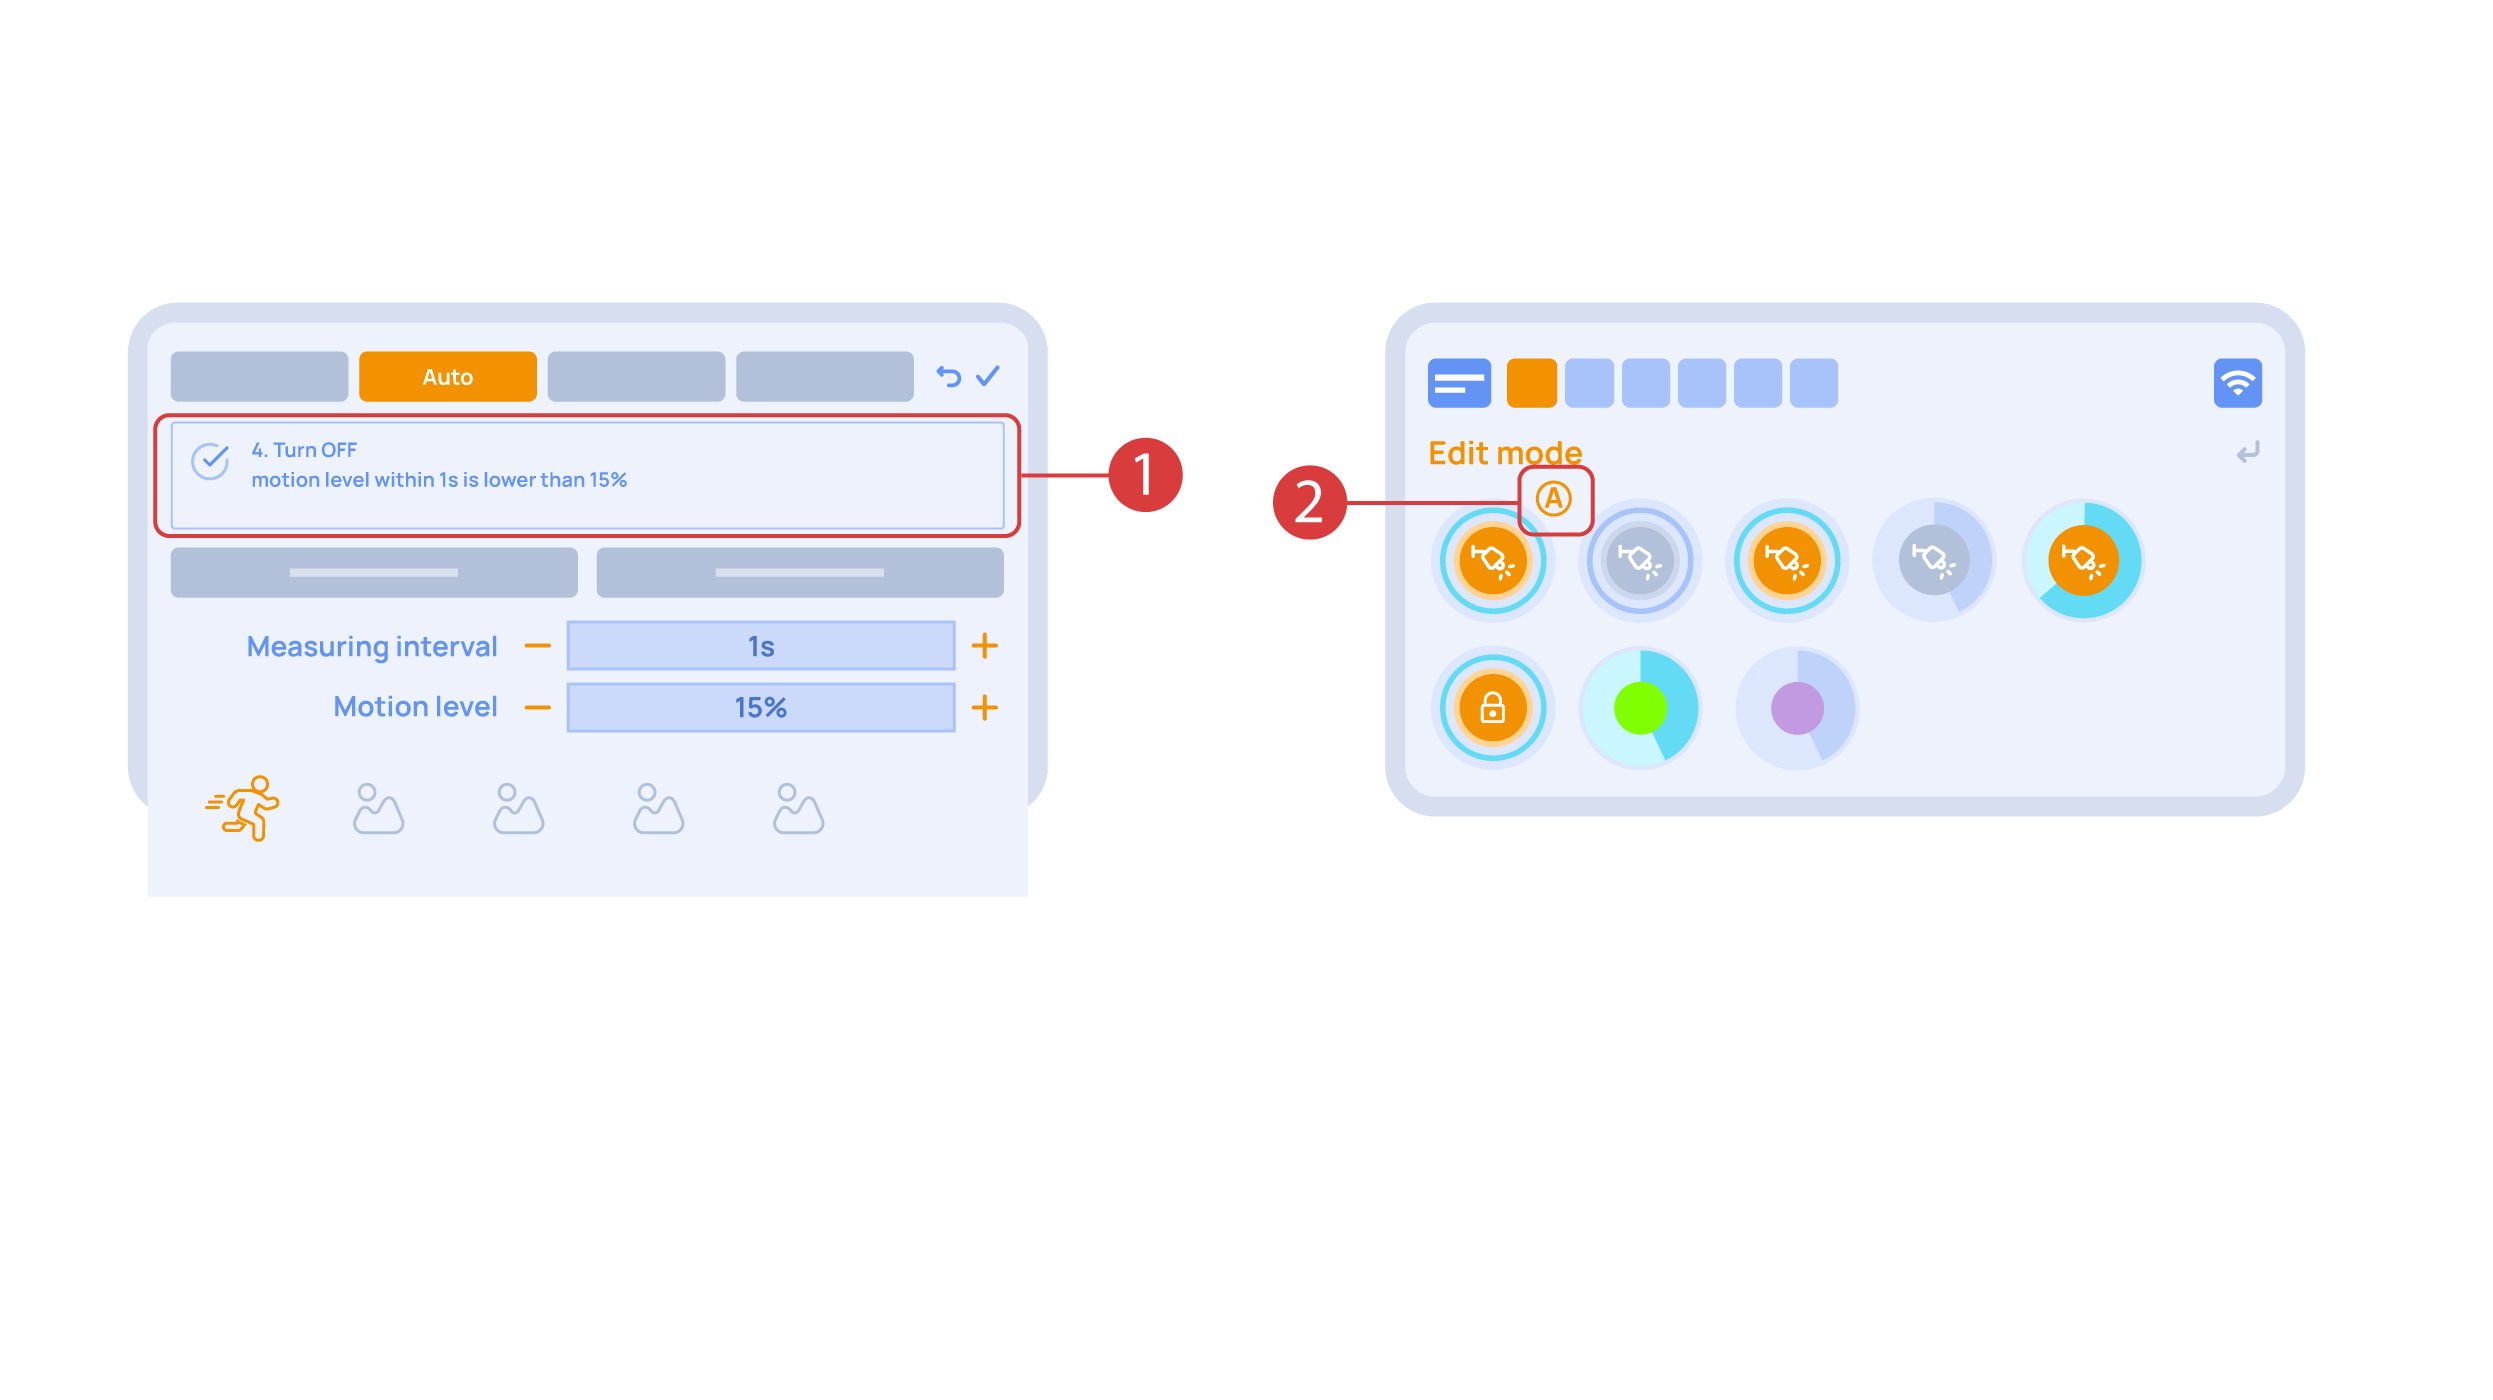
Teraz aktivujeme vypnutie vykonávacieho prvku ①, ak nie je zaznamenaný žiadny pohyb: vyberieme ten istý snímač, nastavíme nižšiu prahovú hodnotu a minimálny čas. Tieto zmeny uložíme.
K ikone vykonávacieho prvku sa pridá dodatočná ikona "A" ②, čo znamená, že preň bola nastavená automatizácia. Teraz sa lampa zapne, keď sa zistí pohyb, a okamžite sa vypne, keď sa žiadny pohyb nezistí.
Poďme si vytvoriť svetelnú schému. Na to musíme vybrať príslušnú položku v doplnkovej ponuke ①. Túto svetelnú schému pomenujte ②.
Na karte "Stav" dlhým stlačením tlačidla pridajte svetlá, ktoré chceme využiť vo svetelnej scéne ①, a nastavte ich stav ②. Zmeny uložíme a novovytvorenú svetelnú schému ③ môžeme ihneď používať.
Keď sa nachádzate v režime úprav ①, v doplnkovej ponuke sa nachádza ikona 'Nastavenie'.
Tu na karte 'Štruktúra' ② vidíme všetky oblasti.
Môžeme vytvárať nové ③, premenovávať ich a tiež prvky presúvať.
Na karte "Mikrotik" ① môžete vidieť aktuálne parametre svojho smerovača, ktorý môžete tiež pripojiť k miestnej Wi-Fi sieti.
Za týmto účelom vstúpte do vedľajšej ponuky Wi-Fi, kliknite na konfiguráciu rozhrania wlan1 ②, po ktorej vyberte režim "stanica" ③, vyberte sieť Wi-Fi zo zoznamu dostupných a zadajte heslo pripojenia.
Na karte "Zálohy" ① si môžete pozrieť zoznam uložených konfigurácií, ktoré môžete v prípade potreby obnoviť.

Pre cloudový prístup k zariadeniu nepotrebujete žiadne ďalšie nastavenia. Aplikácia zistí neprítomnosť systému v miestnej sieti a automaticky vytvorí pripojenie prostredníctvom cloudu.
Ďakujeme vám za sledovanie tohto tutoriálu! Ak máte ďalšie otázky alebo potrebujete akúkoľvek ďalšiu pomoc, neváhajte sa obrátiť na náš tím technickej podpory. Vidíme sa v ďalších epizódach!