Revision as of 14:17, 15 January 2022
Information about message (contribute ) This message has no documentation.
If you know where or how this message is used, you can help other translators by adding documentation to this message.
Message definition (Virtual device )
You need open the link with XML description for each button -> [[Xml]]<br> Copy the code of any button you need, for example '''<item addr="384:6" name="Garage" type="gate"/>'''<br> [[File:Screenshot 001.png|400px]]<br> Then open the Structure tab, and click on Edit logic<br> [[File:Screenshot 002.png|350px]]<br> After that will open pop-up window with XML logic<br> Add your code with a little configuration below!!!<br> [[File:Screenshot 007.png|700px]]<br> *area name - the room, where you want an object to add<br> *addr="292:"<br> '''where "292"'''- ID of your module (Metaforsa, DE-MG, DW-LC10, BW-SW06 etc.)<br> '''and ":"''' - inner ID of the object. '''Assigned automatically by the server''' itself after saving and refreshing the XML logic<br> *name - any you like<br> *type - the icon (widget) of the object. You can change it to another (Jalousie for example)<br> *virtual="yes" - the object will be able to perform the actions. Without it, object will be only viewed, without performing actions<br> After refreshing the XML logic, your line will be like in screenshot below. Inner ID succesfully assigned, in our case it was 240<br> [[File:Screenshot 008.png|700px]]<br> After that object ready to work<br>
You need open the link with XML description for each button -> [[Xml]]<br>
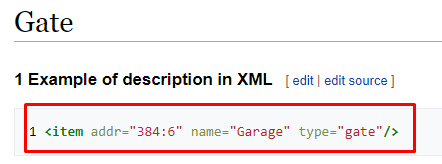
Copy the code of any button you need, for example '''<item addr="384:6" name="Garage" type="gate"/>'''<br>
[[File:Screenshot 001.png|400px]]<br>
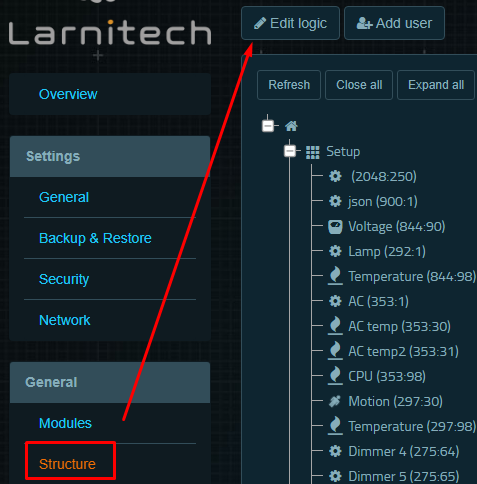
Then open the Structure tab, and click on Edit logic<br>
[[File:Screenshot 002.png|350px]]<br>
After that will open pop-up window with XML logic<br>
Add your code with a little configuration below!!!<br>
[[File:Screenshot 007.png|700px]]<br>
*area name - the room, where you want an object to add<br>
*addr="292:"<br>
'''where "292"'''- ID of your module (Metaforsa, DE-MG, DW-LC10, BW-SW06 etc.)<br>
'''and ":"''' - inner ID of the object. '''Assigned automatically by the server''' itself after saving and refreshing the XML logic<br>
*name - any you like<br>
*type - the icon (widget) of the object. You can change it to another (Jalousie for example)<br>
*virtual="yes" - the object will be able to perform the actions. Without it, object will be only viewed, without performing actions<br>
After refreshing the XML logic, your line will be like in screenshot below. Inner ID succesfully assigned, in our case it was 240<br>
[[File:Screenshot 008.png|700px]]<br>
After that object ready to work<br>
Translation Откройте ссылку с описанием XML для каждой кнопки -> [[Xml]]<br> Скопируйте код любой нужной вам кнопки, например '''<item addr="384:6" name="Garage" type="gate"/>'''<br> [[File:Screenshot 001.png|400px]]<br> Затем откройте вкладку Структура (Structure) и нажмите Изменить алгоритм (Edit logic)<br> [[File:Screenshot 002.png|350px]]<br> После этого откроется всплывающее окно с алгоритмом XML<br> Добавьте свой код с небольшими изменениями, как указано ниже!!!<br> [[File:Screenshot 007.png|700px]]<br> *название области (area name) - помещение, в которое вы хотите добавить объект<br> *addr="292:"<br> '''где "292"'''- идентификатор вашего модуля (Metaforsa, DE-MG, DW-LC10, BW-SW06 etc.)<br> '''and ":"''' - внутренний идентификатор объекта. '''Назначается автоматически сервером''' после сохранения и обновления алгоритма XML<br> *имя (name) - любое на ваше усмотрение<br> *type - иконка (виджет) объекта. Вы можете изменить его на другой (например, Жалюзи)<br> *virtual="yes" - объект сможет выполнять действия. Без этой команды объект будет только виден, без выполнения действий<br> После обновления алгоритма XML ваша строка будет выглядеть, как на скриншоте ниже. Внутренний идентификатор успешно назначен, в нашем случае это был 240<br> [[File:Screenshot 008.png|700px]]<br> После этого объект готов к работе<br> Откройте ссылку с описанием XML для каждой кнопки -> Xml
Скопируйте код любой нужной вам кнопки, например <item addr="384:6" name="Garage" type="gate"/>
Затем откройте вкладку Структура (Structure) и нажмите Изменить алгоритм (Edit logic)
После этого откроется всплывающее окно с алгоритмом XML
Добавьте свой код с небольшими изменениями, как указано ниже!!!
название области (area name) - помещение, в которое вы хотите добавить объект
addr="292:"
где "292" - идентификатор вашего модуля (Metaforsa, DE-MG, DW-LC10, BW-SW06 etc.)
and ":" - внутренний идентификатор объекта. Назначается автоматически сервером после сохранения и обновления алгоритма XML
имя (name) - любое на ваше усмотрение
type - иконка (виджет) объекта. Вы можете изменить его на другой (например, Жалюзи)
virtual="yes" - объект сможет выполнять действия. Без этой команды объект будет только виден, без выполнения действий
После обновления алгоритма XML ваша строка будет выглядеть, как на скриншоте ниже. Внутренний идентификатор успешно назначен, в нашем случае это был 240
После этого объект готов к работе