Автоматизация
Настройки автоматизации
Автоматизация позволяет настроить систему в соответствии с вашими повседневными потребностями. Вы настраиваете систему выполнять необходимые действия по вашему желанию, в зависимости от времени и других параметров. В приложении Larnitech вы можете включить и настроить параметры автоматизации для большинства элементов системы.
Включение автоматизации
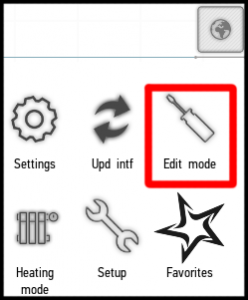
Вы можете настроить и активировать режим автоматизации для приводов и мультирум. Чтобы включить его, войдите в меню и нажмите кнопку Редактировать режим (Edit mode).
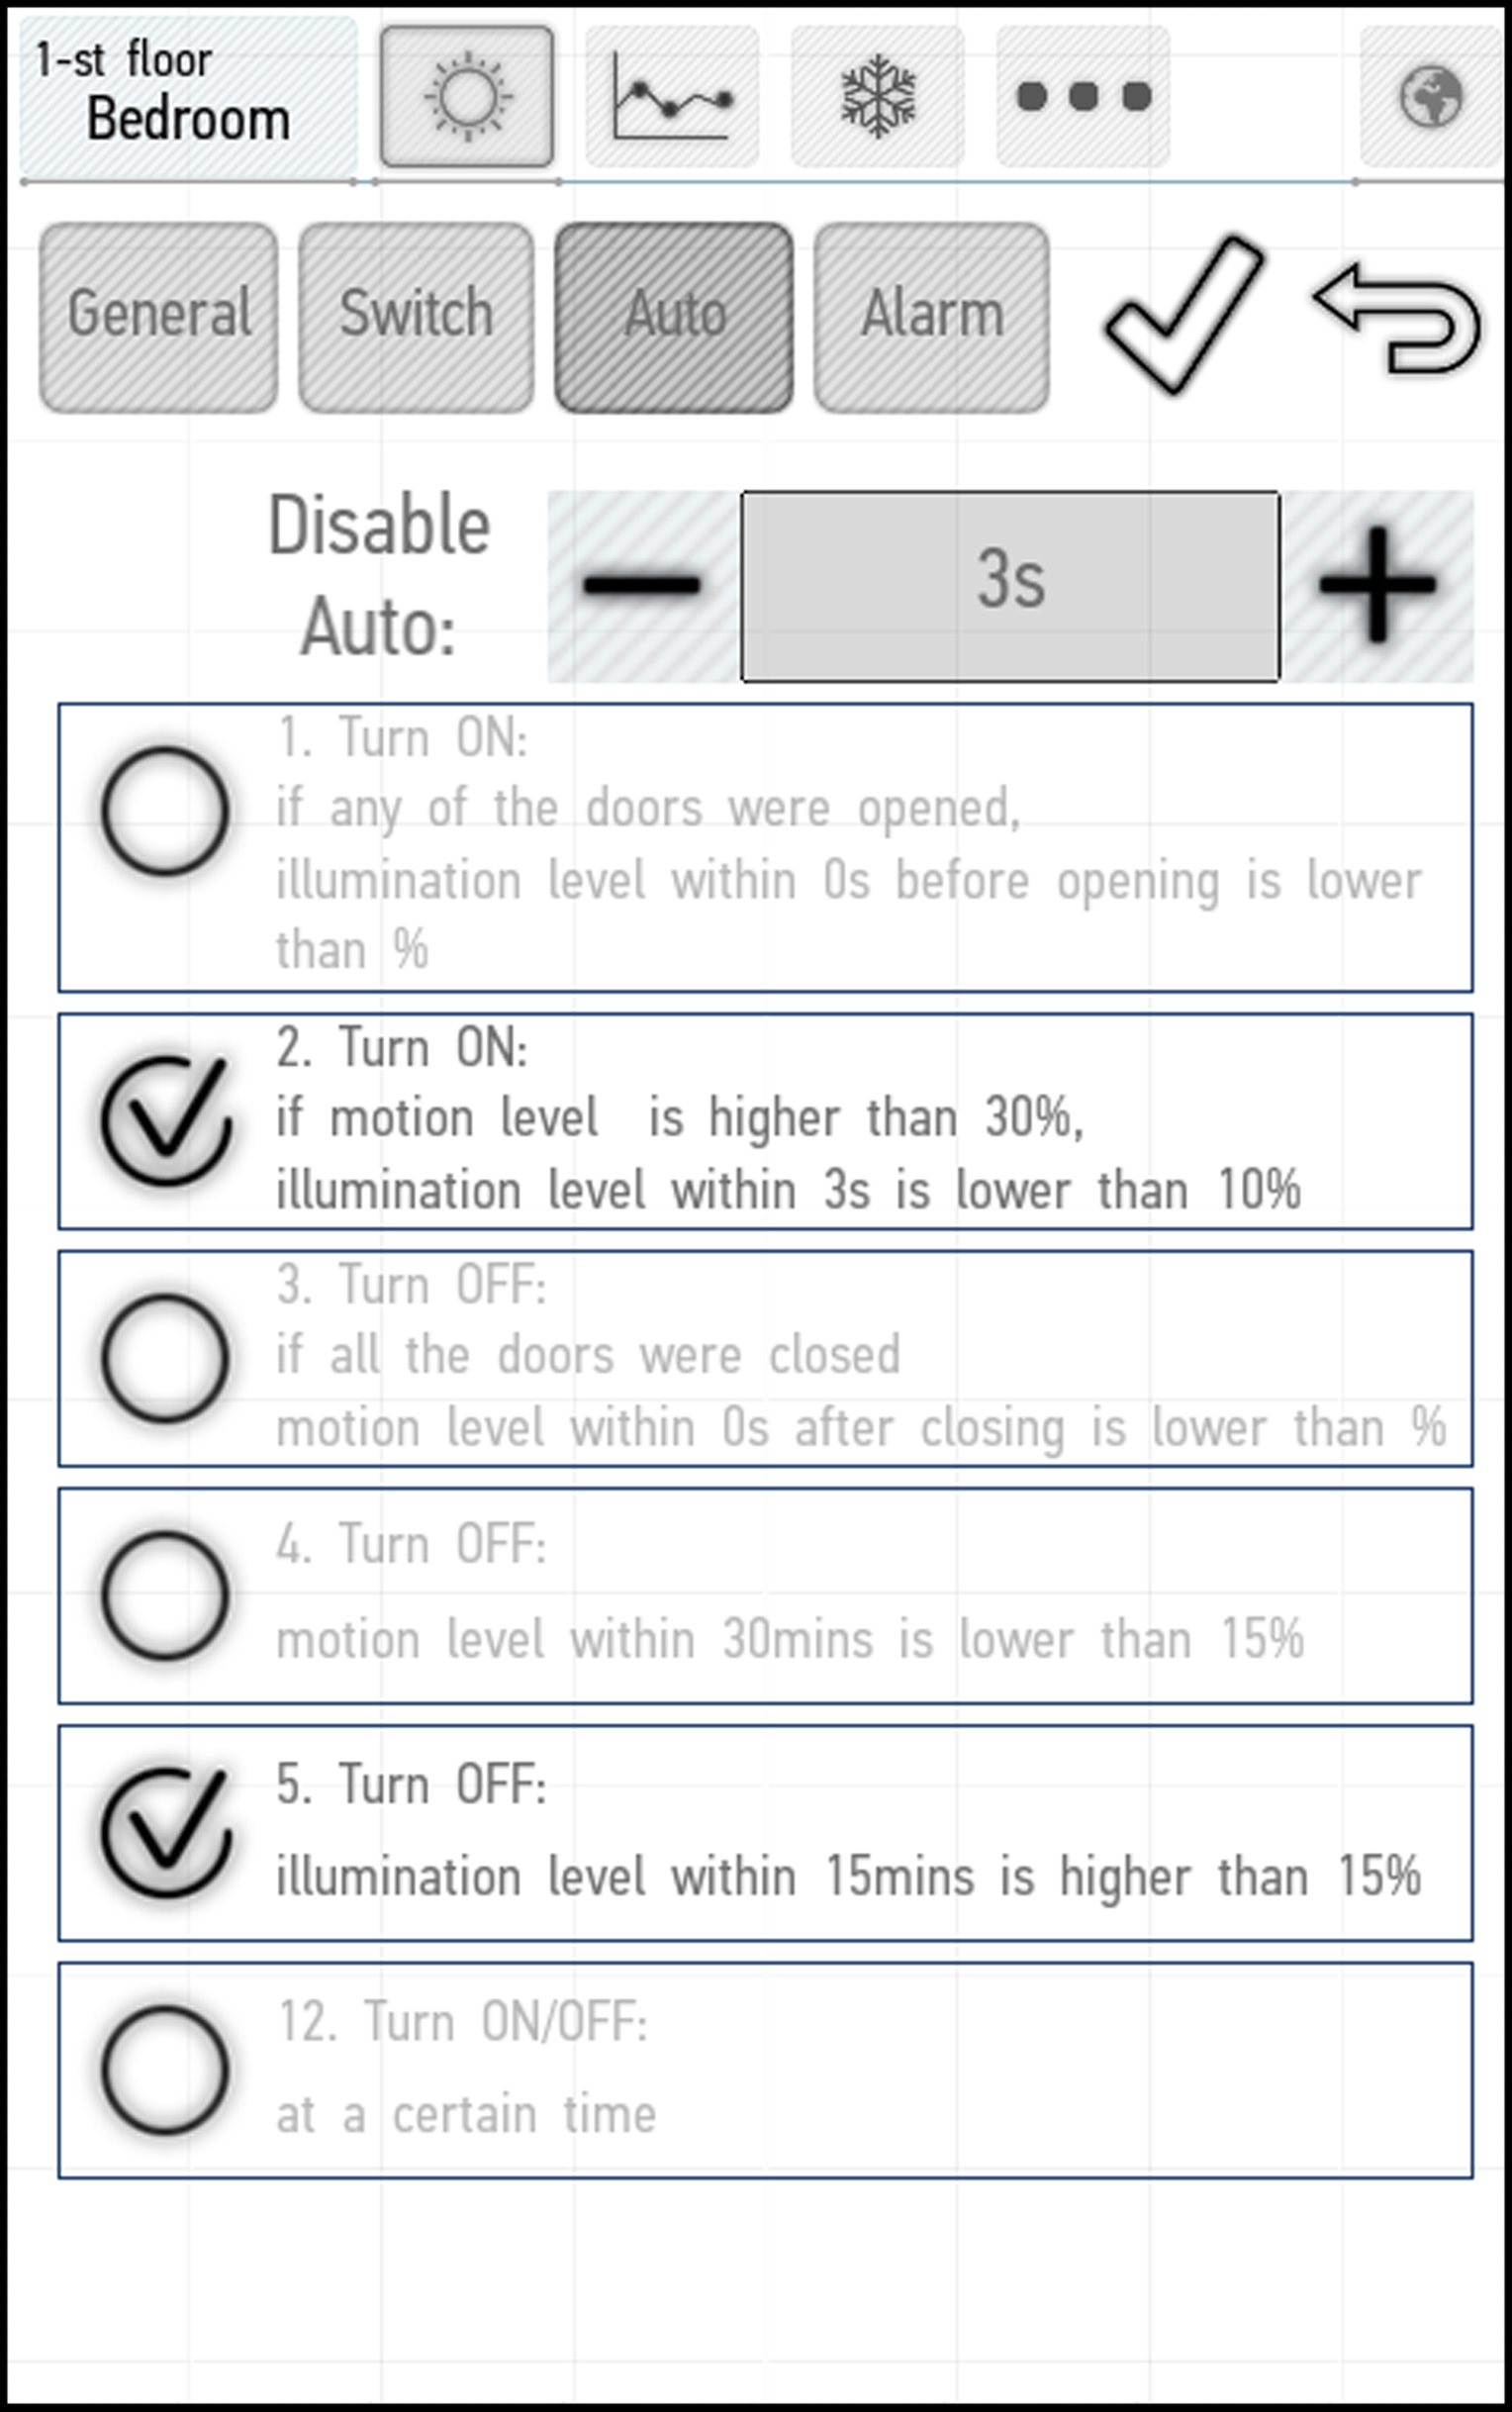
Затем выберите элемент системы, автоматизацию которого вы хотите настроить, нажмите на него и удерживайте, пока не появится меню редактирования. Перейдите на вкладку Авто (Auto).

На вкладке представлены доступные настройки автоматизации. Имеется 13 вариантов настроек, которые доступны для различных элементов в различных сочетаниях.
Чтобы активировать нужную настройку, поставьте рядом с ней галочку. Можно выбрать несколько вариантов настроек одновременно.
Список настроек
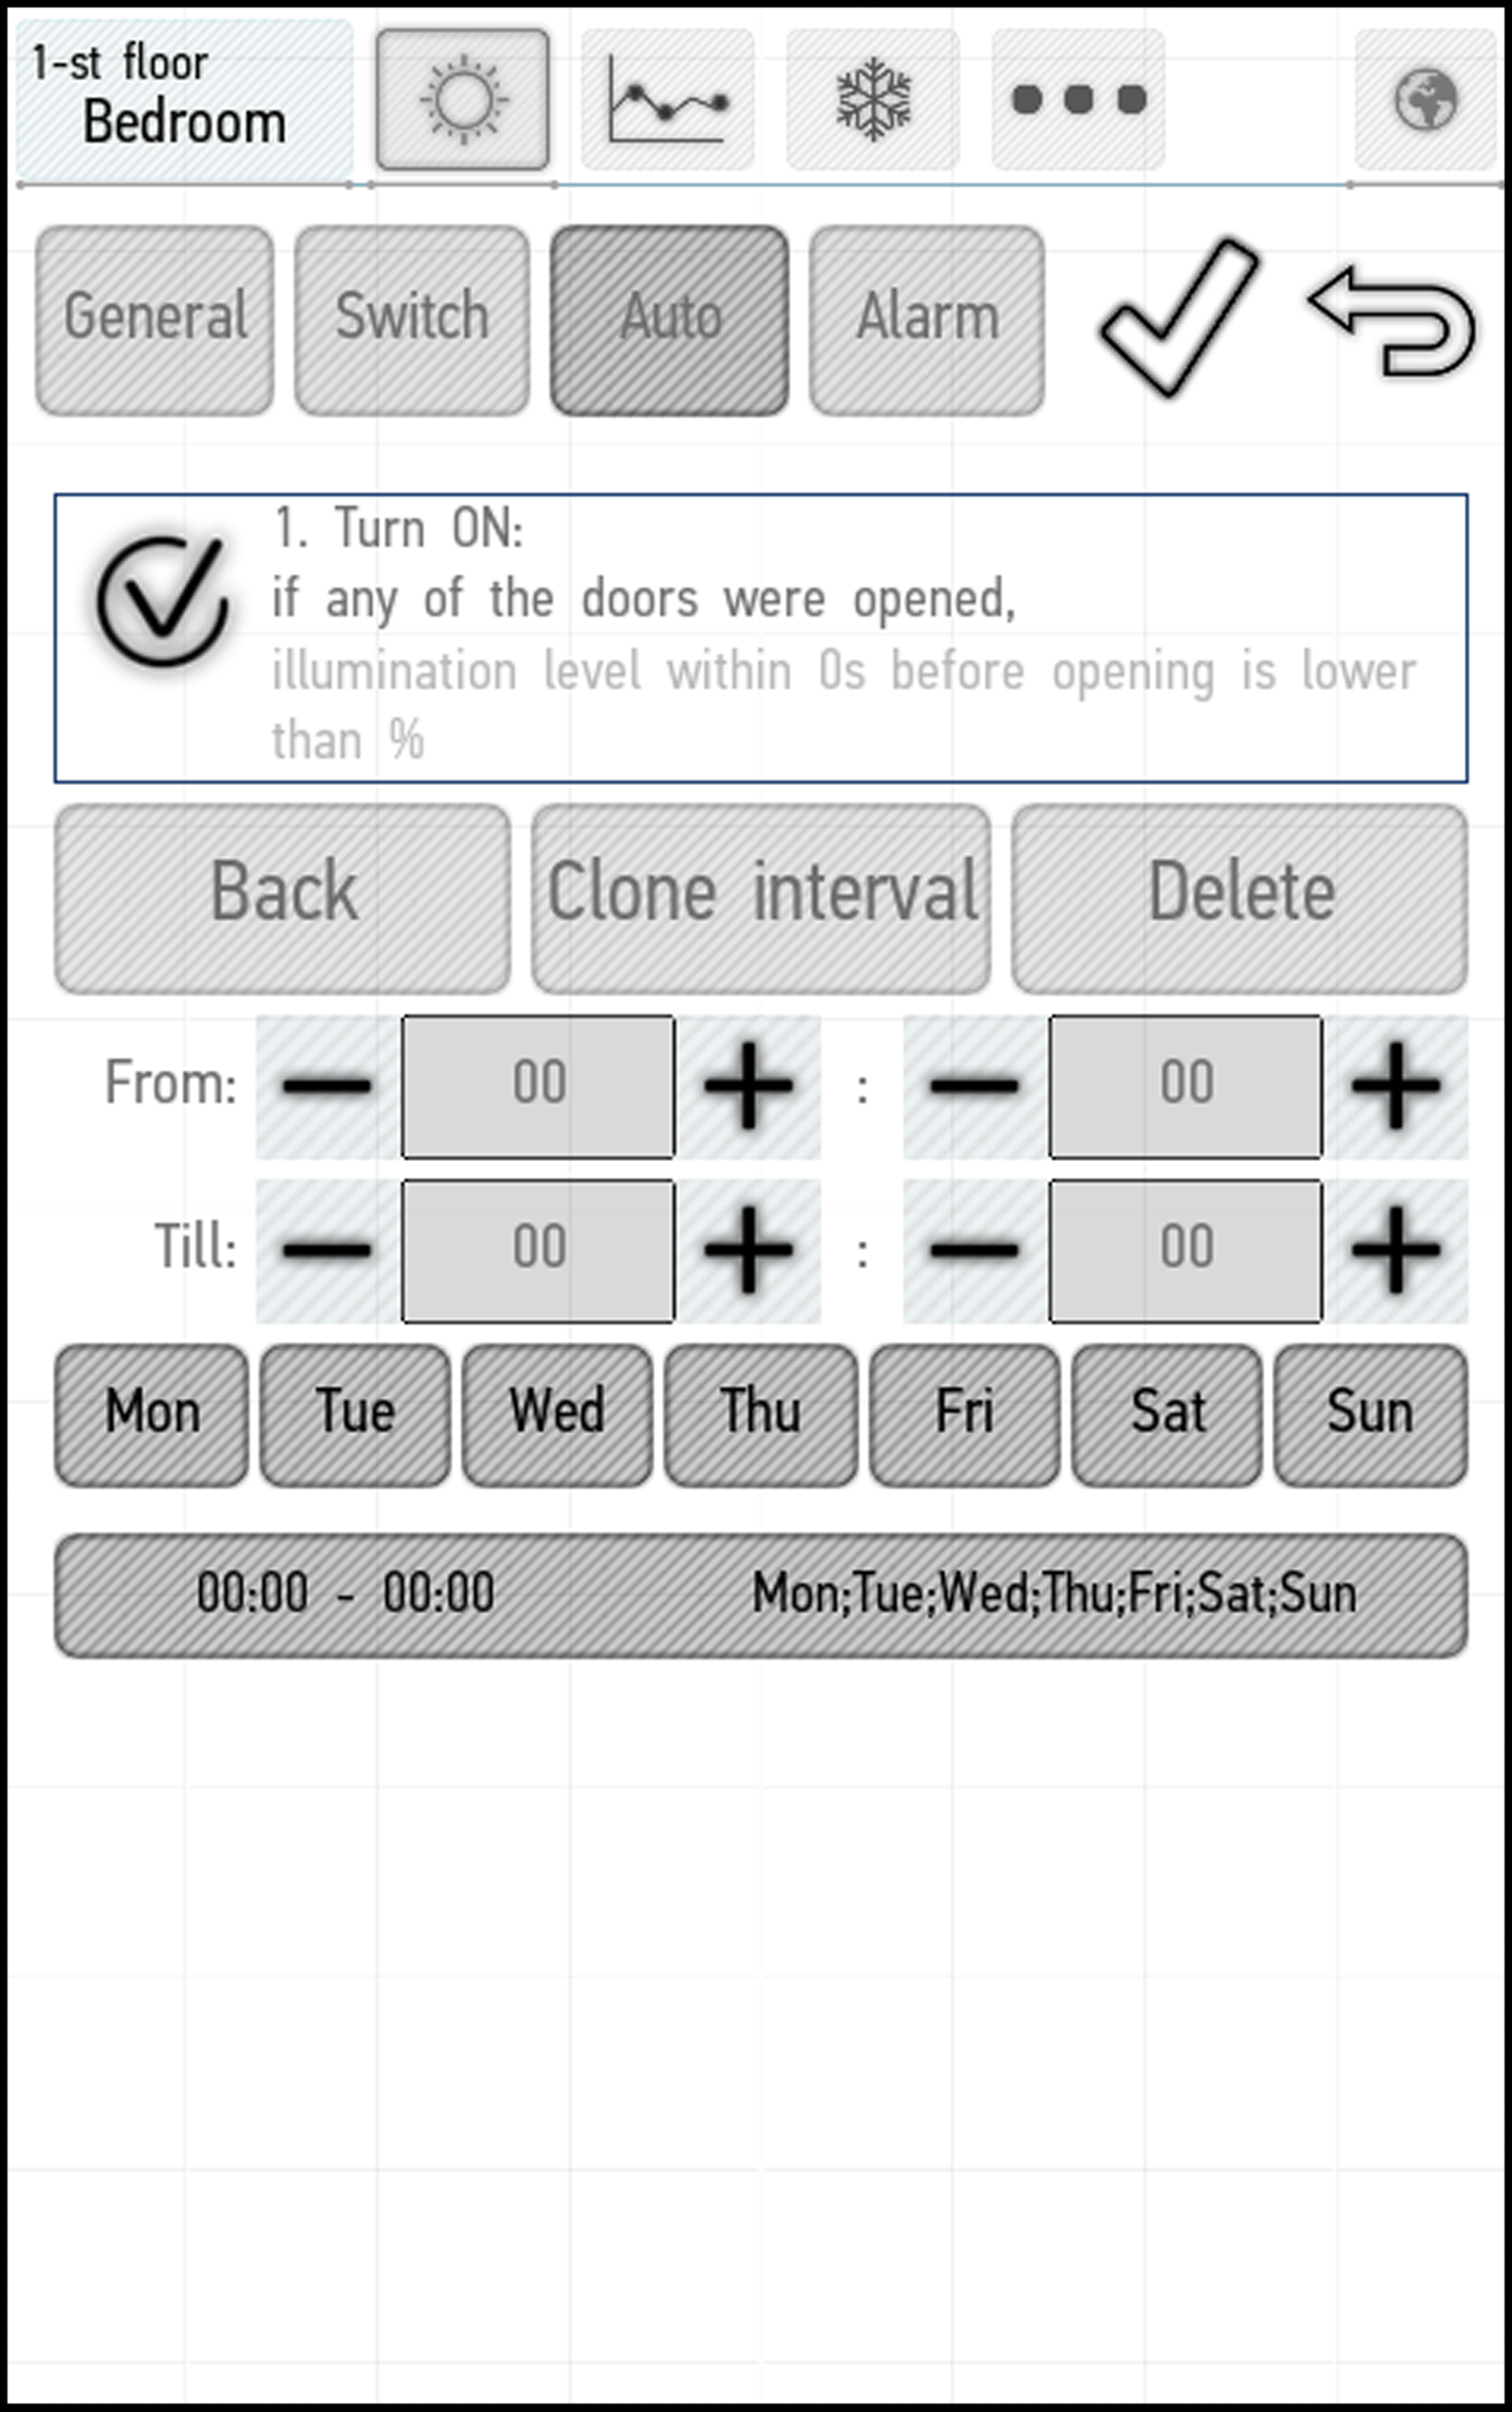
- Включить, если какая-либо дверь была открыта, а уровень освещенности за 3 секунды до этого был ниже 10%.
- Включить, если уровень освещенности за последние 10 секунд был ниже 10%, а уровень движения за последнюю секунду был выше 30%.
- Выключить, если все двери были закрыты, а уровень движения в течение 15 секунд после закрытия дверей был ниже 15%.
- Выключить, если уровень движения за последние полчаса был меньше 15%.
- Выключить, если уровень освещенности за последние 15 минут был выше 15%.
- Служебная
- Включить, если освещение было включено в течение последних 2 минут. Выключить через 2 минуты работы (для вытяжного вентилятора).
- Выключить, если влажность в течение последней минуты была на 20% выше влажности в течение последнего часа. Выключить, если влажность за последнюю минуту была на 10% ниже влажности за последний час (для вытяжного вентилятора).
- Открыть жалюзи, если уровень освещенности за последние 10 минут был выше 20%.
- Закрыть жалюзи, если уровень освещенности за последние 10 минут был ниже 10%, уровень движения был выше 30% или был включено освещение.
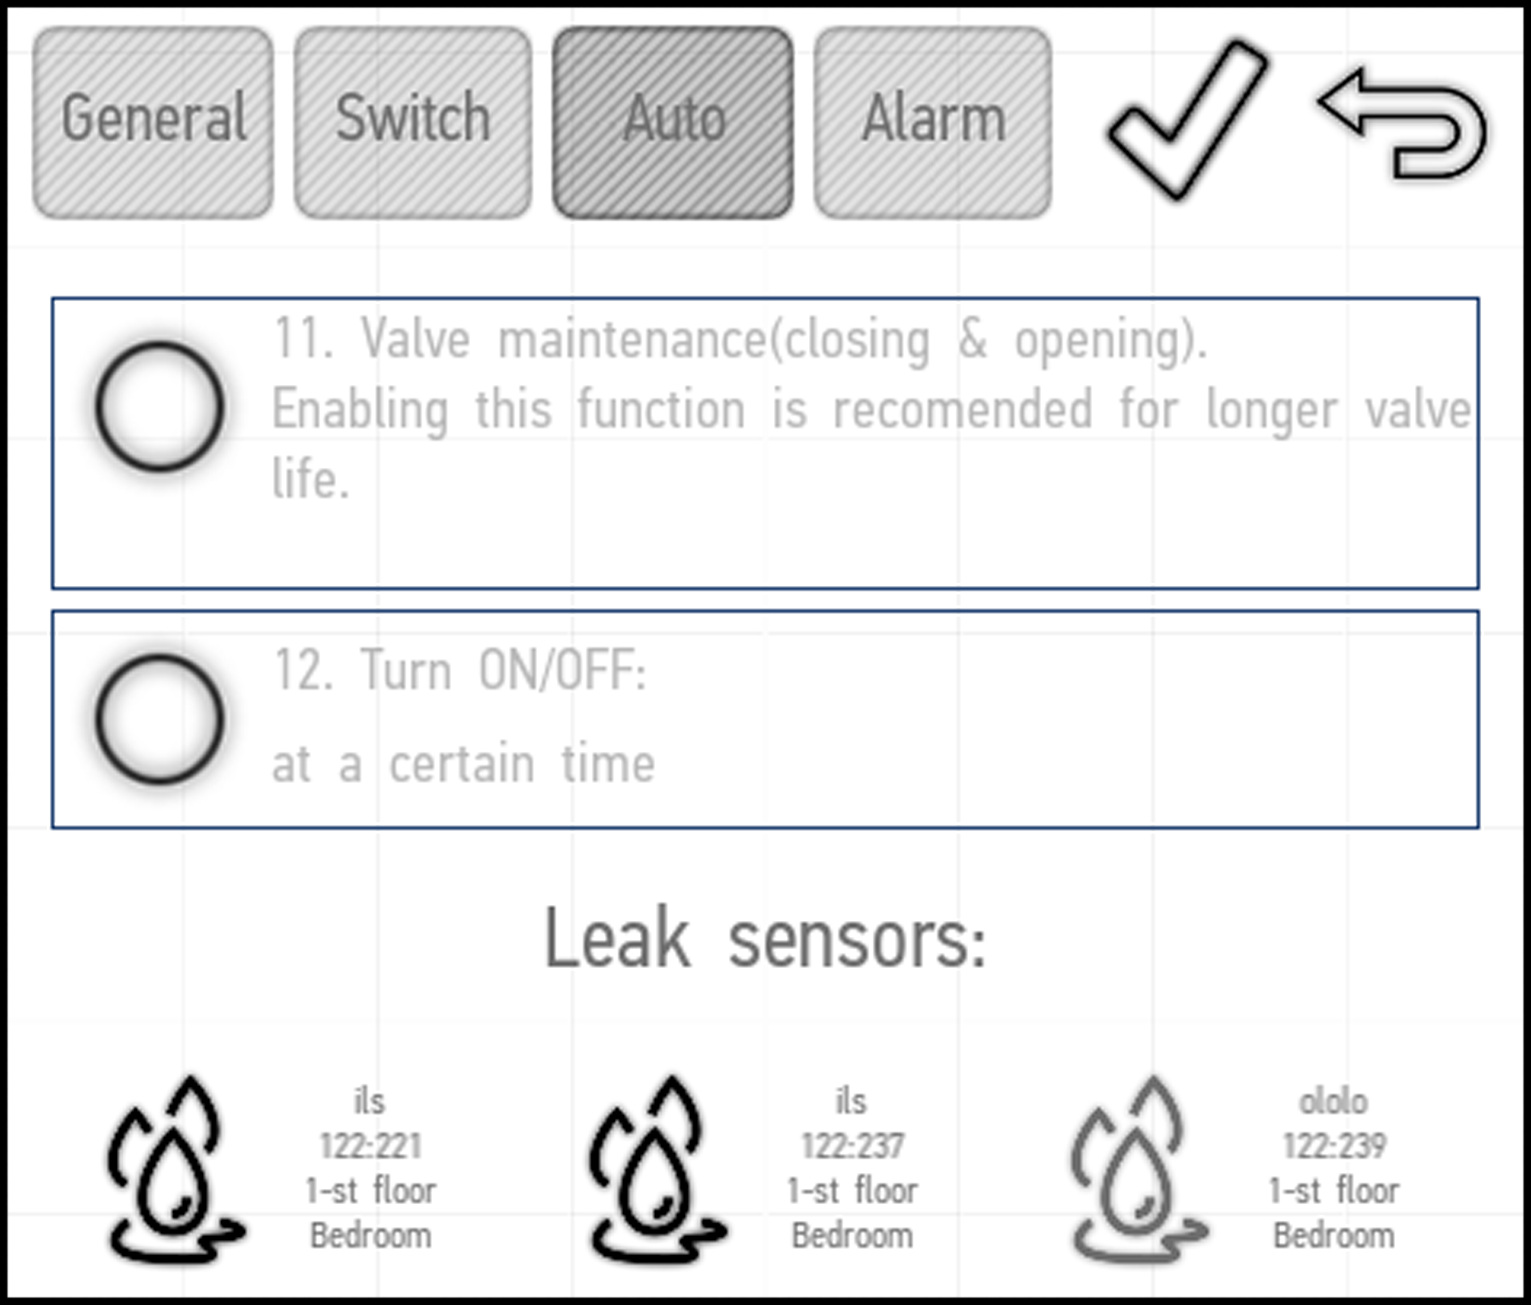
- Техническое обслуживание клапана: открытие и закрытие. Рекомендуется для увеличения срока службы клапана.
- Включать и выключать в указанное время.
- Включать и выключать одновременно с другим устройством.
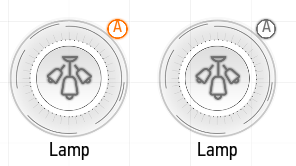
Оранжевая буква «А» в правом верхнем углу указывает на активированный режим автоматизации. Если значок серый, автоматизация временно отключена.
Изменение параметров
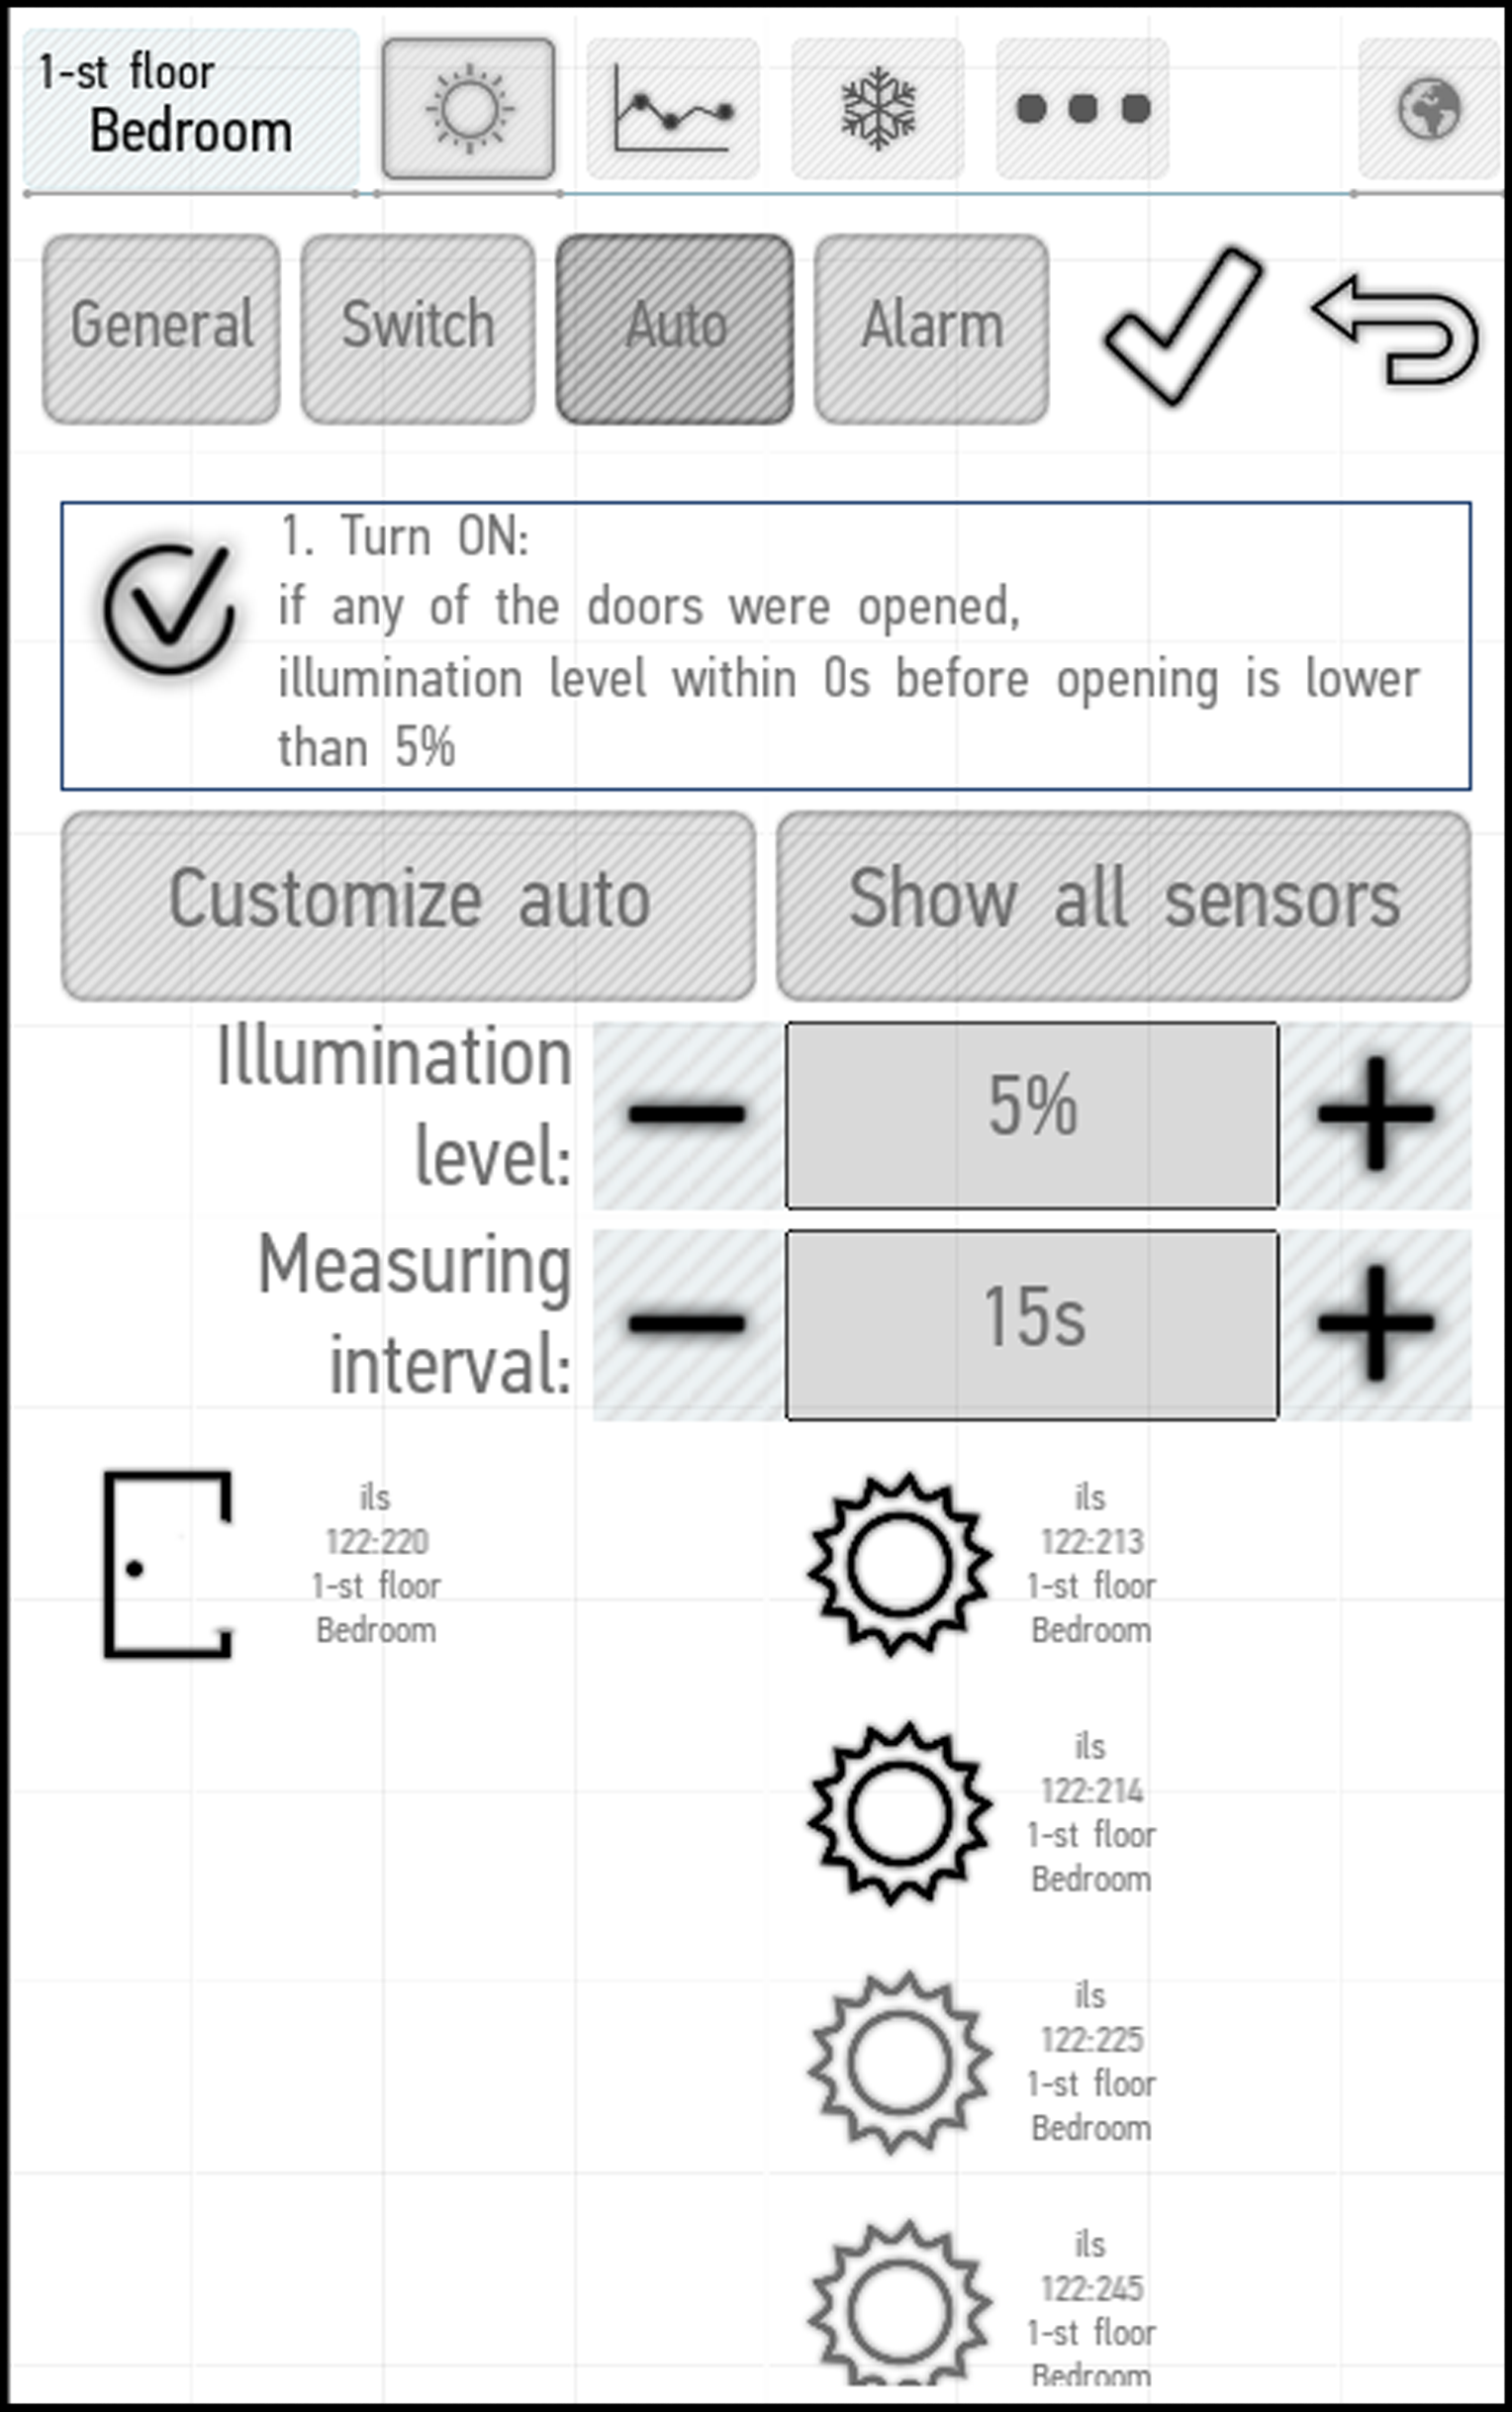
Нажав на название и описание режима, вы откроете меню, в котором сможете изменить параметры. Отключение/включение датчиков соответственно изменяет функциональность. Например, в настройке автоматизации № 2 (Setting No. 2), для которой требуются данные от датчиков движения и освещения, если выбран только один тип датчика, система будет использовать только этот выбранный тип (и срабатывать только при освещении/движении).
На скриншоте ниже показано соответствующее меню для настройки №1 (Setting No.1).
Создание интервала
Вы можете использовать кнопку «Настройка автоматизации» (Customize auto), чтобы установить интервал работы для автоматических режимов. Для этого нажмите кнопку «Настройка автоматизации» (Customize auto), а затем «Создать интервал» (Create interval). Появится следующее окно:
Поля От (From) и До (To) позволяют соответственно установить время включения и выключения режима автоматизации. Семь кнопок под этими полями позволяют установить дни недели, в которые будет активирован режим.
По умолчанию интервал установлен с 00:00 до 00:00 на все 7 дней недели. Вы можете ограничить его или создать другой интервал с помощью кнопки Создать интервал (Create interval).
Если вы хотите скопировать существующий интервал, нажмите кнопку Клонировать интервал (Clone interval). Чтобы удалить выбранный интервал, нажмите кнопку Удалить (Delete).
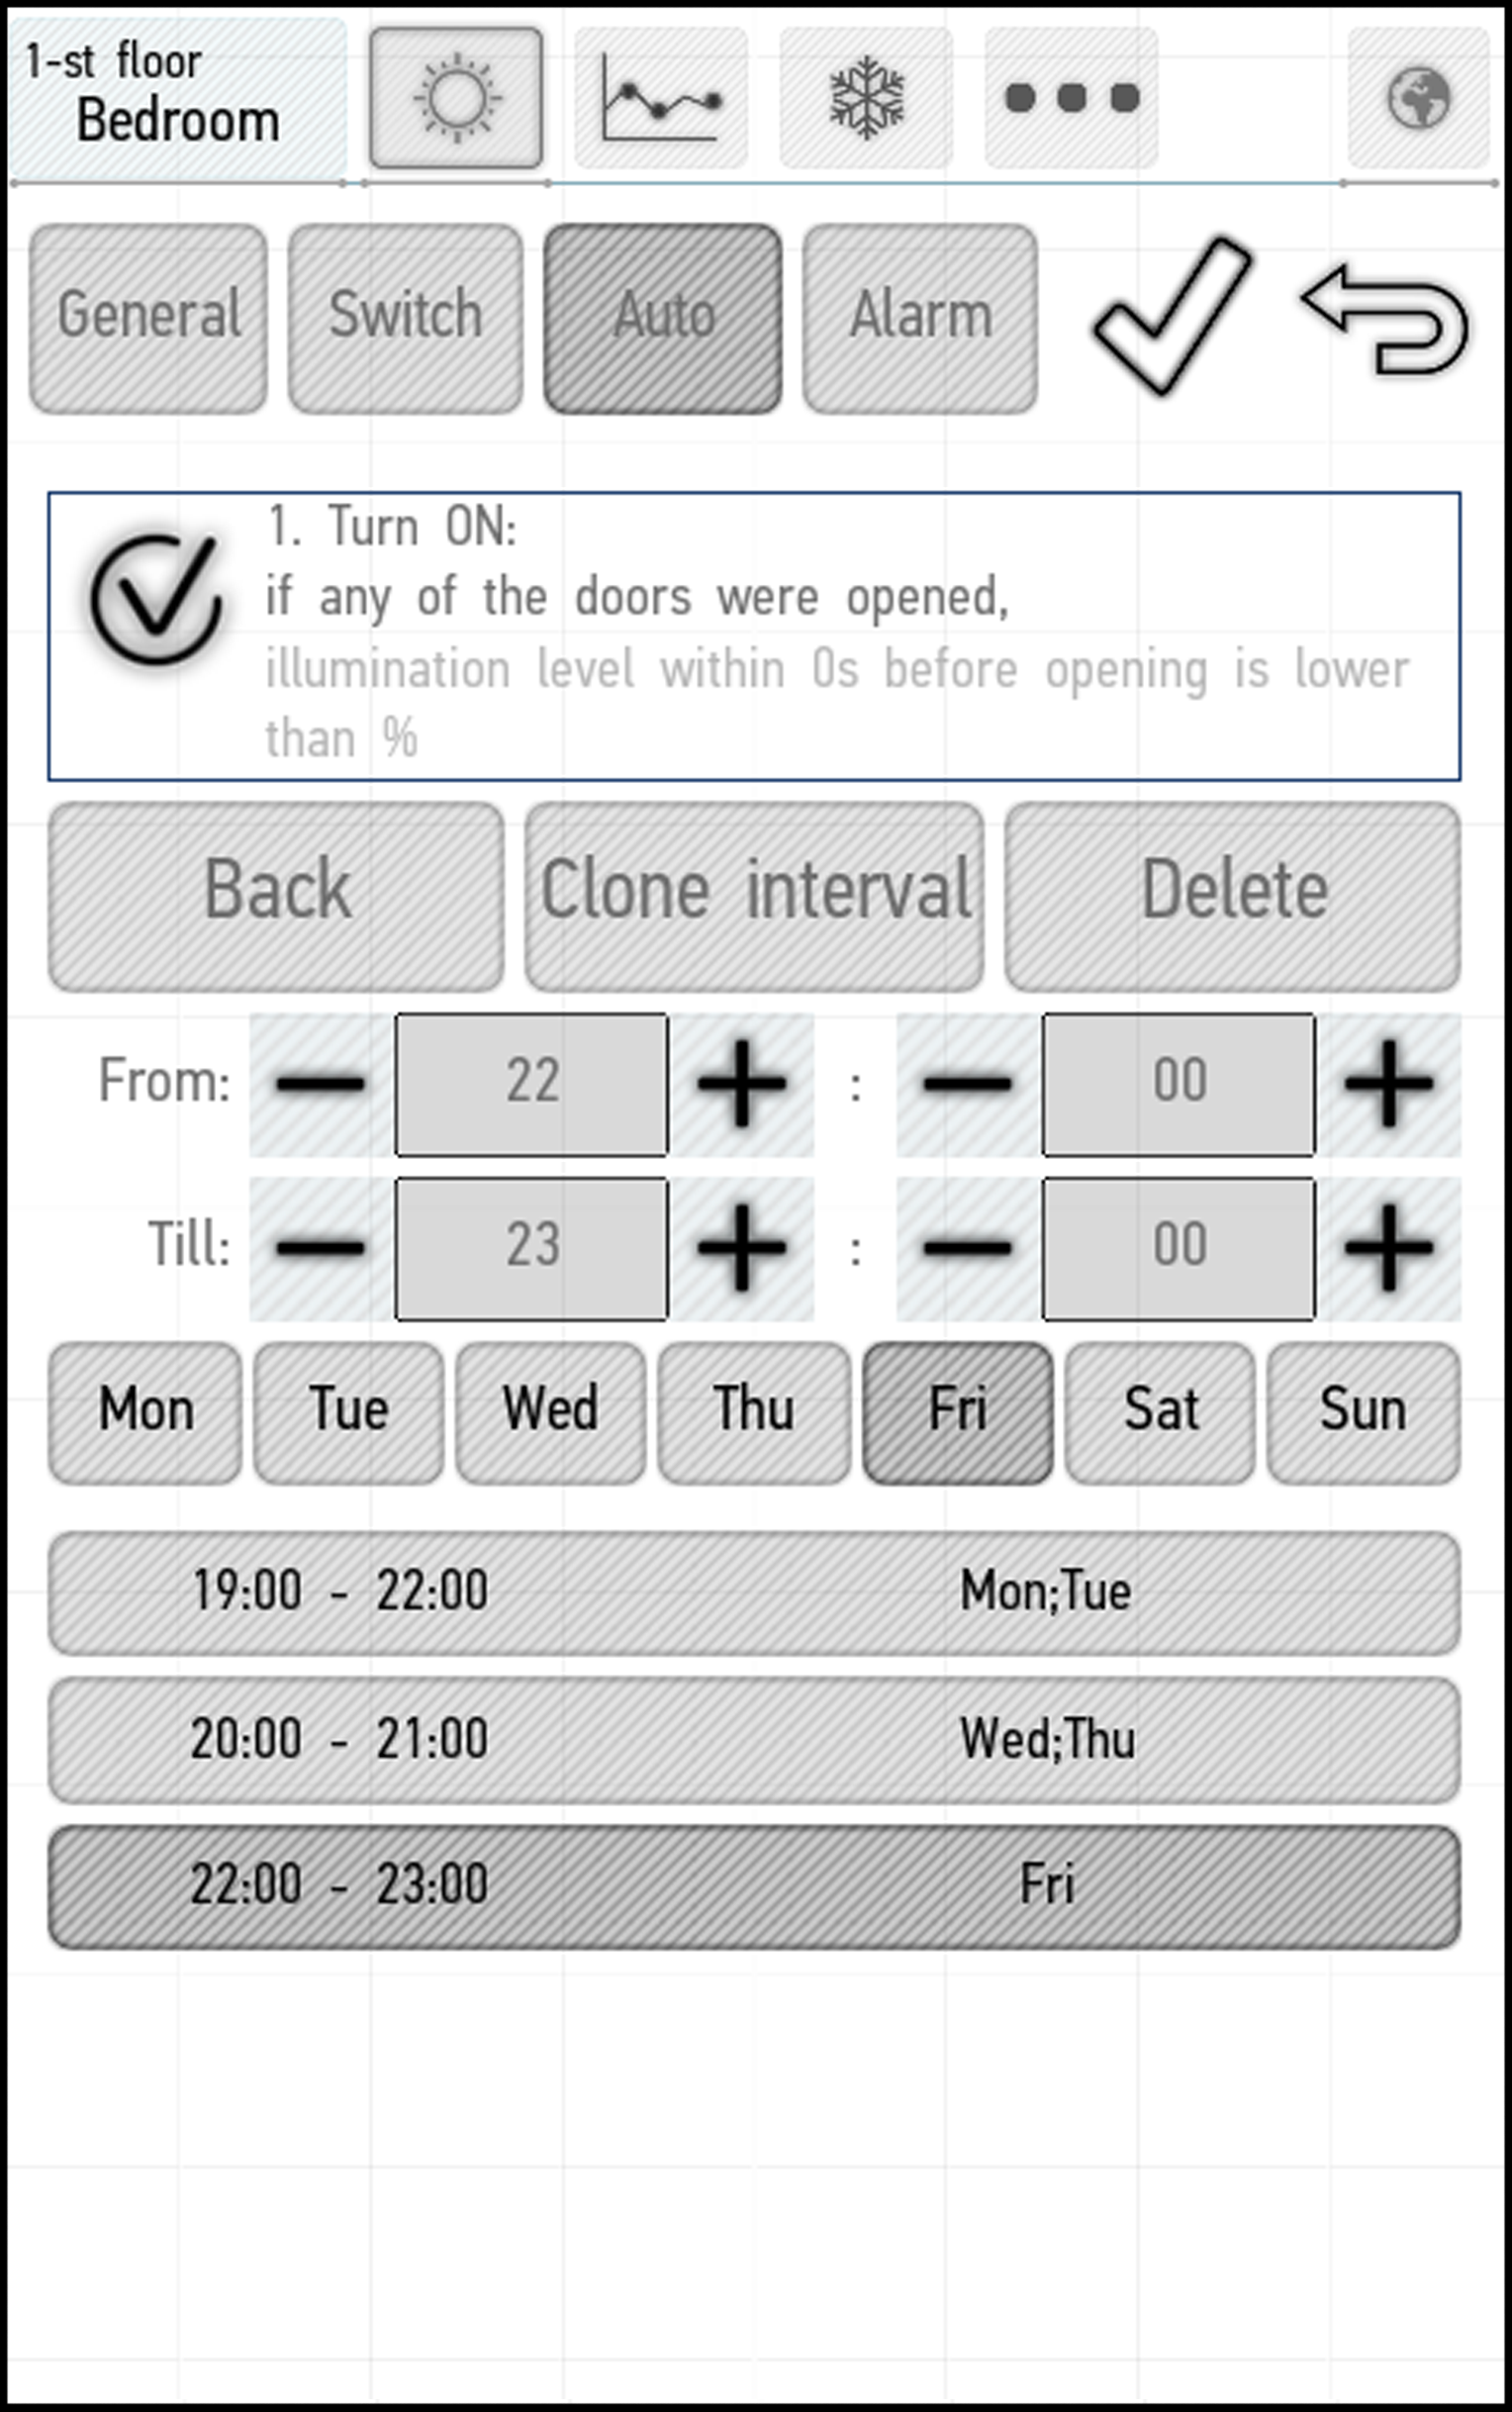
Вы можете создать желаемое количество интервалов. В приведенном ниже примере мы создали интервалы, активирующие режим с 19:00 до 22:00 по понедельникам и вторникам, с 20:00 до 21:00 по средам и четвергам и с 22:00 до 23:00 по пятницам. Чтобы выйти из меню, нажмите кнопку Вернуться назад (Back).
Изменение параметров
С помощью кнопок «-» и «+», как показано на скриншоте ниже, вы можете изменить значения параметров, запускающих систему.
С помощью кнопок «-» и «+» в поле «Уровень освещения» (Illumination Level) можно изменить уровень освещения, при котором будет включаться свет. Аналогичным образом используйте поле Интервал измерения (Measuring interval), чтобы изменить интервал, в течение которого показатели освещенности будут округляться до ближайшего значения.
Набор параметров может различаться для каждой настройки.
500px
Connecting and disconnecting sensors
In the edit menu you can select the sensors that will be connected. In order to use the automation settings, you normally need to select at least one sensor that measures the parameters specified in the settings (unless some sensors are not required). For example, if the setting features measuring the levels of illumination and motion, you need to connect at least one illumination sensor and/or one motion sensor.
By default, only the sensors from the current room are visible. When the Show all sensors button is active, the sensors from other rooms will be added to the menu for selection.
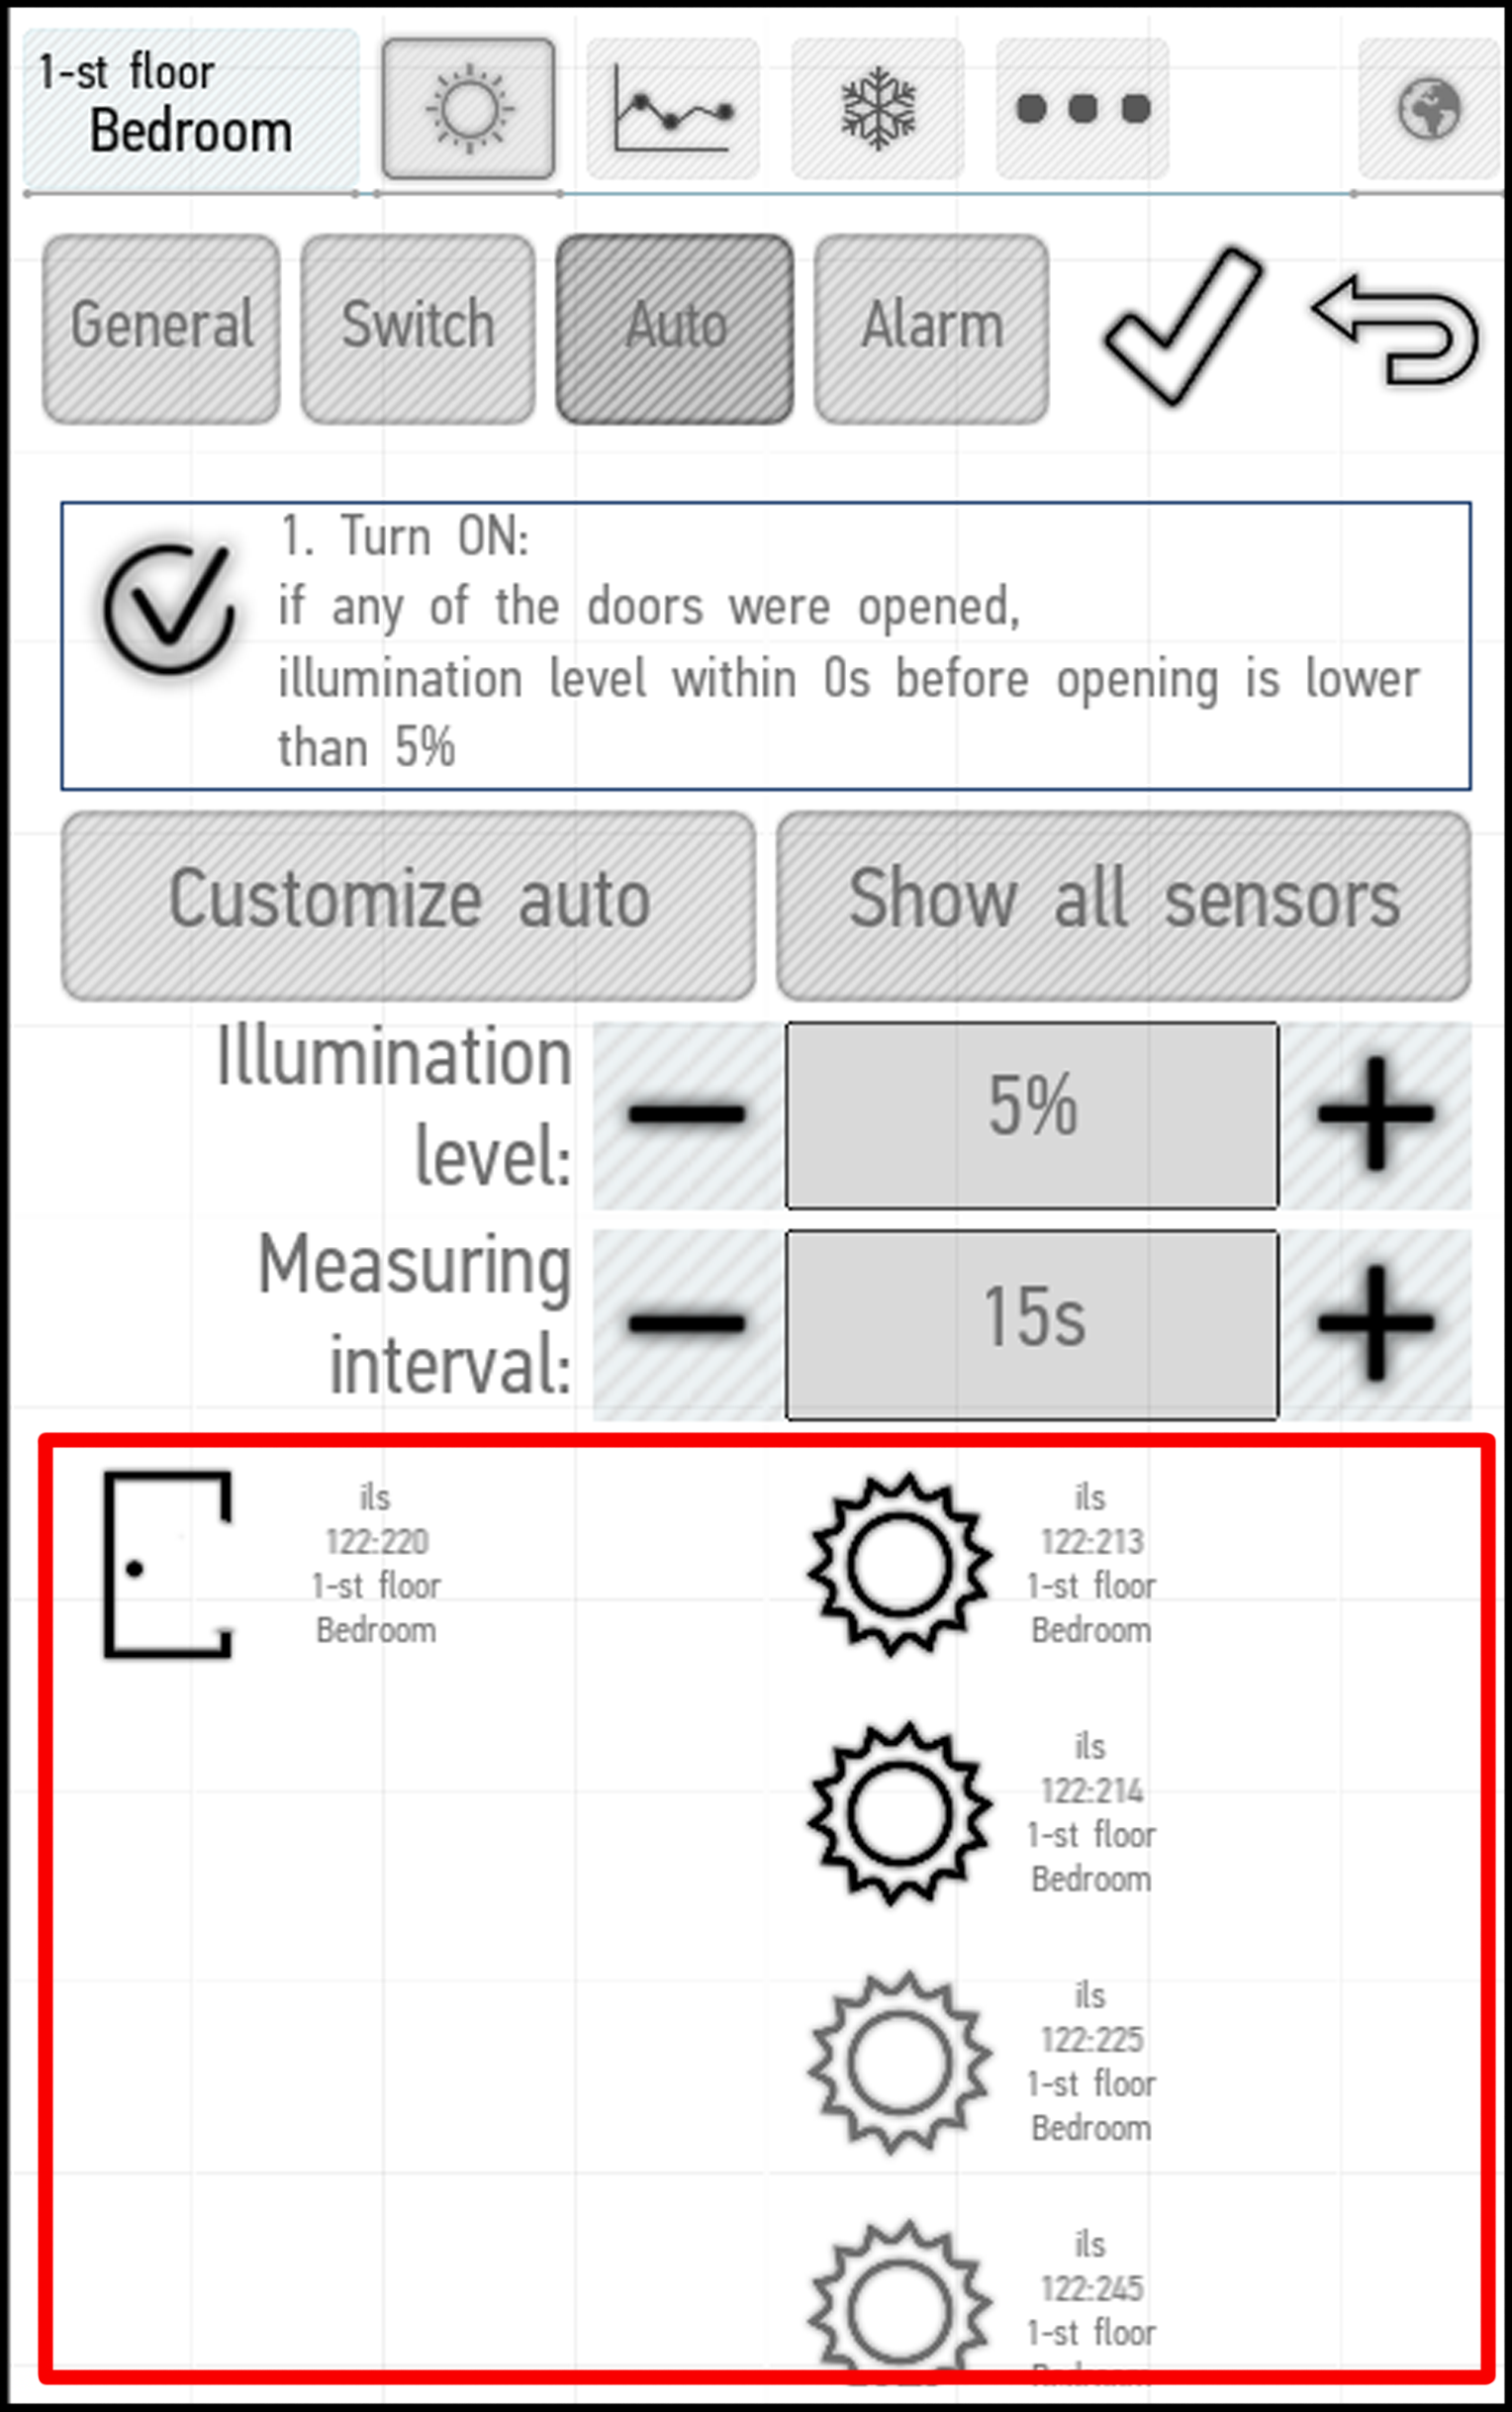
Available sensors can be selected in the lower part of the window. One click on the sensor is sufficient to do this action. Connected sensors are highlighted in orange.
If several humidity, illumination or temperature sensors are connected, then their average value is used in the setup. When connecting multiple motion sensors, the system action will be triggered if at least one of connected sensors detects motion.
In the valve automation settings menu, leak sensors can be connected. When the selected sensor reports leakage, the valve will be automatically closed. You will not be able to open it via the application until the leak sensor is reset/disabled.
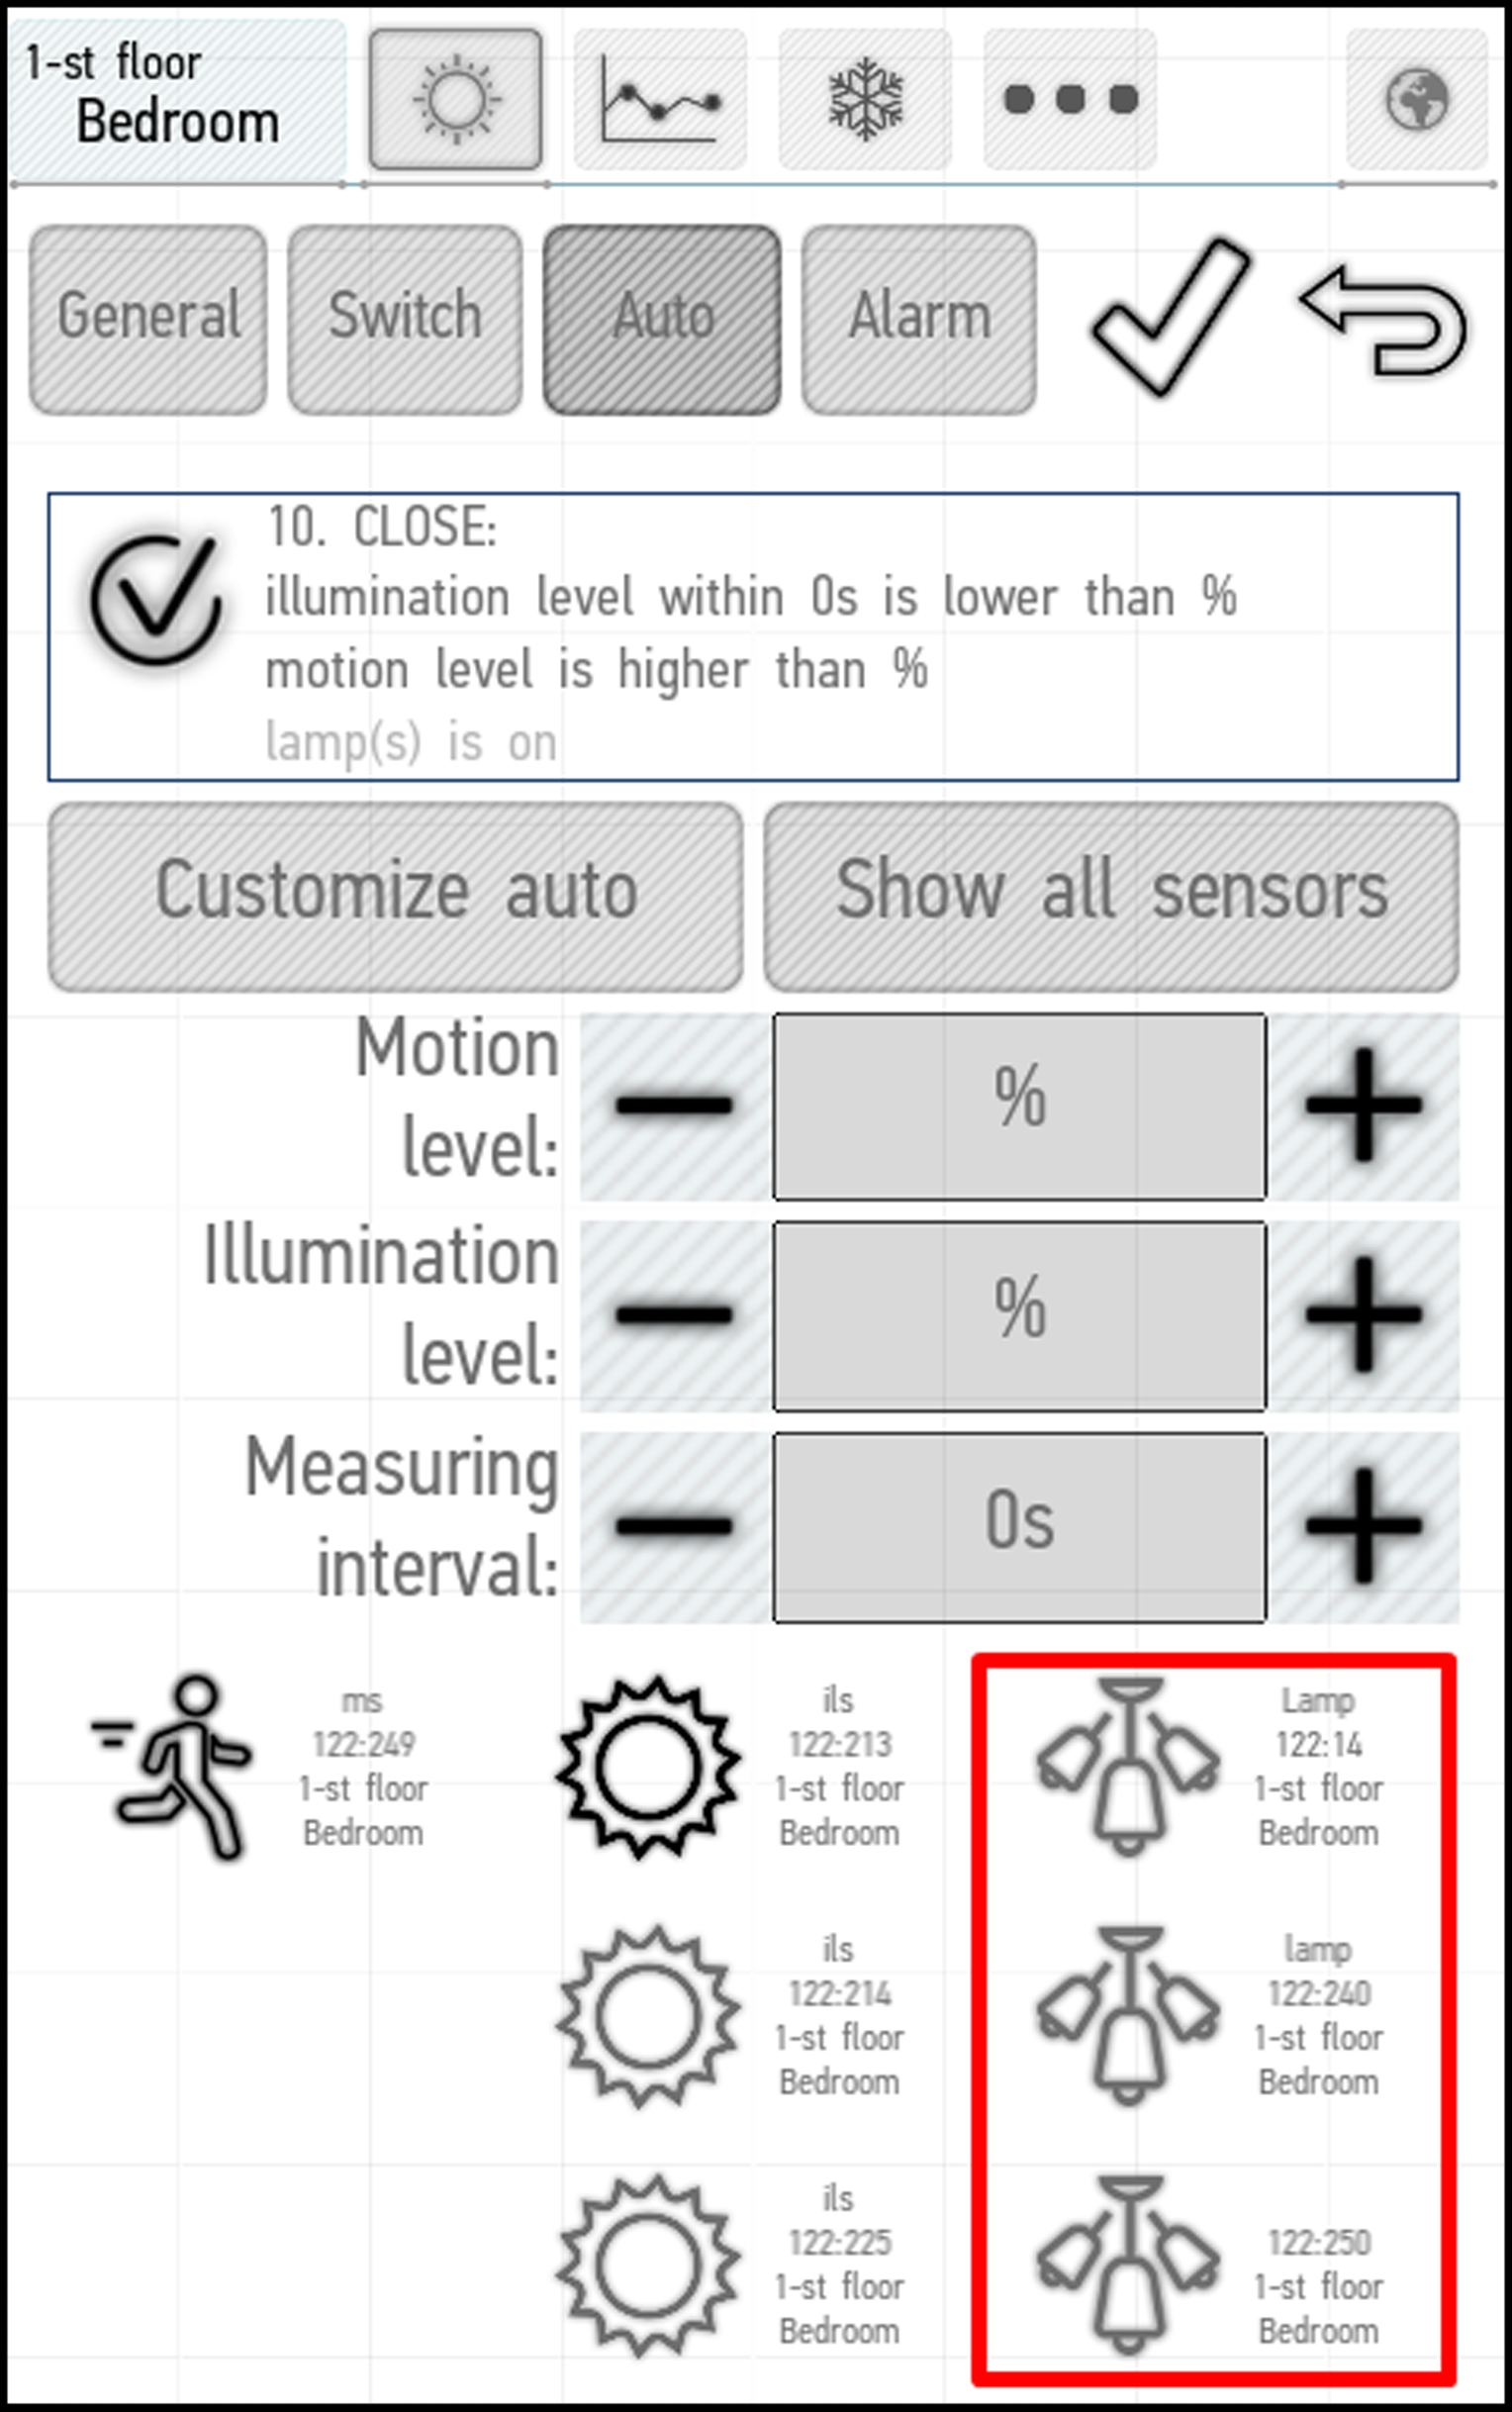
In Setting No.10 for blinds you can select a light, whose turning on will trigger the closing of the blinds:
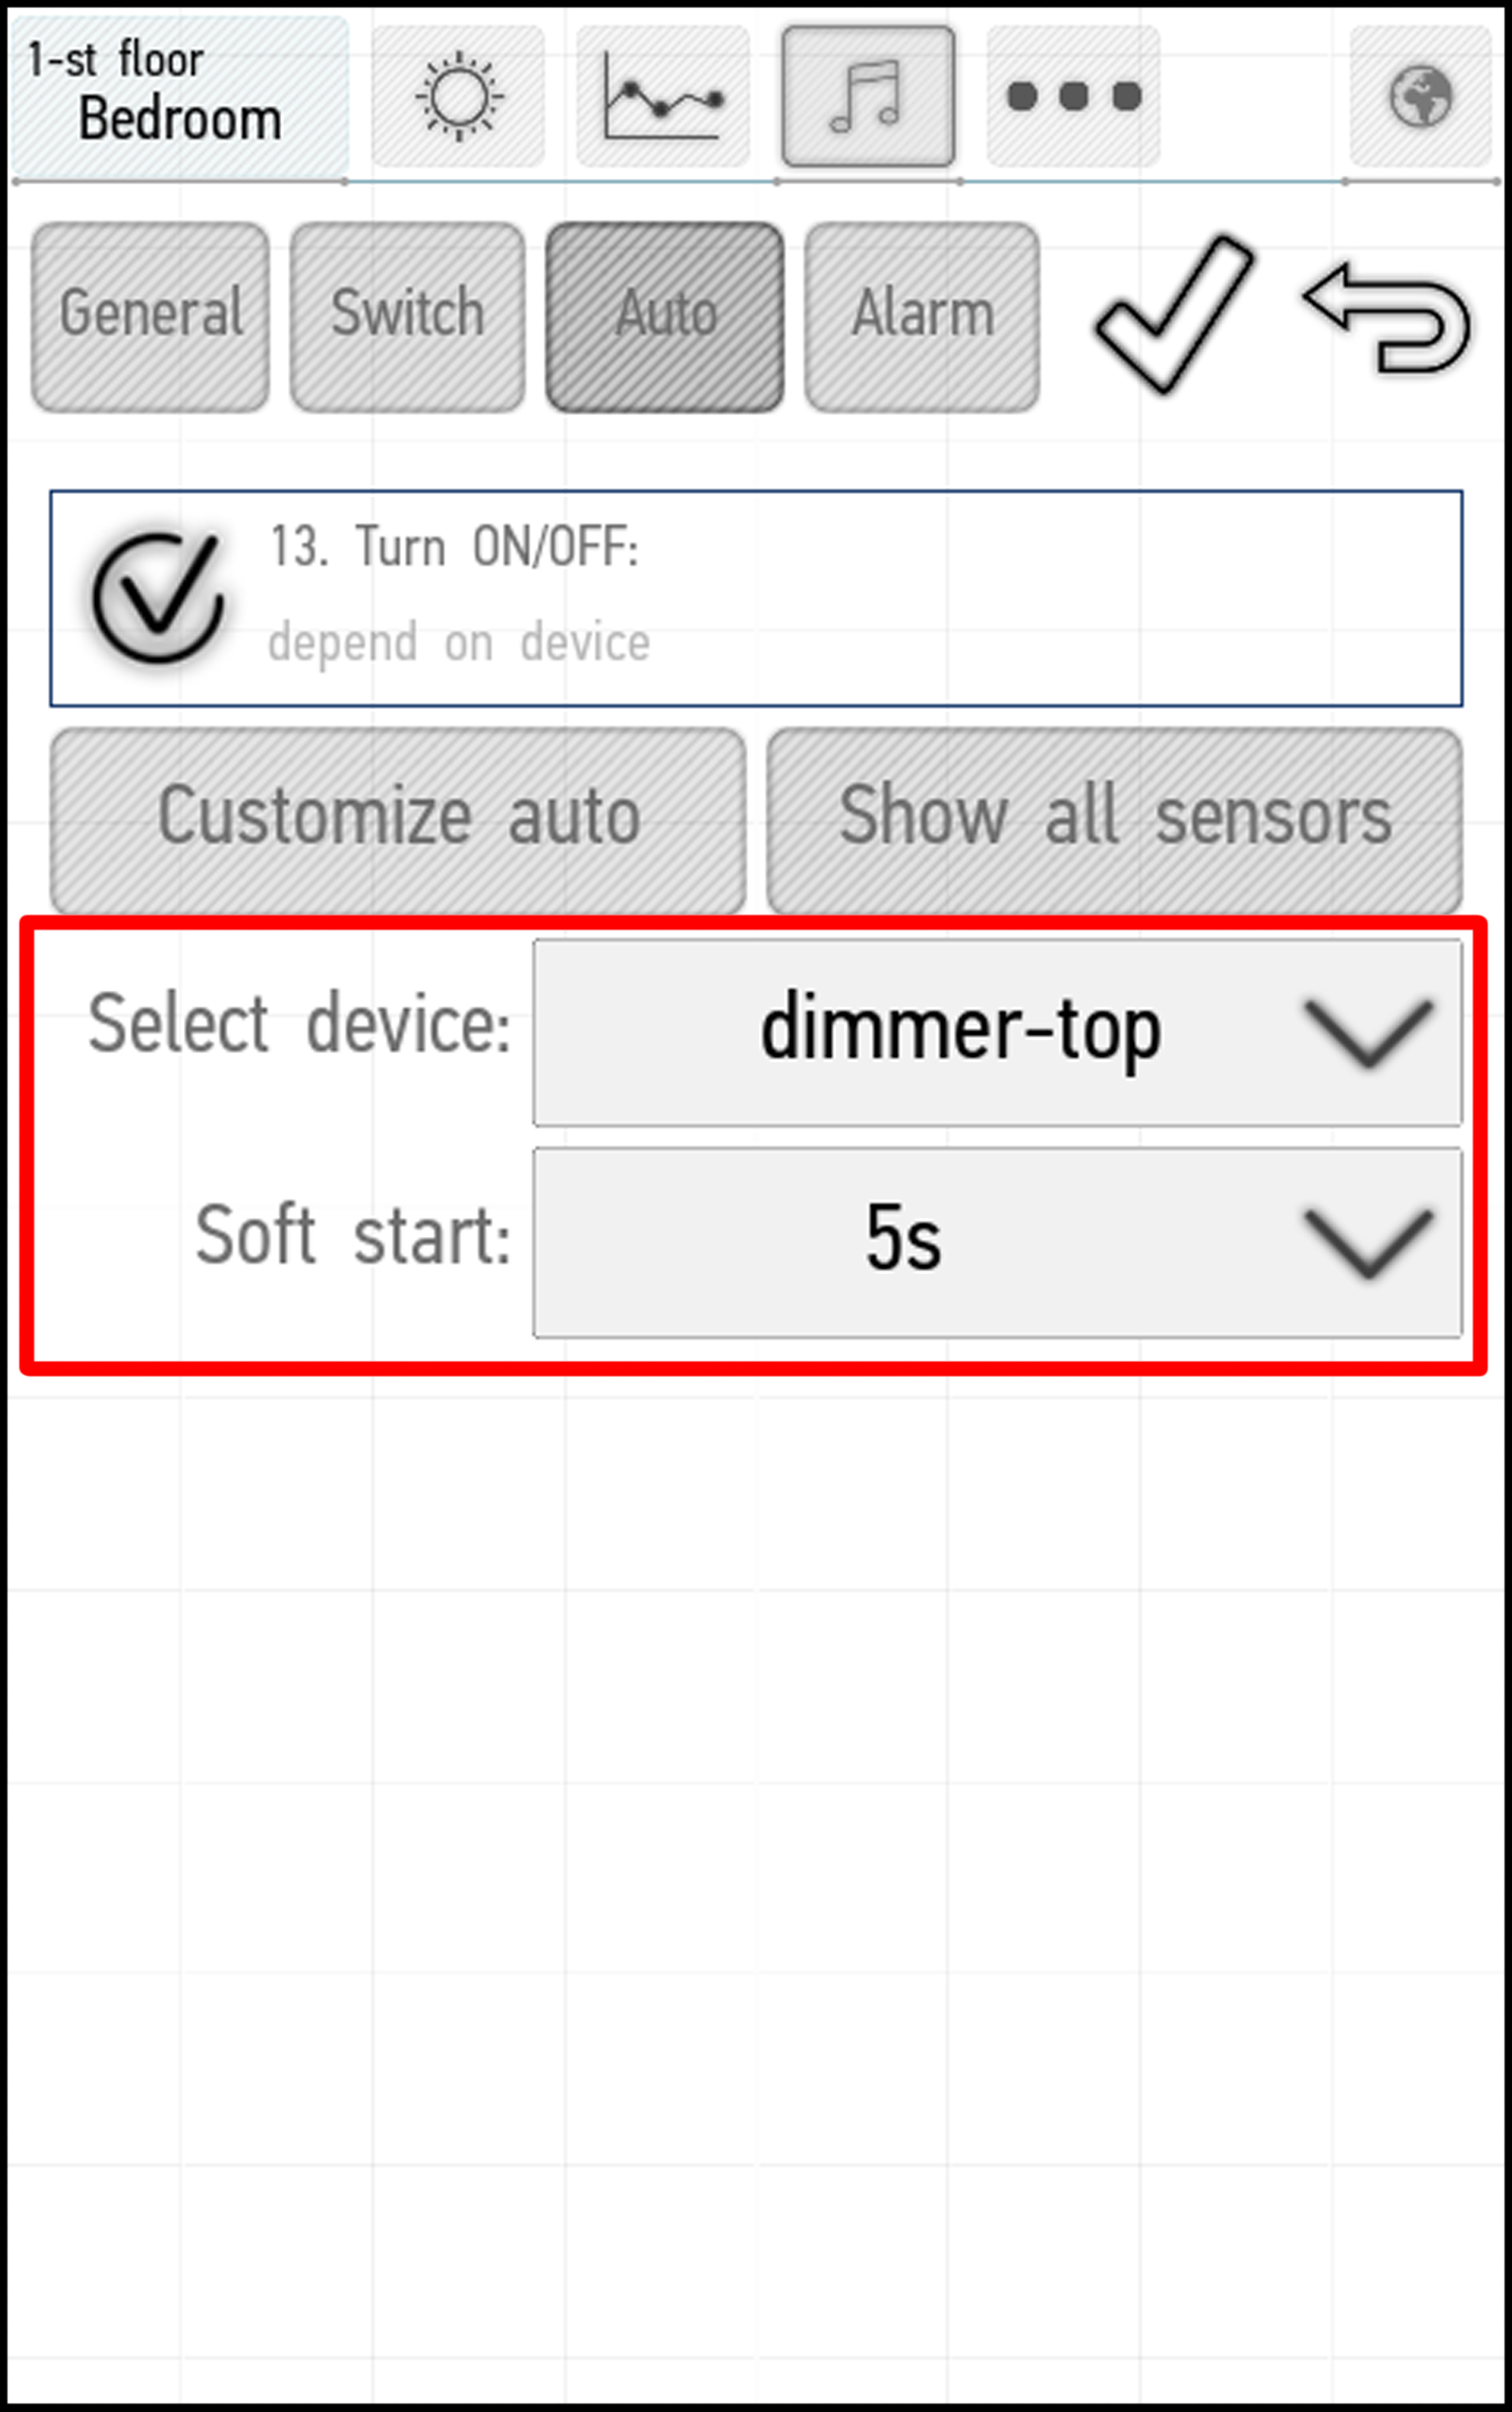
In Setting No.13, you can select an item, whose activation will simultaneously trigger music playing via multiroom. Click on Select device to perform this action. The Soft start parameter defines the period within which the music volume will increase to the specified level.
Disabling automation after its start
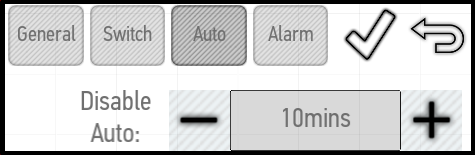
Using the Disable auto parameter you can select the period after manually changing the state of the item (not by automation) during which the automation will not work. In the example below, we have set the value of this parameter to 10 minutes. This means that within the next 10 minutes after manually changing the state of the item, the automation settings will be inactive. After 10 minutes, the automation will start.
A long button press will disable automation for the lights which this button is bound to. In this case, the automation will be turned off until the next change performed manually (unless a different action is specifically assigned to the ‘long press’).
Examples of Use
Lighting
Lighting of the corridor, rooms, and bathrooms can be fully automated using Settings No.1, 2, 3 and 4. The light will be turned on when you open the door or when the motion is detected in the room, provided that the illumination level is lower than 10%. The light will be turned off when you close the door and the motion level is low (15%) within 15 seconds. It means that when everyone leaves the room, the system can turn off the light after 15 seconds, instead of waiting for a long time.
Settings No.2 and 4 are suitable for courtyard lighting. The light will be turned on when the motion is detected if the illumination level is lower than 10%. It will be turned off if within the last half hour the motion level is not higher than 15%.
For night lighting lamps Setting No.5 can be enabled: as a result, the lamps will automatically be turned off if the illumination level within last 15 minutes is higher than 15%.
To configure simultaneous turning on or off, use Setting No.12.
Fan
Setting No.7 is designed for fans in WC facilities. The fan will start operating 2 minutes after the light in the bathroom is turned off (and stay active for 2 minutes). Setting No.8 is designed for fans that reduce humidity. They will start if the humidity rises sharply by more than 20% and stop if humidity drops to the level lower than 10%. To configure simultaneous turning on or off, use Setting No.12.
Blinds
Setting No.9 opens the blinds when the illumination level increases to 20% within the last 10 minutes.
Setting No.10 allows you to close the blinds when the illumination level drops to less than 10% within last 10 minutes. Additionally, you can connect a motion sensor; then the blinds will close when the illumination level decreases and the motion level increases. You can also connect a lamp so that the blinds will close when it is turned on.
To configure simultaneous opening or closing, use Setting No.12.
Valve
The leak sensor can be bound to the valves (Valve). To bind, you need to select one or more sensors available on the Auto tab of the edit menu. Bound sensors are highlighted in orange.
After binding, the valve will automatically be closed when it receives a leakage signal from one of the bound sensors.
You will not be able to open it using the application until the leak sensor is reset/disabled via the app.
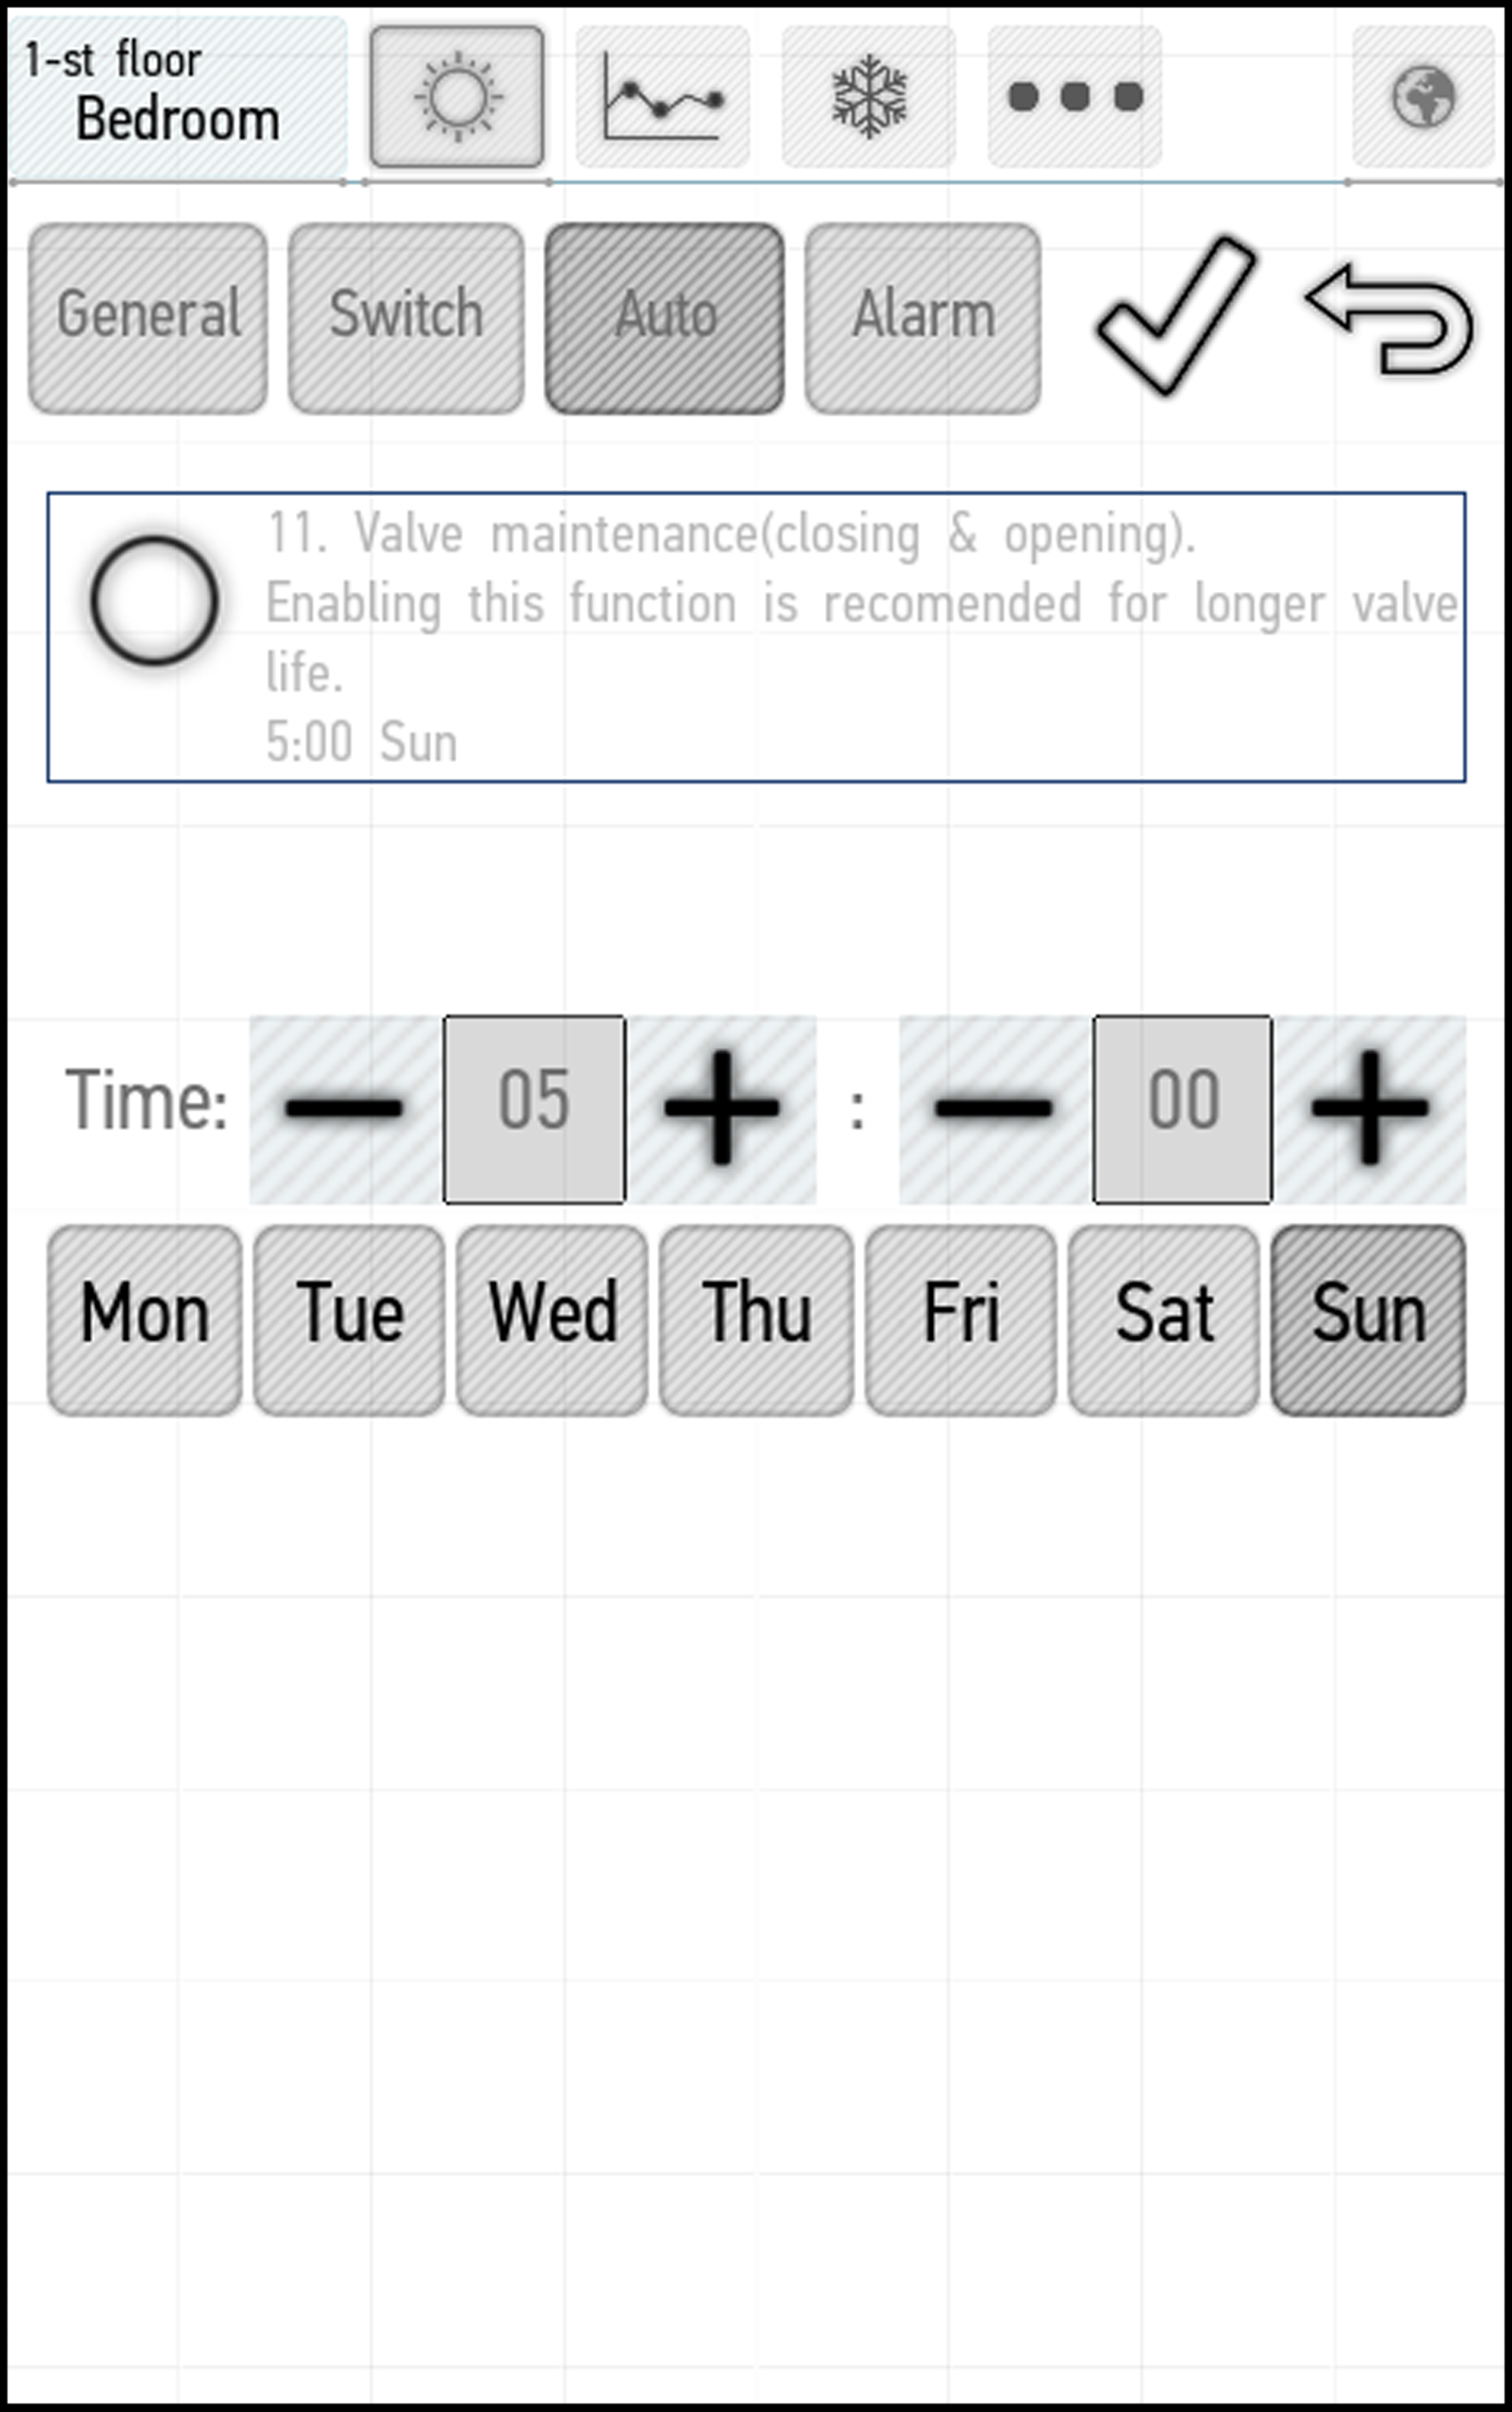
The automation menu also contains Setting No.11 which allows you to enable regular valve maintenance. By clicking on it, you can select the day and time when the valve will automatically open and close. The maintenance allows you to extend the valve lifetime. In the screenshot below, we have set the maintenance time at 5 am Sunday.
Multiroom
Setting No.13 allows you to turn music on and off simultaneously with another device. For example, you can configure the parameters so that the music will be automatically turned on or off when the light in the room is turned on and off.
To configure simultaneous turning on or off, use Setting No.12.