Difference between revisions of "BW-SW06/ru"
Jump to navigation
Jump to search
(Created page with "==Порядок установки и подключения модуля==") |
|||
| (6 intermediate revisions by the same user not shown) | |||
| Line 15: | Line 15: | ||
Модуль используется для подключения кнопок/герконов. | Модуль используется для подключения кнопок/герконов. | ||
| − | == | + | ==Функции== |
*5 входов поддерживают: | *5 входов поддерживают: | ||
**Кнопки | **Кнопки | ||
| Line 51: | Line 51: | ||
==Порядок установки и подключения модуля== | ==Порядок установки и подключения модуля== | ||
| − | # | + | #Подключите входы. |
| − | # | + | #Подсоедините разъем шины CAN. |
| − | # | + | #Настройте модуль с помощью LT SETUP. |
| − | # | + | #Подайте питание на нагружаемые элементы системы. |
| + | #Проверьте все оборудование на правильность работы. | ||
| − | == | + | ==Отключение модуля и процедура демонтажа== |
| − | # | + | #Отсоедините разъем CAN. |
| − | # | + | #Отсоедините входы. |
| − | ==HW | + | ==Установки HW== |
{|class="wikitable" | {|class="wikitable" | ||
|- | |- | ||
| − | ! | + | !Название!!Тип, диапазон!!SUBID!!По умолчанию!!Описание |
|- | |- | ||
| − | |in|| | + | |in||символ[16]||98||'BBBBBB'||Каждый символ отвечает за тип конкретного канала |
| − | *'B'- | + | *'B'-Кнопка, кнопка звонка; |
| − | *'C'- | + | *'C'-Кнопка (инверсия), кнопка звонка (инверсия) (в обычном состоянии - закрыто); |
| − | *'D'- | + | *'D'-Кнопка с задней подсветкой, кнопка с боковой подсветкой; |
| − | *'E'- | + | *'E'-Кнопка с задней подсветкой (инверсия), кнопка с боковой подсветкой (инверсия); |
| − | *'S'- | + | *'S'-Выключатель, выключатель с фиксацией; |
| − | *'K'- | + | *'K'-Контакт, геркон; |
| − | *'H'- | + | *'H'-Контакт (инверсия), геркон (инверсия); |
| − | *'G'-GND, | + | *'G'-GND, заземление; |
| − | *'-'- | + | *'-'-элементы отсутствуют, ничего не подключено. |
| − | + | Также возможно подключить один датчик температуры: | |
<syntaxhighlight lang="xml" line>hw="in='T-----'"</syntaxhighlight> | <syntaxhighlight lang="xml" line>hw="in='T-----'"</syntaxhighlight> | ||
| − | <syntaxhighlight lang="xml" line> | + | <syntaxhighlight lang="xml" line>Пример: in='DEHSSG'</syntaxhighlight> |
|- | |- | ||
| − | |offset|| | + | |offset||переменная(+/- 0…39)||SubID 30 - датчик температуры||'0'||Смещение значений датчика; |
| − | + | Например, смещение -3.8 : | |
<syntaxhighlight lang="xml" line>hw="offset='-3.8'"</syntaxhighlight> | <syntaxhighlight lang="xml" line>hw="offset='-3.8'"</syntaxhighlight> | ||
|} | |} | ||
| − | == | + | ==Конфигурация входов HW== |
{| class="wikitable" | {| class="wikitable" | ||
|- | |- | ||
| − | ! | + | !канал!!1!!2!!3!!4!!5!!6 |
|- | |- | ||
| − | | | + | |Кнопка<br>nКнопка<br>Выключатель<br>Контакт<br>nКонтакт<br>элементы отсутствуют||+||+||+||+||+||+ |
|- | |- | ||
| − | | | + | |Светодиодная кнопка<br>nСветодиодная кнопка||+||+||+||+||+ |
|- | |- | ||
| − | | | + | |Датчик температуры||+|||||||||| |
|} | |} | ||
Latest revision as of 08:58, 30 January 2022
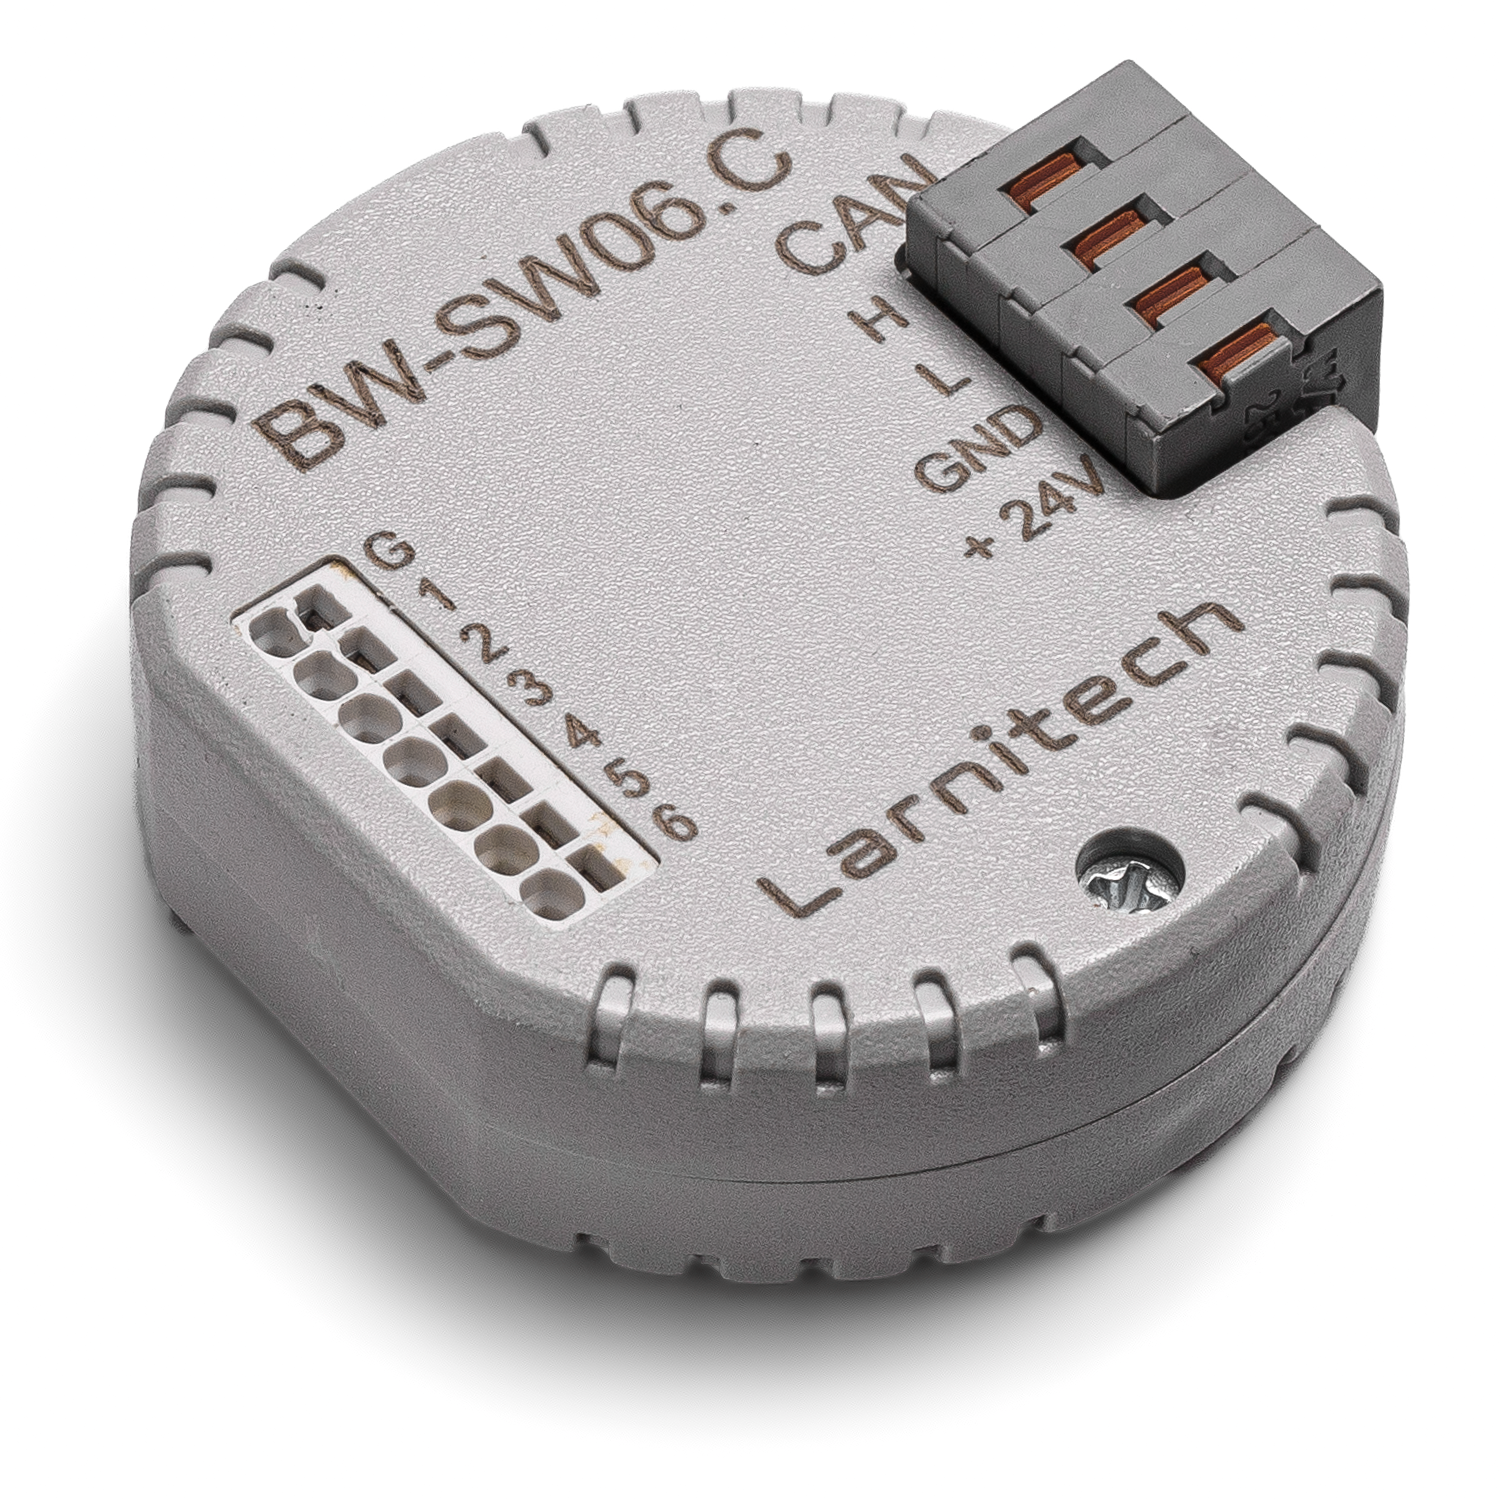
| BW-SW06.C | |||||||||
|---|---|---|---|---|---|---|---|---|---|
 | |||||||||
| |||||||||
6-ТИ КАНАЛЬНЫЙ МОДУЛЬ ВХОДОВ
Модуль используется для подключения кнопок/герконов.
Функции
- 5 входов поддерживают:
- Кнопки
- Выключатели
- Герконы
- Светодиодные кнопки
- Цифровой датчик температуры
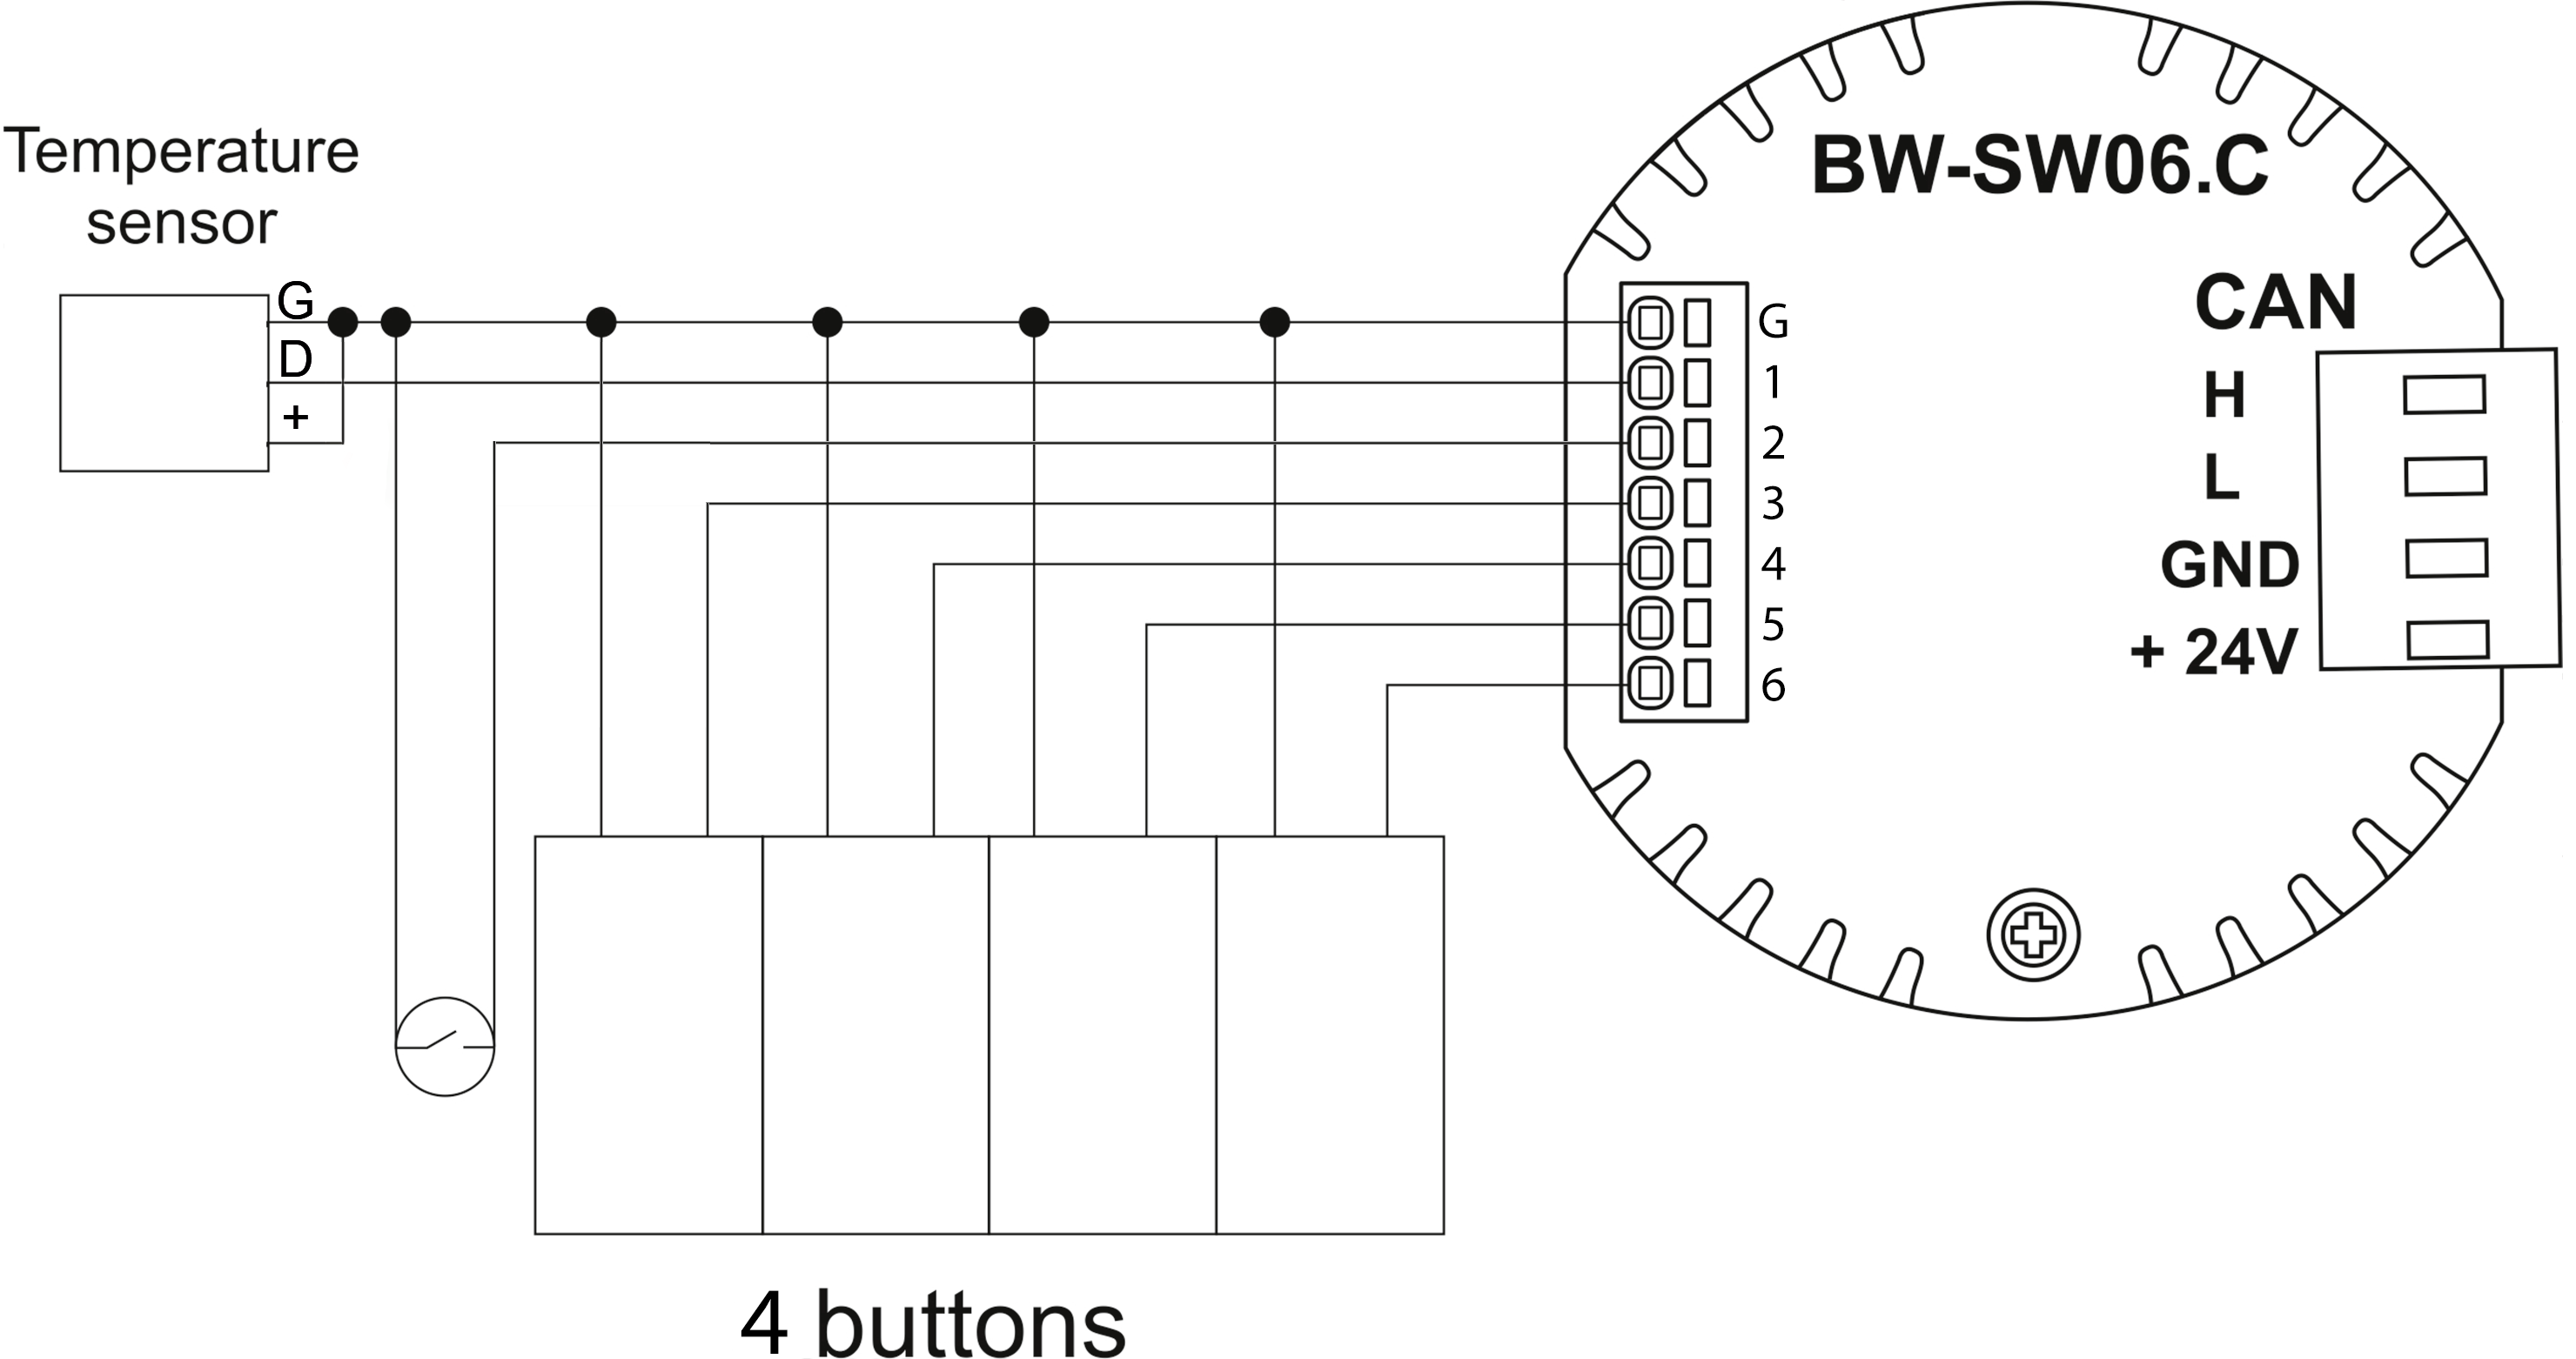
Пример подключения
Параметры модуля
| Parameter name | Value |
|---|---|
| Input channels qty | 6 |
| Buttons | 6 |
| LED Buttons | 5 |
| Backlight voltage | 3V |
| Power supply | 11.5 … 27.5 V DC from CAN |
| Max current(24V) | 30 mA |
| Temperature sensor line max length | 10m |
| Bus type | CAN (4-wire) |
| Equipment installation type | Free |
| Case material | ABS |
| Protection | IP40 |
| Temperature range | -10 … +50 °C |
| Size | 45x42x14 mm |
| Weight | 25 g |
Порядок установки и подключения модуля
- Подключите входы.
- Подсоедините разъем шины CAN.
- Настройте модуль с помощью LT SETUP.
- Подайте питание на нагружаемые элементы системы.
- Проверьте все оборудование на правильность работы.
Отключение модуля и процедура демонтажа
- Отсоедините разъем CAN.
- Отсоедините входы.
Установки HW
| Название | Тип, диапазон | SUBID | По умолчанию | Описание |
|---|---|---|---|---|
| in | символ[16] | 98 | 'BBBBBB' | Каждый символ отвечает за тип конкретного канала
Также возможно подключить один датчик температуры: 1hw="in='T-----'"
1Пример: in='DEHSSG'
|
| offset | переменная(+/- 0…39) | SubID 30 - датчик температуры | '0' | Смещение значений датчика;
Например, смещение -3.8 : 1hw="offset='-3.8'"
|
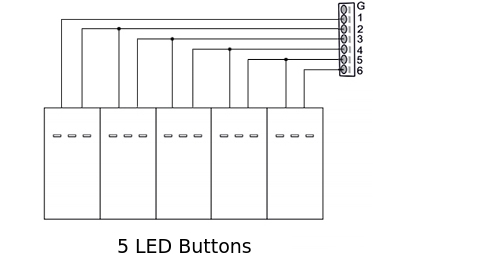
Конфигурация входов HW
| канал | 1 | 2 | 3 | 4 | 5 | 6 |
|---|---|---|---|---|---|---|
| Кнопка nКнопка Выключатель Контакт nКонтакт элементы отсутствуют |
+ | + | + | + | + | + |
| Светодиодная кнопка nСветодиодная кнопка |
+ | + | + | + | + | |
| Датчик температуры | + |
1<item addr="477:13" cfgid="180" name="Switch" type="switch" uniq_id="78"/>
2<item addr="477:14" cfgid="180" name="Switch" type="switch" uniq_id="79"/>
3<item addr="477:16" cfgid="180" name="Door" type="door-sensor" uniq_id="80"/>
4<item addr="477:30" cfgid="180" hw="offset='15'" name="Temperature" type="temperature-sensor" uniq_id="83"/>
5<item addr="477:98" cfgid="180" hw="in='T+DD-H'" name="Temperature" system="yes" type="temperature-sensor" uniq_id="76"/>