Difference between revisions of "Edit Items/ru"
(Created page with "Редактирование элементов") |
(Created page with "===Режим редактирования=== <p>Вы можете самостоятельно изменять настройки приводов, датчиков, эле...") |
||
| Line 1: | Line 1: | ||
<languages/> | <languages/> | ||
| − | === | + | ===Режим редактирования=== |
| − | <p> | + | <p>Вы можете самостоятельно изменять настройки приводов, датчиков, элементов отопления и вентиляции, мультирума и дистанционного управления. Для этого вам нужно открыть меню приложения и нажать кнопку Режим редактирования. |
<p><br>[[File:instruction130.png|500px]]<br> | <p><br>[[File:instruction130.png|500px]]<br> | ||
| − | <p> | + | <p>При включении режима редактирования на главной панели появляется соответствующая надпись: |
<p><br>[[File:instruction131.png|500px]]<br> | <p><br>[[File:instruction131.png|500px]]<br> | ||
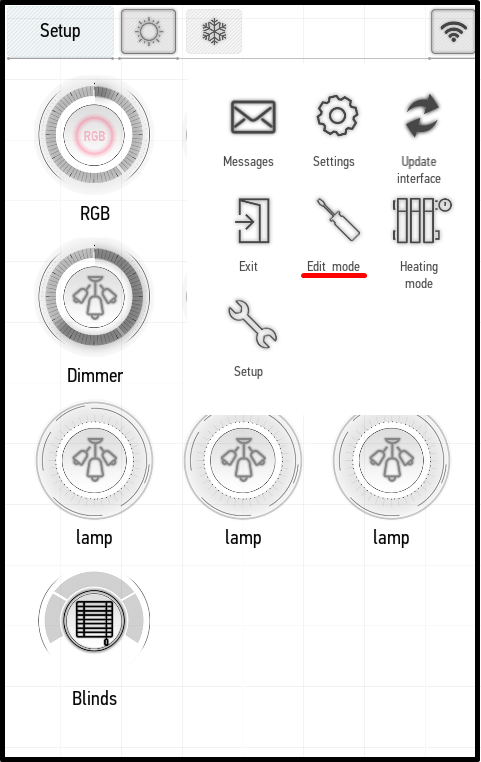
| − | <p> | + | <p>Режим редактирования позволяет открыть меню редактирования для каждого элемента. Для этого просто нажмите и удерживайте значок элемента, пока не откроется меню. В примерах мы открываем меню редактирования освещения. |
| − | === | + | ===Меню редактирования=== |
<p><br>[[File:instruction132.png|500px]]<br> | <p><br>[[File:instruction132.png|500px]]<br> | ||
| − | <p> | + | <p>Меню редактирования представлено несколькими вкладками (до 4, в зависимости от пункта): |
<ul> | <ul> | ||
| − | <li> | + | <li>Общие (General) – общие настройки;</li> |
| − | <li> | + | <li>Авто (Auto) – настройки автоматизации;</li> |
| − | <li> | + | <li>Расписание (Schedule) – настройка расписания;</li> |
| − | <li> | + | <li>Выключатель (Switch) — привязка к кнопкам.</li> |
</ul> | </ul> | ||
| − | ====General==== | + | ====Общие (General)==== |
<p><br>[[File:instruction133.png|500px]]<br> | <p><br>[[File:instruction133.png|500px]]<br> | ||
<ol> | <ol> | ||
| − | <li> | + | <li>Название (Name) — позволяет изменить название элемента.</li> |
| − | <li> | + | <li>Система (System) — показывает системный статус элемента. '''ВНИМАНИЕ!''' После изменения статуса элемента он больше не будет отображаться на главной панели. Не изменяйте этот параметр, если не уверены, что это необходимо. Элемент виден только в инженерном режиме (см. Дополнительные функции -> Редактировать системные элементы) (Additional Functions -> Edit System Items).</li> |
| − | <li> | + | <li>Голосовое управление (Voice control) — позволяет управлять элементом с помощью плагинов Alexa, Siri или Google Home. Для активации поставьте галочку и введите название элемента, который будет использоваться для голосового управления.</li> |
| − | <li> | + | <li>Область (Area) – указывает место элемента в структуре системы. Нажав на эту кнопку, вы сможете переместить элемент в любое доступное помещение. </li> |
| − | <li> | + | <li>Избранное в (Favorite in) – позволяет добавить элемент в Избранное в нужных помещениях (см. Избранное) (Favorites).</li> |
| − | <li> | + | <li>Выбрать изображение (Select image) — позволяет изменить значок на кнопке элемента (нажатие кнопки По умолчанию (Default) возвращает значок по умолчанию).</li> |
</ol> | </ol> | ||
| − | <p> | + | <p>В зависимости от типа элемента часть перечисленных функций может быть недоступна. |
| − | ====Auto==== | + | ====Авто (Auto)==== |
<p><br>[[File:instruction134.png|500px]]<br> | <p><br>[[File:instruction134.png|500px]]<br> | ||
| − | <p> | + | <p>Вы можете использовать меню Авто (Auto) для выбора настроек автоматизации элемента. В нем есть 13 предварительных настроек автоматизации, и для каждого элемента доступен свой определенный набор. Подробнее см. в инструкциях по настройке автоматизации. |
| − | ==== | + | ====Расписание==== |
| − | <p> | + | <p>Это меню используется для указания включения и выключения элемента по определенному расписанию. Чтобы создать расписание, нажмите кнопку Добавить (Add). На экране появится следующая панель. |
<p><br>[[File:instruction135.png|500px]]<br> | <p><br>[[File:instruction135.png|500px]]<br> | ||
| − | <p> | + | <p>В поле Время (Time) вы можете использовать стрелки, чтобы выбрать время, когда будет происходить действие. Кнопки с днями недели расположены внизу — вы можете выбрать нужные действия, и они будут выполняться в выбранное время этих дней. |
| − | <p> | + | <p>Используйте кнопку Режим (Mode), чтобы выбрать частоту повторения действий. Значение Один раз (Once) означает, что действие будет выполнено один раз, в выбранное время выбранного дня. Значение Период (Period) означает, что действие будет повторяться в выбранное время каждый выбранный день. Значение Выкл. (Off) отключает указанное расписание. |
| − | <p> | + | <p>Используйте кнопку Действие (Action), чтобы выбрать действие, которое должно быть выполнено в указанное время. Есть два значения: Вкл. (On) и Выкл. (Off). Соответственно элемент можно включать и выключать. |
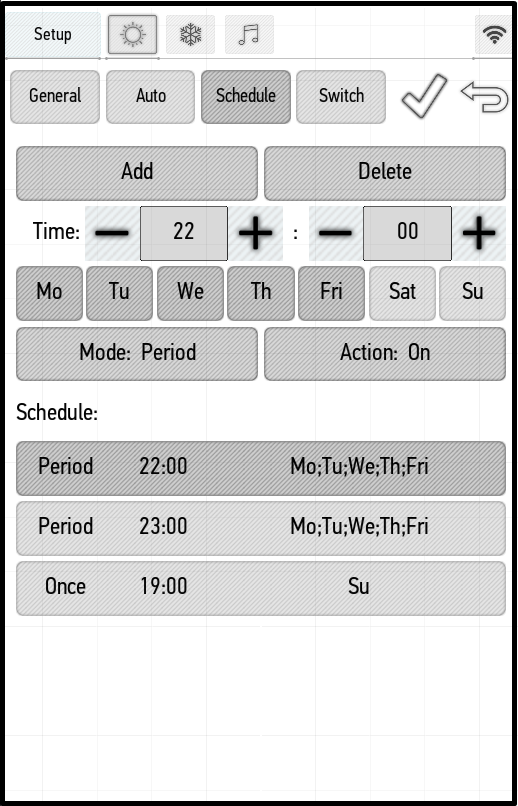
| − | <p> | + | <p>В приведенном ниже примере мы добавили расписание для периодического включения лампы каждый будний день в 22:00, периодического выключения в те же дни в 23:00 и однократного включения в воскресенье в 19:00. |
<p><br>[[File:instruction136.png|500px]]<br> | <p><br>[[File:instruction136.png|500px]]<br> | ||
| − | <p> | + | <p>Чтобы удалить выбранное расписание, нажмите кнопку Удалить (Delete). |
| − | ====Switch==== | + | ====Выключатель (Switch)==== |
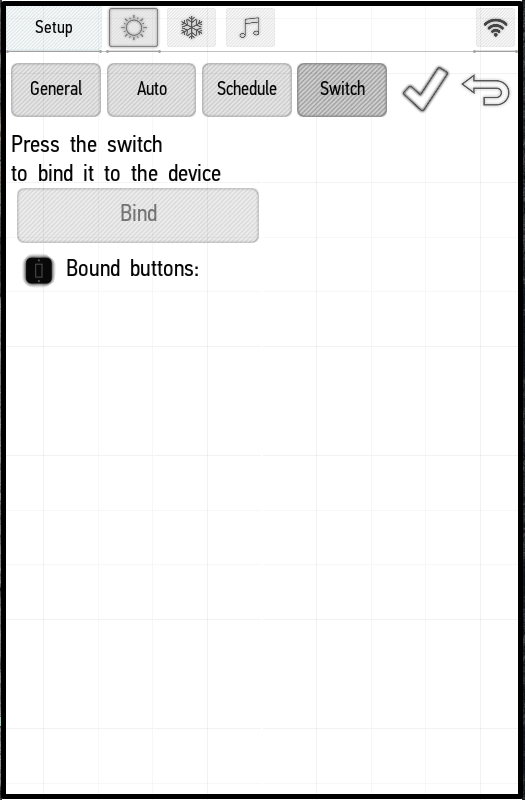
| − | <p> | + | <p>Вы можете использовать меню Выключатель (Switch) для привязки кнопки выключателя к элементу и дальнейшего управления элементом с помощью этой кнопки. Привяжем кнопку к диммеру. Нажмите кнопку выключателя, чтобы программа распознала его. Используемый выключатель отобразится на экране (правый скриншот). |
<table> | <table> | ||
<tr> | <tr> | ||
| Line 46: | Line 46: | ||
</tr> | </tr> | ||
</table> | </table> | ||
| − | <p> | + | <p>Нажмите кнопку Привязать (Bind), чтобы привязать кнопку к элементу. Привязанная кнопка будет отображаться под ним. Таким образом можно привязать несколько кнопок к одному приводу. |
| − | <p> | + | <p>По умолчанию привязанная кнопка переключает состояние элемента. Если вы хотите изменить эти настройки, щелкните значок гаечного ключа. |
| − | <p> | + | <p>Вы можете связать различные действия с одинарным нажатием (Click), двойным нажатием (Double click), тройным нажатием (Triple click), длительным нажатием (Long click), комбинации последовательных коротких и длинных нажатий - Длинный 2-й клик(Long 2-nd click). |
<p><br>[[File:instruction139.png|500px]]<br> | <p><br>[[File:instruction139.png|500px]]<br> | ||
| − | <p> | + | <p>На примере слева мы настроили кнопку для управления диммером и установили следующие параметры: |
<ul> | <ul> | ||
| − | <li>single click: invert state;</li> | + | <li>один щелчок: инвертировать состояние;single click: invert state;</li> |
| − | <li> | + | <li>двойной щелчок: включить;double click: turn on;</li> |
| − | + | <li>тройной щелчок: выключить;triple click: turn off;</li> | |
| − | + | <li>долгое нажатие: увеличение | |
| − | |||
| − | |||
| − | |||
| − | |||
| − | |||
| − | |||
| − | |||
| − | |||
| − | |||
| − | |||
| − | |||
| − | |||
| − | |||
| − | |||
| − | |||
| − | |||
| − | |||
| − | |||
| − | |||
| − | |||
| − | |||
| − | |||
| − | |||
| − | |||
| − | |||
| − | |||
| − | |||
| − | <li> | ||
| − | |||
| − | |||
| − | |||
| − | |||
| − | |||
| − | |||
| − | |||
| − | |||
| − | |||
| − | |||
| − | |||
| − | |||
| − | |||
| − | |||
| − | |||
| − | |||
| − | |||
| − | |||
| − | |||
| − | |||
| − | |||
| − | |||
| − | |||
| − | |||
| − | |||
| − | |||
| − | |||
| − | |||
| − | |||
| − | |||
| − | |||
| − | |||
| − | |||
| − | |||
| − | |||
| − | |||
| − | |||
| − | |||
| − | |||
| − | |||
| − | <li> | ||
| − | |||
| − | |||
| − | |||
| − | |||
| − | |||
Revision as of 12:33, 23 January 2022
Режим редактирования
Вы можете самостоятельно изменять настройки приводов, датчиков, элементов отопления и вентиляции, мультирума и дистанционного управления. Для этого вам нужно открыть меню приложения и нажать кнопку Режим редактирования.
При включении режима редактирования на главной панели появляется соответствующая надпись:

Режим редактирования позволяет открыть меню редактирования для каждого элемента. Для этого просто нажмите и удерживайте значок элемента, пока не откроется меню. В примерах мы открываем меню редактирования освещения.
Меню редактирования

Меню редактирования представлено несколькими вкладками (до 4, в зависимости от пункта):
- Общие (General) – общие настройки;
- Авто (Auto) – настройки автоматизации;
- Расписание (Schedule) – настройка расписания;
- Выключатель (Switch) — привязка к кнопкам.
Общие (General)
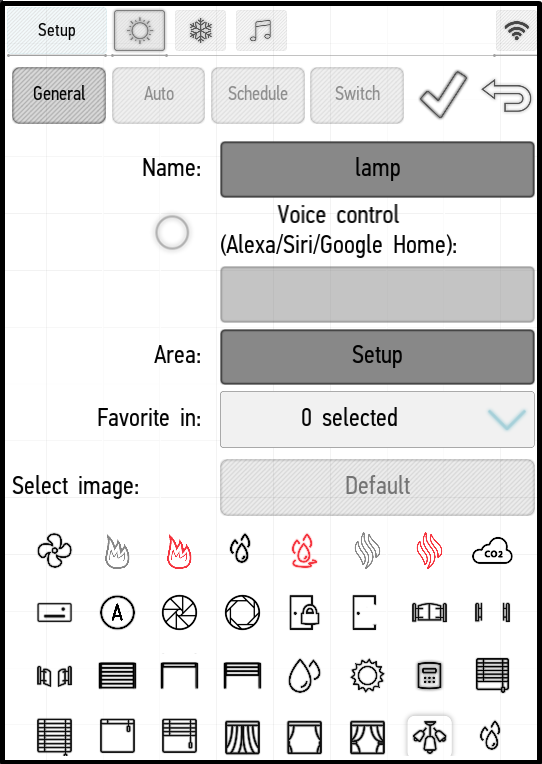
- Название (Name) — позволяет изменить название элемента.
- Система (System) — показывает системный статус элемента. ВНИМАНИЕ! После изменения статуса элемента он больше не будет отображаться на главной панели. Не изменяйте этот параметр, если не уверены, что это необходимо. Элемент виден только в инженерном режиме (см. Дополнительные функции -> Редактировать системные элементы) (Additional Functions -> Edit System Items).
- Голосовое управление (Voice control) — позволяет управлять элементом с помощью плагинов Alexa, Siri или Google Home. Для активации поставьте галочку и введите название элемента, который будет использоваться для голосового управления.
- Область (Area) – указывает место элемента в структуре системы. Нажав на эту кнопку, вы сможете переместить элемент в любое доступное помещение.
- Избранное в (Favorite in) – позволяет добавить элемент в Избранное в нужных помещениях (см. Избранное) (Favorites).
- Выбрать изображение (Select image) — позволяет изменить значок на кнопке элемента (нажатие кнопки По умолчанию (Default) возвращает значок по умолчанию).
В зависимости от типа элемента часть перечисленных функций может быть недоступна.
Авто (Auto)
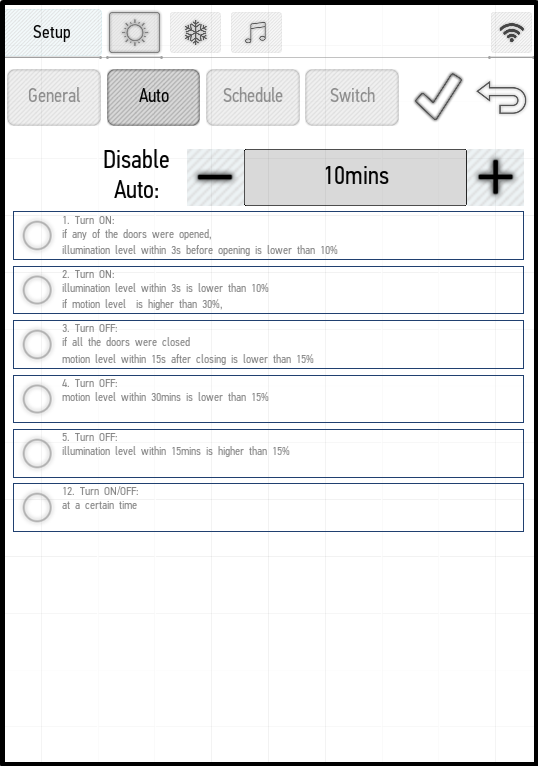
Вы можете использовать меню Авто (Auto) для выбора настроек автоматизации элемента. В нем есть 13 предварительных настроек автоматизации, и для каждого элемента доступен свой определенный набор. Подробнее см. в инструкциях по настройке автоматизации.
Расписание
Это меню используется для указания включения и выключения элемента по определенному расписанию. Чтобы создать расписание, нажмите кнопку Добавить (Add). На экране появится следующая панель.
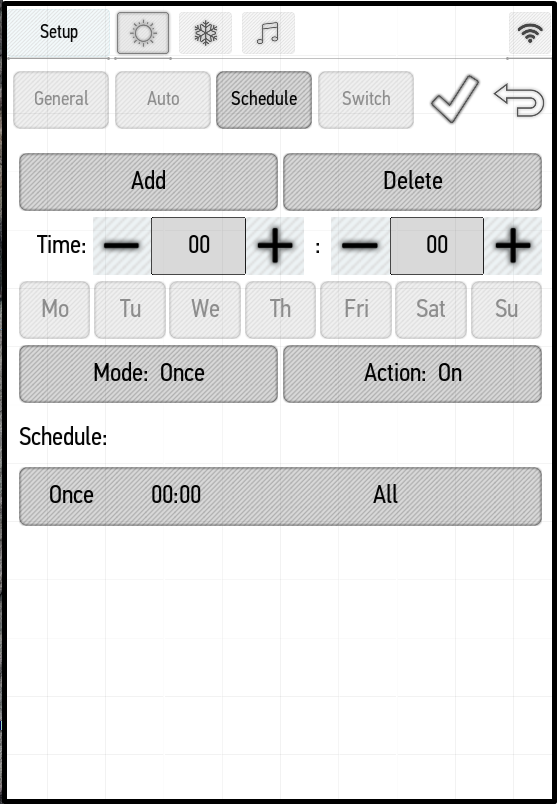
В поле Время (Time) вы можете использовать стрелки, чтобы выбрать время, когда будет происходить действие. Кнопки с днями недели расположены внизу — вы можете выбрать нужные действия, и они будут выполняться в выбранное время этих дней.
Используйте кнопку Режим (Mode), чтобы выбрать частоту повторения действий. Значение Один раз (Once) означает, что действие будет выполнено один раз, в выбранное время выбранного дня. Значение Период (Period) означает, что действие будет повторяться в выбранное время каждый выбранный день. Значение Выкл. (Off) отключает указанное расписание.
Используйте кнопку Действие (Action), чтобы выбрать действие, которое должно быть выполнено в указанное время. Есть два значения: Вкл. (On) и Выкл. (Off). Соответственно элемент можно включать и выключать.
В приведенном ниже примере мы добавили расписание для периодического включения лампы каждый будний день в 22:00, периодического выключения в те же дни в 23:00 и однократного включения в воскресенье в 19:00.
Чтобы удалить выбранное расписание, нажмите кнопку Удалить (Delete).
Выключатель (Switch)
Вы можете использовать меню Выключатель (Switch) для привязки кнопки выключателя к элементу и дальнейшего управления элементом с помощью этой кнопки. Привяжем кнопку к диммеру. Нажмите кнопку выключателя, чтобы программа распознала его. Используемый выключатель отобразится на экране (правый скриншот).
 |
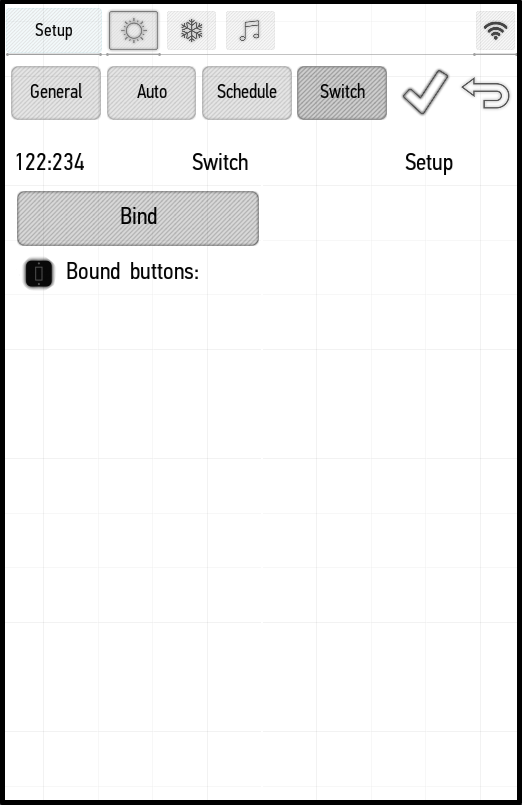 ' |
Нажмите кнопку Привязать (Bind), чтобы привязать кнопку к элементу. Привязанная кнопка будет отображаться под ним. Таким образом можно привязать несколько кнопок к одному приводу.
По умолчанию привязанная кнопка переключает состояние элемента. Если вы хотите изменить эти настройки, щелкните значок гаечного ключа.
Вы можете связать различные действия с одинарным нажатием (Click), двойным нажатием (Double click), тройным нажатием (Triple click), длительным нажатием (Long click), комбинации последовательных коротких и длинных нажатий - Длинный 2-й клик(Long 2-nd click).
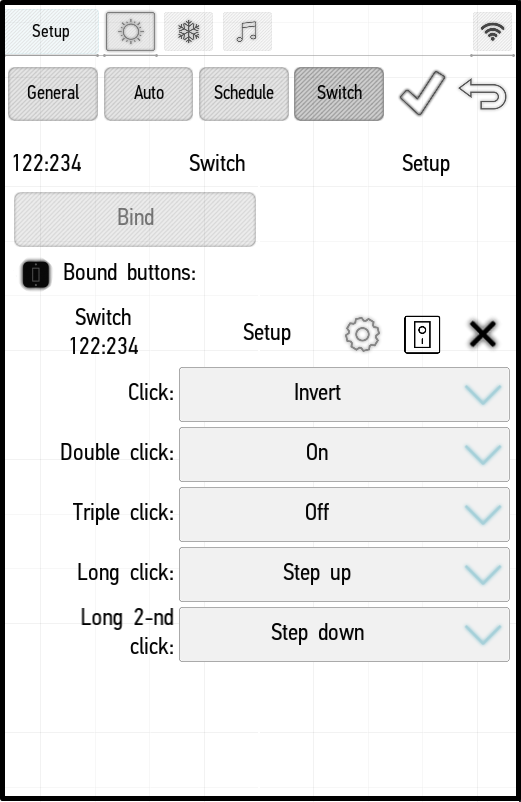
На примере слева мы настроили кнопку для управления диммером и установили следующие параметры:
- один щелчок: инвертировать состояние;single click: invert state;
- двойной щелчок: включить;double click: turn on;
- тройной щелчок: выключить;triple click: turn off;
- долгое нажатие: увеличение