Difference between revisions of "Modbus TCP"
Jump to navigation
Jump to search
(Created page with "<p>MODBUS TCP allows integration with devices that have this interface. </p> <H2>Adding MODBUS TCP</H2> <ol> <li>Authorize yourself in the Web Toolbar of the Smart Home system...") |
|||
| Line 1: | Line 1: | ||
| − | + | ==ModBus TCP Plugin installation & configuration== | |
| − | |||
<ol> | <ol> | ||
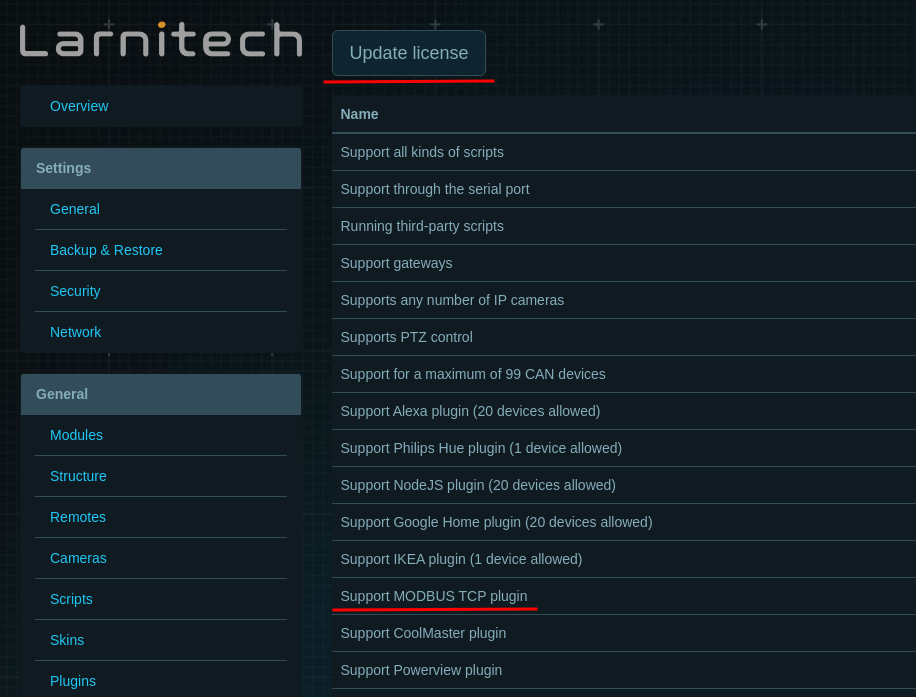
| − | <li> | + | <li>Make sure you have ModBus TCP licenses |
| − | <br>[[ | + | <br>[[file:newmodbus1.png|700px|link=]]<br> |
| − | <li> | + | </li> |
| − | <br>[[ | + | |
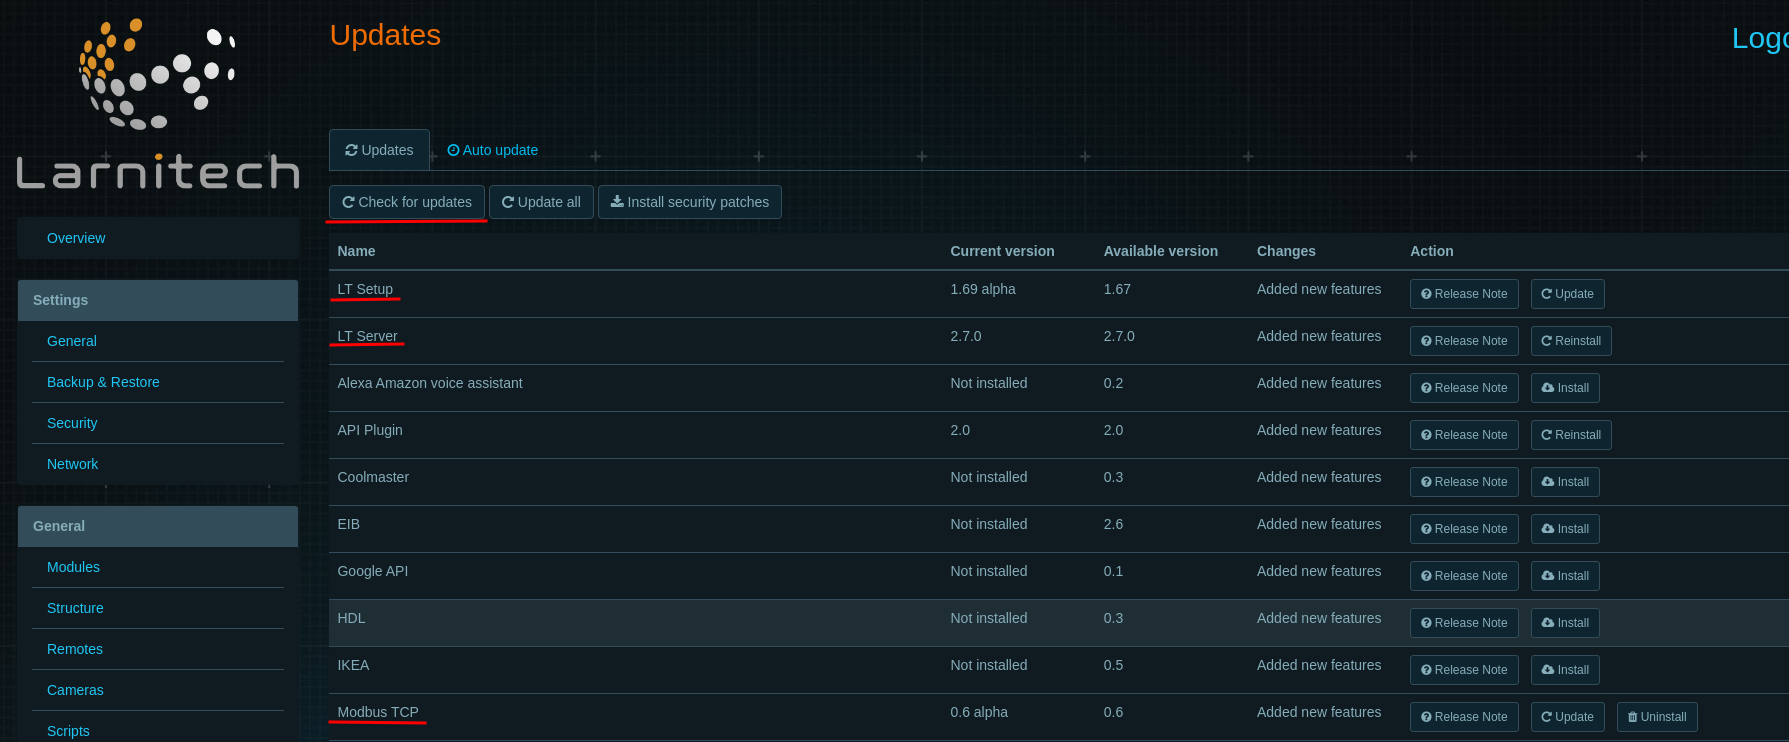
| − | <li> | + | <li>Make sure you have the latest versions of LT Setup, LT Server, ModBus TCP plugin installed |
| − | <br>[[ | + | <br>[[file:newmodbus2.png|700px|link=]]<br> |
| − | < | + | </li> |
| − | <br>[[ | + | |
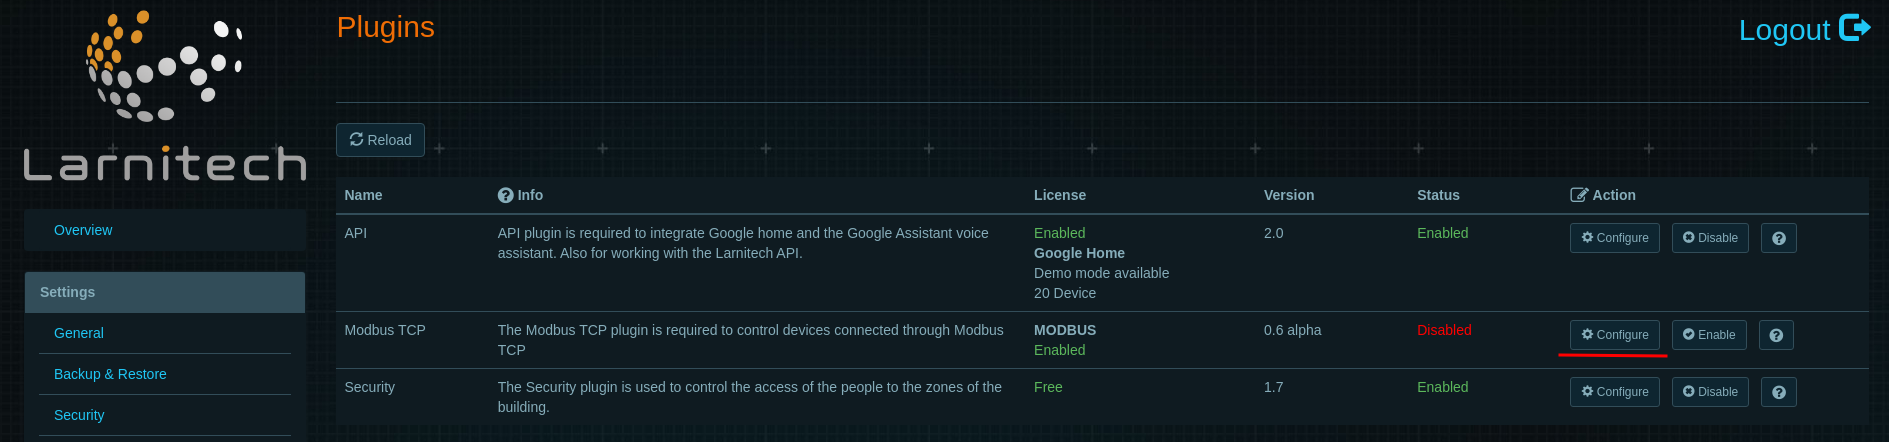
| − | + | <li>Configure plugin before enabling. | |
| − | < | + | <br>[[file:newmodbus3.png|700px|link=]]<br> |
| − | <br>[[ | + | <br>[[file:newmodbus4.png|700px|link=]]<br> |
| − | < | + | <br>[[file:newmodbus5.png|700px|link=]]<br> |
| − | <li> | + | '''IP''' - IP address of a ModBus TCP device, make sure that you can ping this device |
| − | <br>[[ | + | '''Port''' - 502 it is default port in most cases, but check documentation of your ModBus TCP device |
| − | <li> | + | '''Master/Slave''' - this option means that you add a Master device or Slave device |
| − | <br>[[ | + | </li> |
| − | <li> | + | |
| − | <br>[[ | + | <li>Enable plugin. |
| − | + | <br>[[file:newmodbus6.png|700px|link=]]<br> | |
| − | < | + | </li> |
| − | + | </ol> | |
| − | + | ||
| − | + | ||
| + | ==Examples== | ||
| + | <ol> | ||
| + | <li> | ||
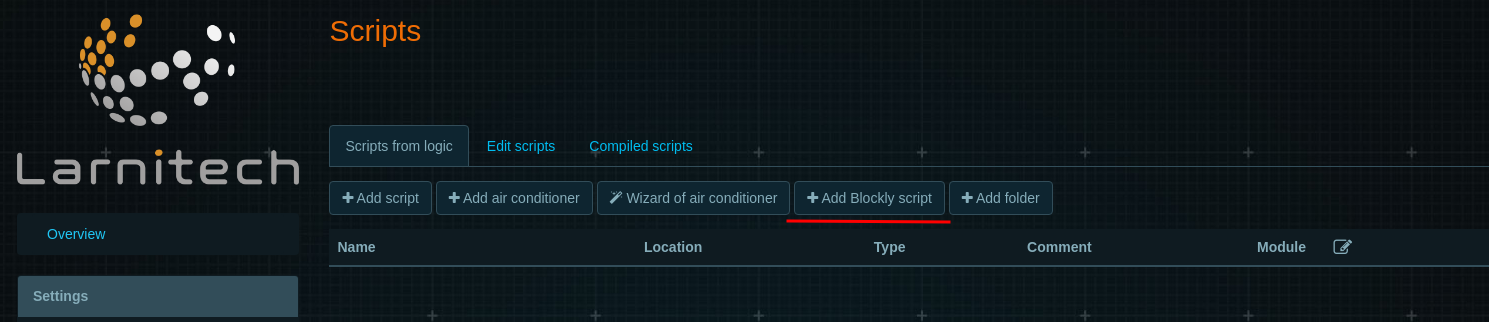
| + | <li>Go to Scripts page and create Blockly script | ||
| + | <br>[[file:newmodbus7.png|700px|link=]]<br> | ||
| + | </li> | ||
| + | |||
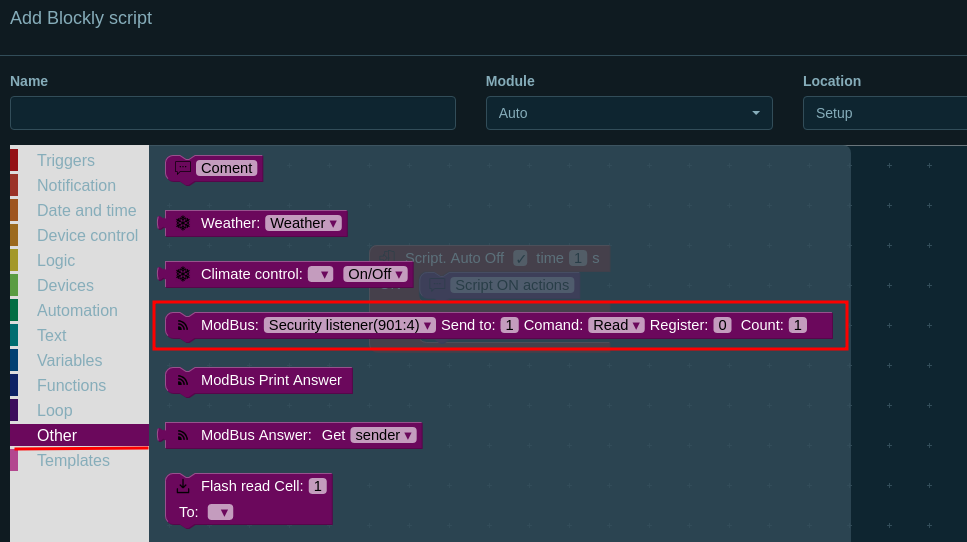
| + | <li>Add ModBus block from Other tab | ||
| + | <br>[[file:newmodbus8.png|700px|link=]]<br> | ||
| + | </li> | ||
| + | |||
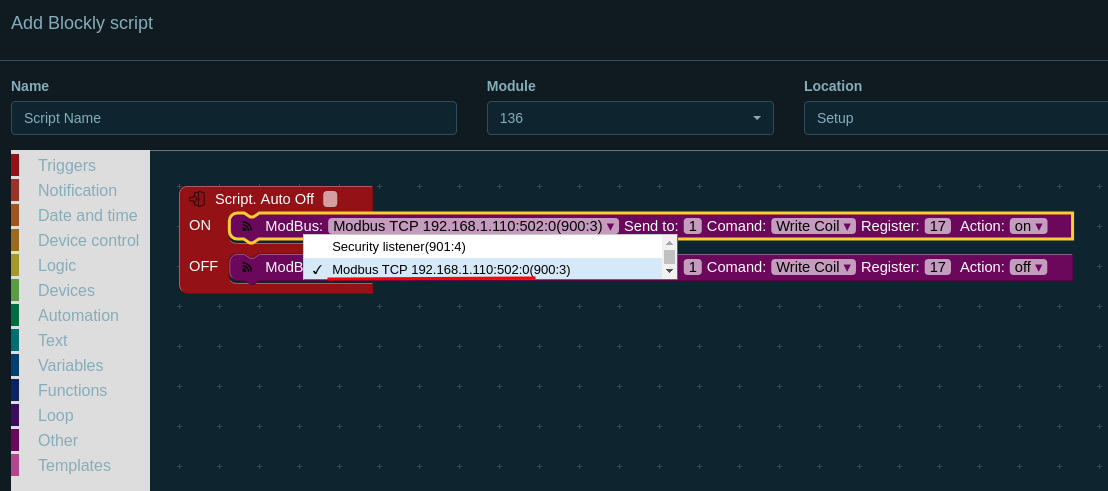
| + | <li>Choose ModBus TCP com-port from dropdown list and fill other fields. Save script and try it. | ||
| + | <br>[[file:newmodbus9.png|700px|link=]]<br> | ||
| + | </li> | ||
| + | </ol> | ||
| + | |||
| + | ==Logs== | ||
| + | Starting Service of MODBUS TCP plugin for Larnitech system... | ||
| + | Started Service of MODBUS TCP plugin for Larnitech system. | ||
| + | Compiled: Jul 7 2021 13:59:57 | ||
| + | INF: Settings: | ||
| + | INF: debug yes '''- Debug mode is enabled''' | ||
| + | INF: modbus-devices 192.168.1.110:502:0 | ||
| + | INF: Modbus 192.168.1.110:502:0 thread created | ||
| + | INF: Modbus 192.168.1.110:502:0 thread started | ||
| + | DEBUG: Modbus client: connected to 192.168.1.110:502:0''' - Plugin connected to device''' | ||
| + | DEBUG: Modbus client: waiting for messages for 192.168.1.110:502:0 | ||
| + | DEBUG: Add message 01050011FF00 to 192.168.1.110:502:0 queue | ||
| + | DEBUG: Modbus thread unlocked for 192.168.1.110:502:0 | ||
| + | DEBUG: Modbus client: send packet to 192.168.1.110:502:0 0x01050011FF00''' - Send ‘ON’ to first coil''' | ||
| + | DEBUG: Modbus client: confirmation from 192.168.1.110:502:0 0x01050011FF00 '''- Right feedback from device''' | ||
| + | DEBUG: Modbus client: waiting for messages for 192.168.1.110:502:0 | ||
| + | DEBUG: Add message 010500110000 to 192.168.1.110:502:0 queue | ||
| + | DEBUG: Modbus thread unlocked for 192.168.1.110:502:0 | ||
| + | DEBUG: Modbus client: send packet to 192.168.1.110:502:0 0x010500110000''' - Send ‘OFF’ to first coil''' | ||
| + | DEBUG: Modbus client: confirmation from 192.168.1.110:502:0 0x010500110000''' - Right feedback from device''' | ||
| + | DEBUG: Modbus client: waiting for messages for 192.168.1.110:502:0 | ||
Revision as of 14:12, 18 November 2021
ModBus TCP Plugin installation & configuration
- Make sure you have ModBus TCP licenses
- Make sure you have the latest versions of LT Setup, LT Server, ModBus TCP plugin installed
- Configure plugin before enabling.

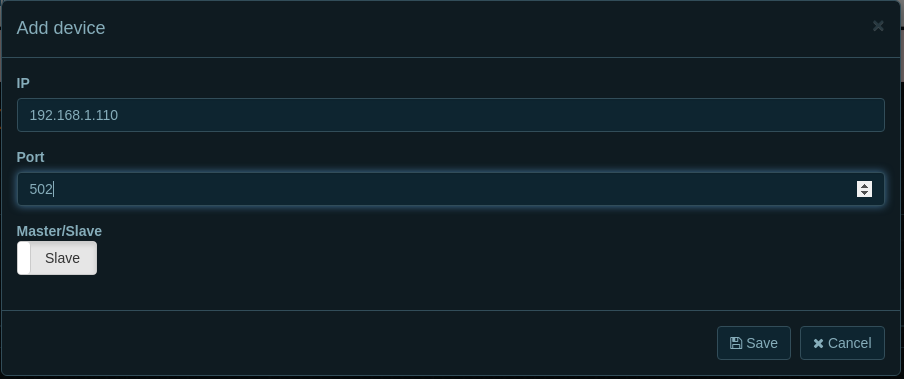
IP - IP address of a ModBus TCP device, make sure that you can ping this device Port - 502 it is default port in most cases, but check documentation of your ModBus TCP device Master/Slave - this option means that you add a Master device or Slave device - Enable plugin.

Examples
- Go to Scripts page and create Blockly script
- Add ModBus block from Other tab
- Choose ModBus TCP com-port from dropdown list and fill other fields. Save script and try it.
Logs
Starting Service of MODBUS TCP plugin for Larnitech system...
Started Service of MODBUS TCP plugin for Larnitech system.
Compiled: Jul  7 2021 13:59:57
INF: Settings:
INF: debug yes - Debug mode is enabled
INF: modbus-devices 192.168.1.110:502:0
INF: Modbus 192.168.1.110:502:0 thread created
INF: Modbus 192.168.1.110:502:0 thread started
DEBUG: Modbus client: connected to 192.168.1.110:502:0 - Plugin connected to device
DEBUG: Modbus client: waiting for messages for 192.168.1.110:502:0
DEBUG: Add message 01050011FF00 to 192.168.1.110:502:0 queue
DEBUG: Modbus thread unlocked for 192.168.1.110:502:0
DEBUG: Modbus client: send packet to 192.168.1.110:502:0 0x01050011FF00 - Send ‘ON’ to first coil
DEBUG: Modbus client: confirmation from 192.168.1.110:502:0 0x01050011FF00 - Right feedback from device
DEBUG: Modbus client: waiting for messages for 192.168.1.110:502:0
DEBUG: Add message 010500110000 to 192.168.1.110:502:0 queue
DEBUG: Modbus thread unlocked for 192.168.1.110:502:0
DEBUG: Modbus client: send packet to 192.168.1.110:502:0 0x010500110000 - Send ‘OFF’ to first coil
DEBUG: Modbus client: confirmation from 192.168.1.110:502:0 0x010500110000 - Right feedback from device
DEBUG: Modbus client: waiting for messages for 192.168.1.110:502:0