Difference between revisions of "Reset to factory defaults/ru"
(Created page with "Сброс к заводским настройкам") |
(Created page with "Сброс к заводским настройкам Если вам необходимо сбросить устройство DE-MG/Metaforsa к заводским наст...") |
||
| Line 1: | Line 1: | ||
<languages/> | <languages/> | ||
| − | + | Сброс к заводским настройкам | |
| − | + | Если вам необходимо сбросить устройство DE-MG/Metaforsa к заводским настройкам, вы можете сделать это с помощью веб-панели администрирования Умного дома (LT Setup) или с помощью кнопки на модуле DE-MG или Metaforsa. | |
| − | == | + | ==ВНИМАНИЕ!== Для успешного сброса на вашем модуле должна быть установлена последняя версия прошивки. |
| − | == | + | ==Обновление прошивки модуля DE-MG или Metaforsa== |
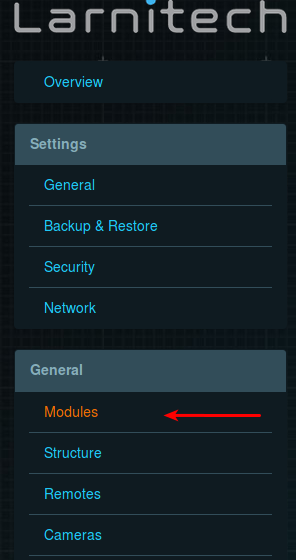
| − | 1. | + | 1. В меню слева выберите «Модули» (категория «Общие»). |
<br>[[file:reset1.png|300px]]<br> | <br>[[file:reset1.png|300px]]<br> | ||
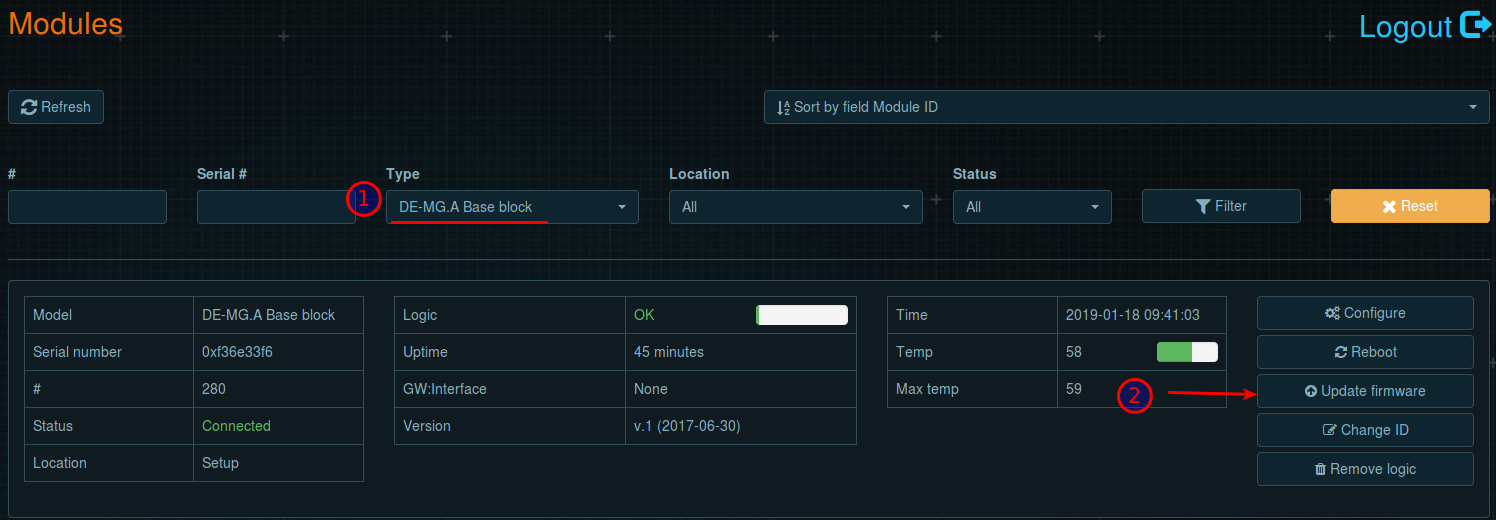
| − | 2. In the “Type” field, select a module whose name starts with “DE-MG” or “Metaforsa” (depending on the module model). The module panel appears. In the menu on the right, click the "Update firmware” button. | + | 2. В поле «Тип» выберите модуль, название которого начинается с «DE-MG» или «Metaforsa» (в зависимости от модели модуля). Появится панель модуля. В меню справа нажмите кнопку «Обновить прошивку».In the “Type” field, select a module whose name starts with “DE-MG” or “Metaforsa” (depending on the module model). The module panel appears. In the menu on the right, click the "Update firmware” button. |
<br>[[file:reset2.png|800px]]<br> | <br>[[file:reset2.png|800px]]<br> | ||
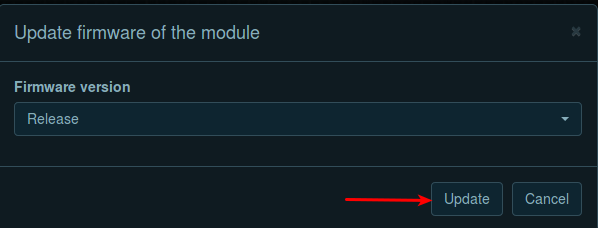
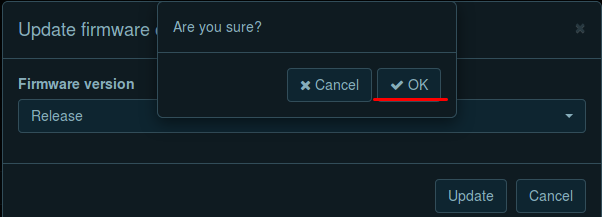
| − | 3. In the window that appears, click the “Update” button and confirm with the “OK” button in the next window. | + | 3. В появившемся окне нажмите кнопку «Обновить» и подтвердите кнопкой «ОК» в следующем окне.In the window that appears, click the “Update” button and confirm with the “OK” button in the next window. |
<br>[[file:reset3.png|500px]]<br> | <br>[[file:reset3.png|500px]]<br> | ||
<br>[[file:reset4.png|500px]]<br> | <br>[[file:reset4.png|500px]]<br> | ||
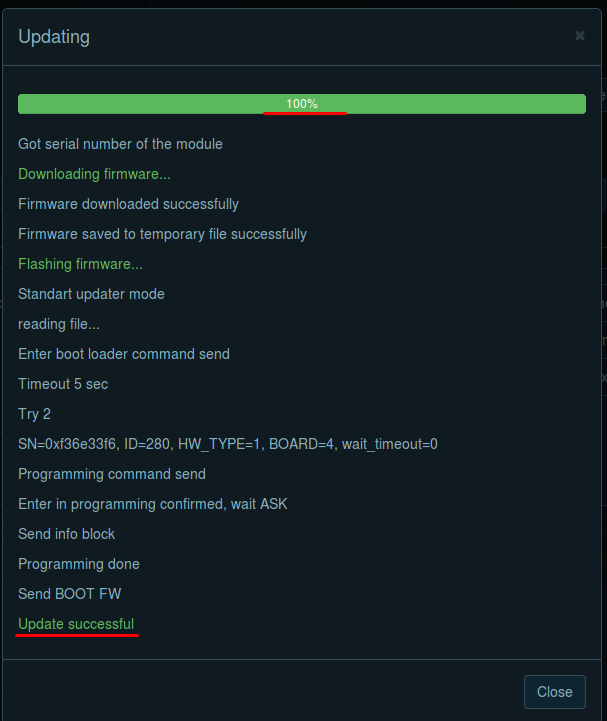
| − | 4. The firmware update will start. The progress bar window appears. When the progress reaches 100%, make sure that the “Update successful” message is displayed at the bottom of the window. This means that the update was successful. To finish, click the “Close” button at the bottom of the window. | + | 4. Начнется обновление прошивки. Появится окно индикатора выполнения. Когда прогресс достигнет 100%, убедитесь, что в нижней части окна отображается сообщение «Обновление выполнено успешно». Это означает, что обновление прошло успешно. Для завершения нажмите кнопку «Закрыть» в нижней части окна.The firmware update will start. The progress bar window appears. When the progress reaches 100%, make sure that the “Update successful” message is displayed at the bottom of the window. This means that the update was successful. To finish, click the “Close” button at the bottom of the window. |
<br>[[file:reset5.png|500px]]<br> | <br>[[file:reset5.png|500px]]<br> | ||
| − | ==Reset via LT Setup== | + | ==Сброс через LT Setup== |
| + | 1. Авторизуйтесь в LT Setup и выберите вкладку «Перезагрузка» в меню слева (категория «Система»).==Reset via LT Setup== | ||
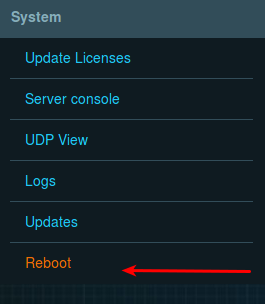
1. Authorize in LT Setup and select the “Reboot” tab from the menu on the left (the “System” category). | 1. Authorize in LT Setup and select the “Reboot” tab from the menu on the left (the “System” category). | ||
<br>[[file:reset6.png|300px]]<br> | <br>[[file:reset6.png|300px]]<br> | ||
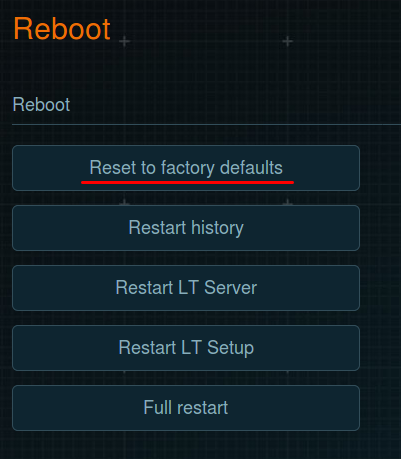
| − | 2. On the page that appears, click the "Reset to factory defaults" button. | + | 2. На появившейся странице нажмите кнопку «Восстановить заводские настройки».On the page that appears, click the "Reset to factory defaults" button. |
<br>[[file:reset7.png|300px]]<br> | <br>[[file:reset7.png|300px]]<br> | ||
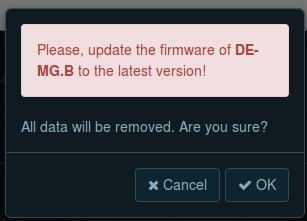
| − | 3. A window will appear on the screen with the warning “All data will be removed. Are you sure?”. Click “OK” to reset. | + | 3. На экране появится окно с предупреждением «Все данные будут удалены. Уверены ли вы?". Нажмите «ОК» для сброса.A window will appear on the screen with the warning “All data will be removed. Are you sure?”. Click “OK” to reset. |
<br>[[file:reset8.png|300px]]<br> | <br>[[file:reset8.png|300px]]<br> | ||
| − | 4. For successful reset, your network must have a DHCP server and Internet access. After resetting, the server will request a dynamic IP address via DHCP. The reset time depends on the speed of your Internet connection and can take from 15 to 40 minutes. If you want to continue, click “OK” in the following window. | + | 4. Для успешного сброса в вашей сети должен быть DHCP-сервер и доступ в Интернет. После сброса сервер запросит динамический IP-адрес через DHCP. Время сброса зависит от скорости вашего интернет-соединения и может занять от 15 до 40 минут. Если вы хотите продолжить, нажмите «ОК» в следующем окне.For successful reset, your network must have a DHCP server and Internet access. After resetting, the server will request a dynamic IP address via DHCP. The reset time depends on the speed of your Internet connection and can take from 15 to 40 minutes. If you want to continue, click “OK” in the following window. |
<br>[[file:reset9.png|800px]]<br> | <br>[[file:reset9.png|800px]]<br> | ||
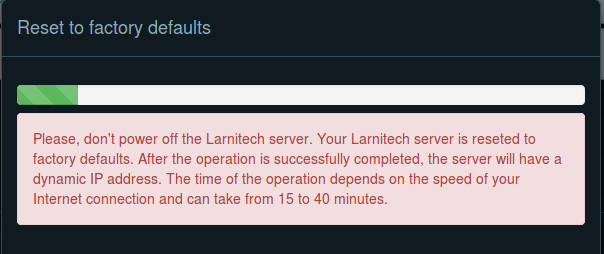
| − | 5. A reset progress bar appears on the screen. Please, do not power off the server while the reset is in progress. | + | 5. На экране появится индикатор выполнения сброса. Пожалуйста, не выключайте сервер во время сброса.A reset progress bar appears on the screen. Please, do not power off the server while the reset is in progress. |
<br>[[file:reset10.png|500px]]<br> | <br>[[file:reset10.png|500px]]<br> | ||
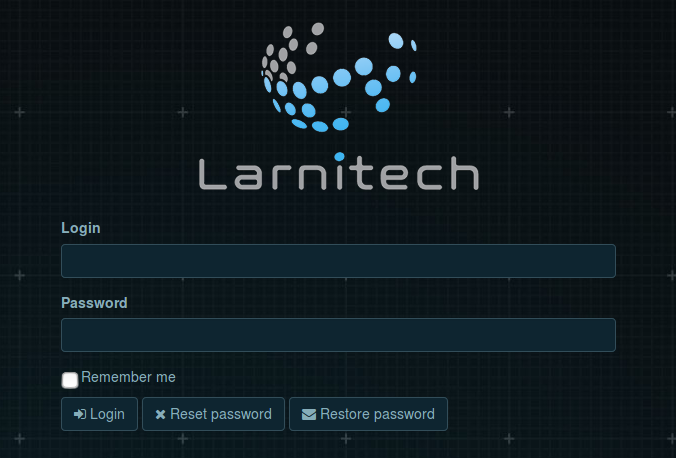
| − | 6. When the reset is complete, the LT Setup authorization panel appears. Authorize by entering your login and password to start using the interface. | + | 6. По завершении сброса появится панель авторизации LT Setup. Авторизуйтесь, введя логин и пароль, чтобы начать пользоваться интерфейсом.When the reset is complete, the LT Setup authorization panel appears. Authorize by entering your login and password to start using the interface. |
<br>[[file:reset11.png|300px]]<br> | <br>[[file:reset11.png|300px]]<br> | ||
| − | ==Instructions for Connecting to LT Setup== | + | ==Инструкции по подключению к программе LT Setup== |
| + | Веб-панель настройки LT будет доступна по адресу http://de-mg.local (или http://metaforsa.local). В некоторых системах не поддерживаются псевдодомены верхнего уровня, из-за чего по указанному адресу получить доступ к панели будет невозможно. В этом случае вам необходимо определить IP-адрес сервера.==Instructions for Connecting to LT Setup== | ||
The LT Setup web panel will be available at http://de-mg.local (or http://metaforsa.local). In some systems, pseudo-domains of the upper level are not supported, and this is why it will not be possible to access the panel at the specified address. In this case, you need to determine the IP address of the server. | The LT Setup web panel will be available at http://de-mg.local (or http://metaforsa.local). In some systems, pseudo-domains of the upper level are not supported, and this is why it will not be possible to access the panel at the specified address. In this case, you need to determine the IP address of the server. | ||
| − | + | Определить IP-адрес сервера можно через приложение Ларнитех на смартфоне или планшете или с помощью панели роутераYou can determine the IP address of the server through the Larnitech application on your smartphone or tablet or using the panel of your router: | |
| − | ==How to Determine the IP-Address using the Larnitech Application== | + | ==Как определить IP-адрес с помощью приложения Larnitech== |
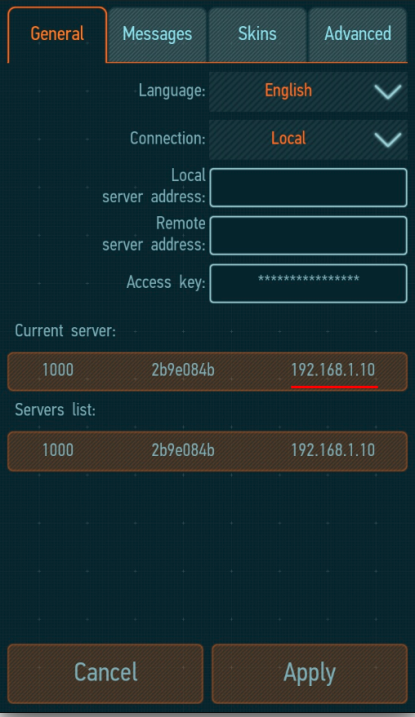
| − | You can determine the IP address of the server using the Larnitech application on your smartphone or tablet. Connect to the network to which the server is connected, open the application, click the button in the upper right corner and select “Settings”. Select “Local” in the “Connection” menu. You will see the “Current server” line. The IP address of your server will be shown under this line. | + | Определить IP-адрес сервера можно с помощью приложения Ларнитех на смартфоне или планшете. Подключитесь к сети, к которой подключен сервер, откройте приложение, нажмите кнопку в правом верхнем углу и выберите «Настройки». Выберите «Локальный» в меню «Подключение». Вы увидите строку «Текущий сервер». Под этой строкой будет показан IP-адрес вашего сервера.==How to Determine the IP-Address using the Larnitech Application== |
| + | :You can determine the IP address of the server using the Larnitech application on your smartphone or tablet. Connect to the network to which the server is connected, open the application, click the button in the upper right corner and select “Settings”. Select “Local” in the “Connection” menu. You will see the “Current server” line. The IP address of your server will be shown under this line. | ||
<br>[[file:reset12.png|300px]]<br> | <br>[[file:reset12.png|300px]]<br> | ||
| − | ==How to Determine the IP Address Using the Router's Control Panel== | + | ==Как определить IP-адрес с помощью панели управления маршрутизатора== |
| + | Вы также можете определить IP-адрес с помощью панели управления маршрутизатора. Для этого откройте список подключенных устройств и выберите нужный модуль («DE-MG» или «Metaforsa»). Его IP-адрес будет отображаться в появившемся окне. На скриншоте ниже мы выполнили это действие с помощью маршрутизатора Linksys.==How to Determine the IP Address Using the Router's Control Panel== | ||
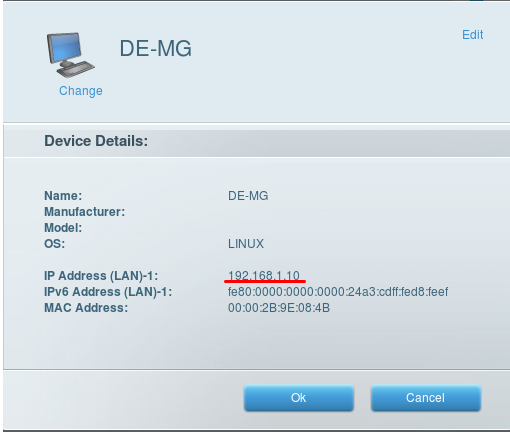
You can also determine the IP address using the router’s control panel. To do this, open the list of connected devices and select the required module (“DE-MG” or “Metaforsa”). Its IP address will be displayed in the window that appears. In the screenshot below, we have performed this action using the Linksys router. | You can also determine the IP address using the router’s control panel. To do this, open the list of connected devices and select the required module (“DE-MG” or “Metaforsa”). Its IP address will be displayed in the window that appears. In the screenshot below, we have performed this action using the Linksys router. | ||
<br>[[file:reset13.png|300px]]<br> | <br>[[file:reset13.png|300px]]<br> | ||
| − | ==Reset with a Button on the Case== | + | ==Сброс с помощью кнопки на корпусе== |
| + | 1. Выключите модуль, вытащив соответствующий разъем питания (под надписью «+24V» на модулях DE-MG). | ||
| + | 2а. Нажмите и удерживайте кнопку «Восстановление» на модулях DE-MG. Его расположение показано цифрой 3 на диаграмме ниже. Кнопка находится внутри корпуса; нужно продавить его тонким предметом через отверстие.==Reset with a Button on the Case== | ||
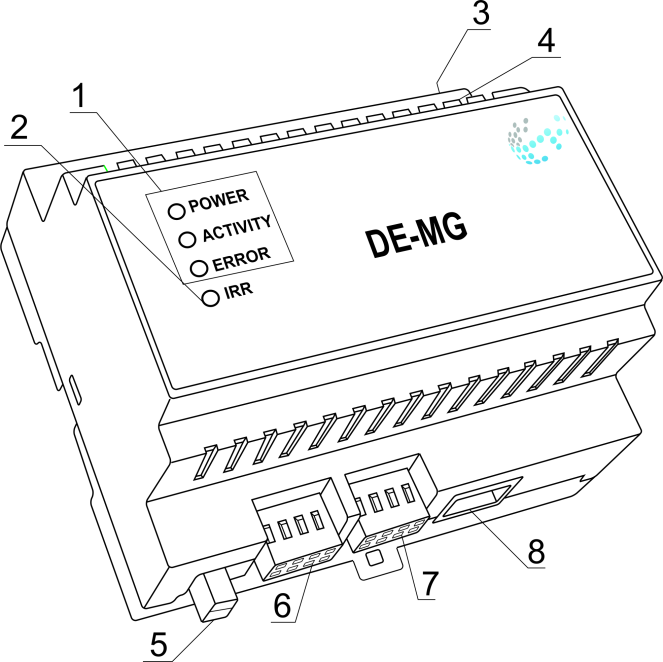
1. Power off the module by pulling out the corresponding power connector (under the “+24V” inscription on DE-MG modules). | 1. Power off the module by pulling out the corresponding power connector (under the “+24V” inscription on DE-MG modules). | ||
2а. Press and hold the “Recovery” button on DE-MG modules. Its location is shown as 3 in the diagram below. The button is located inside the case; you need to press it with a thin object through the hole. | 2а. Press and hold the “Recovery” button on DE-MG modules. Its location is shown as 3 in the diagram below. The button is located inside the case; you need to press it with a thin object through the hole. | ||
Revision as of 14:19, 18 January 2022
Сброс к заводским настройкам Если вам необходимо сбросить устройство DE-MG/Metaforsa к заводским настройкам, вы можете сделать это с помощью веб-панели администрирования Умного дома (LT Setup) или с помощью кнопки на модуле DE-MG или Metaforsa. ==ВНИМАНИЕ!== Для успешного сброса на вашем модуле должна быть установлена последняя версия прошивки.
Обновление прошивки модуля DE-MG или Metaforsa
1. В меню слева выберите «Модули» (категория «Общие»).
2. В поле «Тип» выберите модуль, название которого начинается с «DE-MG» или «Metaforsa» (в зависимости от модели модуля). Появится панель модуля. В меню справа нажмите кнопку «Обновить прошивку».In the “Type” field, select a module whose name starts with “DE-MG” or “Metaforsa” (depending on the module model). The module panel appears. In the menu on the right, click the "Update firmware” button.
3. В появившемся окне нажмите кнопку «Обновить» и подтвердите кнопкой «ОК» в следующем окне.In the window that appears, click the “Update” button and confirm with the “OK” button in the next window.
4. Начнется обновление прошивки. Появится окно индикатора выполнения. Когда прогресс достигнет 100%, убедитесь, что в нижней части окна отображается сообщение «Обновление выполнено успешно». Это означает, что обновление прошло успешно. Для завершения нажмите кнопку «Закрыть» в нижней части окна.The firmware update will start. The progress bar window appears. When the progress reaches 100%, make sure that the “Update successful” message is displayed at the bottom of the window. This means that the update was successful. To finish, click the “Close” button at the bottom of the window.
Сброс через LT Setup
1. Авторизуйтесь в LT Setup и выберите вкладку «Перезагрузка» в меню слева (категория «Система»).==Reset via LT Setup==
1. Authorize in LT Setup and select the “Reboot” tab from the menu on the left (the “System” category).
2. На появившейся странице нажмите кнопку «Восстановить заводские настройки».On the page that appears, click the "Reset to factory defaults" button.
3. На экране появится окно с предупреждением «Все данные будут удалены. Уверены ли вы?". Нажмите «ОК» для сброса.A window will appear on the screen with the warning “All data will be removed. Are you sure?”. Click “OK” to reset.
4. Для успешного сброса в вашей сети должен быть DHCP-сервер и доступ в Интернет. После сброса сервер запросит динамический IP-адрес через DHCP. Время сброса зависит от скорости вашего интернет-соединения и может занять от 15 до 40 минут. Если вы хотите продолжить, нажмите «ОК» в следующем окне.For successful reset, your network must have a DHCP server and Internet access. After resetting, the server will request a dynamic IP address via DHCP. The reset time depends on the speed of your Internet connection and can take from 15 to 40 minutes. If you want to continue, click “OK” in the following window.

5. На экране появится индикатор выполнения сброса. Пожалуйста, не выключайте сервер во время сброса.A reset progress bar appears on the screen. Please, do not power off the server while the reset is in progress.
6. По завершении сброса появится панель авторизации LT Setup. Авторизуйтесь, введя логин и пароль, чтобы начать пользоваться интерфейсом.When the reset is complete, the LT Setup authorization panel appears. Authorize by entering your login and password to start using the interface.
Инструкции по подключению к программе LT Setup
Веб-панель настройки LT будет доступна по адресу http://de-mg.local (или http://metaforsa.local). В некоторых системах не поддерживаются псевдодомены верхнего уровня, из-за чего по указанному адресу получить доступ к панели будет невозможно. В этом случае вам необходимо определить IP-адрес сервера.==Instructions for Connecting to LT Setup== The LT Setup web panel will be available at http://de-mg.local (or http://metaforsa.local). In some systems, pseudo-domains of the upper level are not supported, and this is why it will not be possible to access the panel at the specified address. In this case, you need to determine the IP address of the server. Определить IP-адрес сервера можно через приложение Ларнитех на смартфоне или планшете или с помощью панели роутераYou can determine the IP address of the server through the Larnitech application on your smartphone or tablet or using the panel of your router:
Как определить IP-адрес с помощью приложения Larnitech
Определить IP-адрес сервера можно с помощью приложения Ларнитех на смартфоне или планшете. Подключитесь к сети, к которой подключен сервер, откройте приложение, нажмите кнопку в правом верхнем углу и выберите «Настройки». Выберите «Локальный» в меню «Подключение». Вы увидите строку «Текущий сервер». Под этой строкой будет показан IP-адрес вашего сервера.==How to Determine the IP-Address using the Larnitech Application==
- You can determine the IP address of the server using the Larnitech application on your smartphone or tablet. Connect to the network to which the server is connected, open the application, click the button in the upper right corner and select “Settings”. Select “Local” in the “Connection” menu. You will see the “Current server” line. The IP address of your server will be shown under this line.
Как определить IP-адрес с помощью панели управления маршрутизатора
Вы также можете определить IP-адрес с помощью панели управления маршрутизатора. Для этого откройте список подключенных устройств и выберите нужный модуль («DE-MG» или «Metaforsa»). Его IP-адрес будет отображаться в появившемся окне. На скриншоте ниже мы выполнили это действие с помощью маршрутизатора Linksys.==How to Determine the IP Address Using the Router's Control Panel==
You can also determine the IP address using the router’s control panel. To do this, open the list of connected devices and select the required module (“DE-MG” or “Metaforsa”). Its IP address will be displayed in the window that appears. In the screenshot below, we have performed this action using the Linksys router.
Сброс с помощью кнопки на корпусе
1. Выключите модуль, вытащив соответствующий разъем питания (под надписью «+24V» на модулях DE-MG).
2а. Нажмите и удерживайте кнопку «Восстановление» на модулях DE-MG. Его расположение показано цифрой 3 на диаграмме ниже. Кнопка находится внутри корпуса; нужно продавить его тонким предметом через отверстие.==Reset with a Button on the Case==
1. Power off the module by pulling out the corresponding power connector (under the “+24V” inscription on DE-MG modules).
2а. Press and hold the “Recovery” button on DE-MG modules. Its location is shown as 3 in the diagram below. The button is located inside the case; you need to press it with a thin object through the hole.
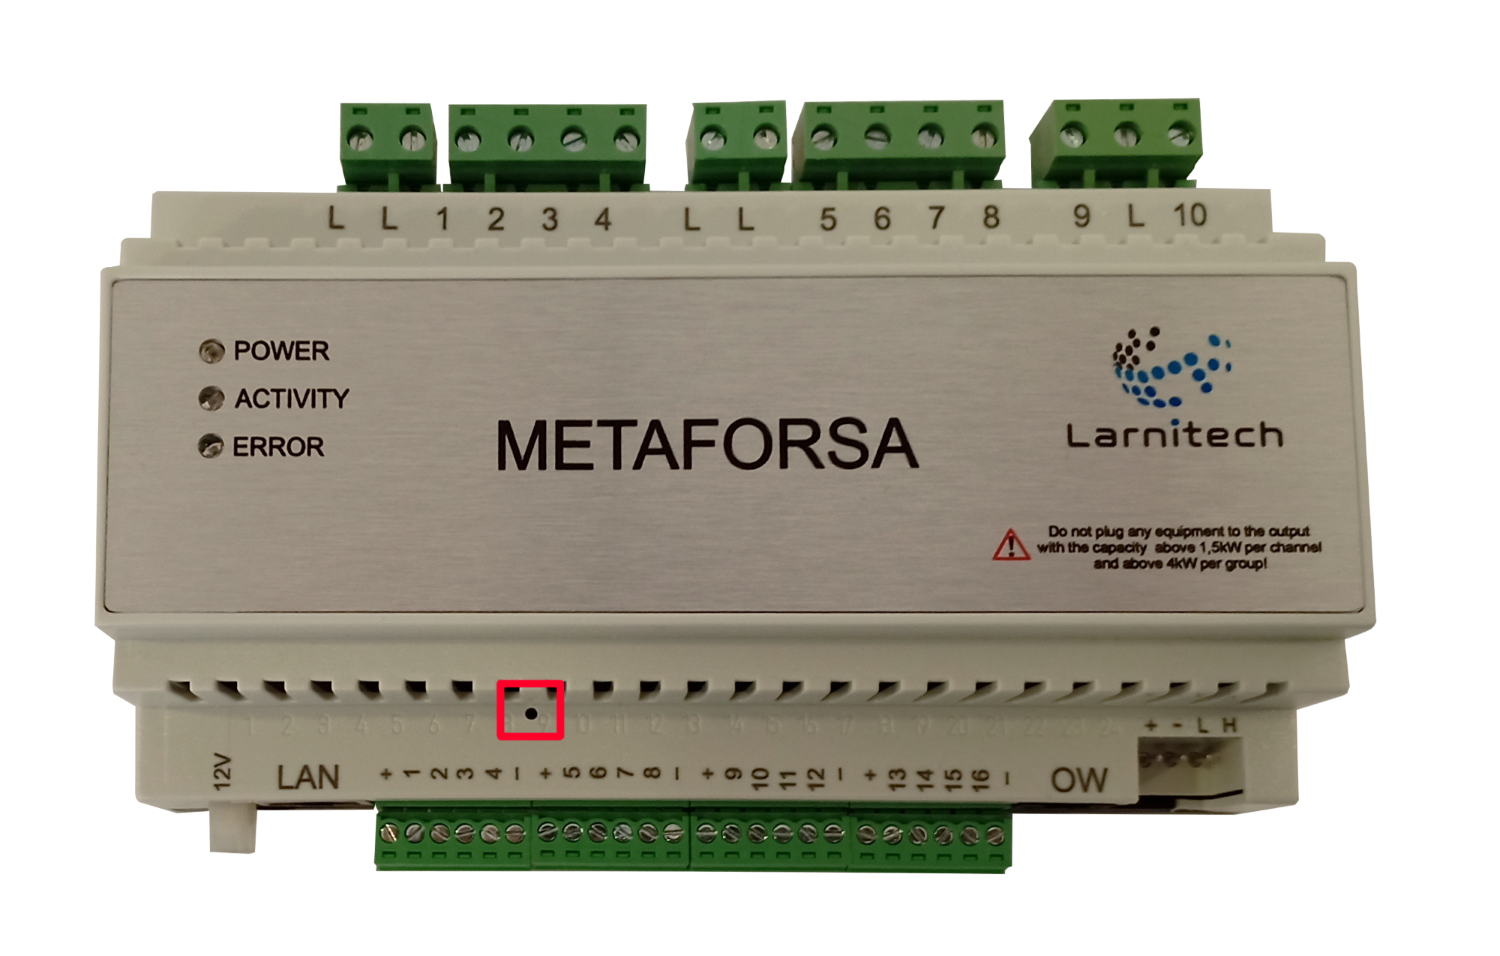
2b. In Metaforsa modules, the button is located under the case cover. Its location is shown in the photo below; you need to press it with a thin object through the hole.
3. While holding the “Recovery” button down, plug in the power connector. On DE-MG modules, the indicator (designated as 4 in the diagram above) should light up in blue, and then start flashing red. When the LED stops flashing and turns red, release the button. The reset process has started. It can take from 15 to 40 minutes, and during this time period the color of the indicator may change. When the reset process is completed, the indicator will turn green. To start the LT Setup web panel, see the Instructions for Running LT Setup.