Edit Items
Edit Mode
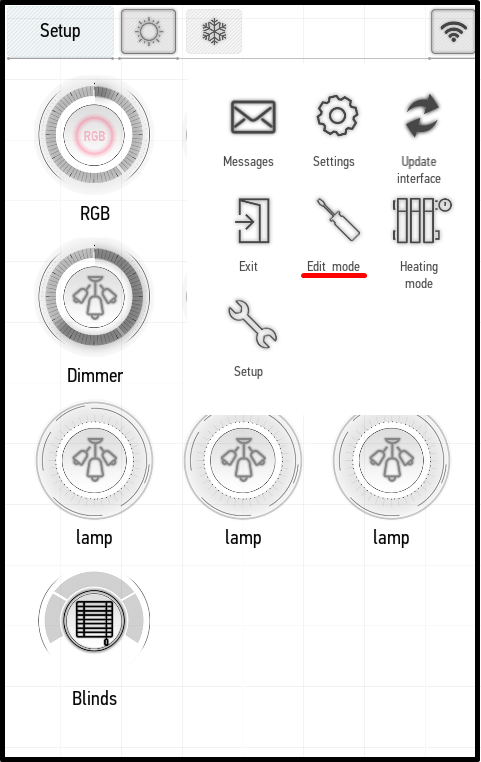
You can yourself change the settings of the actuators, sensors, heating and ventilation items, multiroom and remote control. For that end, you need to open the application menu and click Edit mode.
When the edit mode is enabled, the corresponding inscription appears on the main panel:

The edit mode allows you to open the edit menu for each item. For that end, simply press and hold the item’s icon until the menu opens. In the examples, we open the lamp edit menu.

The edit menu is represented by several tabs (up to 4, depending on the item):
- General – general settings;
- Auto – automation settings;
- Schedule – configuring the schedule;
- Switch – binding to buttons.
General
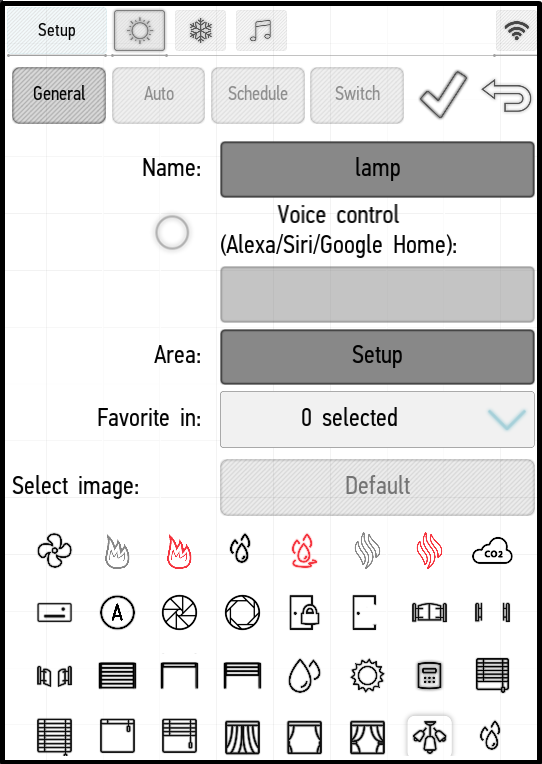
- Name – allows you to change the item name.
- System – gives the system status for the item. WARNING! After changing the status of an item, it will no longer be visible in the main panel. Do not change this setting if you are not sure that it is necessary. The item can be seen only in engineering mode (see Additional Functions -> Edit System Items).
- Voice control – it allows you to control an item using Alexa, Siri or Google Home. To activate, tick the box and enter the name of the item that will be used for voice control.
- Area – it indicates the item location in the system structure. By clicking on the location, you can move the item to any available room.
- Favorite in – it allows you to add the item to the Favorites in the desired rooms (see Favorites).
- Select image – it allows you to change the icon on the item's button (the Default button returns the default icon).
Depending on the item type, a part of the listed functions may be unavailable.
Auto
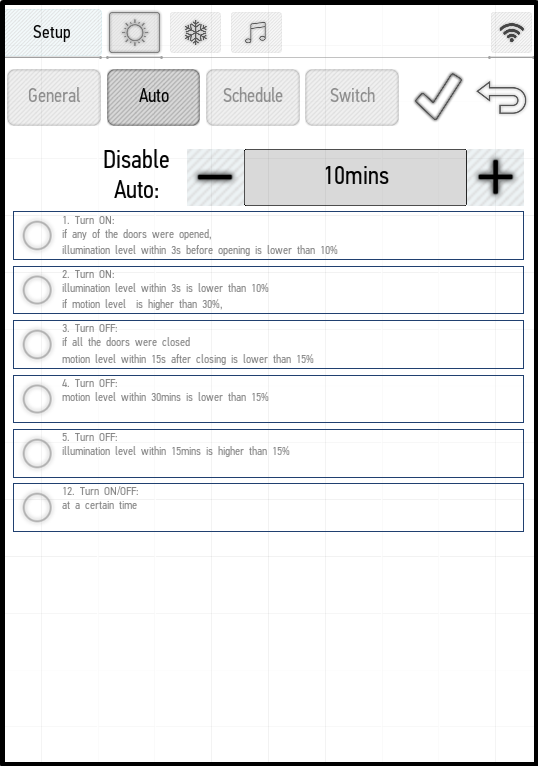
You can use the Auto menu to select settings for the item automation. In total there are 13 automation presets, and its specific set is available for each element. For details, see the automation setup instructions.
Schedule
You can use this menu to specify the item turning on and off according to the specific schedule. To create a schedule, click the Add button. The following panel will appear on the screen.
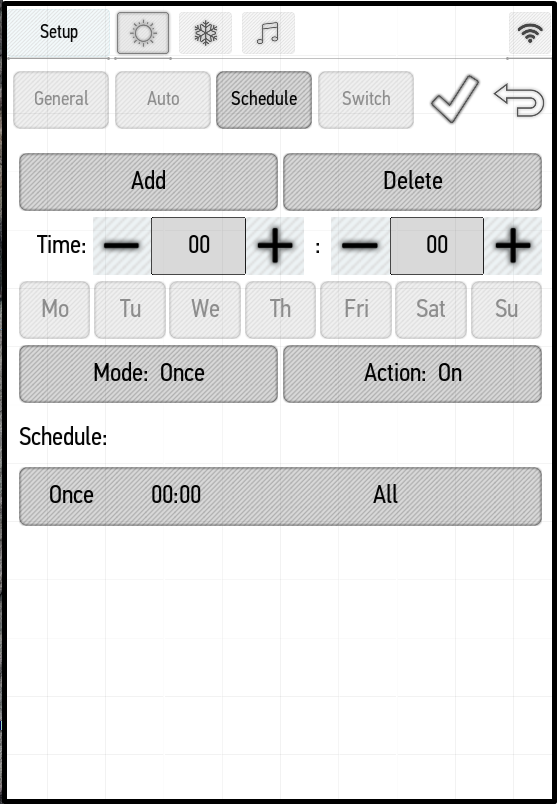
In the Time box you can use the arrows to choose the time when the action will take place. The buttons with the days of week are located below – you can choose the desired actions, and they will be carried out at the selected time of these days.
Use the Mode button to select the frequency of repetitive actions. The Once value means that the action will be performed once, at the selected time of the selected day. The Period value means that the action will be repeated at the selected time every selected day. The Off value disables the specified schedule.
Use the Action button to select an action to be performed at a specified time. There are two values: On and Off. Accordingly, the item can be turned on and off.
In the example below, we have added a schedule for the lamp periodic turning on every weekday at 22:00, periodic turning off on the same days at 23:00 and one-time turning on on Sunday at 19:00.
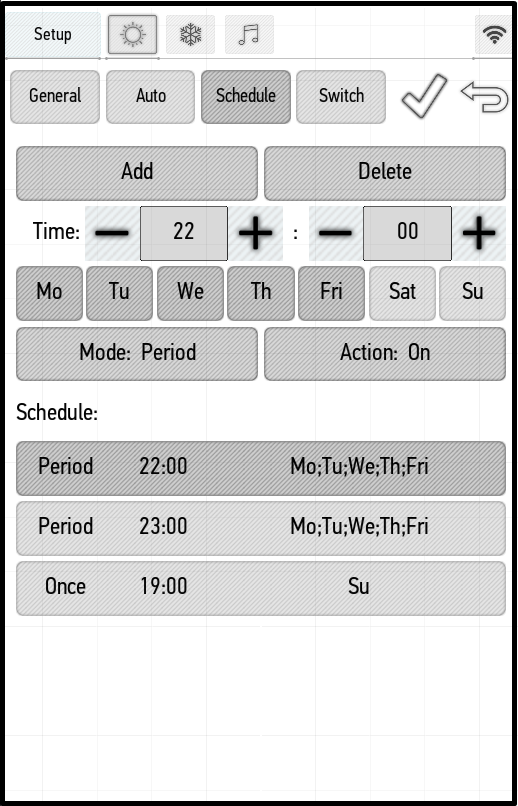
To delete the selected schedule, click the Delete button.
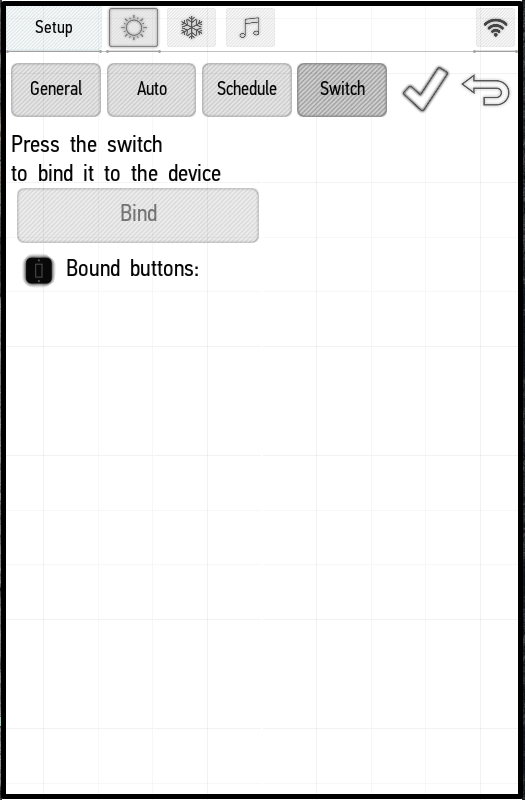
Switch
You can use the Switch menu to bind the switch button to an item, and further control the item by this button. We shall bind a button to the dimmer. Press the switch button in order it would be recognized by the program. Used switch will be displayed on the screen (the right screenshot).
 |
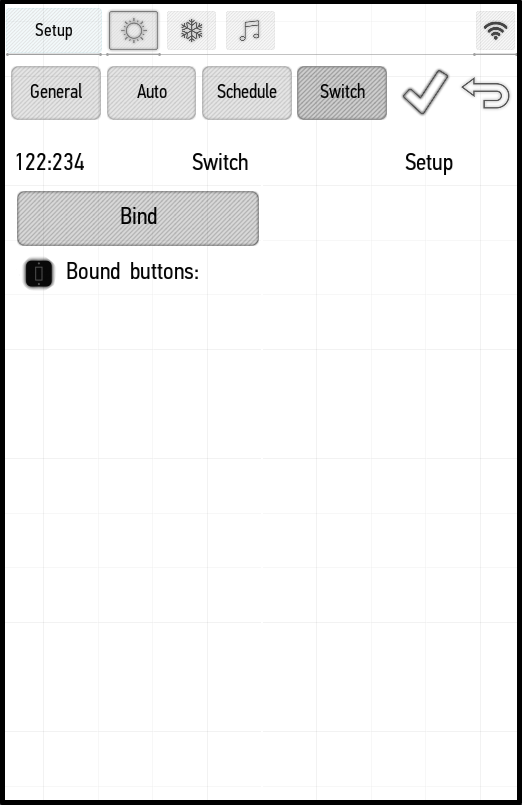 ' |
Click the Bind button to bind the button with the item. The bound button will be displayed below this button. Thus, you can bind several keys to one actuator.
By default, the bound button toggles the item state. If you want to change these settings, click on the wrench icon.
You can bind various actions to a single click (click), double click (Double click), triple click (Triple click), long press (Long click), combinations of successive short and long press (Long 2-nd click).
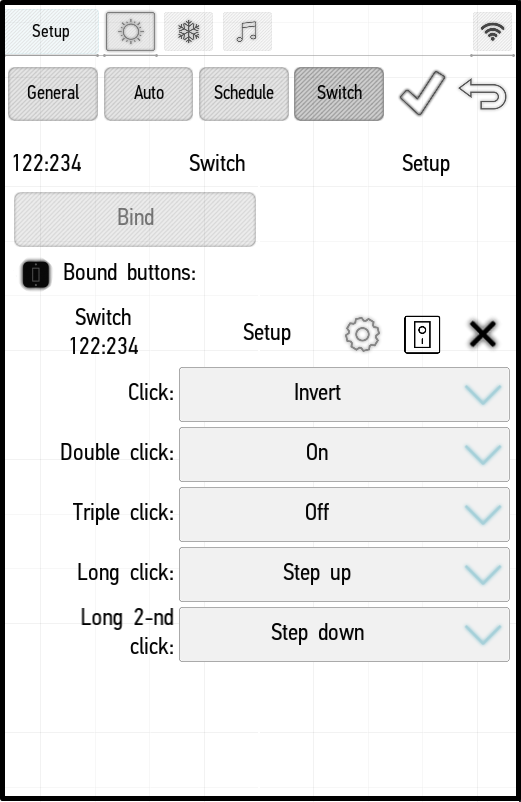
In the example on the left, we have configured the button to control the dimmer and set the following parameters:
- single click: invert state;
- double click: turn on;
- triple click: turn off;
- long click: increase the brightness by one step (4%);
- short and long click: decrease the brightness by one step (4%).
For other types of items to which the button can be bound, actions may differ: for example, gate or jalousie can be opened and closed. The button settings for the multiroom are described in Edit Items -> Edit Multiroom -> Switch.
You can use the X mark to unbind the button from the item. After making changes, you must confirm them by clicking the tick mark. '
Edit radiators
General
The content of the General tab corresponds to the content on other items (see [[#General|Edit elements -> General])
Auto
The Auto tab for radiators contains additional settings. You can add and configure heating modes, as well as specify intervals for their activation.
The following presets for heating modes are available:
- Manual – manually controlled mode;
- Always off – while the mode is active, the radiator is turned off;
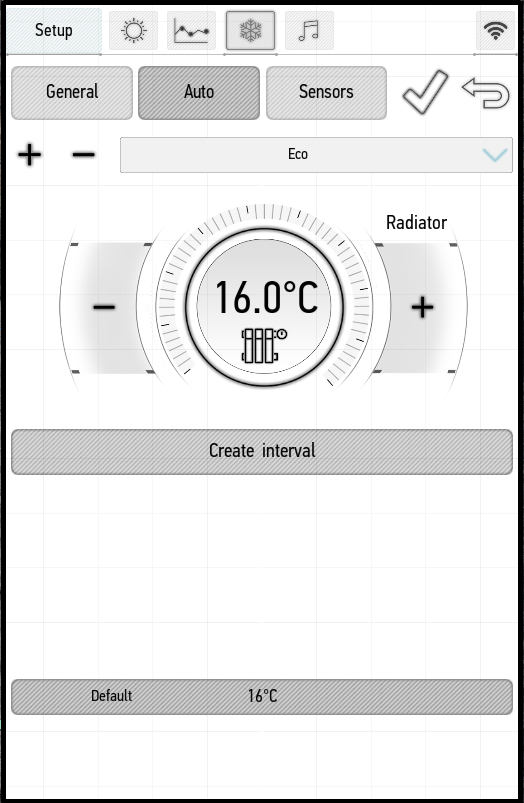
- Eco – it sets the temperature to 16 degrees;
- Comfort – it sets the temperature to 22 degrees;
- Hot – it sets the temperature to 25 degrees.
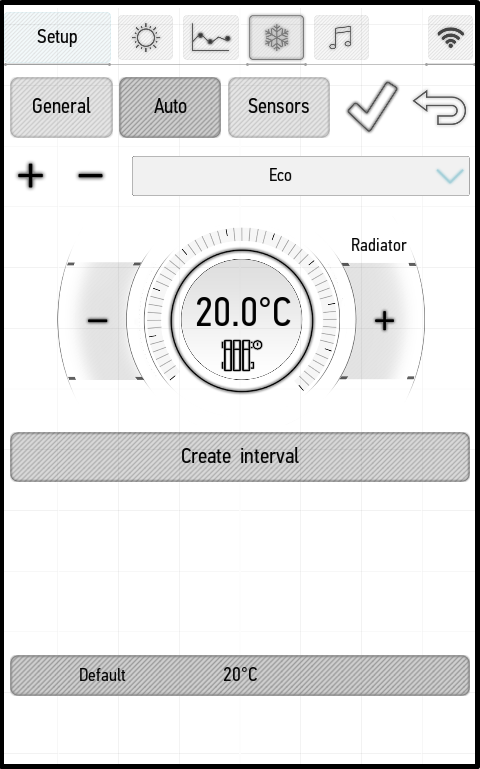
Manual and Always off modes cannot be changed, others can be configured or deleted. For example, in the screenshot below, we change the temperature of the Eco mode and set 20 degrees.
Modes are changed only for a given radiator. By clicking on the plus, you can add your own modes and set the desired temperature for them. By default, the new mode is assigned the name Mode -. To change the name, press and hold it until the cursor appears.
For each mode, except Manual and Always off, you can configure the work schedule. By default, each mode is designed to maintain the specified temperature.
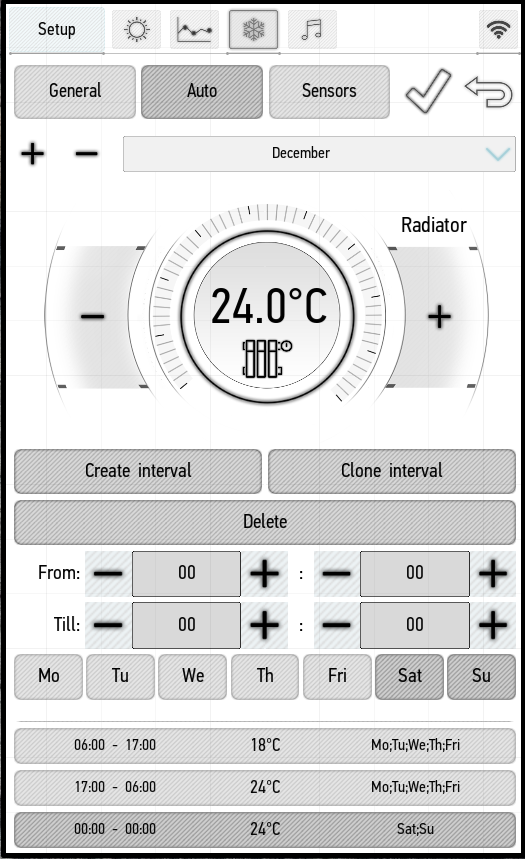
In the screenshot on the right, we have created the “December” mode and configured the following intervals for it:
- from 6:00 to 17:00 from Mon to Fri the radiator maintains an indoor temperature of 18 degrees;
- from 17:00 to 6:00 from Mon to Fri the radiator maintains an indoor temperature of 24 degrees;
- entire weekend the radiator maintains an indoor temperature of 24 degrees.
You can use the Clone interval button to copy the selected interval, and the Delete - button to delete it. In all time intervals outside the specified intervals, the default temperature will be maintained.
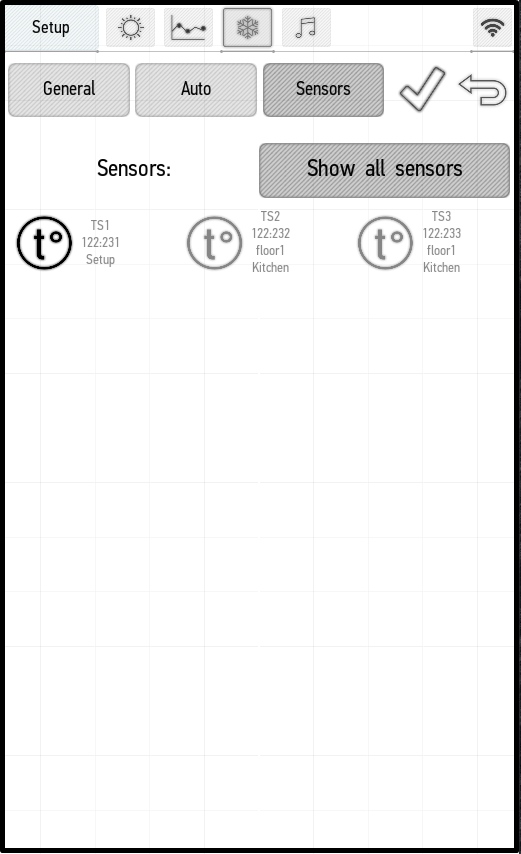
Sensors
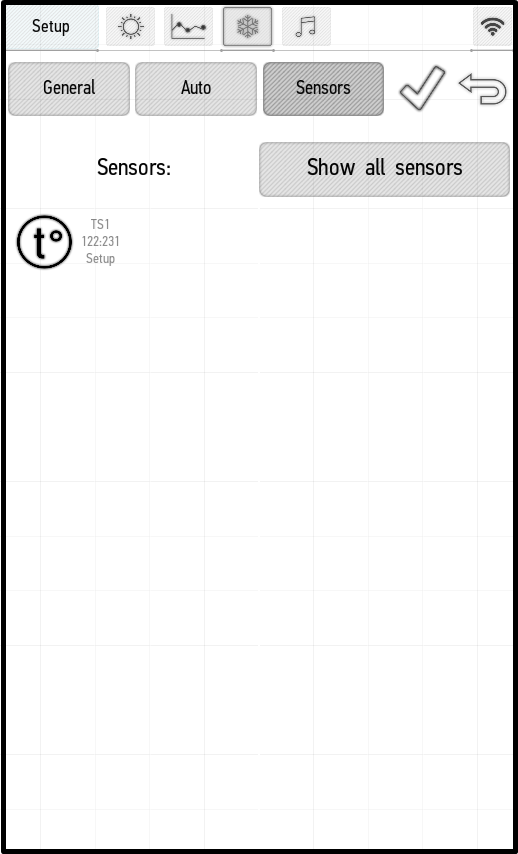
On the Sensors panel you can see sensors from the current room (the screenshot on the left) and sensors from all rooms (the screenshot on the right). To see all the sensors in the home, click the Show all sensors button. To connect the sensor, click on it – it will be highlighted in orange. If several sensors are connected, the temperature received from them is averaged.
 |
 |
Edit Multiroom
When the edit mode is enabled the wrench icon appears in the right upper corner of the multimedia panel. Click it to open the edit menu.
General
The General tab (see #General">Edit elements -> General) in the multiroom has two additional functions:
- Soft Start – it allows you to set the period (in seconds) used to increase the start volume from 0 to the specified level.
- Turn OFF parameters – it allows you to set the period in seconds or the number of tracks which will pass before the playback stops.
Color Music
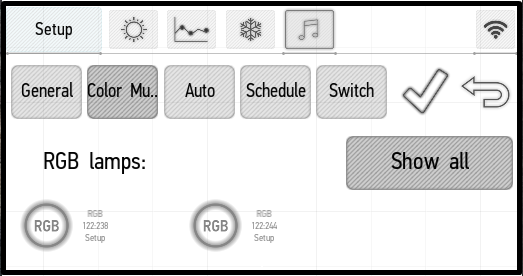
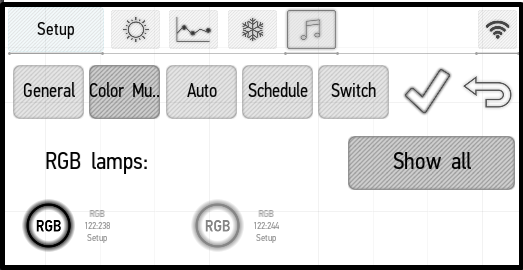
In this section you can choose RGB backlights, which will be used in color music. By default, those backlights are displayed that are in the same room with a multiroom. Click on the Show All button, and you can see all RGBs in the home (the left screenshot). Click on the desired backlights, and you will add them to the color music; selected backlights are highlighted in orange (the right screenshot).
 |
 |
Auto
The contents of the Auto tab correspond to the contents on other items (see Edit Items -> Auto).
Schedule
The contents of the Schedule tab correspond to the contents on other items (see Edit Items -> Schedule).
Switch
The algorithm of binding a button to multiroom corresponds to the binding algorithm for other items (see Edit Items -> Switch), but other actions can be performed when you click buttons:
- Play/Pause – playback start or stop (it starts the music when it is stopped, and stops it when it plays);
- Pause – playback stop (when the music is stopped, it will not work);
- Play – playback start (when the music plays, it will not work);
- Next track – go to the next track;
- Previous track – go to the previous track;
- Cyclic volume change – the volume increases and decreases in turn. A long press causes smooth change of the volume until the button is released, and a short press causes its change by 5%;
- Volume up – increasing the volume by 5% with a single click. A long press causes increasing the volume within the entire period of pressing;
- Volume down – decreasing the volume by 5% with a single click. A long press causes decreasing the volume within the entire period of pressing.
Saving changes

After editing the item, click the tick mark in the right upper corner to save the changes.

To exit without saving the specified parameters, click on the arrow in the right upper corner of the screen.