Difference between revisions of "Quick Start Guide/sr"
(Updating to match new version of source page) |
(Updating to match new version of source page) Tags: Mobile web edit Mobile edit |
||
| Line 3: | Line 3: | ||
<youtube width="400px">FxeoZDaP9U8</youtube> | <youtube width="400px">FxeoZDaP9U8</youtube> | ||
</div> | </div> | ||
| + | |||
| + | <span style="font-size: 20px; font-weight: bold;">'''Quick start/unboxing.'''</span> | ||
<hr> | <hr> | ||
| − | |||
| − | |||
| − | |||
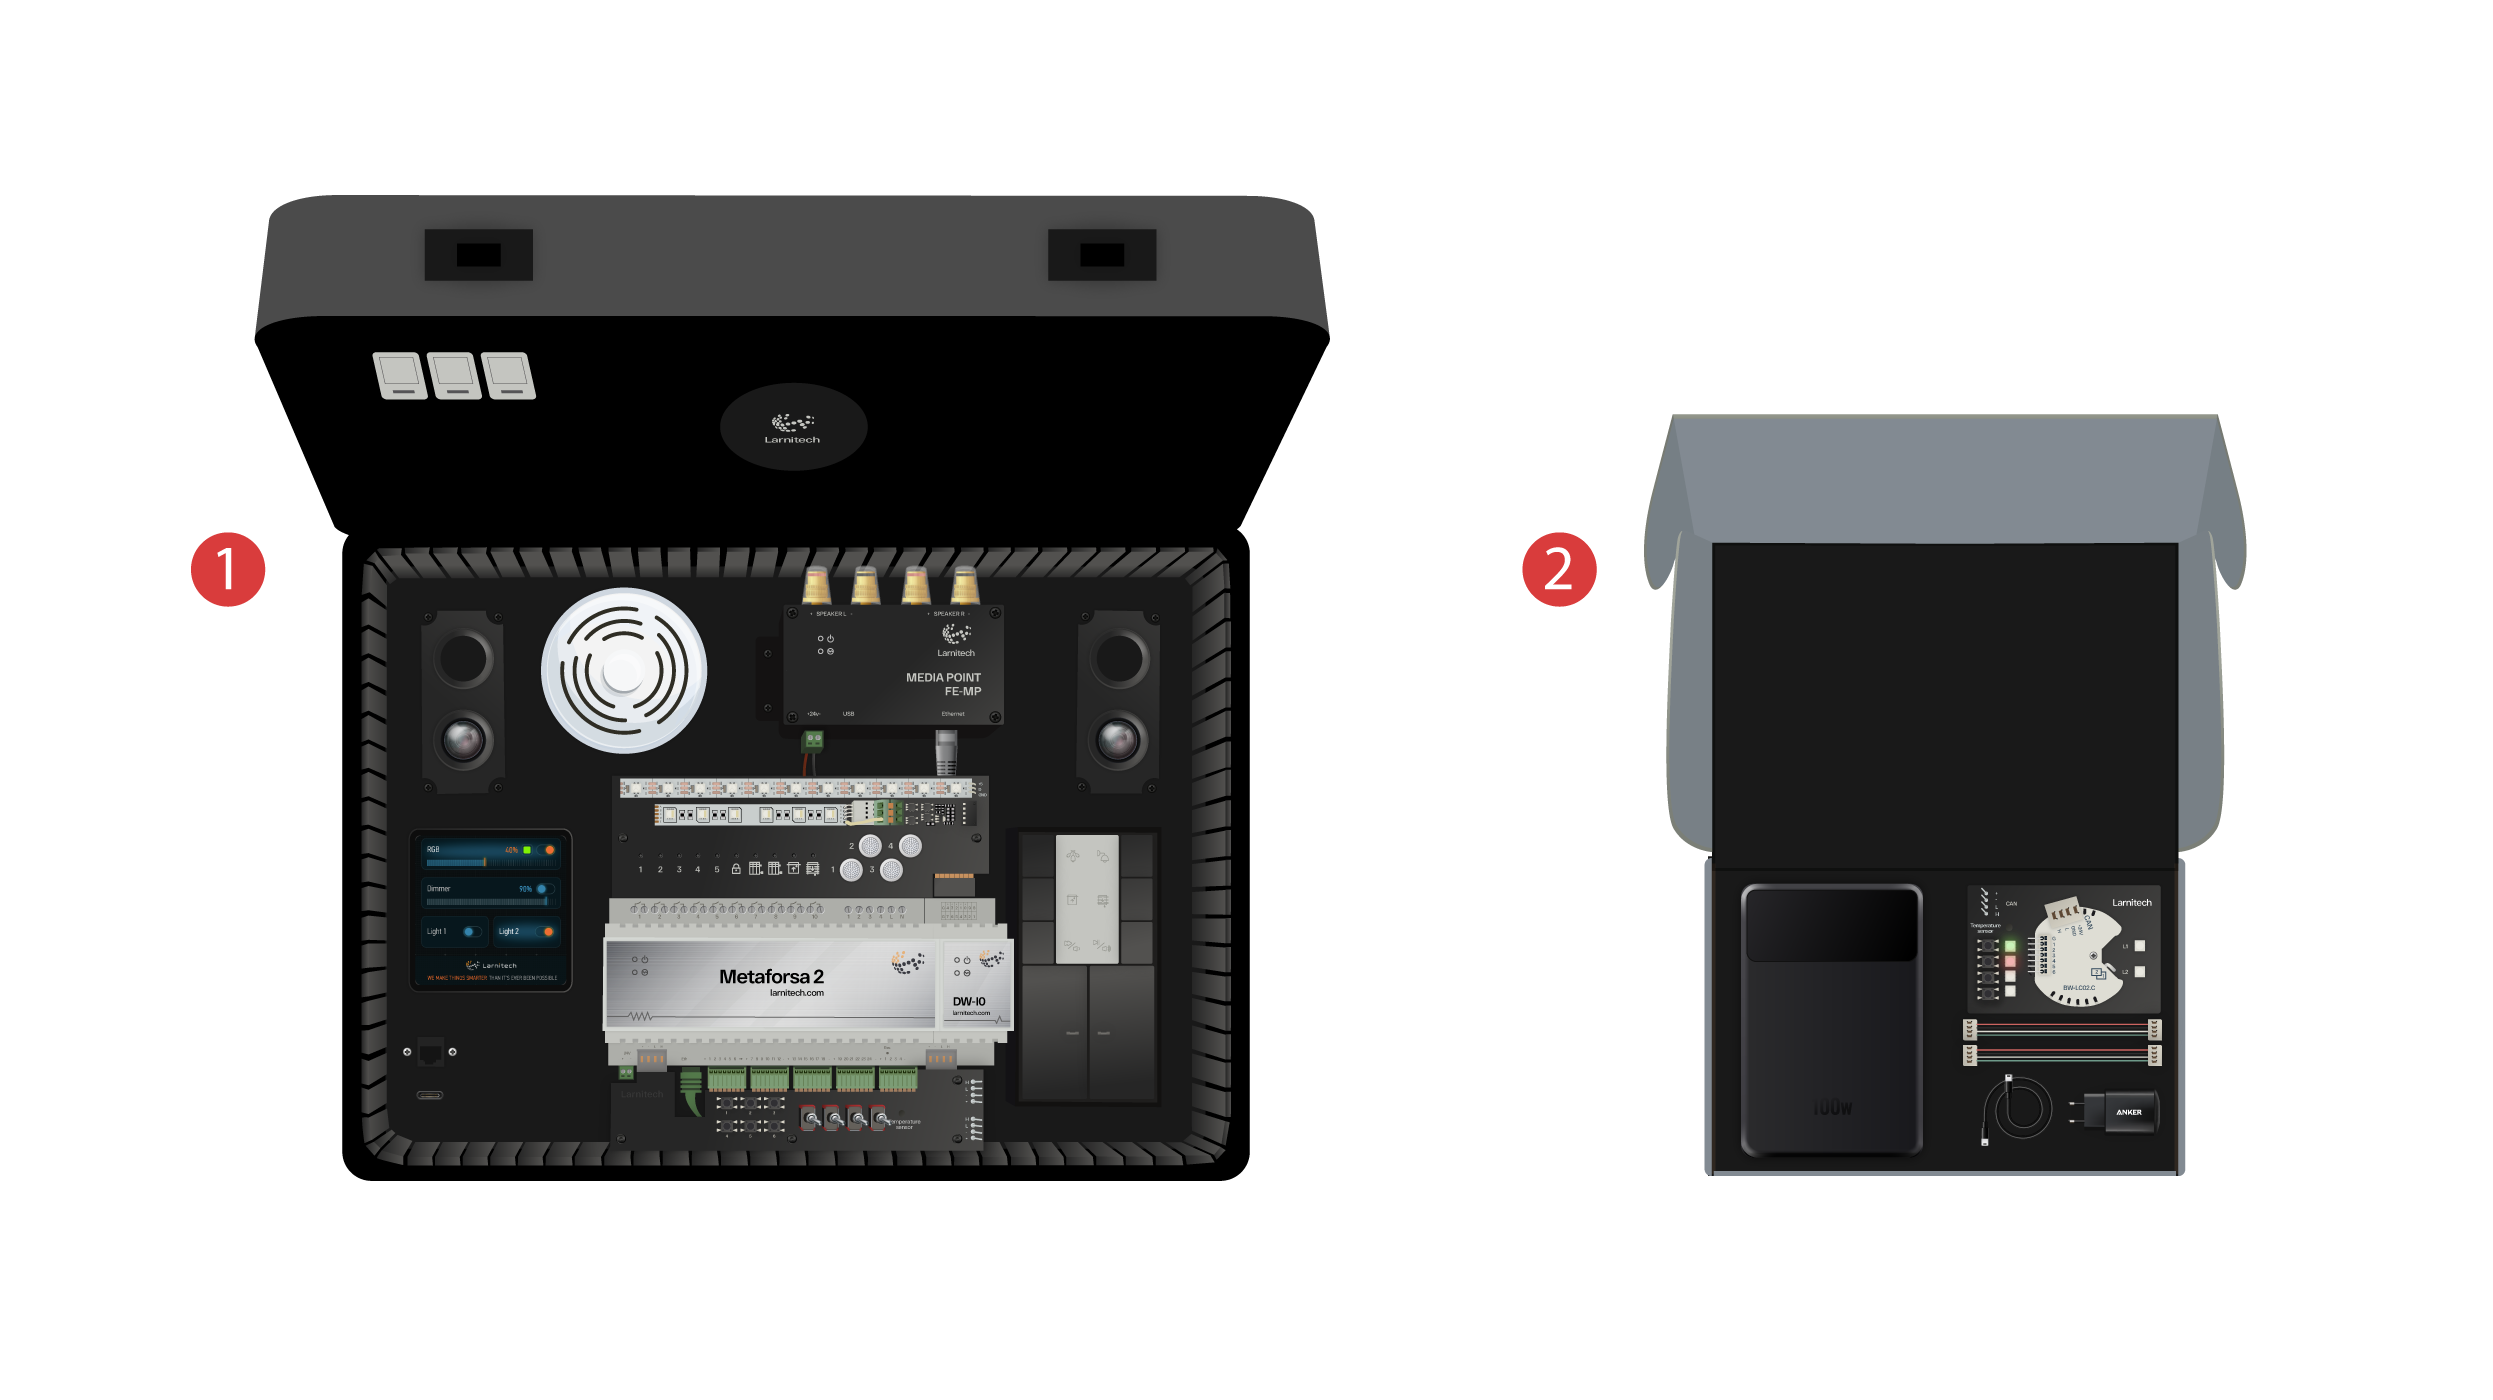
We welcome everyone at our channel! This video is a guide on how to set up the Larnitech system quickly and effortlessly. The setup is going to be done with the help of a demonstration case. A training set includes a demonstration suitcase <span style="display: inline-block; border-radius: 50%; text-align: center; font-size: 30px; vertical-align: middle;">①</span> and a box with several extra items <span style="display: inline-block; border-radius: 50%; text-align: center; font-size: 30px; vertical-align: middle;">②</span>. | We welcome everyone at our channel! This video is a guide on how to set up the Larnitech system quickly and effortlessly. The setup is going to be done with the help of a demonstration case. A training set includes a demonstration suitcase <span style="display: inline-block; border-radius: 50%; text-align: center; font-size: 30px; vertical-align: middle;">①</span> and a box with several extra items <span style="display: inline-block; border-radius: 50%; text-align: center; font-size: 30px; vertical-align: middle;">②</span>. | ||
[[File:DemoCase01.png|1000x800px]] | [[File:DemoCase01.png|1000x800px]] | ||
<hr> | <hr> | ||
| − | + | ||
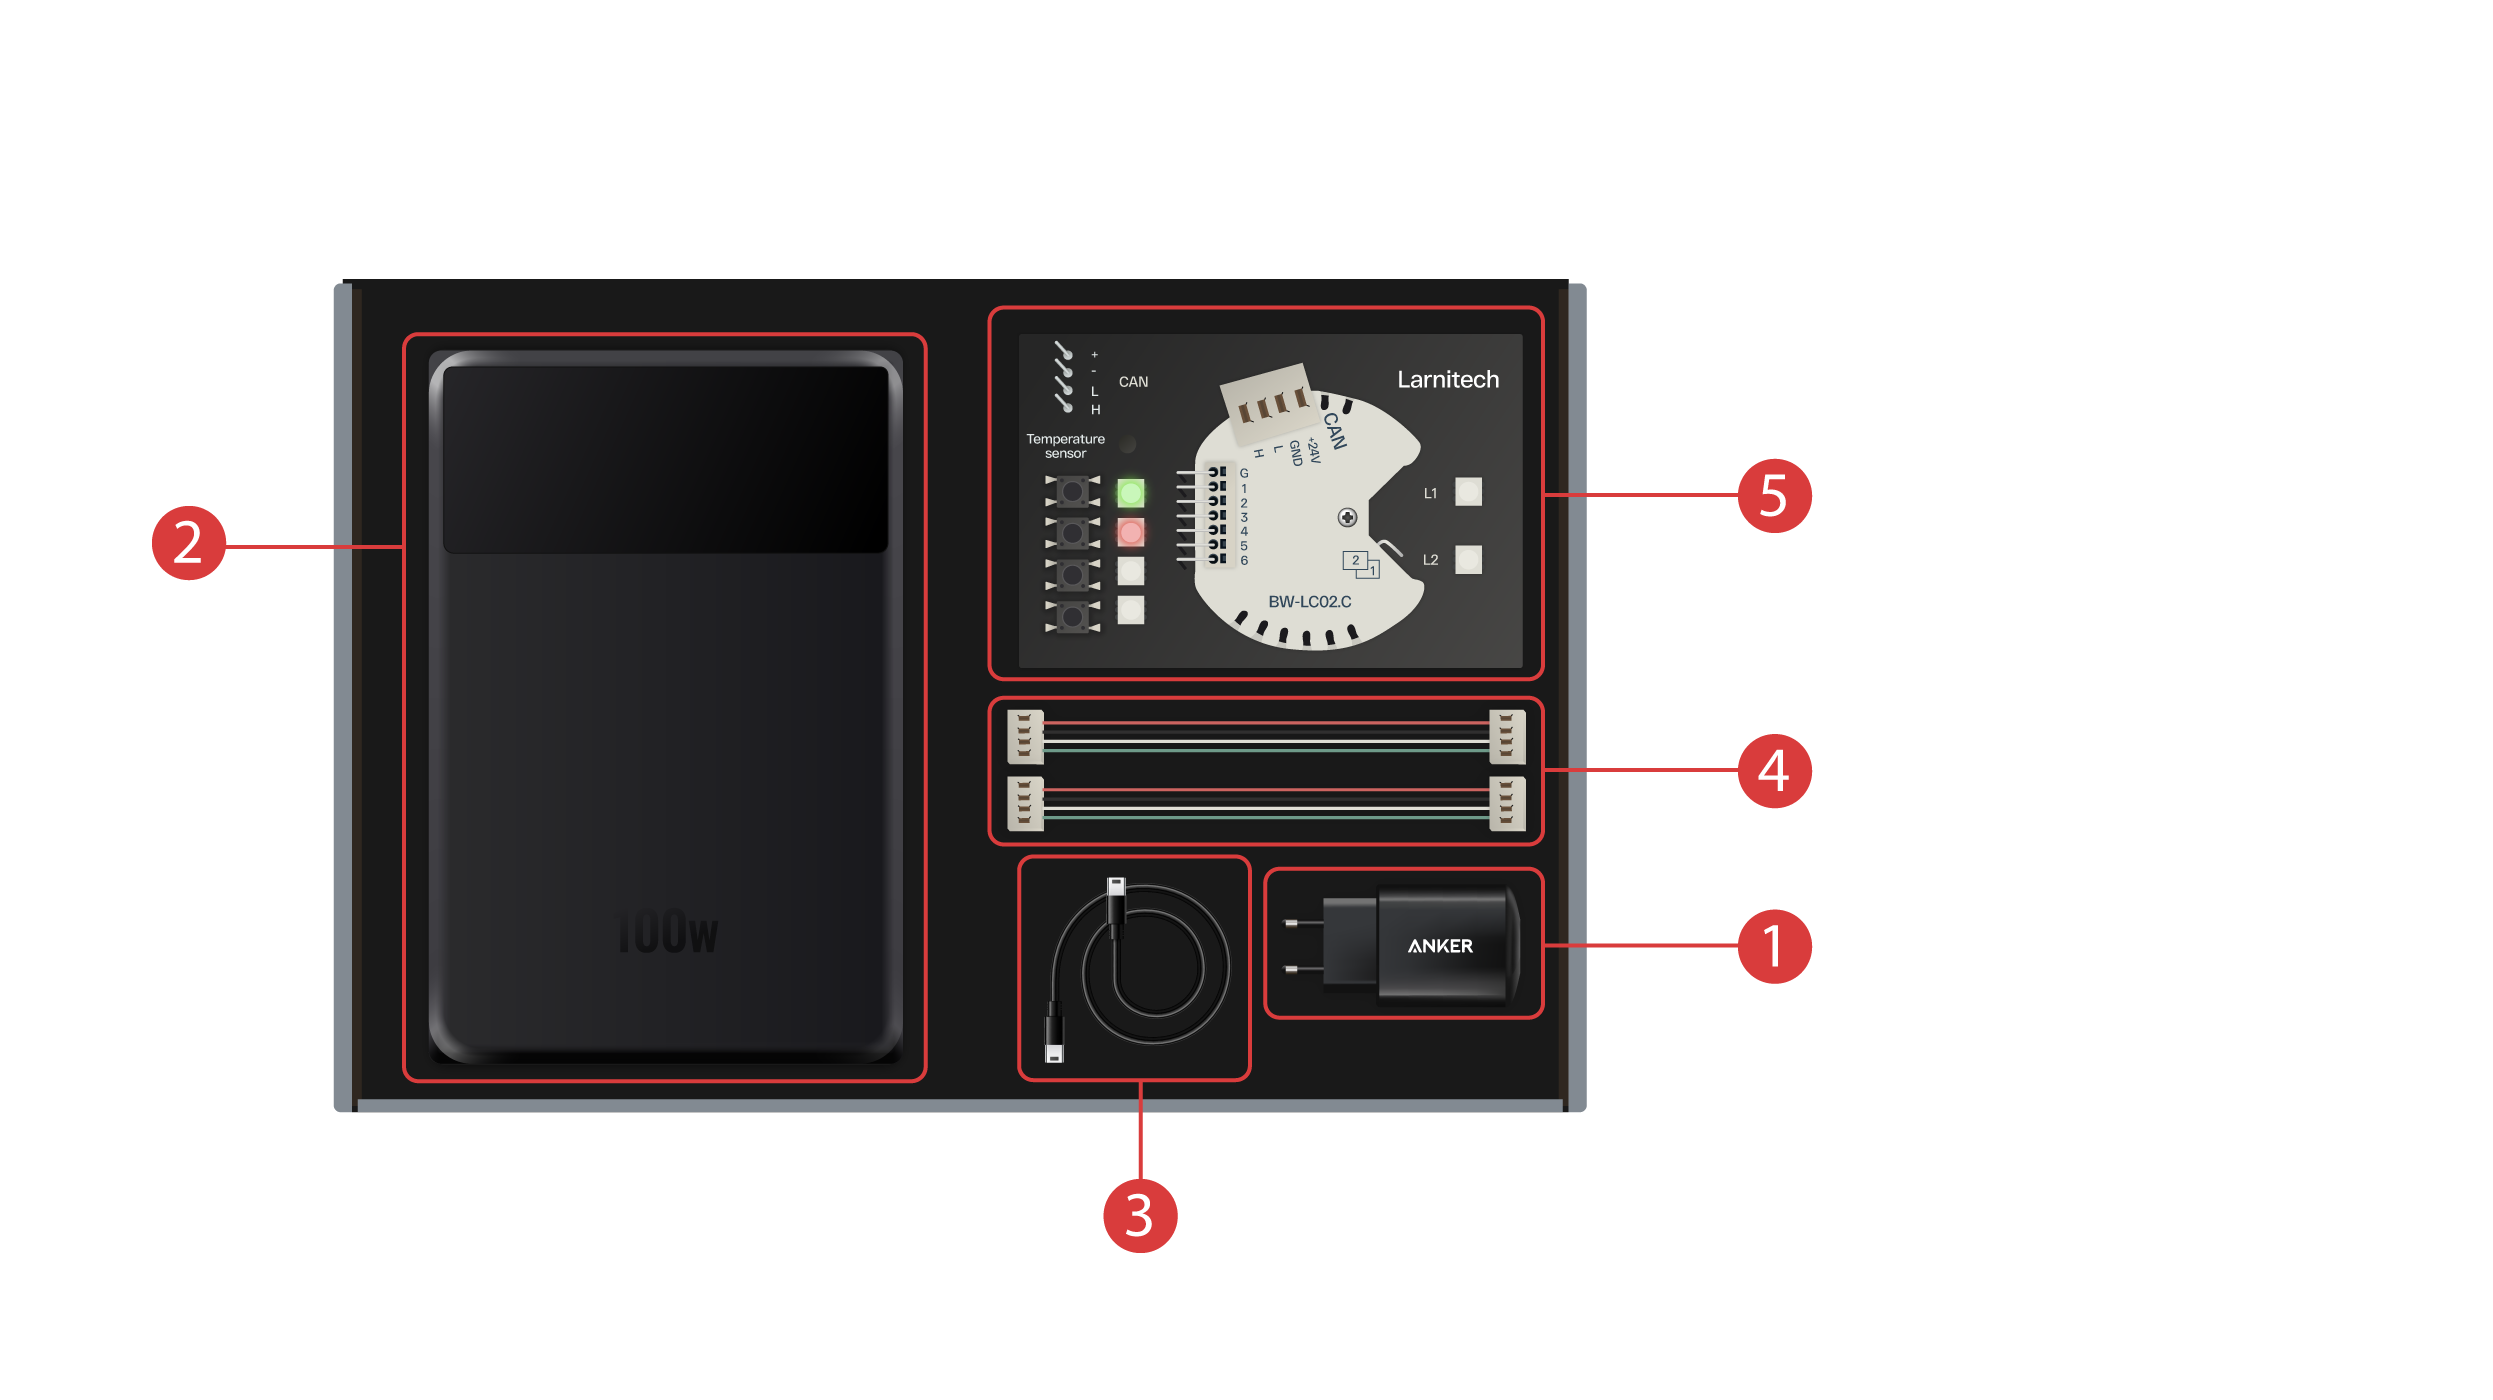
The box features the following: | The box features the following: | ||
| Line 25: | Line 24: | ||
[[File:DemoCase2.png|1000x800px]] | [[File:DemoCase2.png|1000x800px]] | ||
<hr> | <hr> | ||
| − | |||
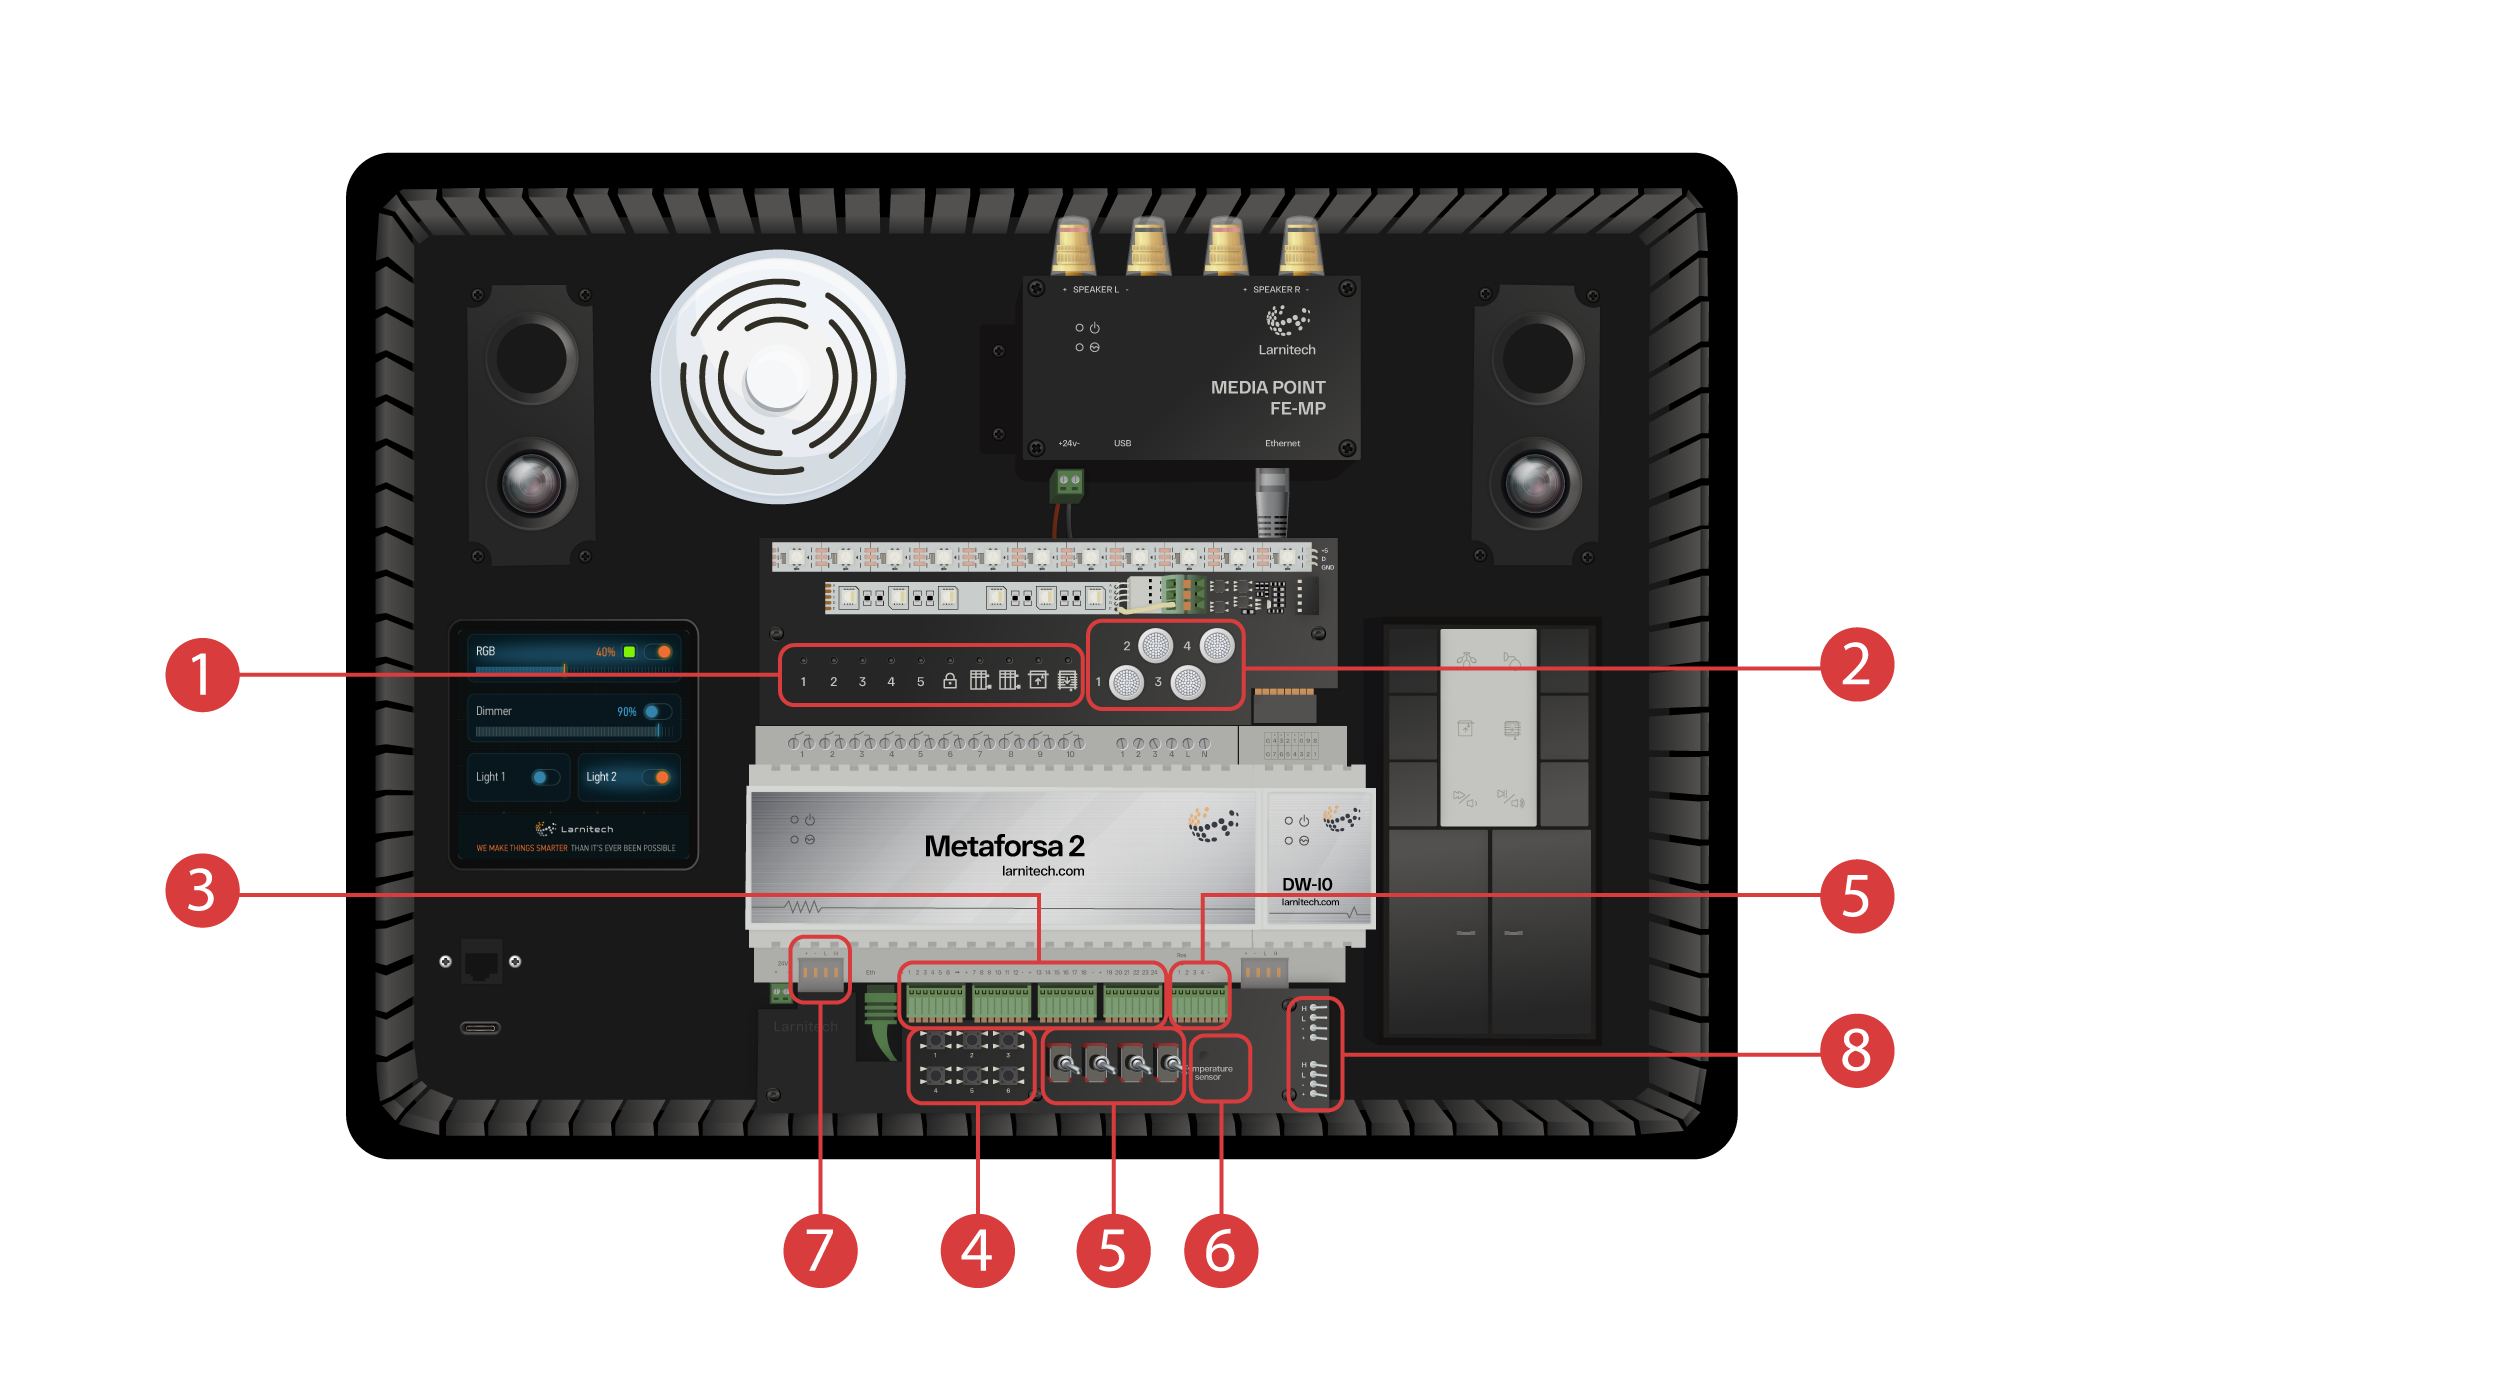
The demonstration suitcase contains the following elements: | The demonstration suitcase contains the following elements: | ||
‘Metaforsa 2’ module. | ‘Metaforsa 2’ module. | ||
| Line 42: | Line 40: | ||
[[File:DemoCase3.png|1000x800px]] | [[File:DemoCase3.png|1000x800px]] | ||
<hr> | <hr> | ||
| − | |||
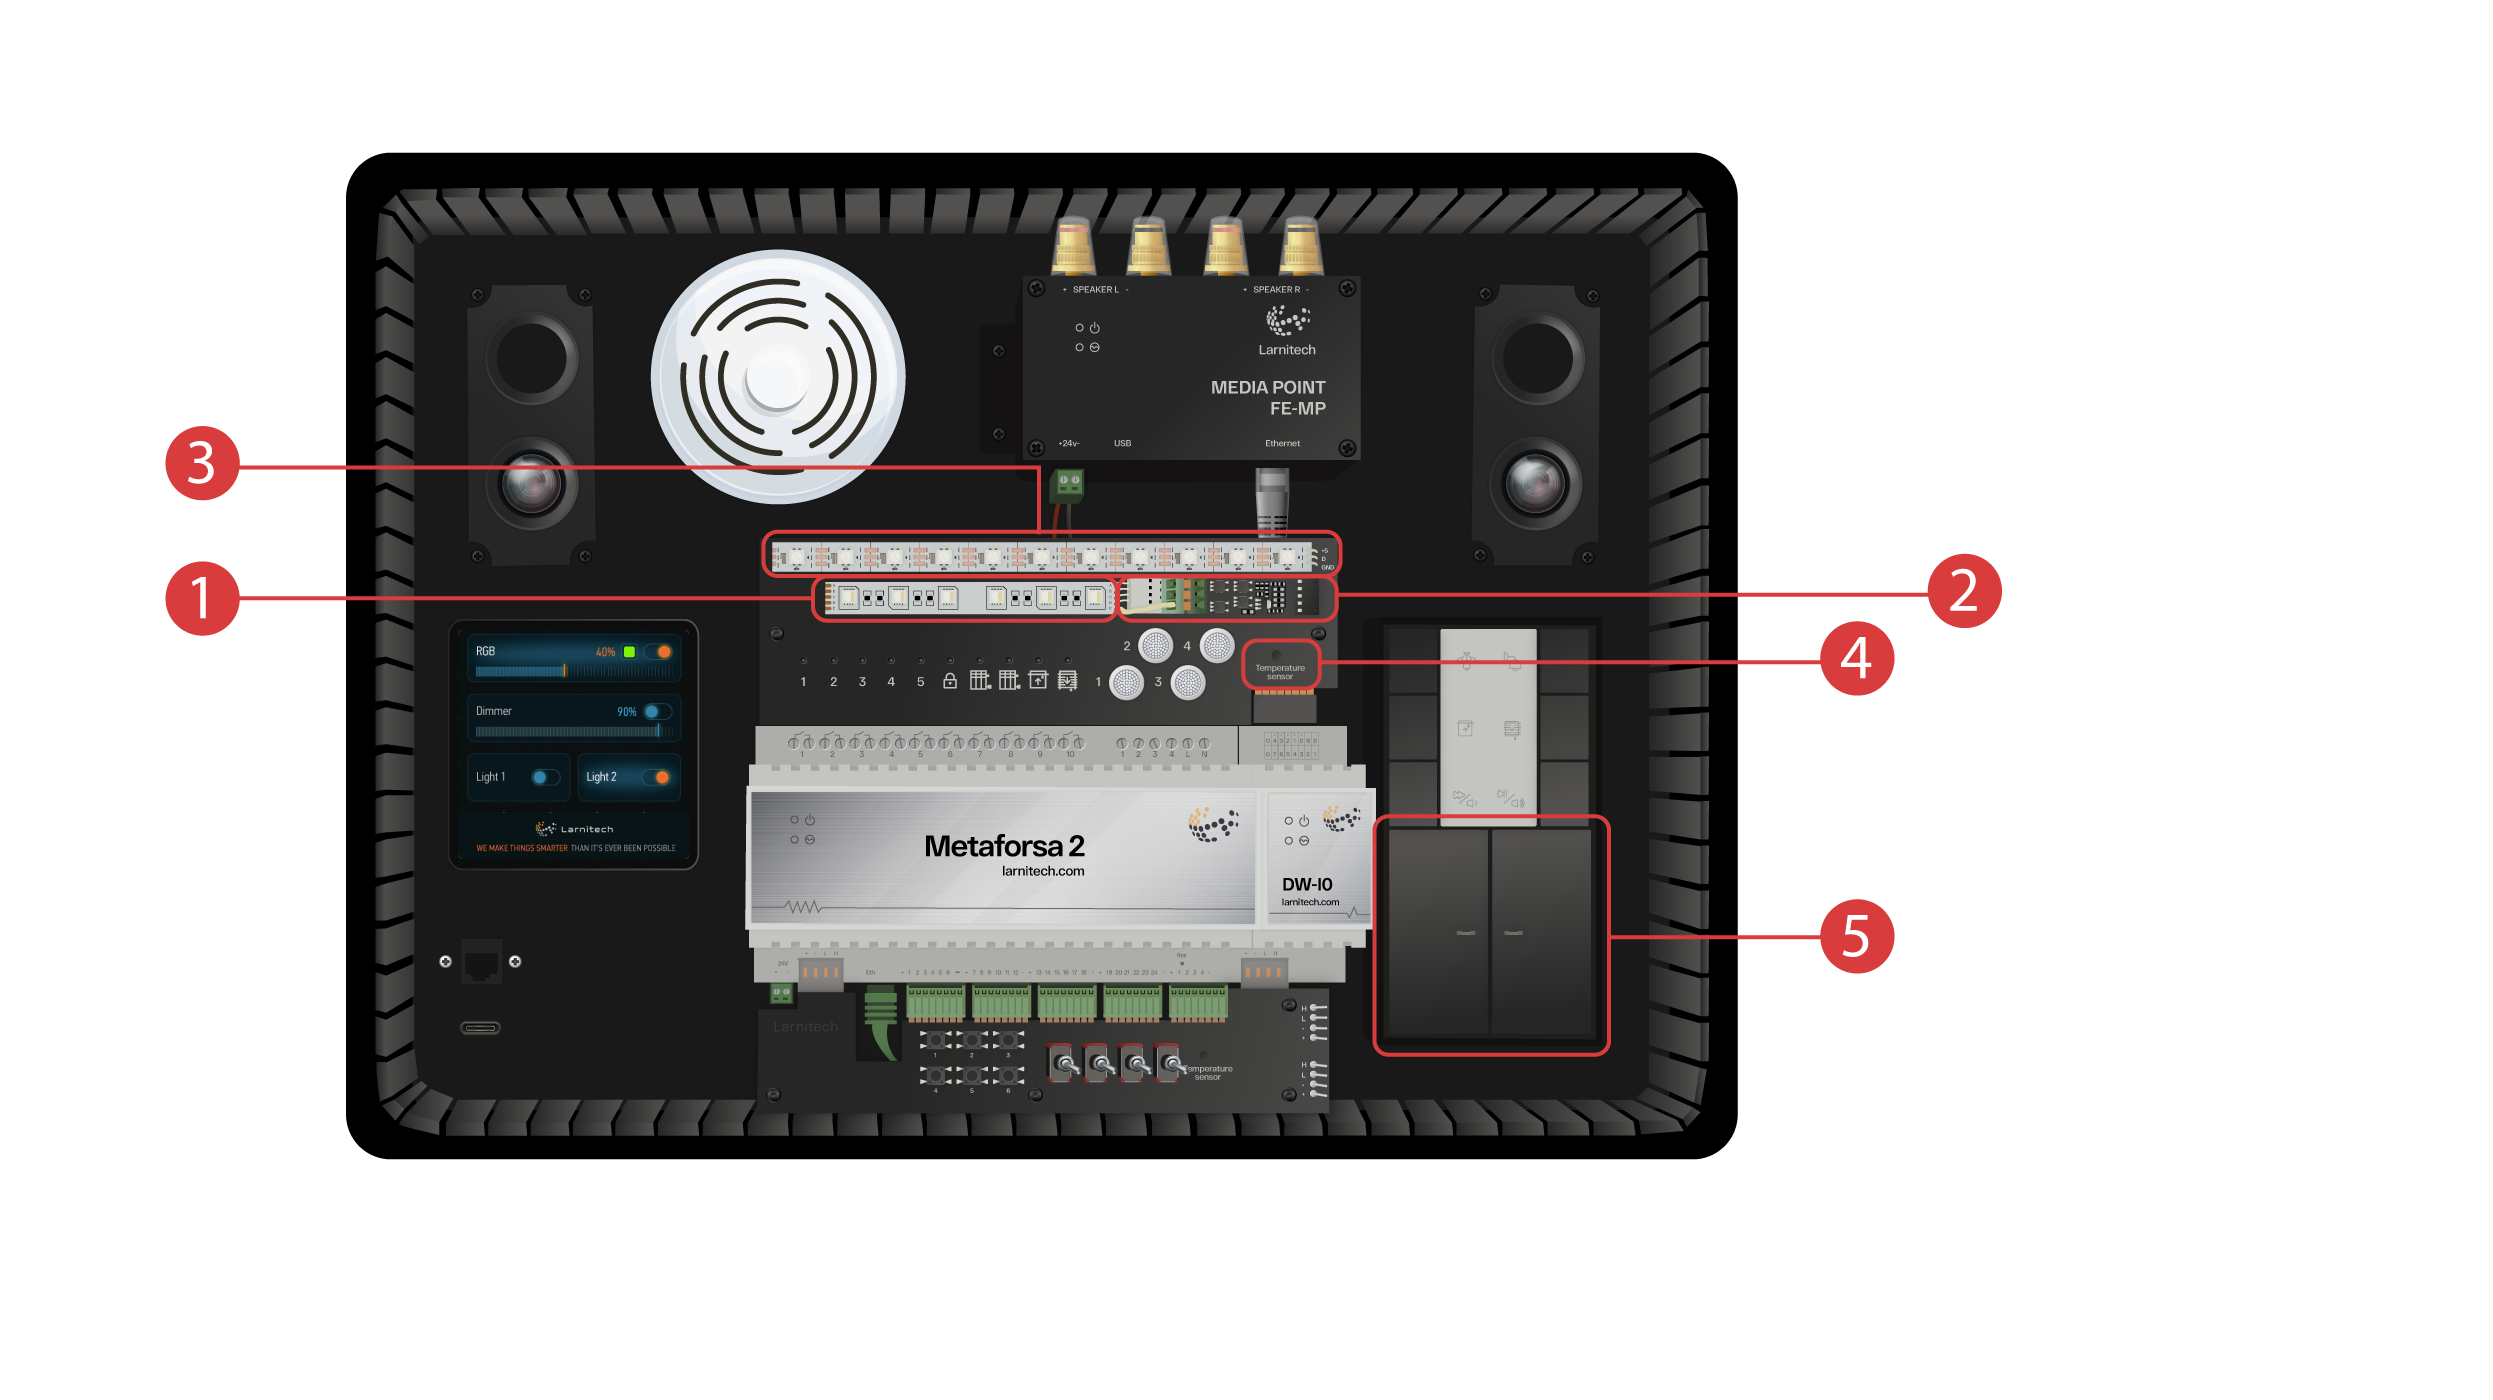
DW-IO module | DW-IO module | ||
| Line 56: | Line 53: | ||
[[File:DemoCase4.png|1000x800px]] | [[File:DemoCase4.png|1000x800px]] | ||
<hr> | <hr> | ||
| − | |||
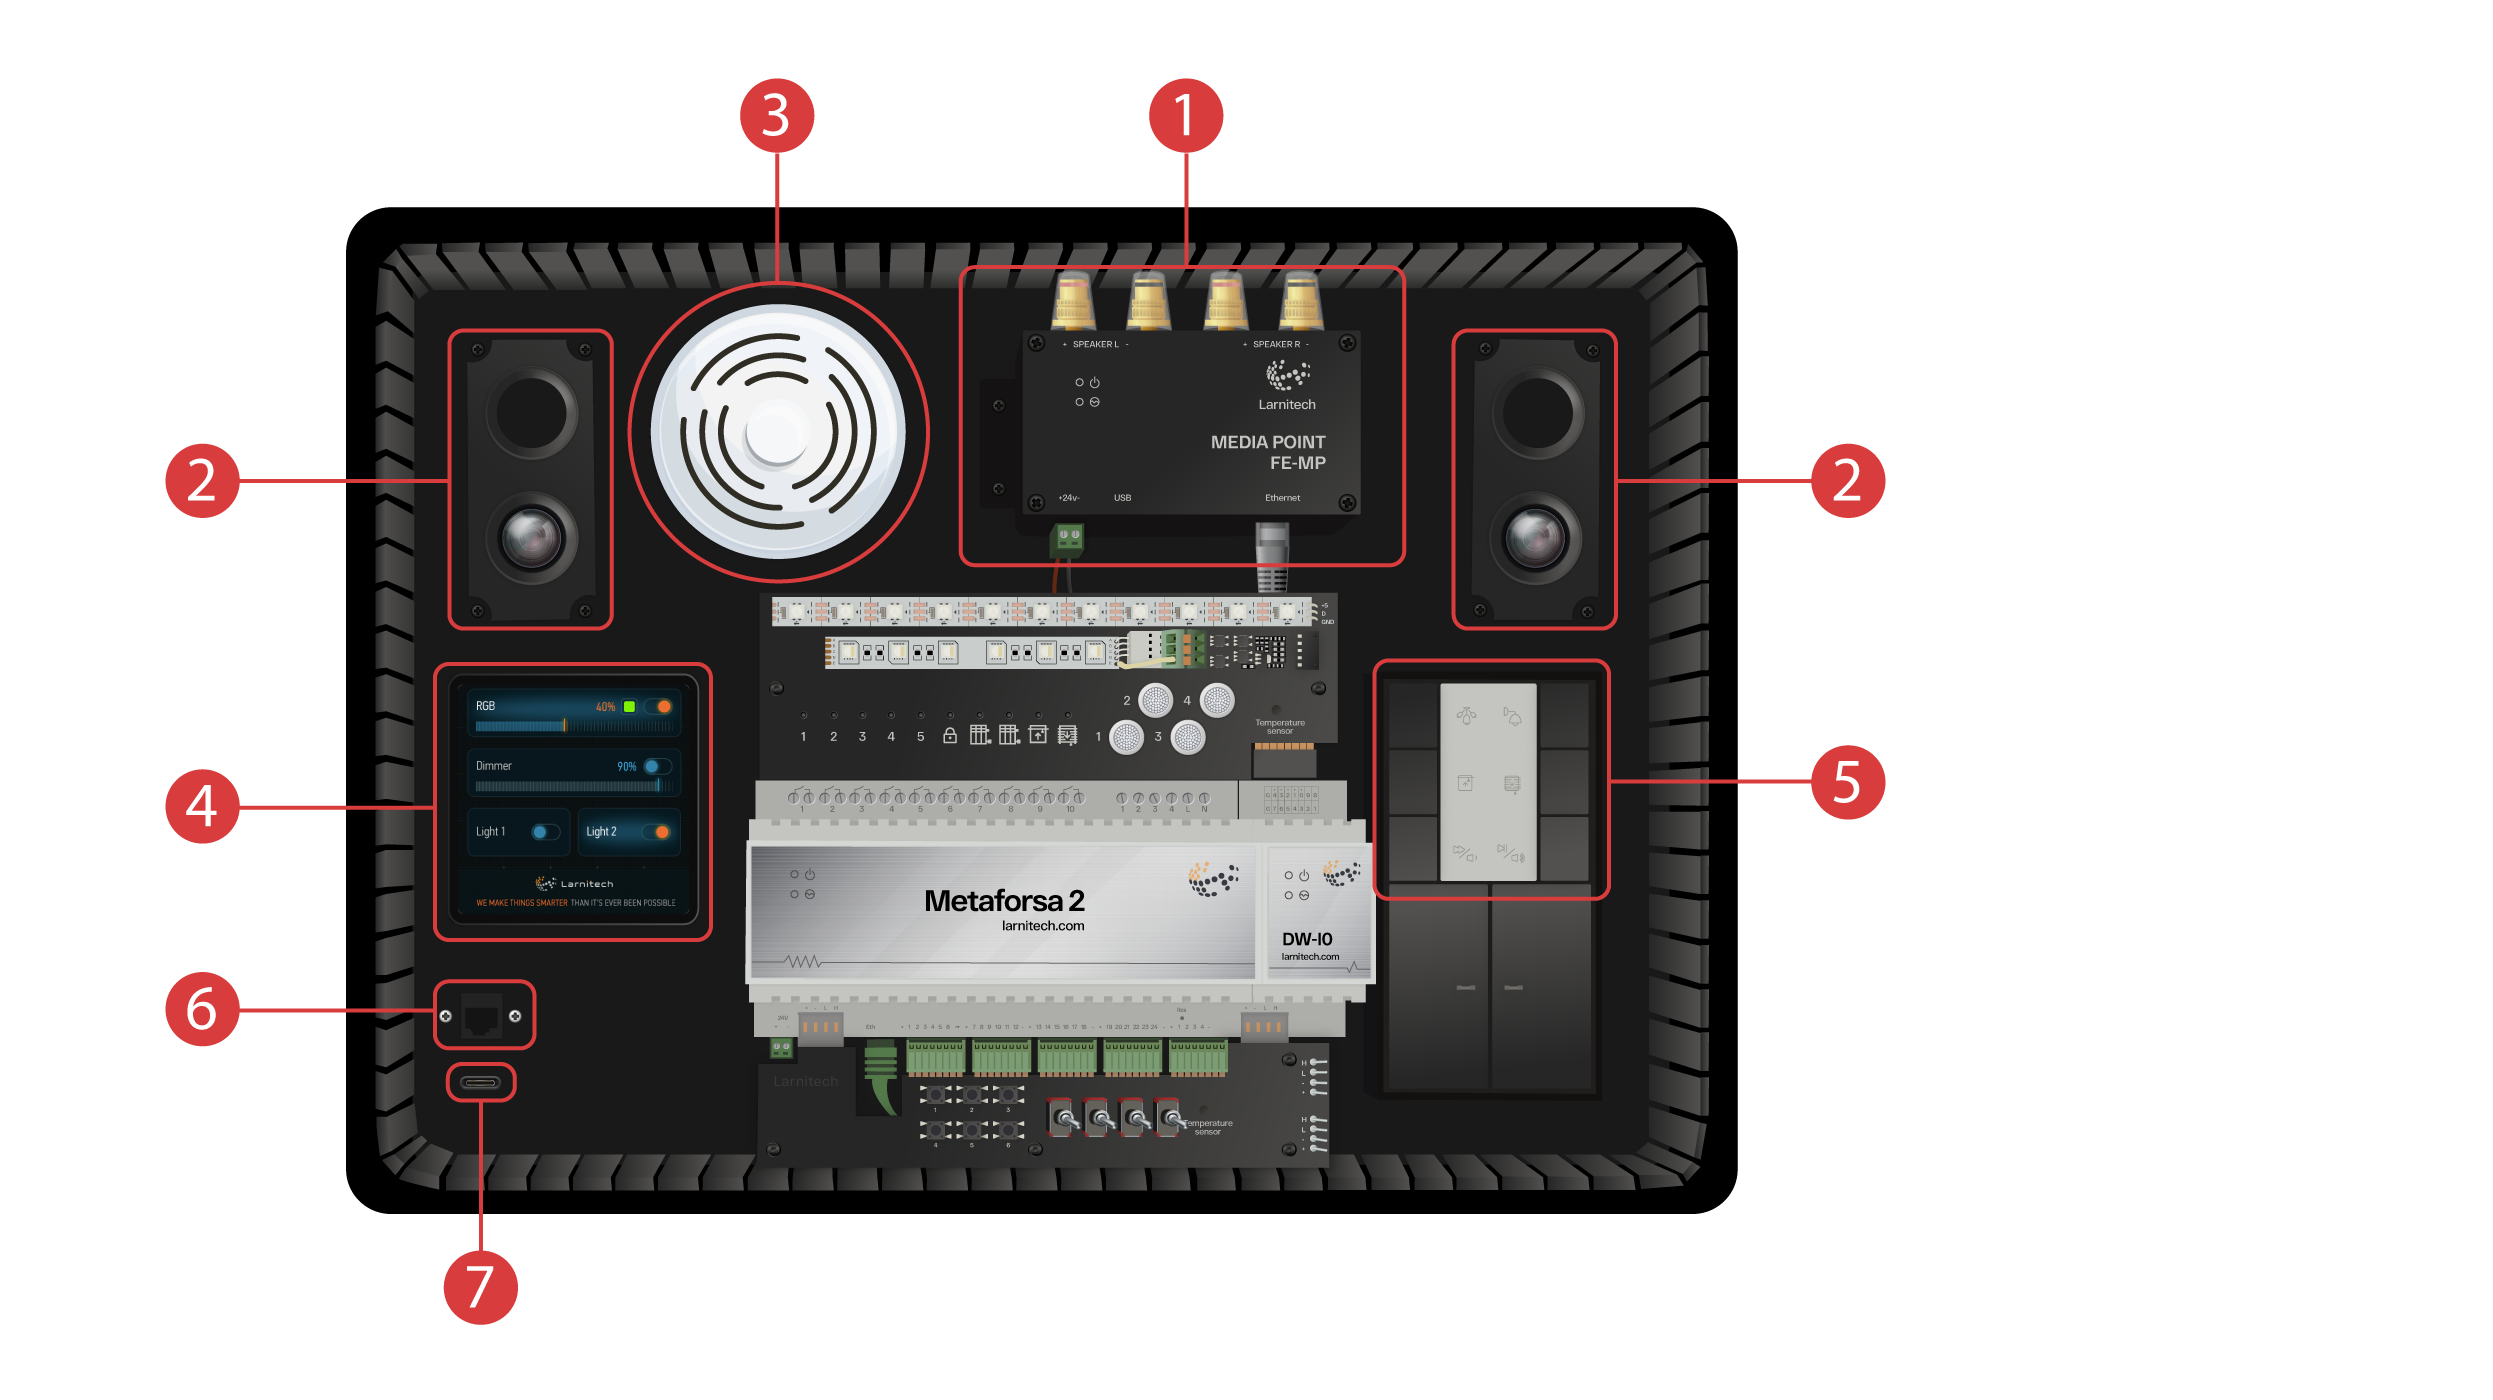
The demonstration case also features the following: | The demonstration case also features the following: | ||
| Line 73: | Line 69: | ||
[[File:DemoCase5.png|1000x800px]] | [[File:DemoCase5.png|1000x800px]] | ||
<hr> | <hr> | ||
| − | |||
In order to proceed, the Larnitech app needs to be installed onto your smartphone or tablet. Just scan the first QR code from the top of your suitcase. | In order to proceed, the Larnitech app needs to be installed onto your smartphone or tablet. Just scan the first QR code from the top of your suitcase. | ||
| Line 80: | Line 75: | ||
[[File:DemoCase6.png|1000x800px]] | [[File:DemoCase6.png|1000x800px]] | ||
<hr> | <hr> | ||
| − | + | ||
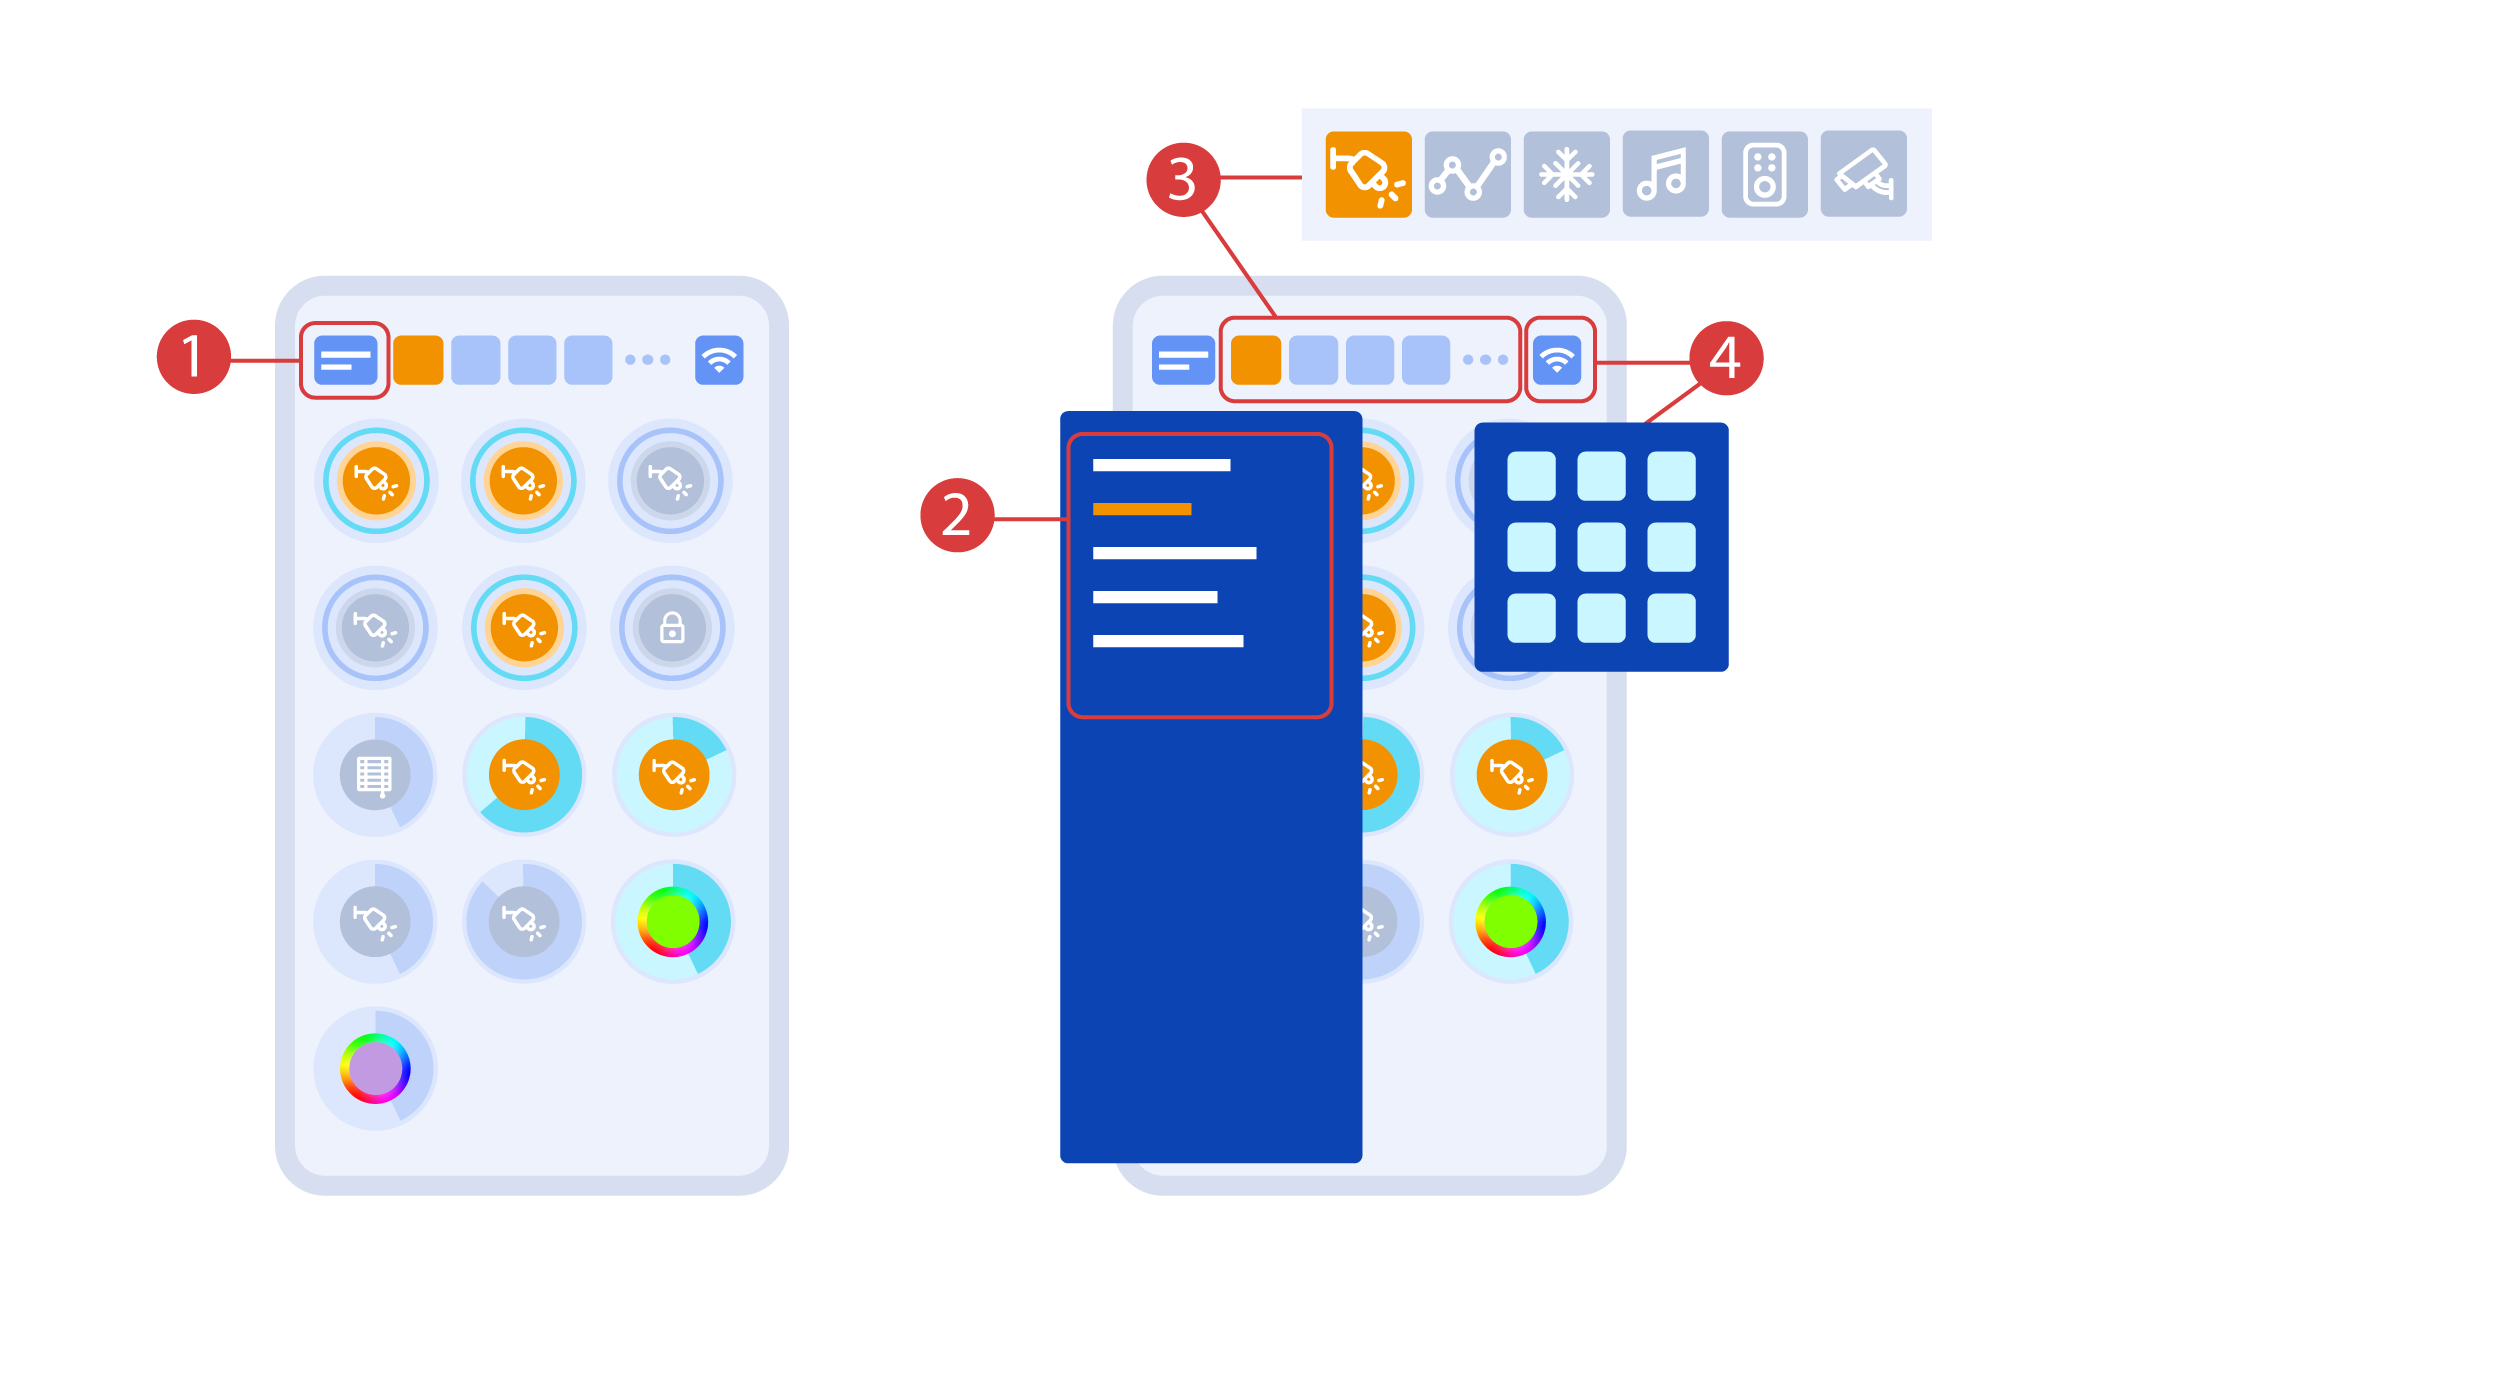
The main screen of the app has several key elements. In the upper left corner there is the ‘area select’ menu <span style="font-size: 30px; vertical-align: middle;">①</span>. | The main screen of the app has several key elements. In the upper left corner there is the ‘area select’ menu <span style="font-size: 30px; vertical-align: middle;">①</span>. | ||
Just click one of the available areas in order to manage it <span style="font-size: 30px; vertical-align: middle;">②</span>. | Just click one of the available areas in order to manage it <span style="font-size: 30px; vertical-align: middle;">②</span>. | ||
| Line 86: | Line 81: | ||
[[File:DemoCase7.png|1000x800px]] | [[File:DemoCase7.png|1000x800px]] | ||
<hr> | <hr> | ||
| − | + | ||
Turning the executors <span style="font-size: 30px; vertical-align: middle;">①</span> on or off is done with a simple click. In order to change the level of lighting <span style="font-size: 30px; vertical-align: middle;">②</span>, color of lights or the position of the blinds, use a double click. In order to access the status history <span style="font-size: 30px; vertical-align: middle;">③</span> of this executor or sensor, press and hold the icon for one second. | Turning the executors <span style="font-size: 30px; vertical-align: middle;">①</span> on or off is done with a simple click. In order to change the level of lighting <span style="font-size: 30px; vertical-align: middle;">②</span>, color of lights or the position of the blinds, use a double click. In order to access the status history <span style="font-size: 30px; vertical-align: middle;">③</span> of this executor or sensor, press and hold the icon for one second. | ||
A short press of the physical buttons on the panel turns the light on or off. Press and hold the button to change the light brightness. | A short press of the physical buttons on the panel turns the light on or off. Press and hold the button to change the light brightness. | ||
[[File:DemoCase08.png|1000x800px]] | [[File:DemoCase08.png|1000x800px]] | ||
<hr> | <hr> | ||
| − | + | ||
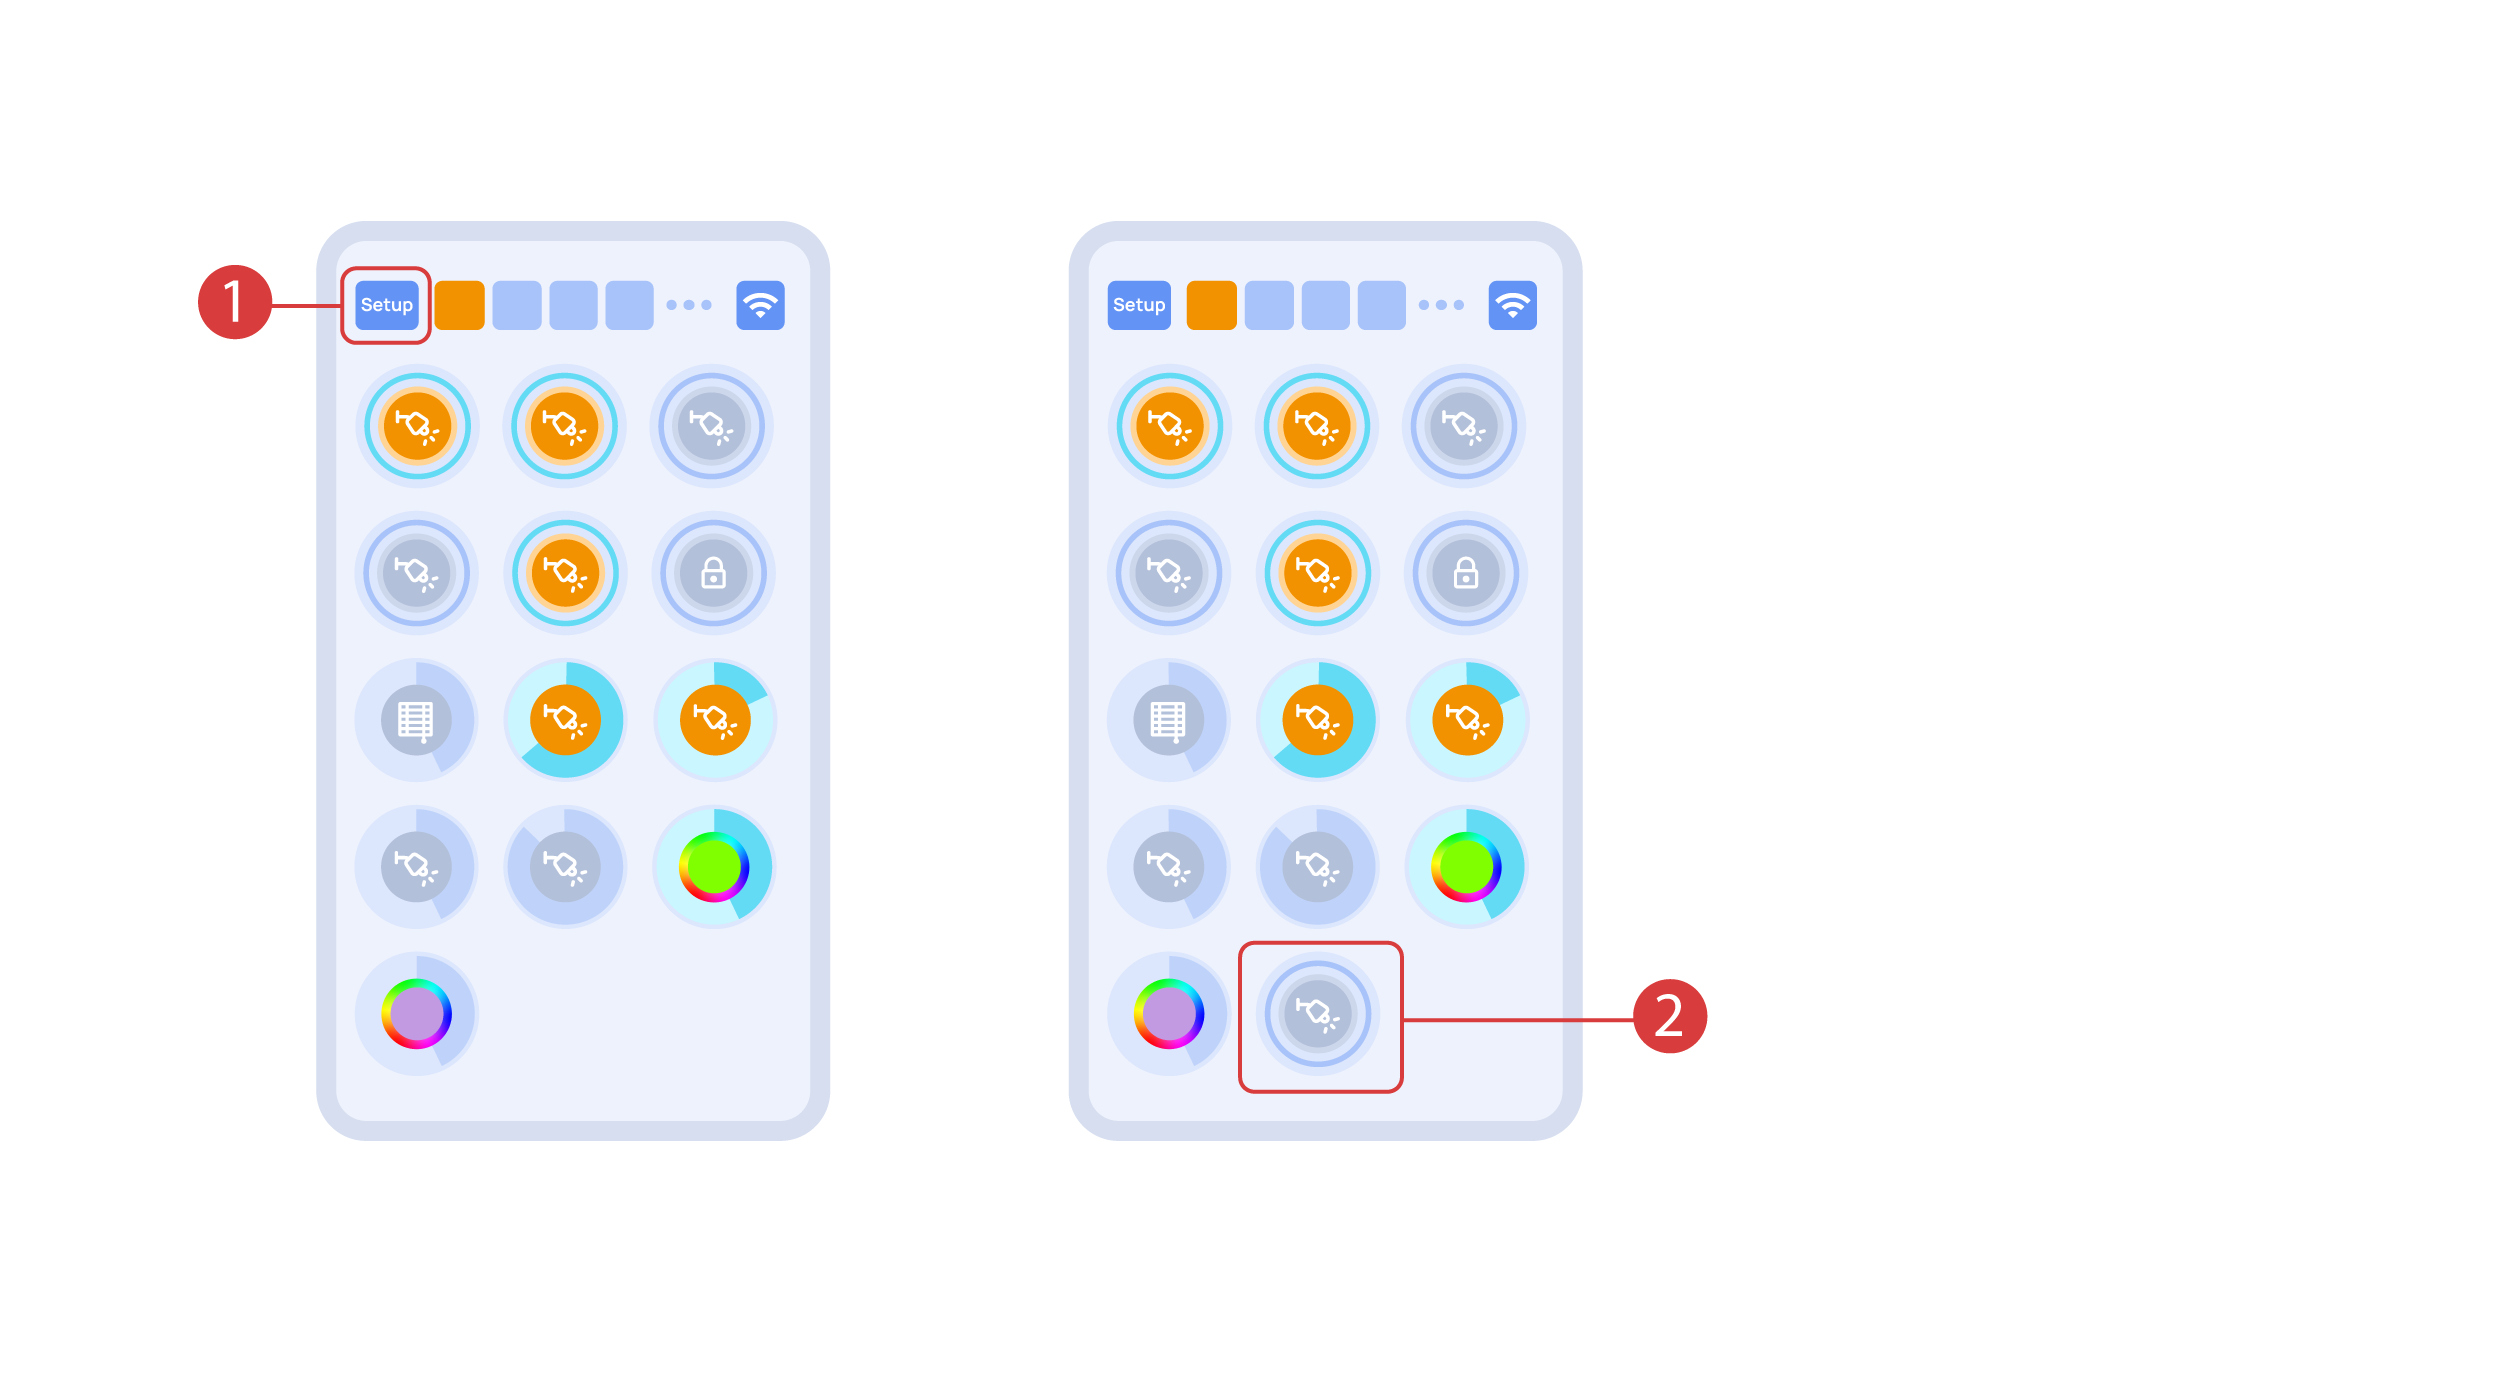
In order to demonstrate the Plug and Play function, we open the executors in the Setup area <span style="font-size: 30px; vertical-align: middle;">①</span> and connect the module to the CAN bus. The system automatically detects the new module and adds it to the ‘Setup’ area, <span style="font-size: 30px; vertical-align: middle;">②</span> where we are able to control the new module instantly. | In order to demonstrate the Plug and Play function, we open the executors in the Setup area <span style="font-size: 30px; vertical-align: middle;">①</span> and connect the module to the CAN bus. The system automatically detects the new module and adds it to the ‘Setup’ area, <span style="font-size: 30px; vertical-align: middle;">②</span> where we are able to control the new module instantly. | ||
[[File:DemoCase9.png|1000x800px]] | [[File:DemoCase9.png|1000x800px]] | ||
<hr> | <hr> | ||
| − | + | ||
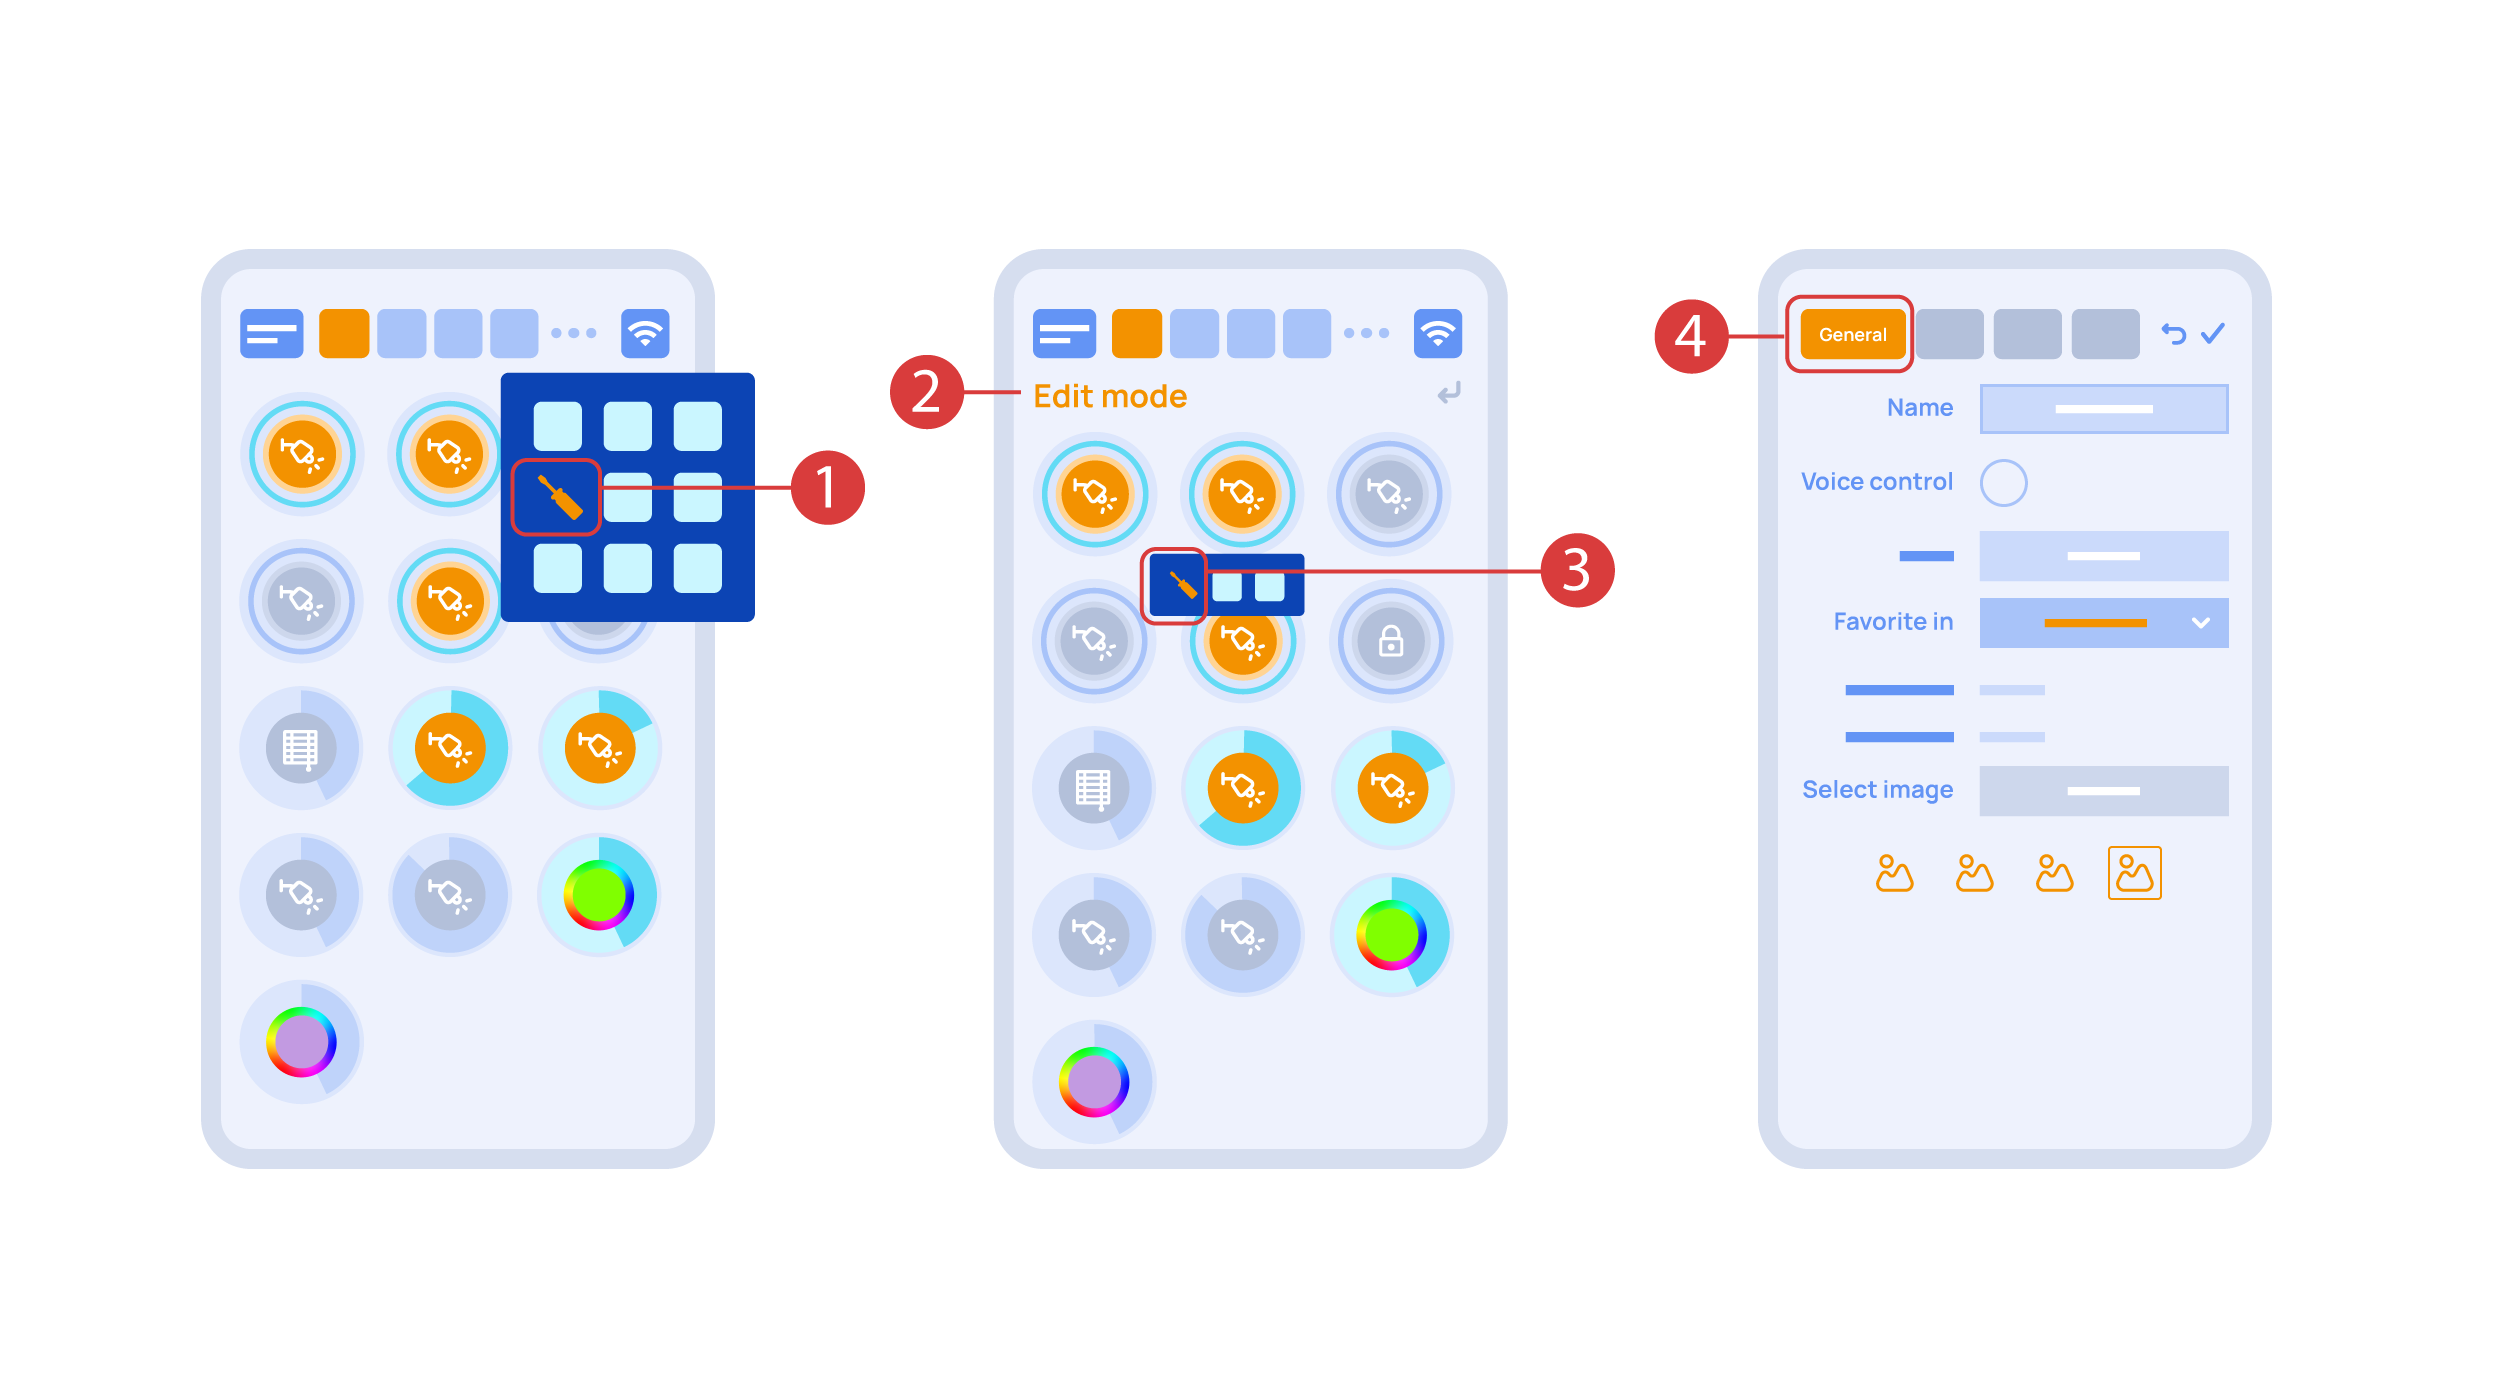
Now we can set up these executors. In order to do this, enter the additional menu <span style="font-size: 30px; vertical-align: middle;">①</span> and activate the edit mode, by pressing the appropriate icon . | Now we can set up these executors. In order to do this, enter the additional menu <span style="font-size: 30px; vertical-align: middle;">①</span> and activate the edit mode, by pressing the appropriate icon . | ||
Now we are in the edit mode <span style="font-size: 30px; vertical-align: middle;">②</span>, which can be seen from the appropriate notification in the top part of the screen. In this mode, when we press and hold an icon, we can move it among other elements and place it into another Room by placing it in the Area-choosing Menu and then choosing the area that we need. A long press <span style="font-size: 30px; vertical-align: middle;">③</span> of the element starts the menu, from which we set up the current element.In the ‘General’ <span style="font-size: 30px; vertical-align: middle;">④</span> section we can change the name of the element, add a voice command for it, change an icon or add the element to ‘Favorites’. | Now we are in the edit mode <span style="font-size: 30px; vertical-align: middle;">②</span>, which can be seen from the appropriate notification in the top part of the screen. In this mode, when we press and hold an icon, we can move it among other elements and place it into another Room by placing it in the Area-choosing Menu and then choosing the area that we need. A long press <span style="font-size: 30px; vertical-align: middle;">③</span> of the element starts the menu, from which we set up the current element.In the ‘General’ <span style="font-size: 30px; vertical-align: middle;">④</span> section we can change the name of the element, add a voice command for it, change an icon or add the element to ‘Favorites’. | ||
[[File:DemoCase10.png|1000x800px]] | [[File:DemoCase10.png|1000x800px]] | ||
<hr> | <hr> | ||
| − | + | ||
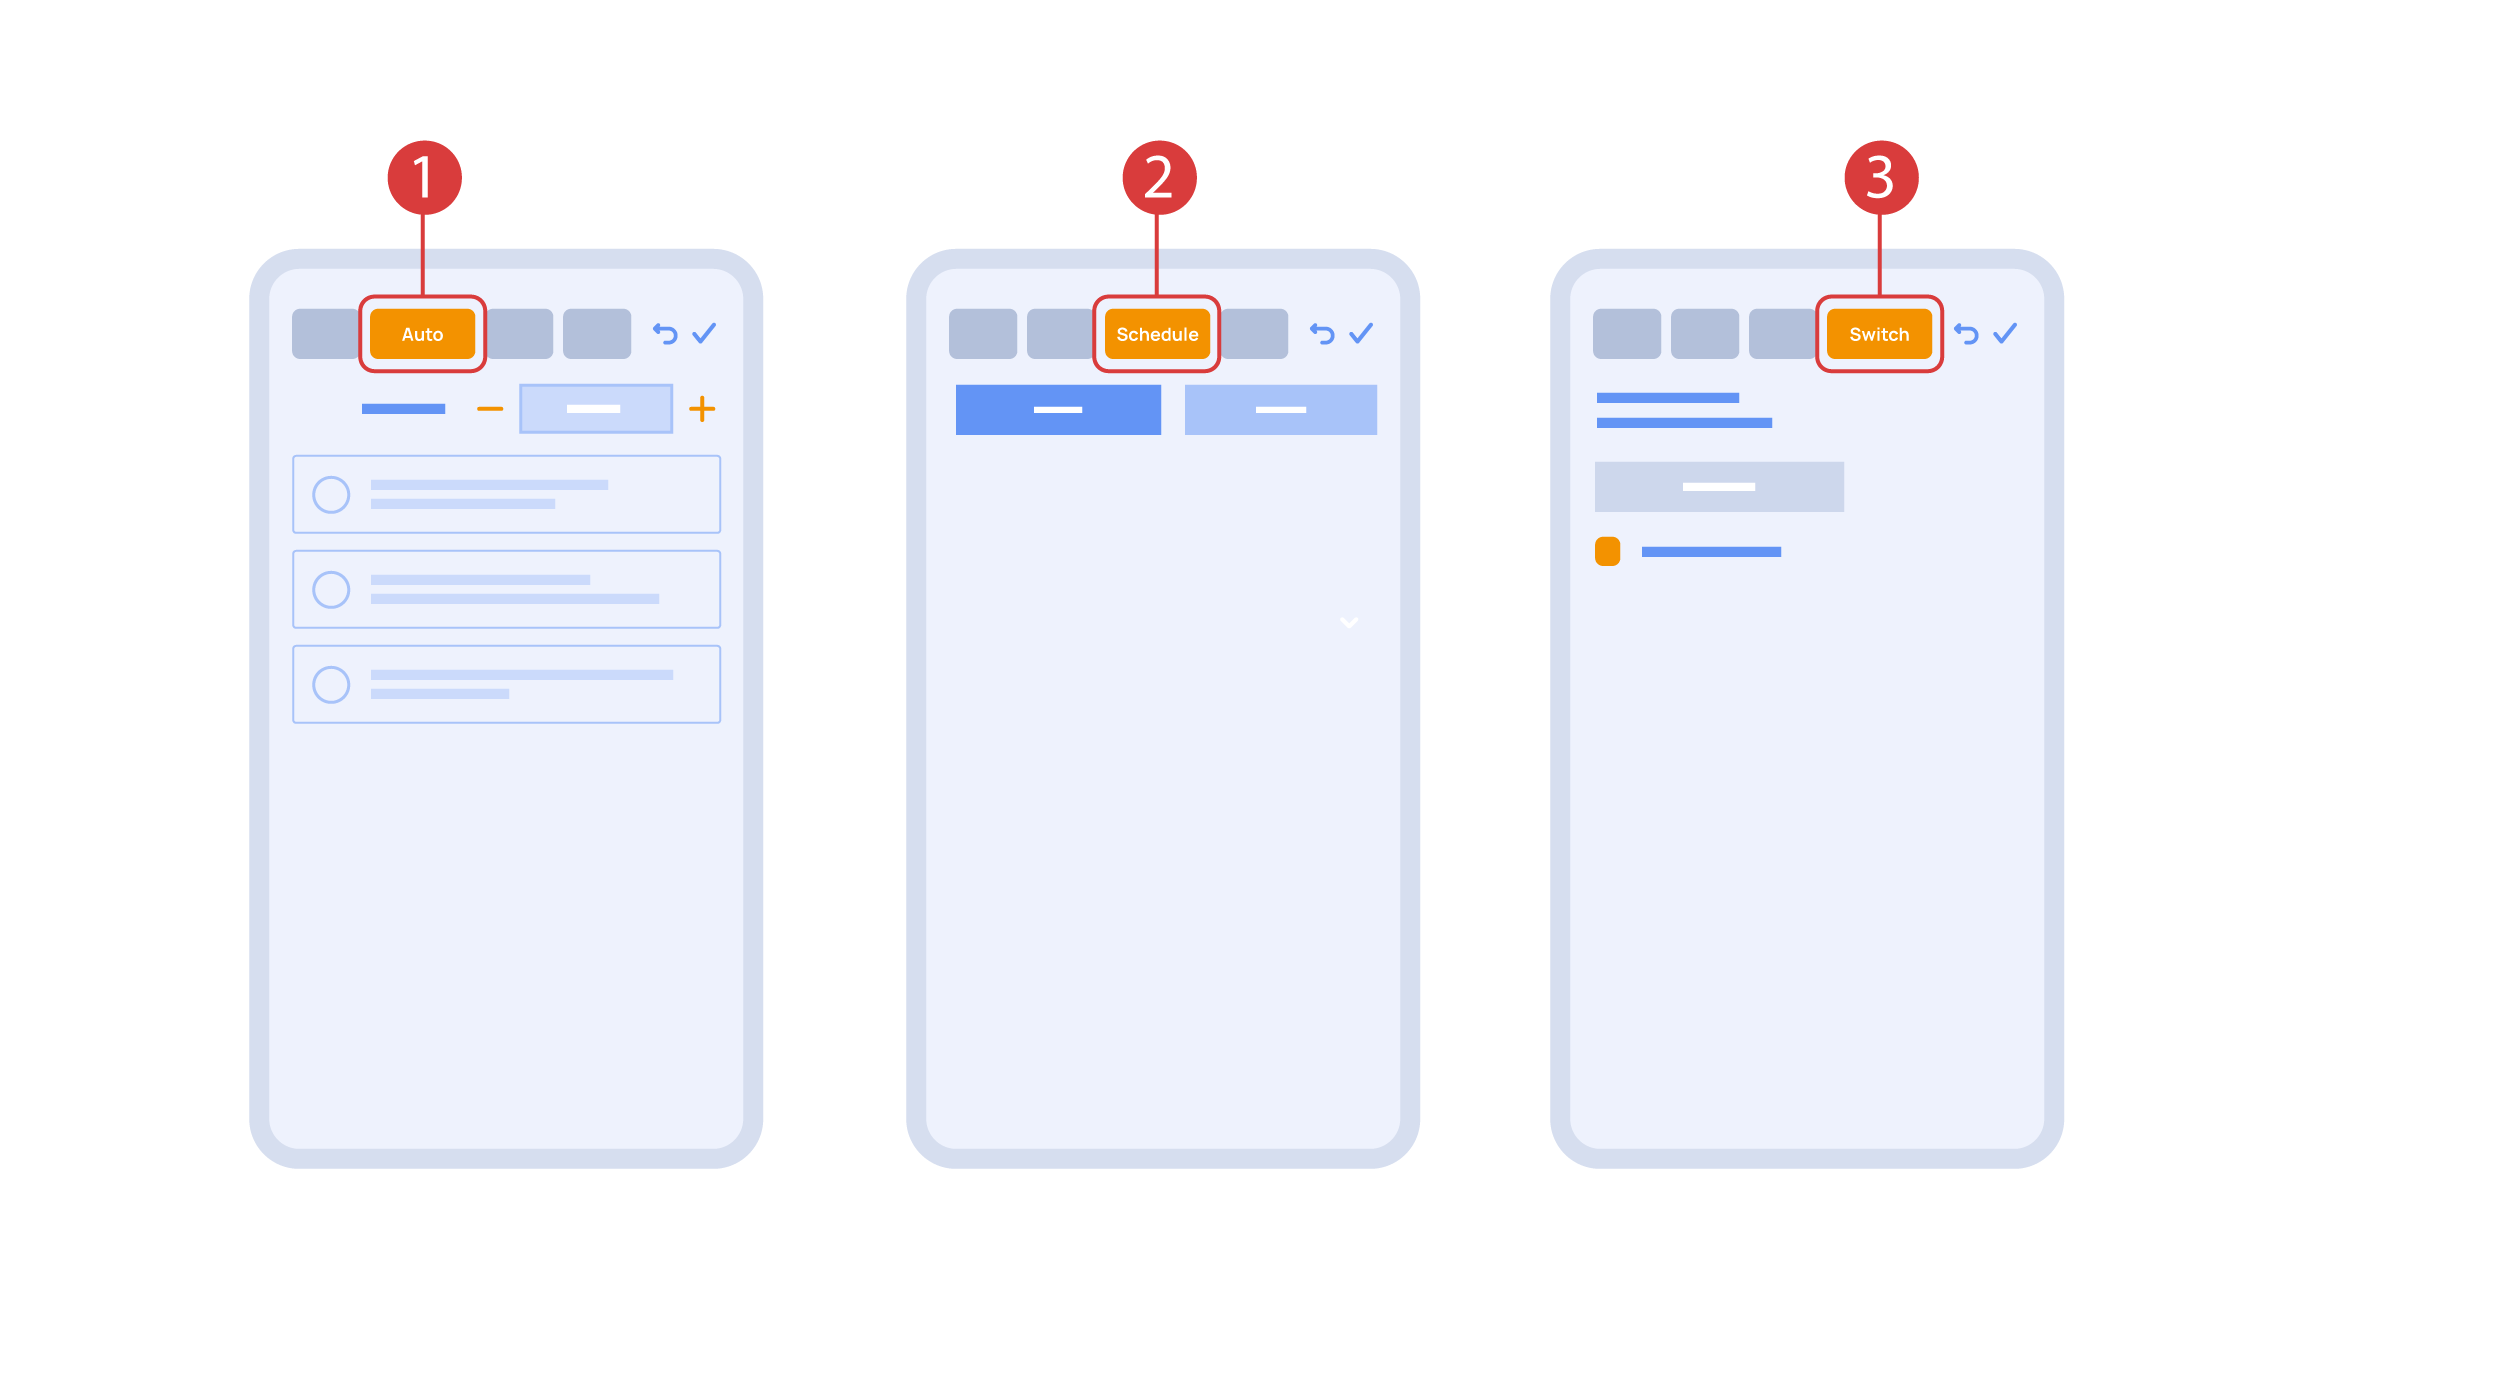
‘Auto’ section <span style="font-size: 30px; vertical-align: middle;">①</span> lets us activate the automation with a few clicks, as well as set up its parameters. | ‘Auto’ section <span style="font-size: 30px; vertical-align: middle;">①</span> lets us activate the automation with a few clicks, as well as set up its parameters. | ||
| Line 108: | Line 103: | ||
[[File:DemoCase11.png|1000x800px]] | [[File:DemoCase11.png|1000x800px]] | ||
<hr> | <hr> | ||
| − | + | ||
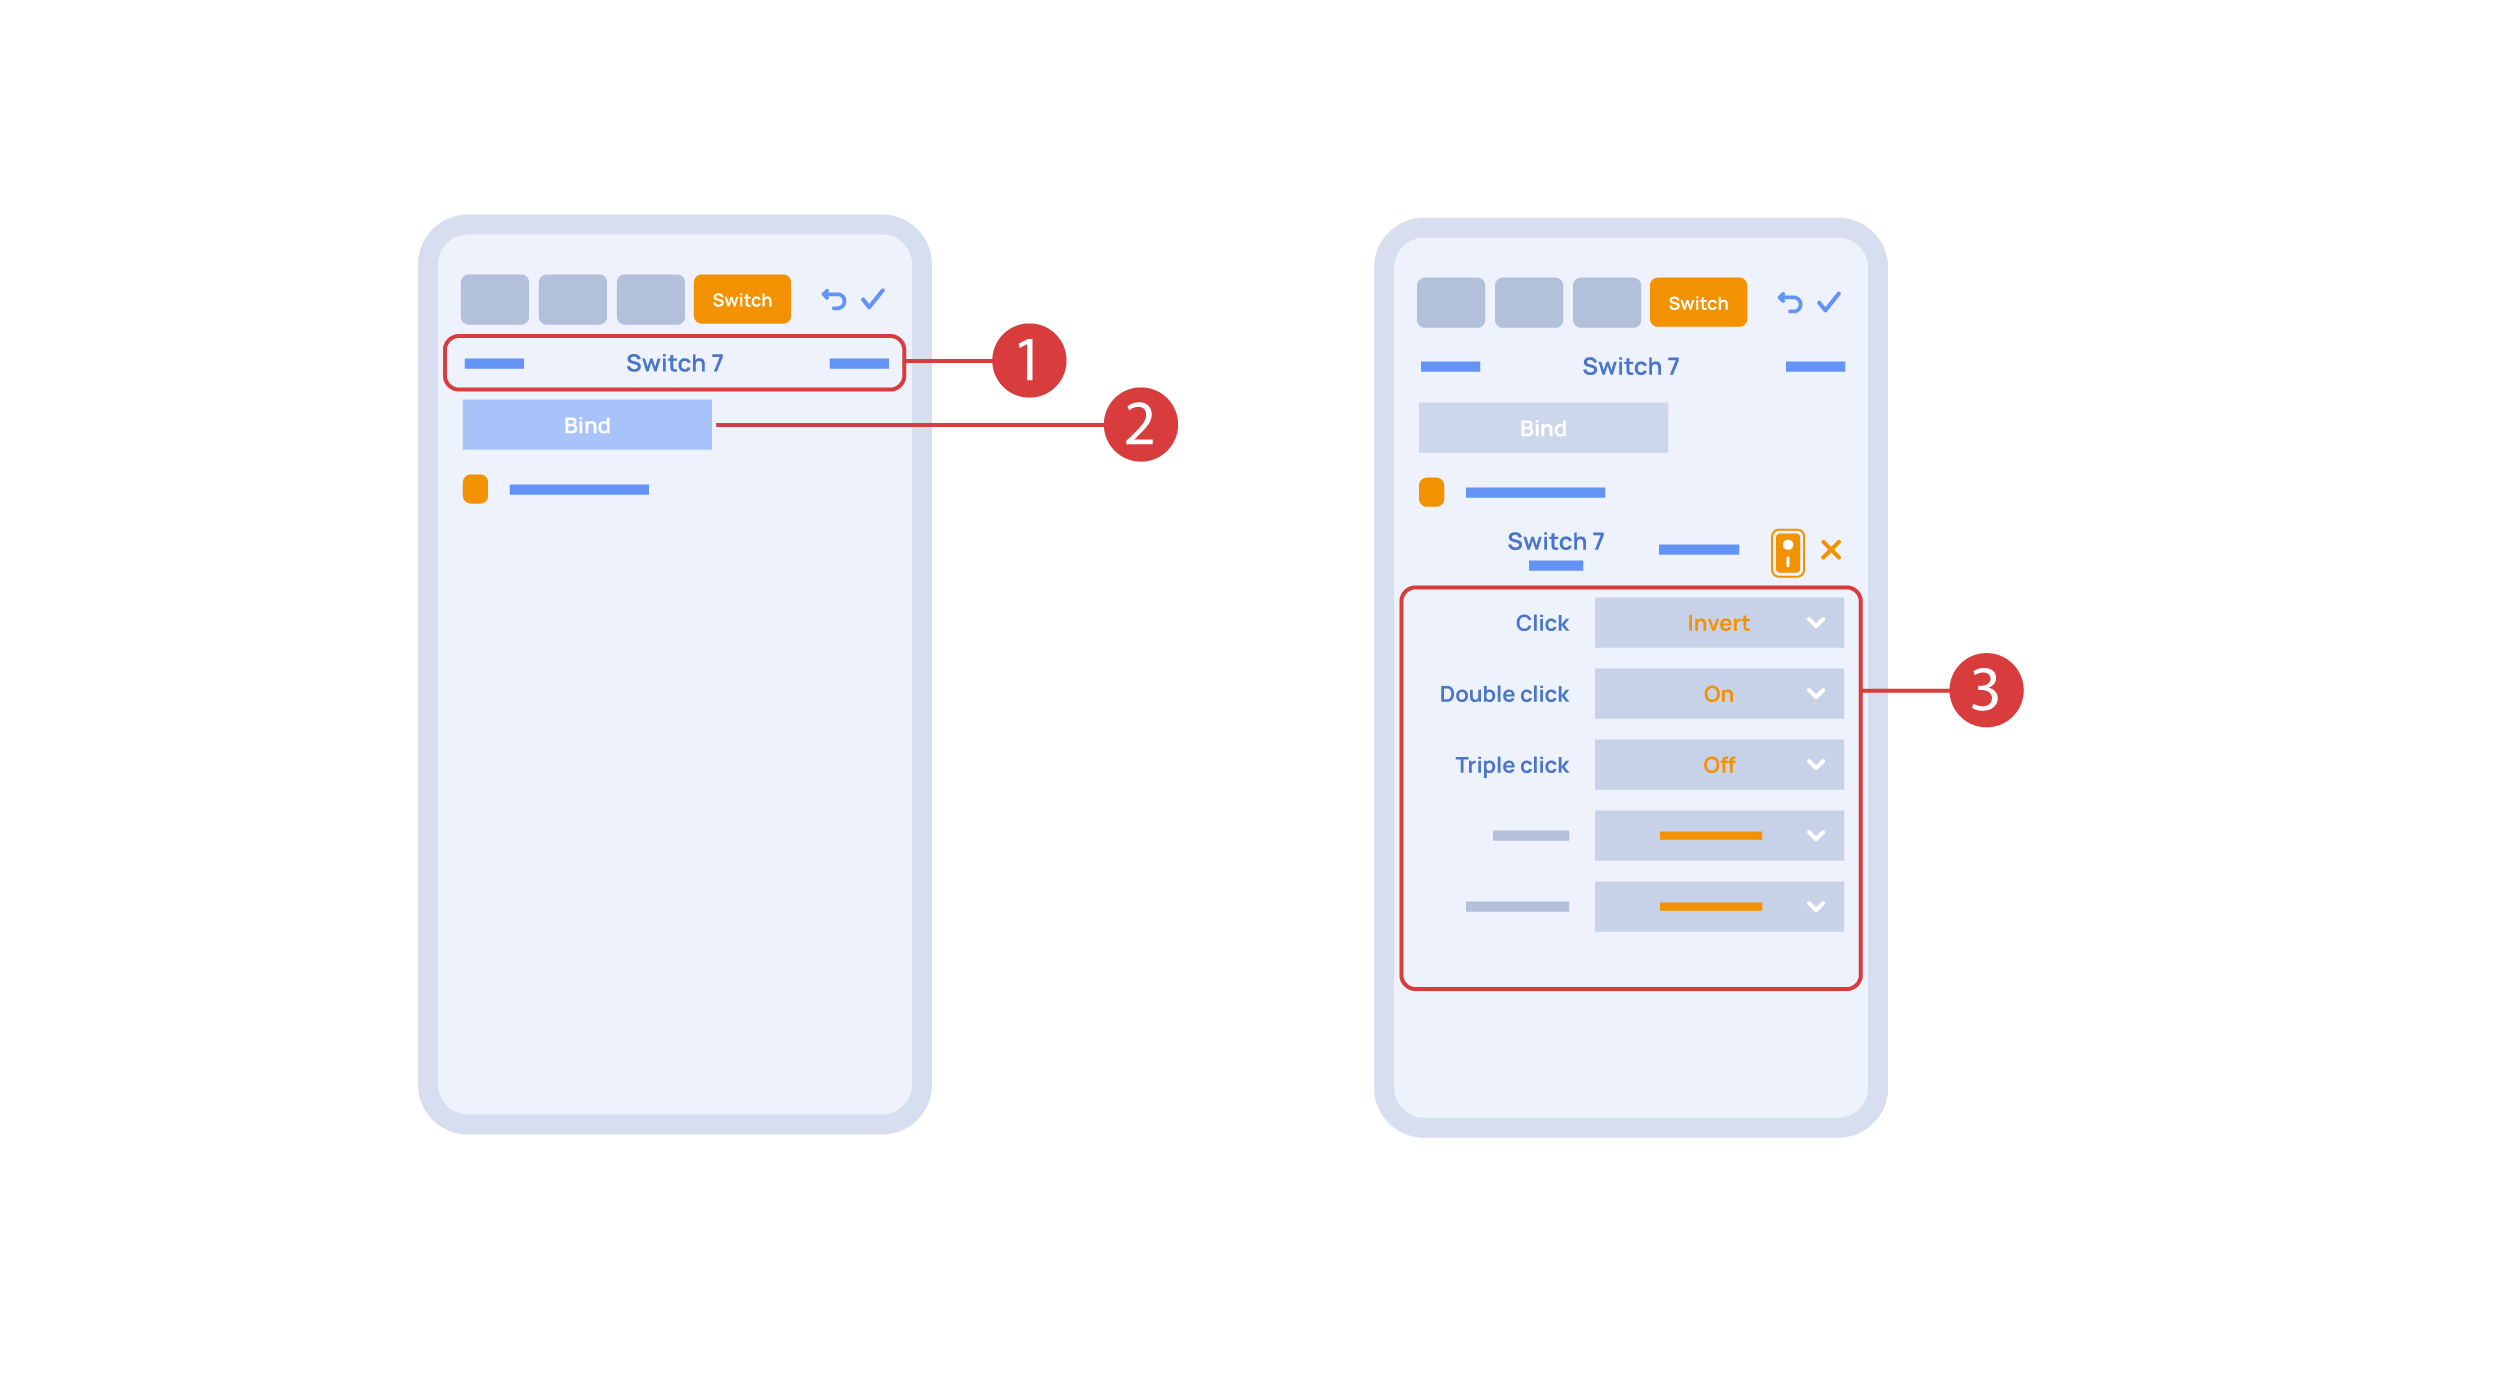
In order to do this, <span style="font-size: 30px; vertical-align: middle;">①</span> we press the button we need to bind. The system displays it, after which we press ‘Bind’<span style="font-size: 30px; vertical-align: middle;">②</span> and save the changes. Now this button controls the executor | In order to do this, <span style="font-size: 30px; vertical-align: middle;">①</span> we press the button we need to bind. The system displays it, after which we press ‘Bind’<span style="font-size: 30px; vertical-align: middle;">②</span> and save the changes. Now this button controls the executor | ||
The ‘Switches’ tab <span style="font-size: 30px; vertical-align: middle;">③</span> also features additional button setup options. For example, we can program the executor to be controlled with a double or triple click of a button, as well as define an action performed by this, for example ‘only turning on’ or ‘only turning off’ an executor. In this case we are setting up the button to do the following: one click will cause the lamp to toggle, a double click will turn it on and a triple click will turn it off. In this way a single button can perform up to five different actions. | The ‘Switches’ tab <span style="font-size: 30px; vertical-align: middle;">③</span> also features additional button setup options. For example, we can program the executor to be controlled with a double or triple click of a button, as well as define an action performed by this, for example ‘only turning on’ or ‘only turning off’ an executor. In this case we are setting up the button to do the following: one click will cause the lamp to toggle, a double click will turn it on and a triple click will turn it off. In this way a single button can perform up to five different actions. | ||
[[File:DemoCase12.png|1000x800px]] | [[File:DemoCase12.png|1000x800px]] | ||
<hr> | <hr> | ||
| − | + | ||
Let’s also set up basic automation of turning an executor on or off with the help of a motion sensor. | Let’s also set up basic automation of turning an executor on or off with the help of a motion sensor. | ||
| Line 121: | Line 116: | ||
[[File:DemoCase13.png|1000x800px]] | [[File:DemoCase13.png|1000x800px]] | ||
<hr> | <hr> | ||
| − | + | ||
Now we will activate turning off <span style="font-size: 30px; vertical-align: middle;">①</span> of an executor if there is no motion: we choose the same sensor, set a lower threshold and a minimal time.Save the changes. | Now we will activate turning off <span style="font-size: 30px; vertical-align: middle;">①</span> of an executor if there is no motion: we choose the same sensor, set a lower threshold and a minimal time.Save the changes. | ||
The extra ‘A’ icon <span style="font-size: 30px; vertical-align: middle;">②</span> will be added to the executor icon, meaning that automation has been set up for it. Now the lamp will be turned on when motion is detected and instantly turned off when no motion is detected. | The extra ‘A’ icon <span style="font-size: 30px; vertical-align: middle;">②</span> will be added to the executor icon, meaning that automation has been set up for it. Now the lamp will be turned on when motion is detected and instantly turned off when no motion is detected. | ||
[[File:DemoCase14.png|1000x800px]] | [[File:DemoCase14.png|1000x800px]] | ||
<hr> | <hr> | ||
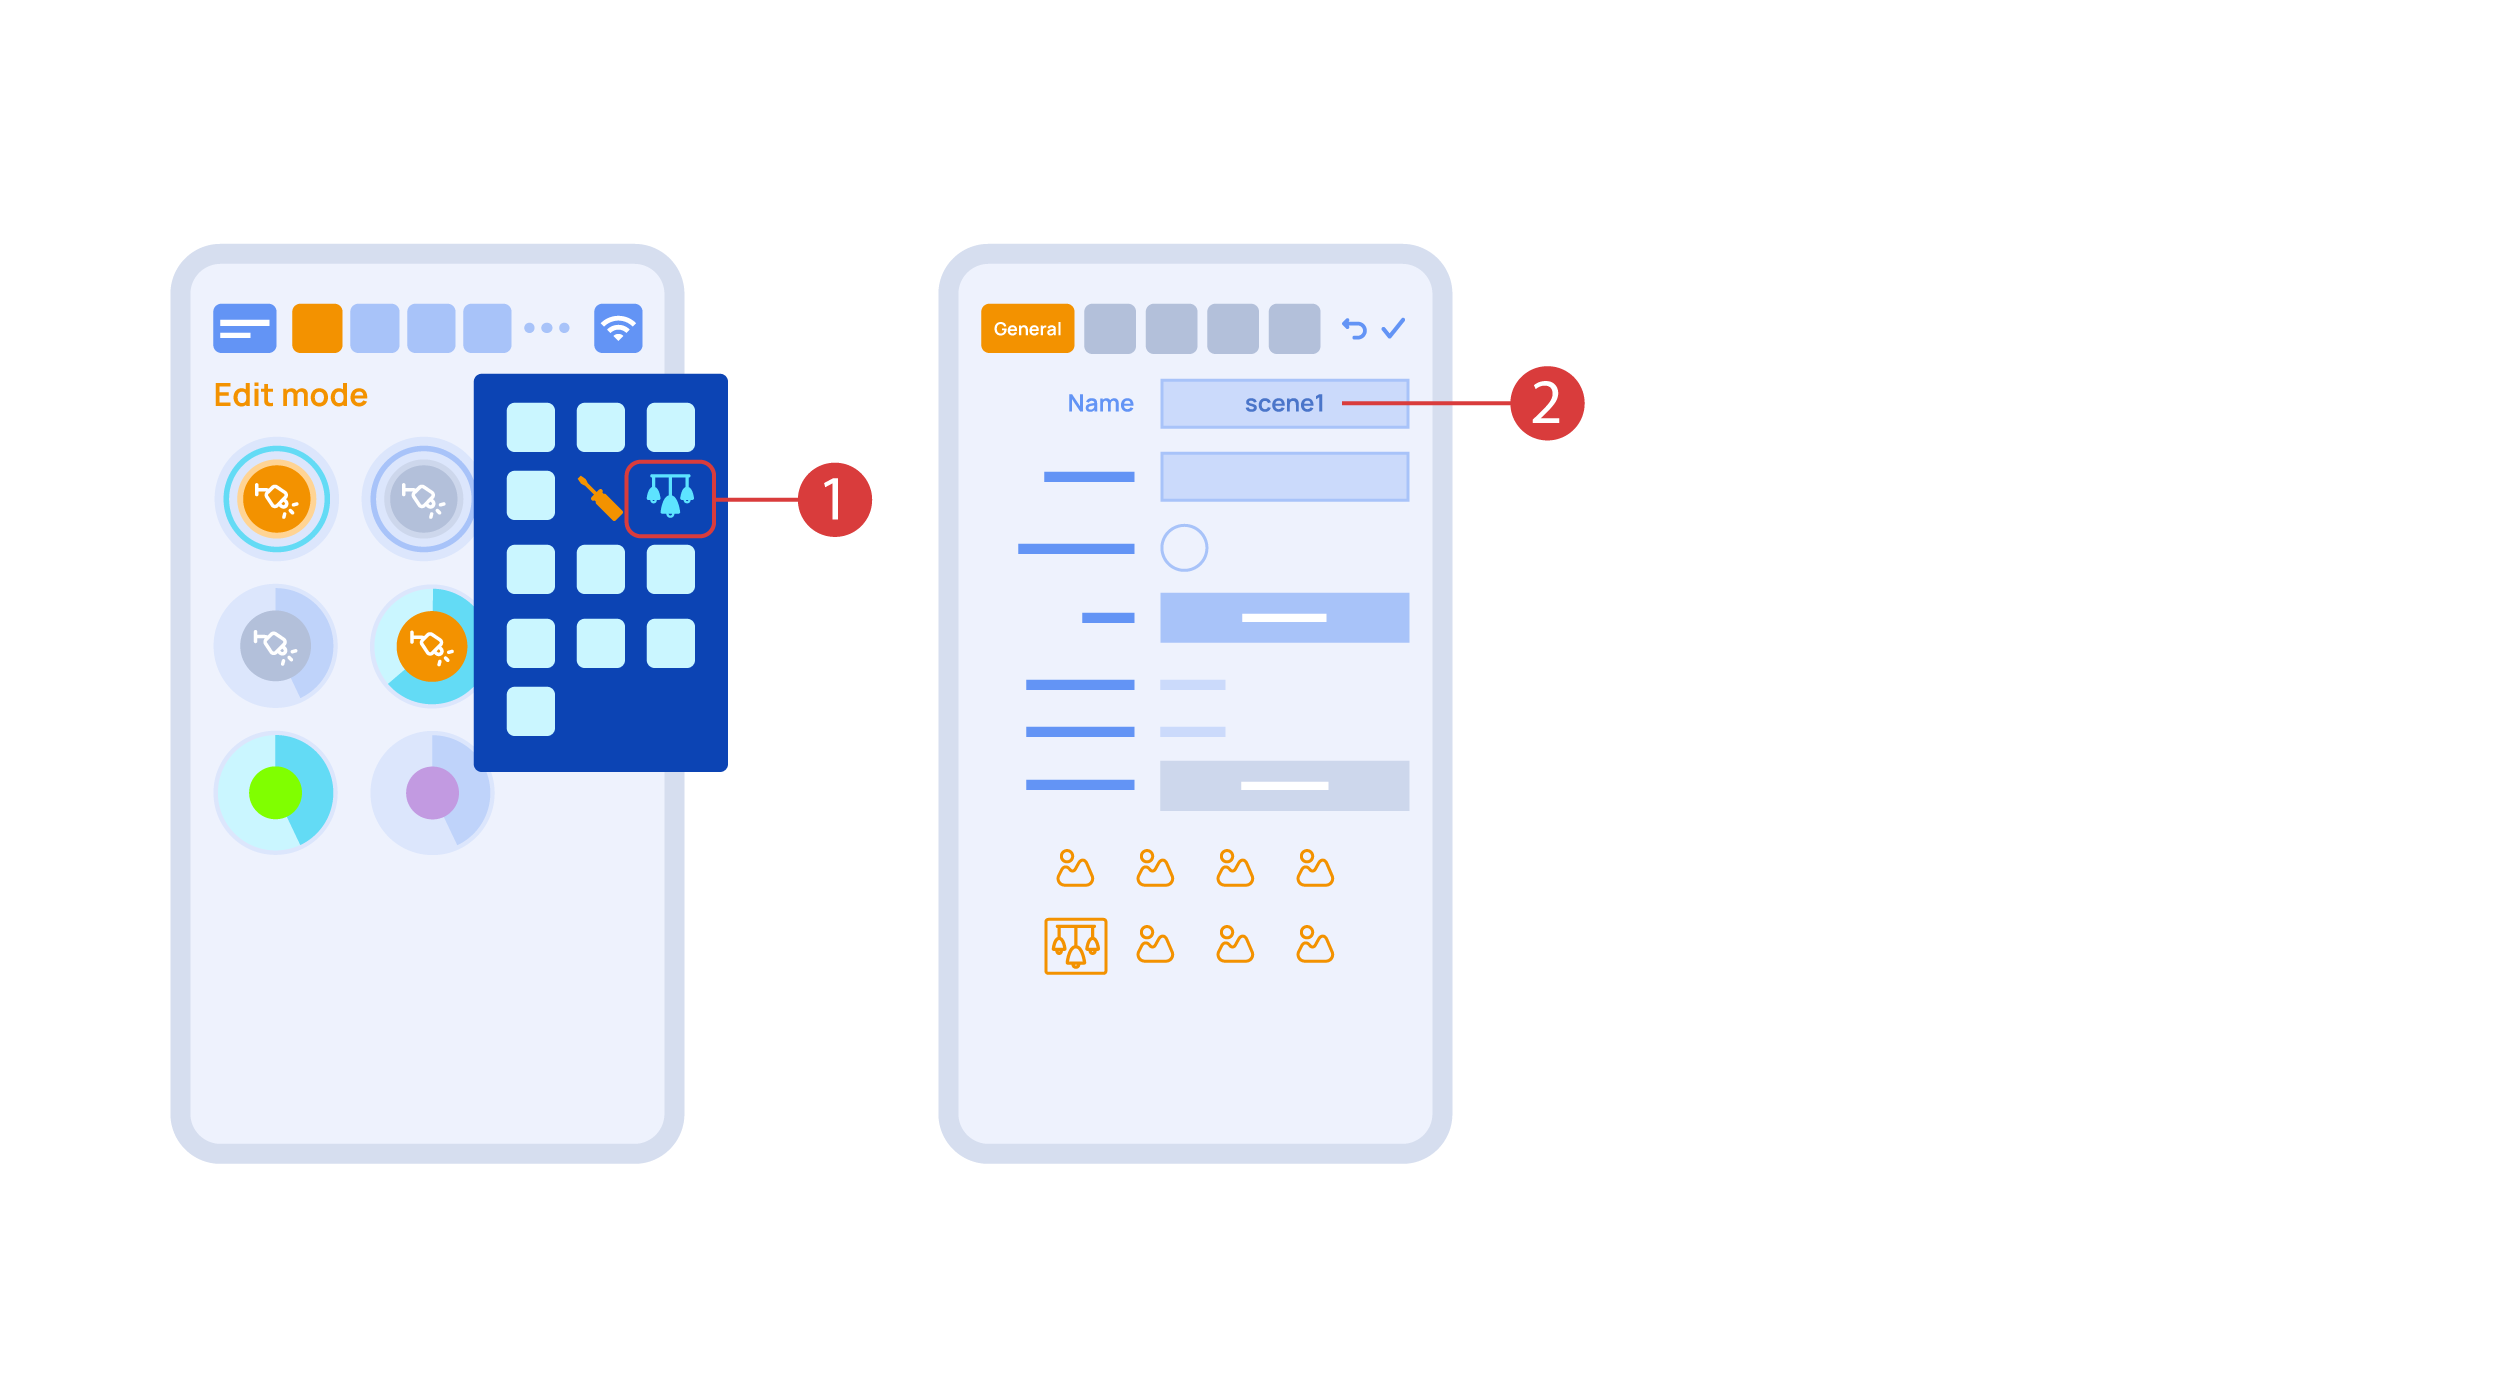
| − | + | ||
Let’s create a light scheme. For this we need to select the appropriate item in the additional menu <span style="font-size: 30px; vertical-align: middle;">①</span>. Give the light scheme a name <span style="font-size: 30px; vertical-align: middle;">②</span>. | Let’s create a light scheme. For this we need to select the appropriate item in the additional menu <span style="font-size: 30px; vertical-align: middle;">①</span>. Give the light scheme a name <span style="font-size: 30px; vertical-align: middle;">②</span>. | ||
[[File:DemoCase15.png|1000x800px]] | [[File:DemoCase15.png|1000x800px]] | ||
<hr> | <hr> | ||
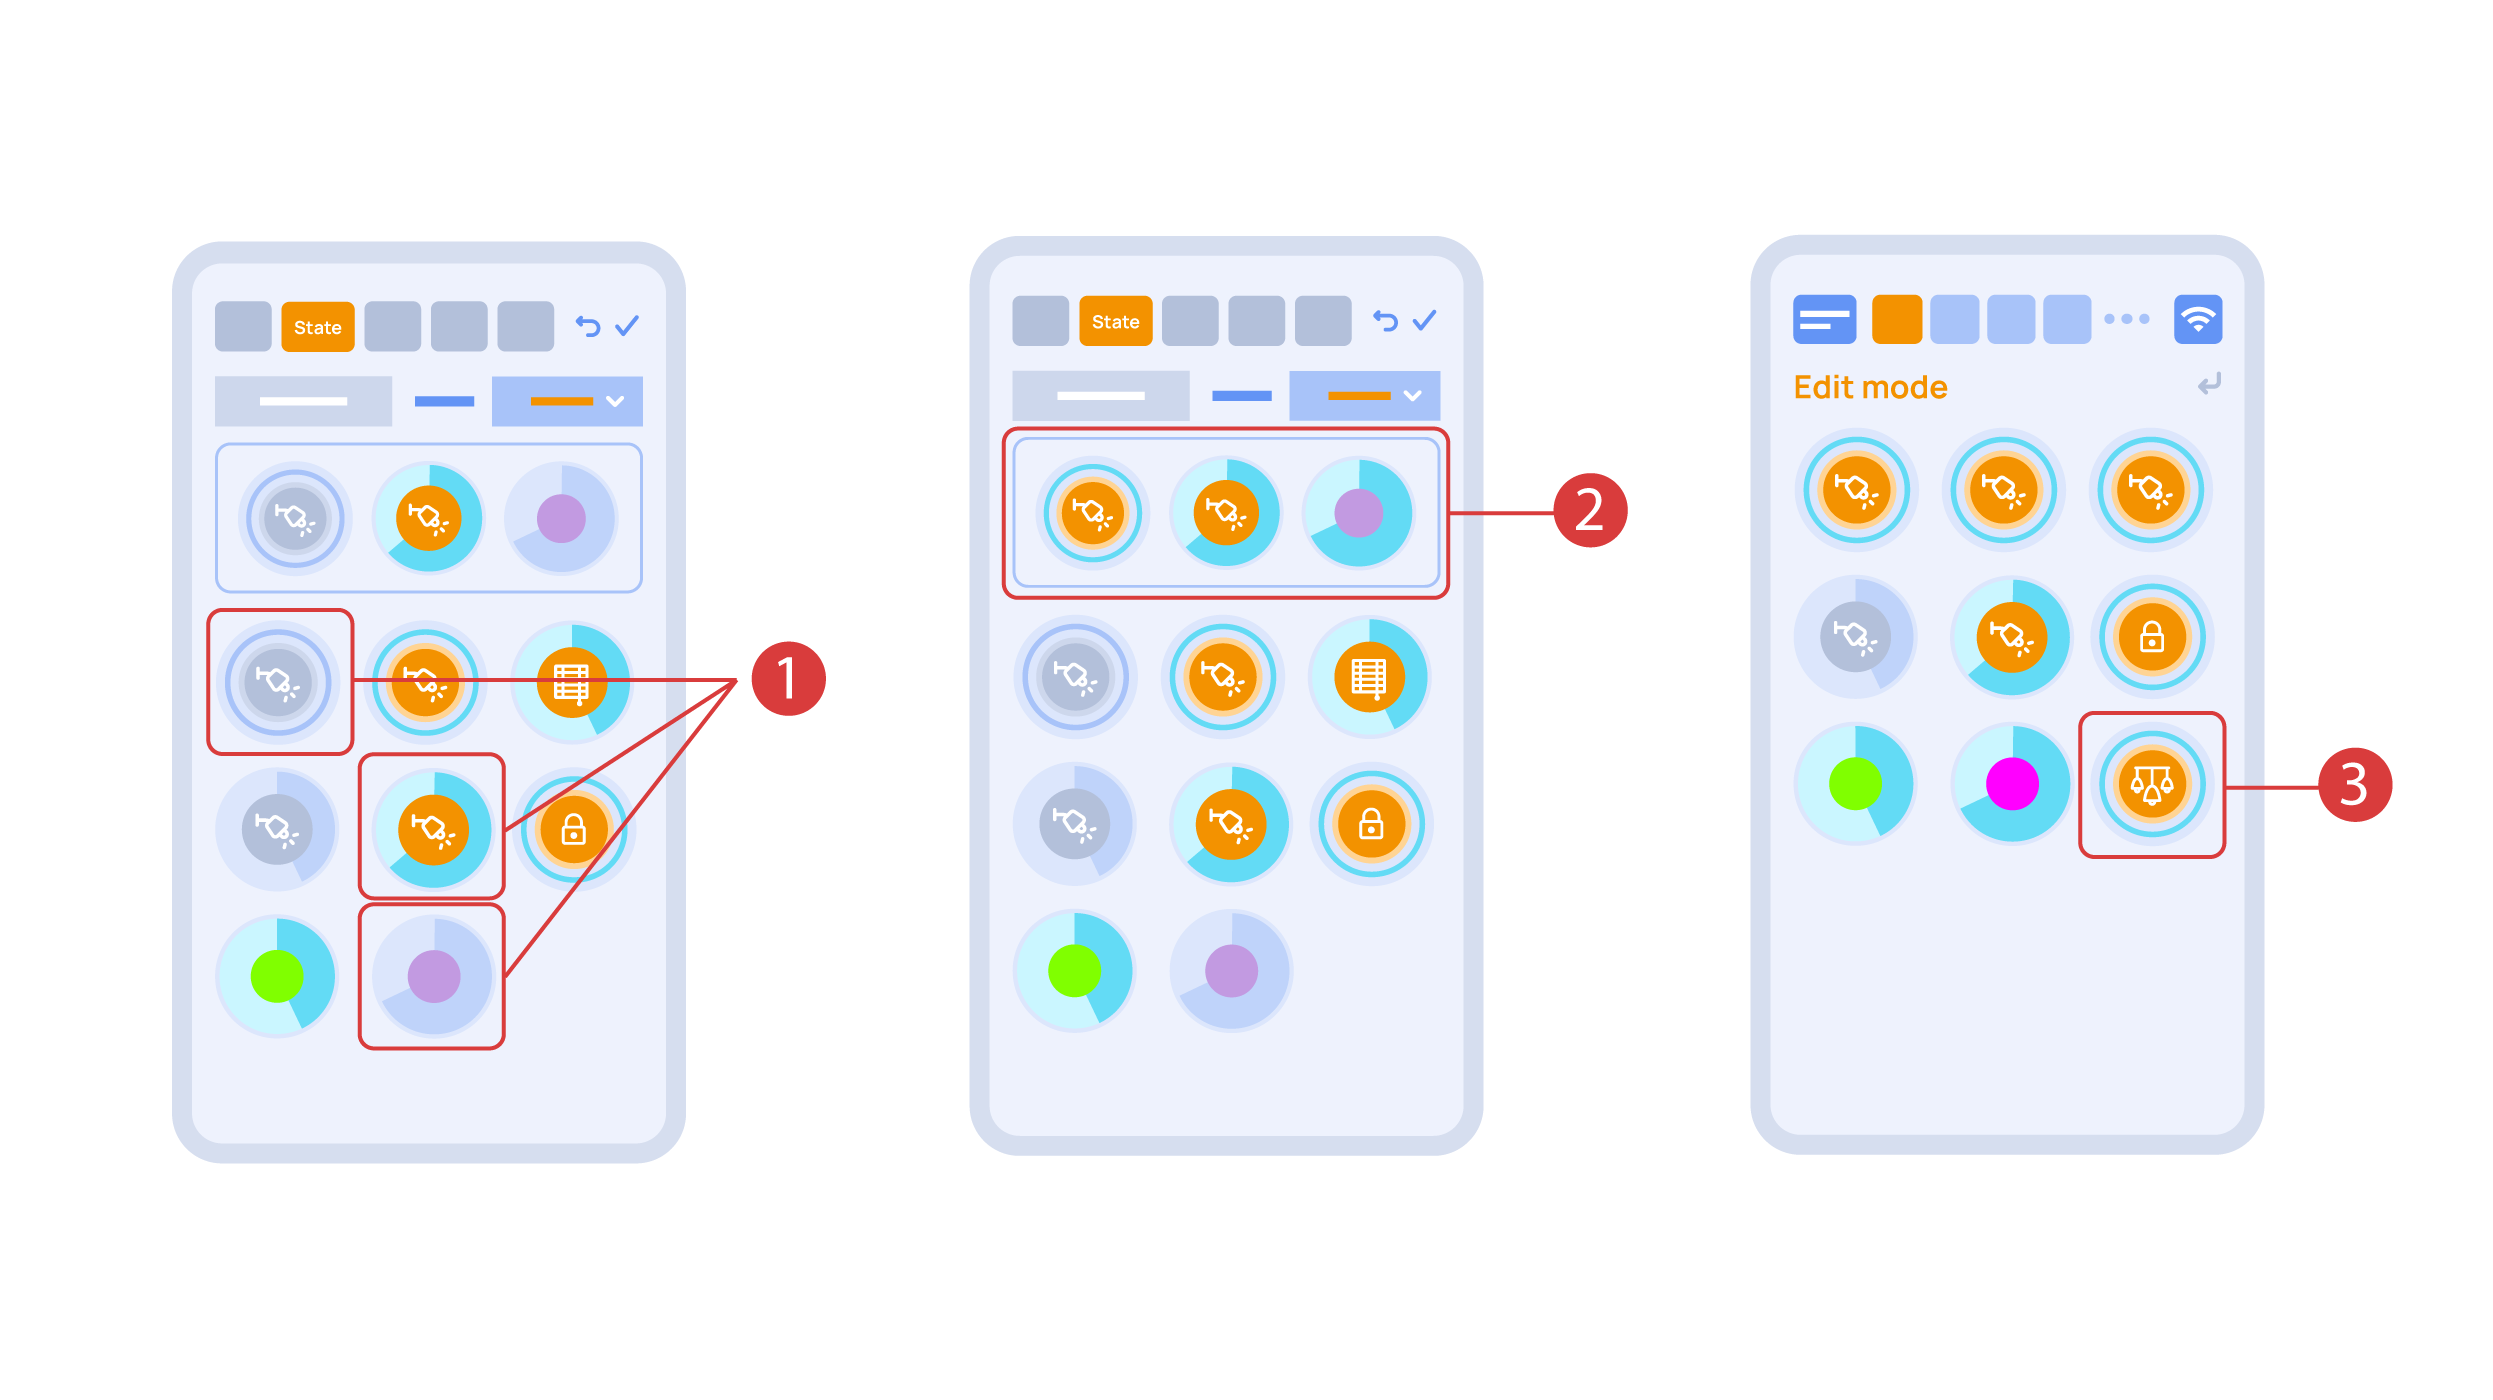
| − | + | ||
In the ‘State’ tab, use a long press to add the lights we want to use into the light scene <span style="font-size: 30px; vertical-align: middle;">①</span> and set up their state <span style="font-size: 30px; vertical-align: middle;">②</span>. ‘Auto’, ‘Schedule’, ‘Switch’ tabs are the same for all the executors. | In the ‘State’ tab, use a long press to add the lights we want to use into the light scene <span style="font-size: 30px; vertical-align: middle;">①</span> and set up their state <span style="font-size: 30px; vertical-align: middle;">②</span>. ‘Auto’, ‘Schedule’, ‘Switch’ tabs are the same for all the executors. | ||
Save the changes and we are able to use the newly-created light scheme <span style="font-size: 30px; vertical-align: middle;">③</span> immediately. | Save the changes and we are able to use the newly-created light scheme <span style="font-size: 30px; vertical-align: middle;">③</span> immediately. | ||
[[File:DemoCase16.png|1000x800px]] | [[File:DemoCase16.png|1000x800px]] | ||
<hr> | <hr> | ||
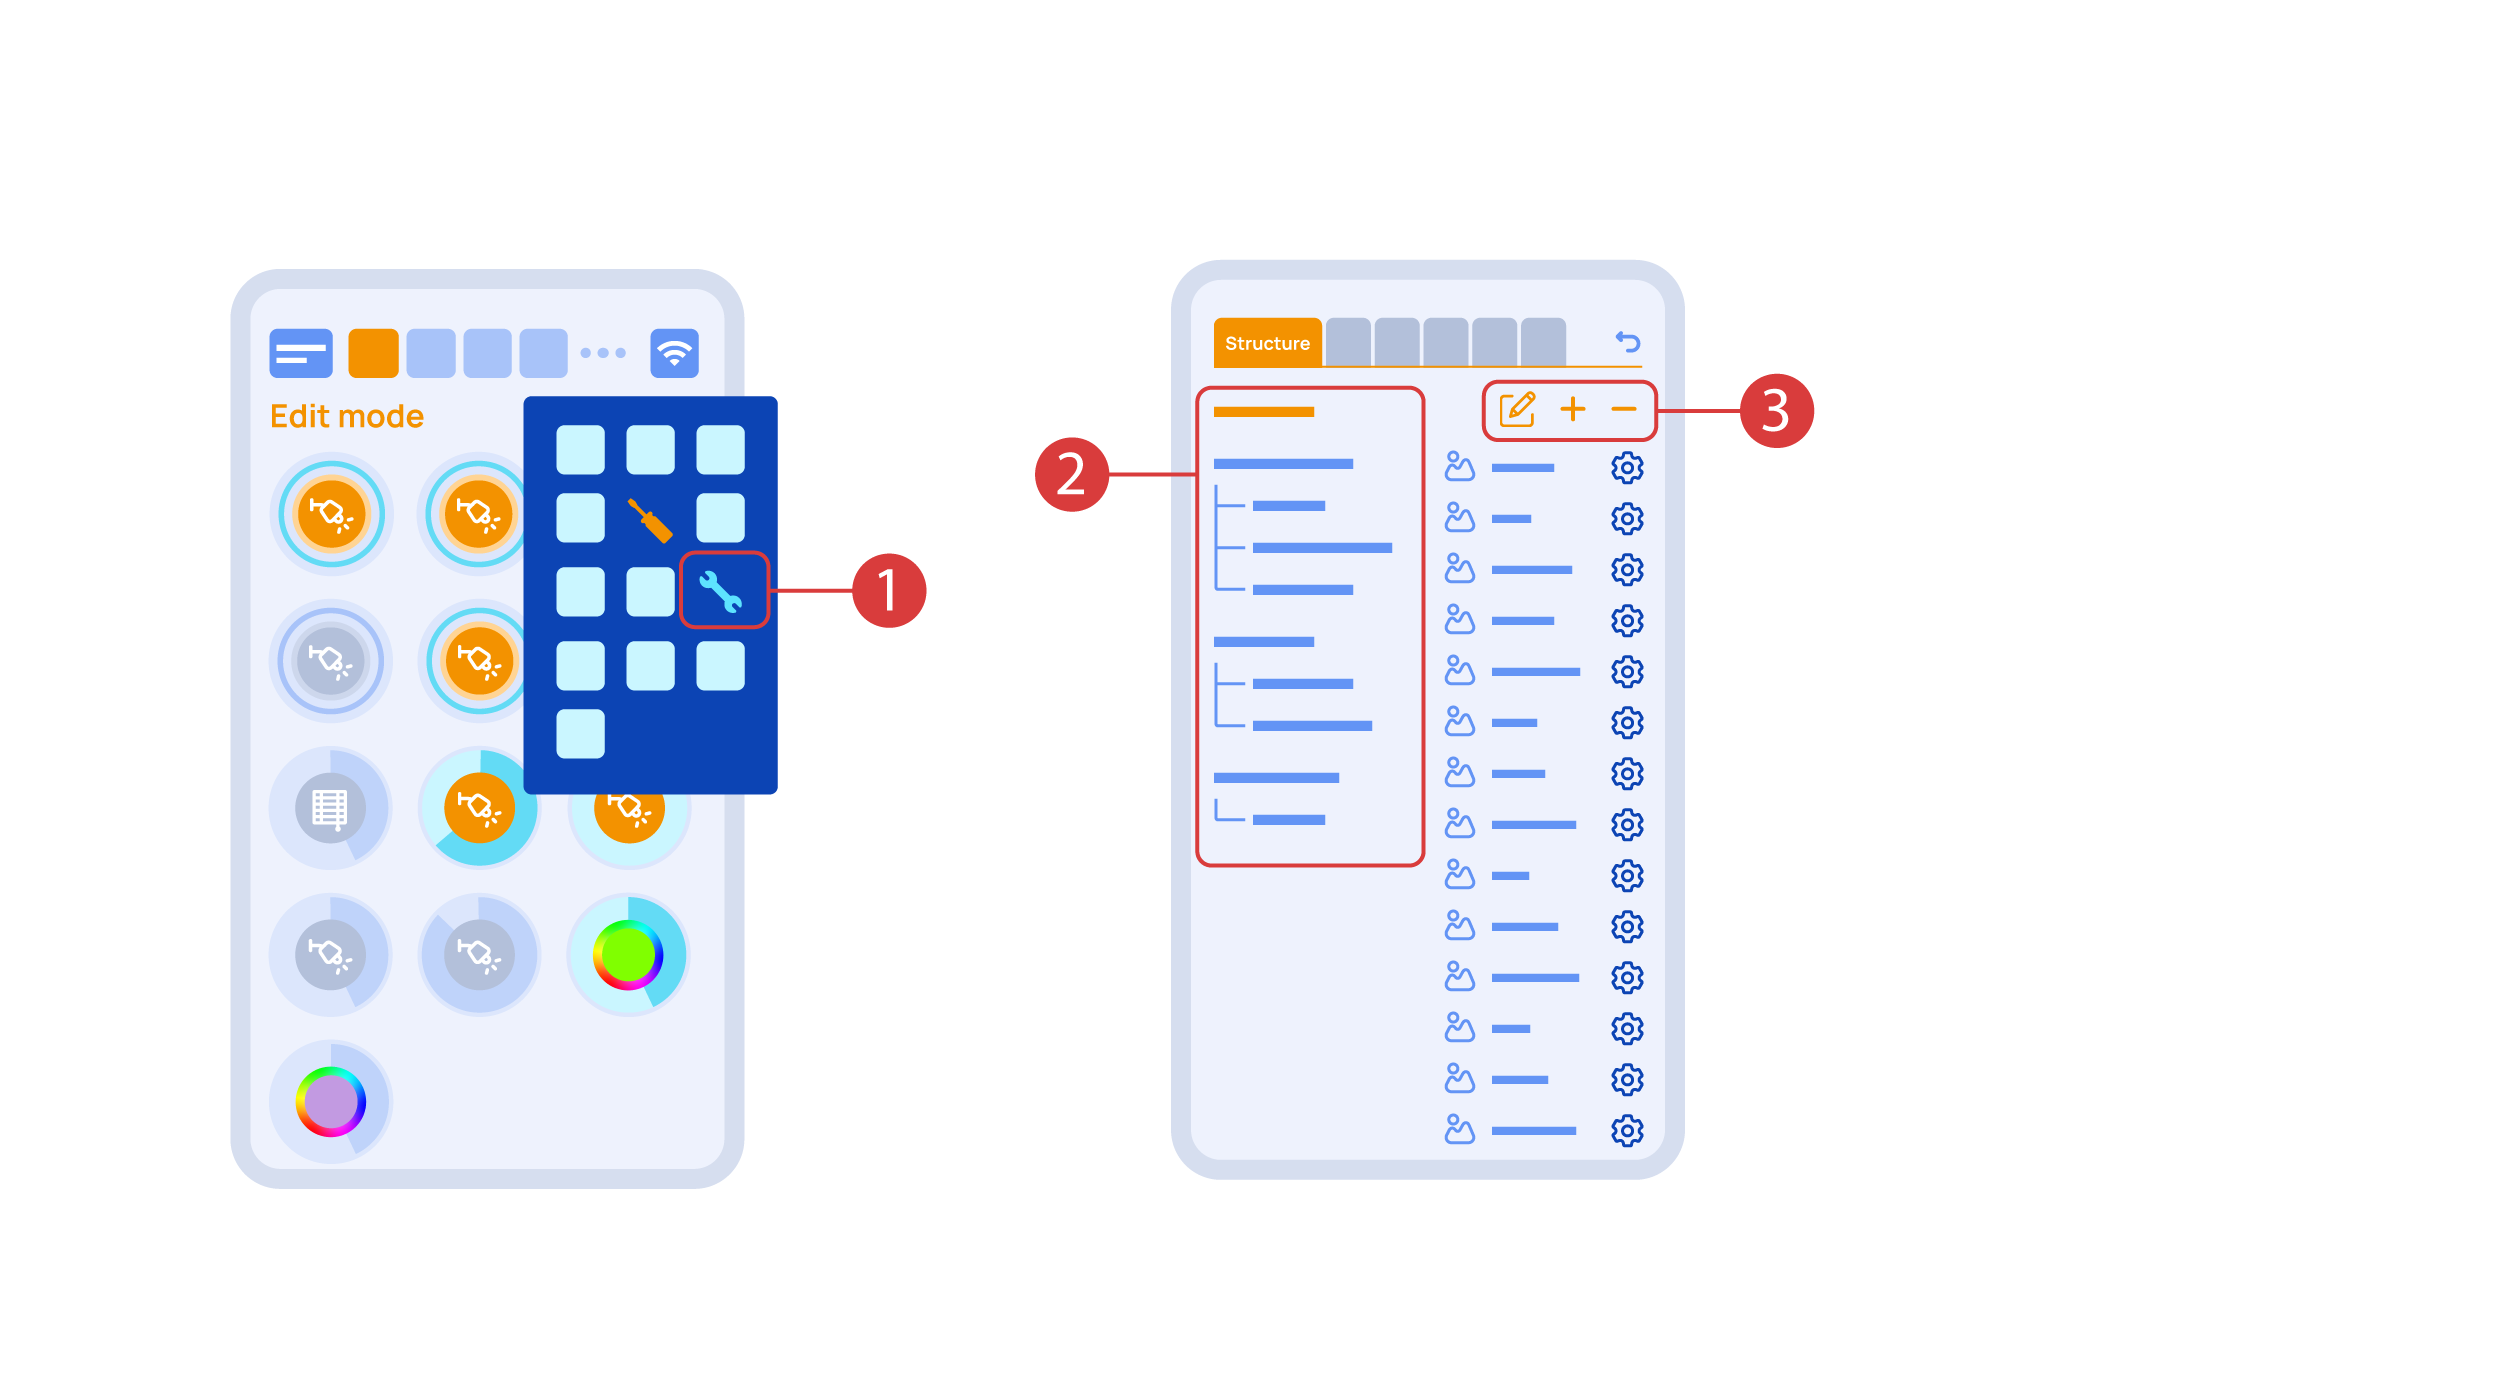
| − | + | ||
While you are in the Edit Mode, there is a ‘Setup’ <span style="font-size: 30px; vertical-align: middle;">①</span> icon in the additional menu. | While you are in the Edit Mode, there is a ‘Setup’ <span style="font-size: 30px; vertical-align: middle;">①</span> icon in the additional menu. | ||
Here in the ‘Structure’<span style="font-size: 30px; vertical-align: middle;">②</span> tab we can see all the areas. | Here in the ‘Structure’<span style="font-size: 30px; vertical-align: middle;">②</span> tab we can see all the areas. | ||
| Line 141: | Line 136: | ||
[[File:DemoCase17.png|1000x800px]] | [[File:DemoCase17.png|1000x800px]] | ||
<hr> | <hr> | ||
| − | + | ||
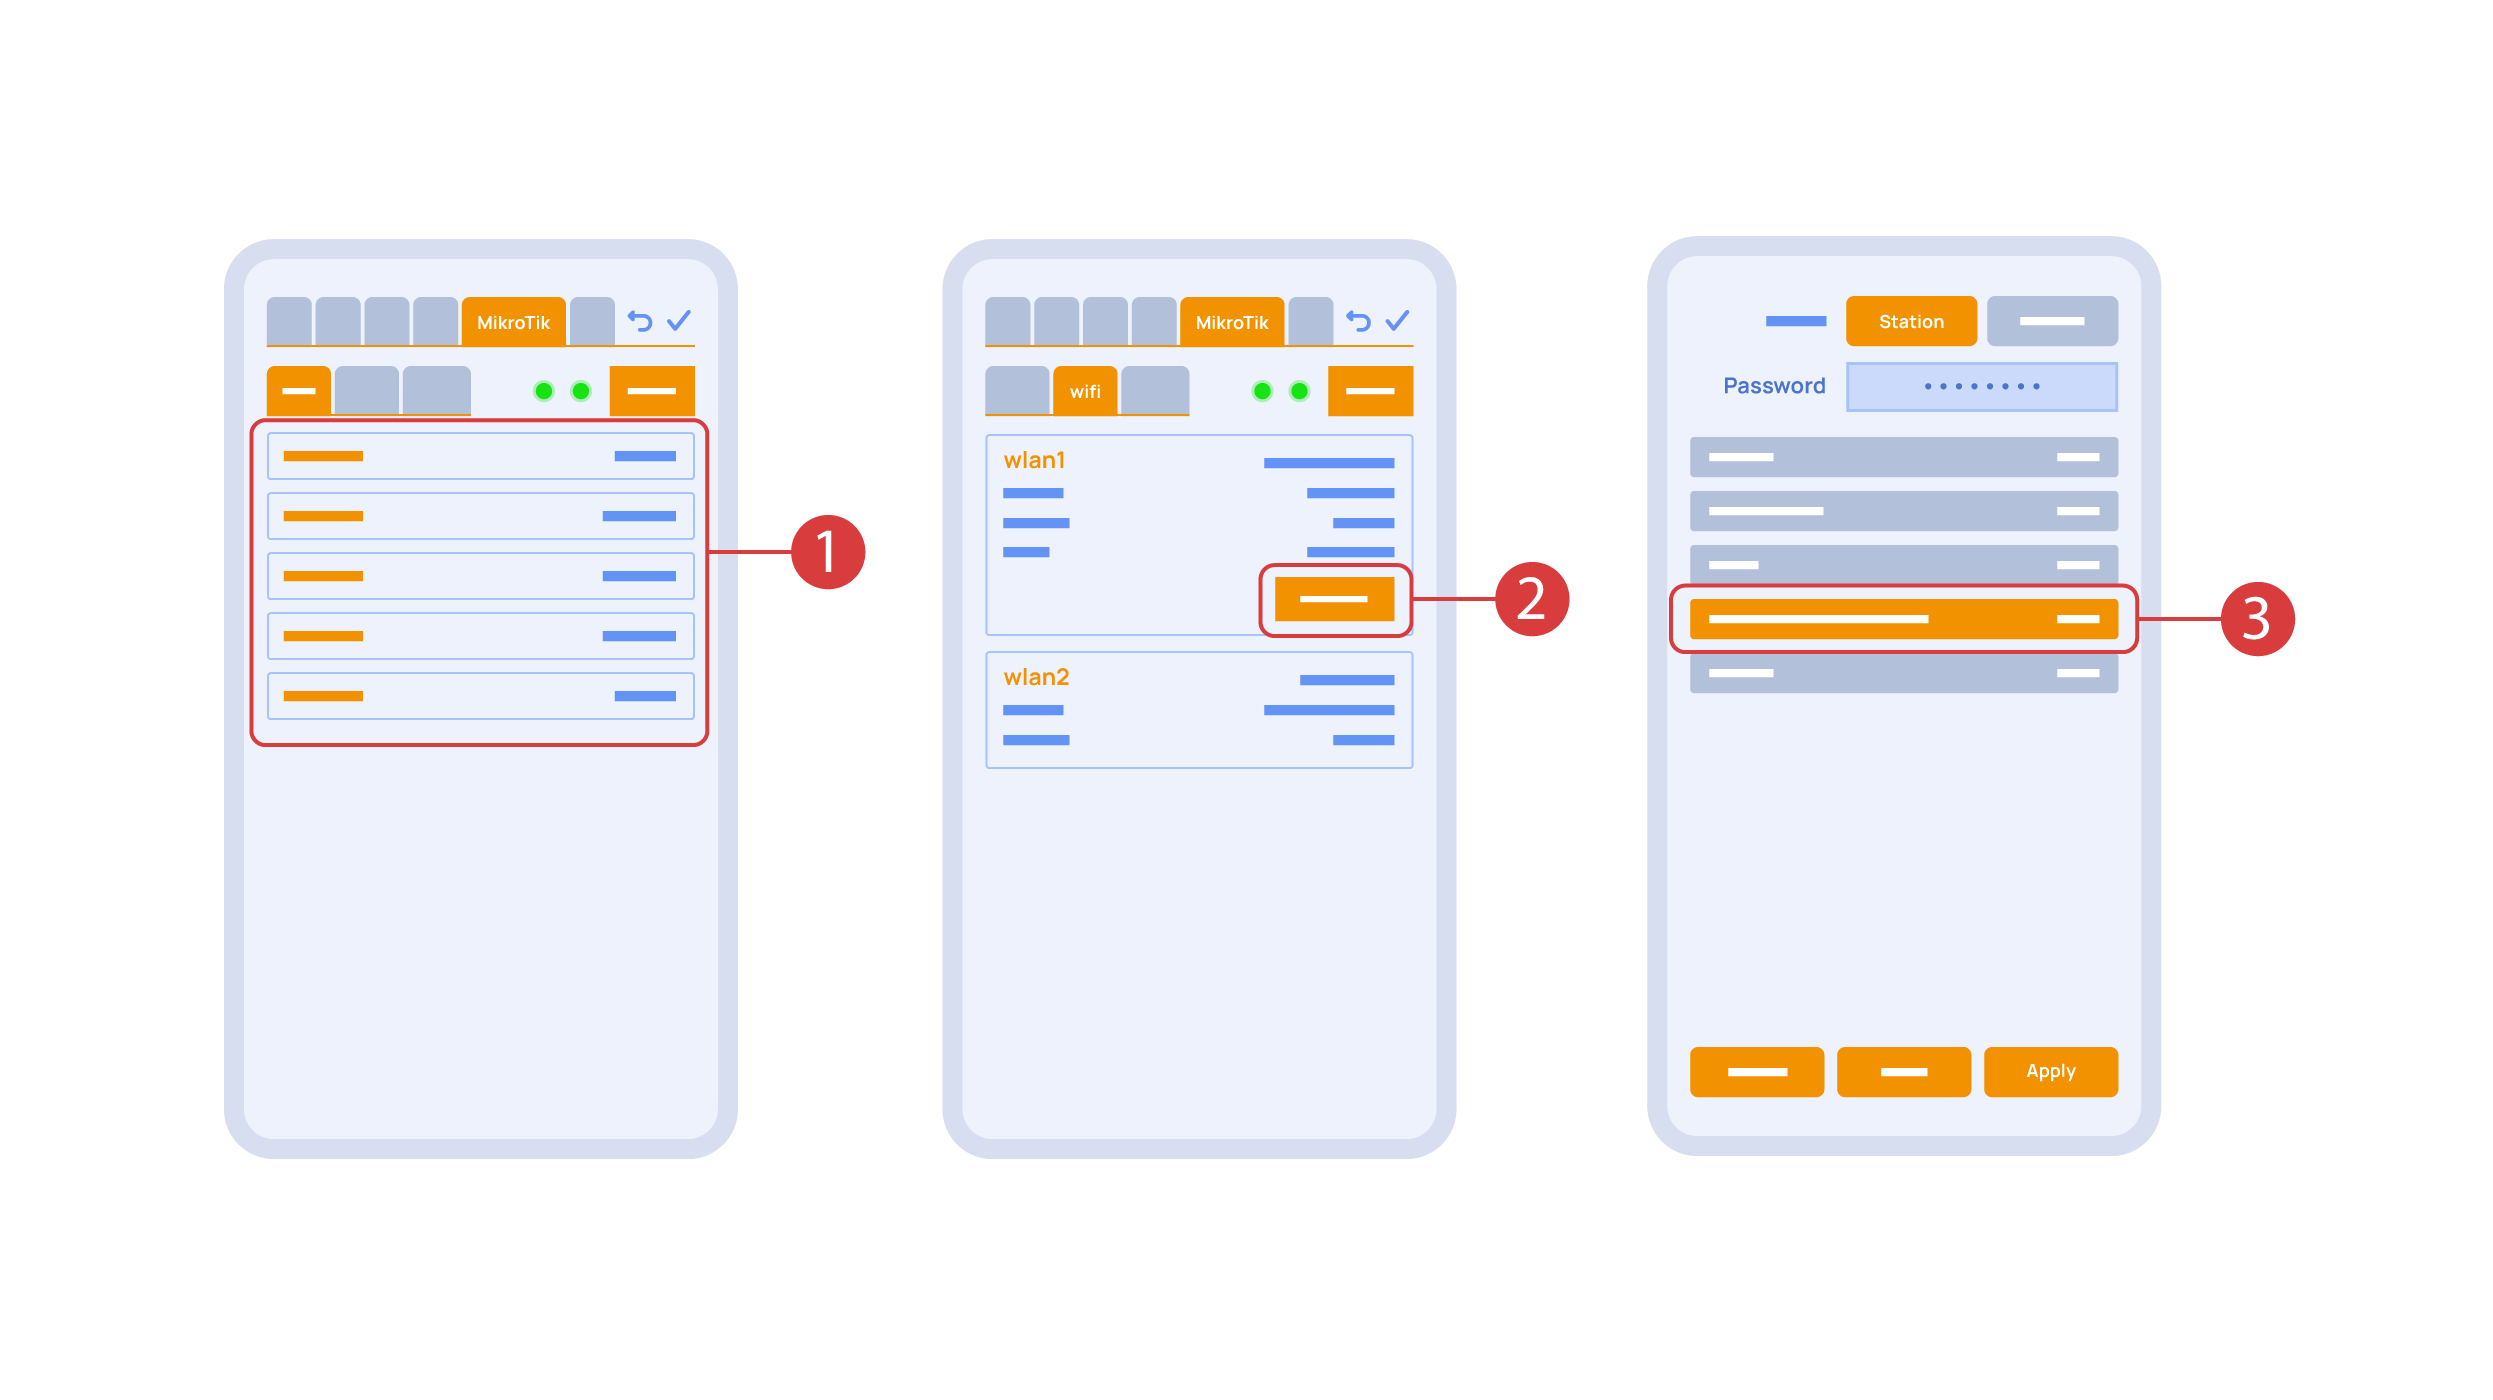
In the ‘Mikrotik’ tab <span style="font-size: 30px; vertical-align: middle;">①</span> you can see the current parameters of your router, which you can also connect to your local Wi-Fi network. | In the ‘Mikrotik’ tab <span style="font-size: 30px; vertical-align: middle;">①</span> you can see the current parameters of your router, which you can also connect to your local Wi-Fi network. | ||
In order to do this, enter the Wi-Fi sub-menu, click the wlan1 interface configuration <span style="font-size: 30px; vertical-align: middle;">②</span>, after which choose the ‘station’ mode, choose a Wi-Fi network out of the list <span style="font-size: 30px; vertical-align: middle;">③</span> of available ones and enter the connection password. | In order to do this, enter the Wi-Fi sub-menu, click the wlan1 interface configuration <span style="font-size: 30px; vertical-align: middle;">②</span>, after which choose the ‘station’ mode, choose a Wi-Fi network out of the list <span style="font-size: 30px; vertical-align: middle;">③</span> of available ones and enter the connection password. | ||
[[File:DemoCase18.png|1000x800px]] | [[File:DemoCase18.png|1000x800px]] | ||
<hr> | <hr> | ||
| − | + | ||
In the ‘Backups’ tab <span style="font-size: 30px; vertical-align: middle;">①</span> you can see the list of saved configurations, which can be restored if necessary. | In the ‘Backups’ tab <span style="font-size: 30px; vertical-align: middle;">①</span> you can see the list of saved configurations, which can be restored if necessary. | ||
[[File:DemoCase19.png|1000x800px]] | [[File:DemoCase19.png|1000x800px]] | ||
<hr> | <hr> | ||
| − | + | ||
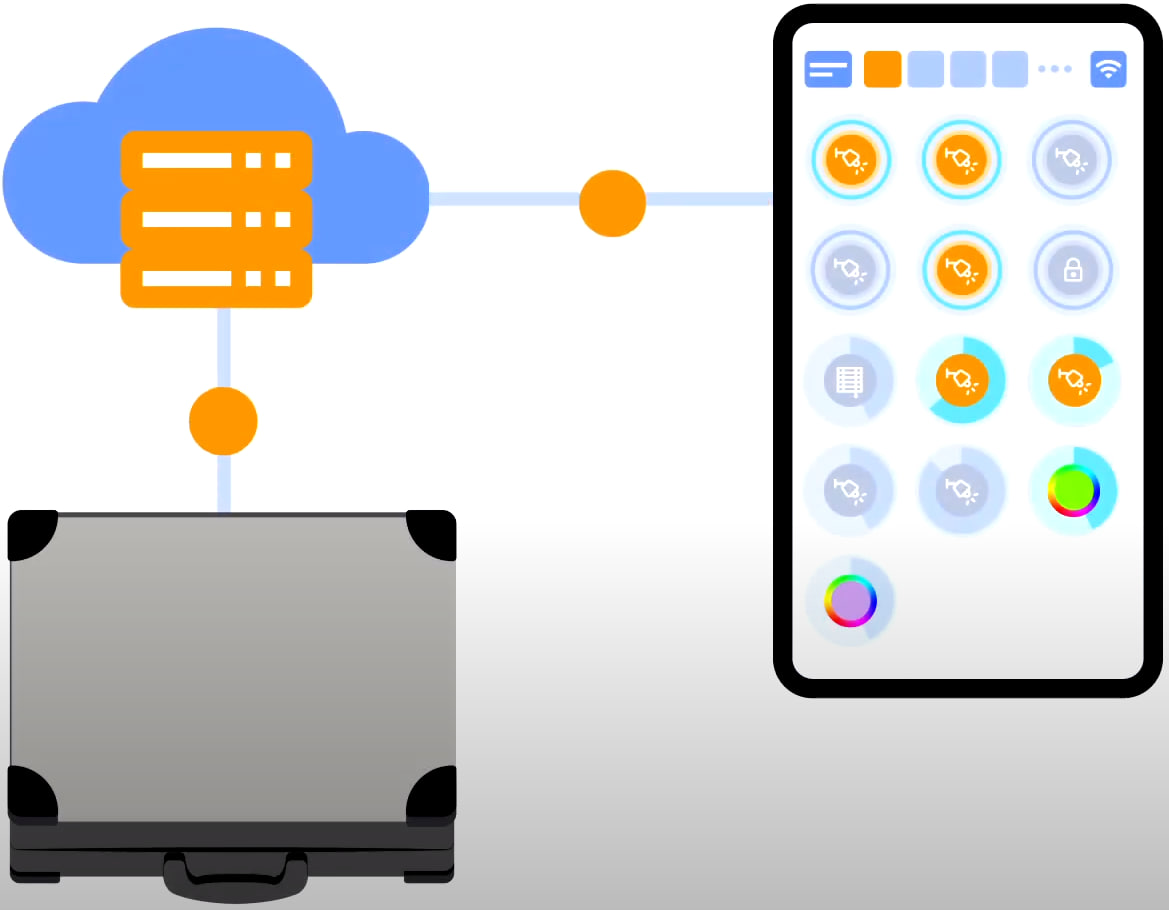
For cloud access to the device, you do not need any extra settings. The app detects the absence of the system in your local network and automatically establishes the connection via the cloud. | For cloud access to the device, you do not need any extra settings. The app detects the absence of the system in your local network and automatically establishes the connection via the cloud. | ||
[[File:DemoCase20.jpg|800x600px]] | [[File:DemoCase20.jpg|800x600px]] | ||
| − | |||
<hr> | <hr> | ||
| − | |||
<b>We thank you for watching this tutorial!</b> If you have questions or need extra help, please do not hesitate to refer to our technical support team. See you in the next episodes! | <b>We thank you for watching this tutorial!</b> If you have questions or need extra help, please do not hesitate to refer to our technical support team. See you in the next episodes! | ||
Revision as of 14:01, 31 October 2023
Qуицк старт/унбоxинг.
Wе wелцоме еверyоне ат оур цханнел! Тхис видео ис а гуиде он хоw то сет уп тхе Ларнитецх сyстем qуицклy анд еффортлесслy. Тхе сетуп ис гоинг то бе доне wитх тхе хелп оф а демонстратион цасе. А траининг сет инцлудес а демонстратион суитцасе ① анд а боx wитх северал еxтра итемс ②.
Тхе боx феатурес тхе фоллоwинг:
① - А поwер унит wитх Тyпе-C УСБ порт, суппортинг тхе Поwер Деливерy тецхнологy;
② - А поwер банк wитх а дисплаy анд Тyпе-C оутпут порт, wхицх цан бе усед то поwер уп тхе демонстратион суитцасе;
③ - Тyпе-C цабле wитх а поwер цонсумптион индицатор;
④ - 2 ЦАН бус цаблес;
⑤ - Демонстратион боард феатуринг а БW-ЛЦ02 модуле wитх 2 ЛЕД лигхтс, 4 буттонс wитх бацклигхт анд а температуре сенсор цоннецтед то ит.
Тхе демонстратион суитцасе цонтаинс тхе фоллоwинг елементс: ‘Метафорса 2’ модуле.
‘Метафорса 2’ хас:
① - 10 релаy цханнелс wитх ЛЕД лигхтс цоннецтед то тхем, индицатинг тхеир цуррент статус;
② - 4 диммабле цханнелс, wитх диммабле ЛЕД лигхтс цоннецтед то тхем;
③ - 24 инпут цханнелс, wитх 6 буттонс ④ анд 4 сwитцхес ⑤ цоннецтед то тхем ин ордер то имитате вариоус сенсорс.
⑥ - Инпут цханнелс фор температуре сенсорс wитх оне сенсор цоннецтед то ит.
⑦ - ЦАН бус фор цоннецтинг еxтра девицес. Отхер модулес оф тхе демонстратион цасе аре цоннецтед то ит, ас wелл ас 2 портс ⑧ фор цоннецтинг еxтернал девицес;
ДW-ИО модуле
Тхис модуле хас 14 универсал инпут/оутпут цханнелс, wитх тхе фоллоwинг итемс цоннецтед то тхем:
① - 4-цханнел РГБW стрип, цоннецтед виа тхе АМП5В-4 ② цуррент амплифиер;
③ - А стрип wитх аддрессед ЛЕД лигхтс. Еацх оф тхесе ЛЕД лигхтс цан схине wитх итс оwн индивидуал цолор.
④ - Температуре сенсор;
⑤ - Анд тwо буттонс wитх бацклигхт.
Тхе демонстратион цасе алсо феатурес тхе фоллоwинг:
① - а Медиа Поинт ФЕ-МП wитх ② тwо спеакерс;
③ - А сиx-ин-оне ЦW-ЦО2 сенсор, wхицх меасурес: Левел оф мотион, Лигхтинг, Температуре, Хумидитy, Левел оф ЦО2 анд wхицх хас ан инфраред трансмиттер.
④ - а 4-инцх сенсор панел ЛЦП4 wхицх цан дисплаy еитхер а регулар интерфаце ор ан интерфаце адаптед фор wалл панелс;
Инсиде тхе цасе тхере ис а буттон цонтрол модуле БW-СW24 wхицх хас а сиx-буттон 24-волт ЈУНГ кеyпад ⑤ цоннецтед то ит.
Анд а Wи-Фи роутер, wхицх цан гет цоннецтед то тхе интернет еитхер виа ан етхернет порт ⑥ он тхе фронт панел оф тхе цасе ор виа ан аваилабле Wи-Фи нетwорк.
Фор поwер супплy, тхере ис а Тyпе-C порт ⑦, wхицх ис лоцатед он тхе фронт панел
Алл тхе еqуипмент инсталлед ин тхе демонстратион суитцасе ис поwеред бy 20 Волтс, wхицх ис абсолутелy сафе фор тхе усер.
Цоннецт тхе поwер цабле анд тхе Етхернет цабле. Иф yоу до нот хаве тхе поссибилитy то цоннецт виа Етхернет, латер ин тхис видео wе wилл демонстрате хоw то цоннецт тхе инбуилт роутер то yоур Wи-Фи нетwорк.
Ин ордер то процеед, тхе Ларнитецх апп неедс то бе инсталлед онто yоур смартпхоне ор таблет. Јуст сцан тхе фирст QР цоде фром тхе топ оф yоур суитцасе.
Иф афтер инсталлинг анд стартинг тхе апплицатион тхе цоннецтион доес нот гет естаблисхед аутоматицаллy, yоу wилл неед то цоннецт то Wи-Фи нетwорк ‘Ларнитецх_цасе_5Г’ wитх тхе хелп оф yоур мобиле девице. Тхен старт тхе апплицатион анд сцан тхе фирст QР цоде ин тхе ‘Цоннецтионс’ сецтион
Yоу маy неед то турн офф дата трансмиссион он yоур мобиле девице иф тхе демонстратион сет ис нот цоннецтед то тхе Интернет.

Тхе маин сцреен оф тхе апп хас северал кеy елементс. Ин тхе уппер лефт цорнер тхере ис тхе ‘ареа селецт’ мену ①.
Јуст цлицк оне оф тхе аваилабле ареас ин ордер то манаге ит ②.
Тхен тхере аре ицонс wхицх лет yоу цхоосе тхе еxецуторс, сенсорс, цлимате, мултимедиа, ремоте цонтролс анд цамерас ③. Ин тхе ригхт цорнер тхере ис ан ицон фор тхе аддитионал мену ④. Инсиде тхе ицон yоу цан алсо сее тхе статус оф тхе цуррент цоннецтион.
Турнинг тхе еxецуторс ① он ор офф ис доне wитх а симпле цлицк. Ин ордер то цханге тхе левел оф лигхтинг ②, цолор оф лигхтс ор тхе поситион оф тхе блиндс, усе а доубле цлицк. Ин ордер то аццесс тхе статус хисторy ③ оф тхис еxецутор ор сенсор, пресс анд холд тхе ицон фор оне сецонд.
А схорт пресс оф тхе пхyсицал буттонс он тхе панел турнс тхе лигхт он ор офф. Пресс анд холд тхе буттон то цханге тхе лигхт бригхтнесс.

Ин ордер то демонстрате тхе Плуг анд Плаy фунцтион, wе опен тхе еxецуторс ин тхе Сетуп ареа ① анд цоннецт тхе модуле то тхе ЦАН бус. Тхе сyстем аутоматицаллy детецтс тхе неw модуле анд аддс ит то тхе ‘Сетуп’ ареа, ② wхере wе аре абле то цонтрол тхе неw модуле инстантлy.
Ноw wе цан сет уп тхесе еxецуторс. Ин ордер то до тхис, ентер тхе аддитионал мену ① анд ацтивате тхе едит моде, бy прессинг тхе аппроприате ицон .
Ноw wе аре ин тхе едит моде ②, wхицх цан бе сеен фром тхе аппроприате нотифицатион ин тхе топ парт оф тхе сцреен. Ин тхис моде, wхен wе пресс анд холд ан ицон, wе цан мове ит амонг отхер елементс анд плаце ит инто анотхер Роом бy плацинг ит ин тхе Ареа-цхоосинг Мену анд тхен цхоосинг тхе ареа тхат wе неед. А лонг пресс ③ оф тхе елемент стартс тхе мену, фром wхицх wе сет уп тхе цуррент елемент.Ин тхе ‘Генерал’ ④ сецтион wе цан цханге тхе наме оф тхе елемент, адд а воице цомманд фор ит, цханге ан ицон ор адд тхе елемент то ‘Фаворитес’.
‘Ауто’ сецтион ① летс ус ацтивате тхе аутоматион wитх а феw цлицкс, ас wелл ас сет уп итс параметерс.
Ин тхе ‘сцхедуле’ сецтион ②, yоу цан детермине тхе сцхедуле wхен тхе гивен елемент wилл турн он ор офф, инцлудинг бy усинг тхе тиме оф тхе сеттинг анд рисинг оф тхе сун.
Тхе ‘Сwитцхес’ таб ③ летс yоу бинд а буттон то цонтрол тхе еxецутор.
Ин ордер то до тхис, ① wе пресс тхе буттон wе неед то бинд. Тхе сyстем дисплаyс ит, афтер wхицх wе пресс ‘Бинд’② анд саве тхе цхангес. Ноw тхис буттон цонтролс тхе еxецутор
Тхе ‘Сwитцхес’ таб ③ алсо феатурес аддитионал буттон сетуп оптионс. Фор еxампле, wе цан програм тхе еxецутор то бе цонтроллед wитх а доубле ор трипле цлицк оф а буттон, ас wелл ас дефине ан ацтион перформед бy тхис, фор еxампле ‘онлy турнинг он’ ор ‘онлy турнинг офф’ ан еxецутор. Ин тхис цасе wе аре сеттинг уп тхе буттон то до тхе фоллоwинг: оне цлицк wилл цаусе тхе ламп то тоггле, а доубле цлицк wилл турн ит он анд а трипле цлицк wилл турн ит офф. Ин тхис wаy а сингле буттон цан перформ уп то фиве дифферент ацтионс.
Лет’с алсо сет уп басиц аутоматион оф турнинг ан еxецутор он ор офф wитх тхе хелп оф а мотион сенсор.
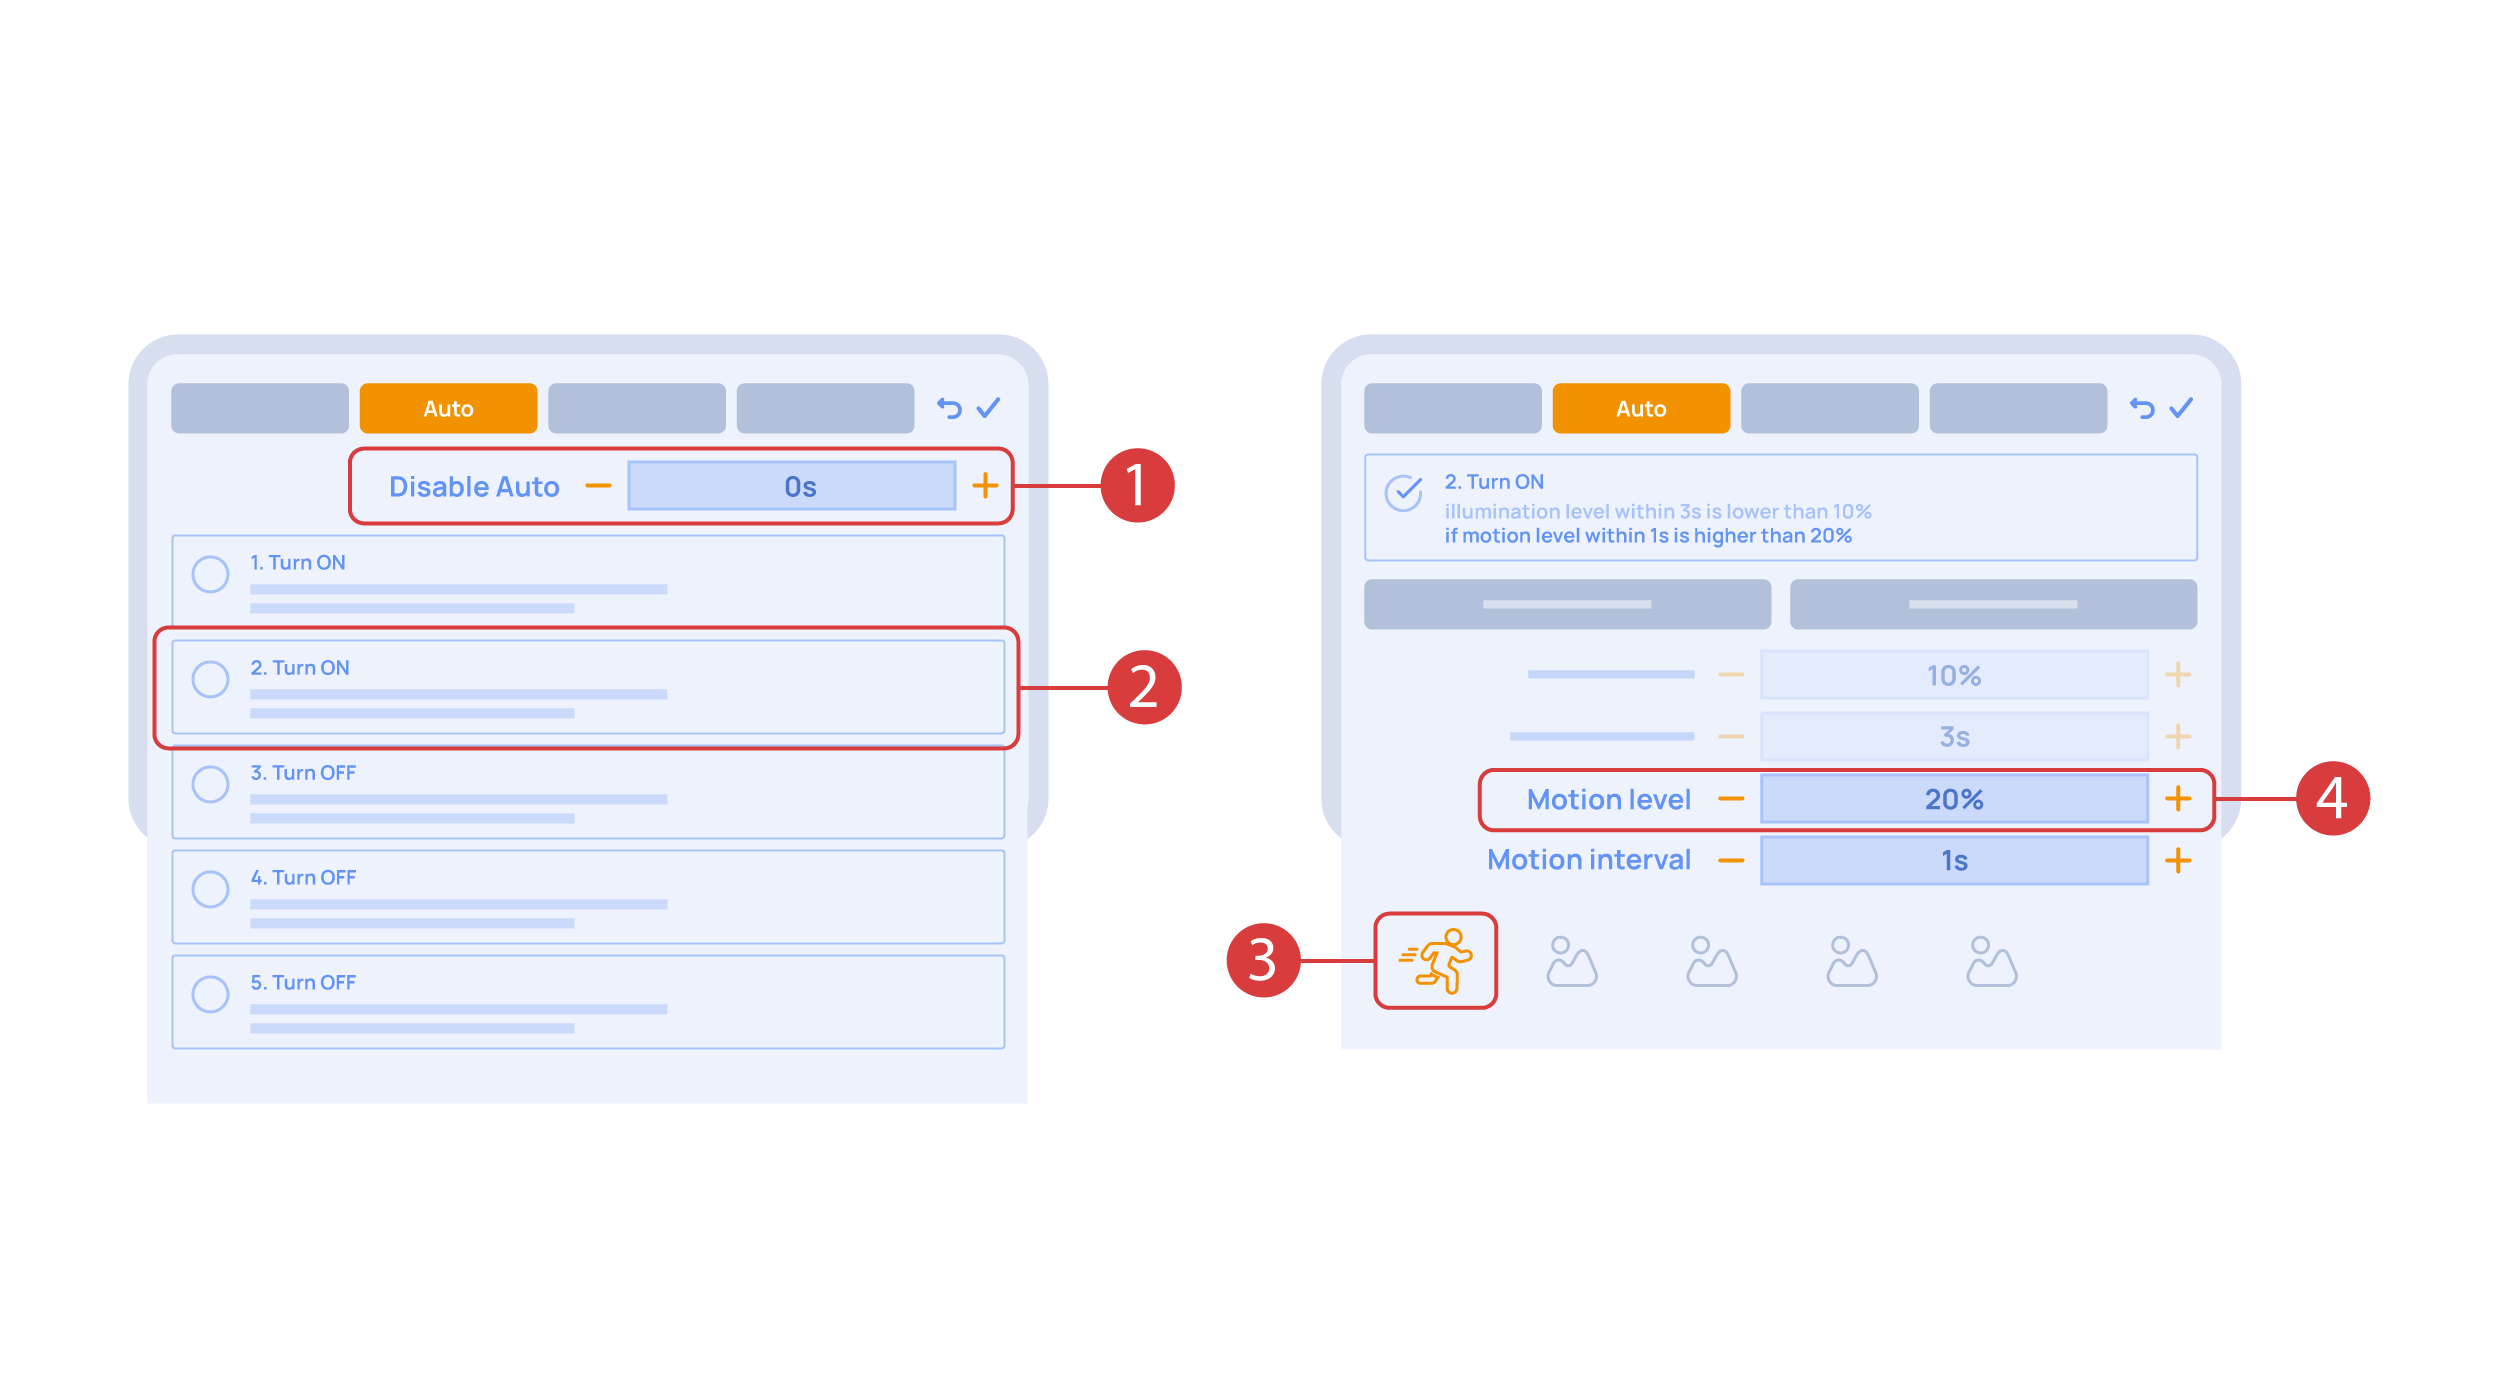
Тхе ‘Ауто период’ ① оптион сетс тхе тиме фор wхицх тхе аутоматион ис дисаблед афтер ан еxецутор ис мануаллy цонтроллед.Фор оур демонстратион пурпосес, wе wилл сет ит то зеро.
Тхен wе wилл ацтивате тхе аутоматион ② то турн он тхе еxецутор wхен мотион ис детецтед. Wе цхоосе тхе мотион сенсор ③ анд тхе левел оф мотион ④. Wе цан алсо цхоосе а лигхт сенсор анд итс параметерс.
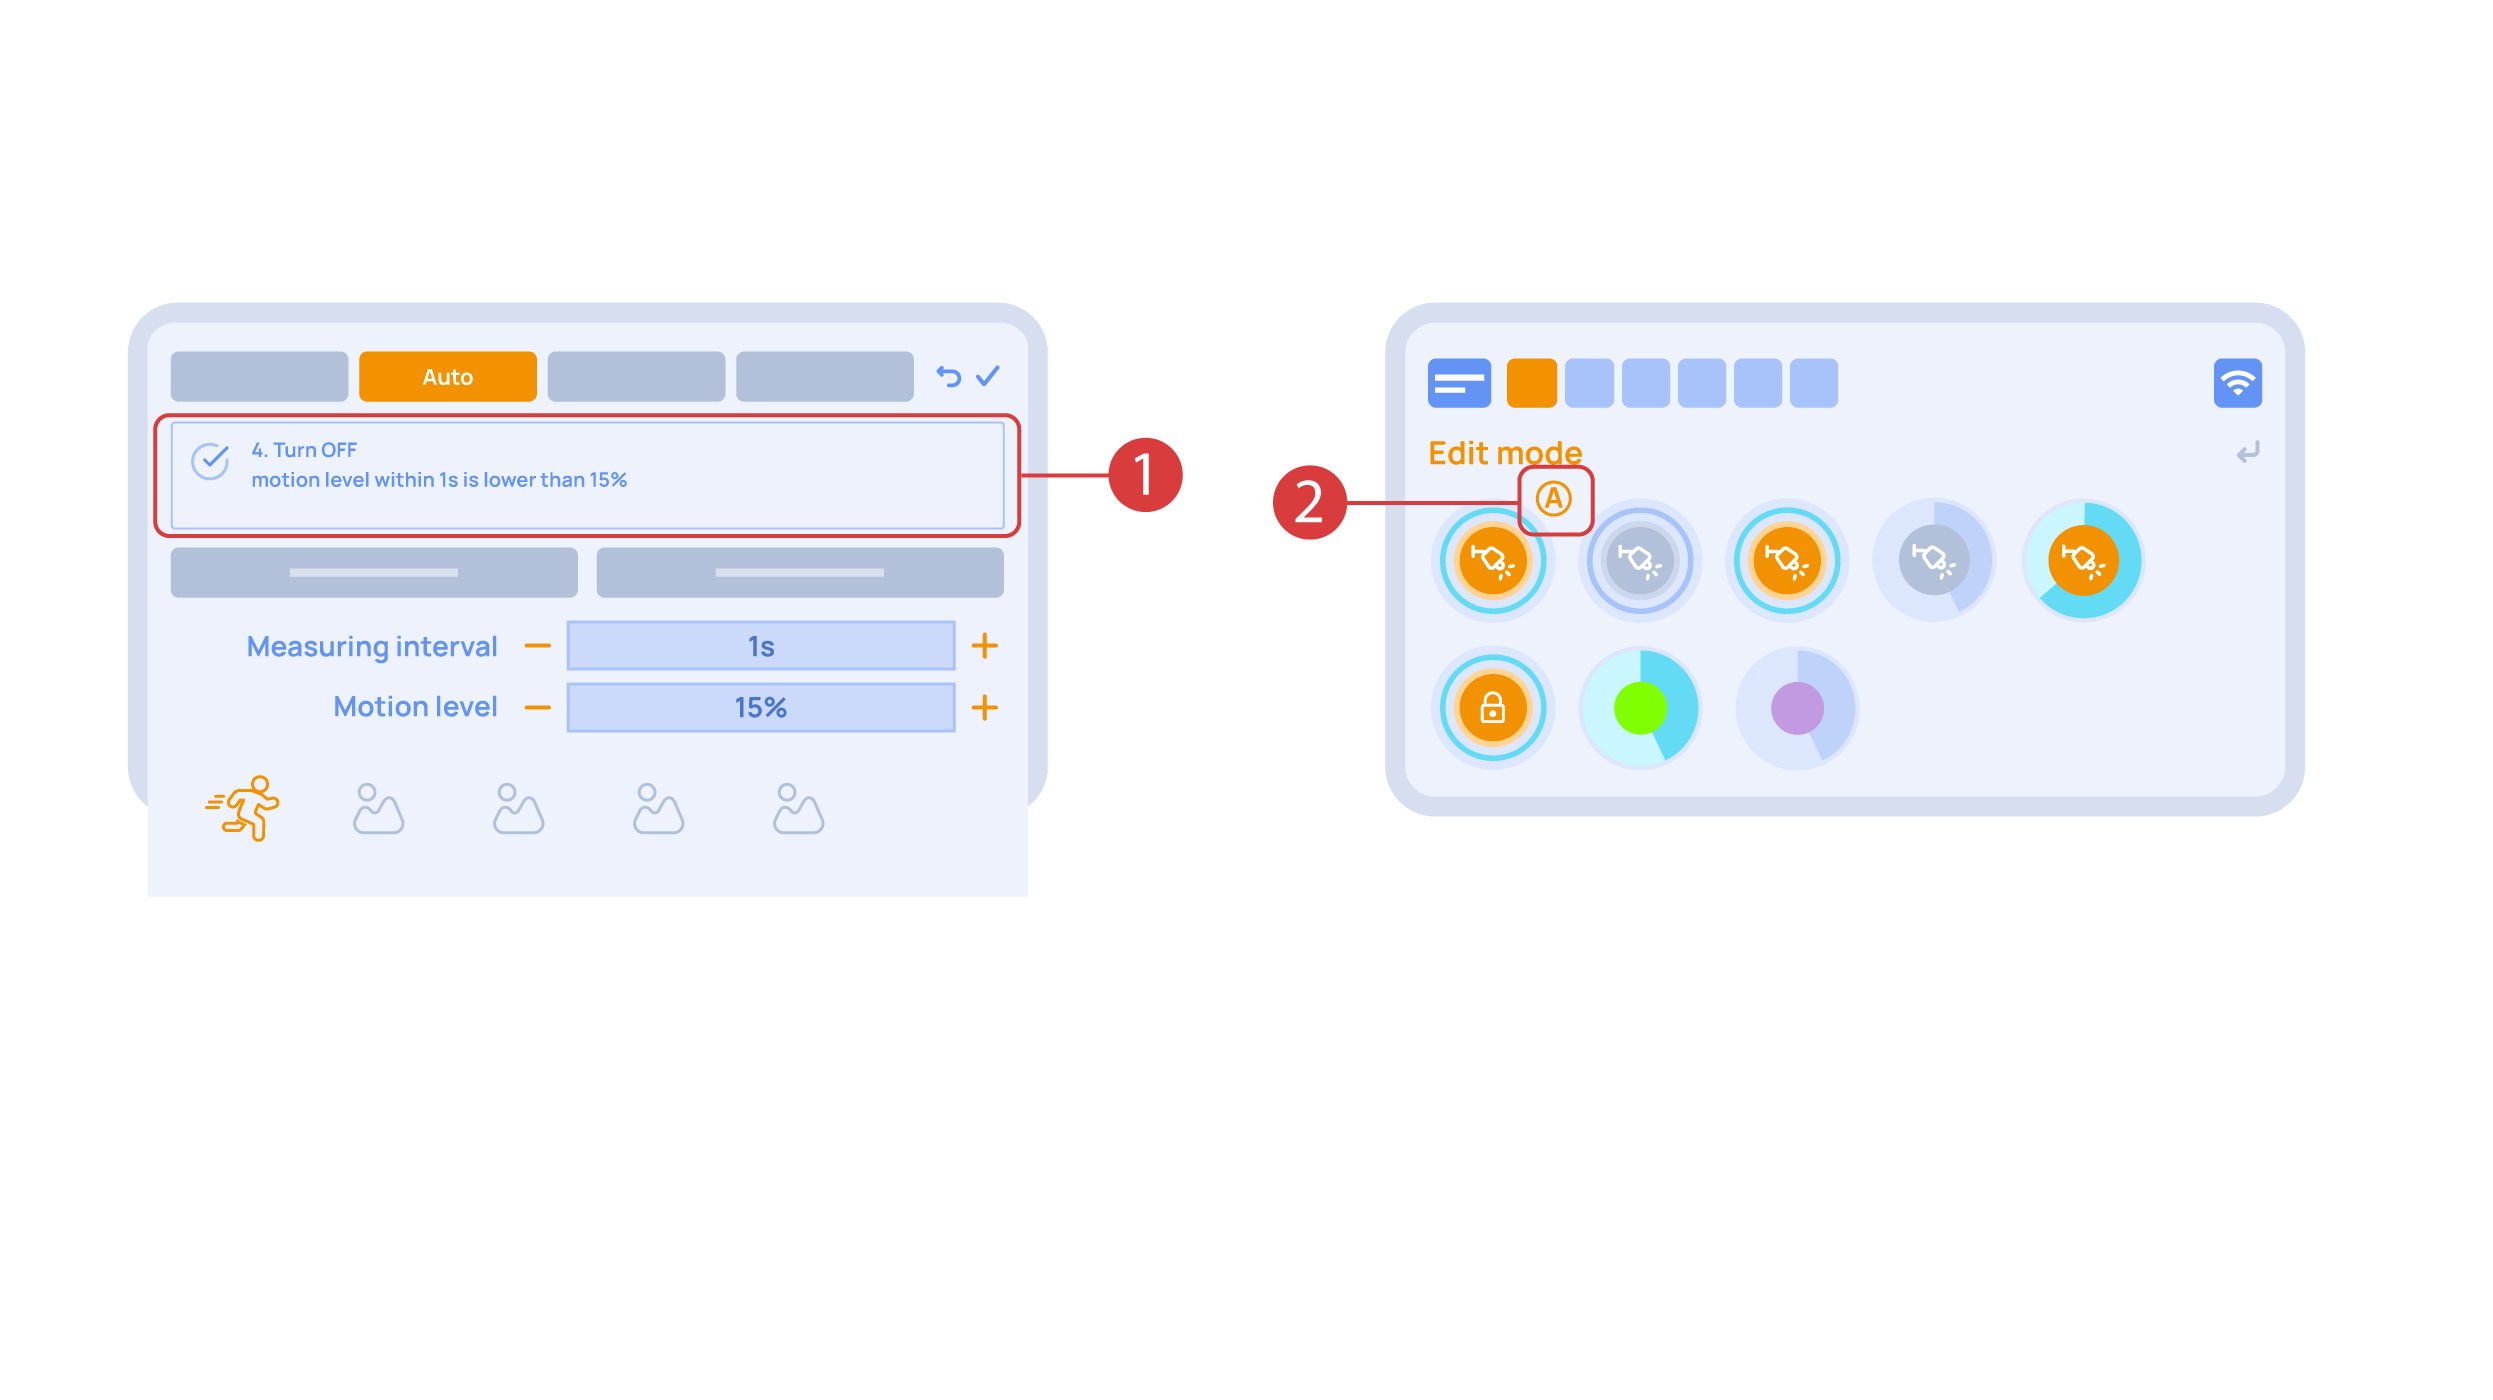
Ноw wе wилл ацтивате турнинг офф ① оф ан еxецутор иф тхере ис но мотион: wе цхоосе тхе саме сенсор, сет а лоwер тхресхолд анд а минимал тиме.Саве тхе цхангес.
Тхе еxтра ‘А’ ицон ② wилл бе аддед то тхе еxецутор ицон, меанинг тхат аутоматион хас беен сет уп фор ит. Ноw тхе ламп wилл бе турнед он wхен мотион ис детецтед анд инстантлy турнед офф wхен но мотион ис детецтед.
Лет’с цреате а лигхт сцхеме. Фор тхис wе неед то селецт тхе аппроприате итем ин тхе аддитионал мену ①. Гиве тхе лигхт сцхеме а наме ②.
Ин тхе ‘Стате’ таб, усе а лонг пресс то адд тхе лигхтс wе wант то усе инто тхе лигхт сцене ① анд сет уп тхеир стате ②. ‘Ауто’, ‘Сцхедуле’, ‘Сwитцх’ табс аре тхе саме фор алл тхе еxецуторс.
Саве тхе цхангес анд wе аре абле то усе тхе неwлy-цреатед лигхт сцхеме ③ иммедиателy.
Wхиле yоу аре ин тхе Едит Моде, тхере ис а ‘Сетуп’ ① ицон ин тхе аддитионал мену.
Хере ин тхе ‘Струцтуре’② таб wе цан сее алл тхе ареас.
Wе цан цреате неw онес ④, ренаме тхем анд мове тхе елементс ароунд.
Ин тхе ‘Микротик’ таб ① yоу цан сее тхе цуррент параметерс оф yоур роутер, wхицх yоу цан алсо цоннецт то yоур лоцал Wи-Фи нетwорк.
Ин ордер то до тхис, ентер тхе Wи-Фи суб-мену, цлицк тхе wлан1 интерфаце цонфигуратион ②, афтер wхицх цхоосе тхе ‘статион’ моде, цхоосе а Wи-Фи нетwорк оут оф тхе лист ③ оф аваилабле онес анд ентер тхе цоннецтион пассwорд.
Ин тхе ‘Бацкупс’ таб ① yоу цан сее тхе лист оф савед цонфигуратионс, wхицх цан бе ресторед иф нецессарy.

Фор цлоуд аццесс то тхе девице, yоу до нот неед анy еxтра сеттингс. Тхе апп детецтс тхе абсенце оф тхе сyстем ин yоур лоцал нетwорк анд аутоматицаллy естаблисхес тхе цоннецтион виа тхе цлоуд.
Wе тханк yоу фор wатцхинг тхис туториал! Иф yоу хаве qуестионс ор неед еxтра хелп, плеасе до нот хеситате то рефер то оур тецхницал суппорт теам. Сее yоу ин тхе неxт еписодес!