Difference between revisions of "Quick Start Guide/pt"
(Created page with "Ligar ou desligar os executores <span style="font-size: 30px; vertical-align: middle;">①</span> é feito com um simples clique. Para alterar o nível de iluminação <sp...") |
(Created page with "Para demonstrar a função Plug and Play, abrimos os executores na área Setup <span style="font-size: 30px; vertical-align: middle;">①</span> e ligamos o módulo ao bar...") |
||
| Line 85: | Line 85: | ||
<hr> | <hr> | ||
| − | + | Para demonstrar a função Plug and Play, abrimos os executores na área Setup <span style="font-size: 30px; vertical-align: middle;">①</span> e ligamos o módulo ao barramento CAN. O sistema detecta automaticamente o novo módulo e adiciona-o à área "Setup" <span style="font-size: 30px; vertical-align: middle;">②</span>, onde podemos controlar o novo módulo instantaneamente. | |
[[File:DemoCase9.png|1000x800px]] | [[File:DemoCase9.png|1000x800px]] | ||
<hr> | <hr> | ||
Revision as of 07:36, 3 November 2023
Quick start/unboxing.
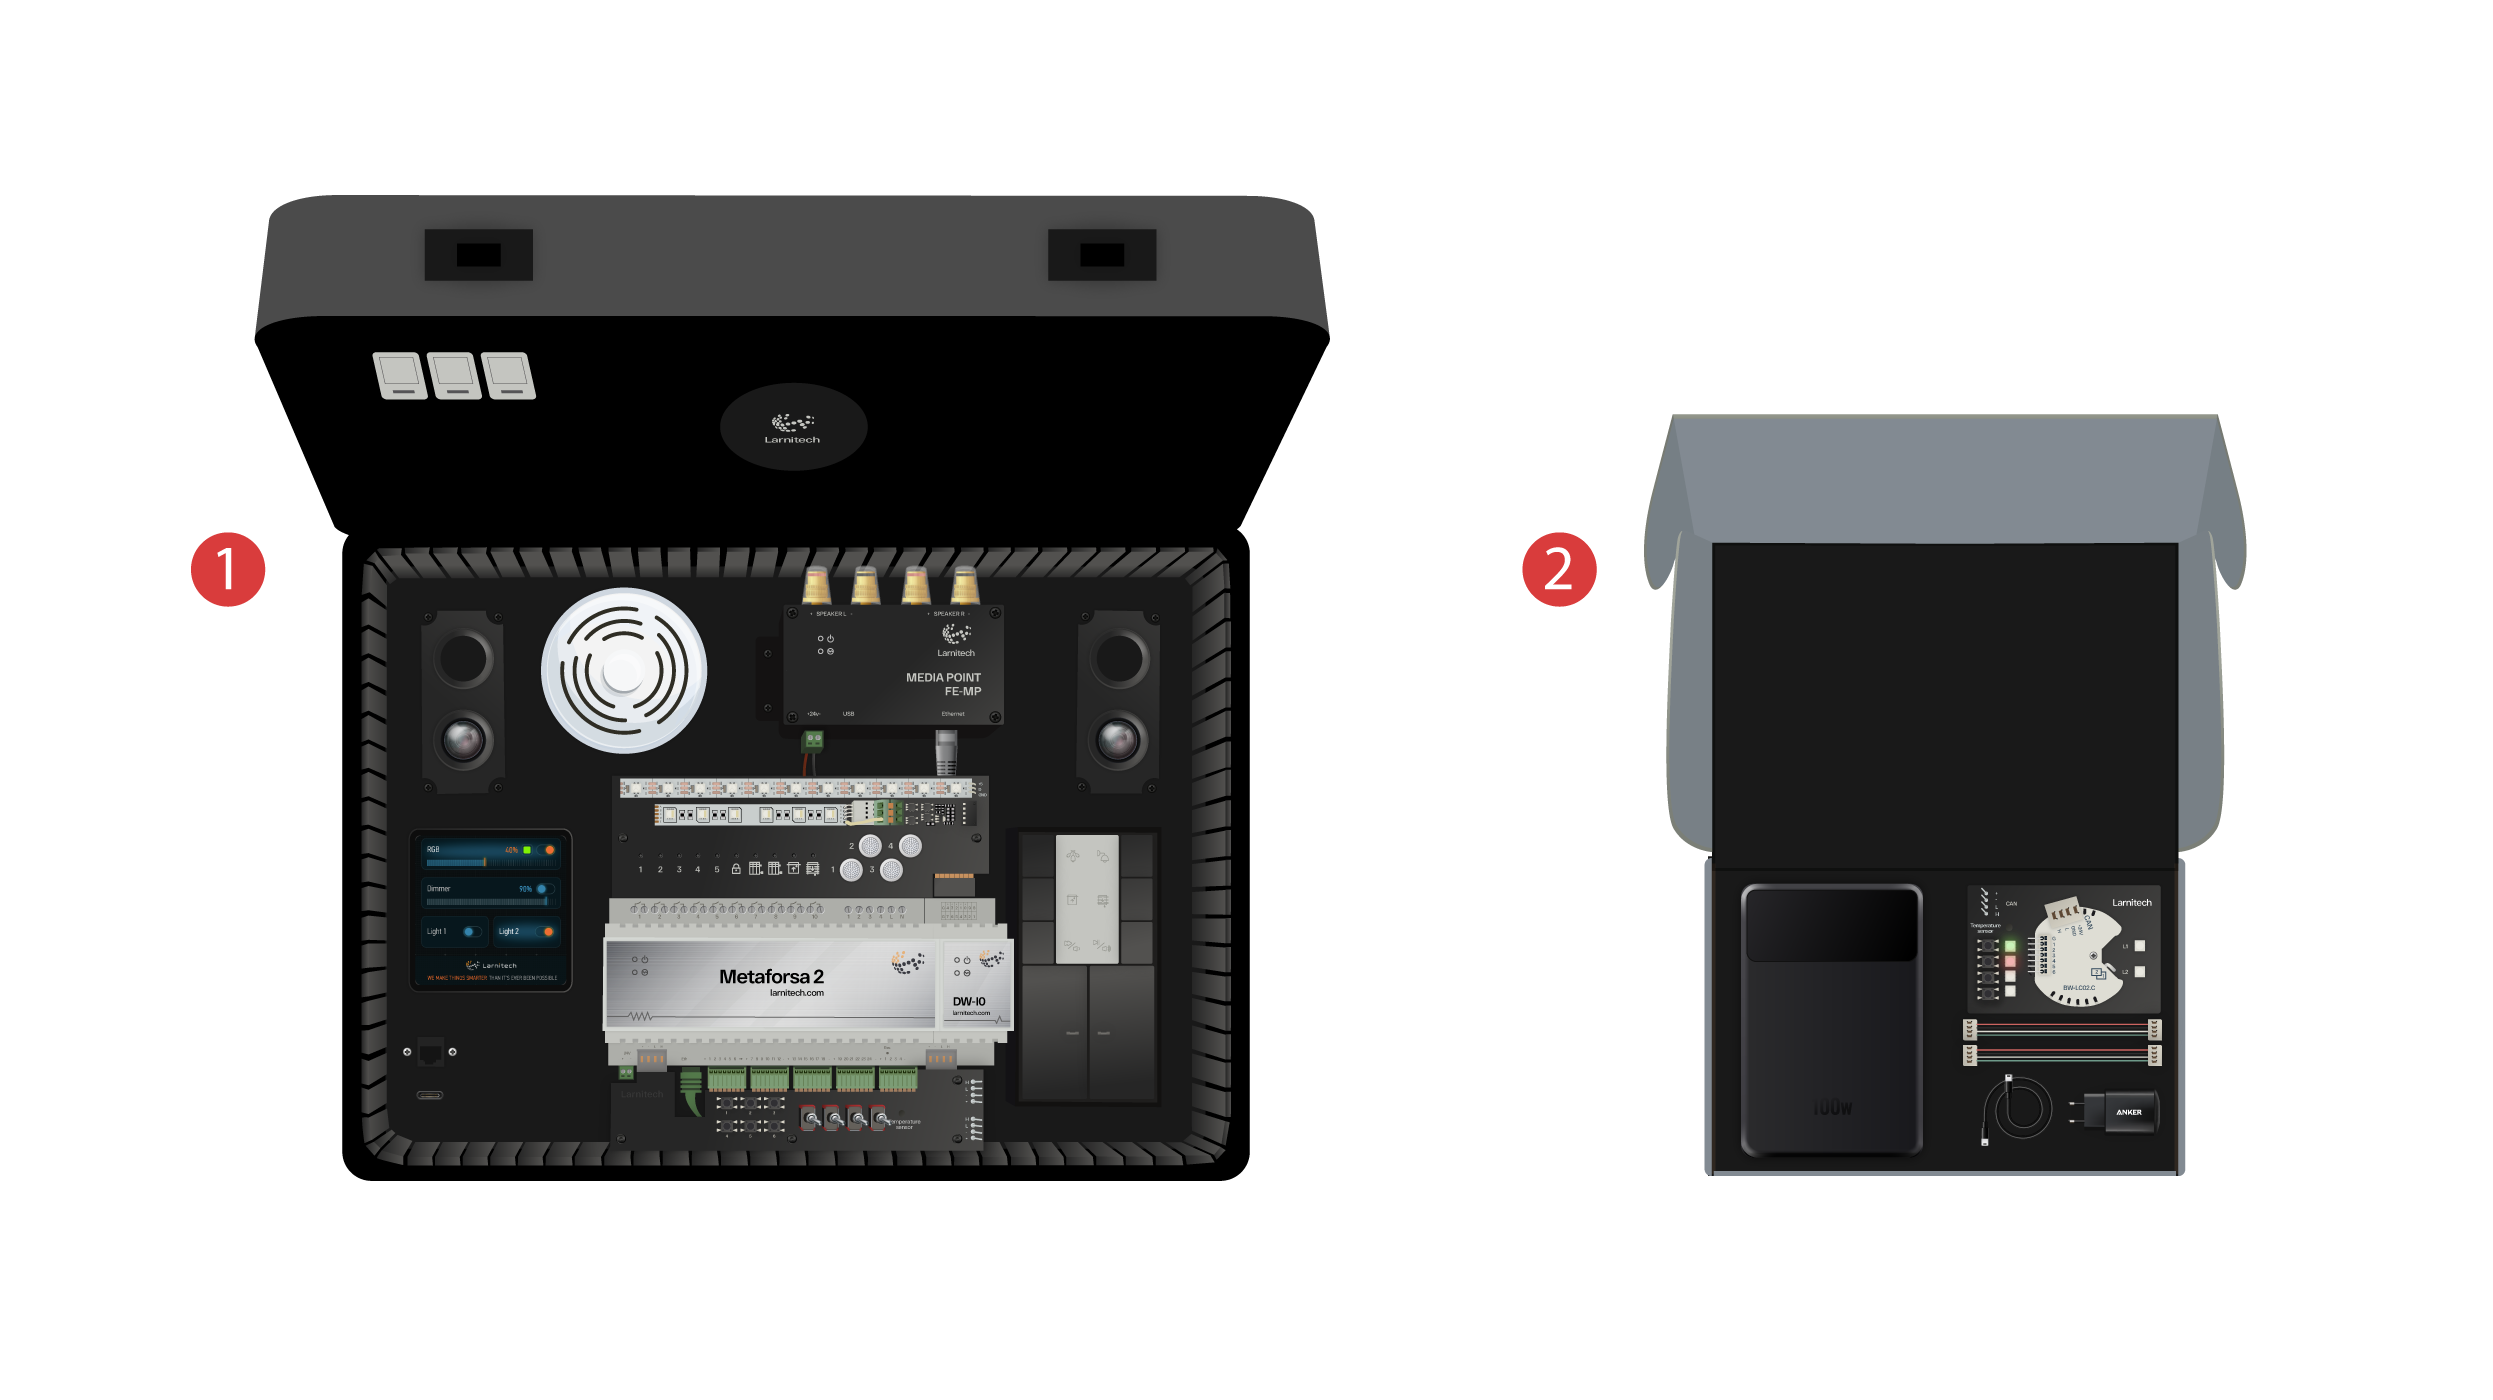
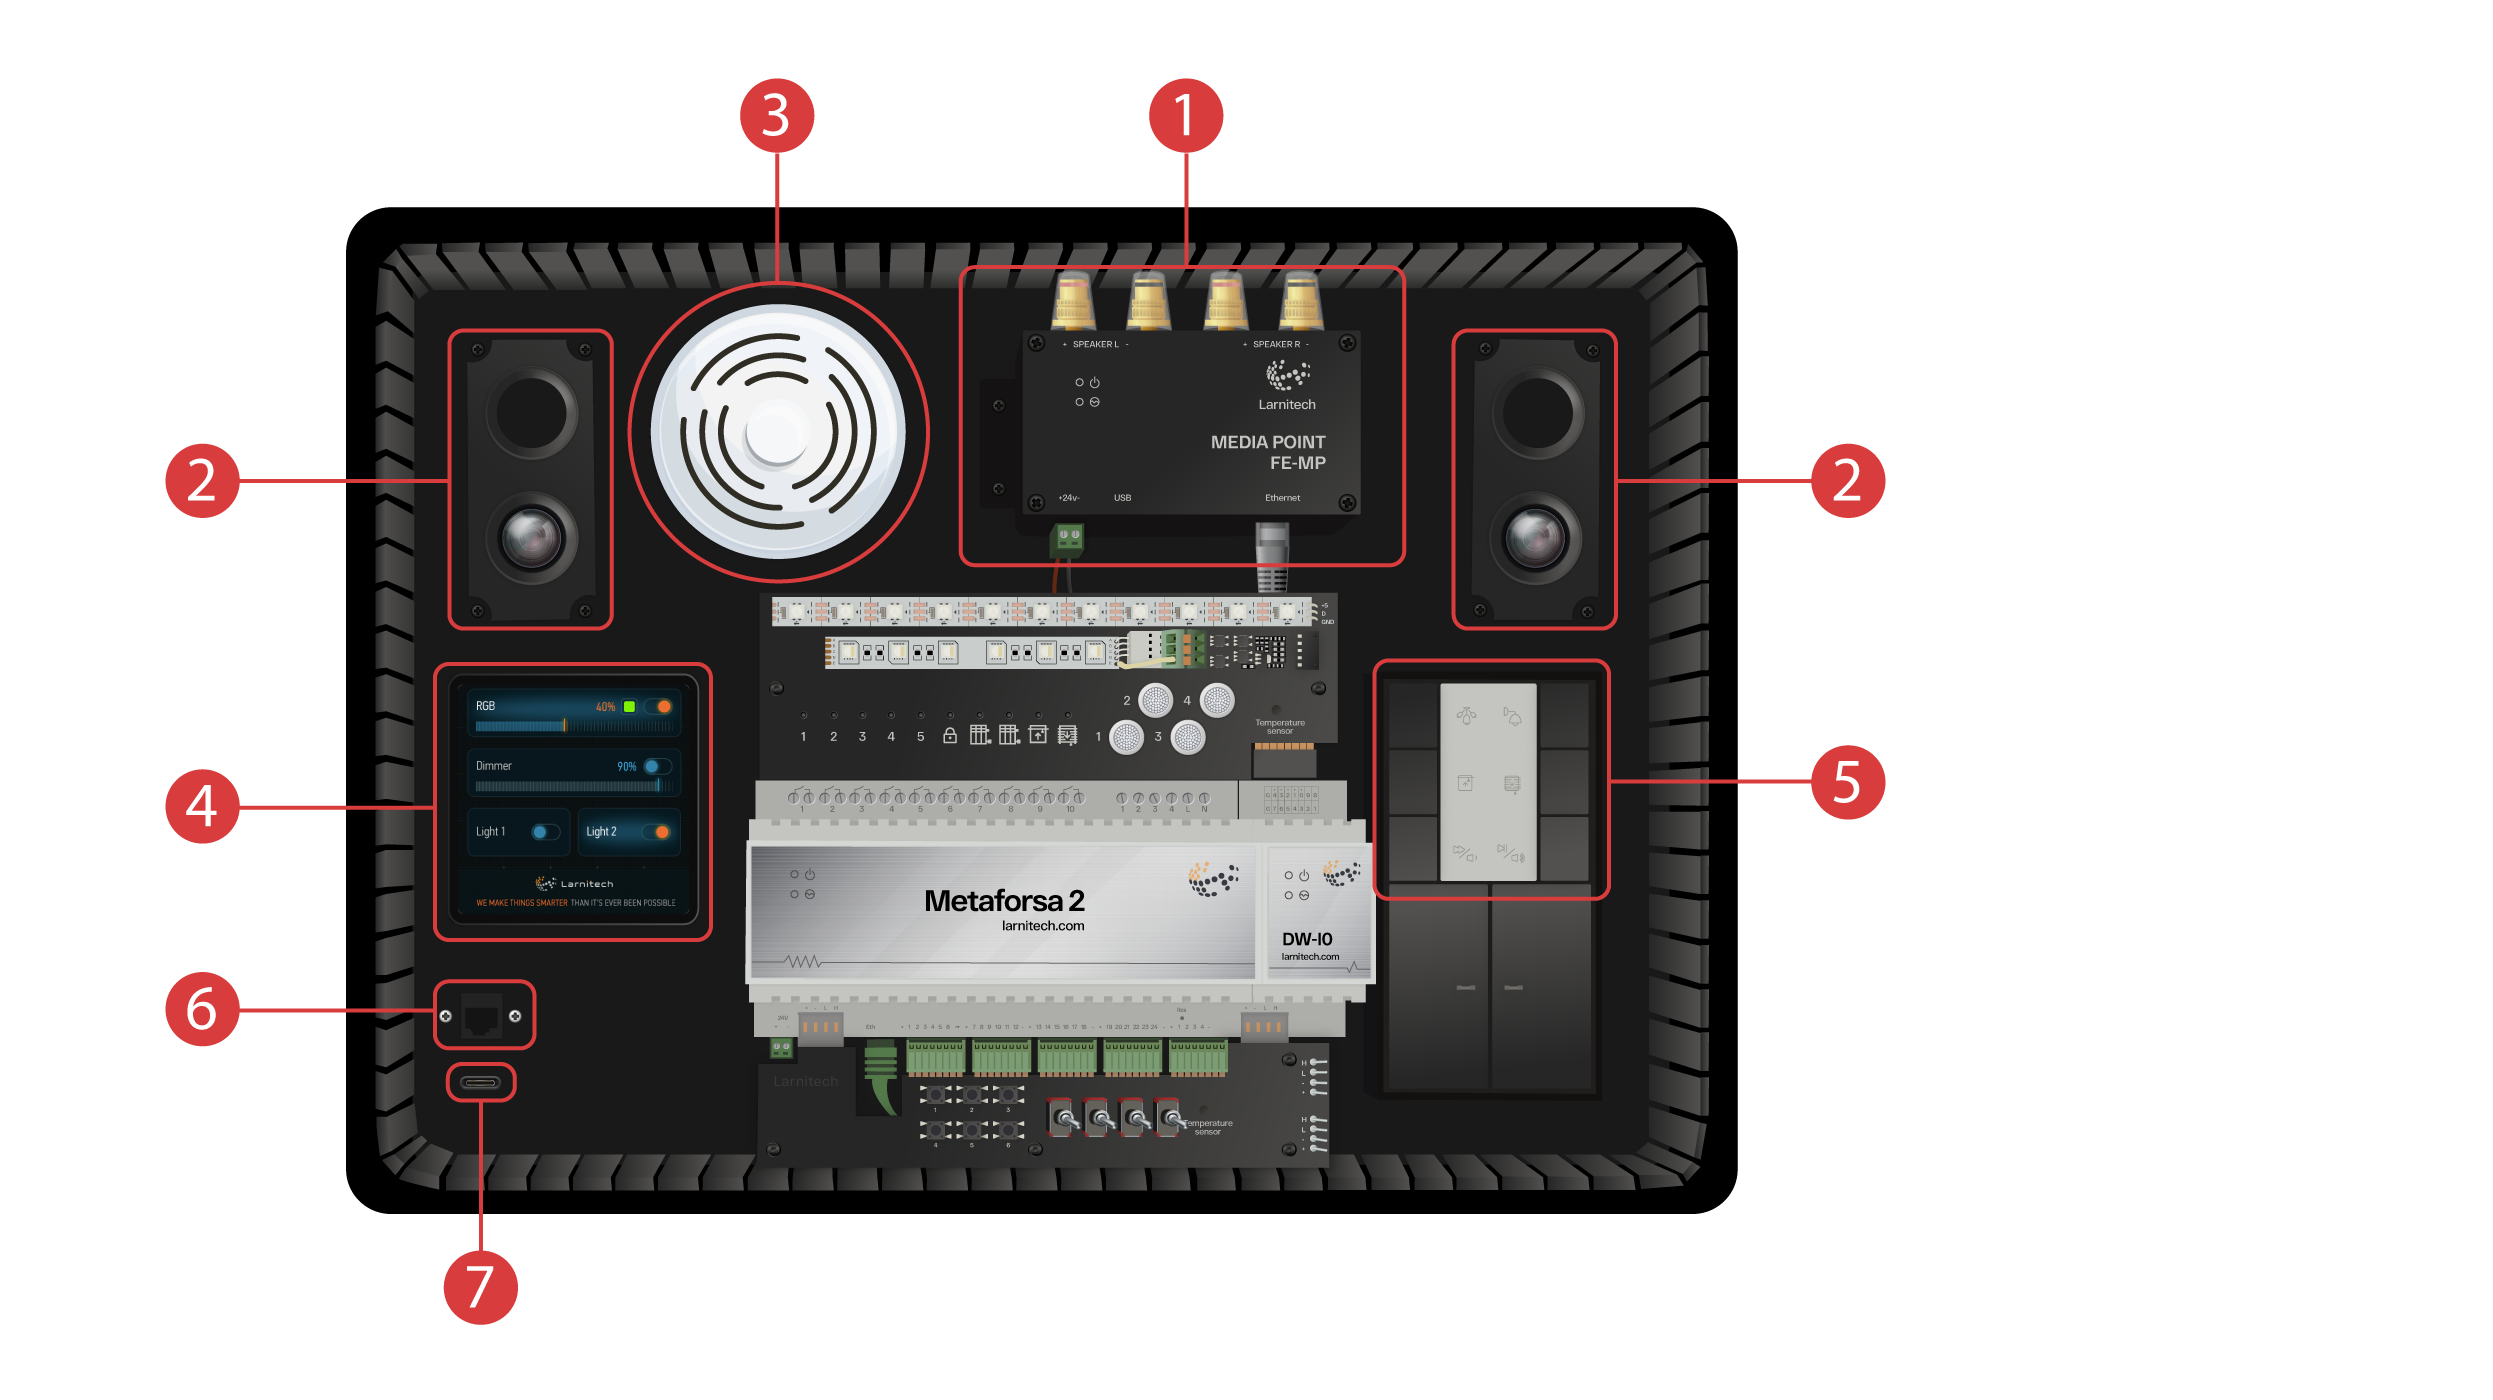
Sejam bem-vindos ao nosso canal! Este vídeo é um guia sobre como configurar o sistema Larnitech de forma rápida e sem esforço. A configuração será efectuada com a ajuda de um caso de demonstração. O conjunto de preparação inclui uma mala de demonstração ① e uma caixa com vários objectos extra ②.
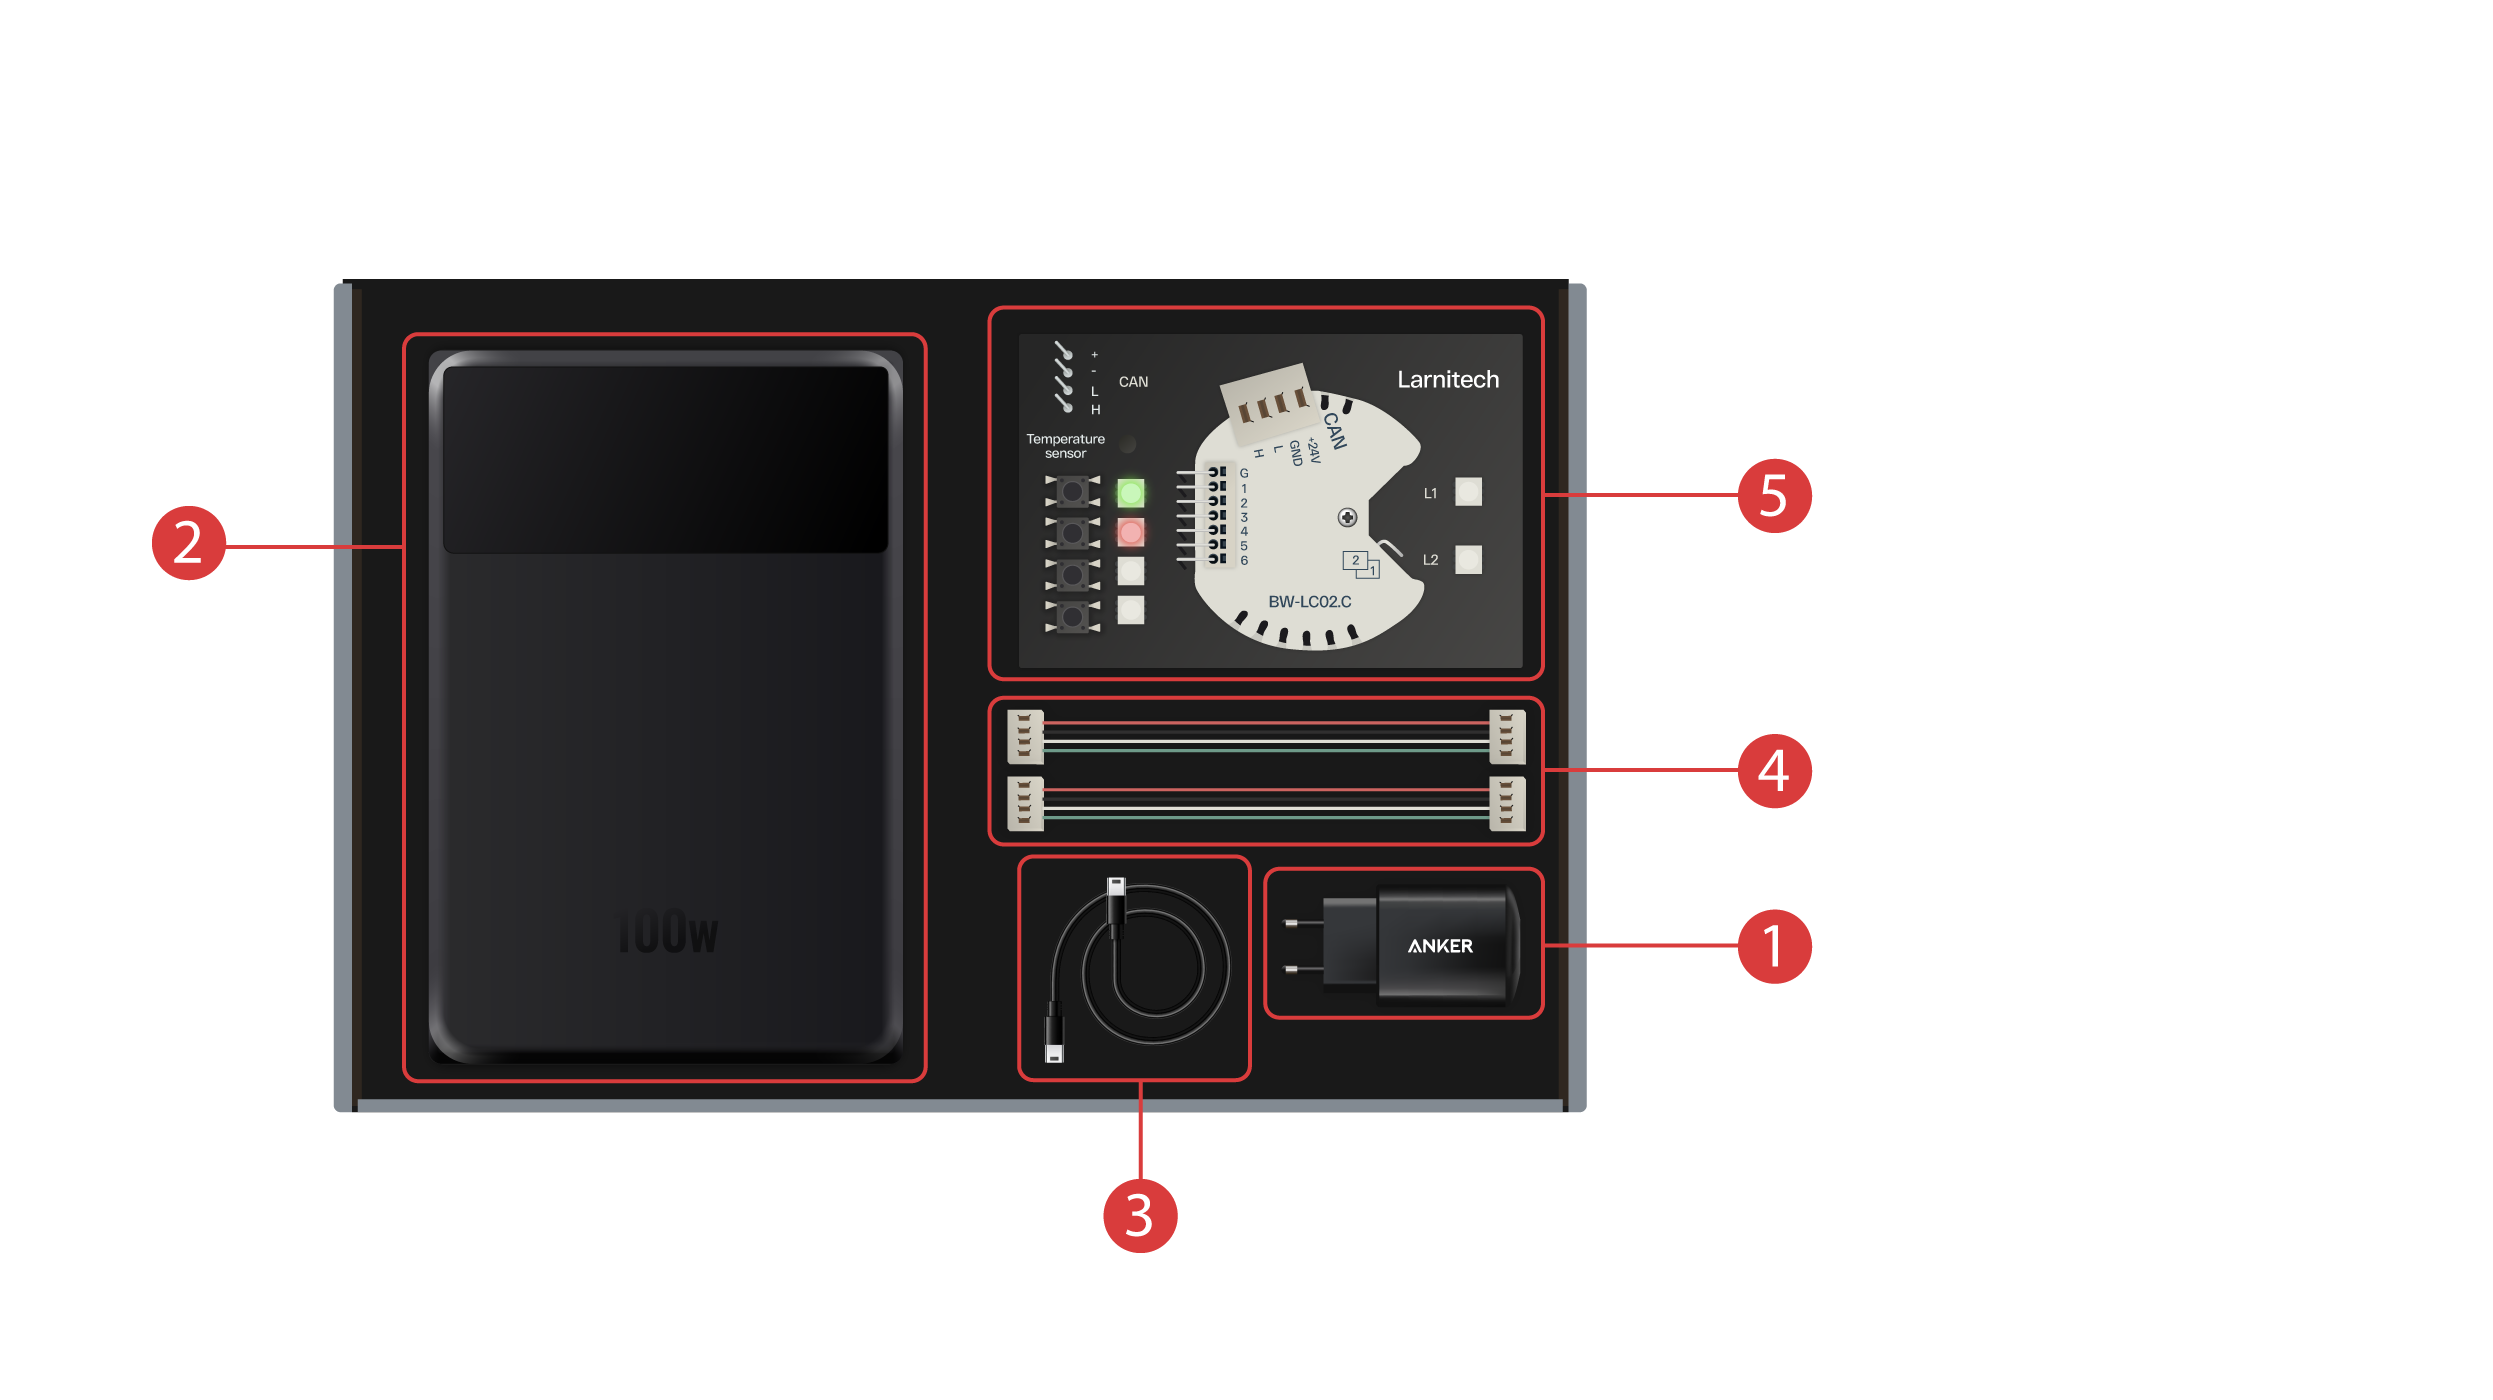
A caixa inclui os seguintes elementos:
① - Uma unidade de alimentação com porta USB Tipo C, que suporta a tecnologia Power Delivery;
② - Um banco de potência com um ecrã e uma porta de saída Tipo C, que pode ser utilizado para alimentar a mala de demonstração;
③ - Cabo tipo C com um indicador de consumo de energia;
④ - 2 cabos de barramento CAN;
⑤ - Placa de demonstração com um módulo BW-LC02 com 2 luzes LED, 4 botões com retroiluminação e um sensor de temperatura.
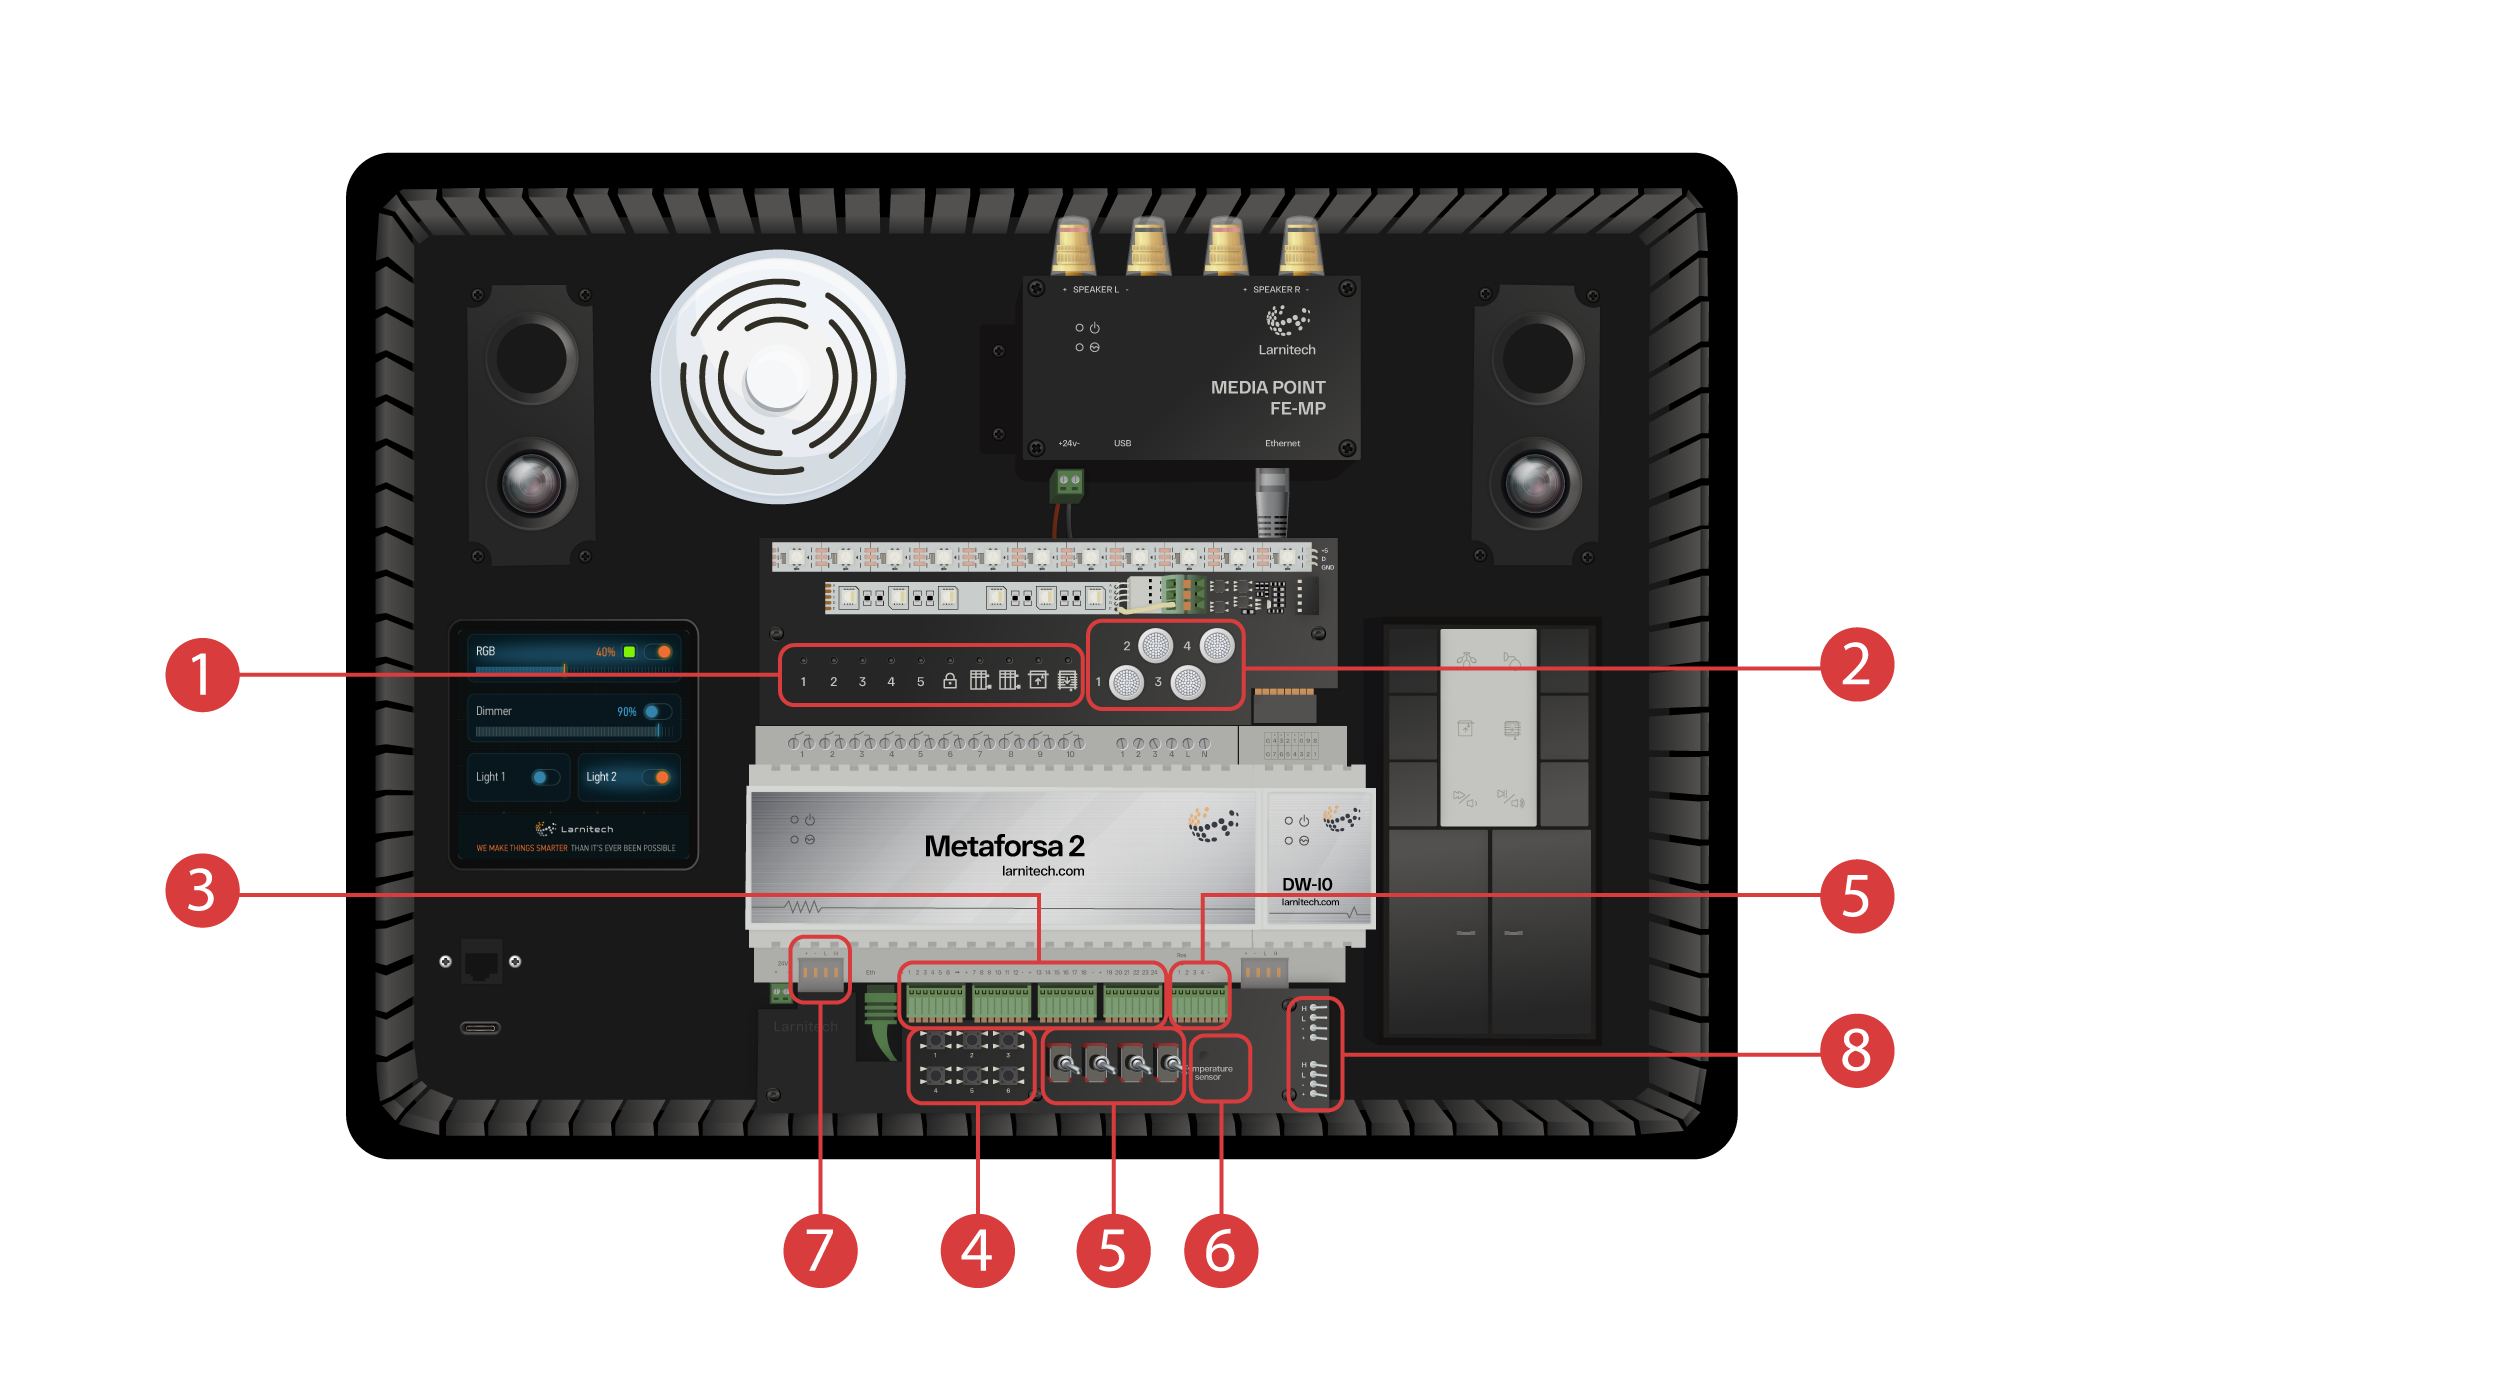
A mala de demonstração contém os seguintes elementos: Módulo "Metaforsa 2".
O módulo "Metaforsa 2" possui:
① - 10 canais de relé com luzes LED ligadas a eles, indicando o seu estado atual;
② - 4 canais reguláveis, aos quais estão ligadas luzes LED reguláveis;
③ - 24 canais de entrada, aos quais estão ligados 6 botões ④ e 4 interruptores ⑤ para imitar vários sensores;
⑥ - Canais de entrada para sensores de temperatura com um sensor associado;
⑦ - Barramento CAN para ligação de dispositivos adicionais. Outros módulos do caso de demonstração estão conectados, bem como 2 portas ⑧ para ligar dispositivos externos.
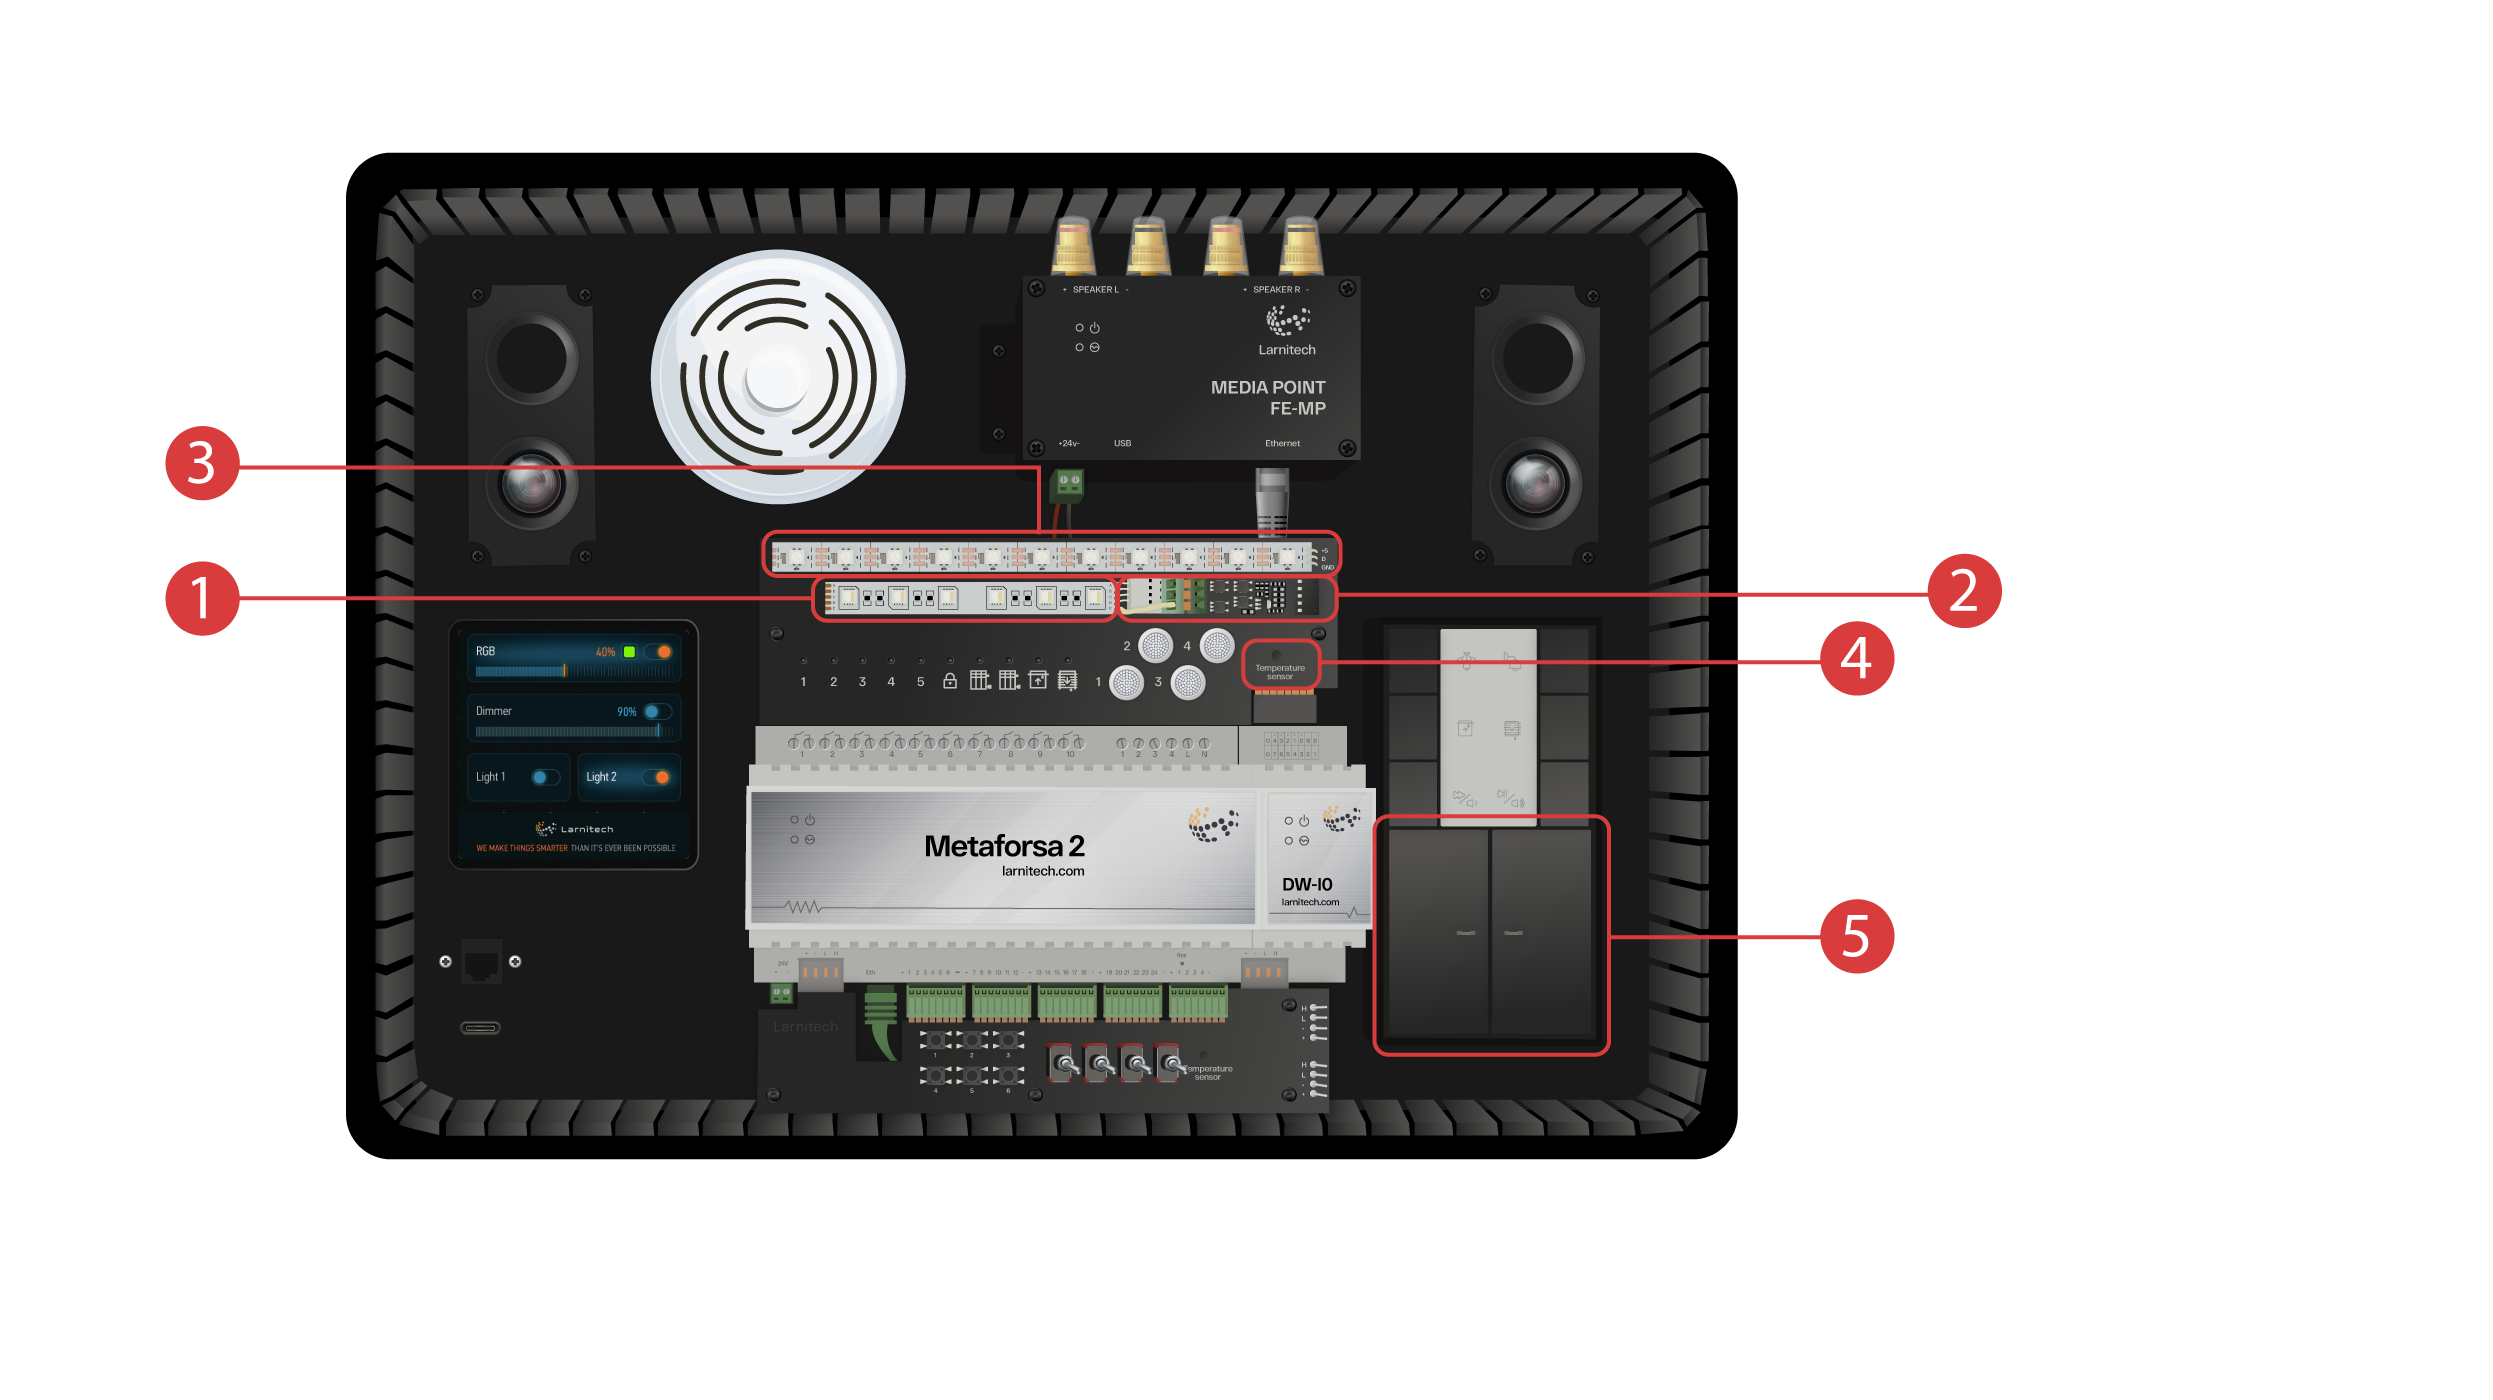
Módulo DW-IO
Este módulo possui 14 canais de entrada/saída universais, aos quais estão ligados os seguintes elementos:
① - Fita RGBW de 4 canais, ligada através do amplificador de corrente AMP5V-4 ②;
③ - Uma faixa com luzes LED endereçadas. Cada uma destas luzes LED pode brilhar com a sua própria cor individual;
④ - Sensor de temperatura;
⑤ - E dois botões com retroiluminação.
A caixa de demonstração também inclui o seguinte:
① - Um Media Point FE-MP com ② dois altifalantes;
③ - Um sensor CW-CO2 seis-em-um, que mede: Nível de movimento, Iluminação, Temperatura, Humidade, Nível de CO2 e que possui um transmissor de infravermelhos;
④ - um painel de sensores LCP4 de 4 polegadas que pode apresentar uma interface normal ou uma interface adaptada para painéis de parede;
No interior da caixa encontra-se um módulo de controlo de botões BW-SW24, ao qual está ligado um teclado de seis botões de 24 volts da JUNG ⑤.
E um router Wi-Fi, que pode ser ligado à Internet através de uma porta ethernet ⑥ no painel frontal da caixa ou através de uma rede Wi-Fi disponível.
Para a alimentação elétrica, existe uma porta tipo-C ⑦, que se encontra no painel frontal.
Todo o equipamento instalado na mala de demonstração é alimentado a 20 Volts, o que é absolutamente seguro para o utilizador.
Ligue o cabo de alimentação e o cabo Ethernet. Se não tiver a possibilidade de se ligar via Ethernet, mais adiante neste vídeo demonstraremos como ligar o router incorporado à sua rede Wi-Fi.
Para prosseguir, é necessário instalar a aplicação Larnitech no seu smartphone ou tablet. Basta digitalizar o primeiro código QR a partir do topo da sua mala.
Se, depois de instalar e iniciar a aplicação, a ligação não for estabelecida automaticamente, terá de se ligar à rede Wi-Fi "Larnitech_case_5G" com a ajuda do seu dispositivo móvel. Em seguida, inicie a aplicação e leia o primeiro código QR na secção "Ligações".
Poderá ser necessário desativar a transmissão de dados no seu dispositivo móvel se o conjunto de demonstração não estiver ligado à Internet.

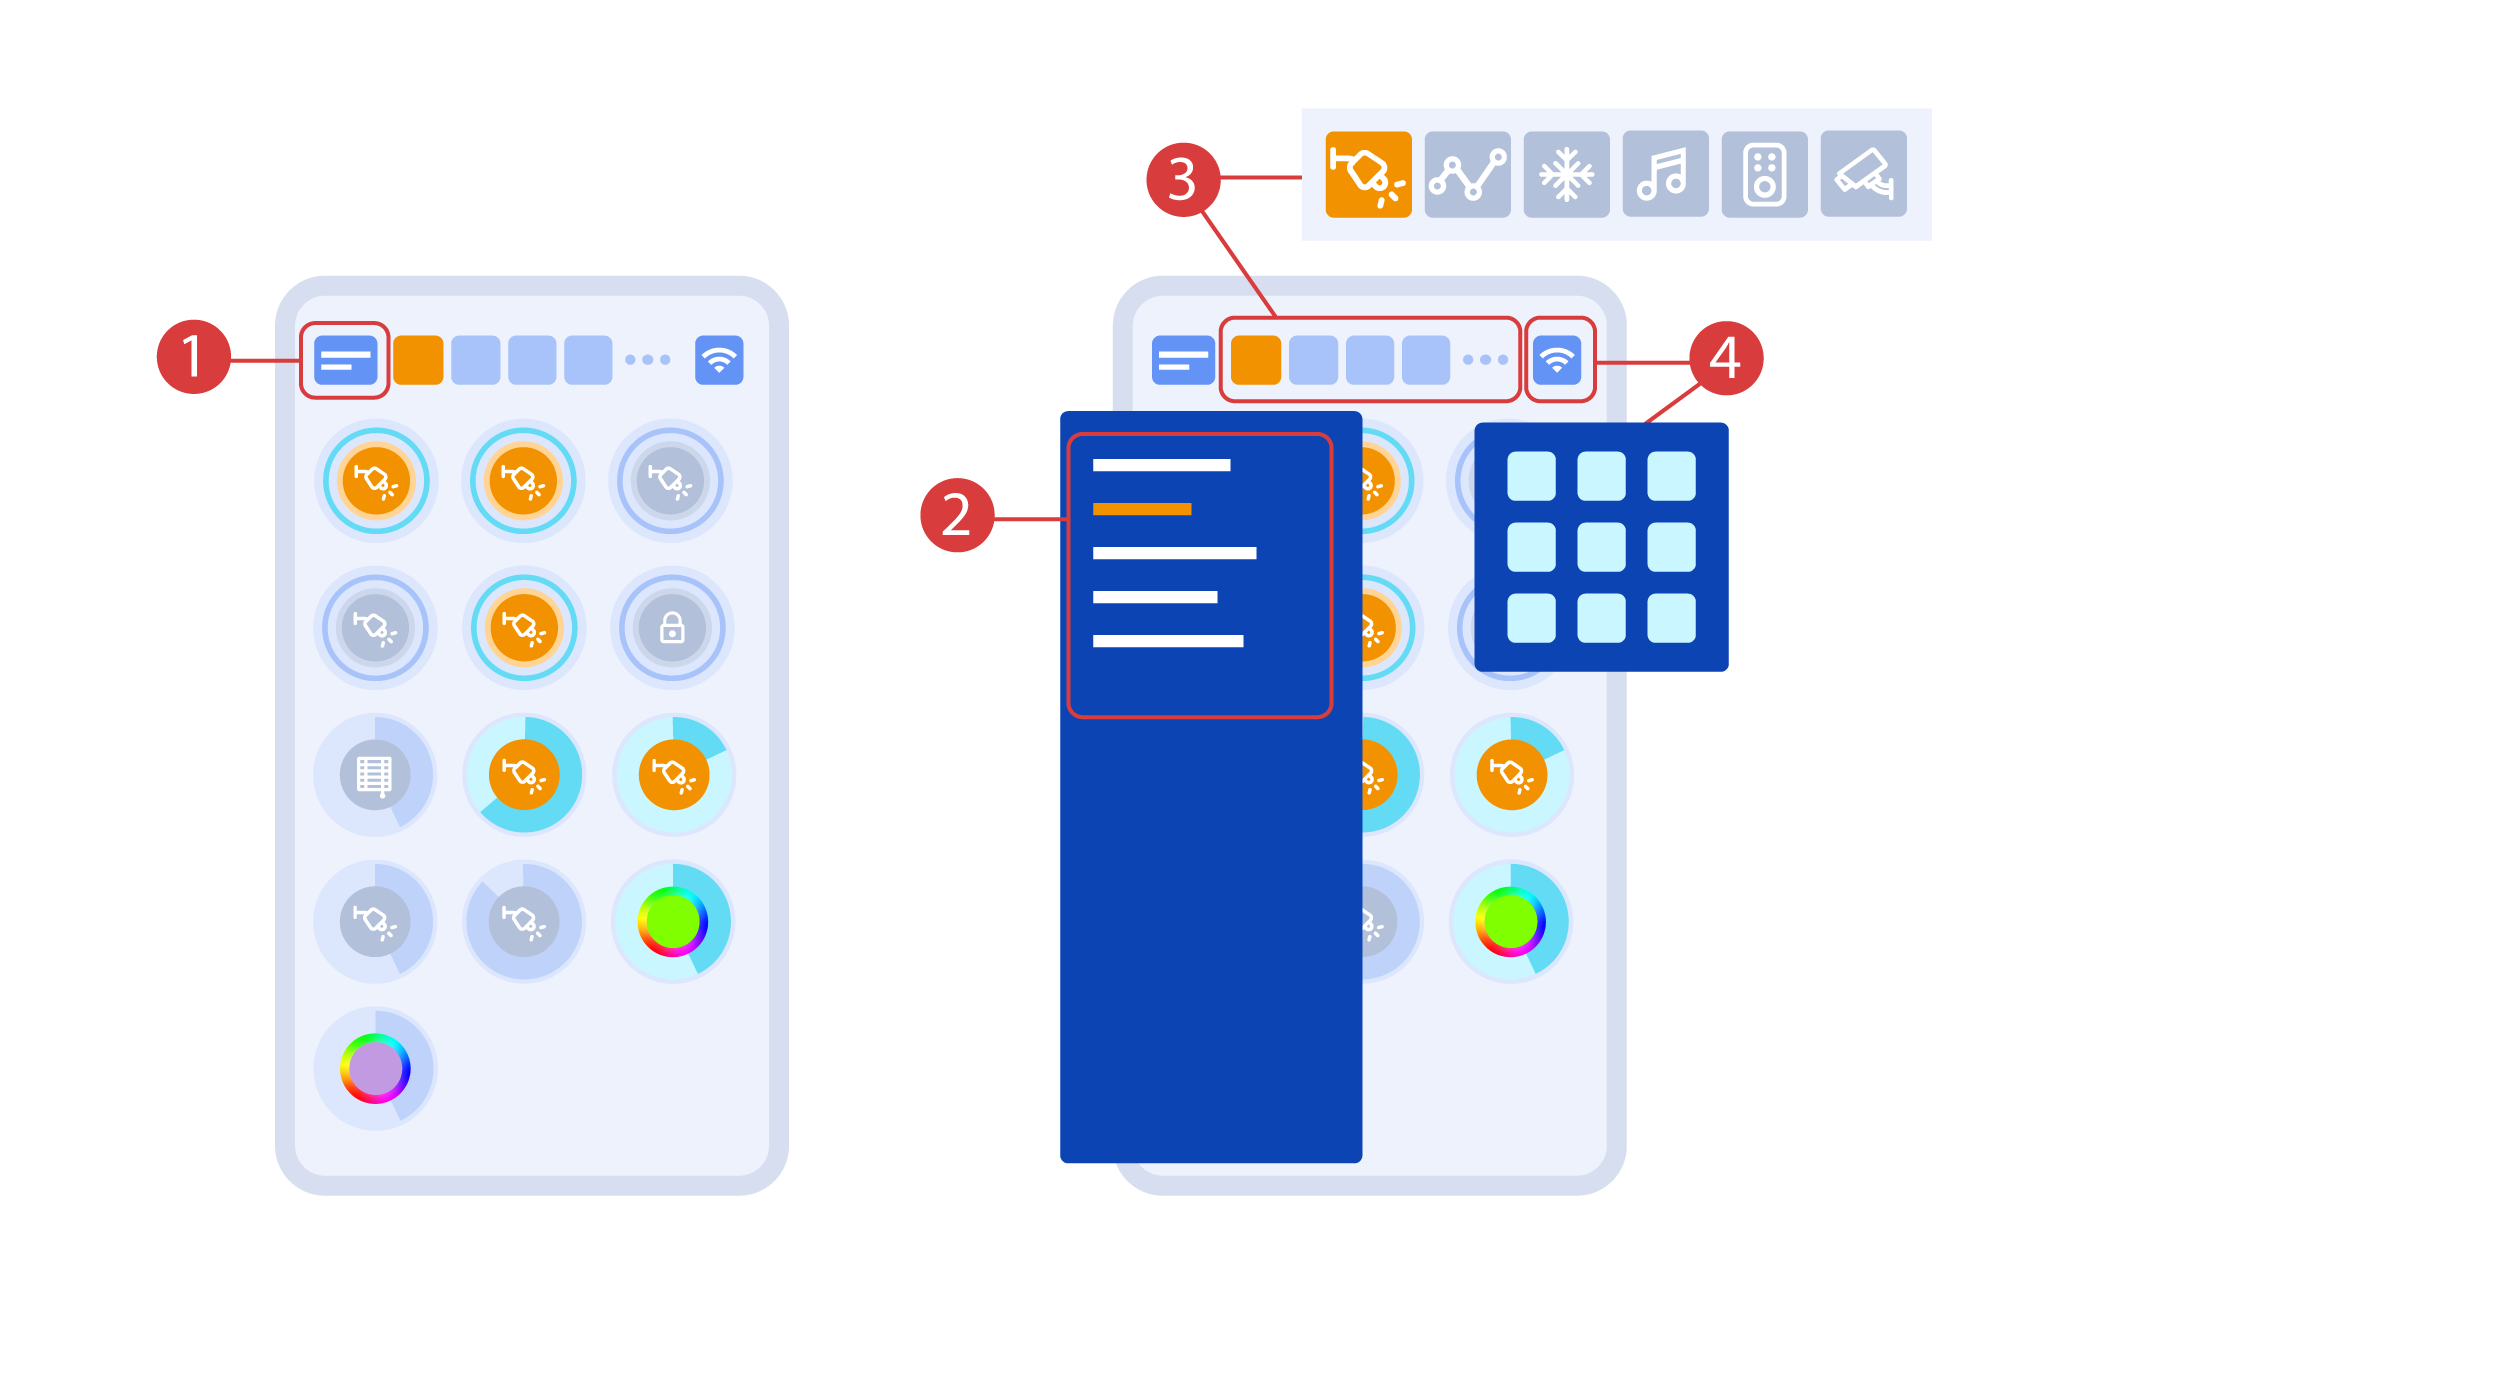
O ecrã principal da aplicação tem vários elementos-chave. No canto superior esquerdo, encontra-se o menu "seleção de área" ①.
Basta clicar numa das áreas disponíveis para a gerir ②.
Em seguida, existem ícones que permitem escolher os executores, sensores, climatização, multimédia, controlos remotos e câmaras ③. No canto direito, existe um ícone para o menu adicional ④. Dentro do ícone, pode também ver o estado da ligação atual.
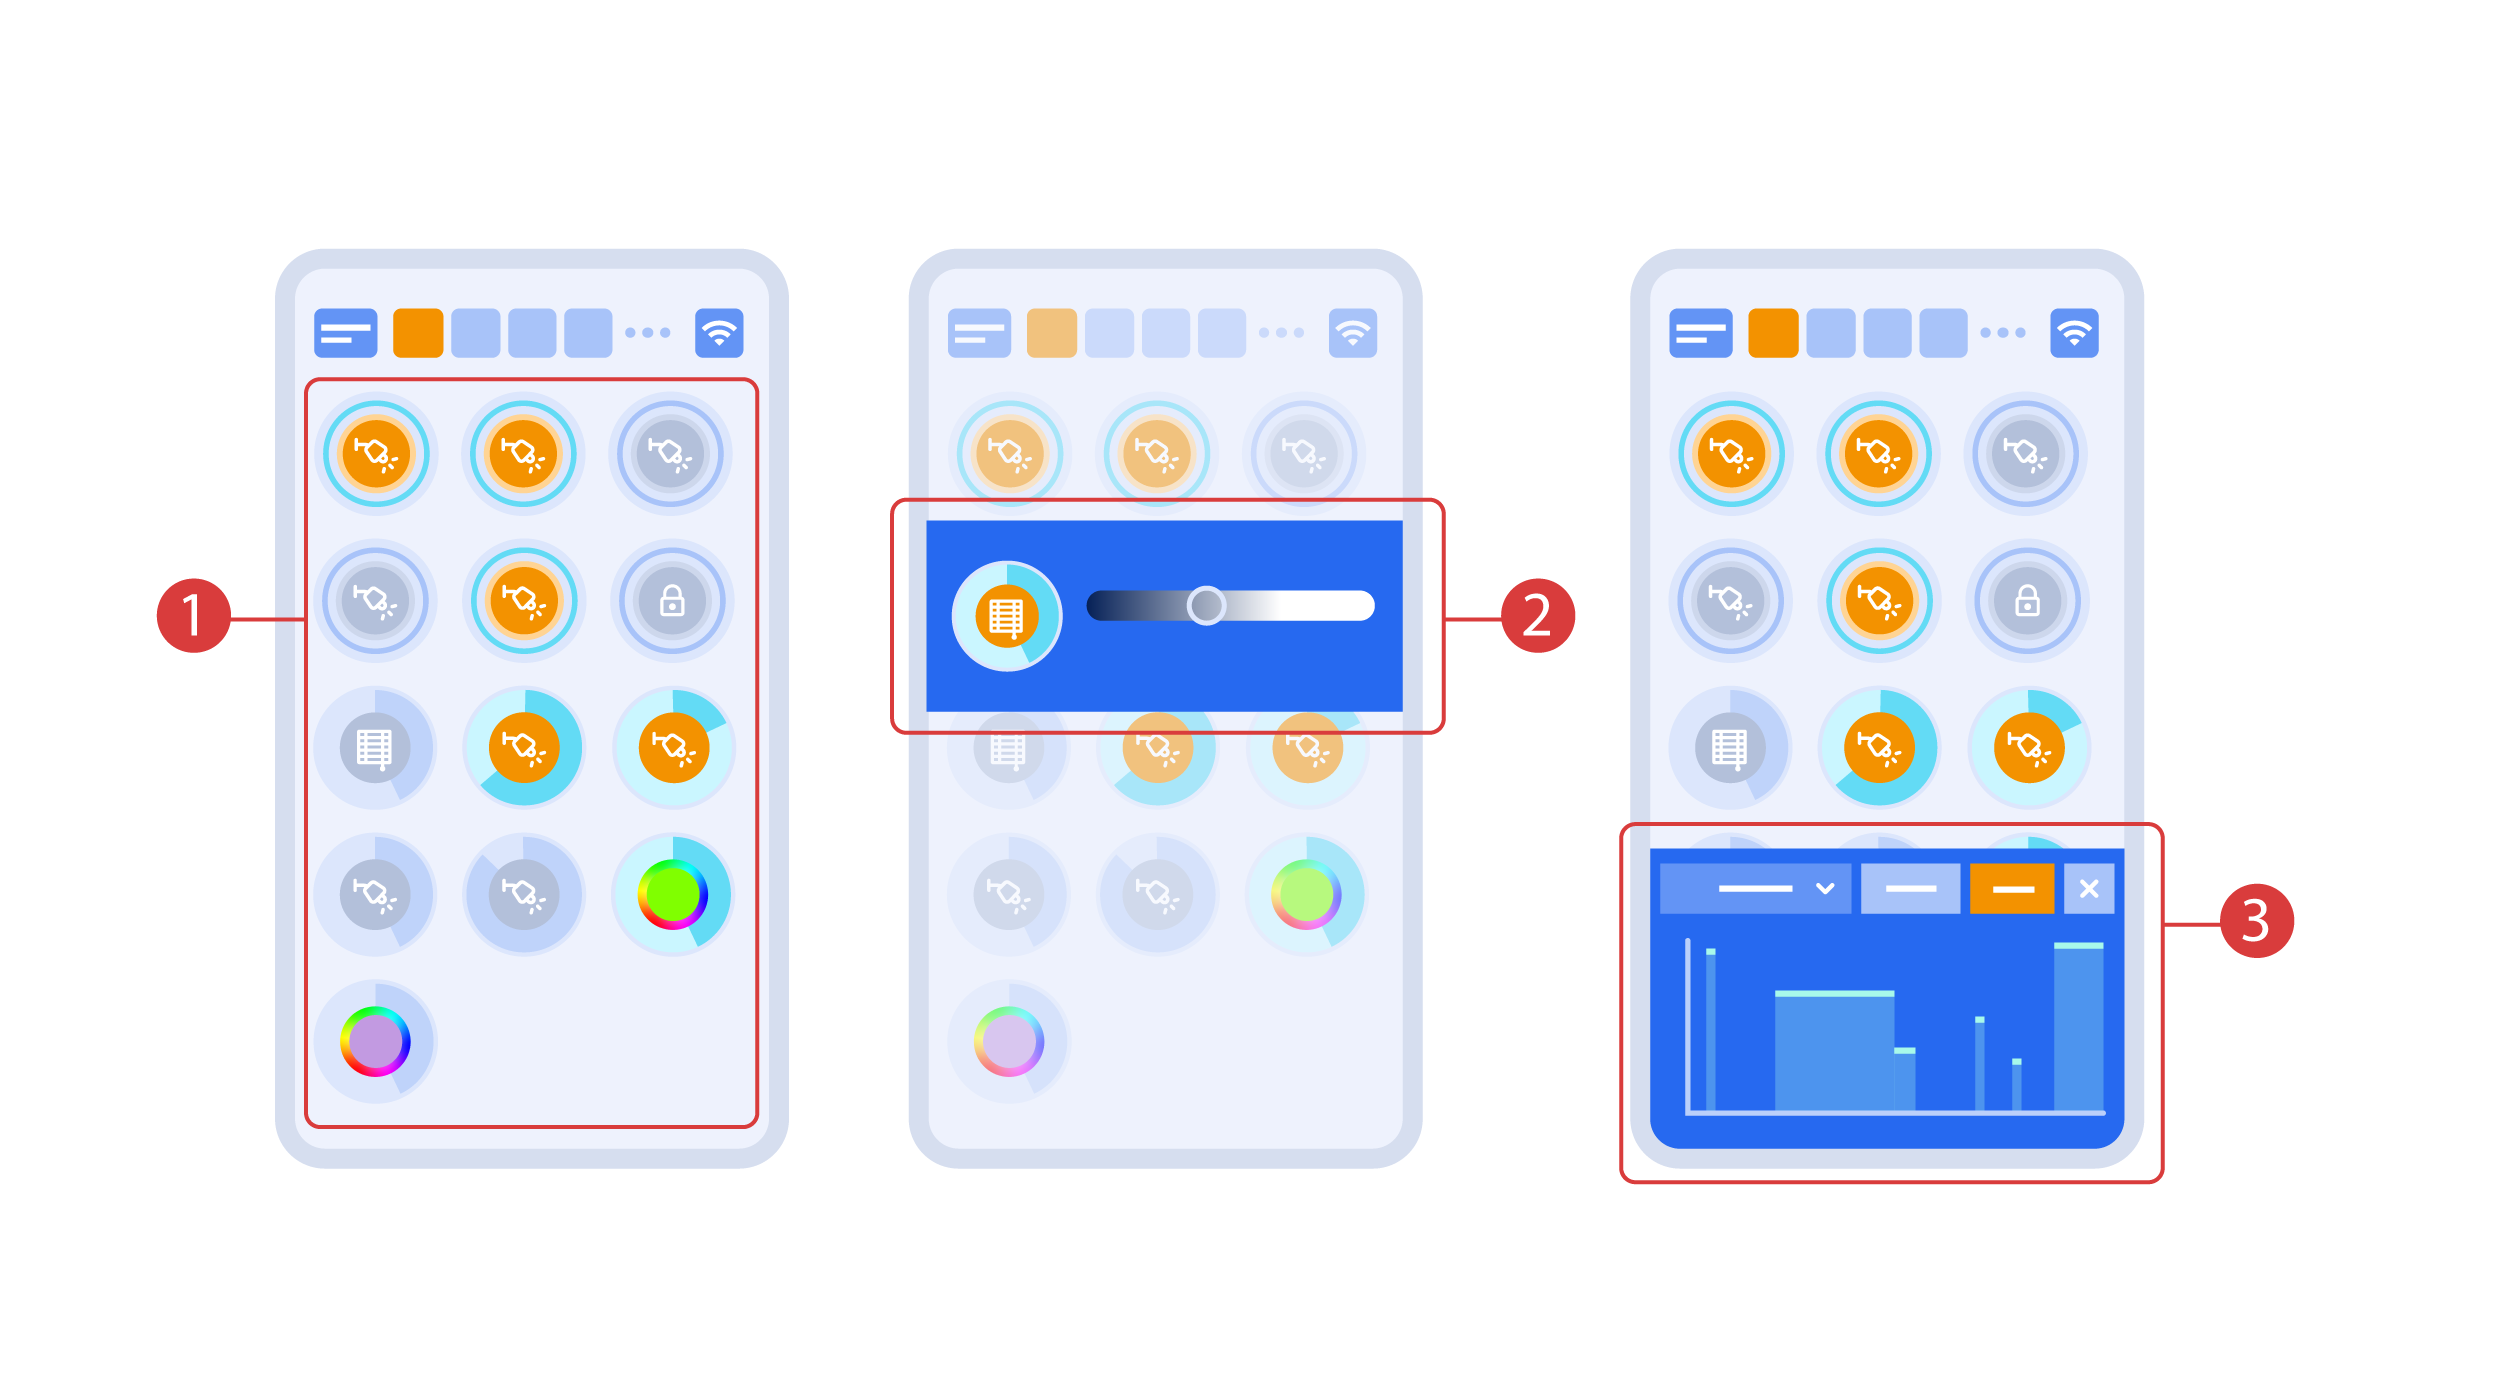
Ligar ou desligar os executores ① é feito com um simples clique. Para alterar o nível de iluminação ②, a cor das luzes ou a posição das persianas, basta um duplo clique. Para aceder ao histórico do estado ③ deste executor ou sensor, prima e mantenha premido o ícone durante um segundo.
Uma pressão breve nos botões físicos do painel permite ligar ou desligar a luz. Prima e mantenha premido o botão para alterar o brilho da luz.
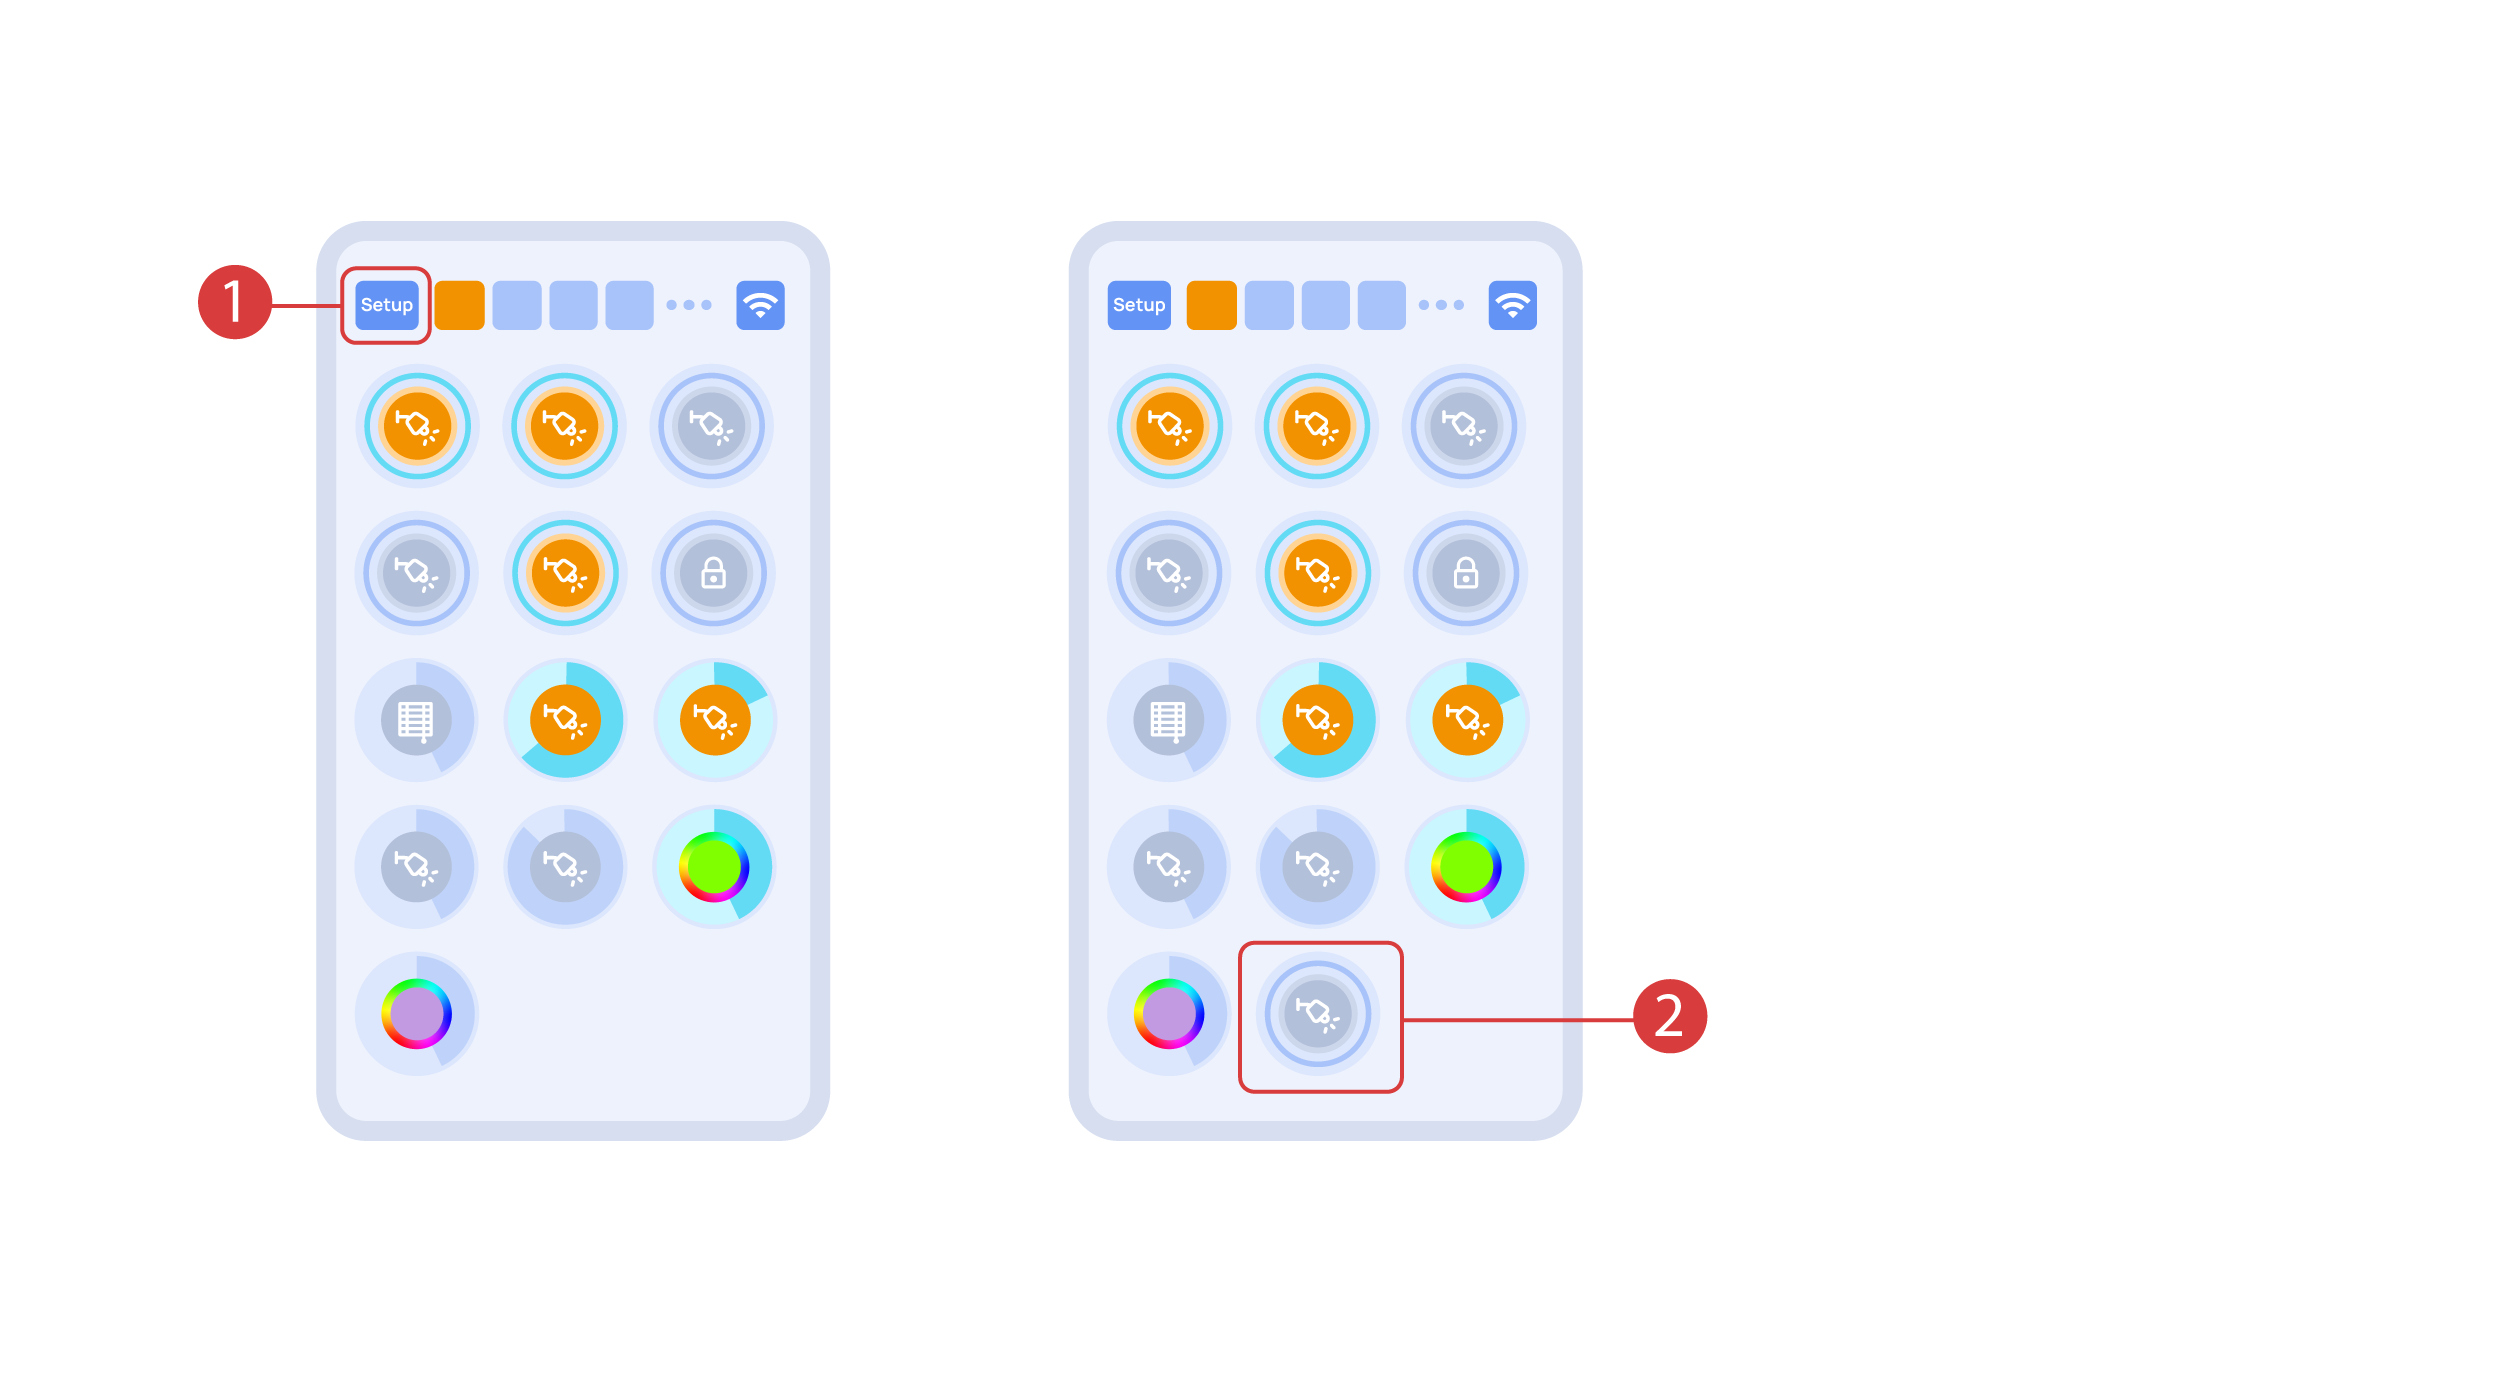
Para demonstrar a função Plug and Play, abrimos os executores na área Setup ① e ligamos o módulo ao barramento CAN. O sistema detecta automaticamente o novo módulo e adiciona-o à área "Setup" ②, onde podemos controlar o novo módulo instantaneamente.
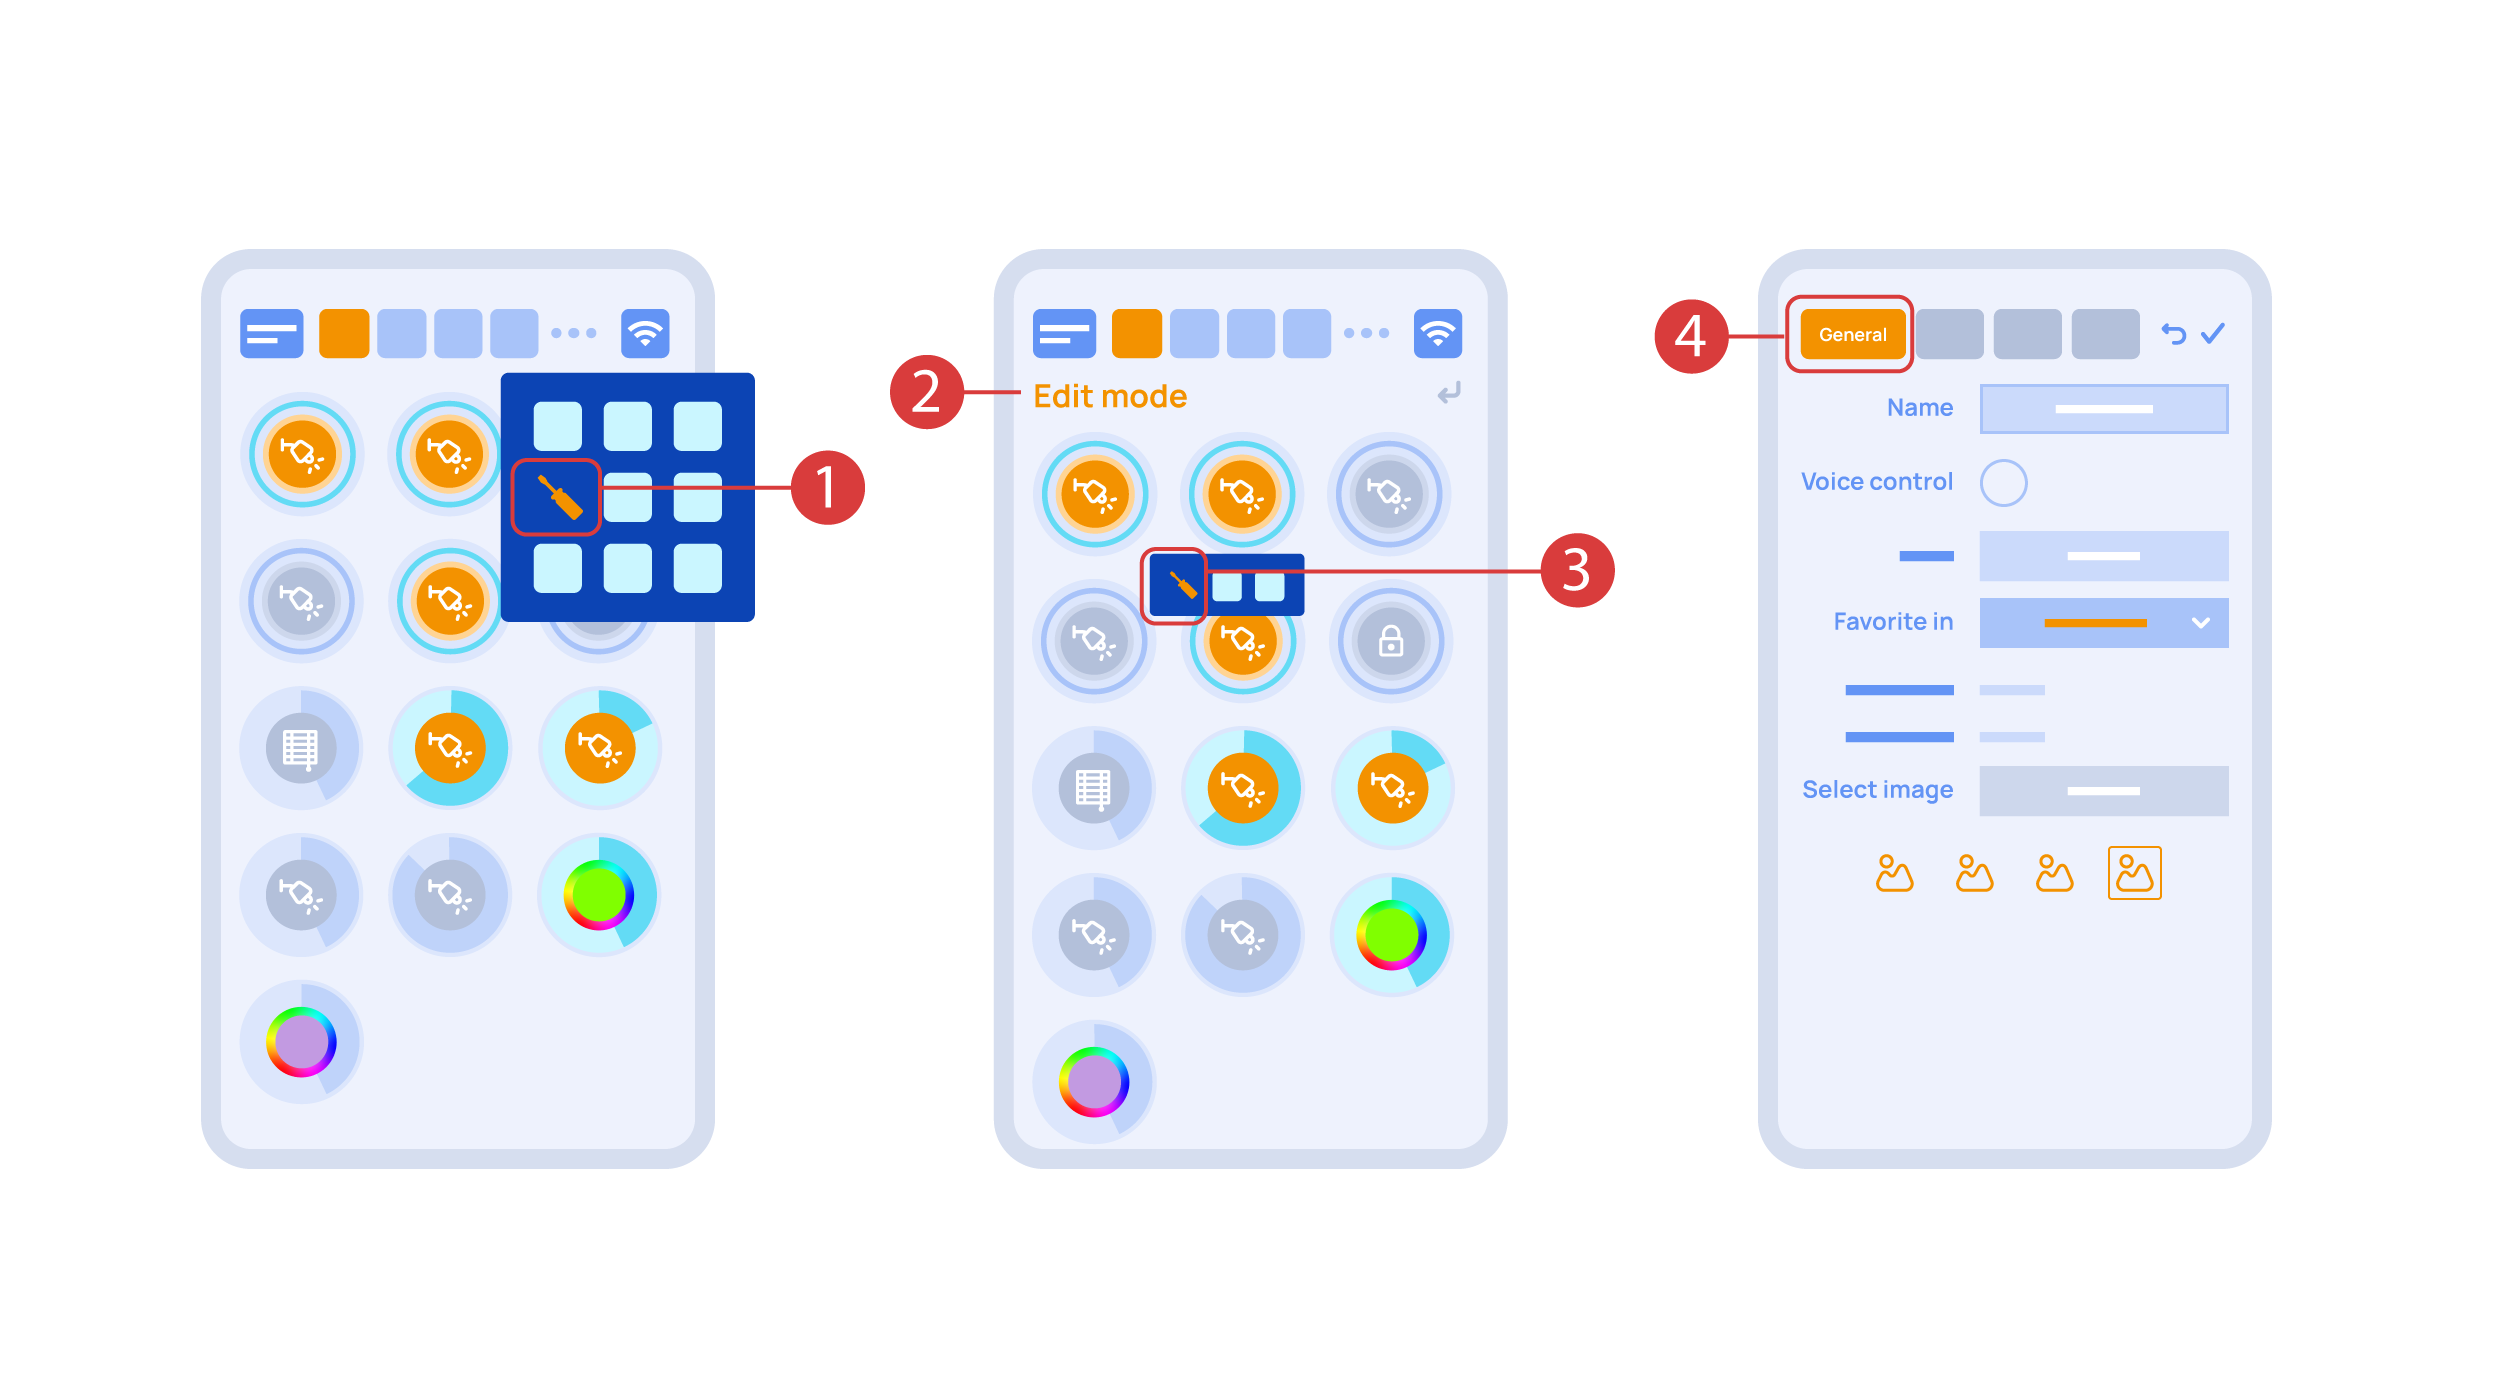
Now we can set up these executors. In order to do this, enter the additional menu ① and activate the edit mode, by pressing the appropriate icon .
Now we are in the edit mode ②, which can be seen from the appropriate notification in the top part of the screen. In this mode, when we press and hold an icon, we can move it among other elements and place it into another Room by placing it in the Area-choosing Menu and then choosing the area that we need. A long press ③ of the element starts the menu, from which we set up the current element.In the ‘General’ ④ section we can change the name of the element, add a voice command for it, change an icon or add the element to ‘Favorites’.
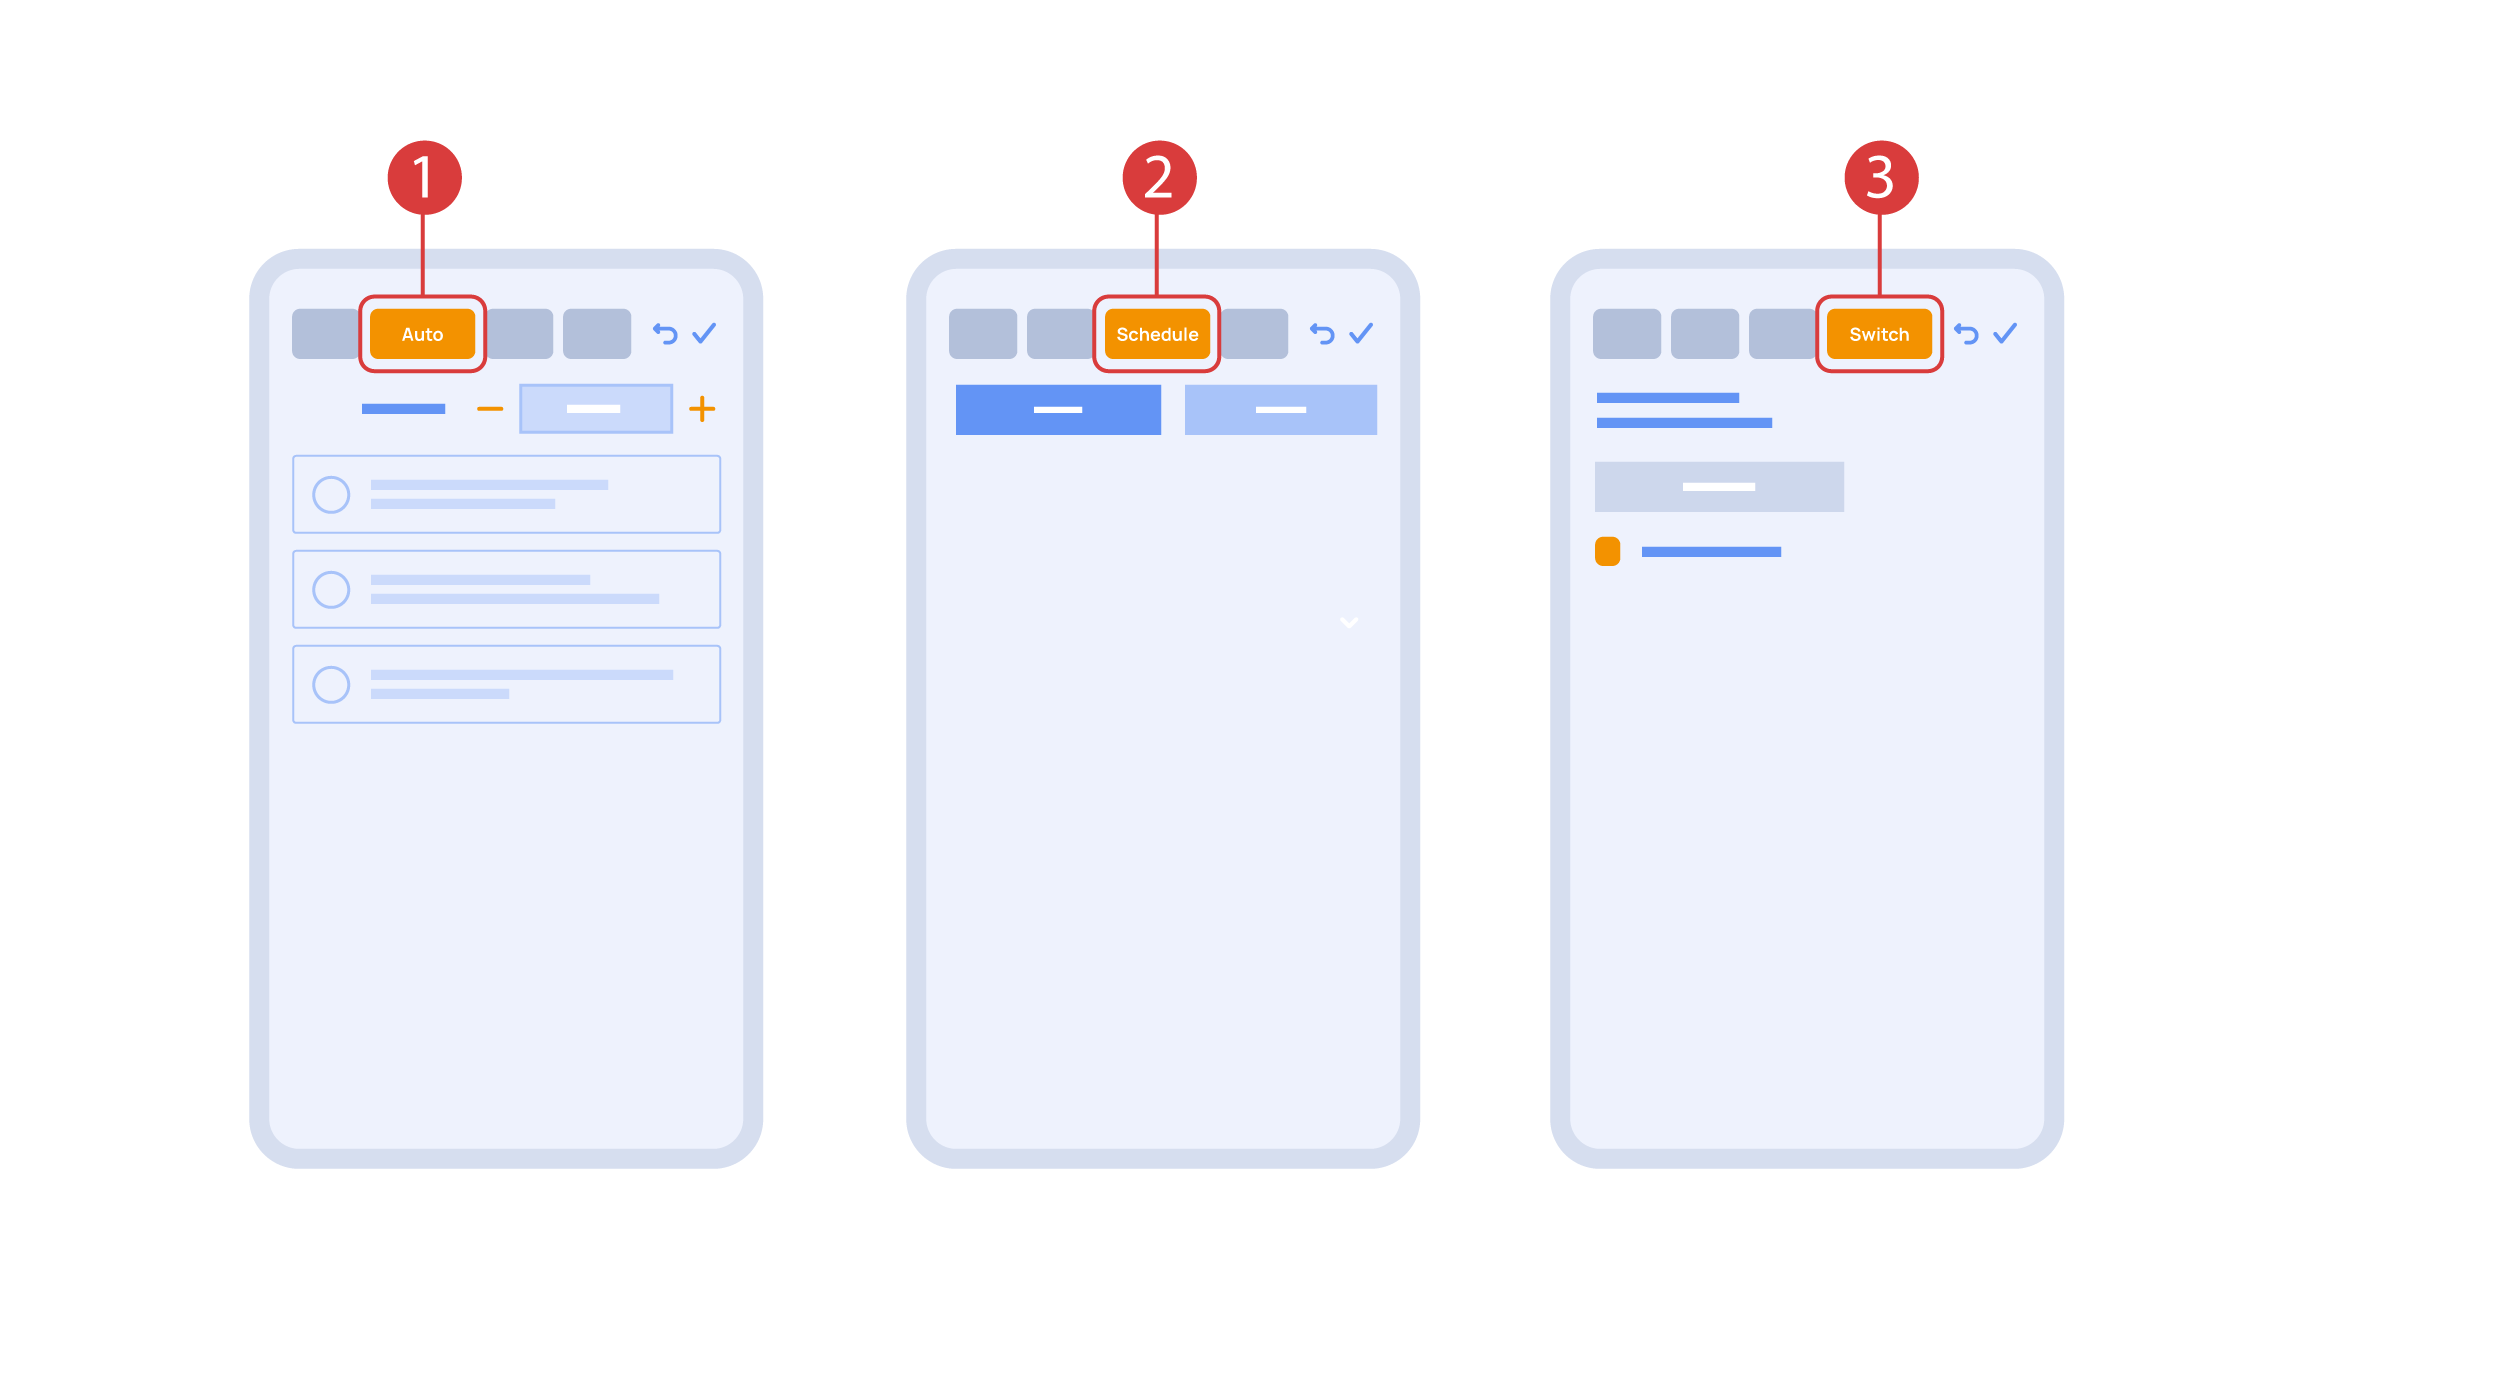
‘Auto’ section ① lets us activate the automation with a few clicks, as well as set up its parameters.
In the ‘schedule’ section ②, you can determine the schedule when the given element will turn on or off, including by using the time of the setting and rising of the sun.
The ‘Switches’ tab ③ lets you bind a button to control the executor.
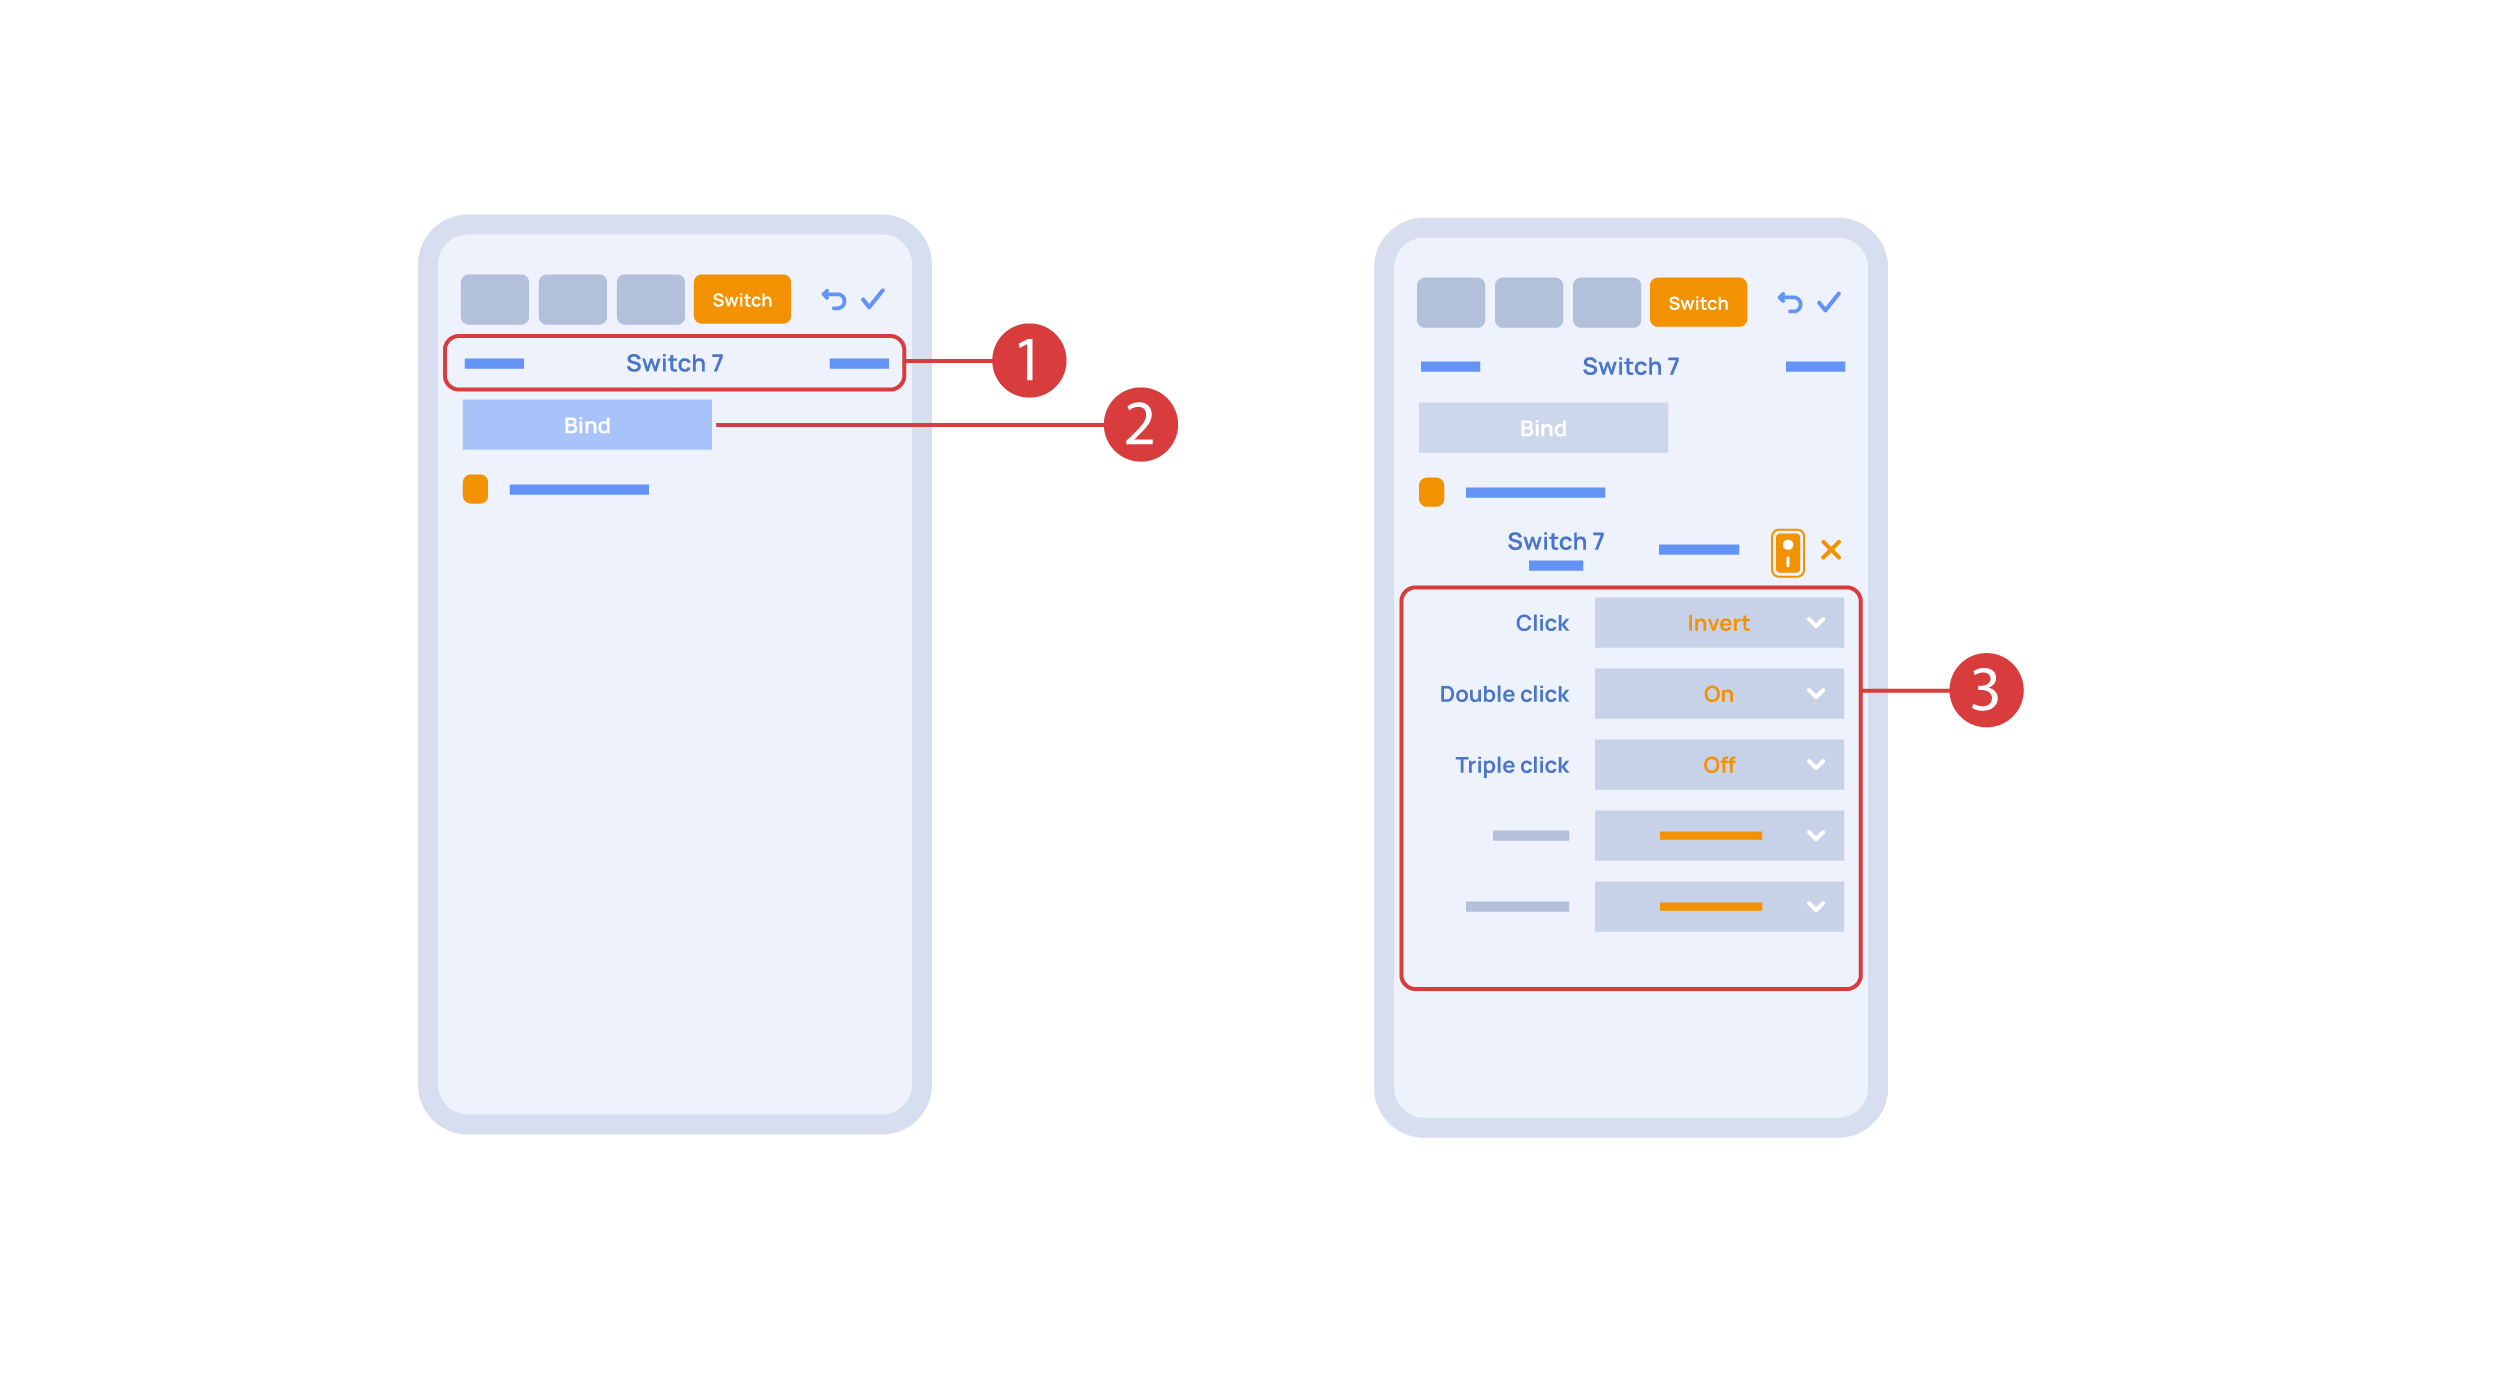
In order to do this, ① we press the button we need to bind. The system displays it, after which we press ‘Bind’② and save the changes. Now this button controls the executor
The ‘Switches’ tab ③ also features additional button setup options. For example, we can program the executor to be controlled with a double or triple click of a button, as well as define an action performed by this, for example ‘only turning on’ or ‘only turning off’ an executor. In this case we are setting up the button to do the following: one click will cause the lamp to toggle, a double click will turn it on and a triple click will turn it off. In this way a single button can perform up to five different actions.
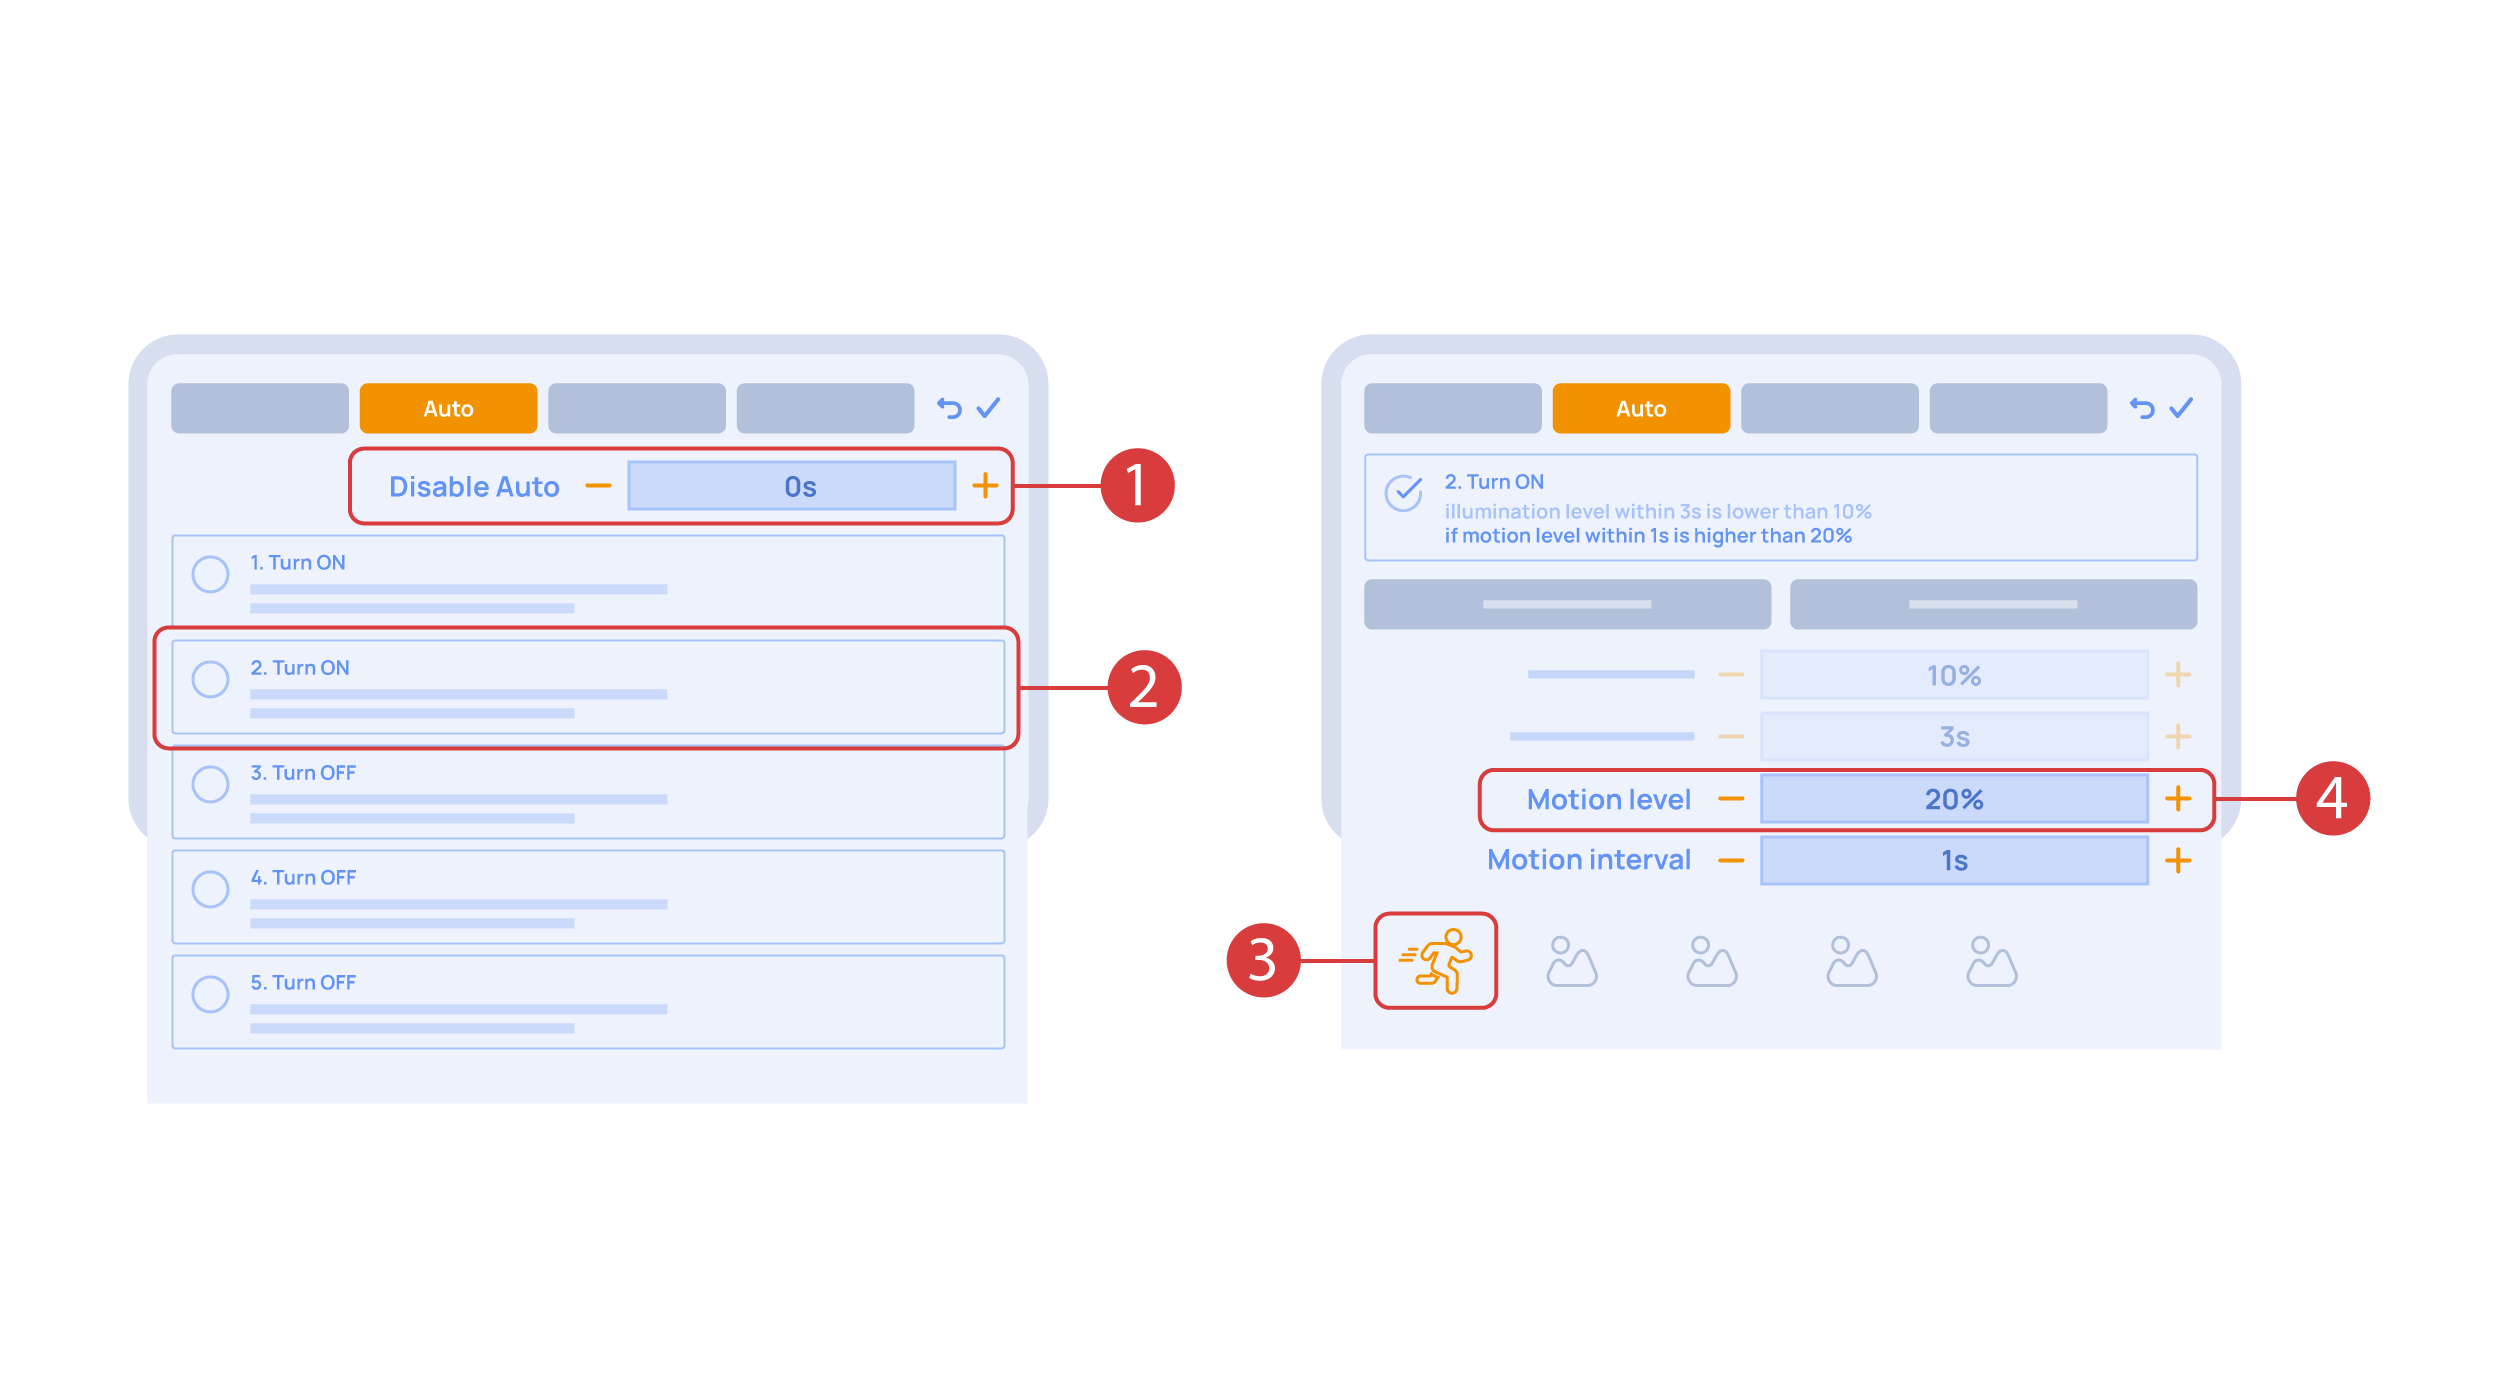
Let’s also set up basic automation of turning an executor on or off with the help of a motion sensor.
The ‘Auto period’ ① option sets the time for which the automation is disabled after an executor is manually controlled.For our demonstration purposes, we will set it to zero.
Then we will activate the automation ② to turn on the executor when motion is detected. We choose the motion sensor ③ and the level of motion ④. We can also choose a light sensor and its parameters.
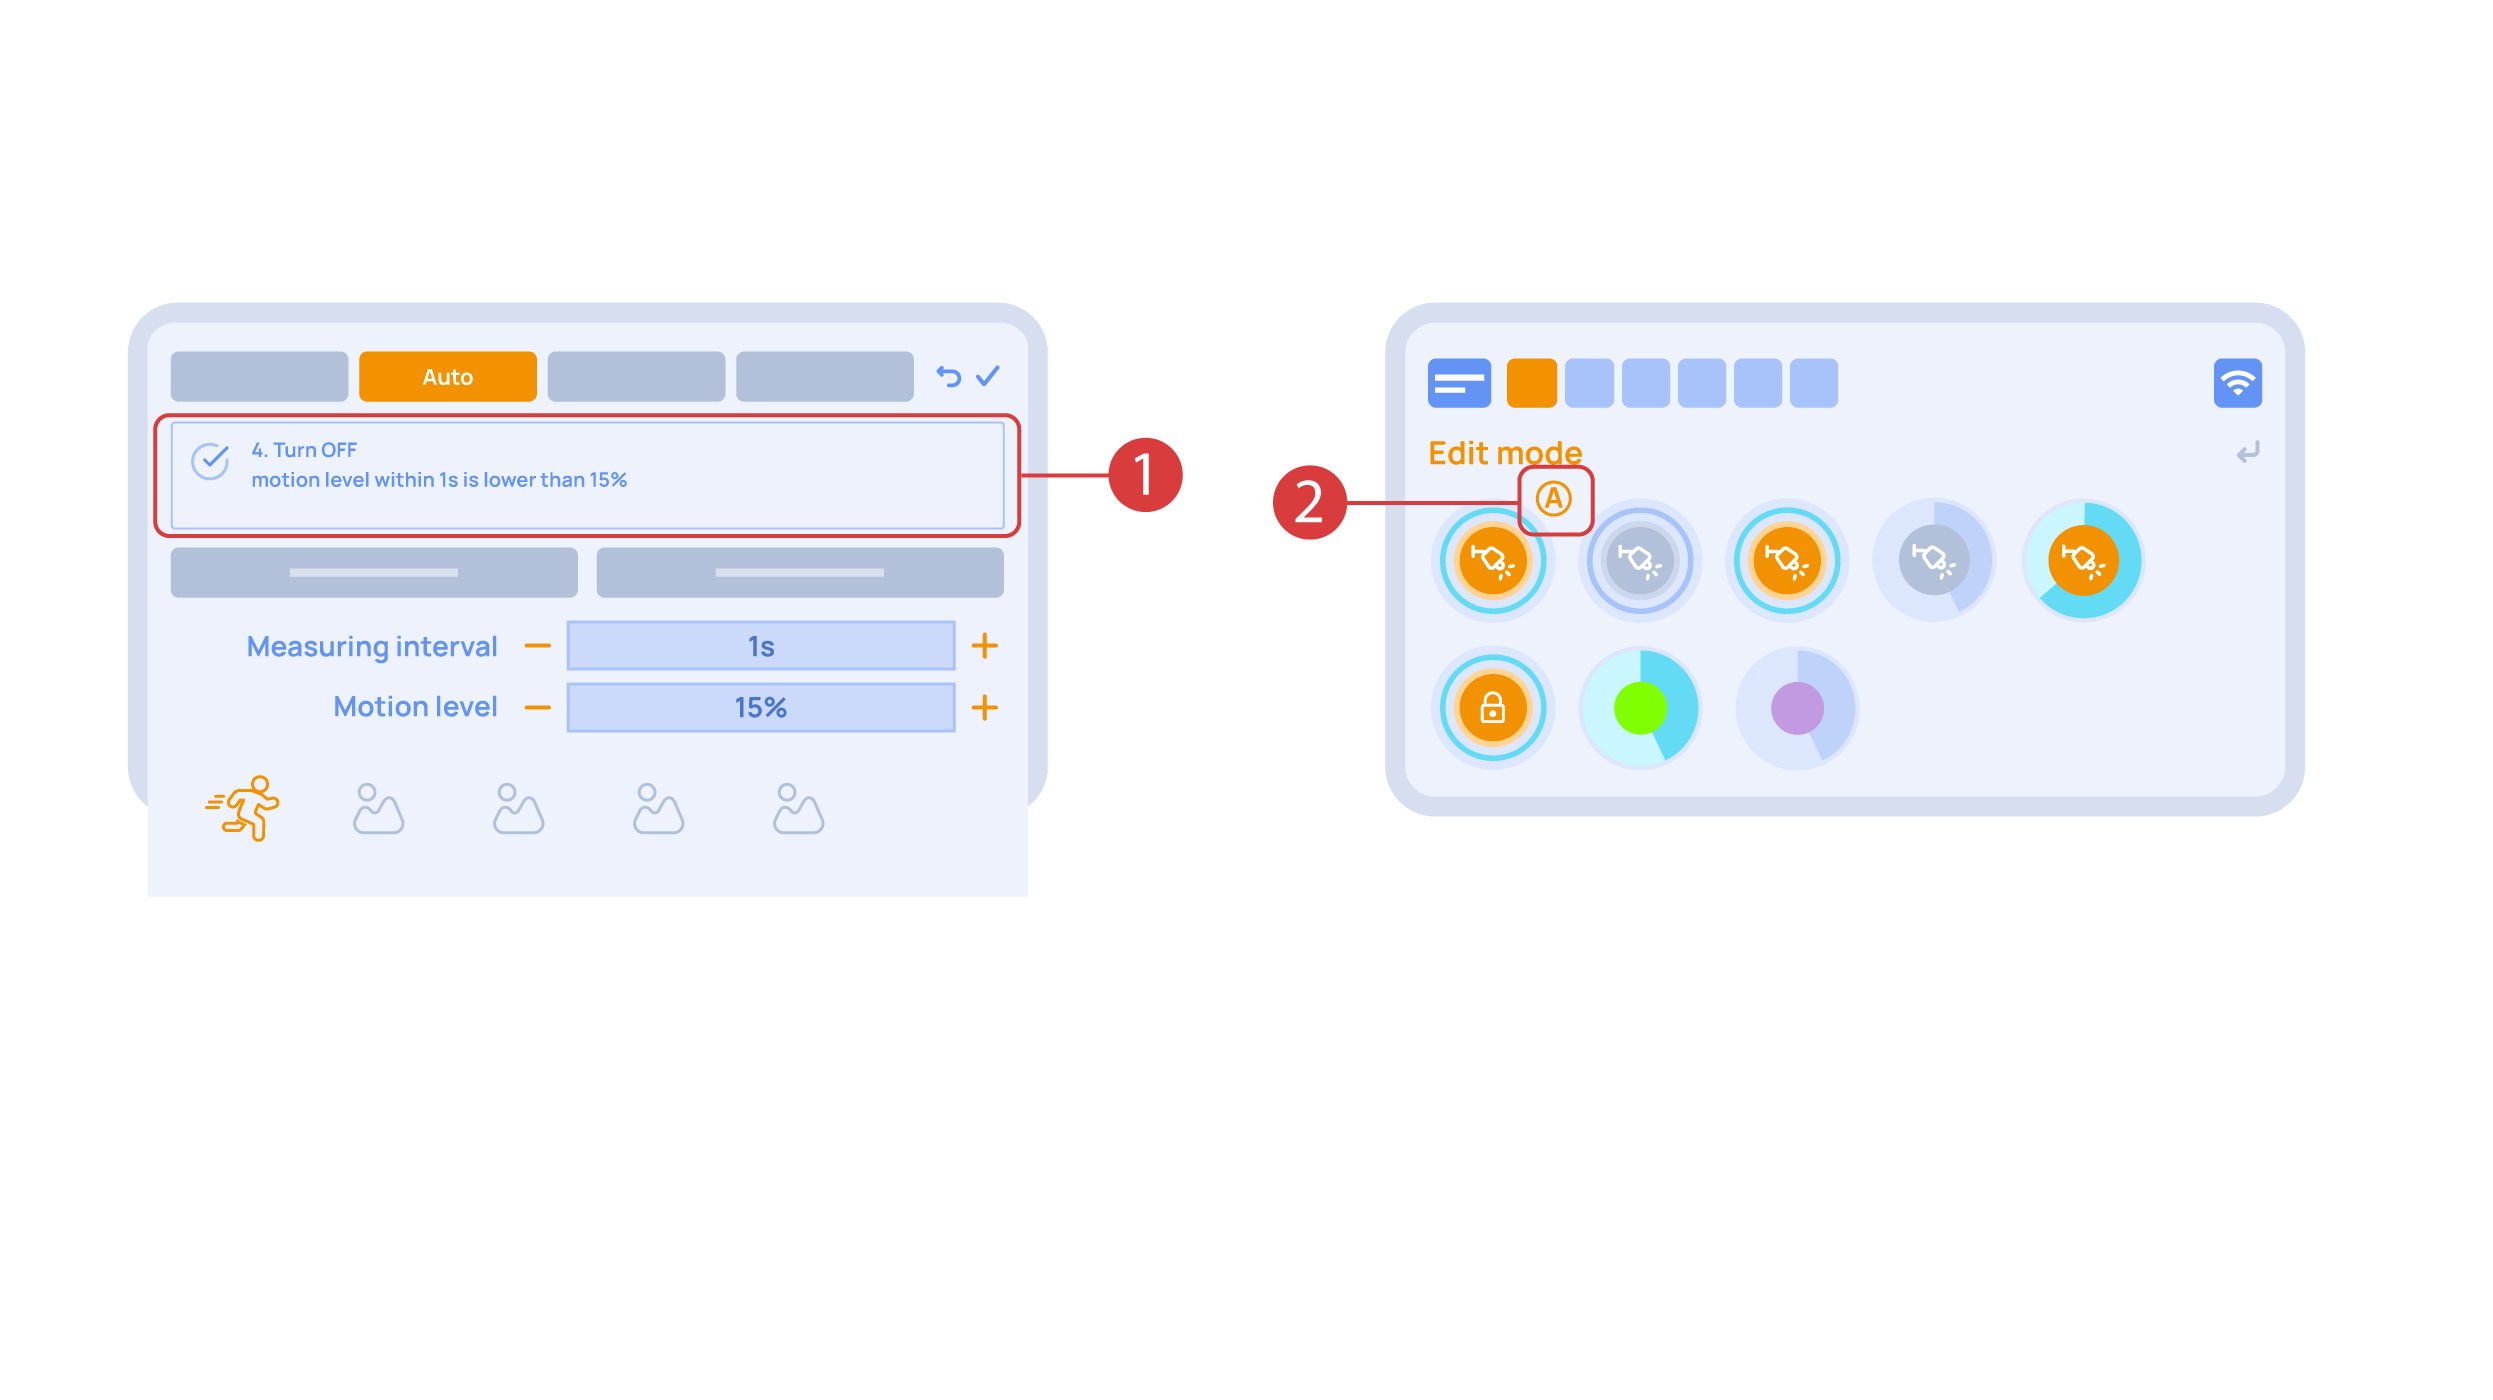
Now we will activate turning off ① of an executor if there is no motion: we choose the same sensor, set a lower threshold and a minimal time.Save the changes.
The extra ‘A’ icon ② will be added to the executor icon, meaning that automation has been set up for it. Now the lamp will be turned on when motion is detected and instantly turned off when no motion is detected.
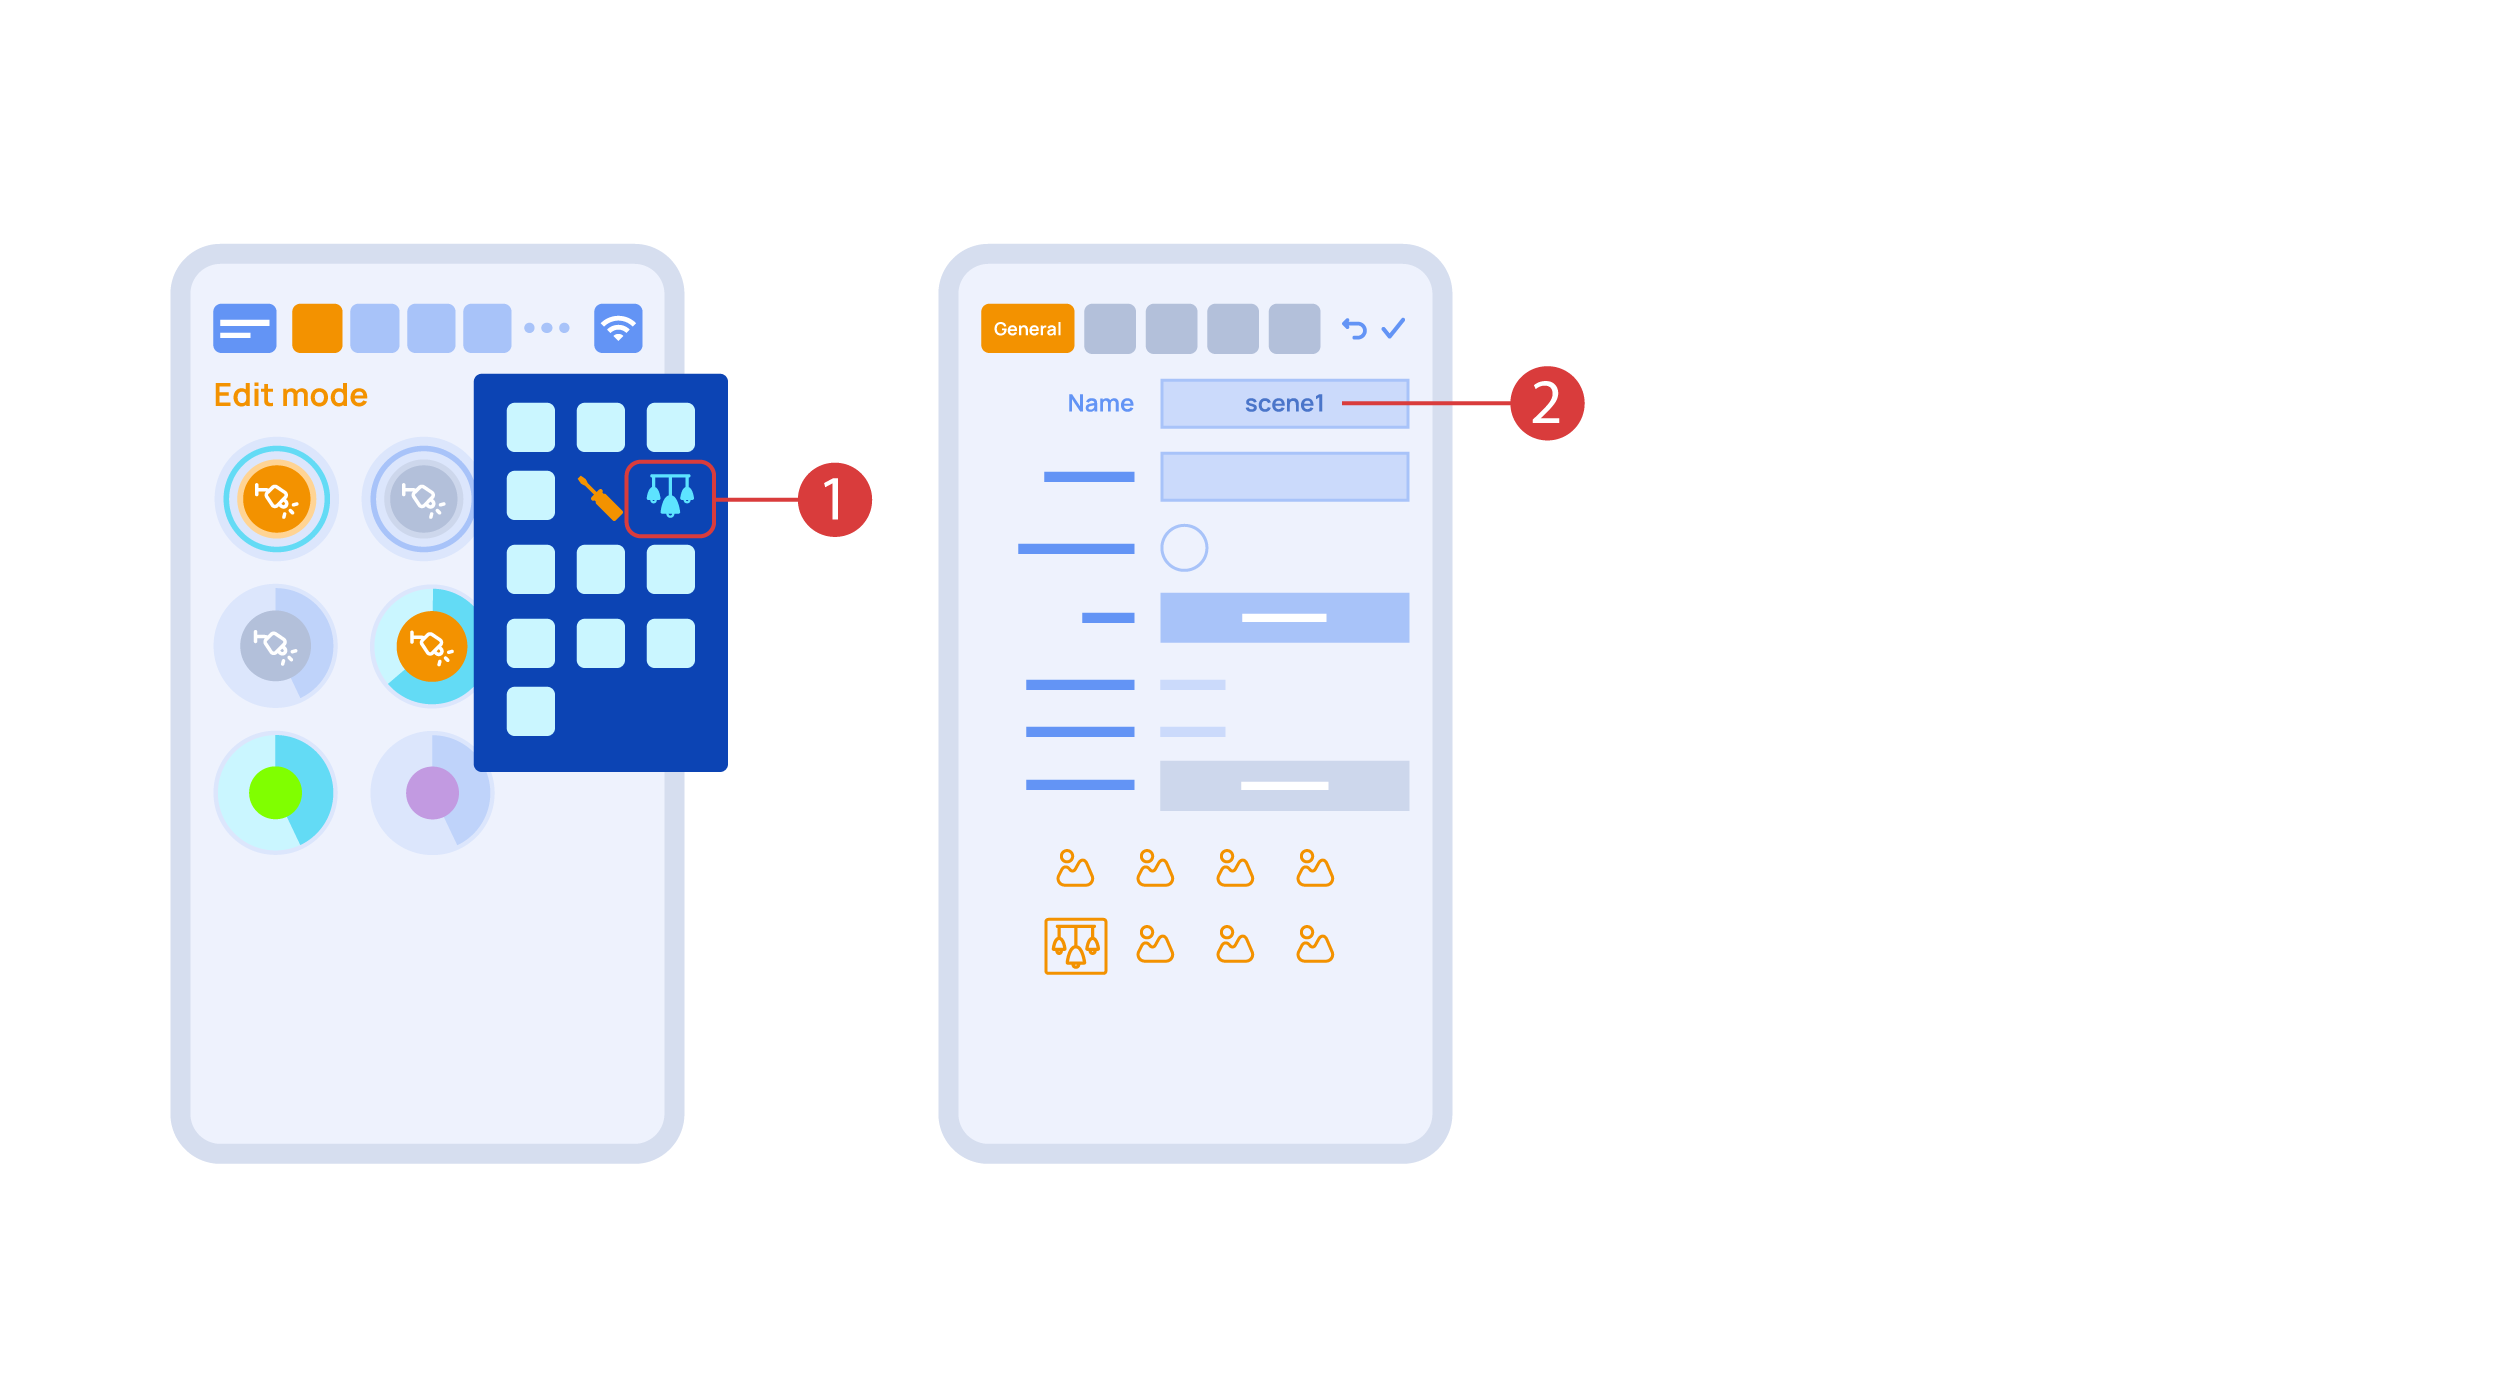
Let’s create a light scheme. For this we need to select the appropriate item in the additional menu ①. Give the light scheme a name ②.
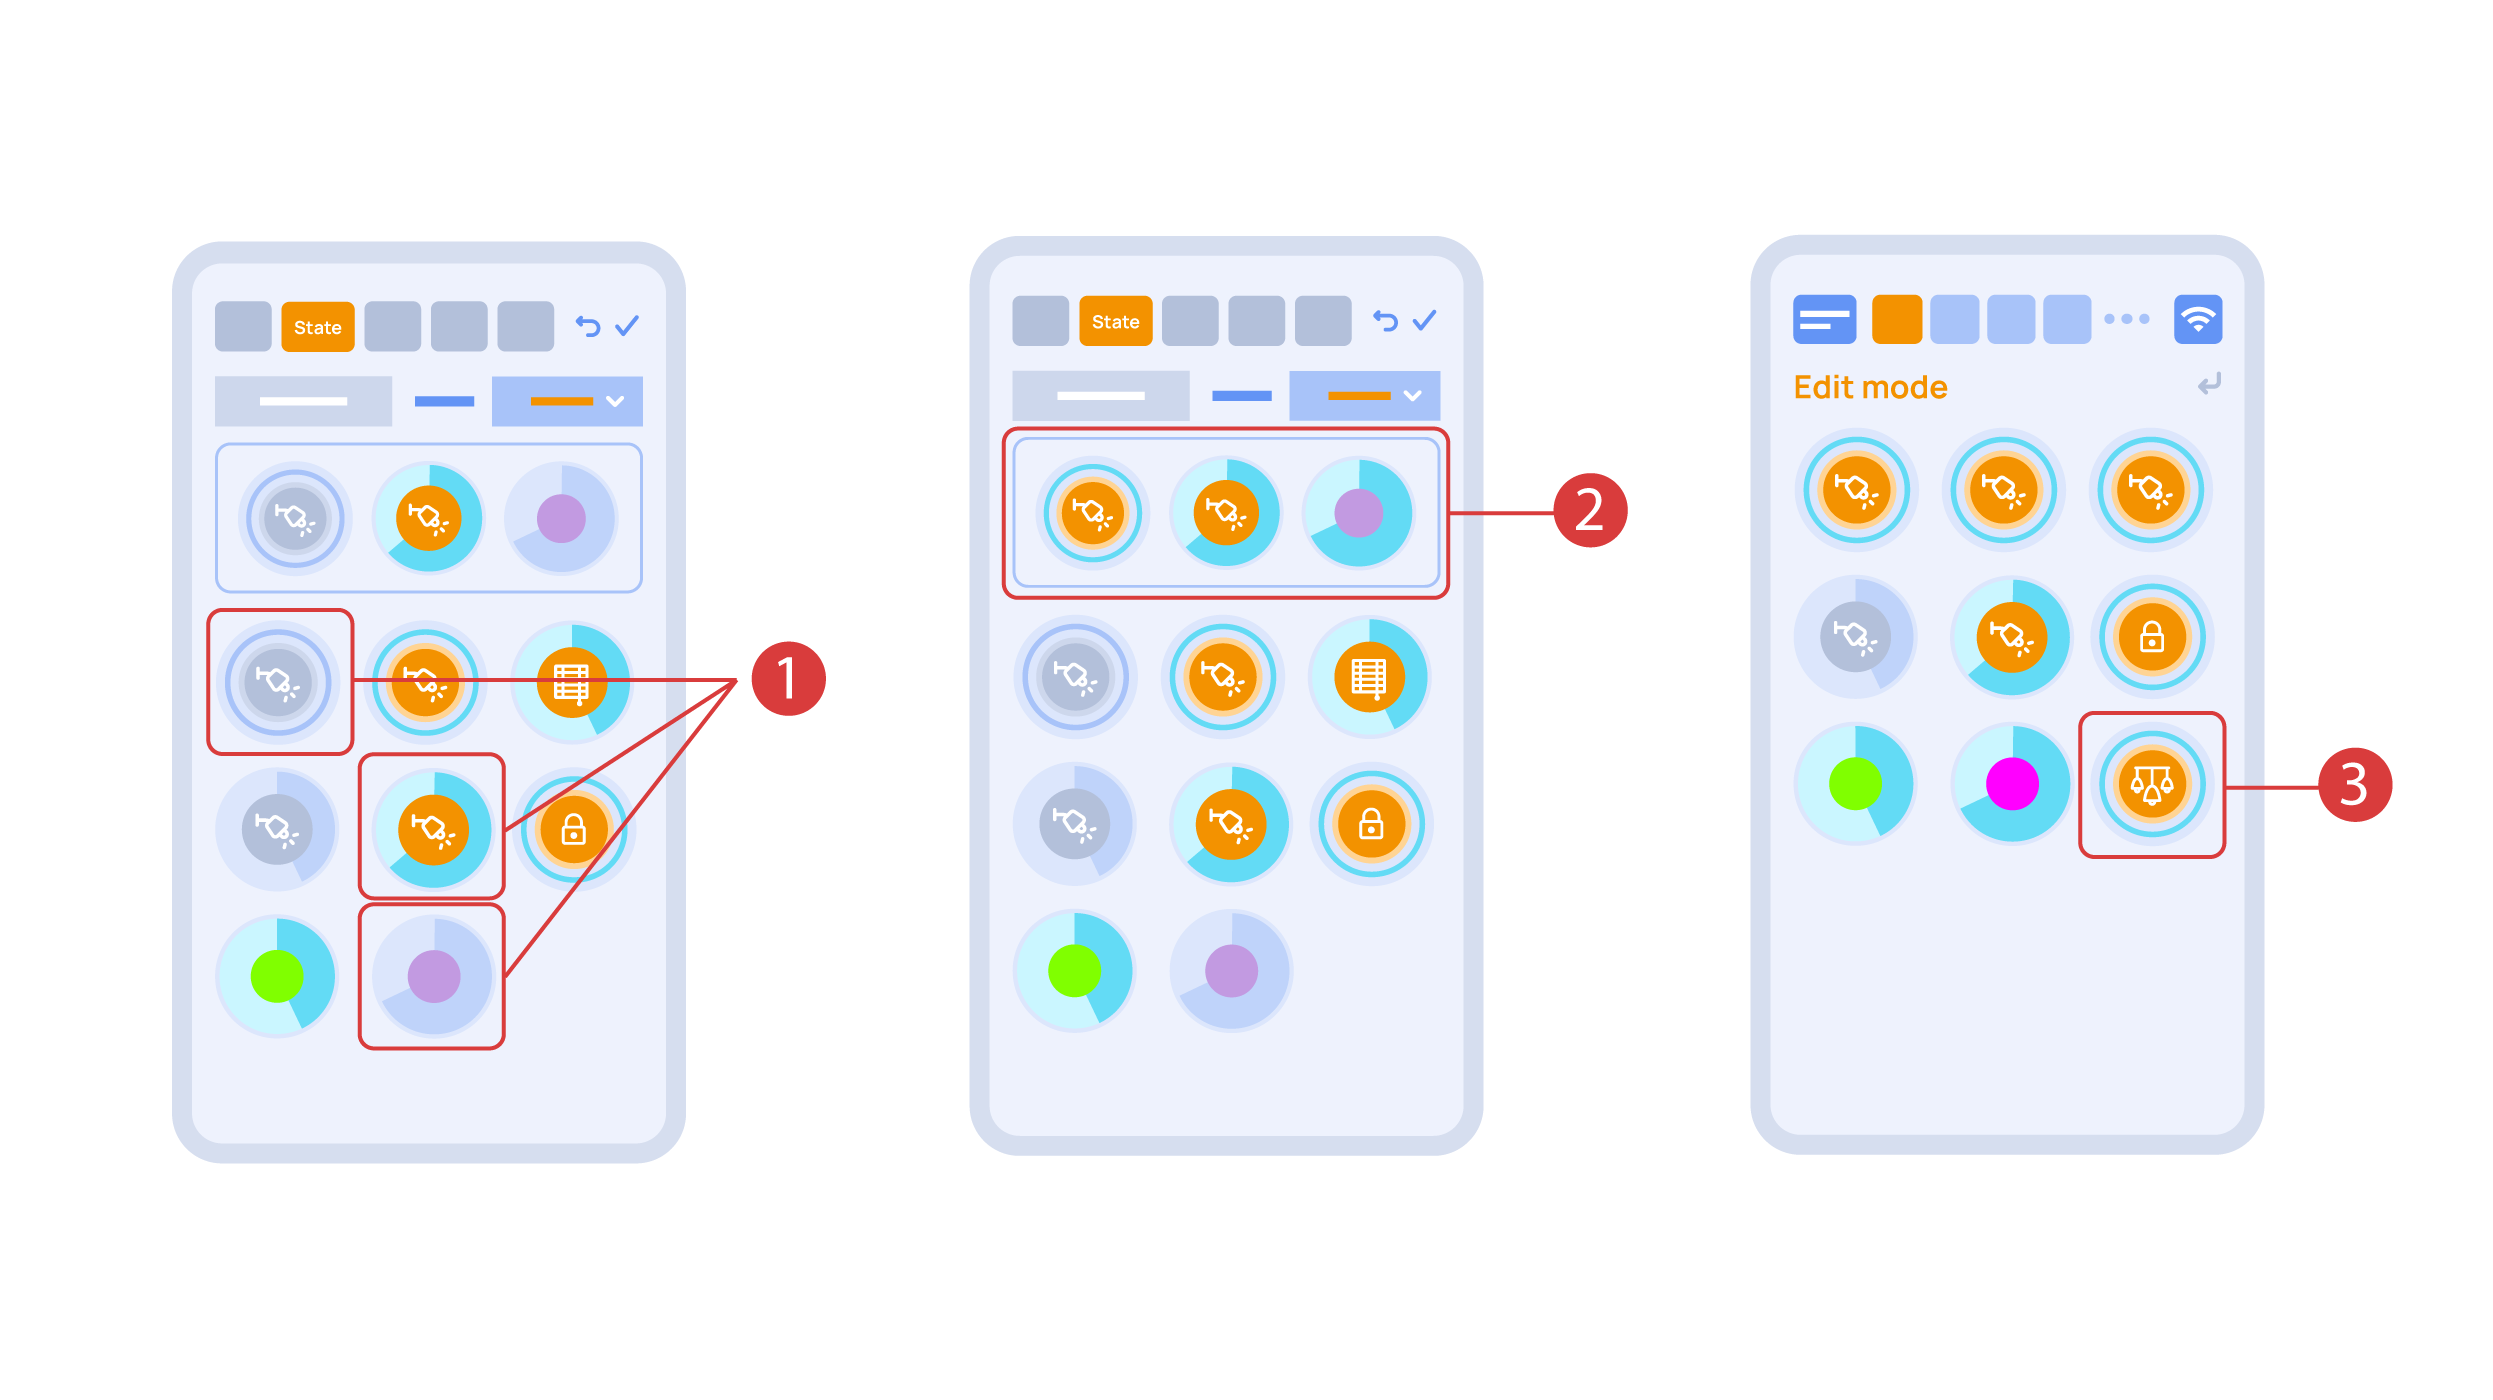
In the ‘State’ tab, use a long press to add the lights we want to use into the light scene ① and set up their state ②. ‘Auto’, ‘Schedule’, ‘Switch’ tabs are the same for all the executors.
Save the changes and we are able to use the newly-created light scheme ③ immediately.
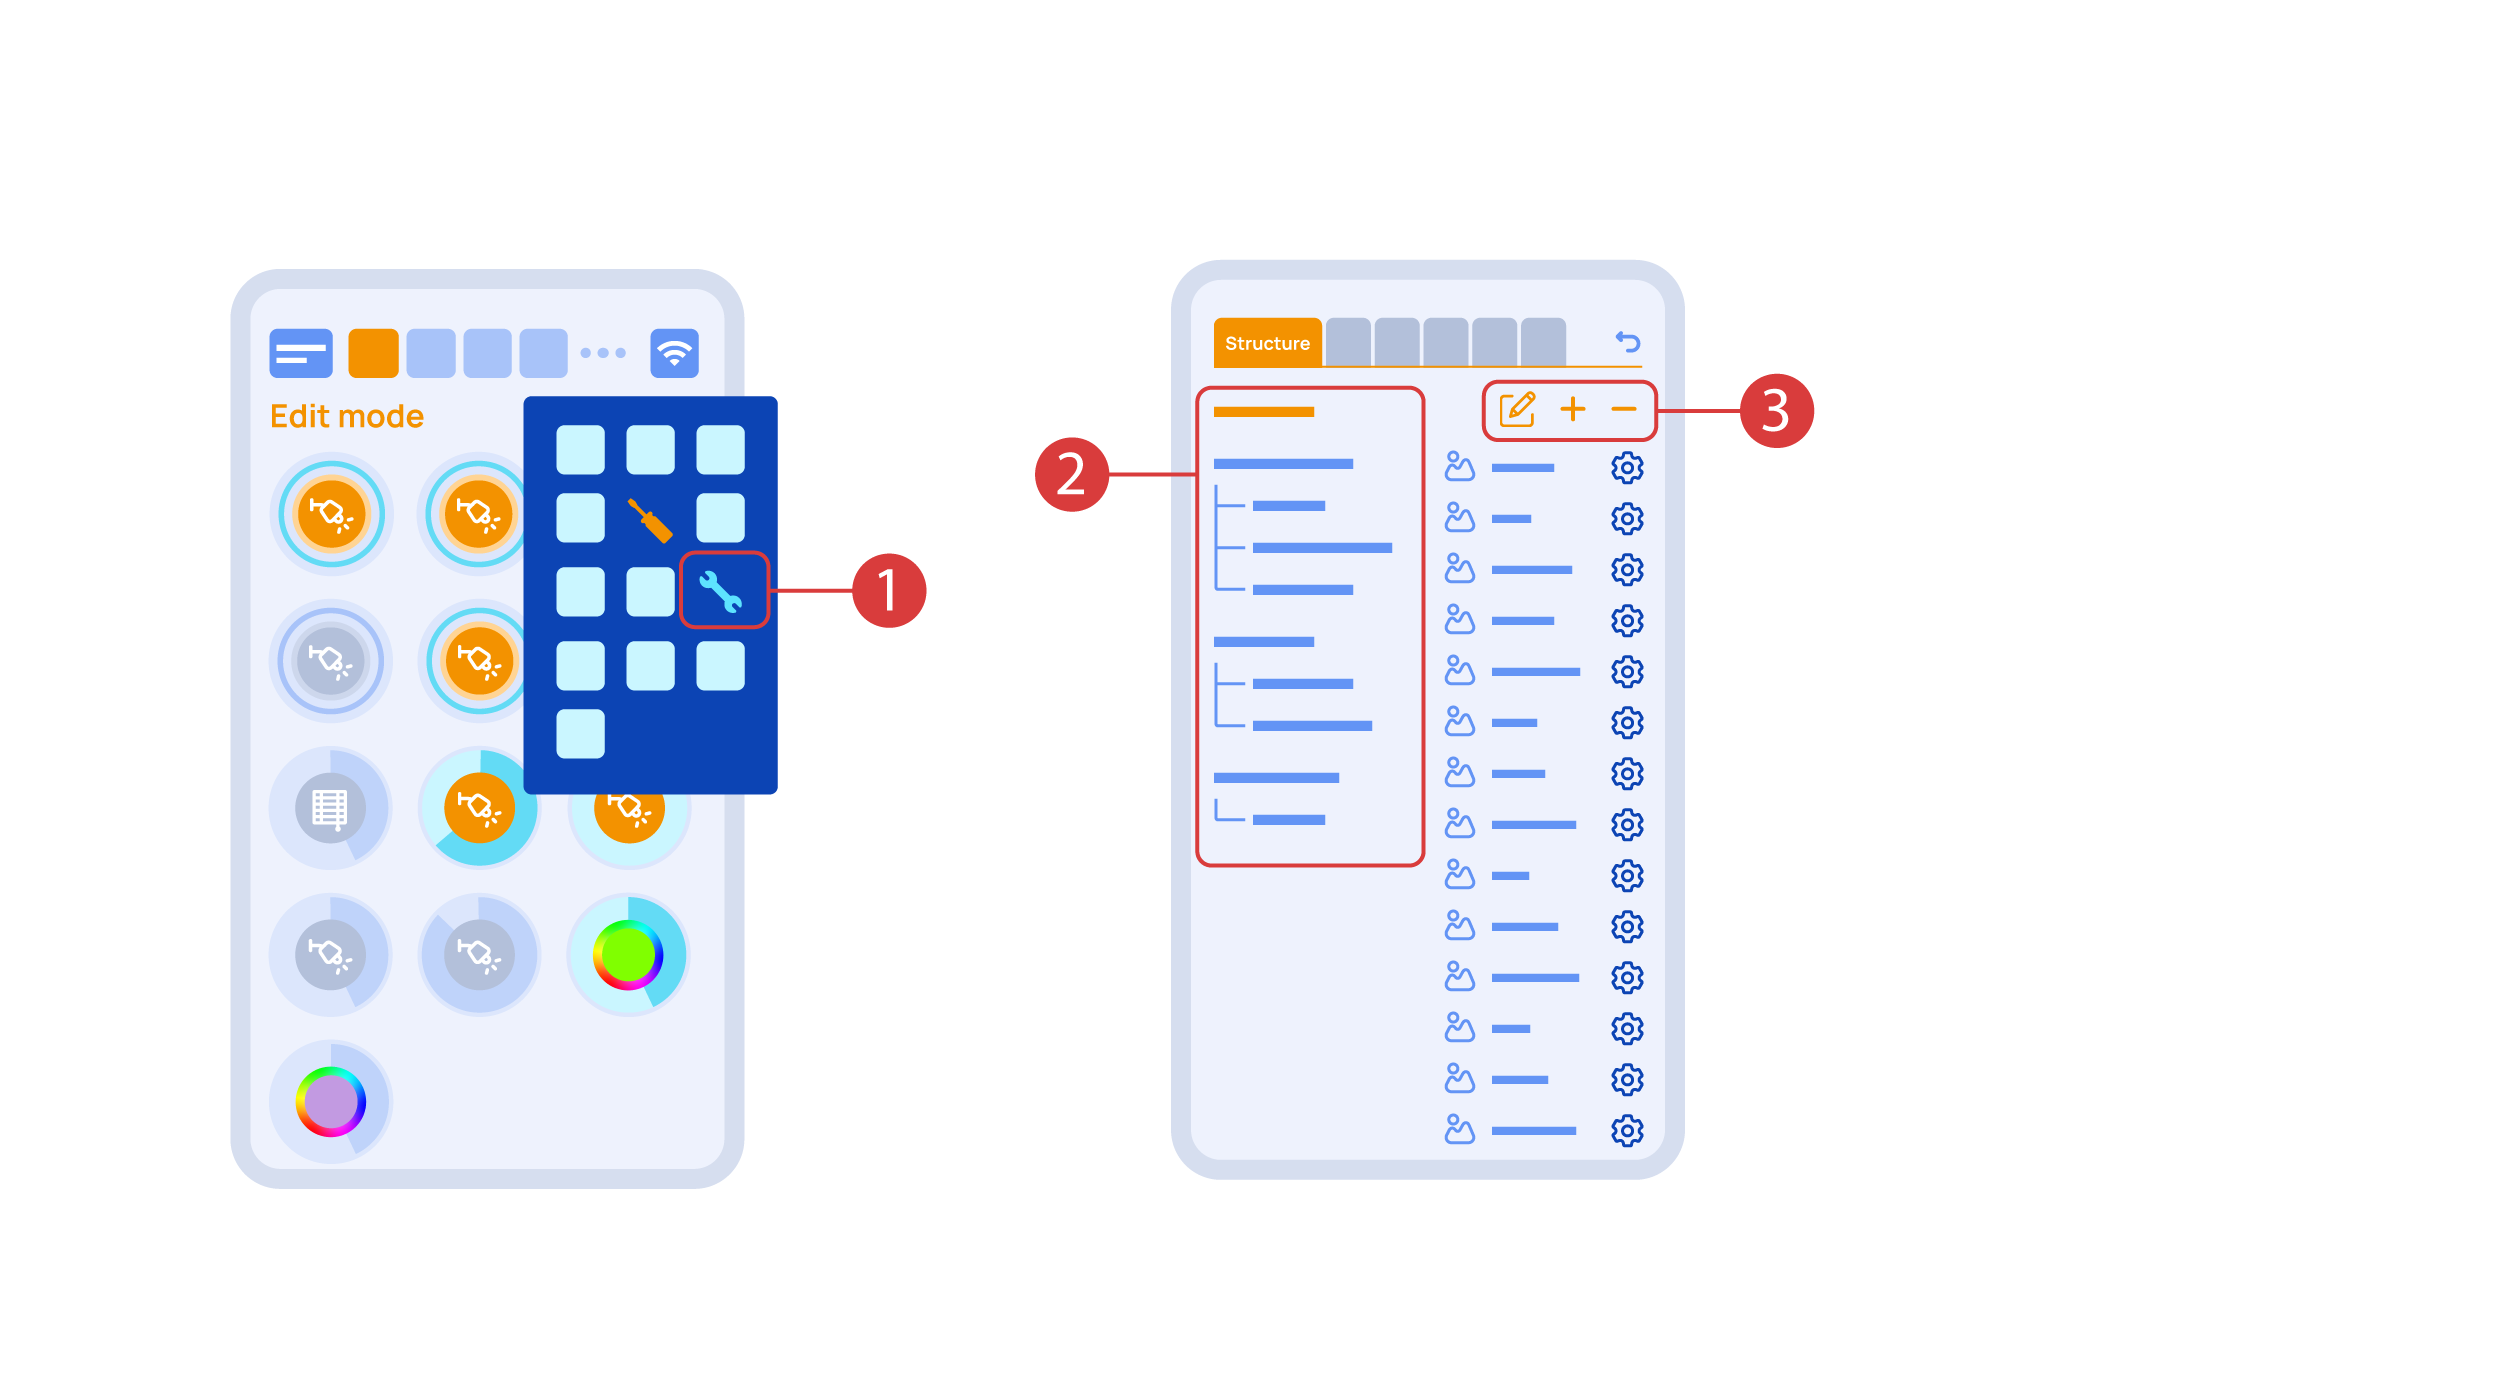
While you are in the Edit Mode, there is a ‘Setup’ ① icon in the additional menu.
Here in the ‘Structure’② tab we can see all the areas.
We can create new ones ④, rename them and move the elements around.
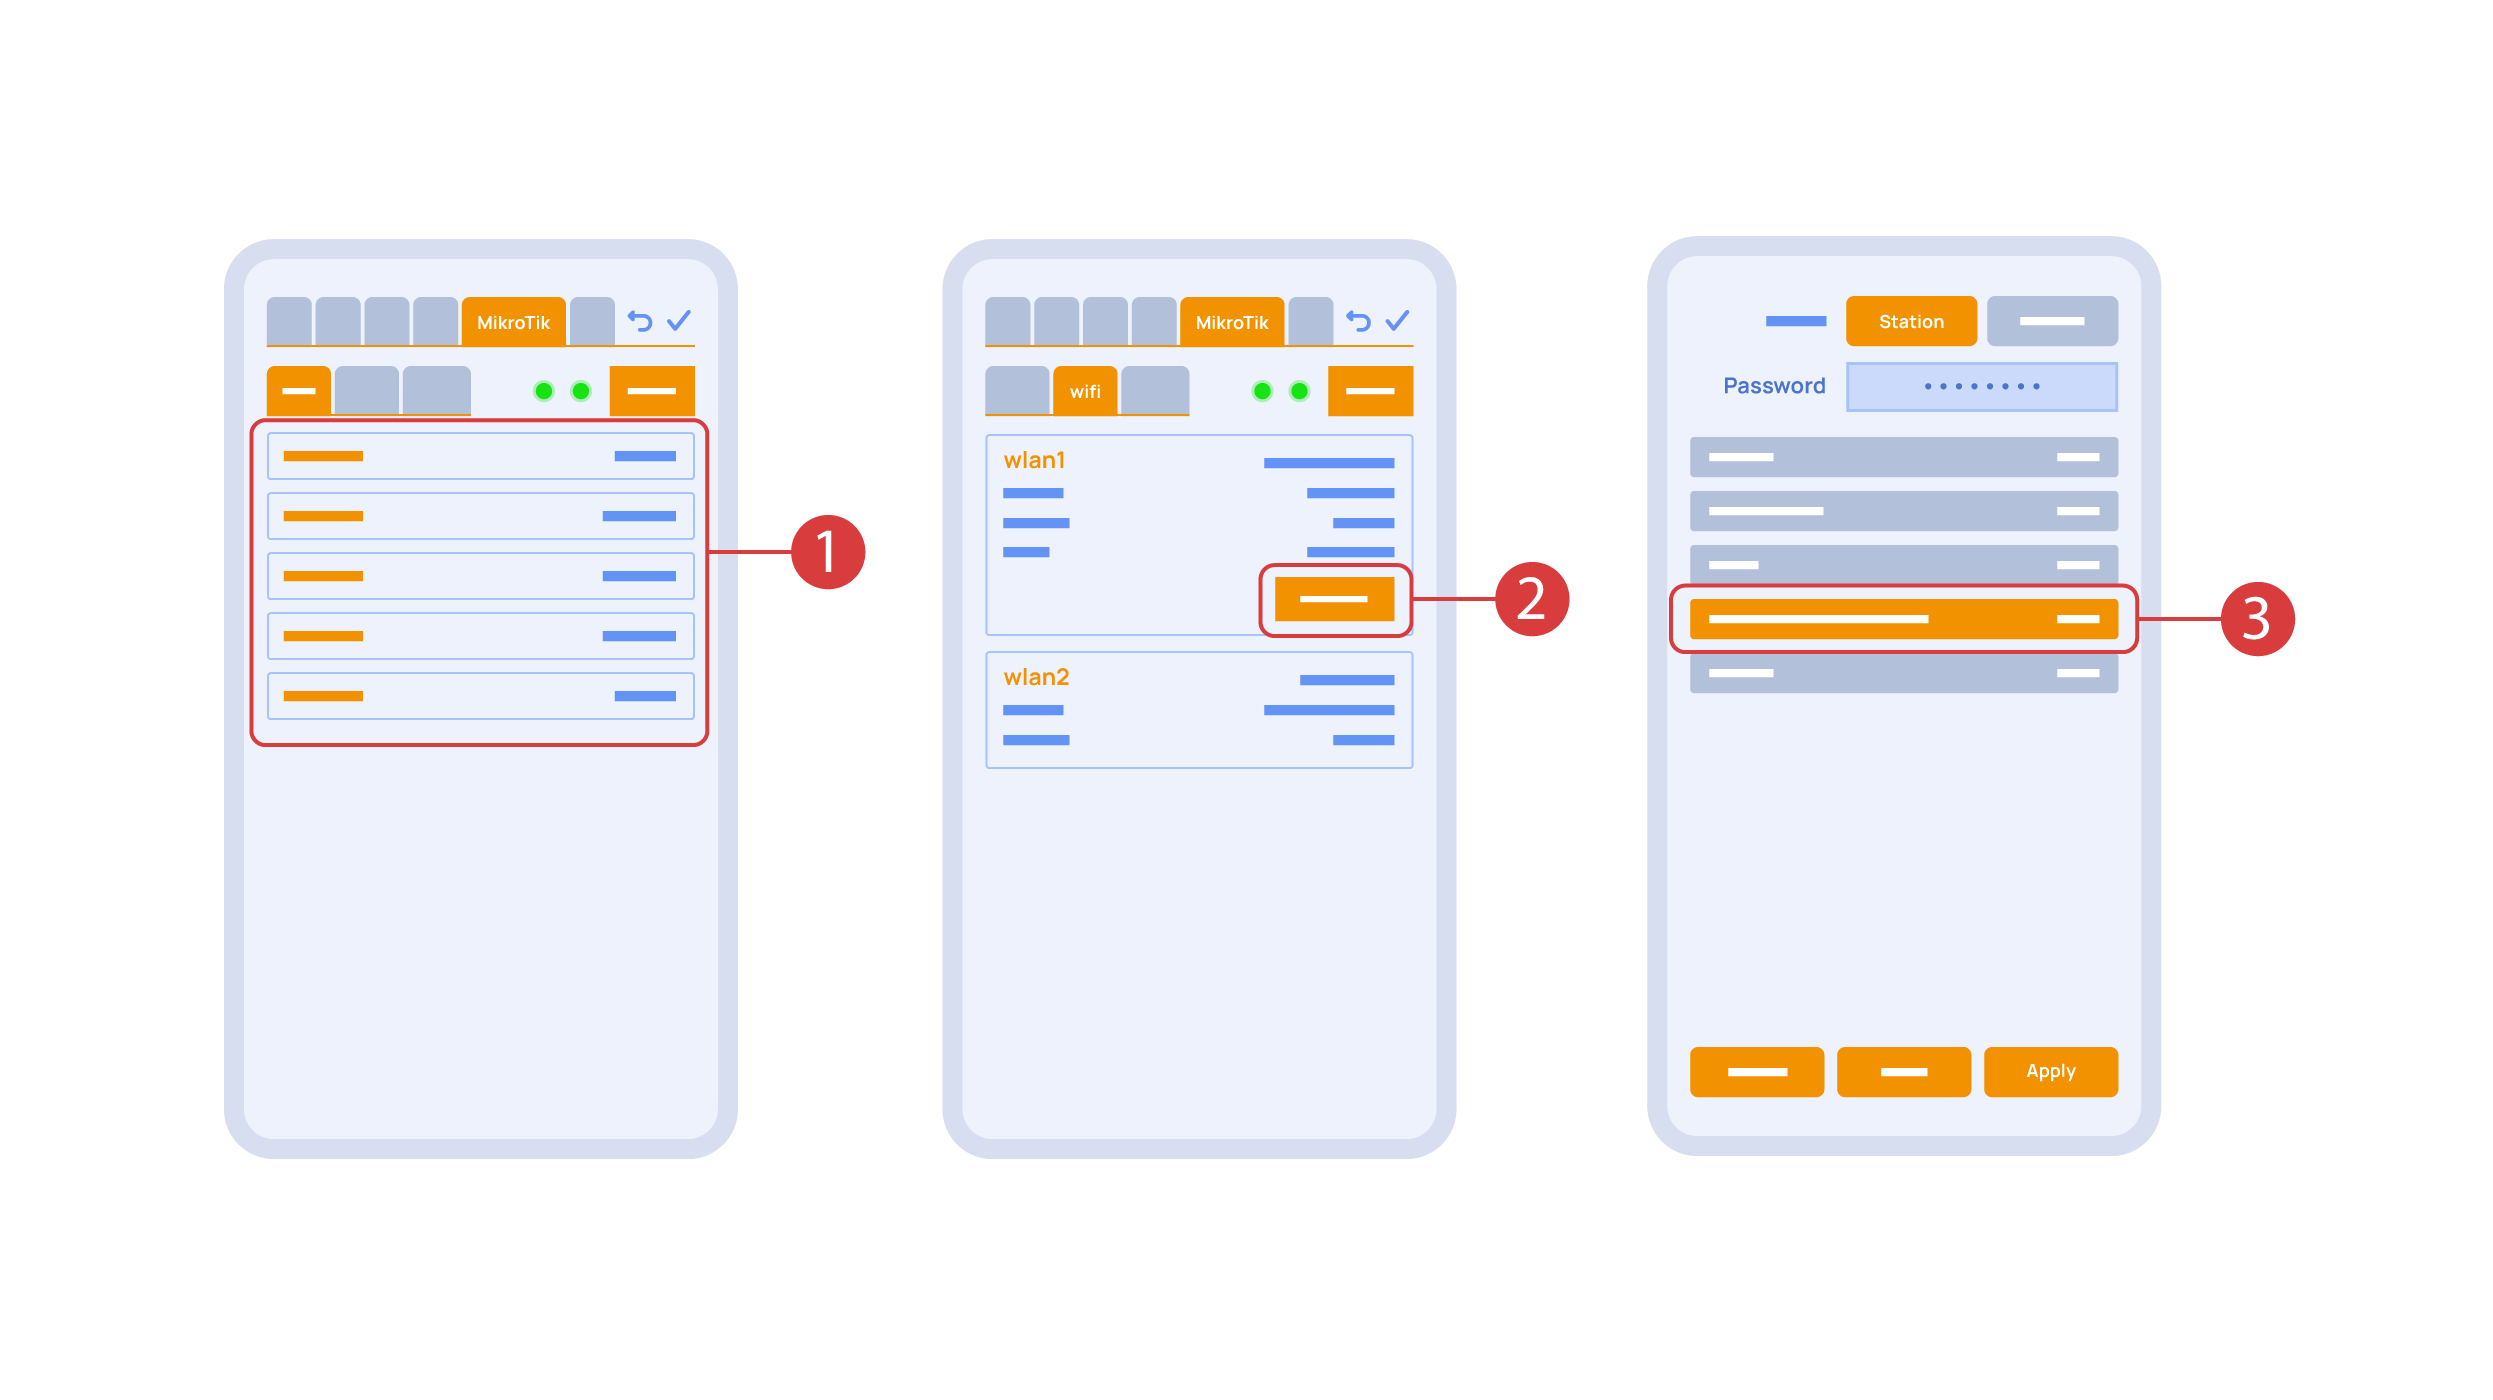
In the ‘Mikrotik’ tab ① you can see the current parameters of your router, which you can also connect to your local Wi-Fi network.
In order to do this, enter the Wi-Fi sub-menu, click the wlan1 interface configuration ②, after which choose the ‘station’ mode, choose a Wi-Fi network out of the list ③ of available ones and enter the connection password.
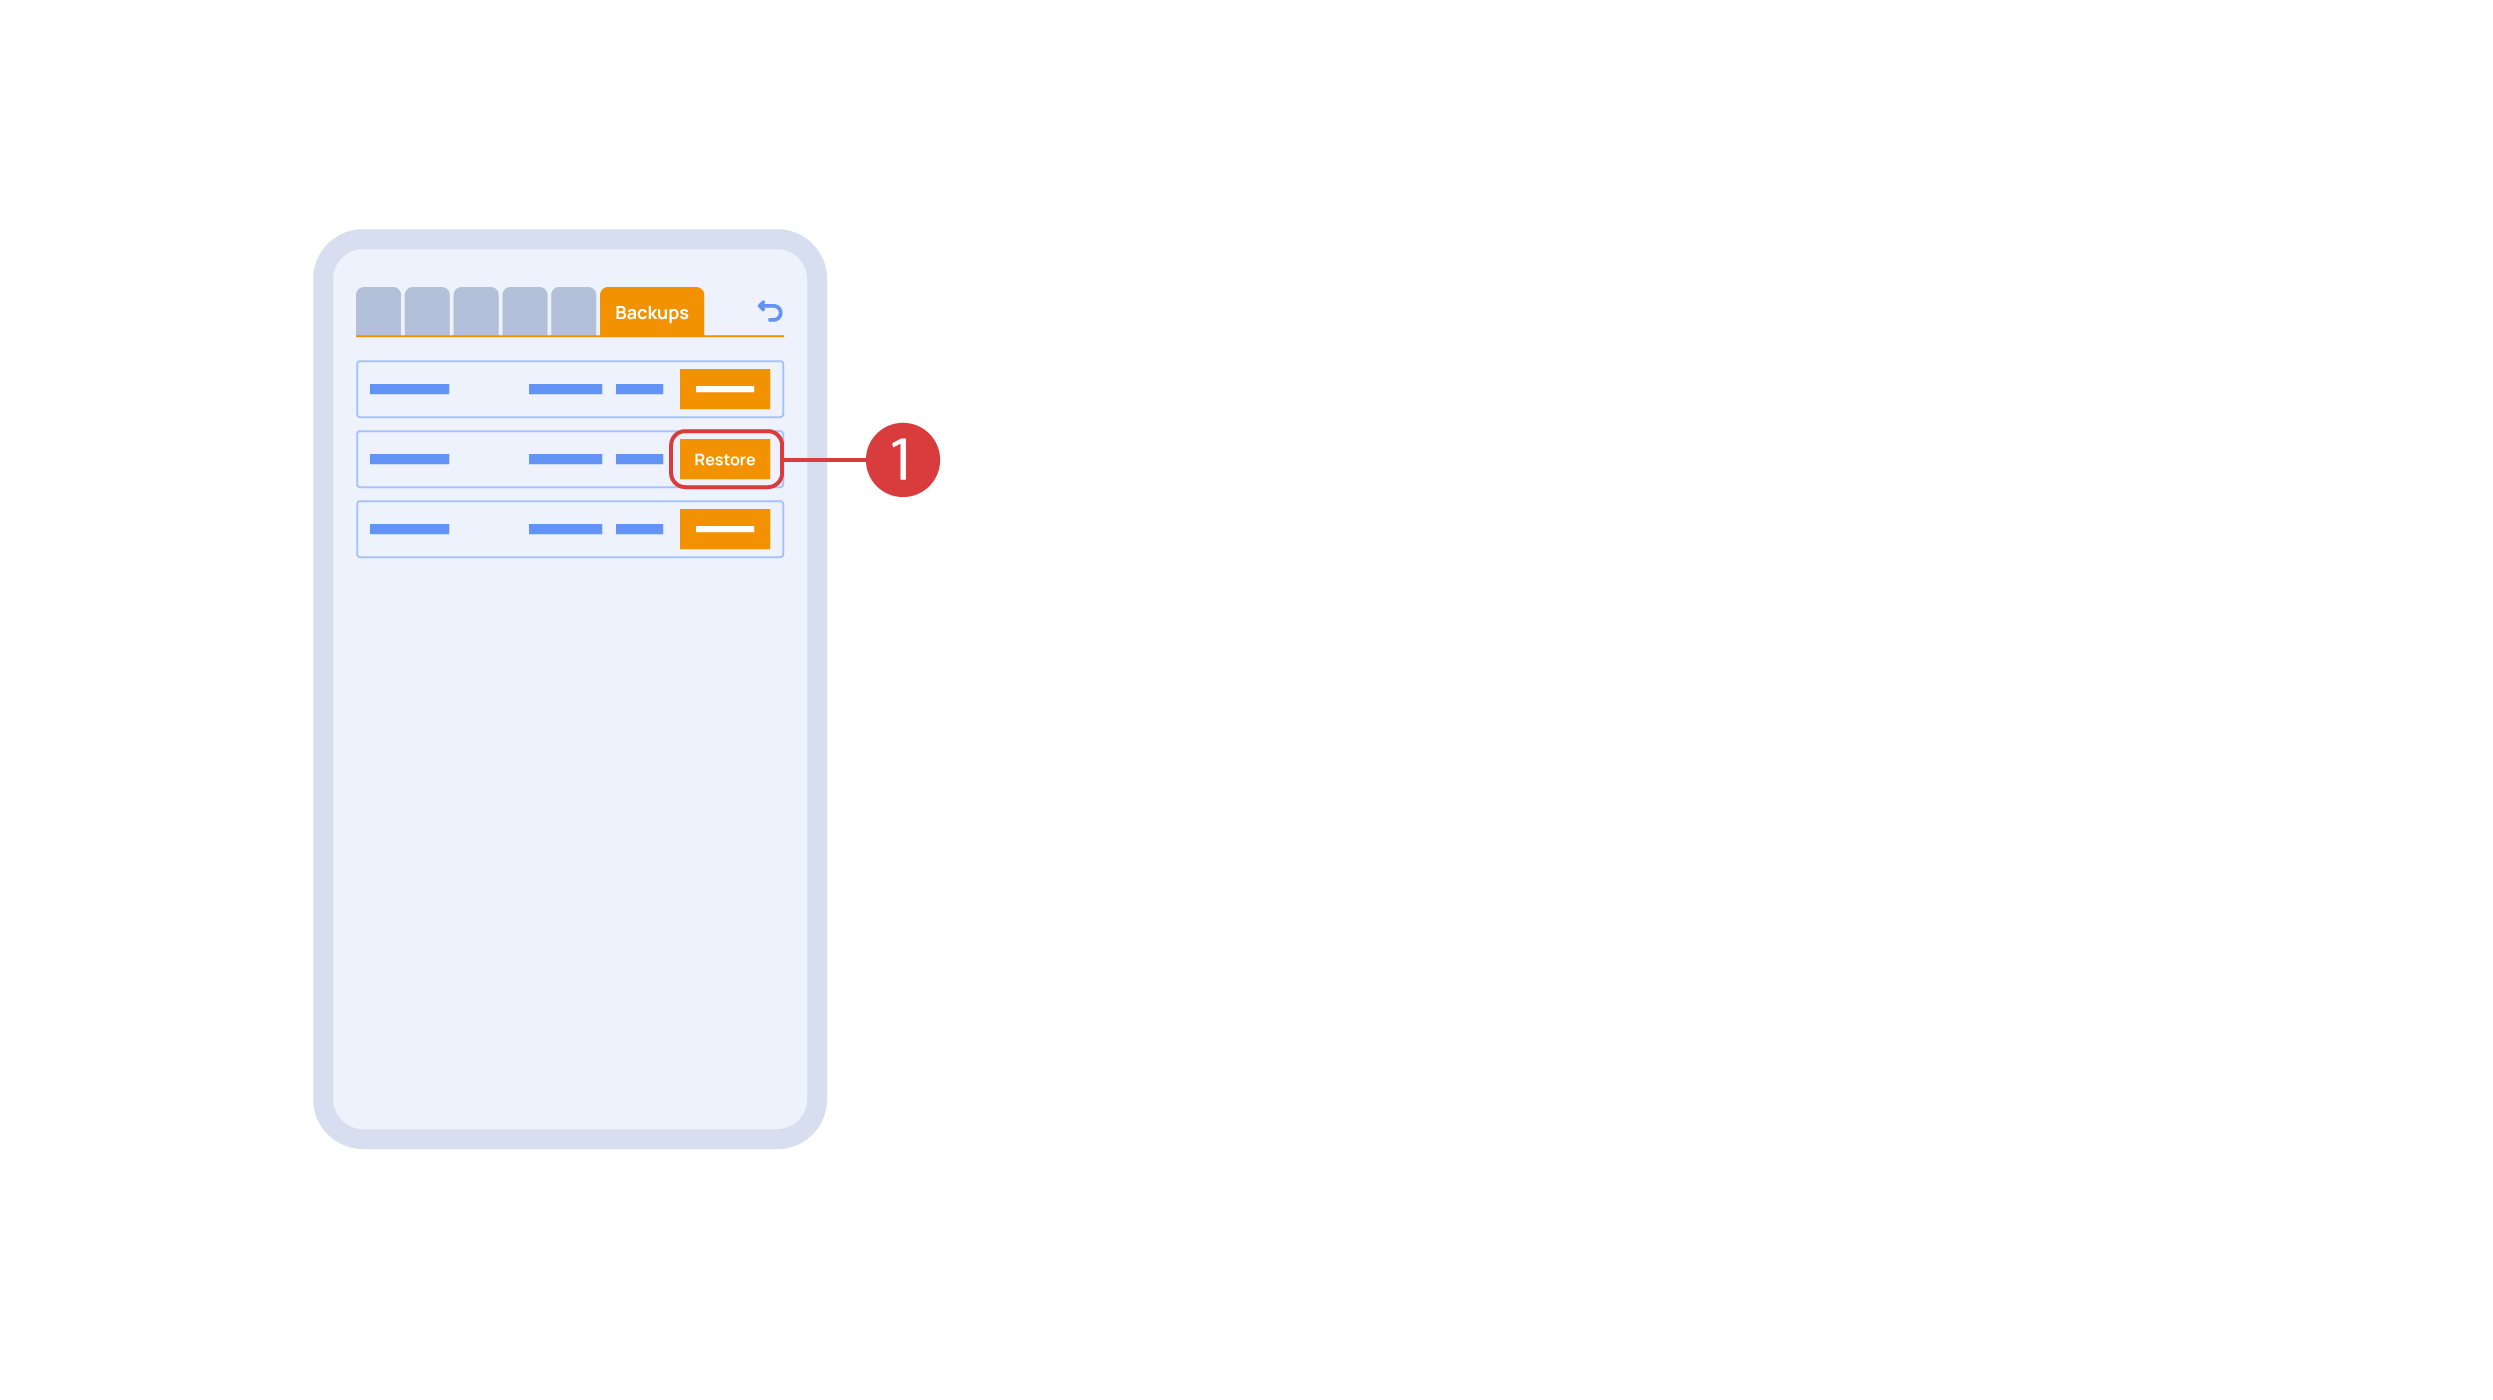
In the ‘Backups’ tab ① you can see the list of saved configurations, which can be restored if necessary.
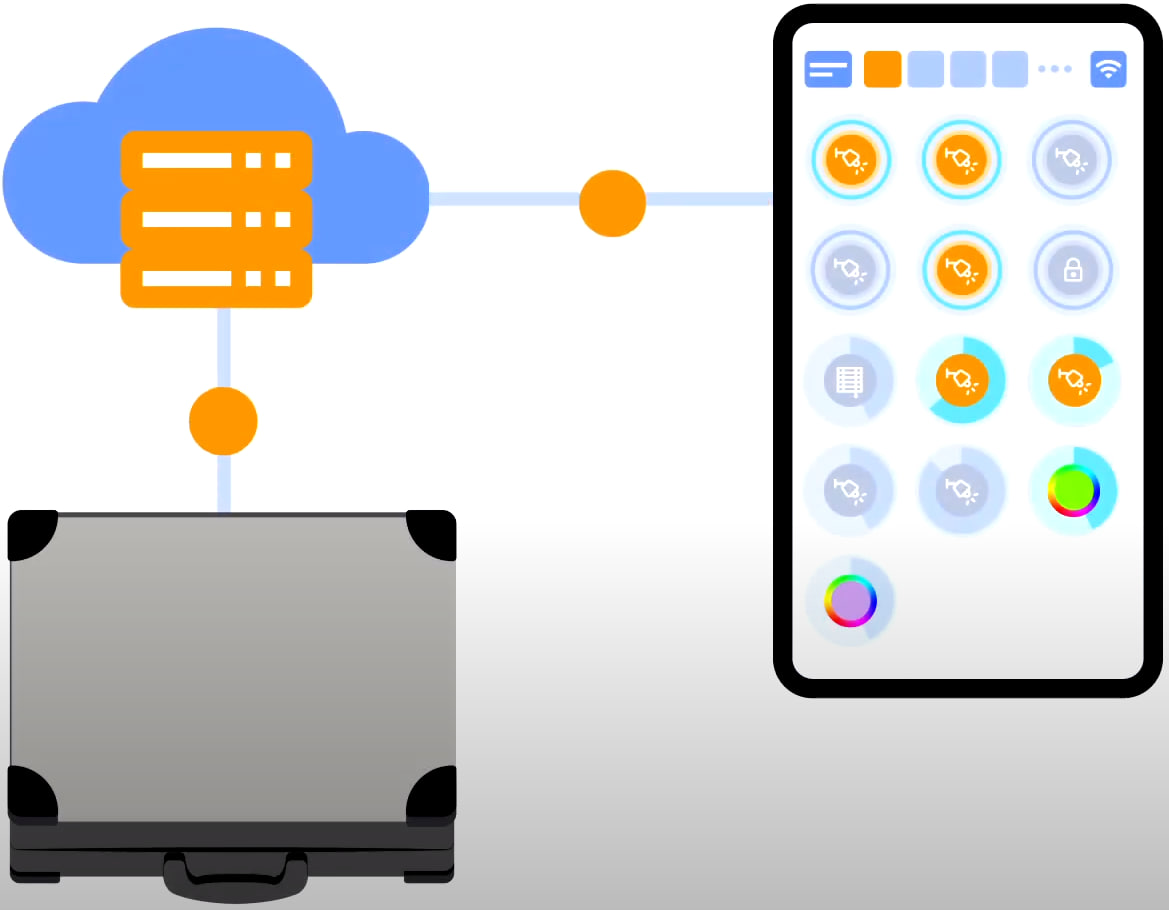
For cloud access to the device, you do not need any extra settings. The app detects the absence of the system in your local network and automatically establishes the connection via the cloud.
We thank you for watching this tutorial! If you have questions or need extra help, please do not hesitate to refer to our technical support team. See you in the next episodes!