Водич за брзи почетак
Brzi početak/raspakivanje.
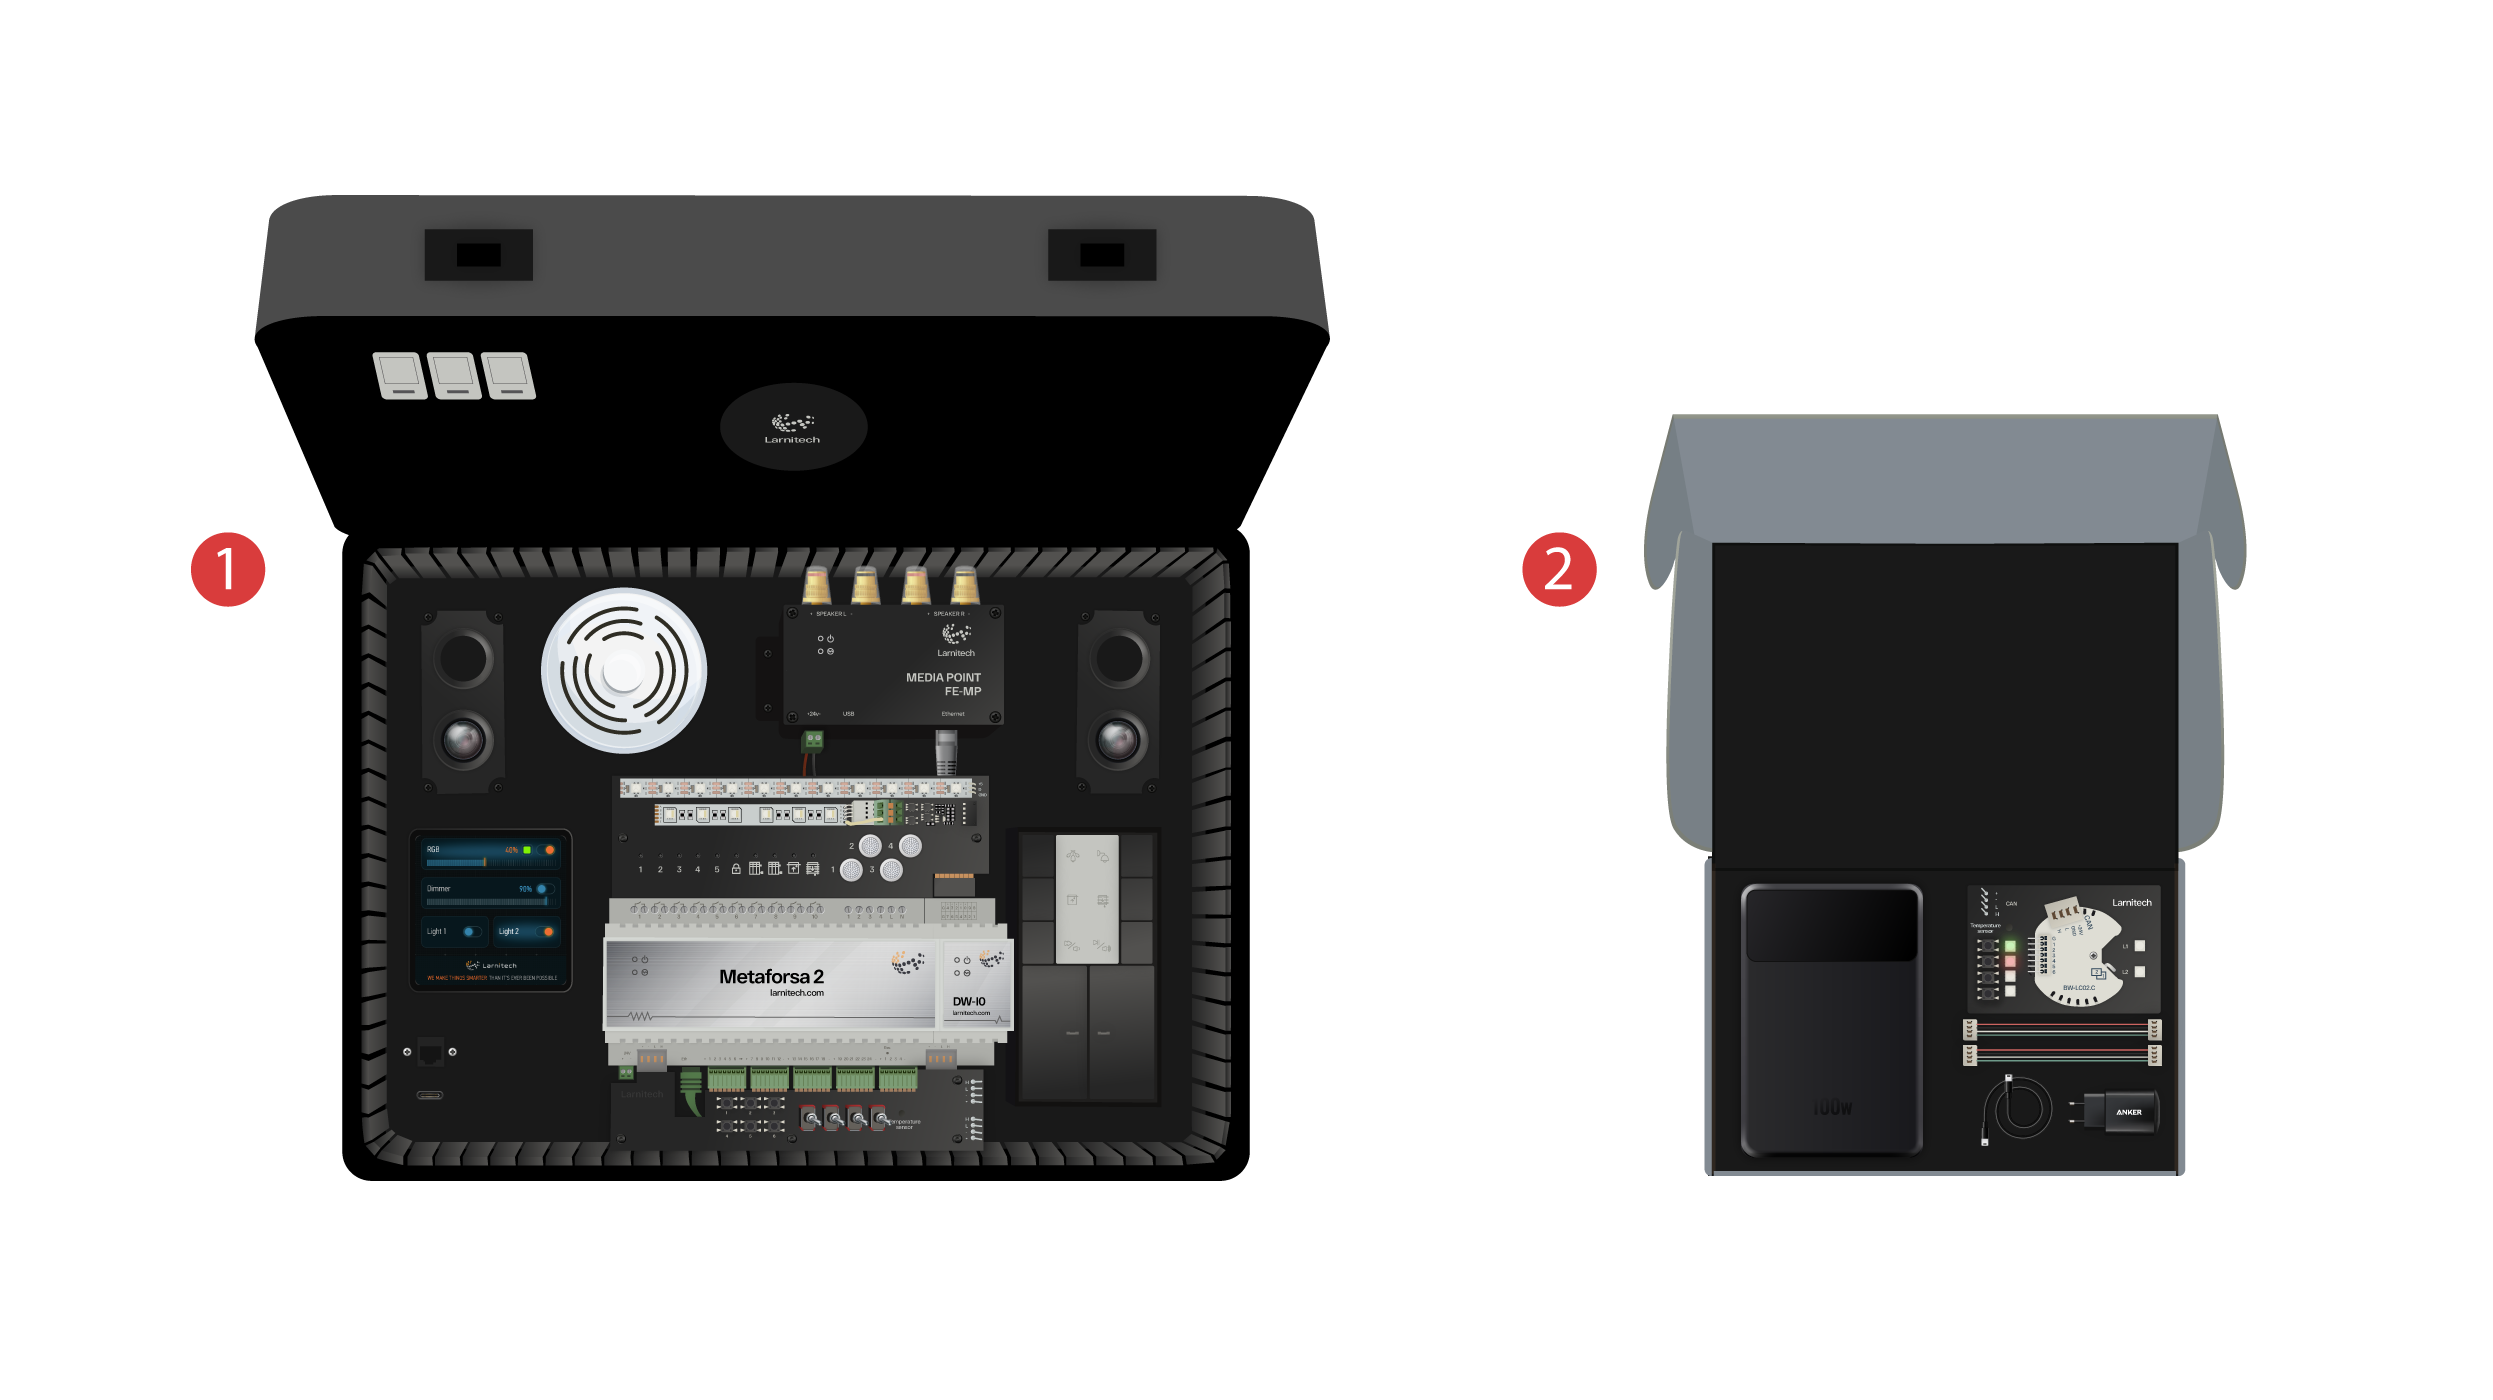
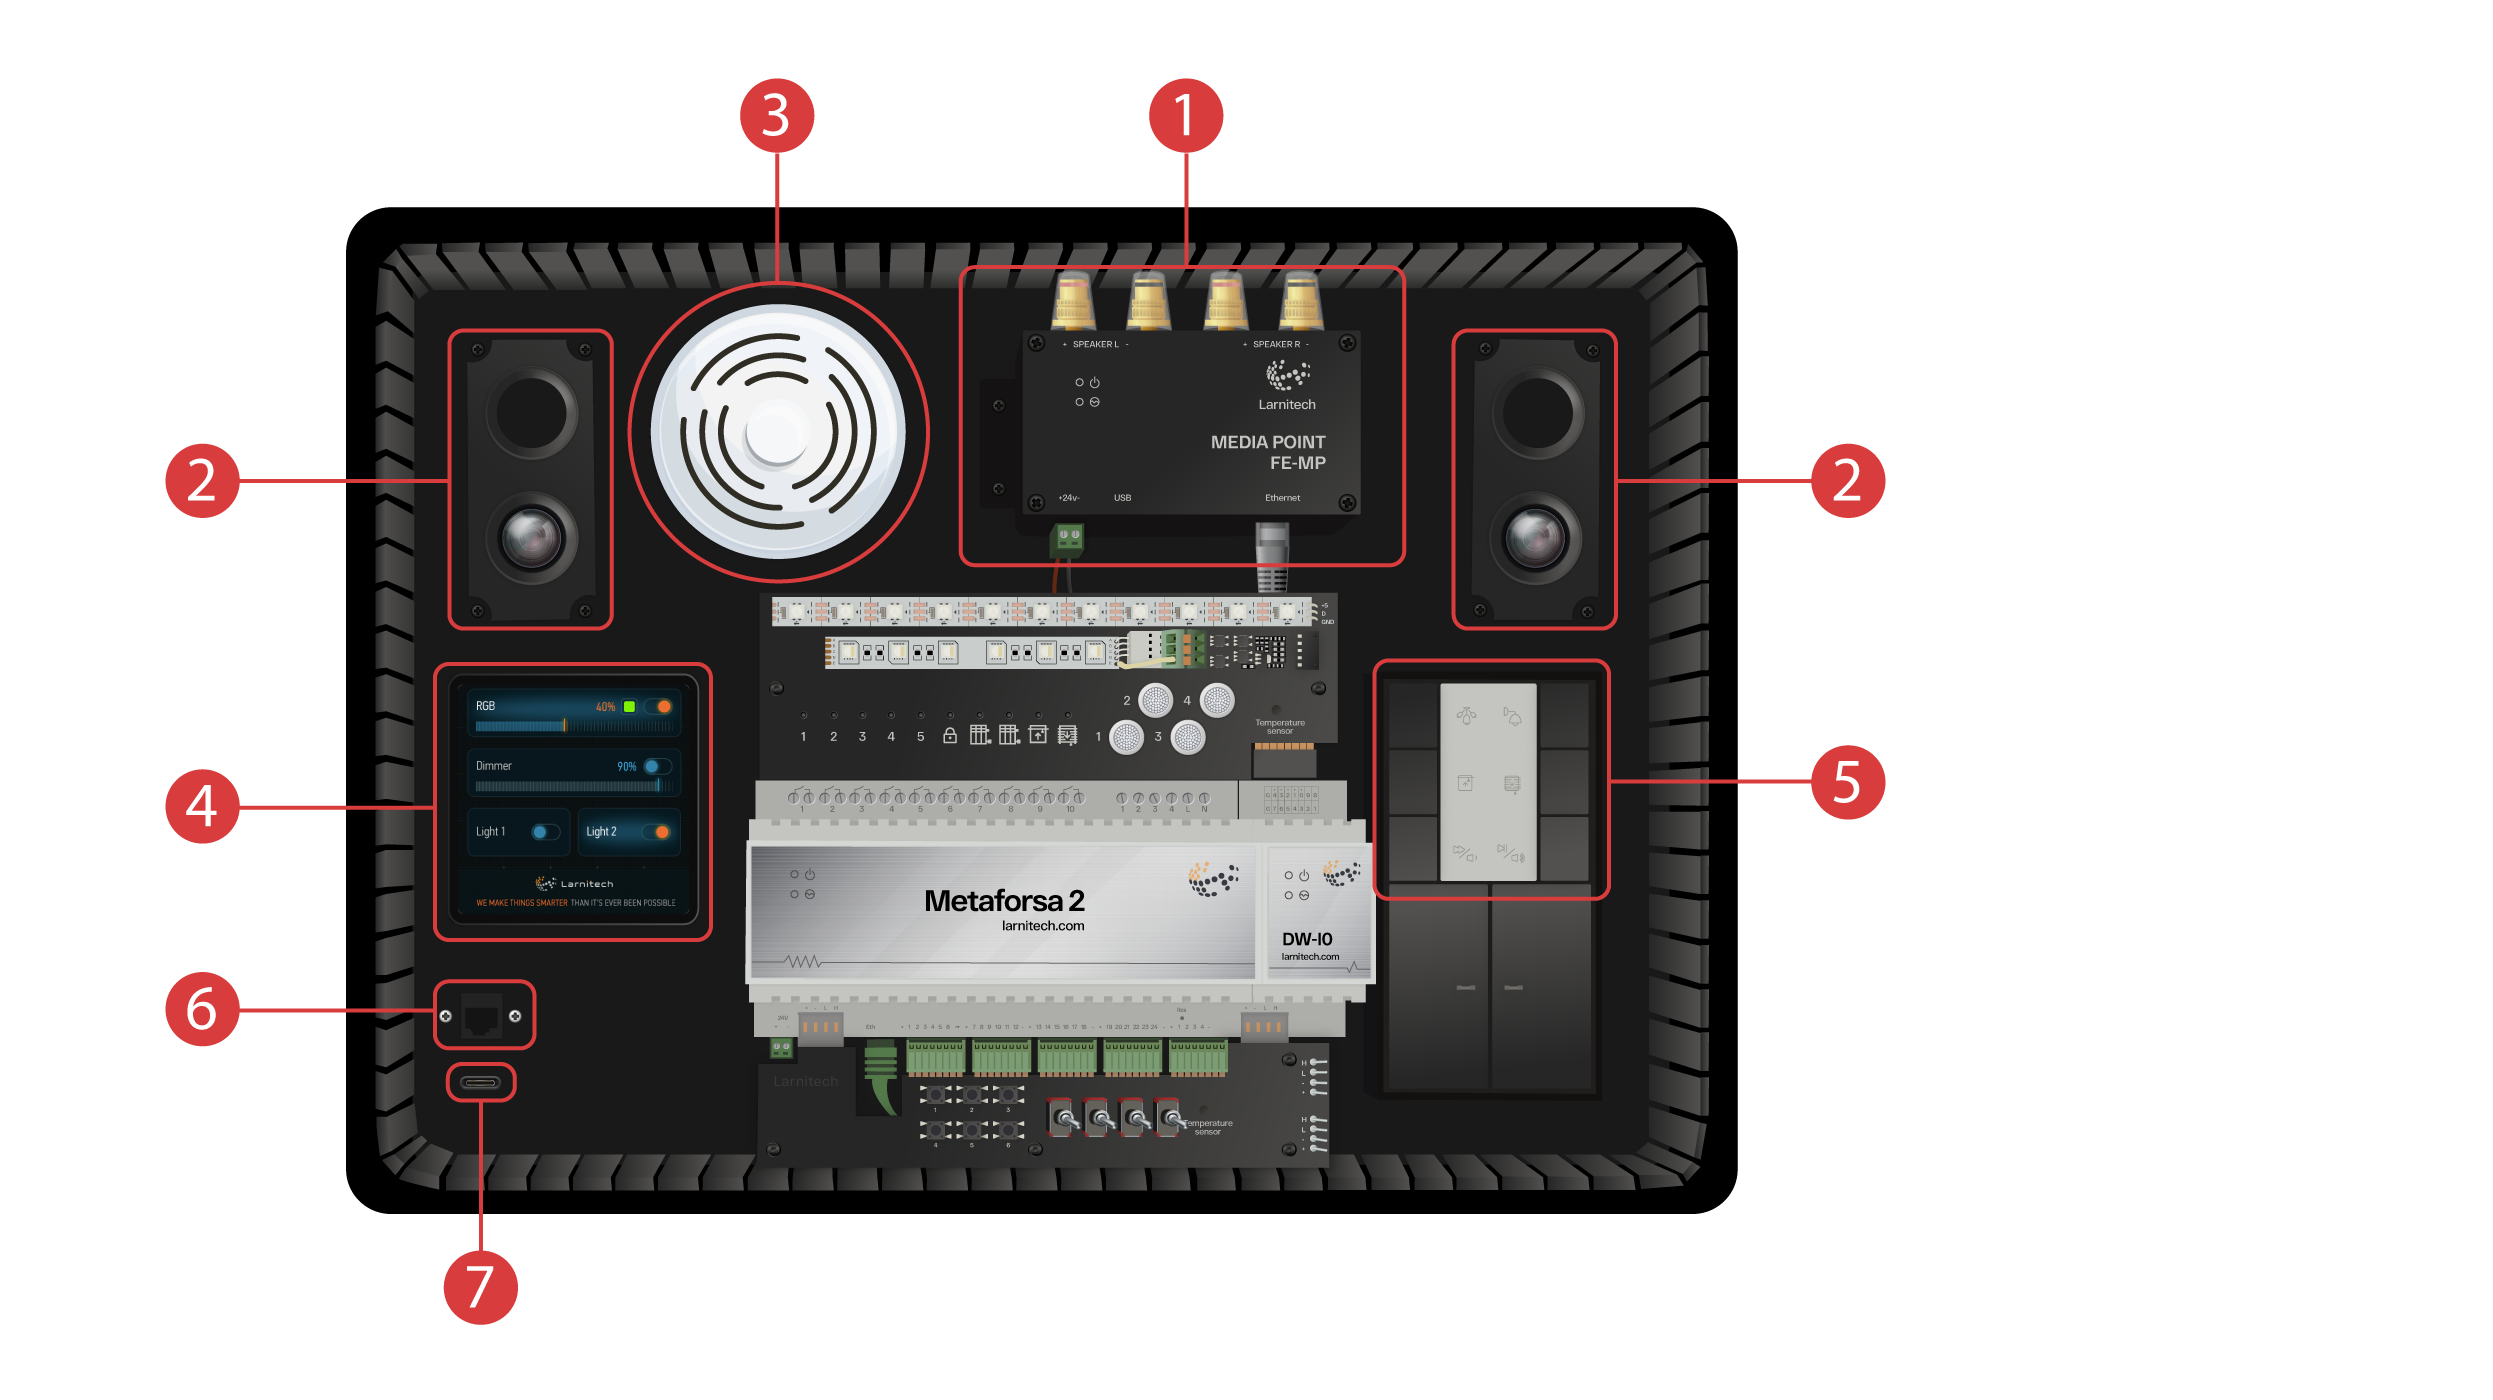
Dobrodošli na naš kanal! Ovaj video je vodič o tome kako brzo i bez napora postaviti Larnitech sistem. Podešavanje će se obaviti uz pomoć demonstracije. Set za obuku uključuje demonstracijsko kućište ① i kutiju sa nekoliko dodatnih predmeta ②.
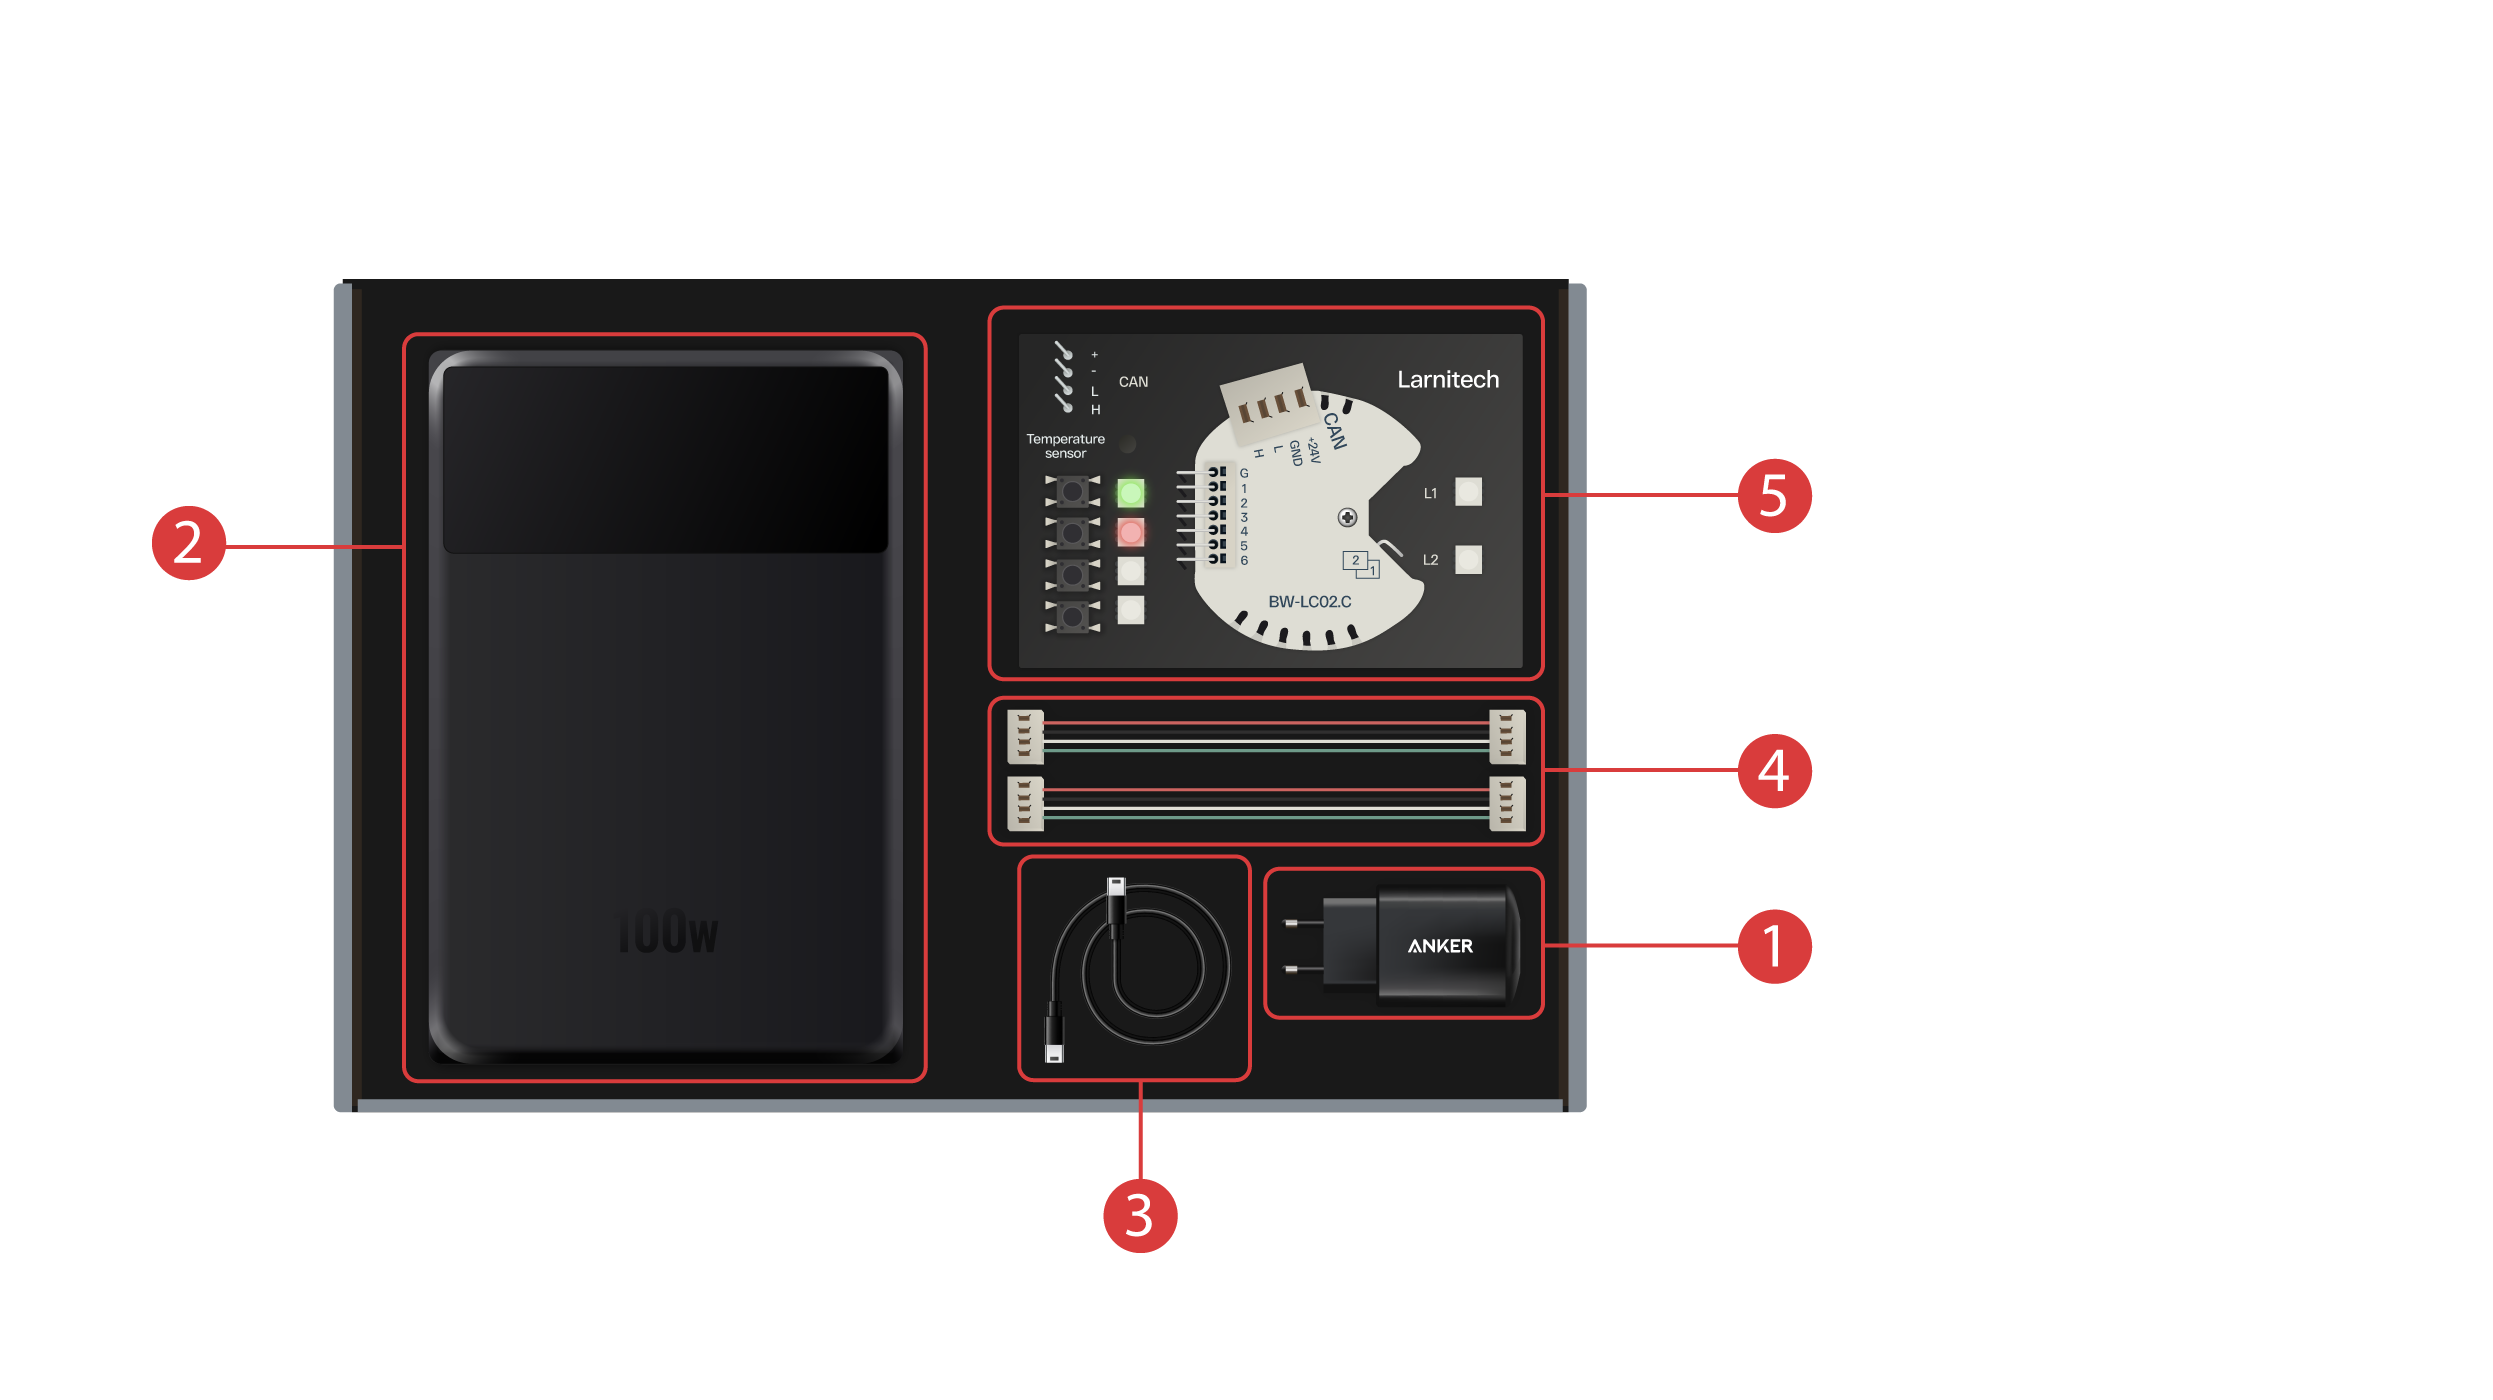
Kutija sadrži sledeće:
① - Jedinicu za napajanje sa USB portom tipa C, koja podržava tehnologiju isporuke napajanja;
② - Power bank sa displejom i izlaznim portom tipa C, koji se može koristiti za napajanje demonstracijskog kućišta;
③ - Tip-C kabl sa indikatorom potrošnje energije;
④ - 2 CAN bus kabla;
⑤ - Demonstracijska tabla sa modulom BW-LC02 sa 2 LED lampice, 4 dugmeta sa pozadinskim osvetljenjem i senzorom temperature koji je povezan na njega.
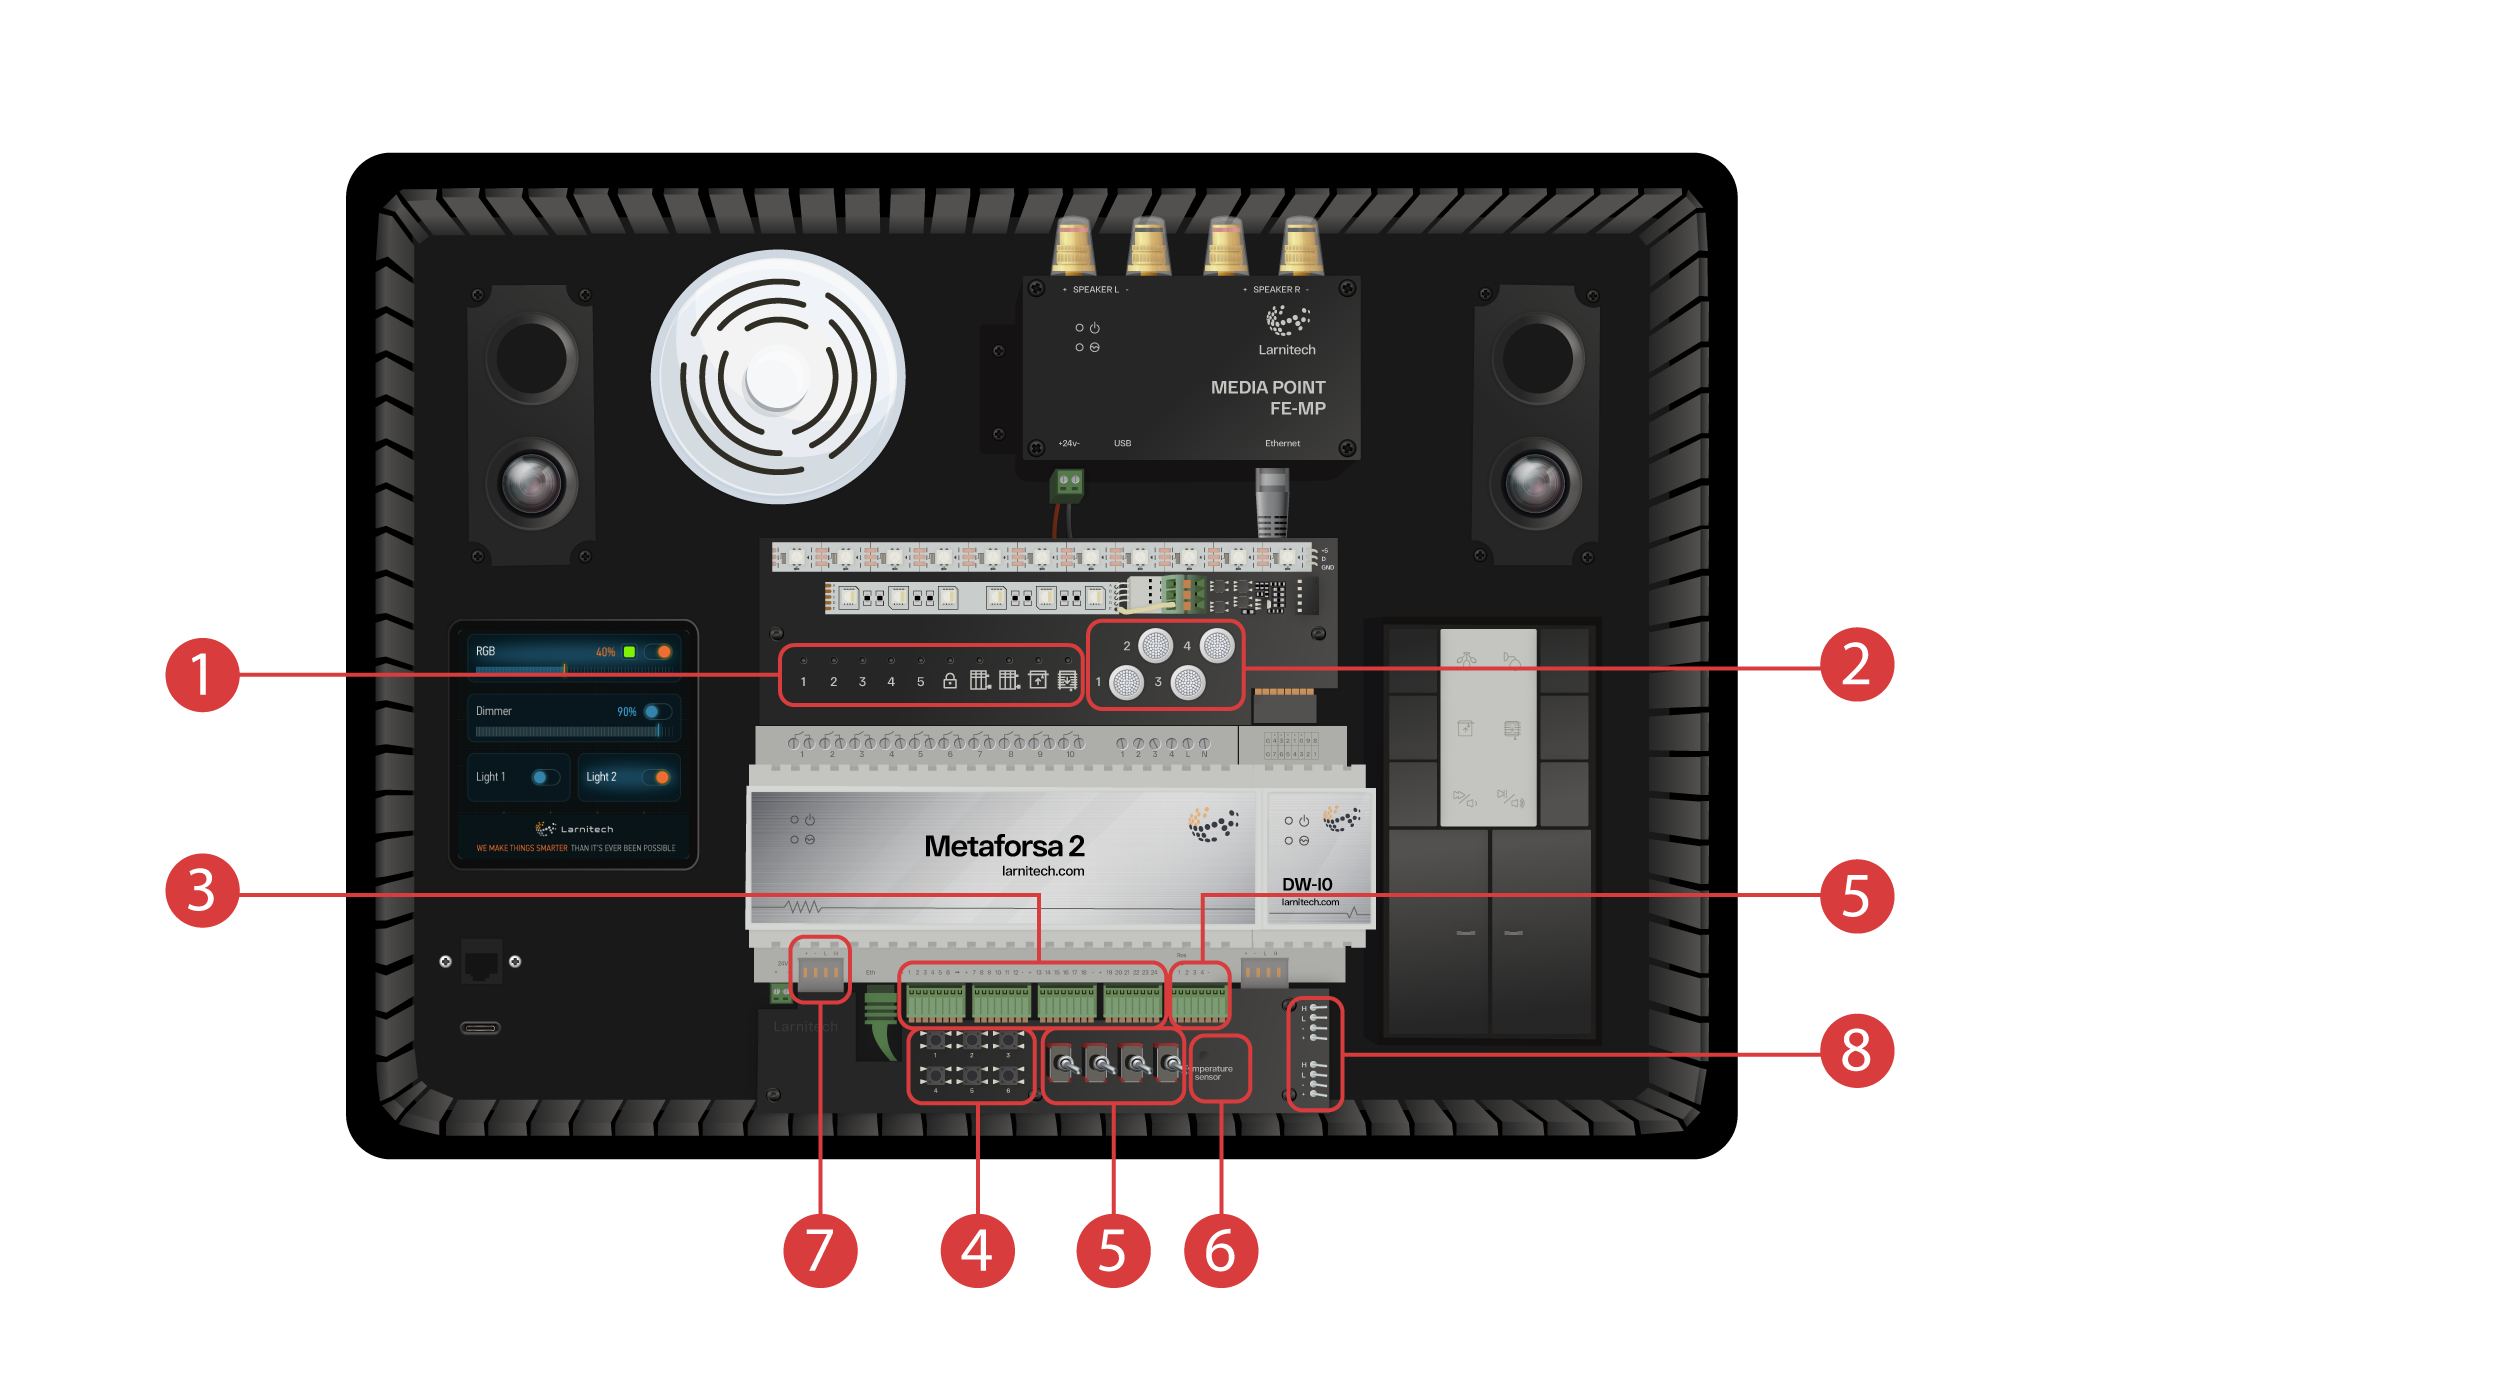
Demonstracijsko kućište sadrži sljedeće elemente: Modul „Metaforsa 2“.
'Metaforsa 2' ima:
① - 10 relejnih kanala sa povezanim LED lampicama koje pokazuju njihov trenutni status;
② - 4 kanala sa mogućnošću zatamnjivanja, sa prigušenim LED svetlima povezanim na njih;
③ - 24 ulazna kanala, sa 6 tipki ④ i 4 prekidača ⑤ spojenih na njih kako bi imitirali različite senzore;
⑥ - Ulazni kanali za temperaturne senzore sa jednim senzorom povezanim na njega;
⑦ - CAN bus za povezivanje dodatnih uređaja. Na njega su spojeni i ostali moduli demonstracijskog kućišta, kao i 2 porta ⑧ za povezivanje eksternih uređaja.
DW-IO modul
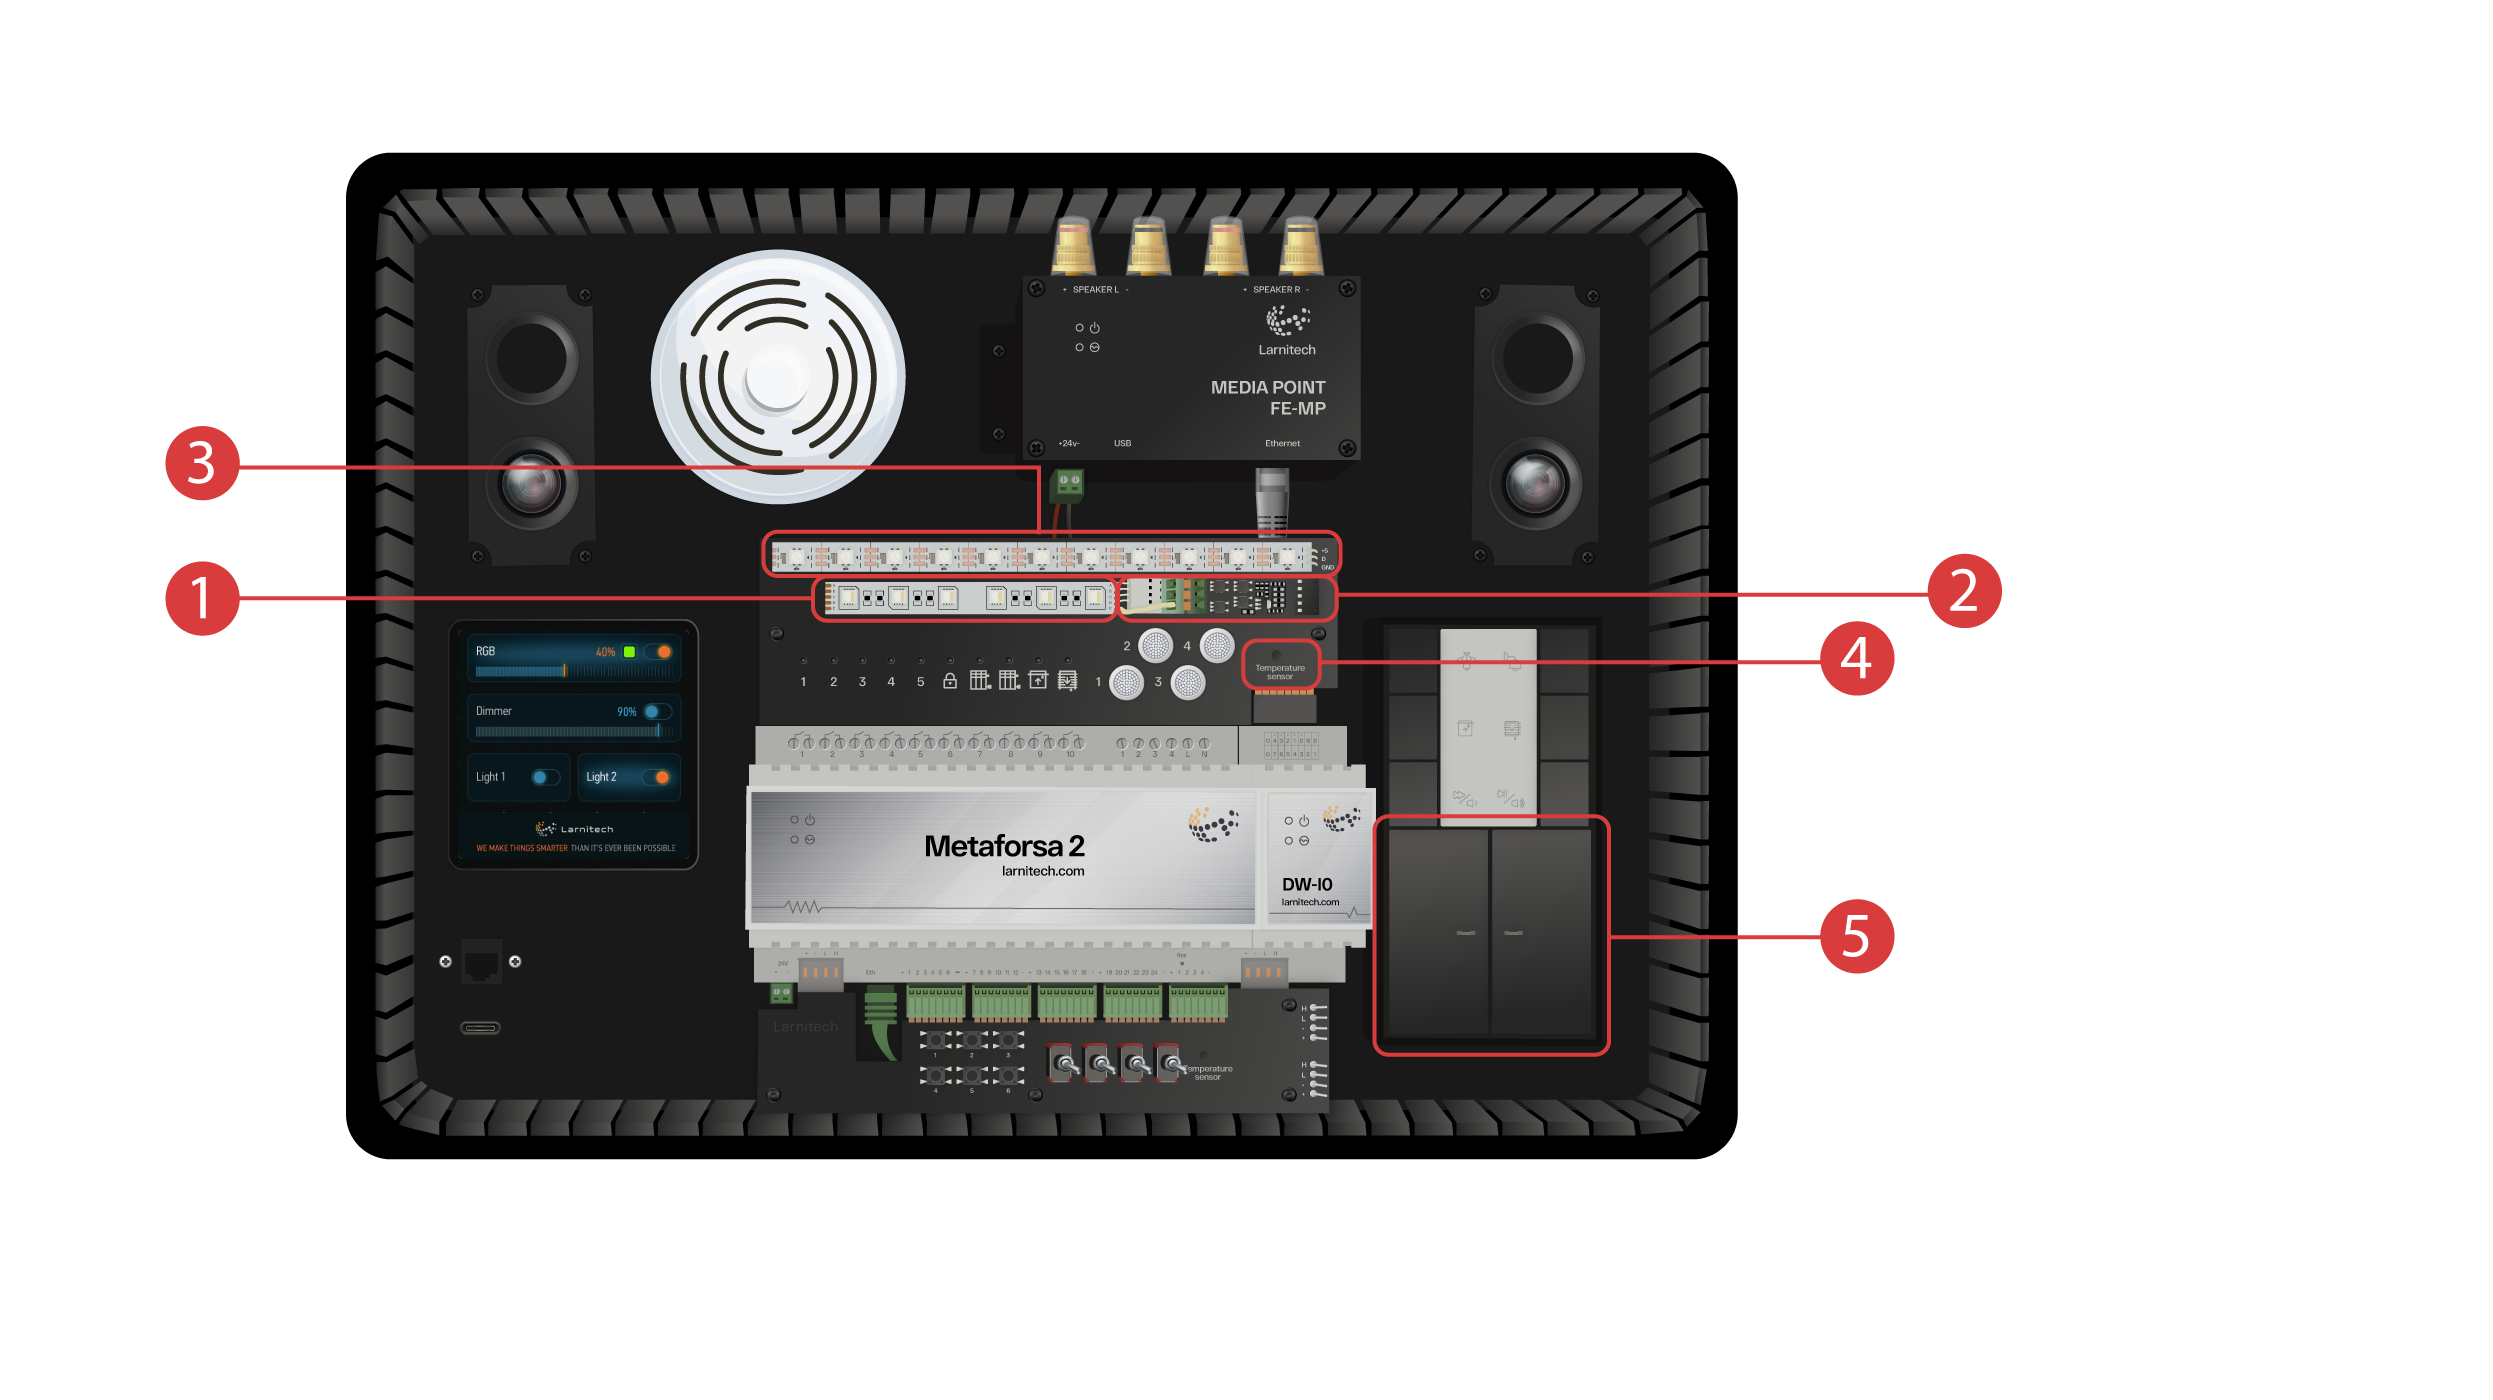
Ovaj modul ima 14 univerzalnih ulazno/izlaznih kanala, na koje su povezane sledeće stavke:
① - 4-kanalna RGBW traka, povezana preko strujnog pojačala AMP5V-4 ②;
③ - Traka sa adresiranim LED svetlima. Svako od ovih LED svetala može zasijati svojom individualnom bojom;
④ - Senzor temperature;
⑤ - I dva dugmeta sa pozadinskim osvetljenjem.
Demonstracijsko kućište također sadrži sljedeće:
① - Media Point FE-MP sa ② dva zvučnika;
③ - Šest u jednom CW-CO2 senzor, koji meri: Nivo pokreta, Osvetljenje, Temperaturu, Vlažnost, Nivo CO2 i koji ima infracrveni predajnik;
④ - Senzorski panel LCP4 od 4 inča koji može prikazati običan interfejs ili interfejs prilagođen zidnim panelima;
Unutar kućišta nalazi se upravljački modul dugmeta BW-SW24 koji ima 24-voltnu JUNG tastaturu sa šest tastera ⑤ spojenu na njega;
I Wi-Fi ruter, koji se može povezati na internet ili preko ethernet porta ⑥ na prednjoj ploči kućišta ili putem dostupne Wi-Fi mreže;
Za napajanje postoji Tip-C port ⑦, koji se nalazi na prednjoj ploči.
Sva oprema ugrađena u demonstracijsko kućište napaja se na 20 volti, što je apsolutno sigurno za korisnika.
Povežite kabl za napajanje i Ethernet kabl. Ako nemate mogućnost povezivanja putem Etherneta, kasnije u ovom videu ćemo vam pokazati kako spojiti ugrađeni ruter na vašu Wi-Fi mrežu.
Da biste nastavili, aplikacija Larnitech mora biti instalirana na vašem pametnom telefonu ili tabletu. Samo skenirajte prvi QR kod sa vrha vašeg kućišta.
Ako se nakon instaliranja i pokretanja aplikacije veza ne uspostavi automatski, potrebno je da se povežete na Wi-Fi mrežu „Larnitech_case_5G“ uz pomoć svog mobilnog uređaja. Zatim pokrenite aplikaciju i skenirajte prvi QR kod u odjeljku "Veze".
Možda ćete morati isključiti prenos podataka na svom mobilnom uređaju ako demonstracijski set nije povezan na internet.

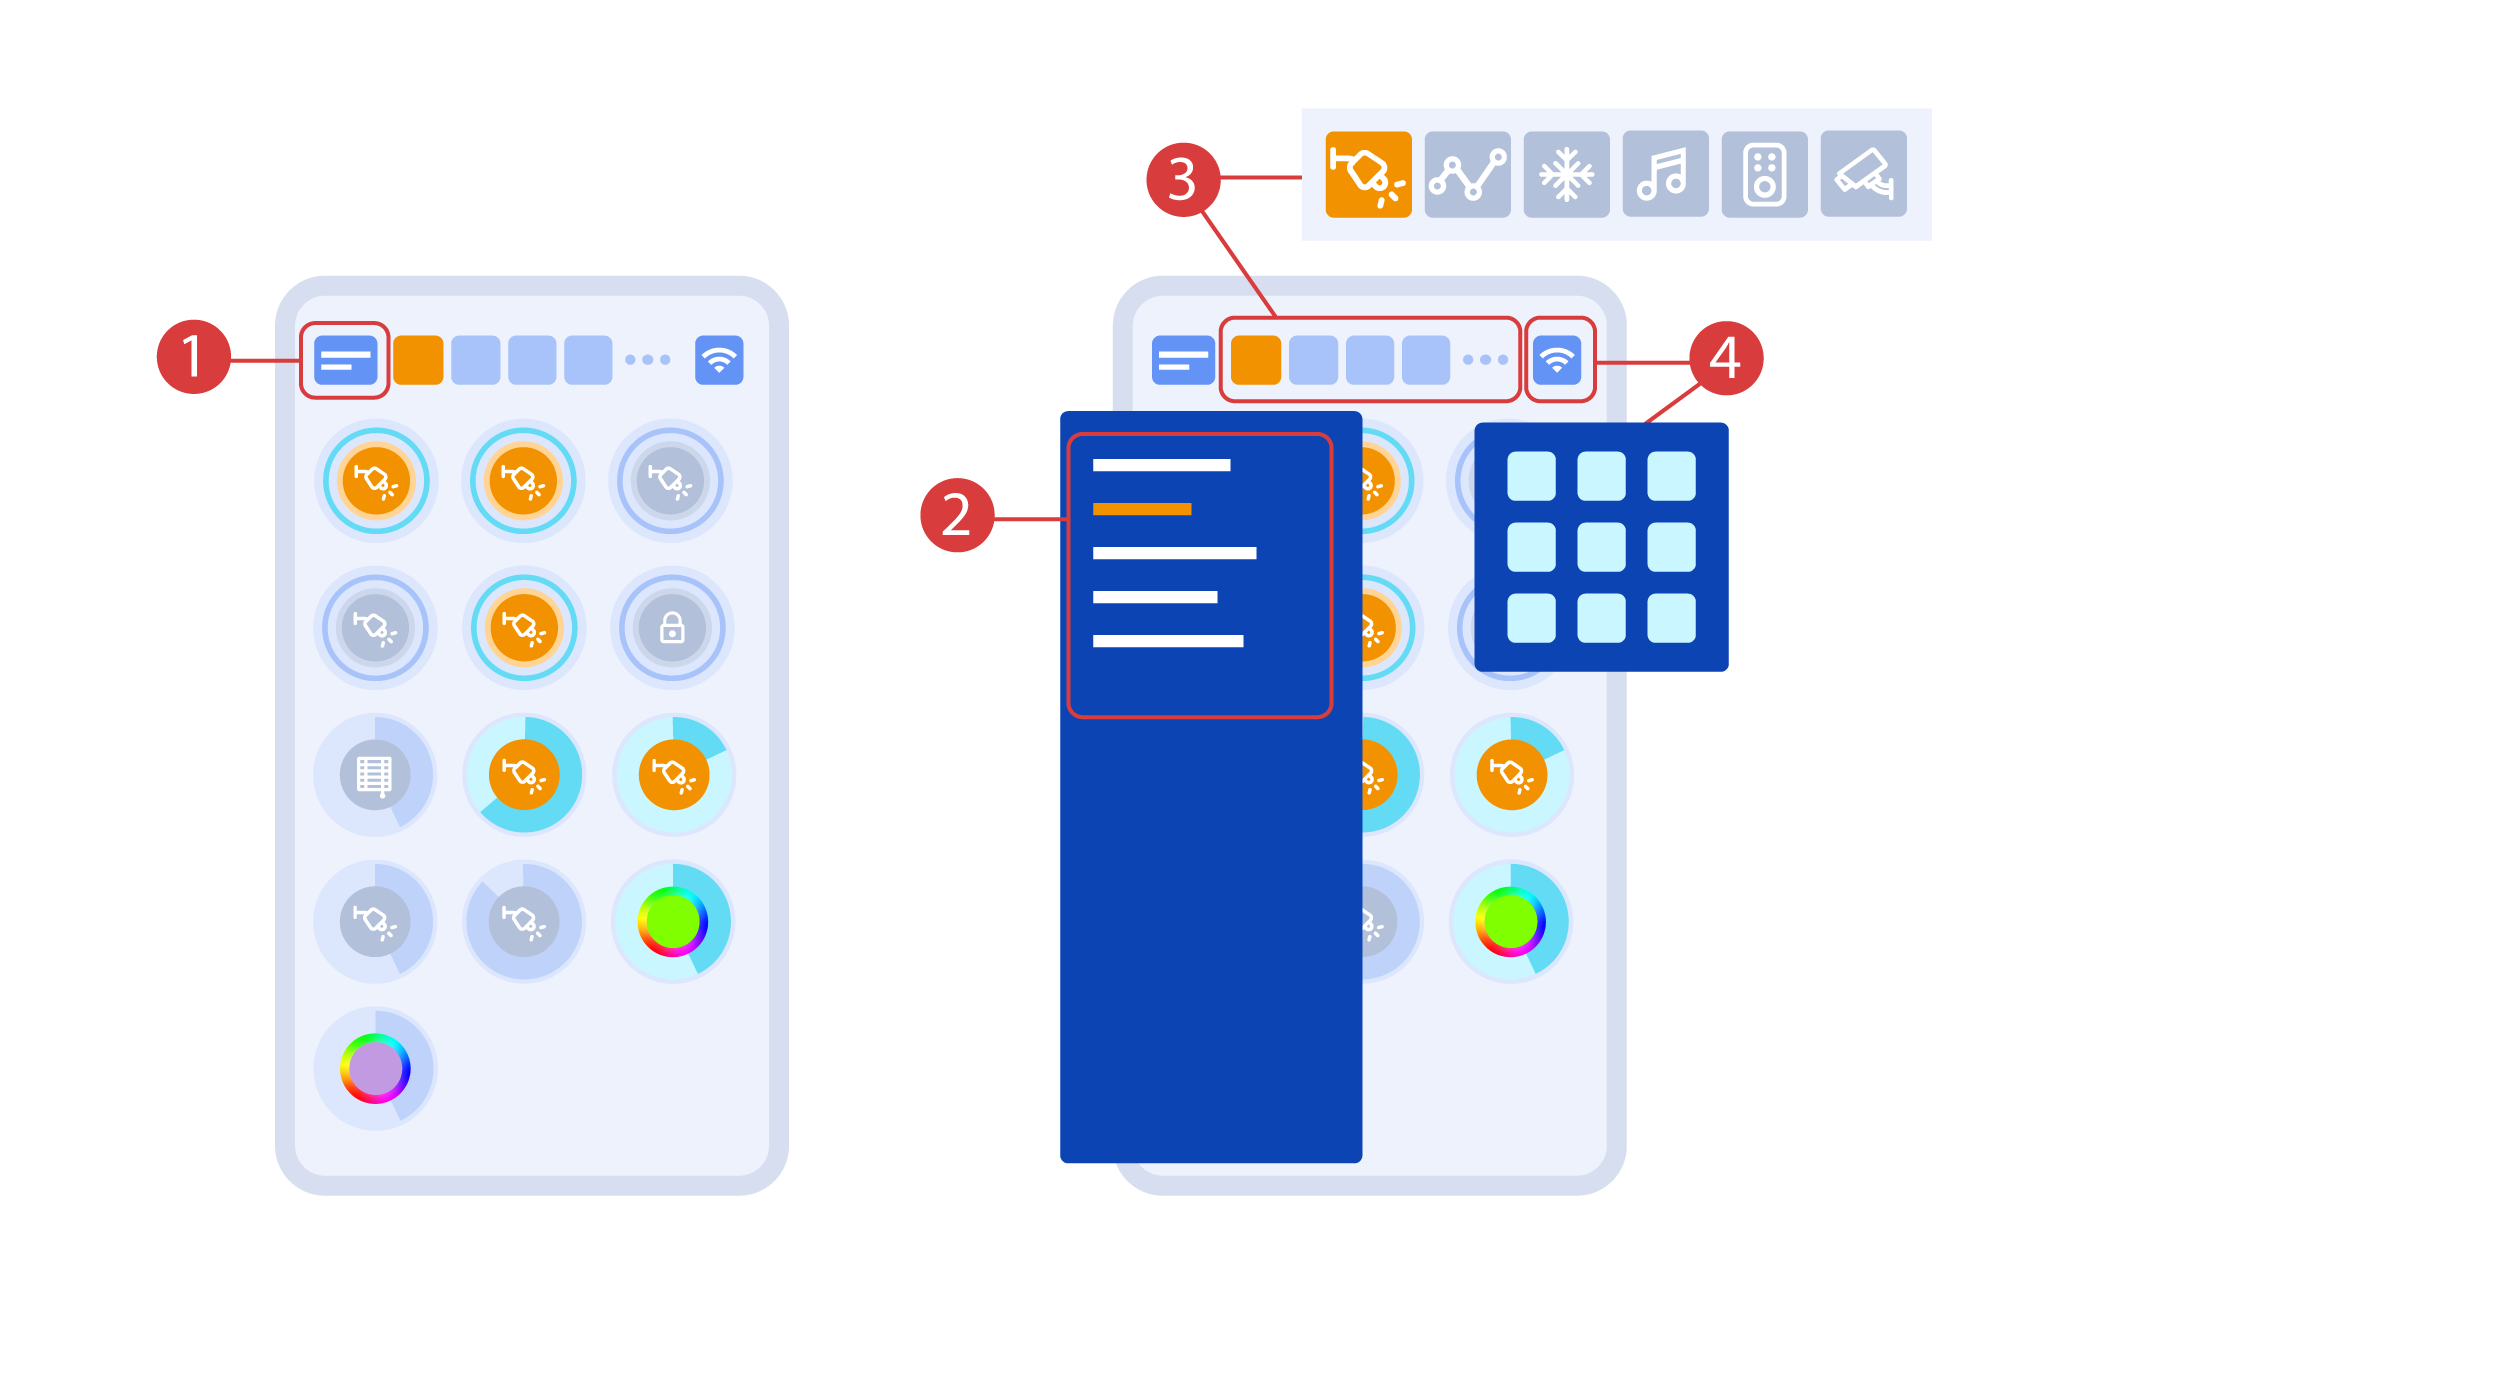
Glavni ekran aplikacije ima nekoliko ključnih elemenata. U gornjem levom uglu nalazi se ’Izbor Oblasti’ meni ①.
Samo kliknite na jedno od dostupnih oblasti kako biste njime upravljali ②.
atim, tu su ikone koje vam omogućavaju da odaberete izvršitelje, senzore, klimu, multimediju, daljinske upravljače i kamere ③. U desnom uglu se nalazi ikona za dodatni meni ④. Unutar ikone možete videti i status trenutne veze.
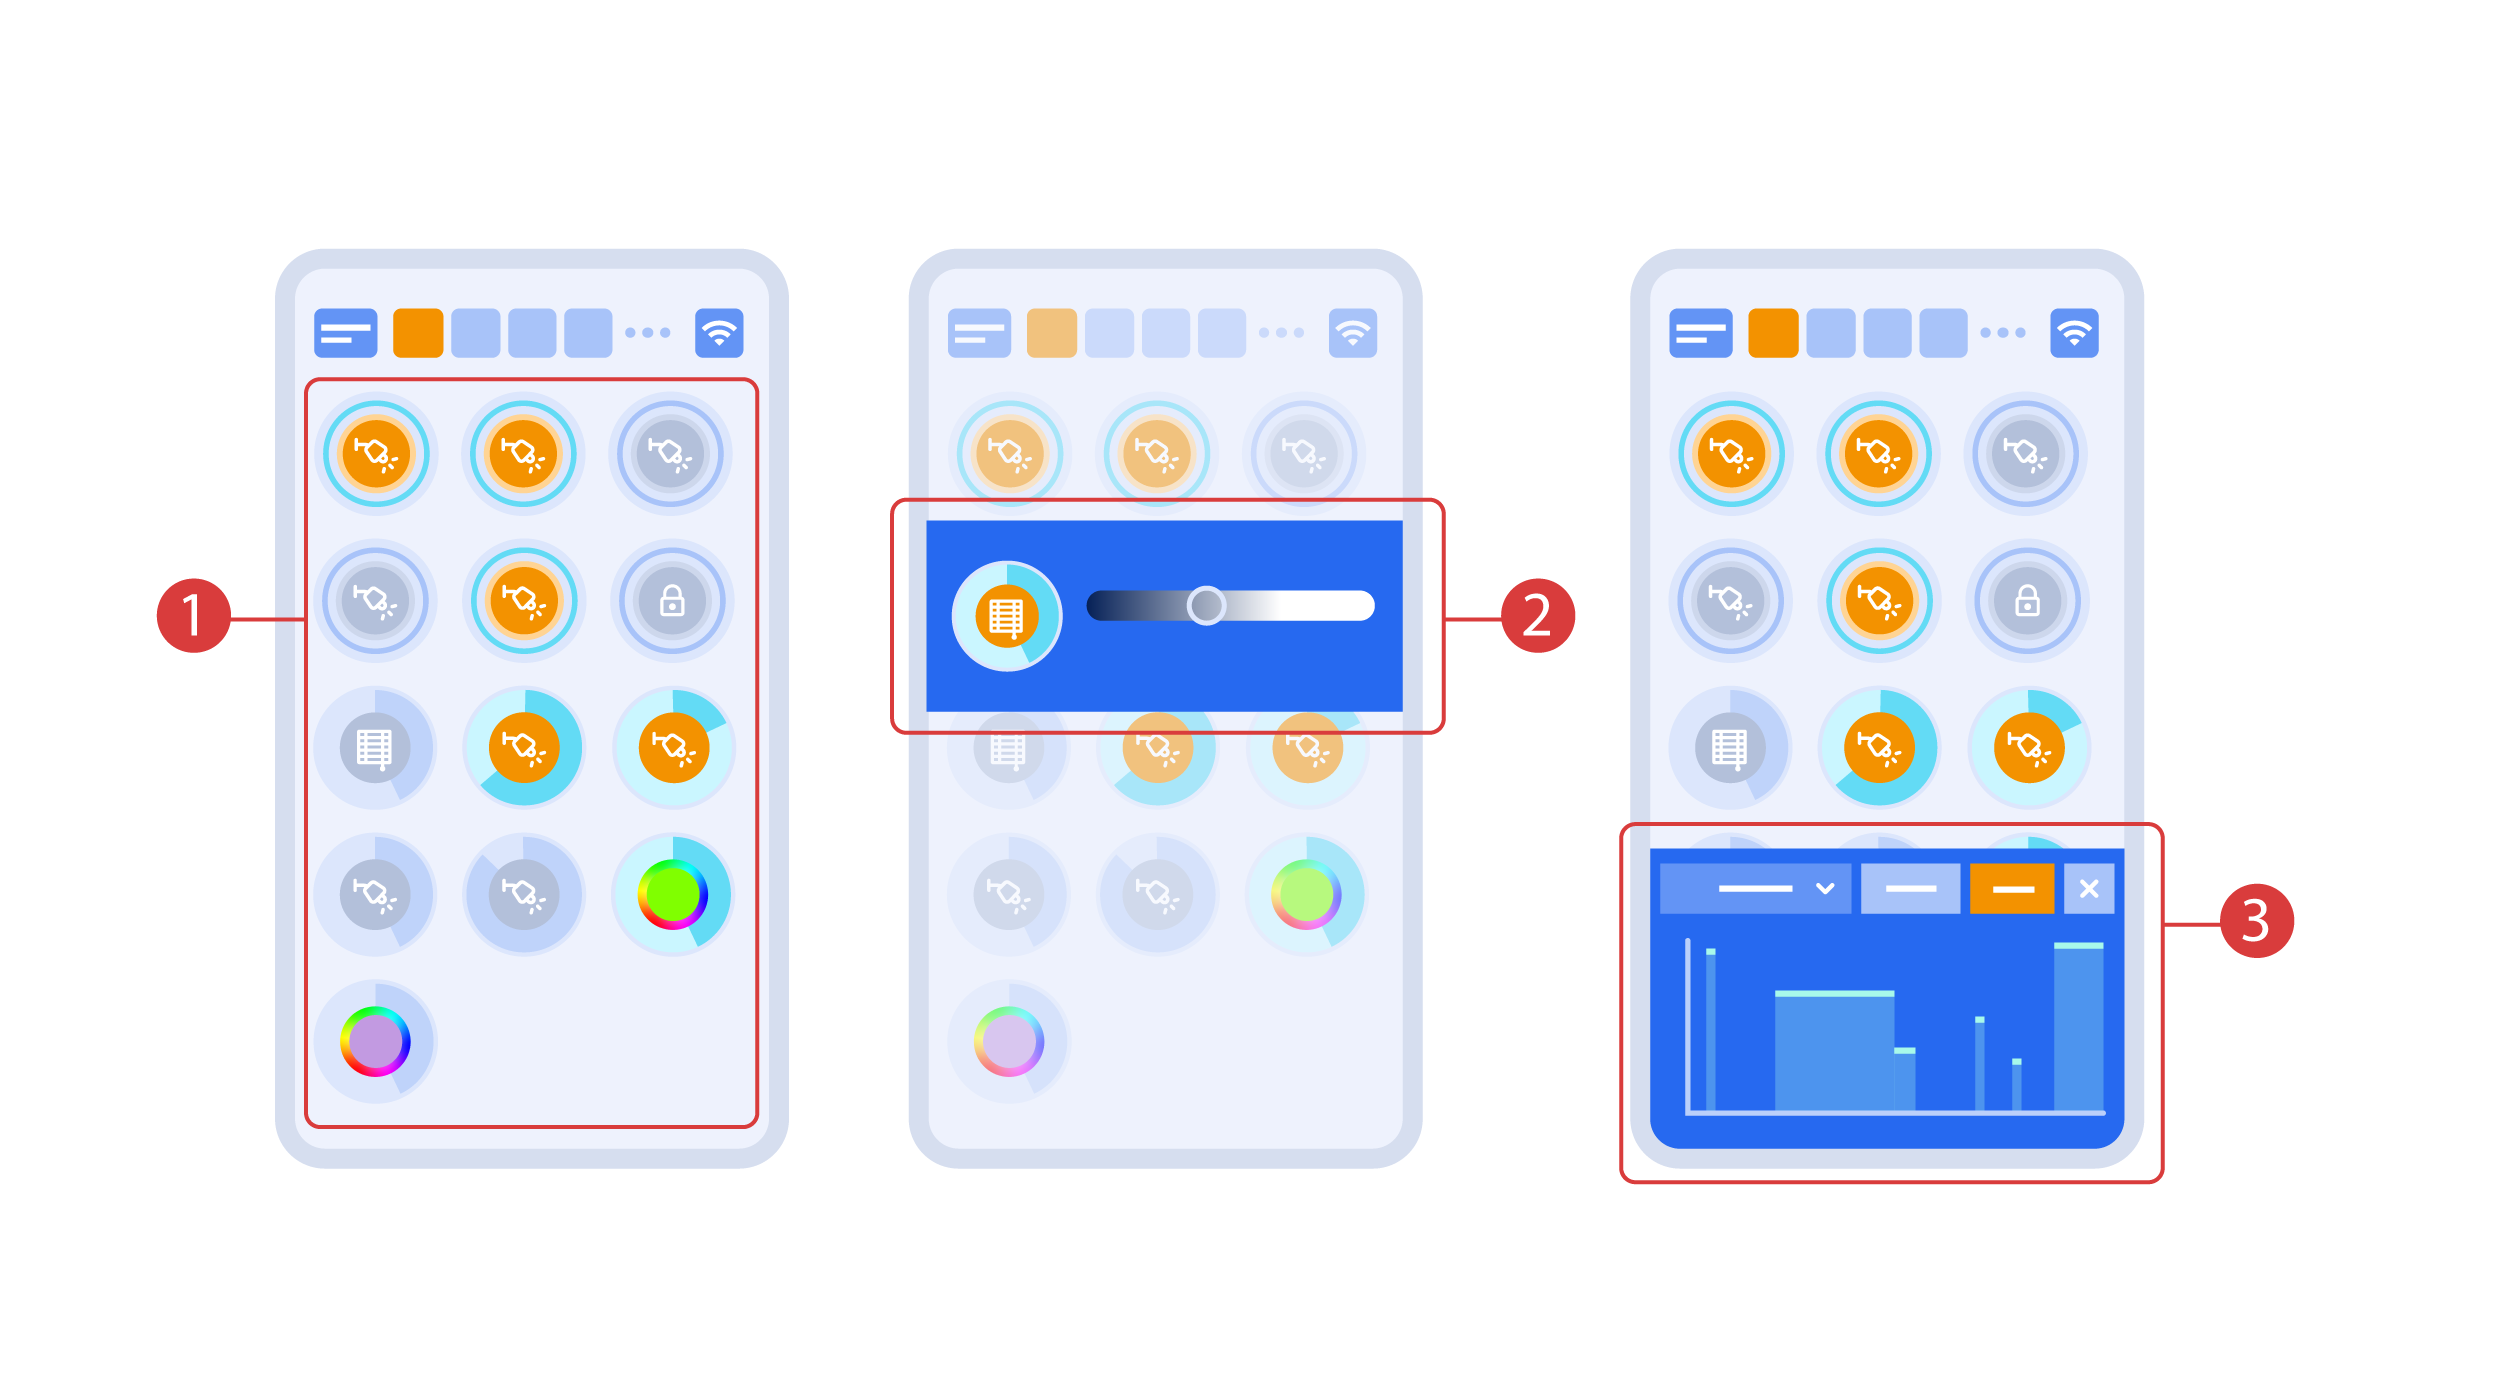
Turning the executors ① on or off is done with a simple click. In order to change the level of lighting ②, color of lights or the position of the blinds, use a double click. In order to access the status history ③ of this executor or sensor, press and hold the icon for one second.
A short press of the physical buttons on the panel turns the light on or off. Press and hold the button to change the light brightness.
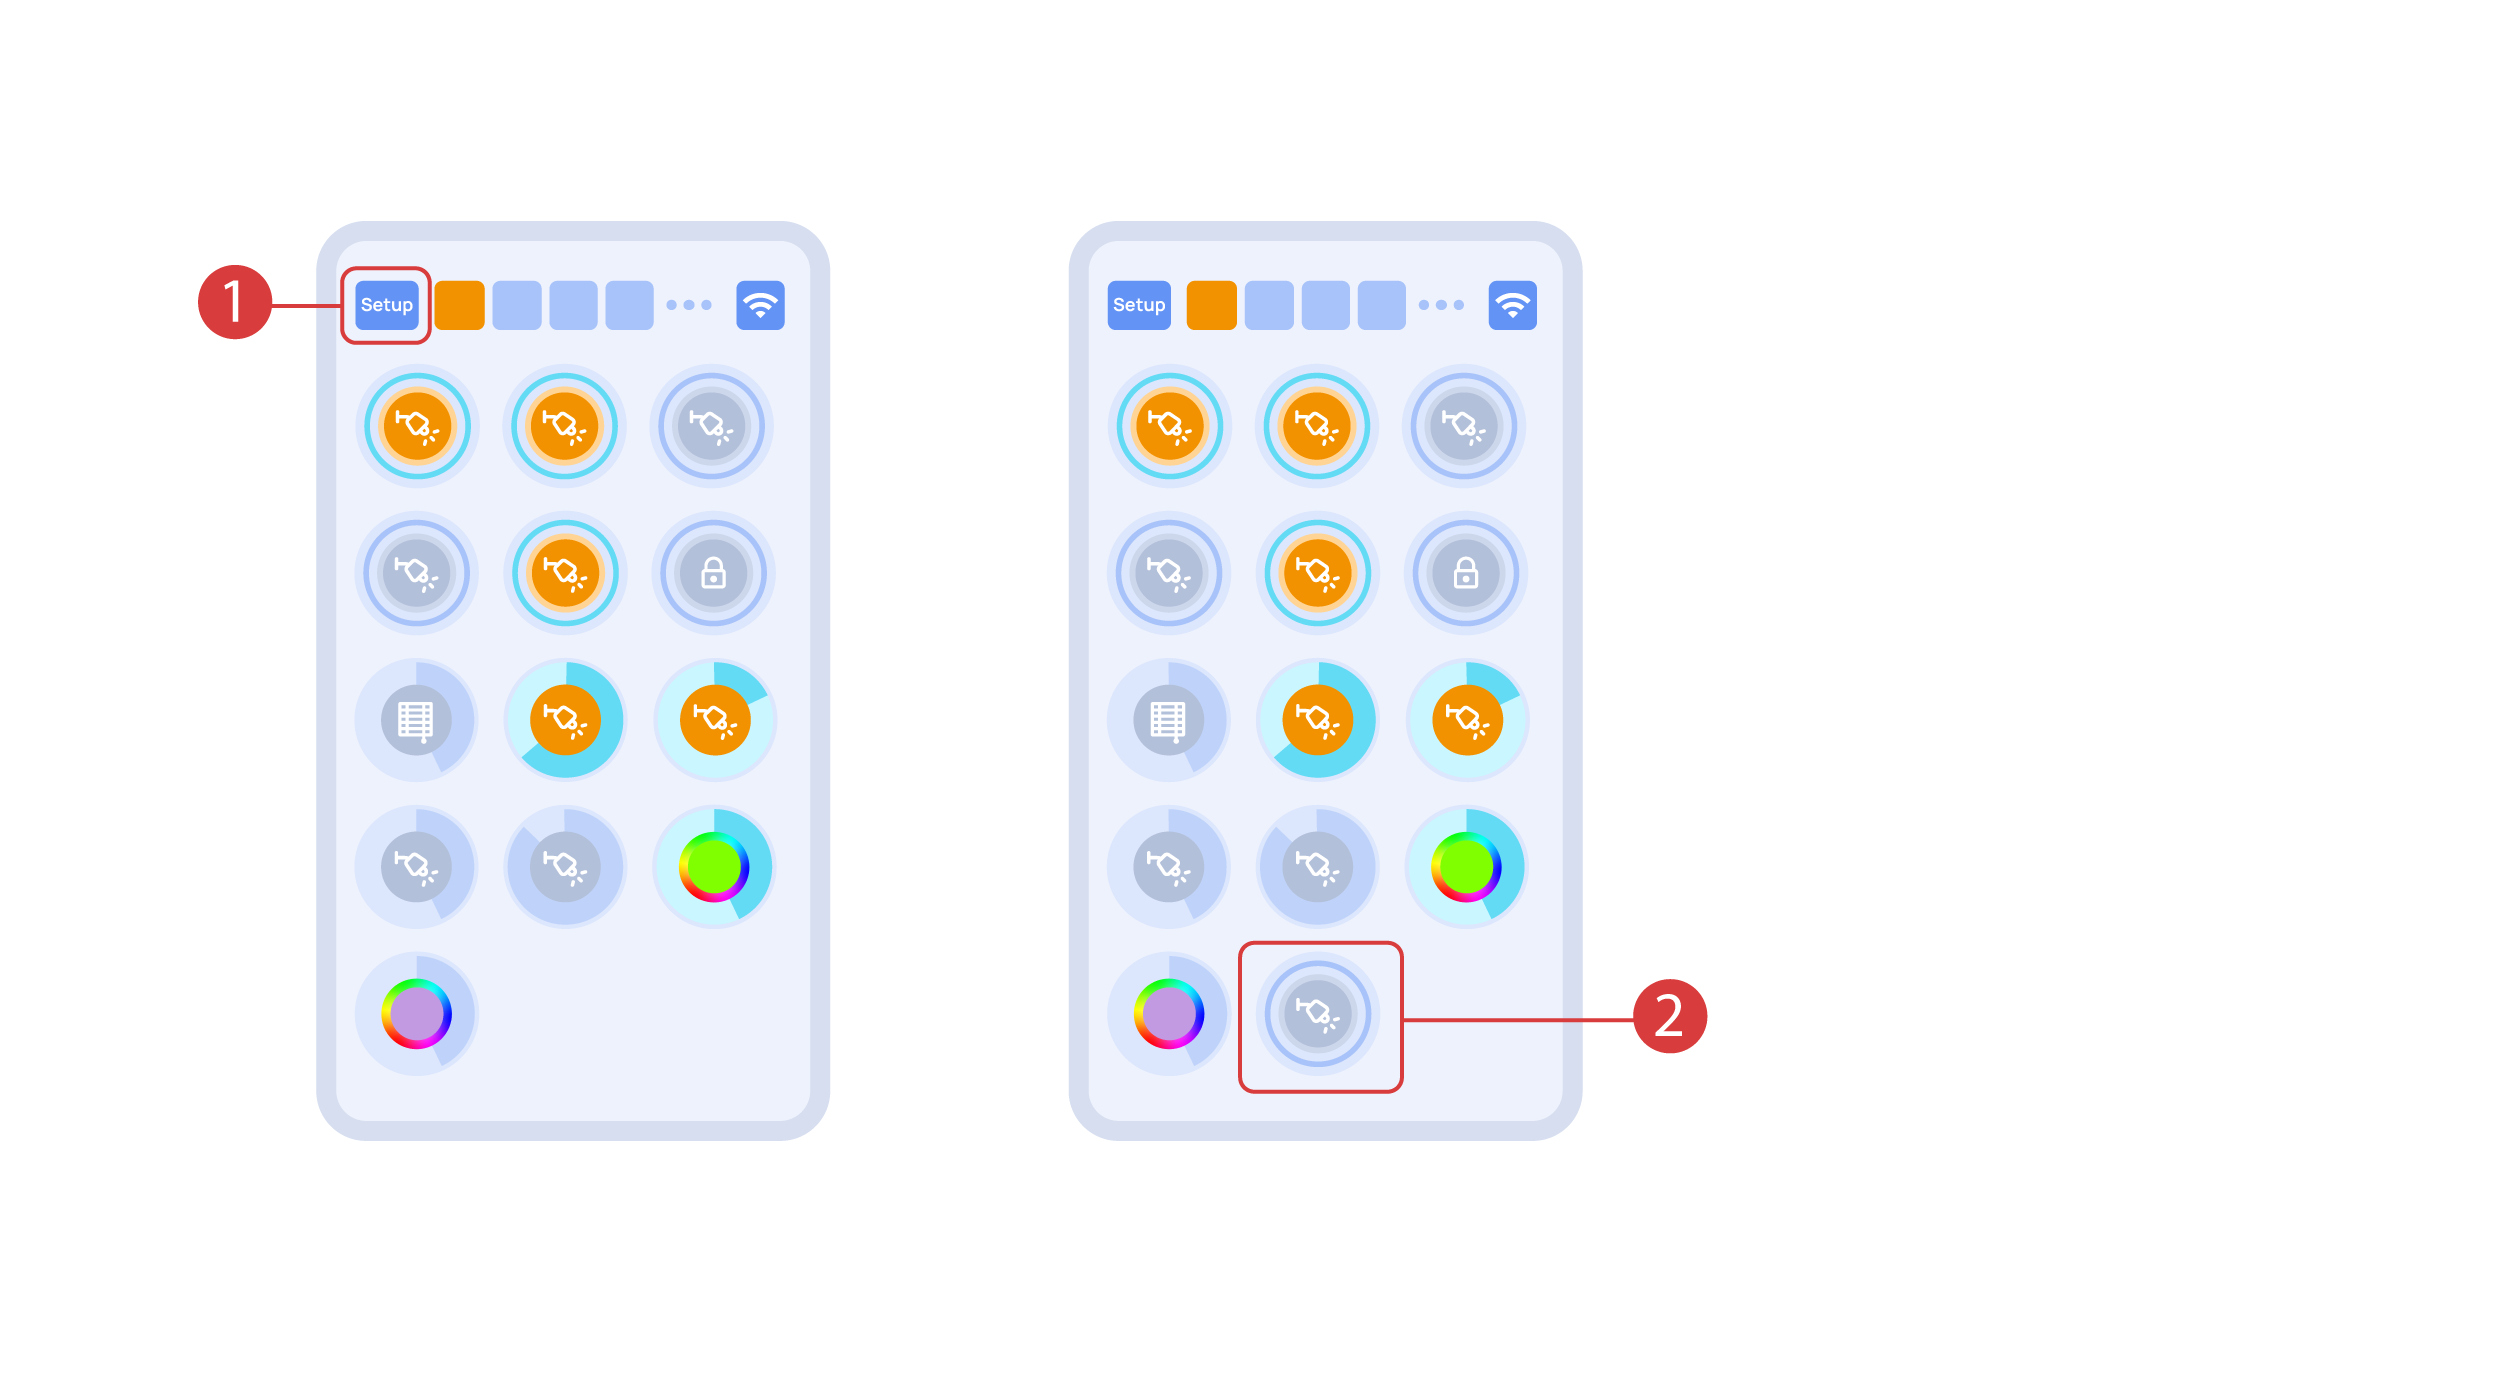
In order to demonstrate the Plug and Play function, we open the executors in the Setup area ① and connect the module to the CAN bus. The system automatically detects the new module and adds it to the ‘Setup’ area, ② where we are able to control the new module instantly.
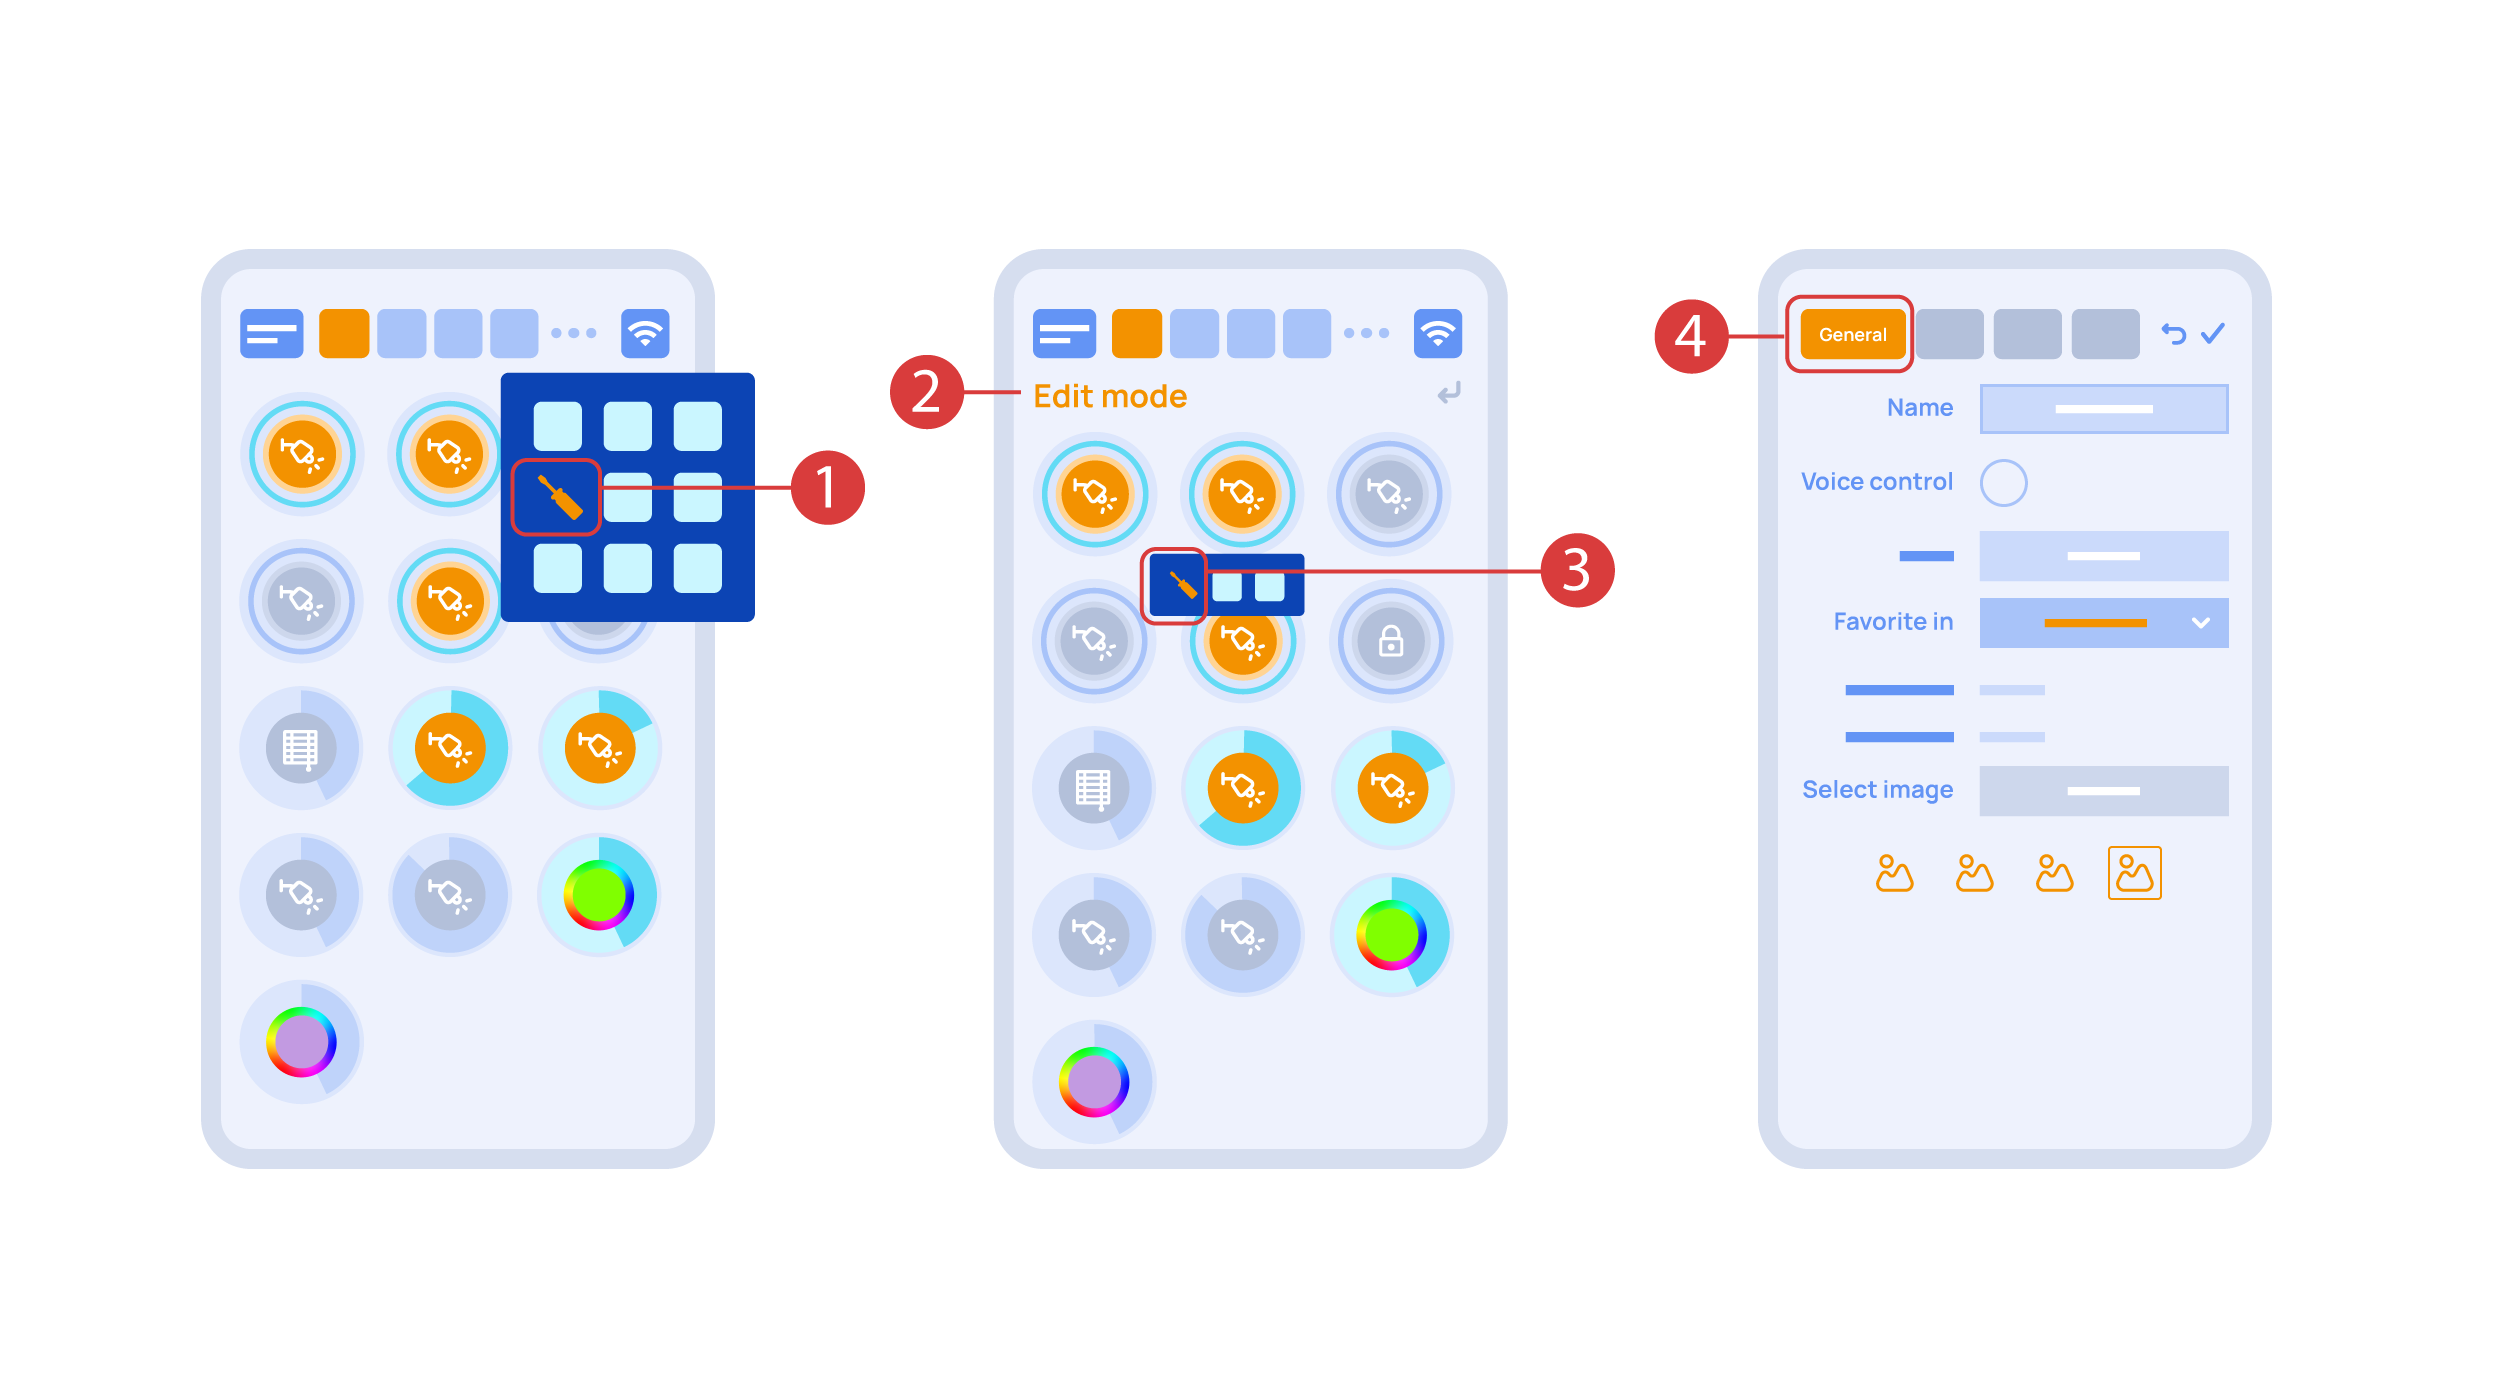
Now we can set up these executors. In order to do this, enter the additional menu ① and activate the edit mode, by pressing the appropriate icon .
Now we are in the edit mode ②, which can be seen from the appropriate notification in the top part of the screen. In this mode, when we press and hold an icon, we can move it among other elements and place it into another Room by placing it in the Area-choosing Menu and then choosing the area that we need. A long press ③ of the element starts the menu, from which we set up the current element.In the ‘General’ ④ section we can change the name of the element, add a voice command for it, change an icon or add the element to ‘Favorites’.
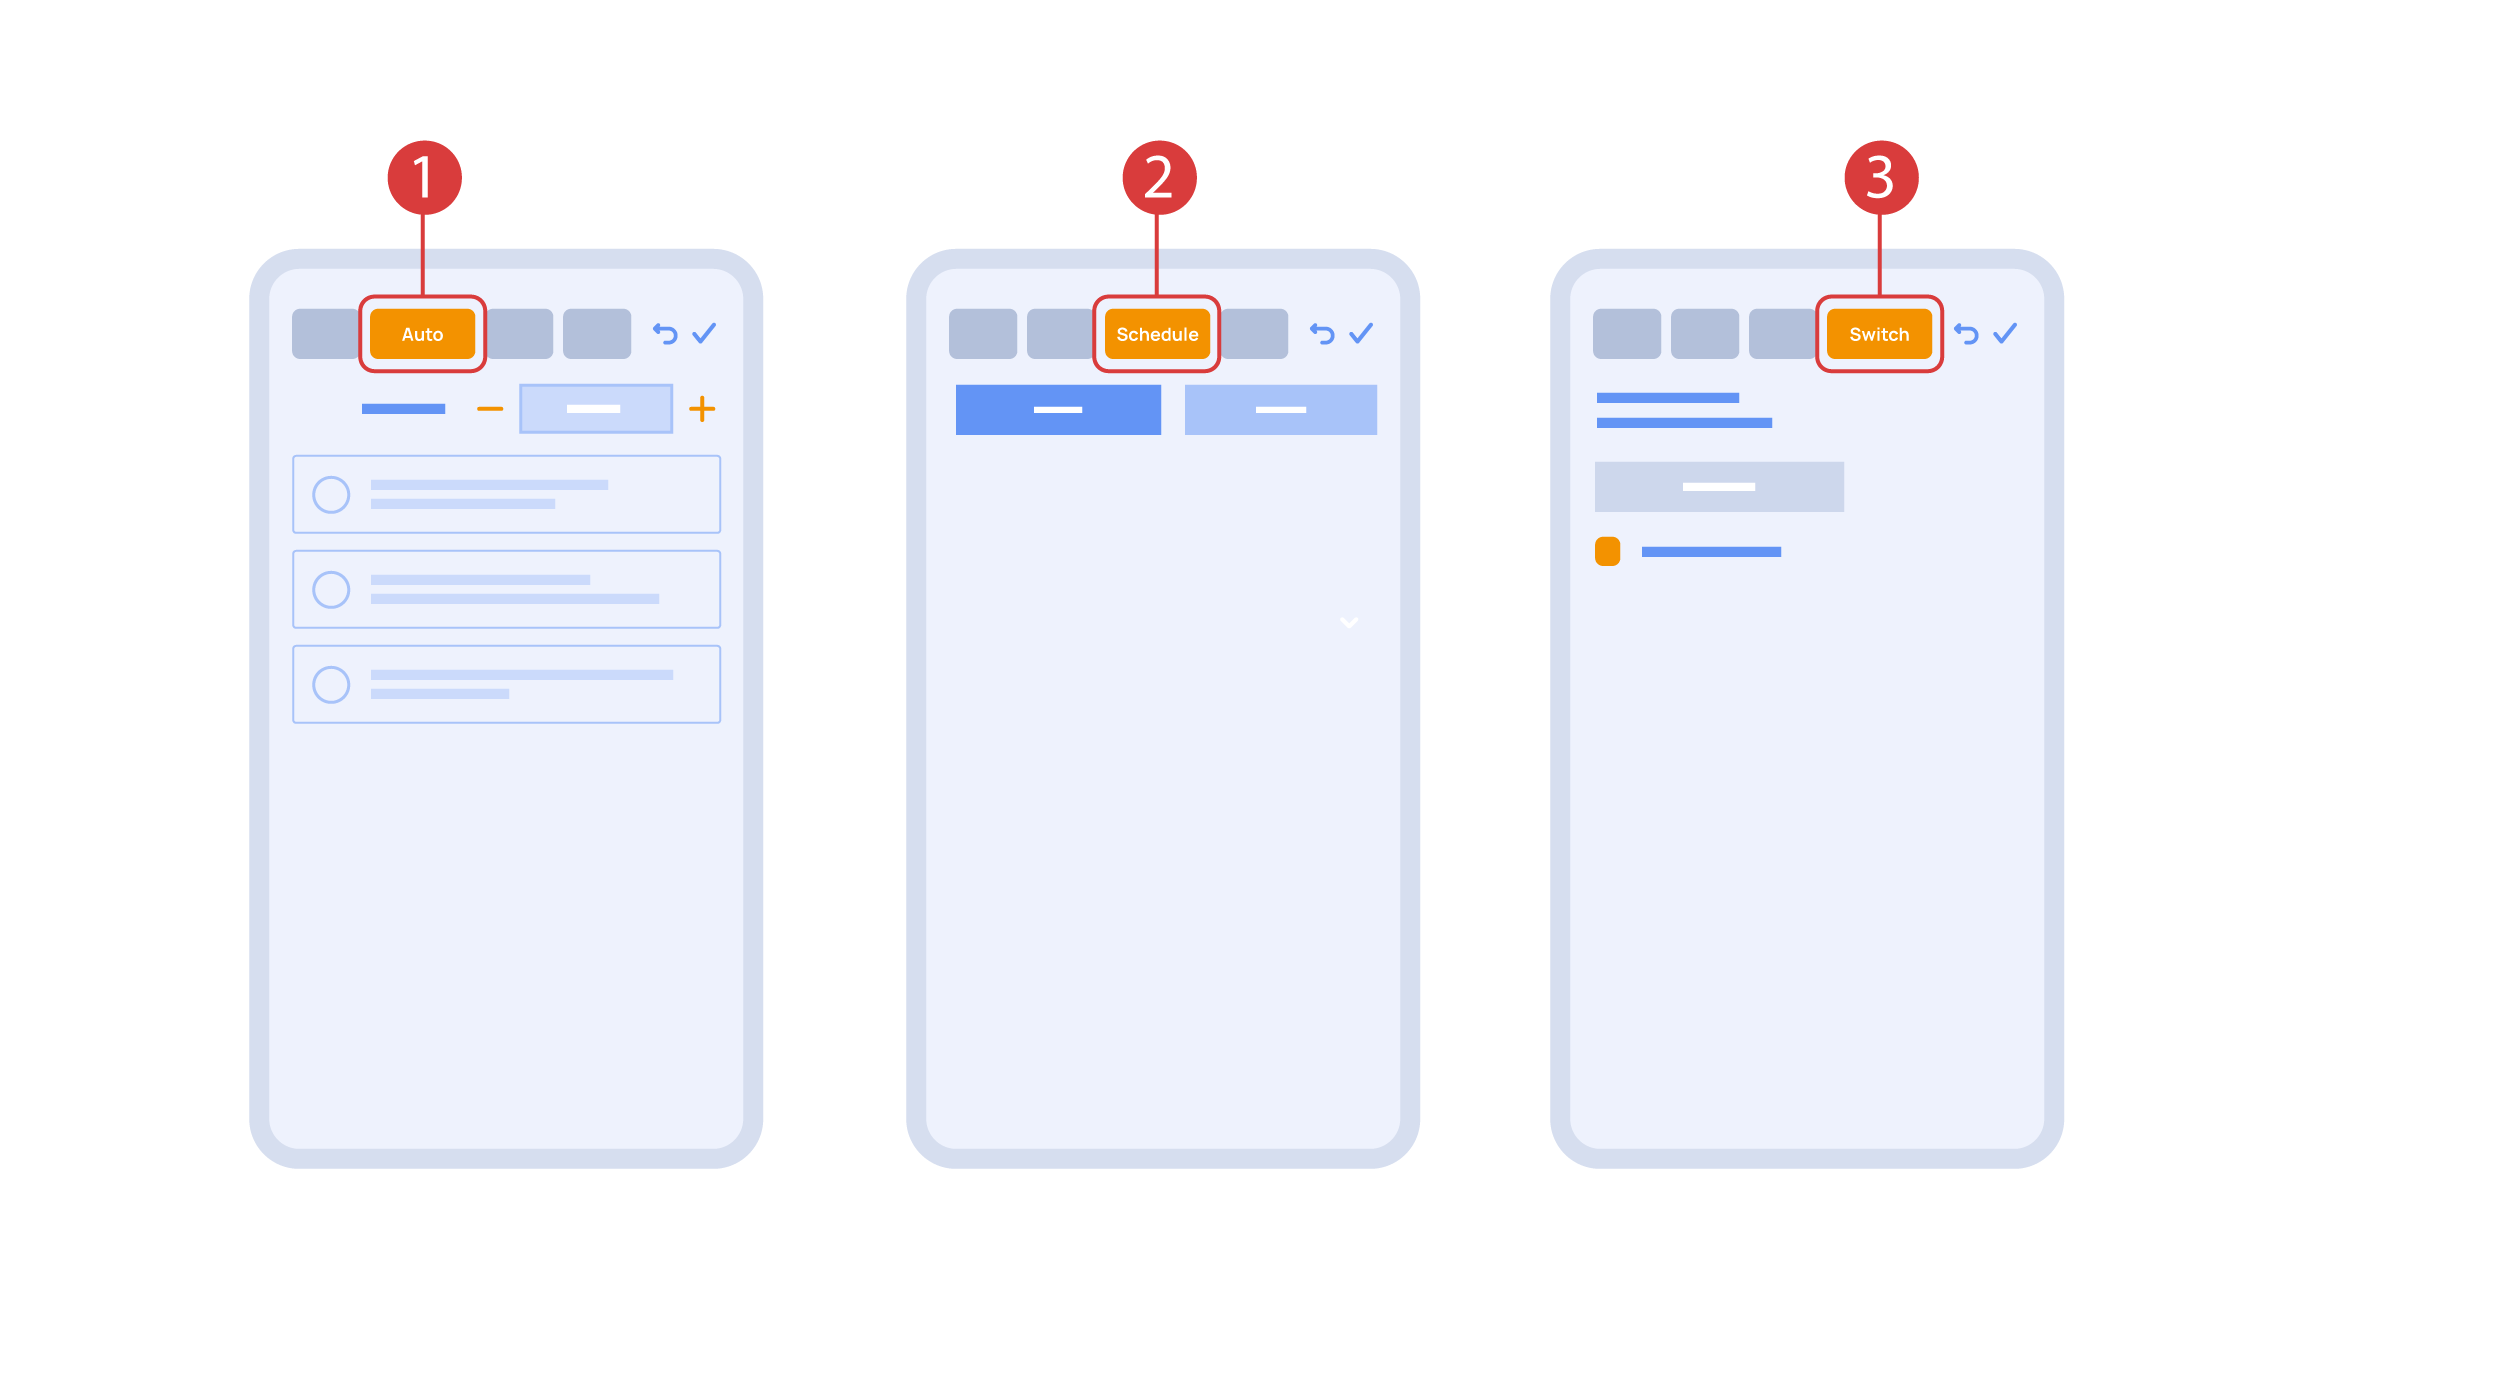
‘Auto’ section ① lets us activate the automation with a few clicks, as well as set up its parameters.
In the ‘schedule’ section ②, you can determine the schedule when the given element will turn on or off, including by using the time of the setting and rising of the sun.
The ‘Switches’ tab ③ lets you bind a button to control the executor.
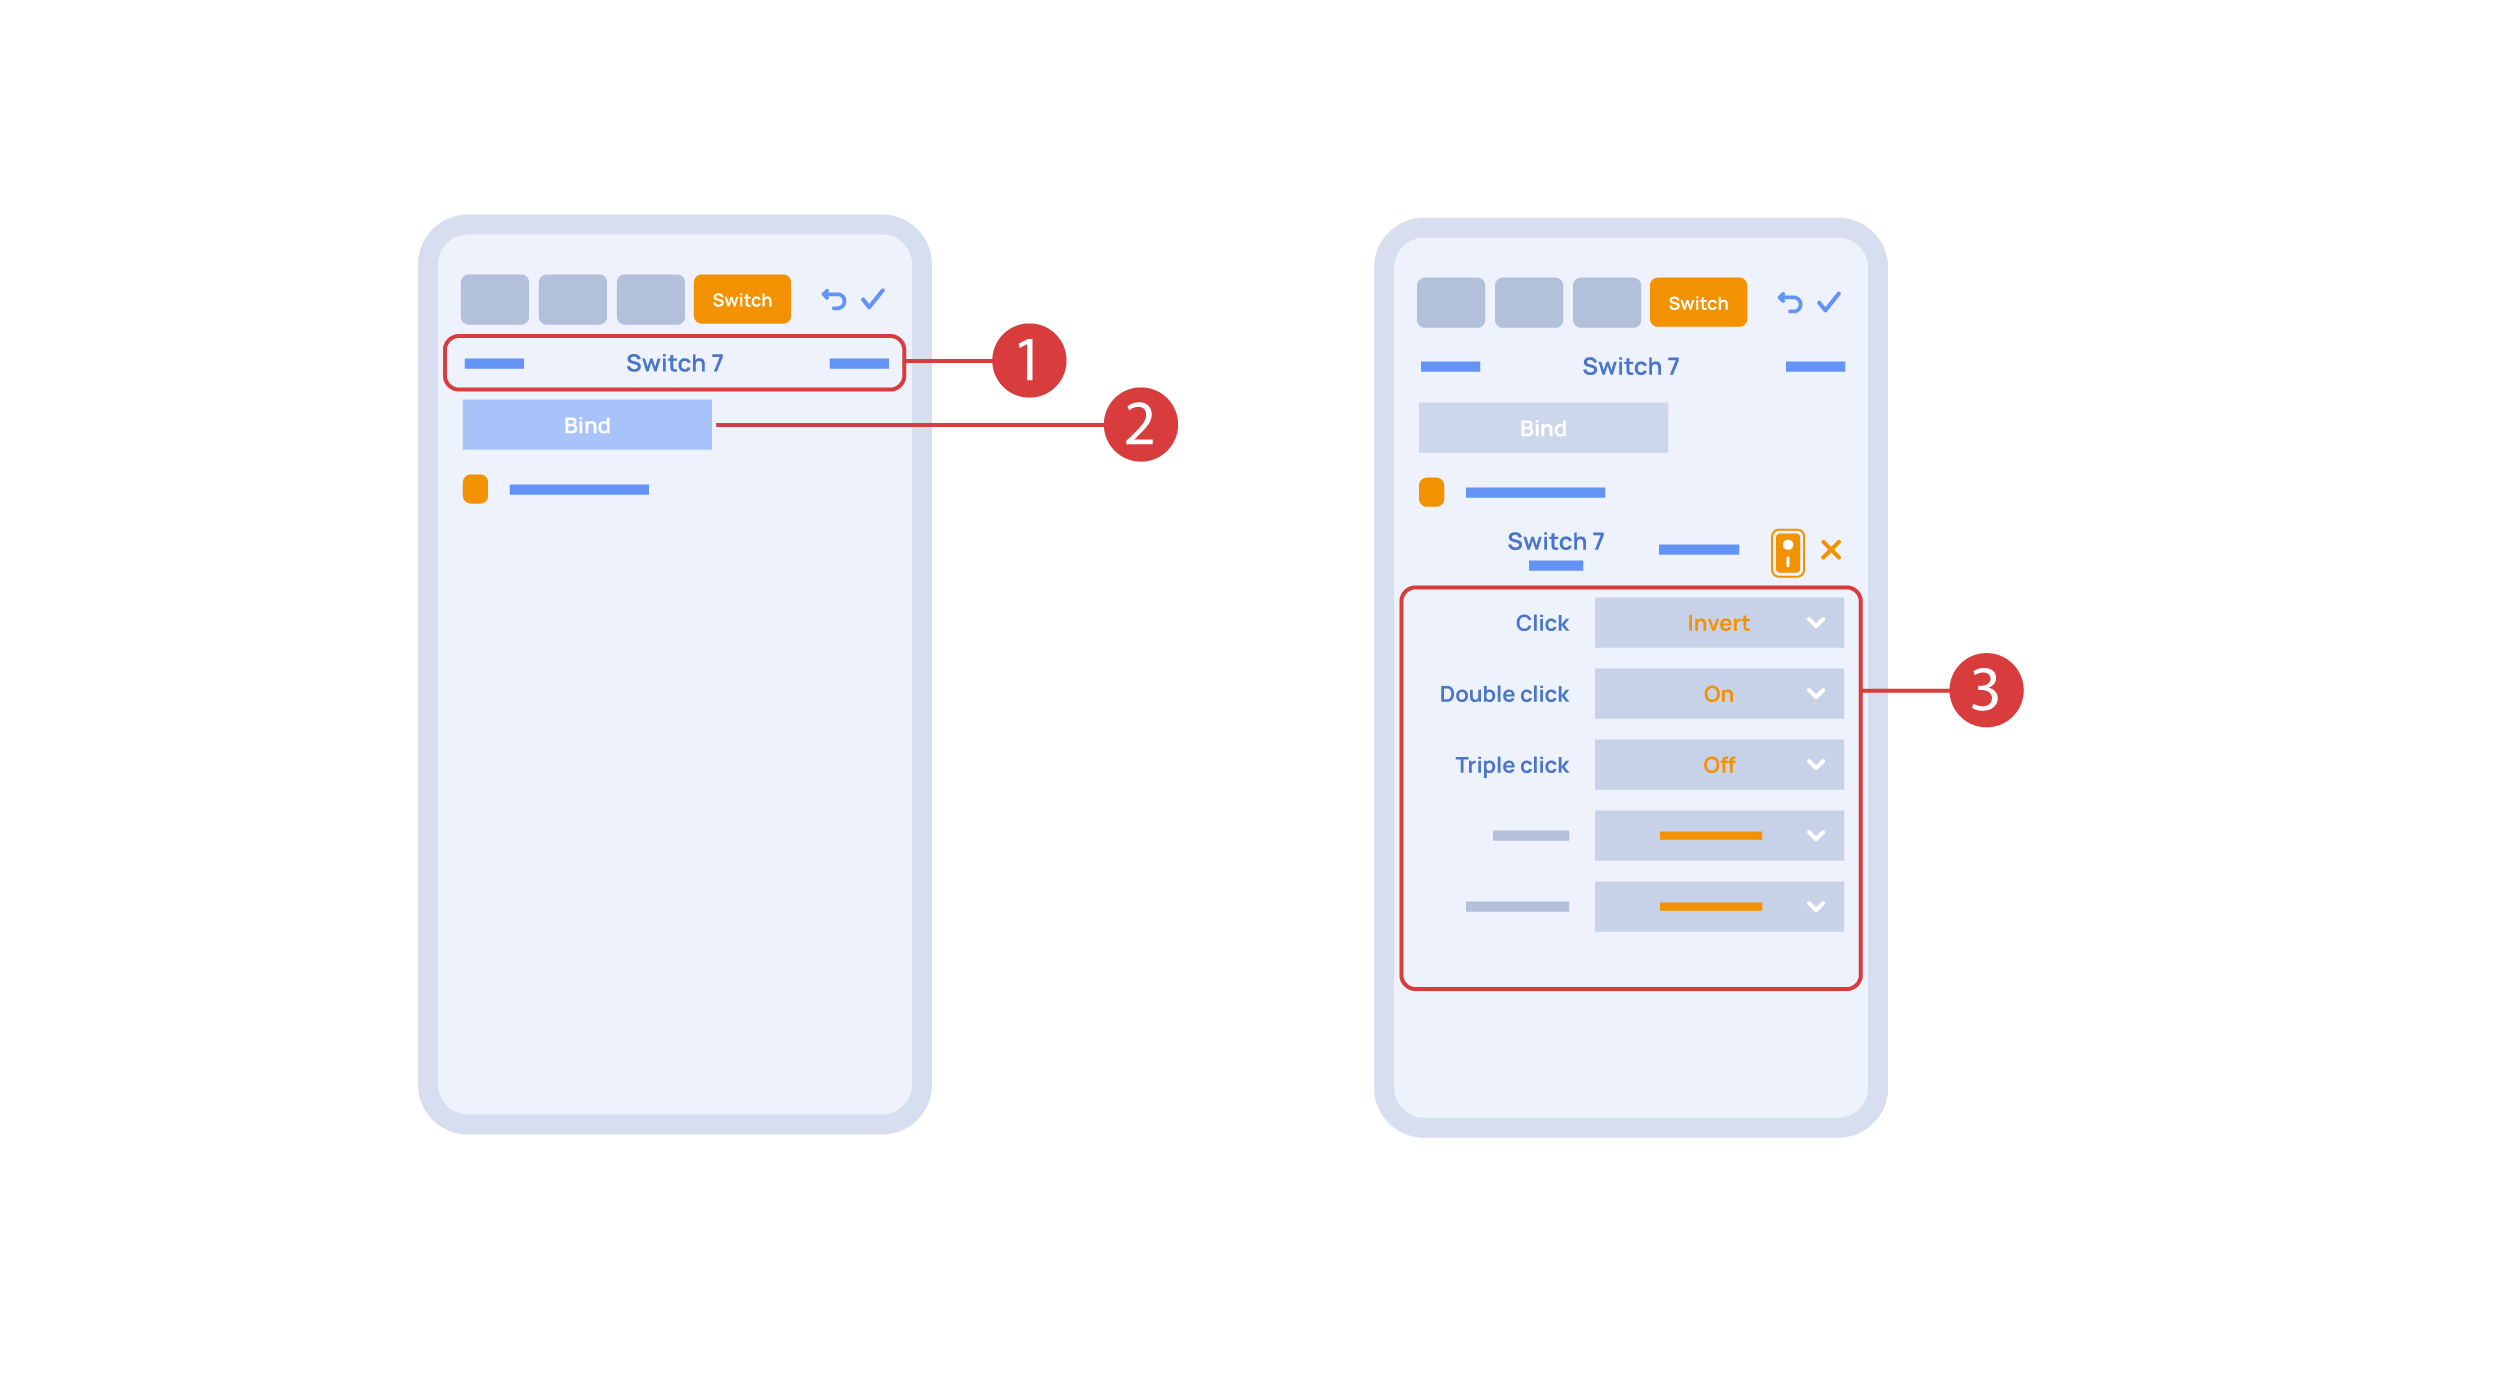
In order to do this, ① we press the button we need to bind. The system displays it, after which we press ‘Bind’② and save the changes. Now this button controls the executor
The ‘Switches’ tab ③ also features additional button setup options. For example, we can program the executor to be controlled with a double or triple click of a button, as well as define an action performed by this, for example ‘only turning on’ or ‘only turning off’ an executor. In this case we are setting up the button to do the following: one click will cause the lamp to toggle, a double click will turn it on and a triple click will turn it off. In this way a single button can perform up to five different actions.
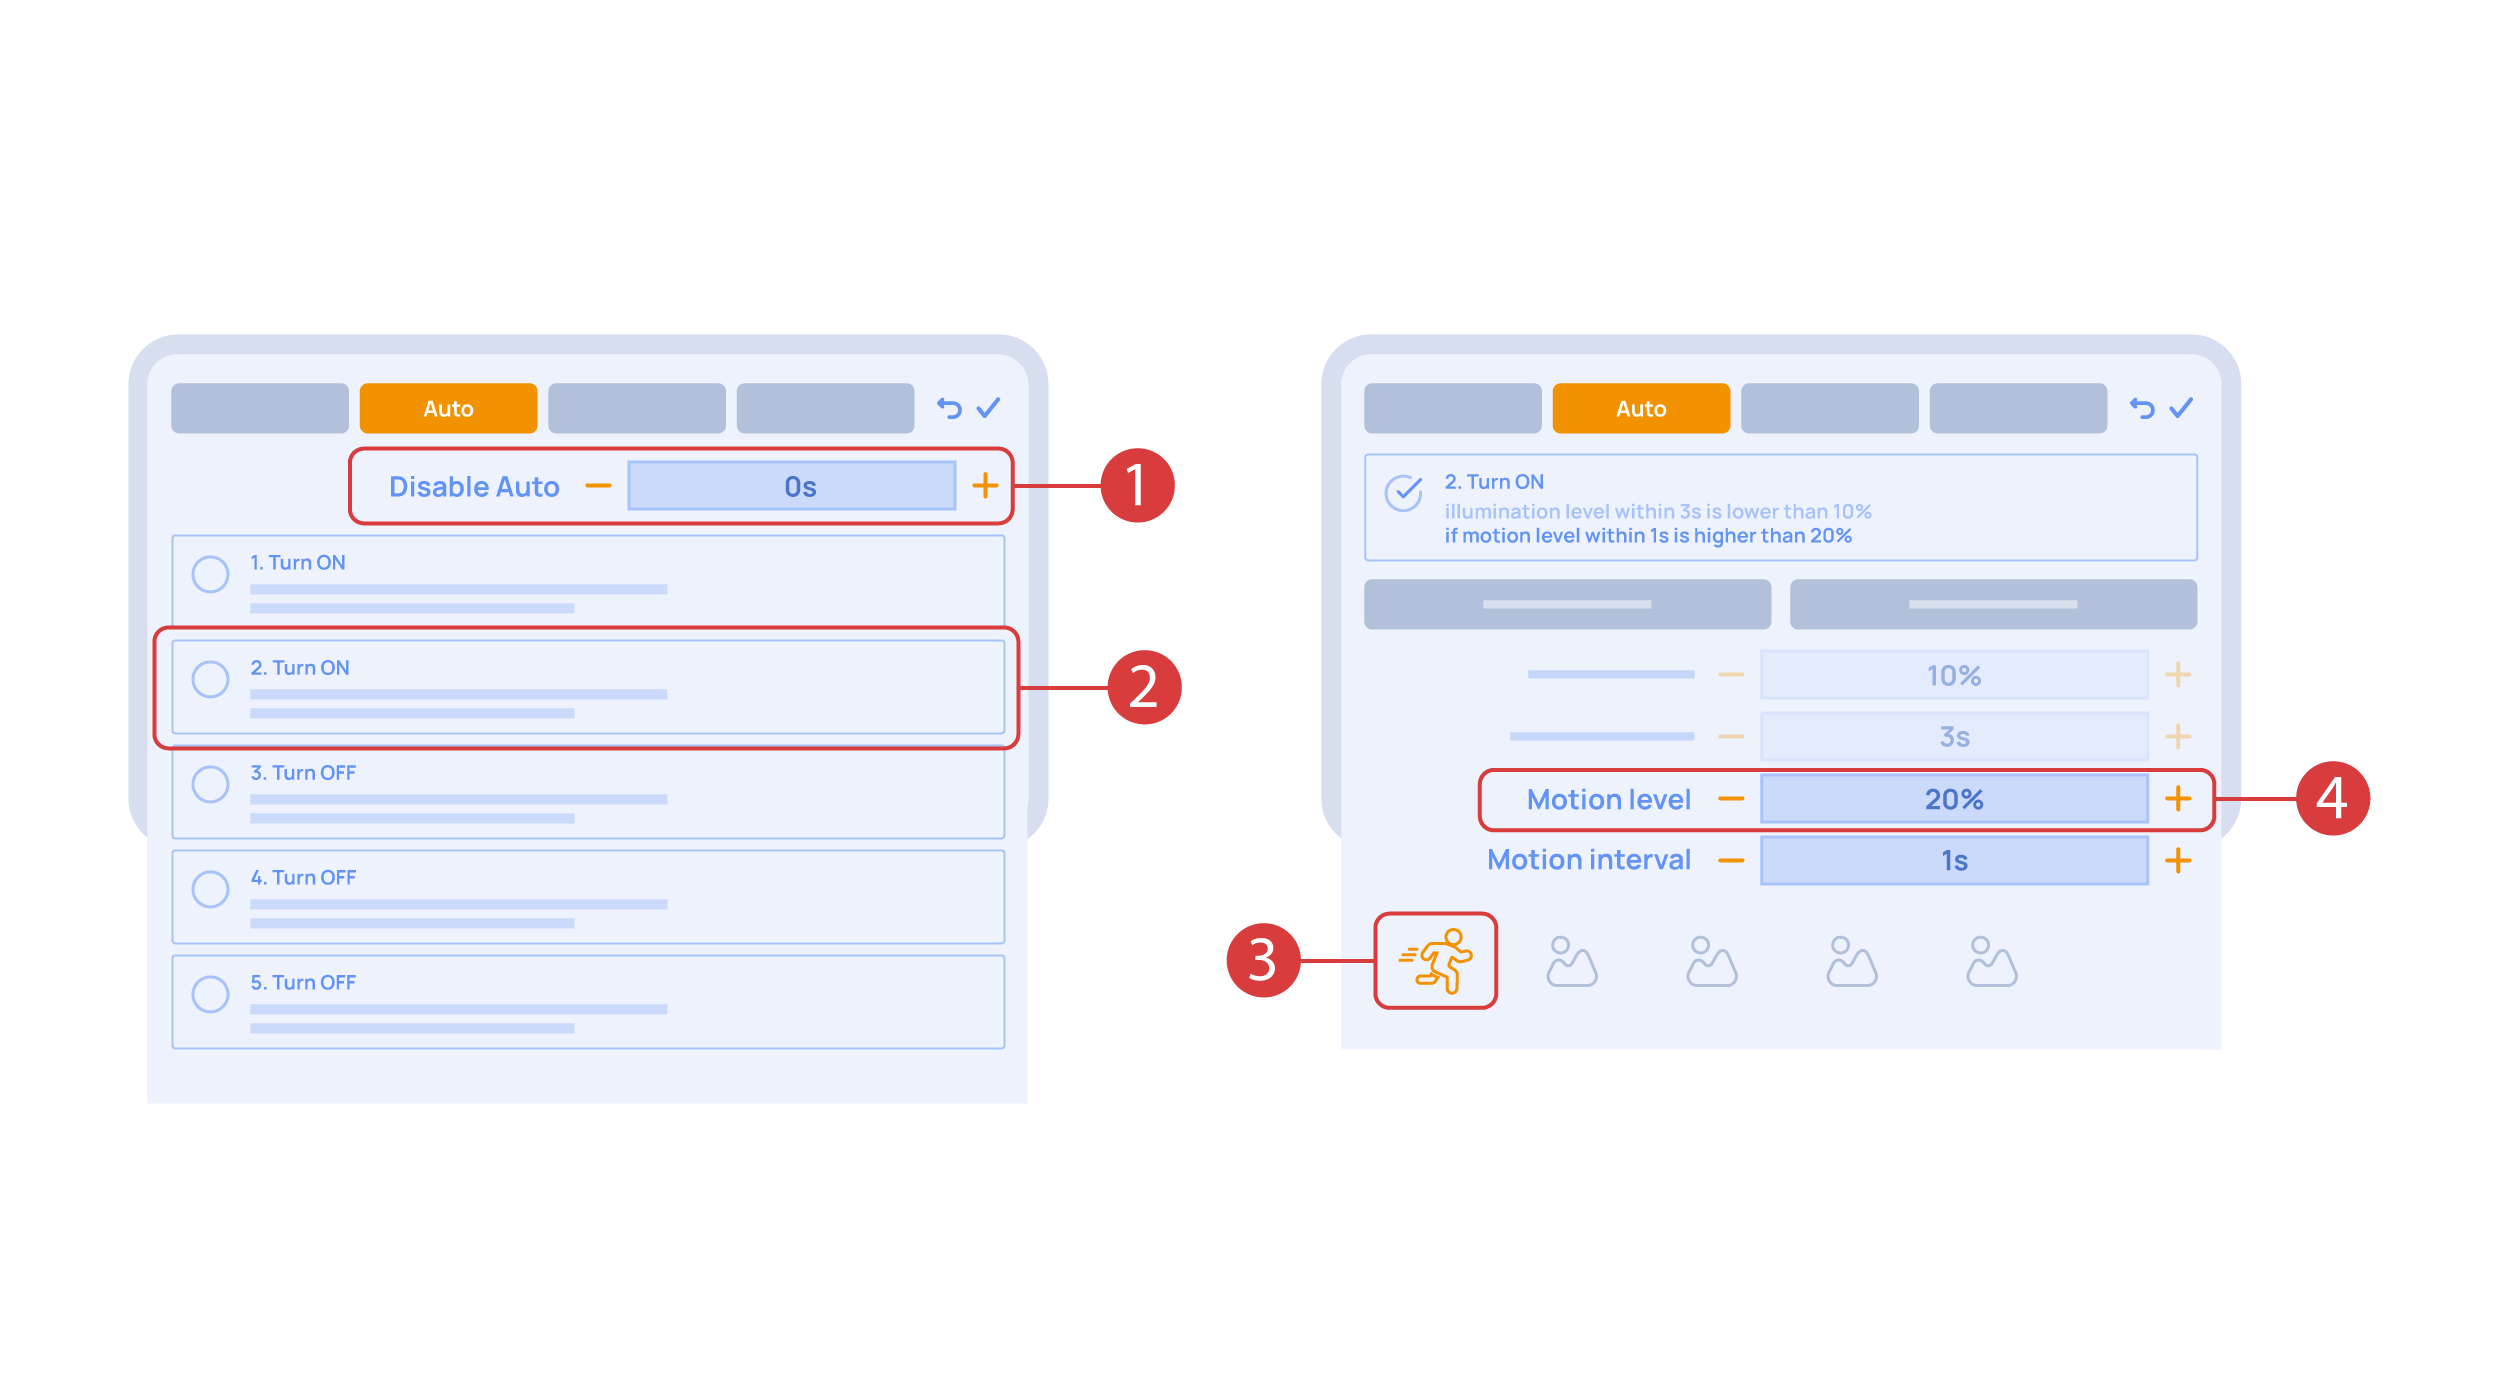
Let’s also set up basic automation of turning an executor on or off with the help of a motion sensor.
The ‘Auto period’ ① option sets the time for which the automation is disabled after an executor is manually controlled.For our demonstration purposes, we will set it to zero.
Then we will activate the automation ② to turn on the executor when motion is detected. We choose the motion sensor ③ and the level of motion ④. We can also choose a light sensor and its parameters.
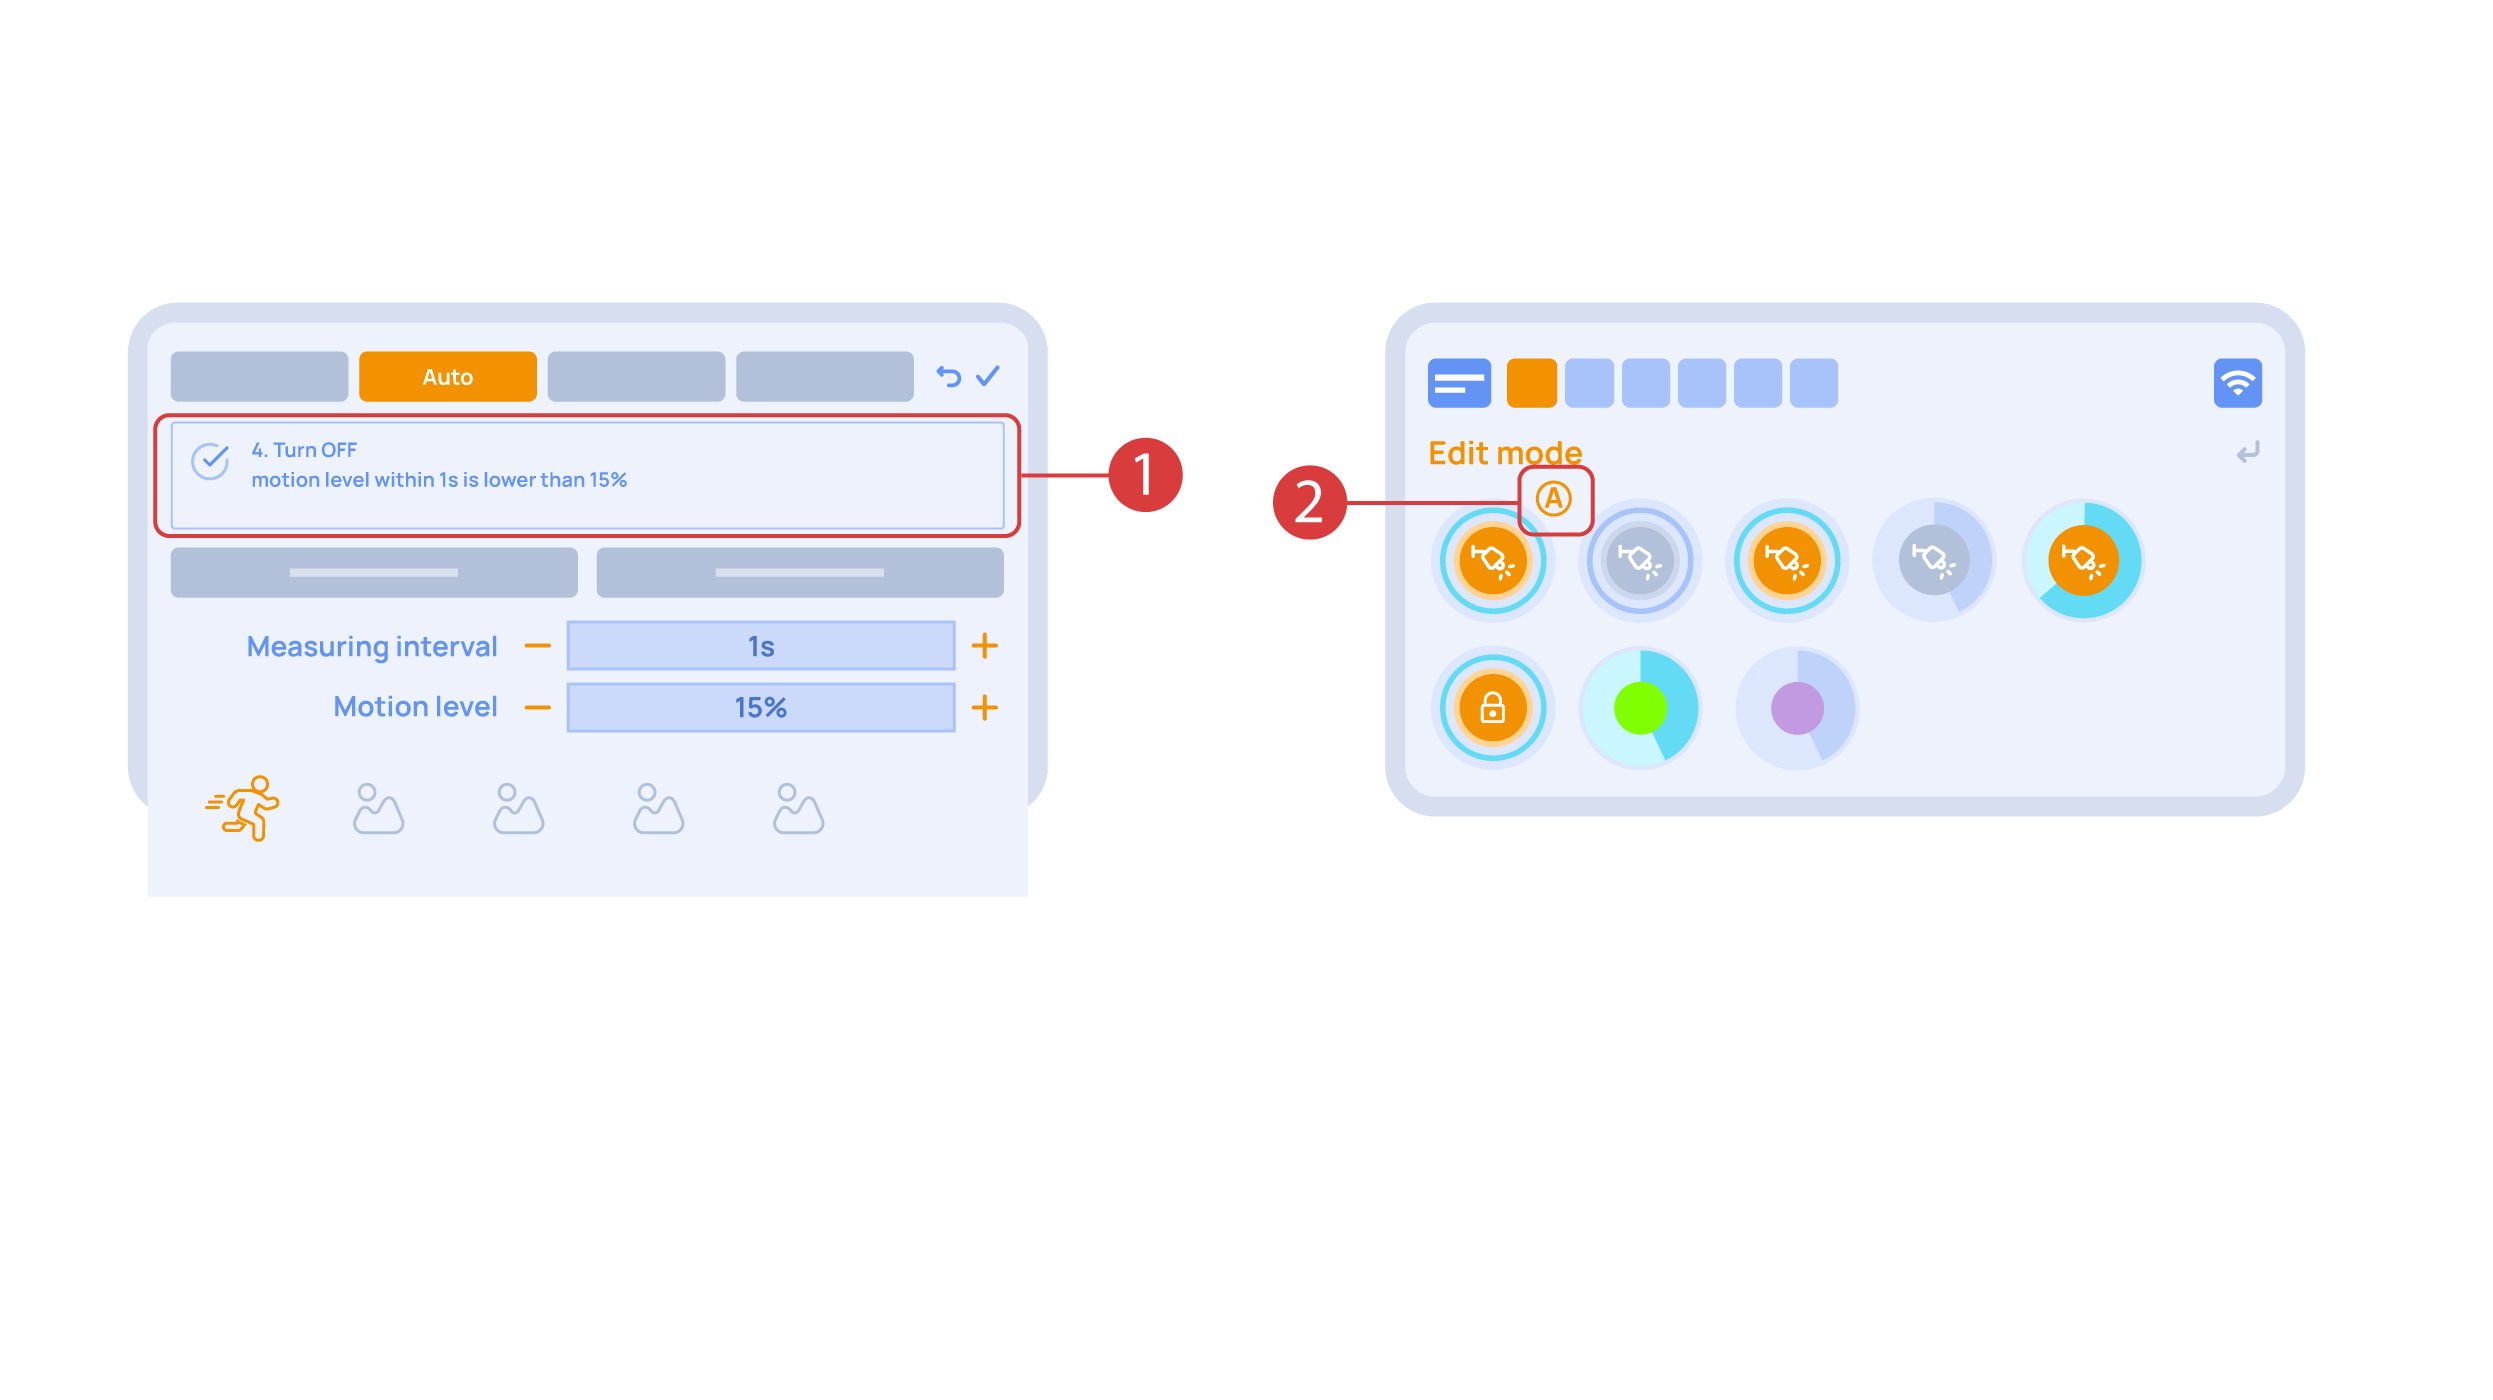
Now we will activate turning off ① of an executor if there is no motion: we choose the same sensor, set a lower threshold and a minimal time.Save the changes.
The extra ‘A’ icon ② will be added to the executor icon, meaning that automation has been set up for it. Now the lamp will be turned on when motion is detected and instantly turned off when no motion is detected.
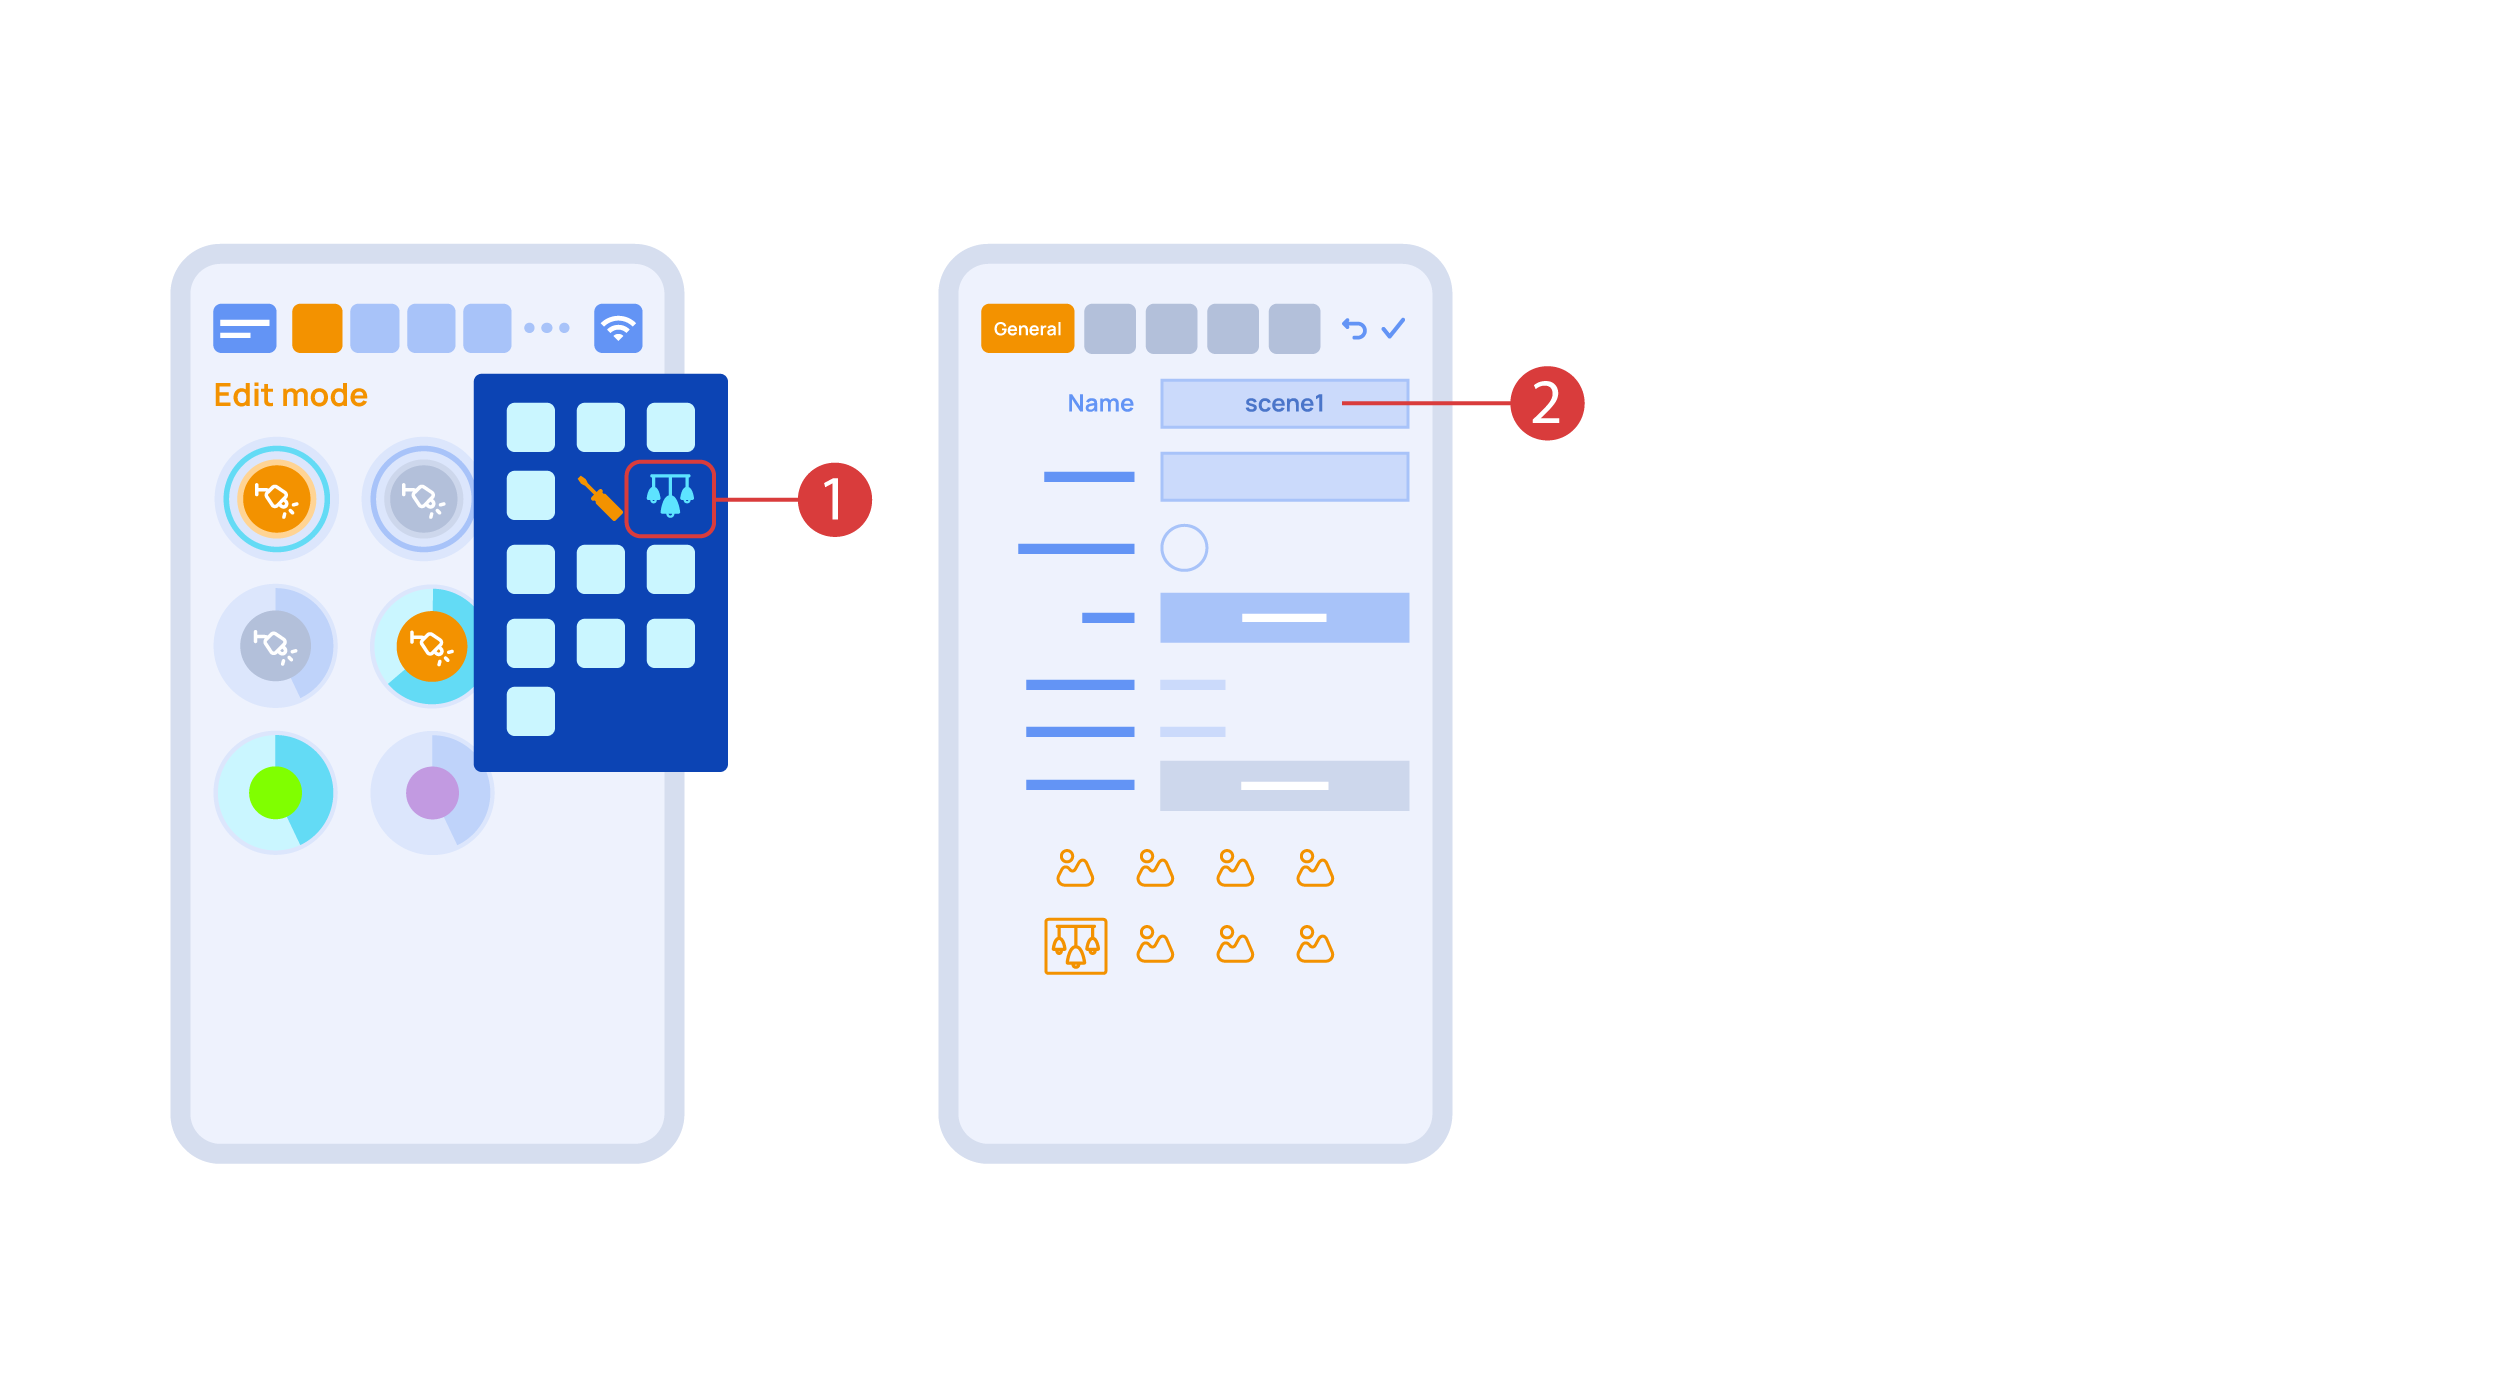
Let’s create a light scheme. For this we need to select the appropriate item in the additional menu ①. Give the light scheme a name ②.
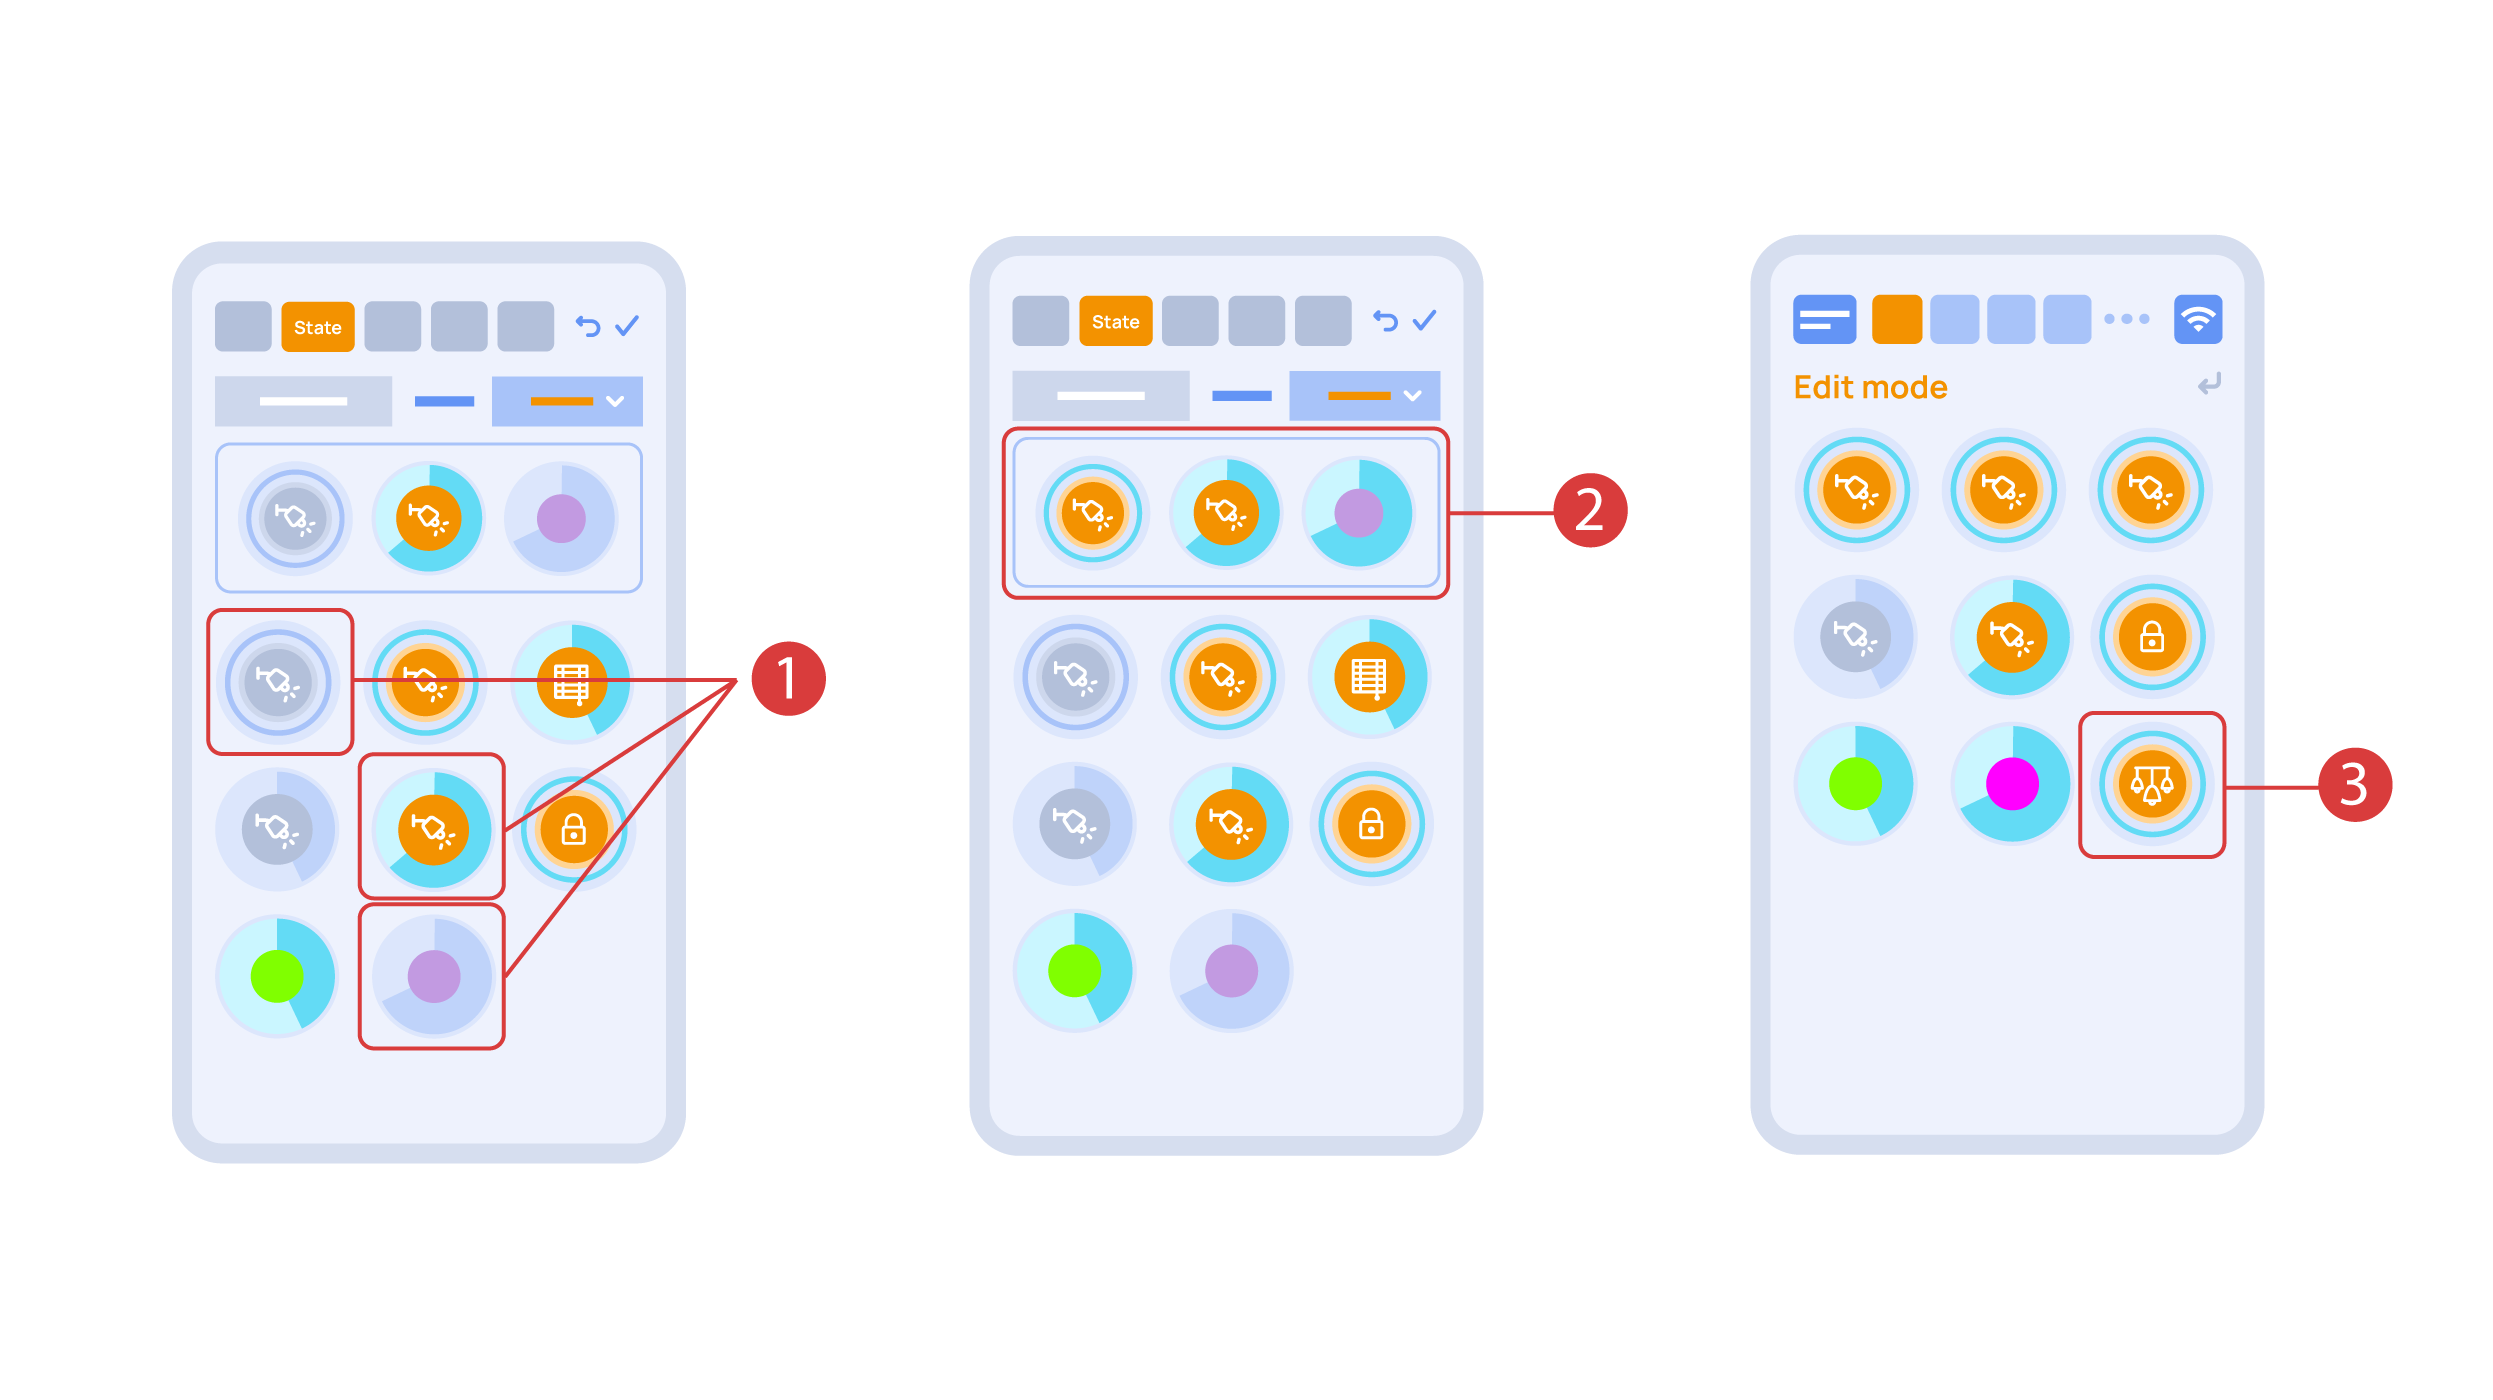
In the ‘State’ tab, use a long press to add the lights we want to use into the light scene ① and set up their state ②. ‘Auto’, ‘Schedule’, ‘Switch’ tabs are the same for all the executors.
Save the changes and we are able to use the newly-created light scheme ③ immediately.
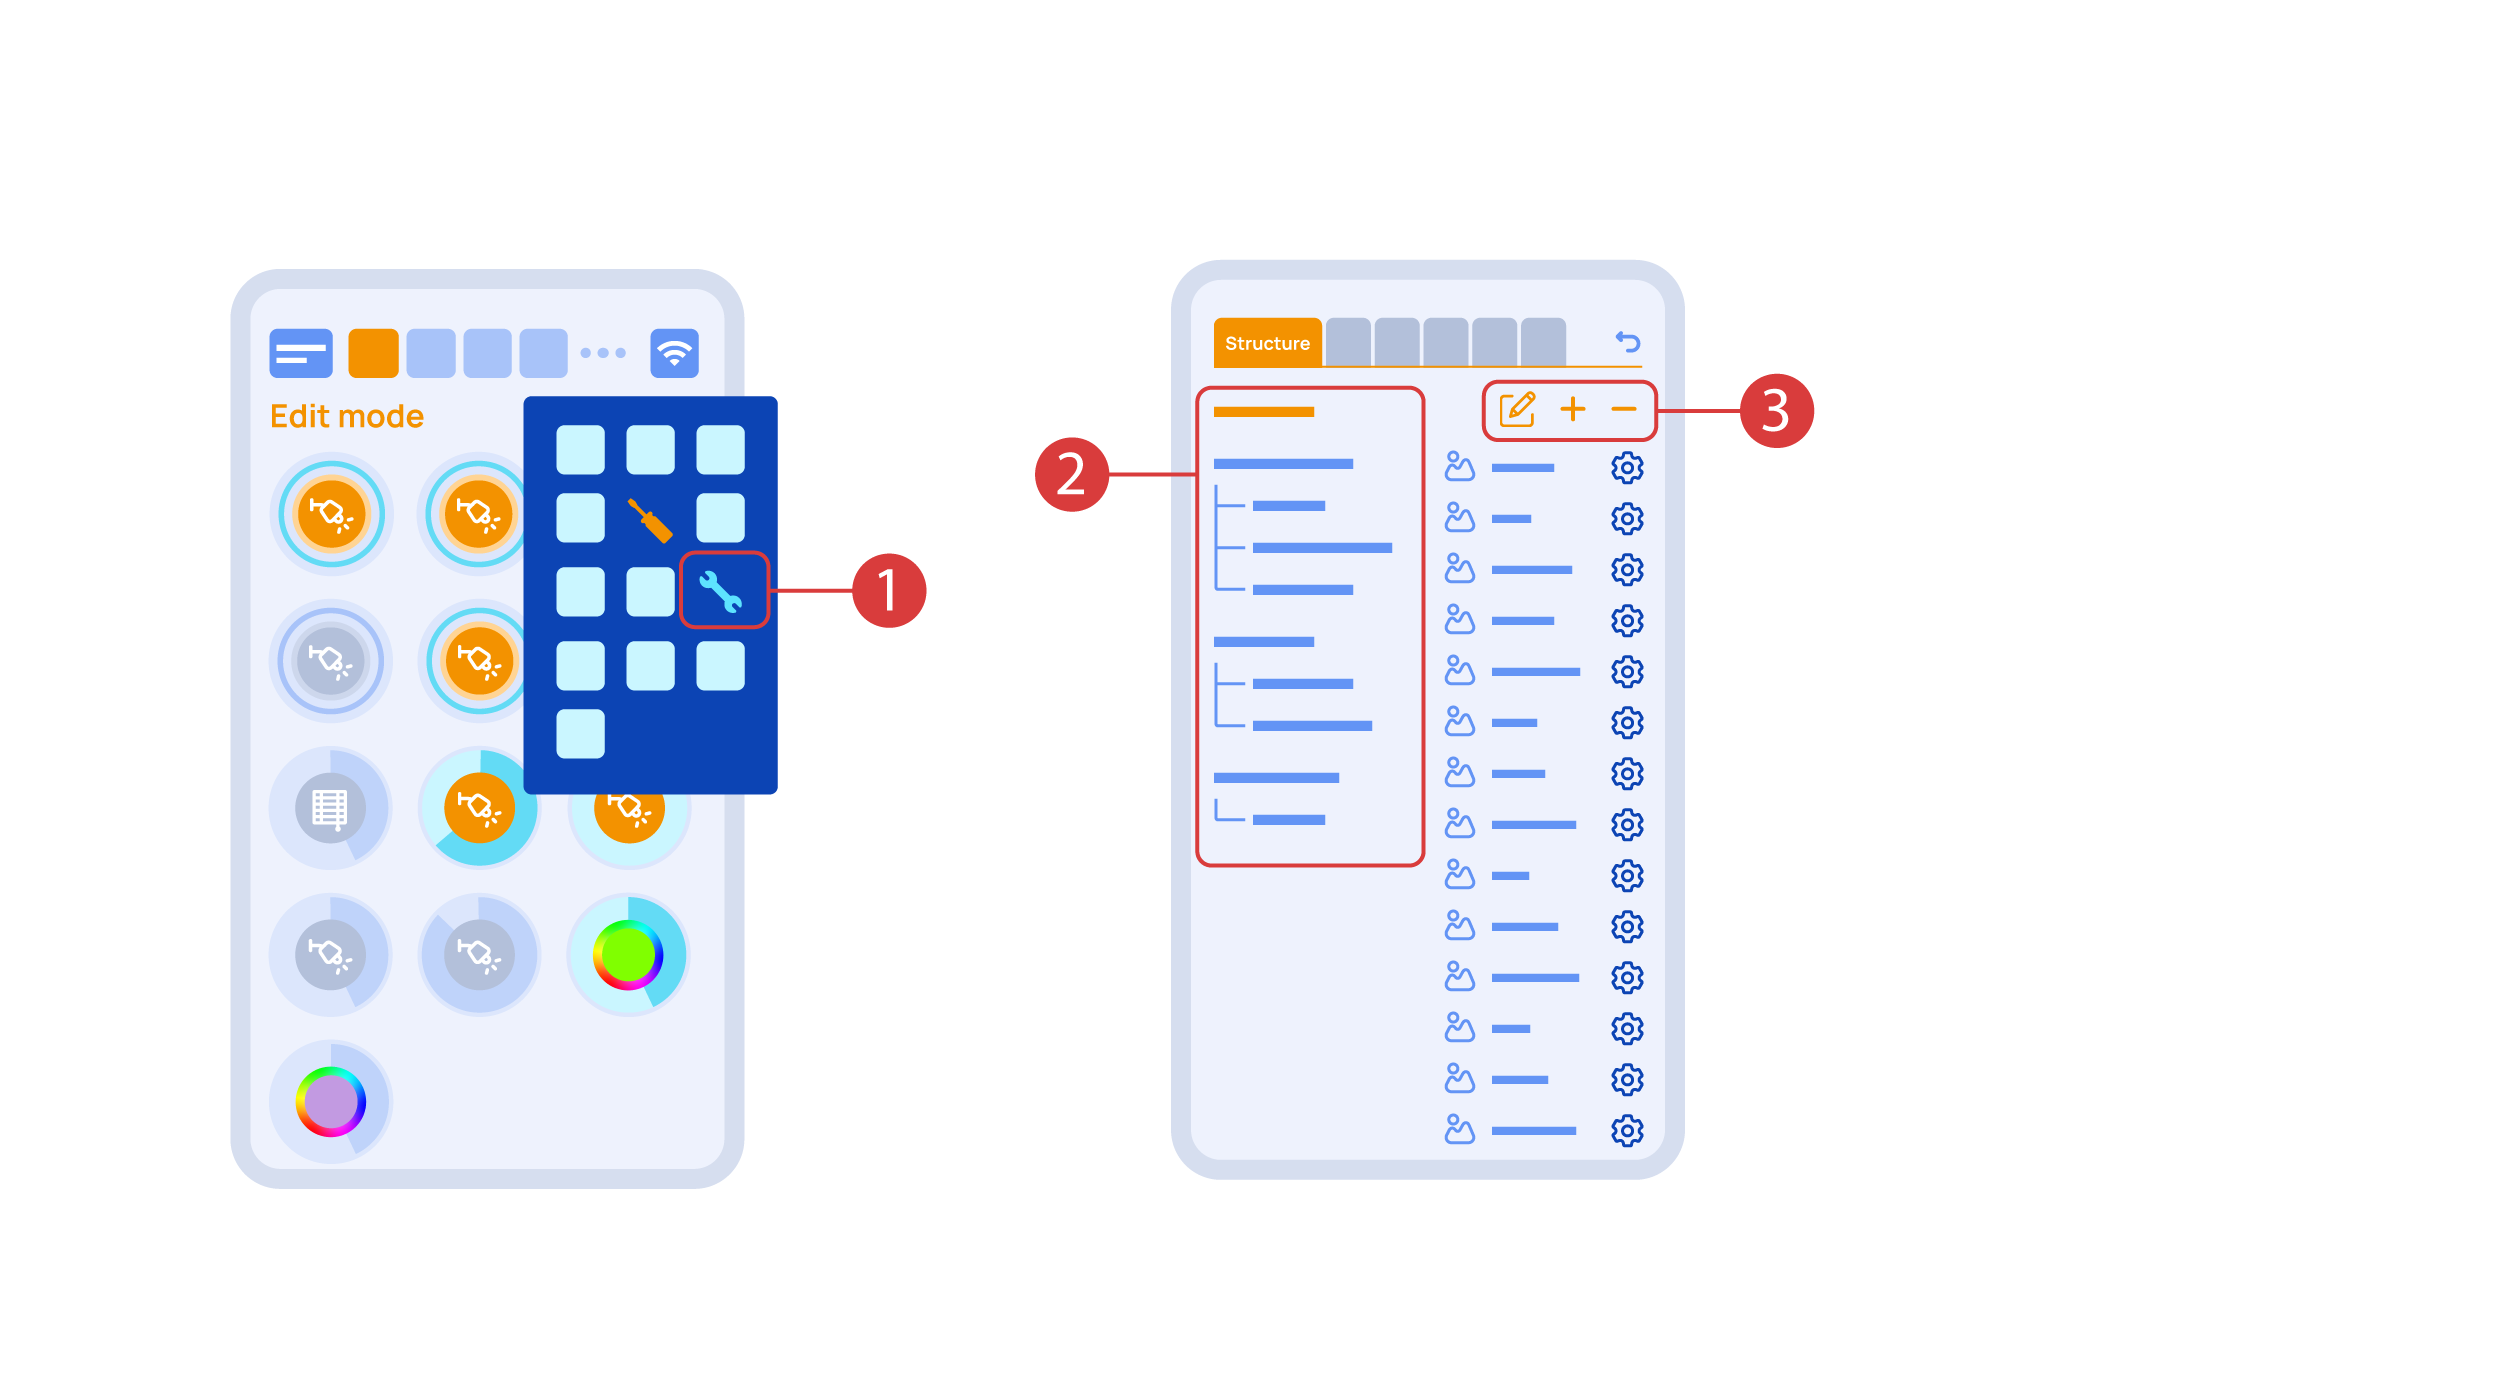
While you are in the Edit Mode, there is a ‘Setup’ ① icon in the additional menu.
Here in the ‘Structure’② tab we can see all the areas.
We can create new ones ④, rename them and move the elements around.
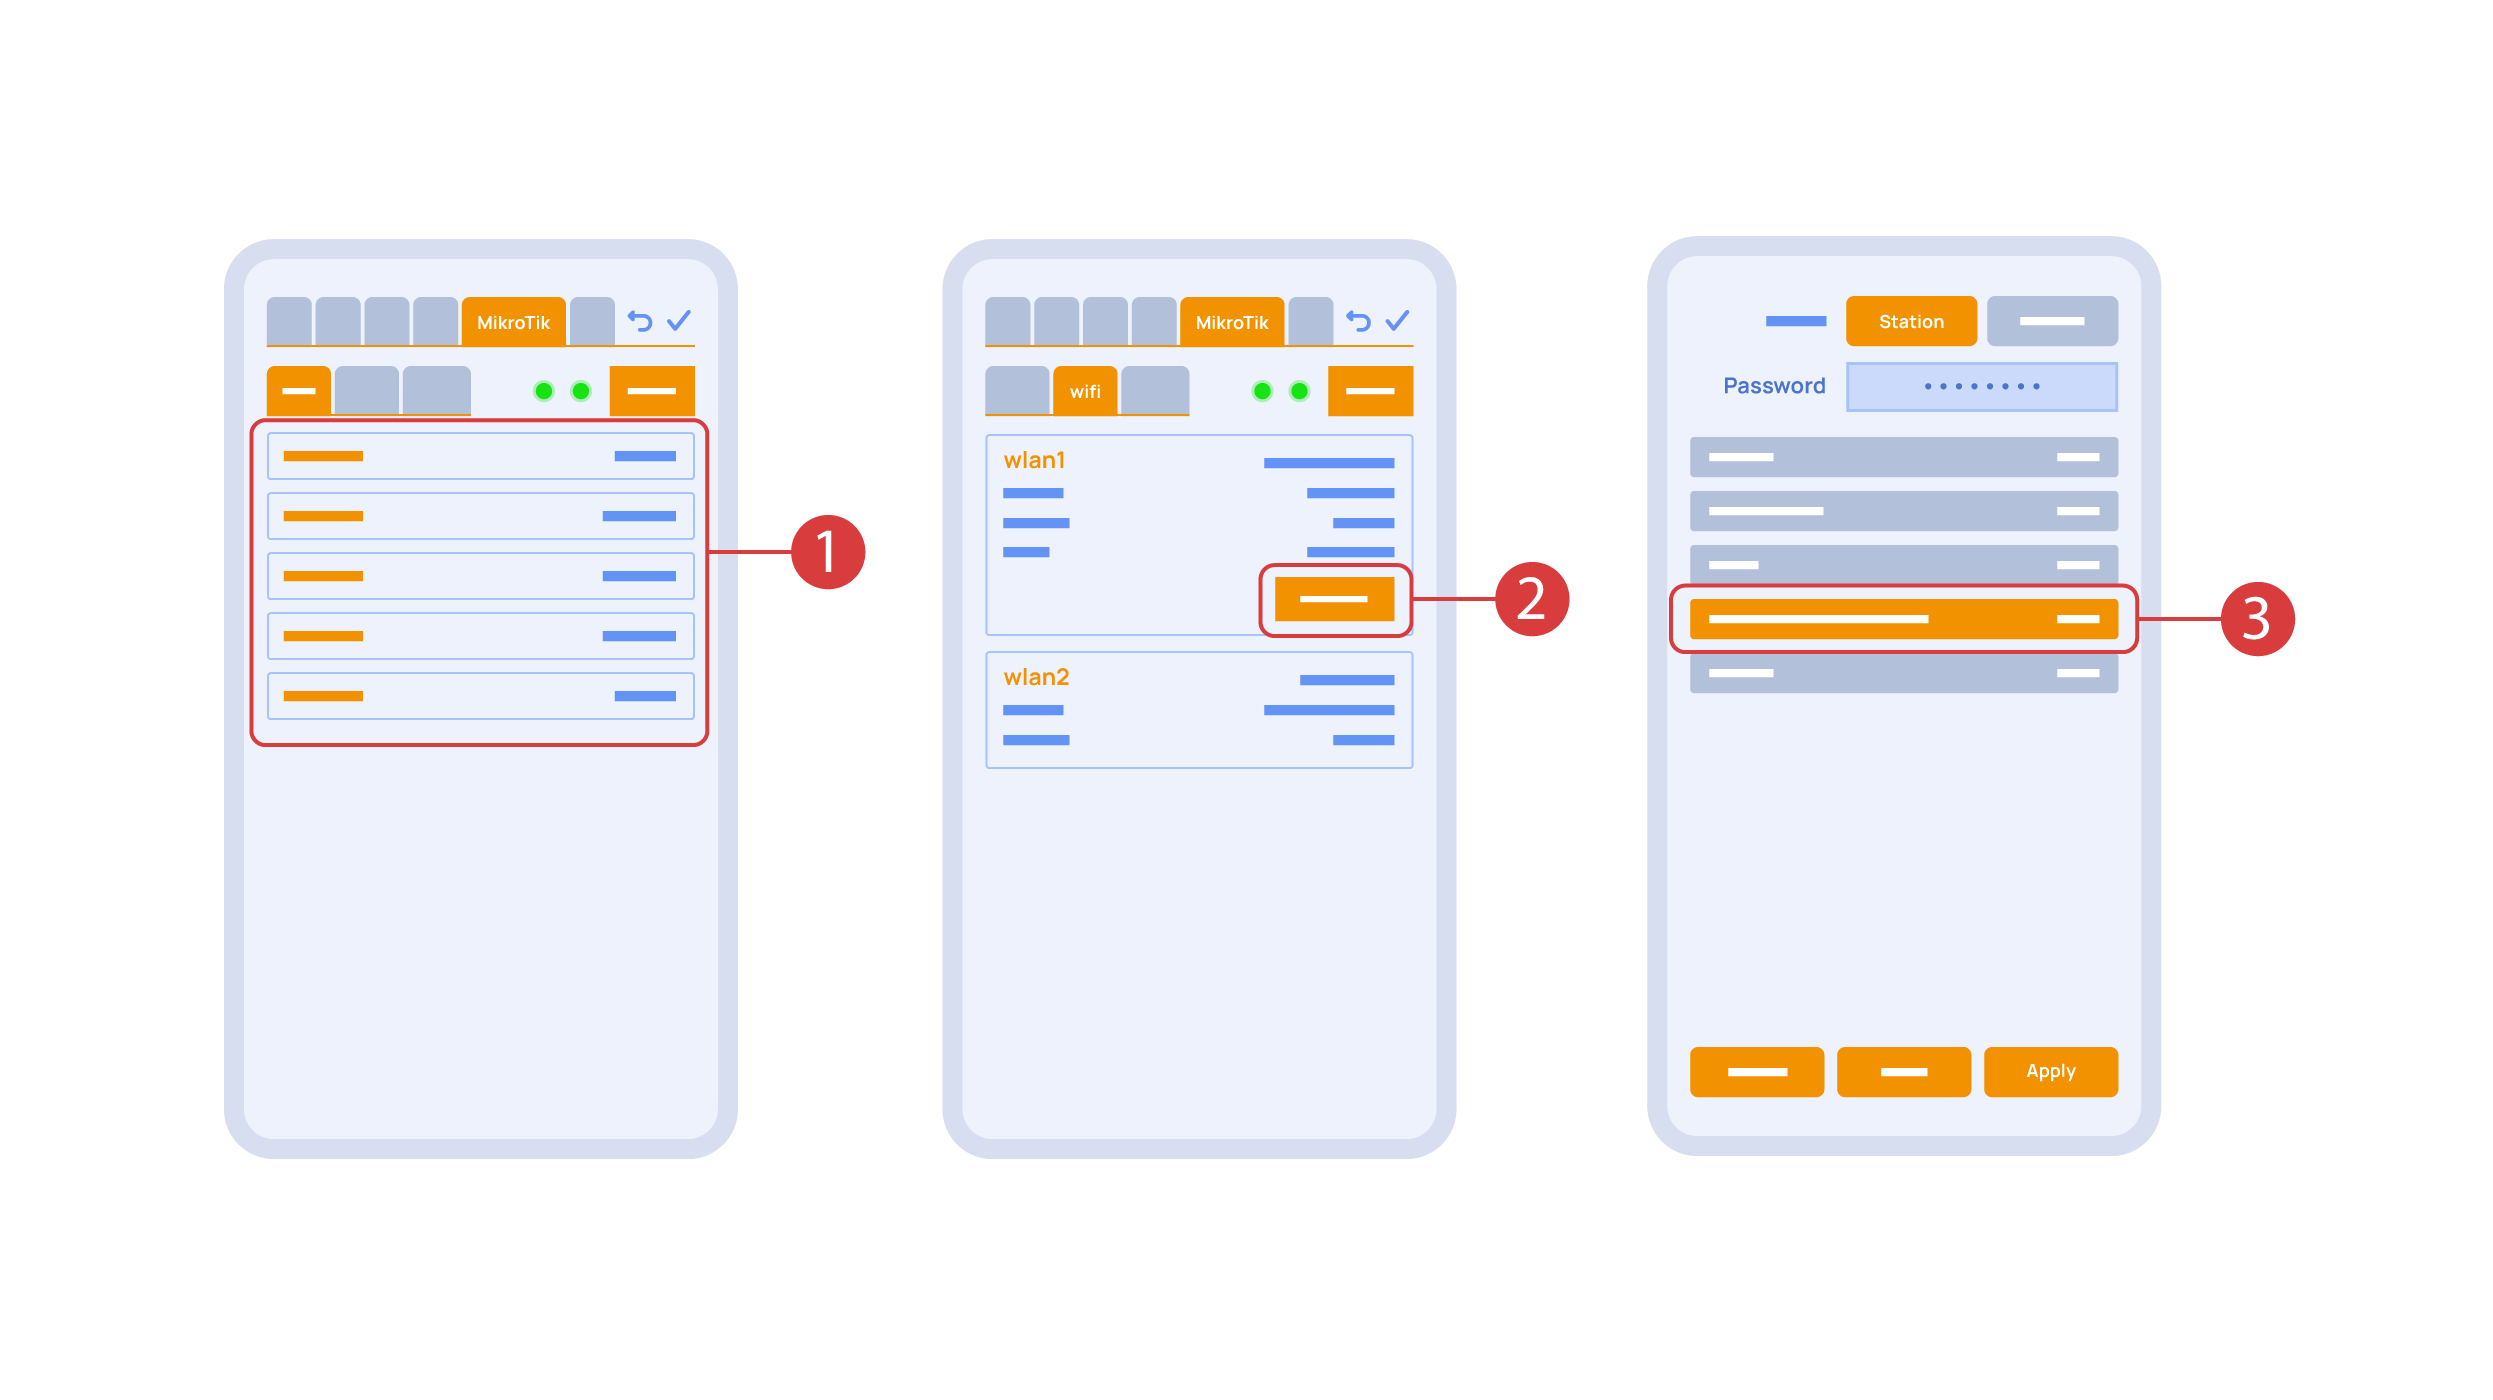
In the ‘Mikrotik’ tab ① you can see the current parameters of your router, which you can also connect to your local Wi-Fi network.
In order to do this, enter the Wi-Fi sub-menu, click the wlan1 interface configuration ②, after which choose the ‘station’ mode, choose a Wi-Fi network out of the list ③ of available ones and enter the connection password.
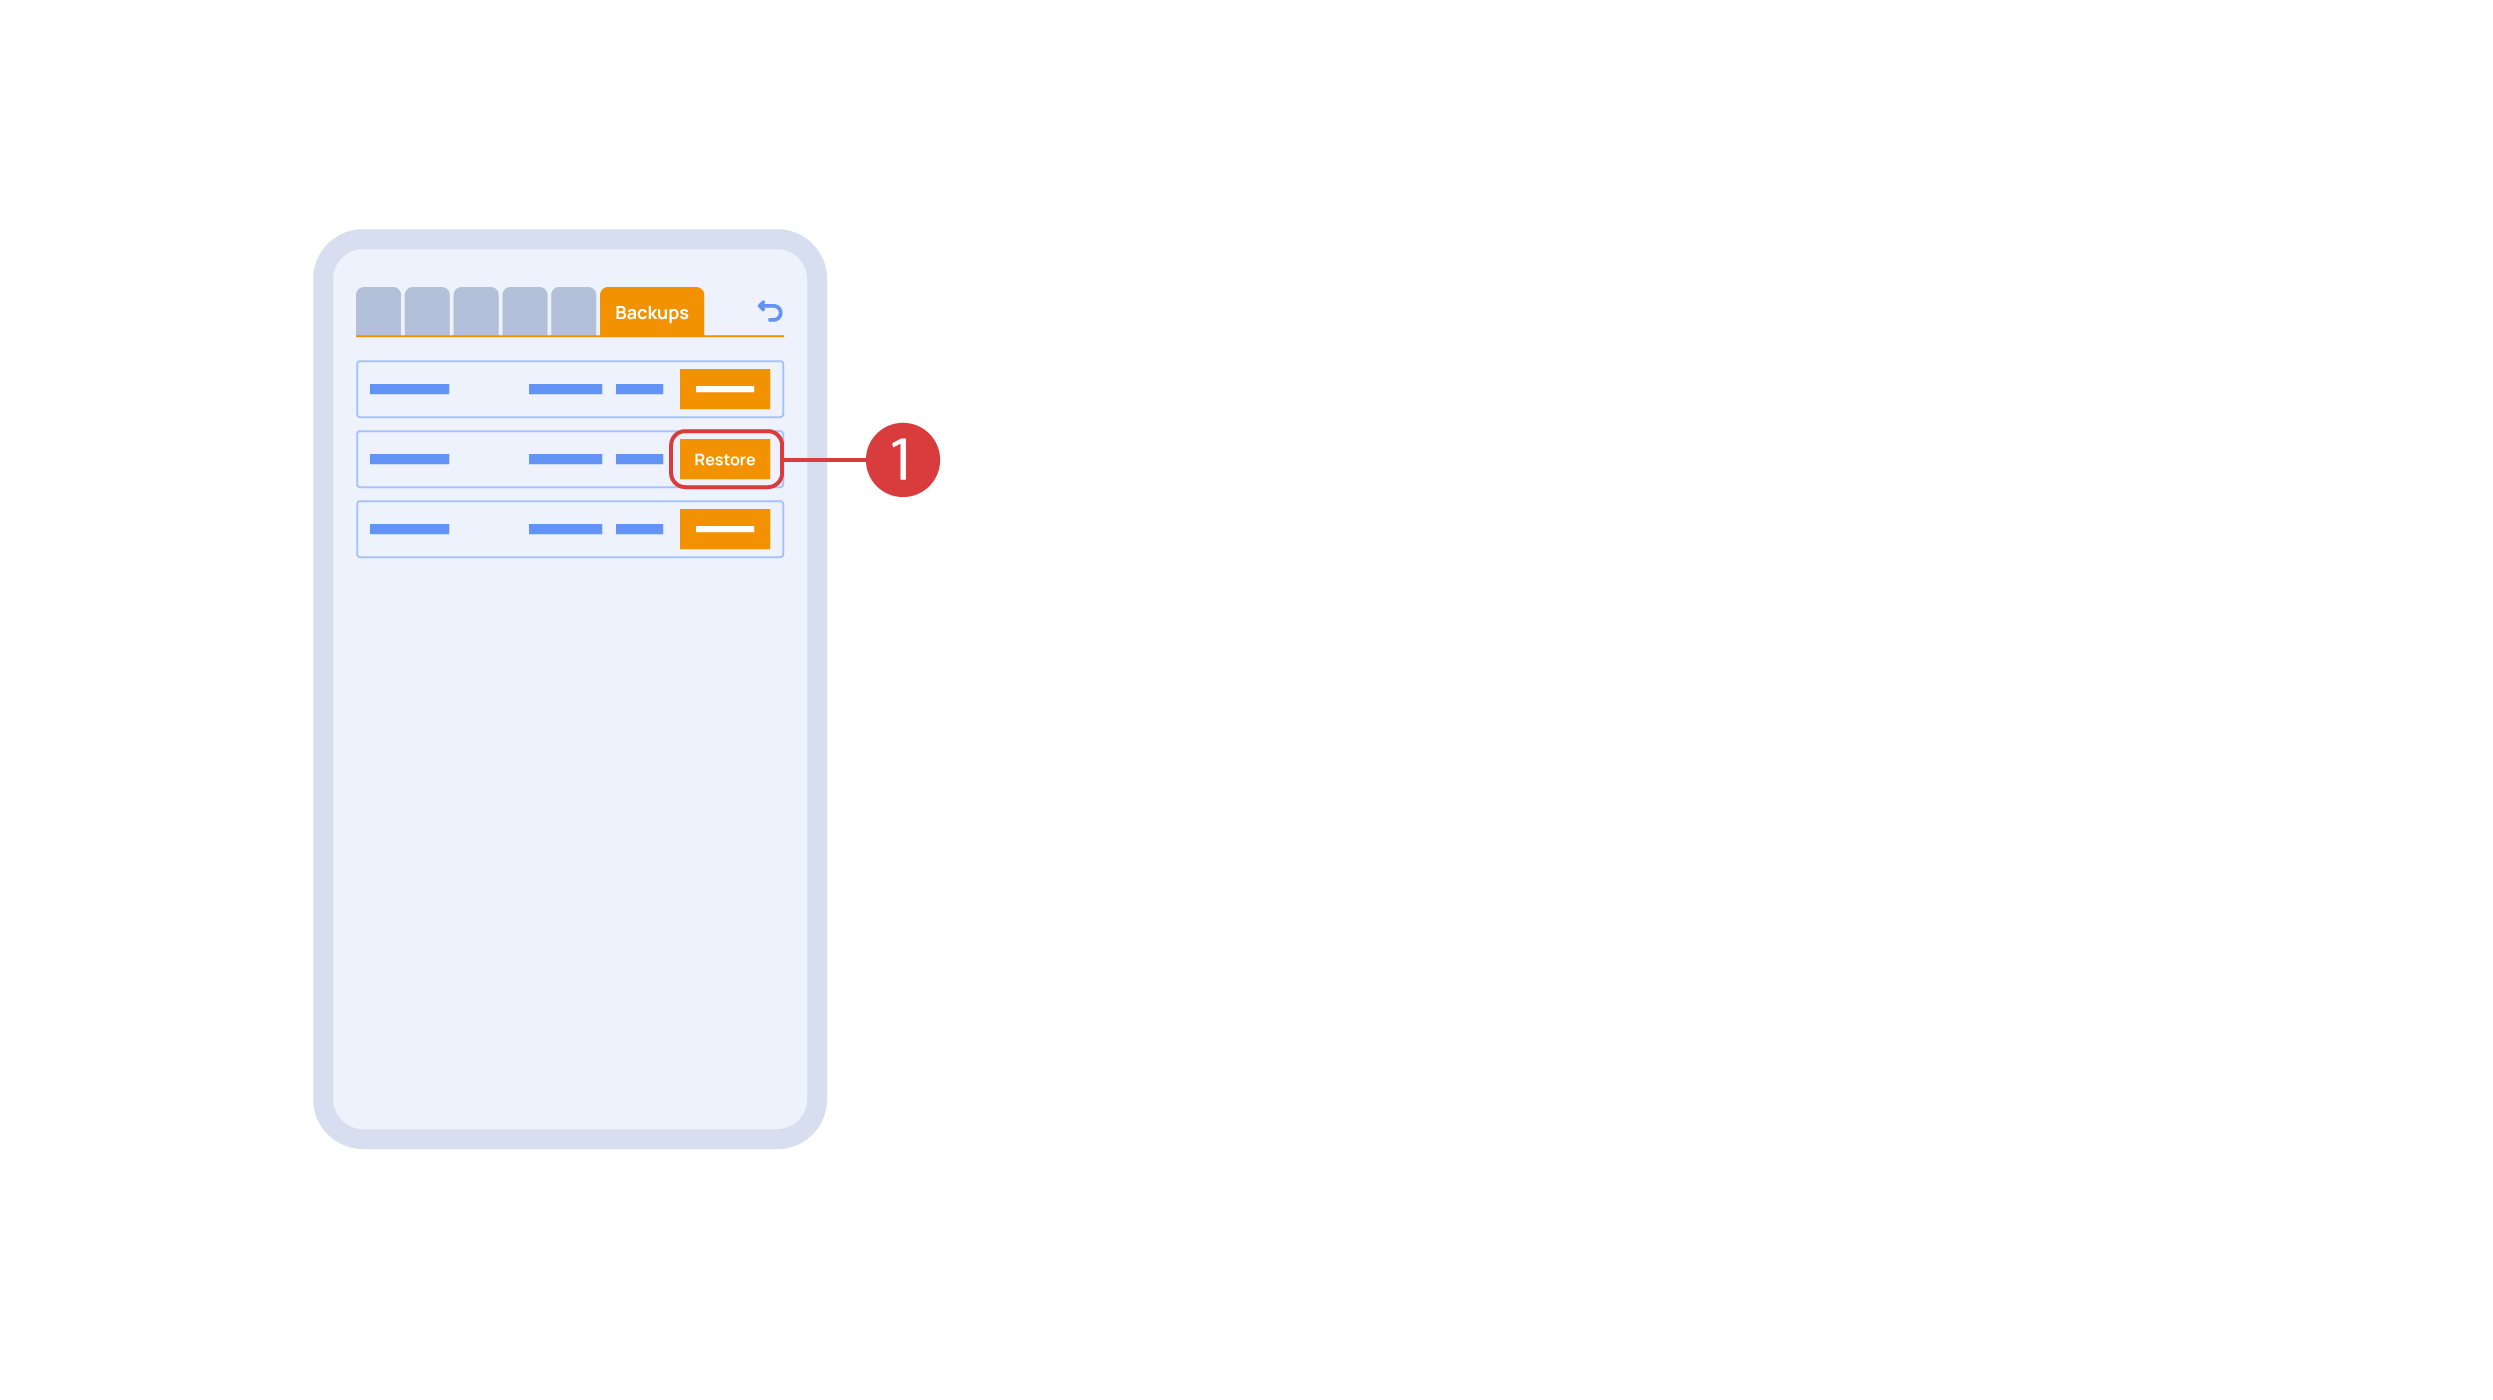
In the ‘Backups’ tab ① you can see the list of saved configurations, which can be restored if necessary.
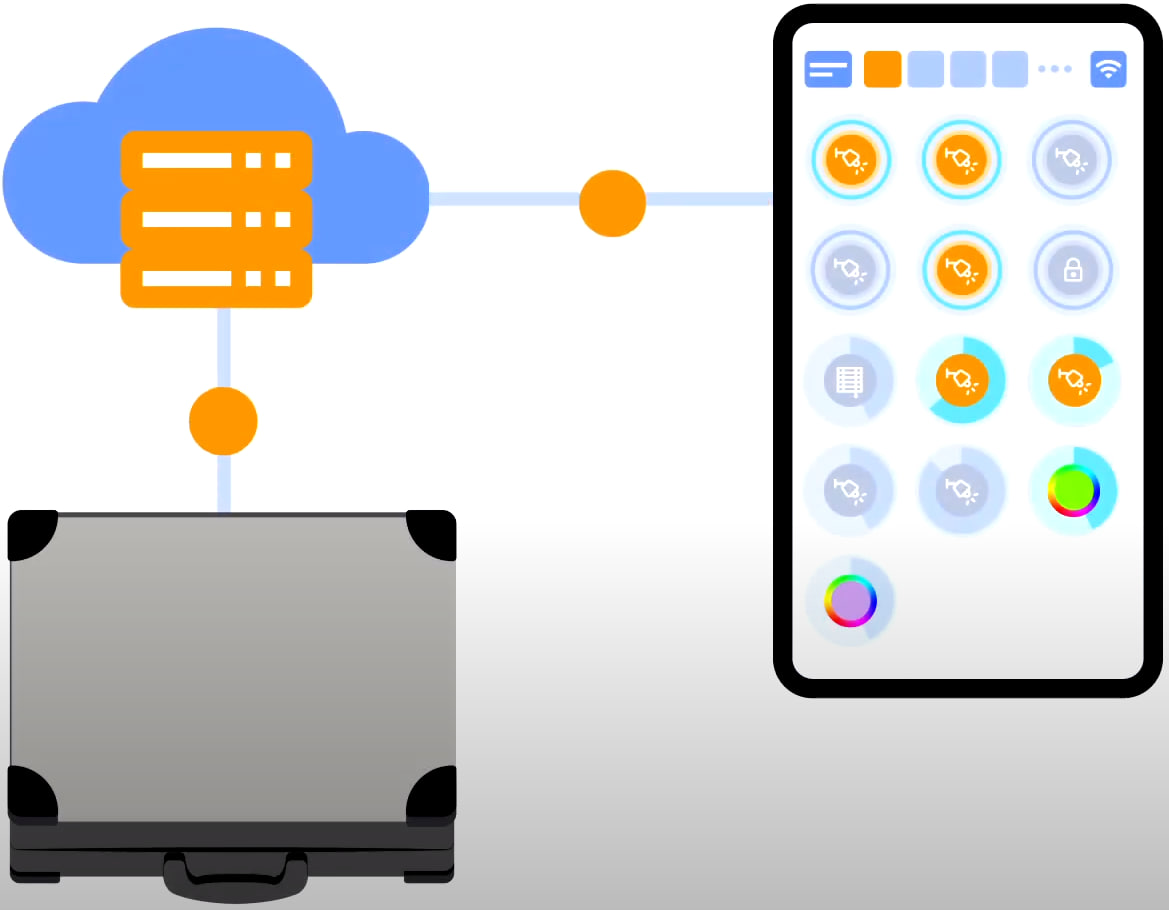
For cloud access to the device, you do not need any extra settings. The app detects the absence of the system in your local network and automatically establishes the connection via the cloud.
We thank you for watching this tutorial! If you have questions or need extra help, please do not hesitate to refer to our technical support team. See you in the next episodes!