Príručka rýchleho spustenia
Quick start/unboxing.
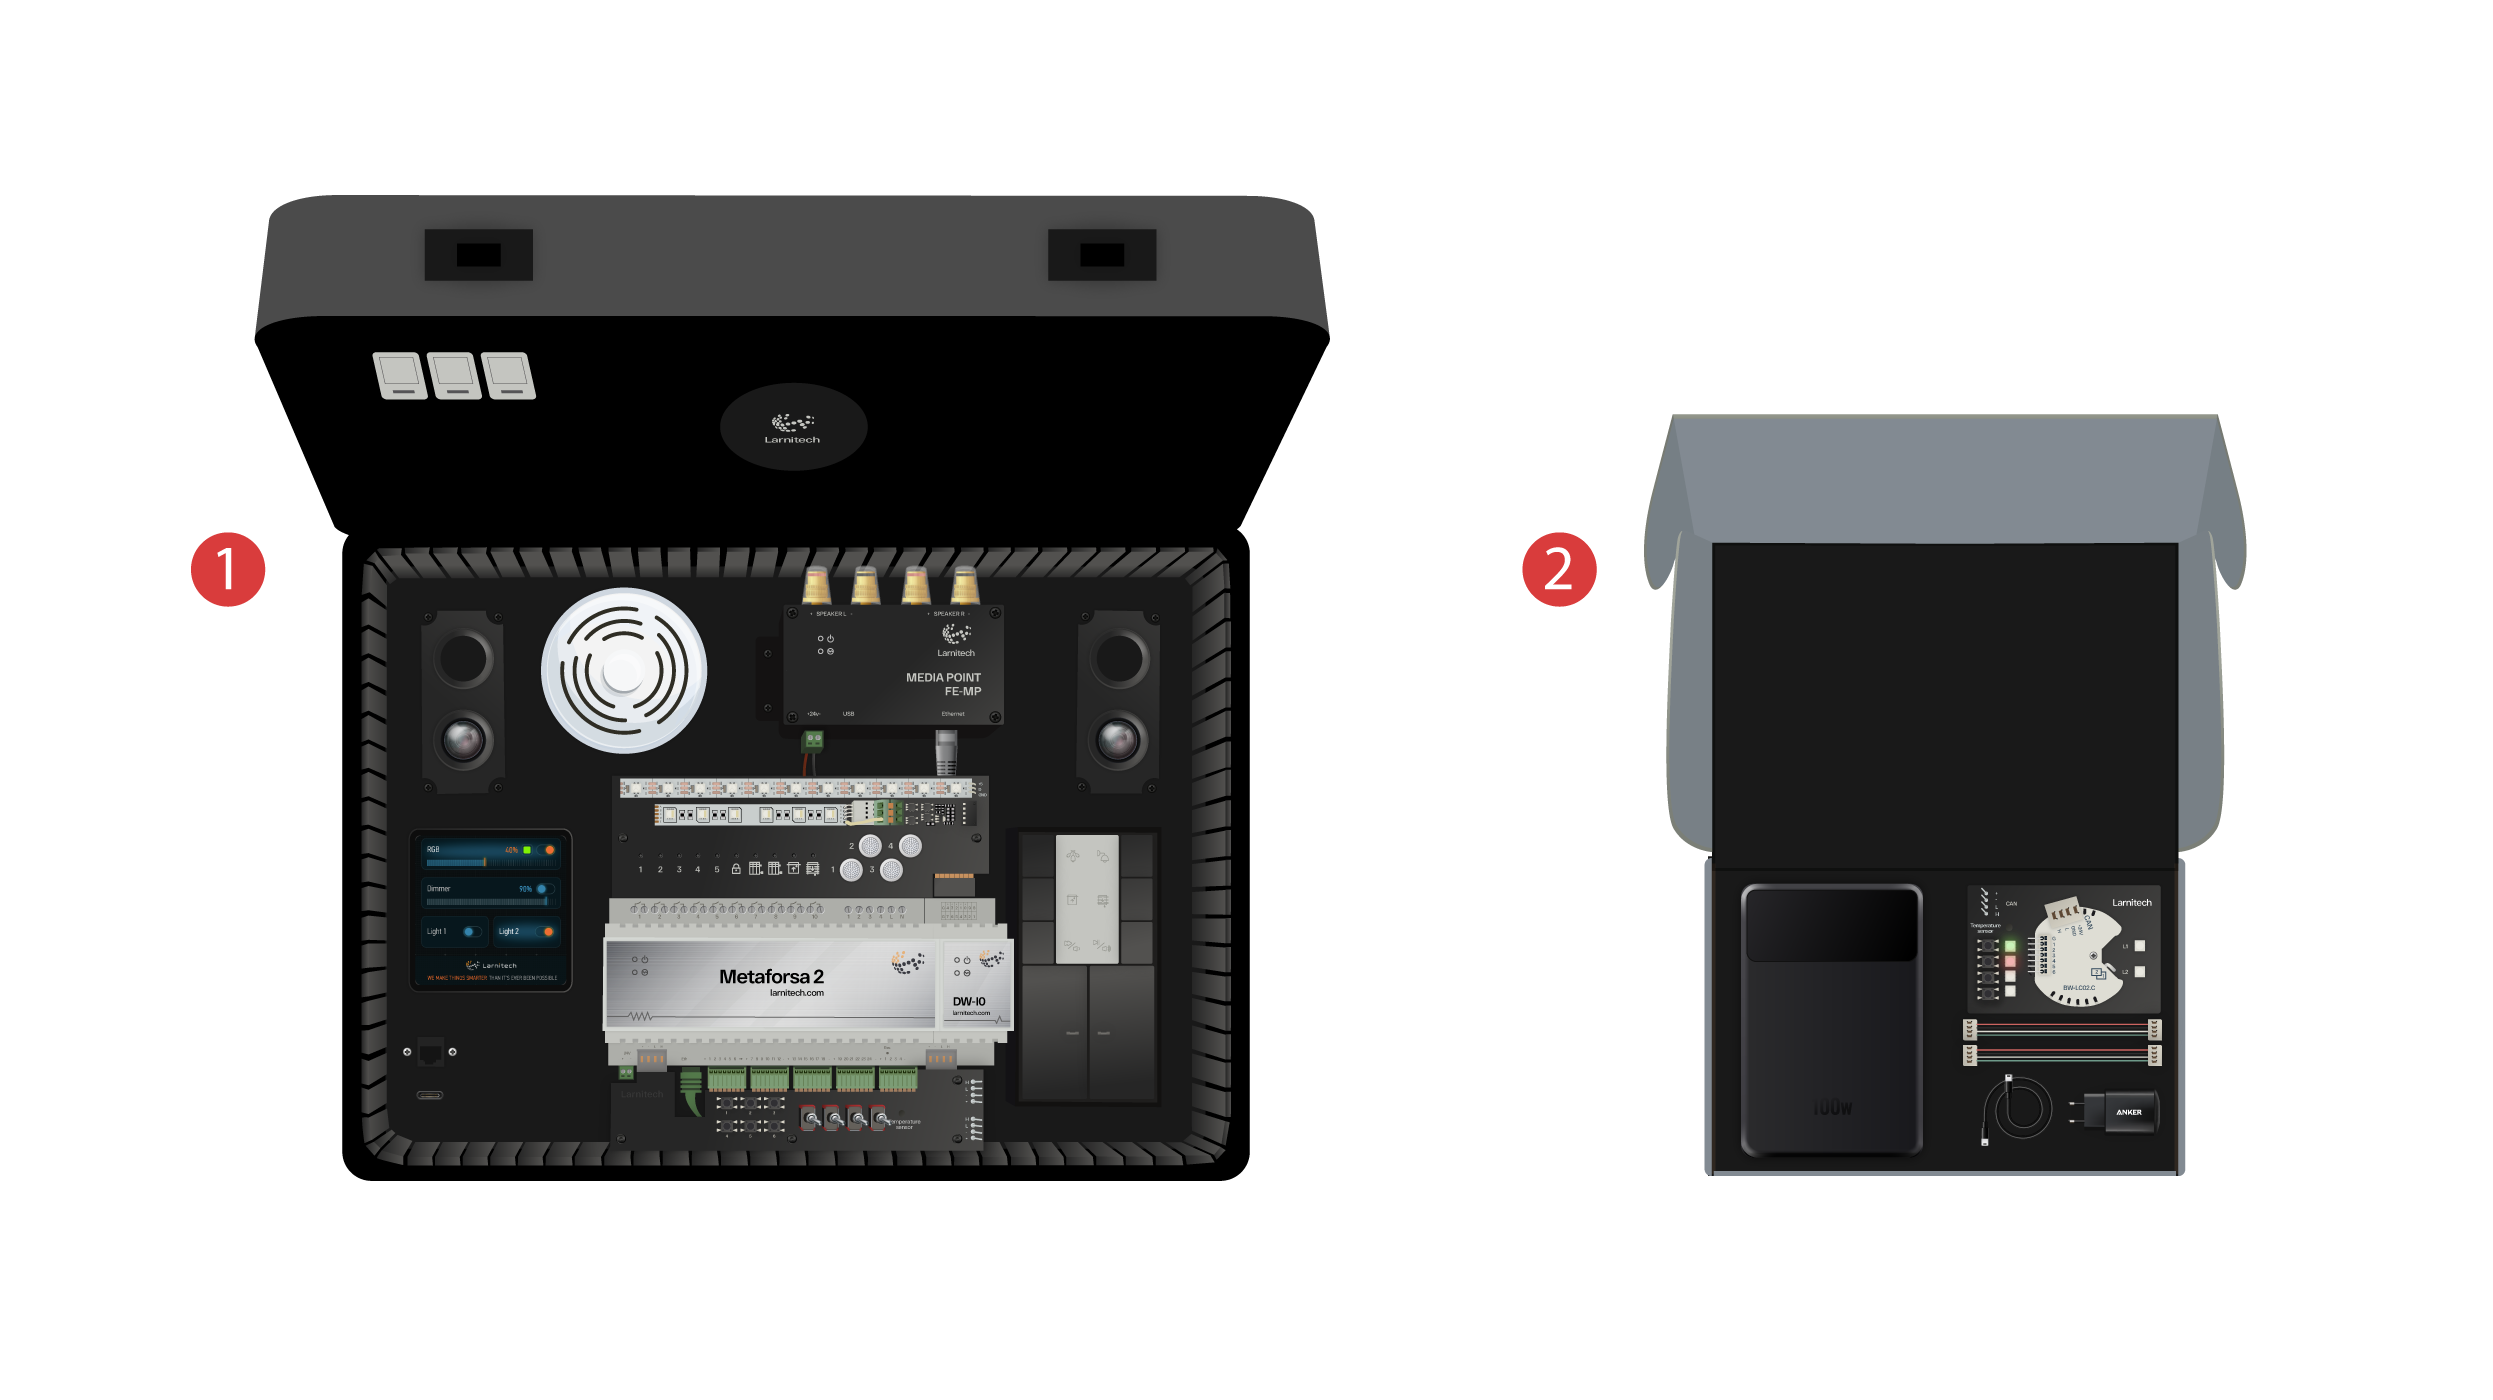
Vítame všetkých na našom kanáli! V tomto videu sa dozviete, ako rýchlo a bez námahy nastaviť systém Larnitech. Nastavenie sa bude vykonávať pomocou ukážkovej kazety. Tréningová súprava obsahuje demonštračný kufrík ① a škatuľu s niekoľkými dodatočnými súčasťami ②.
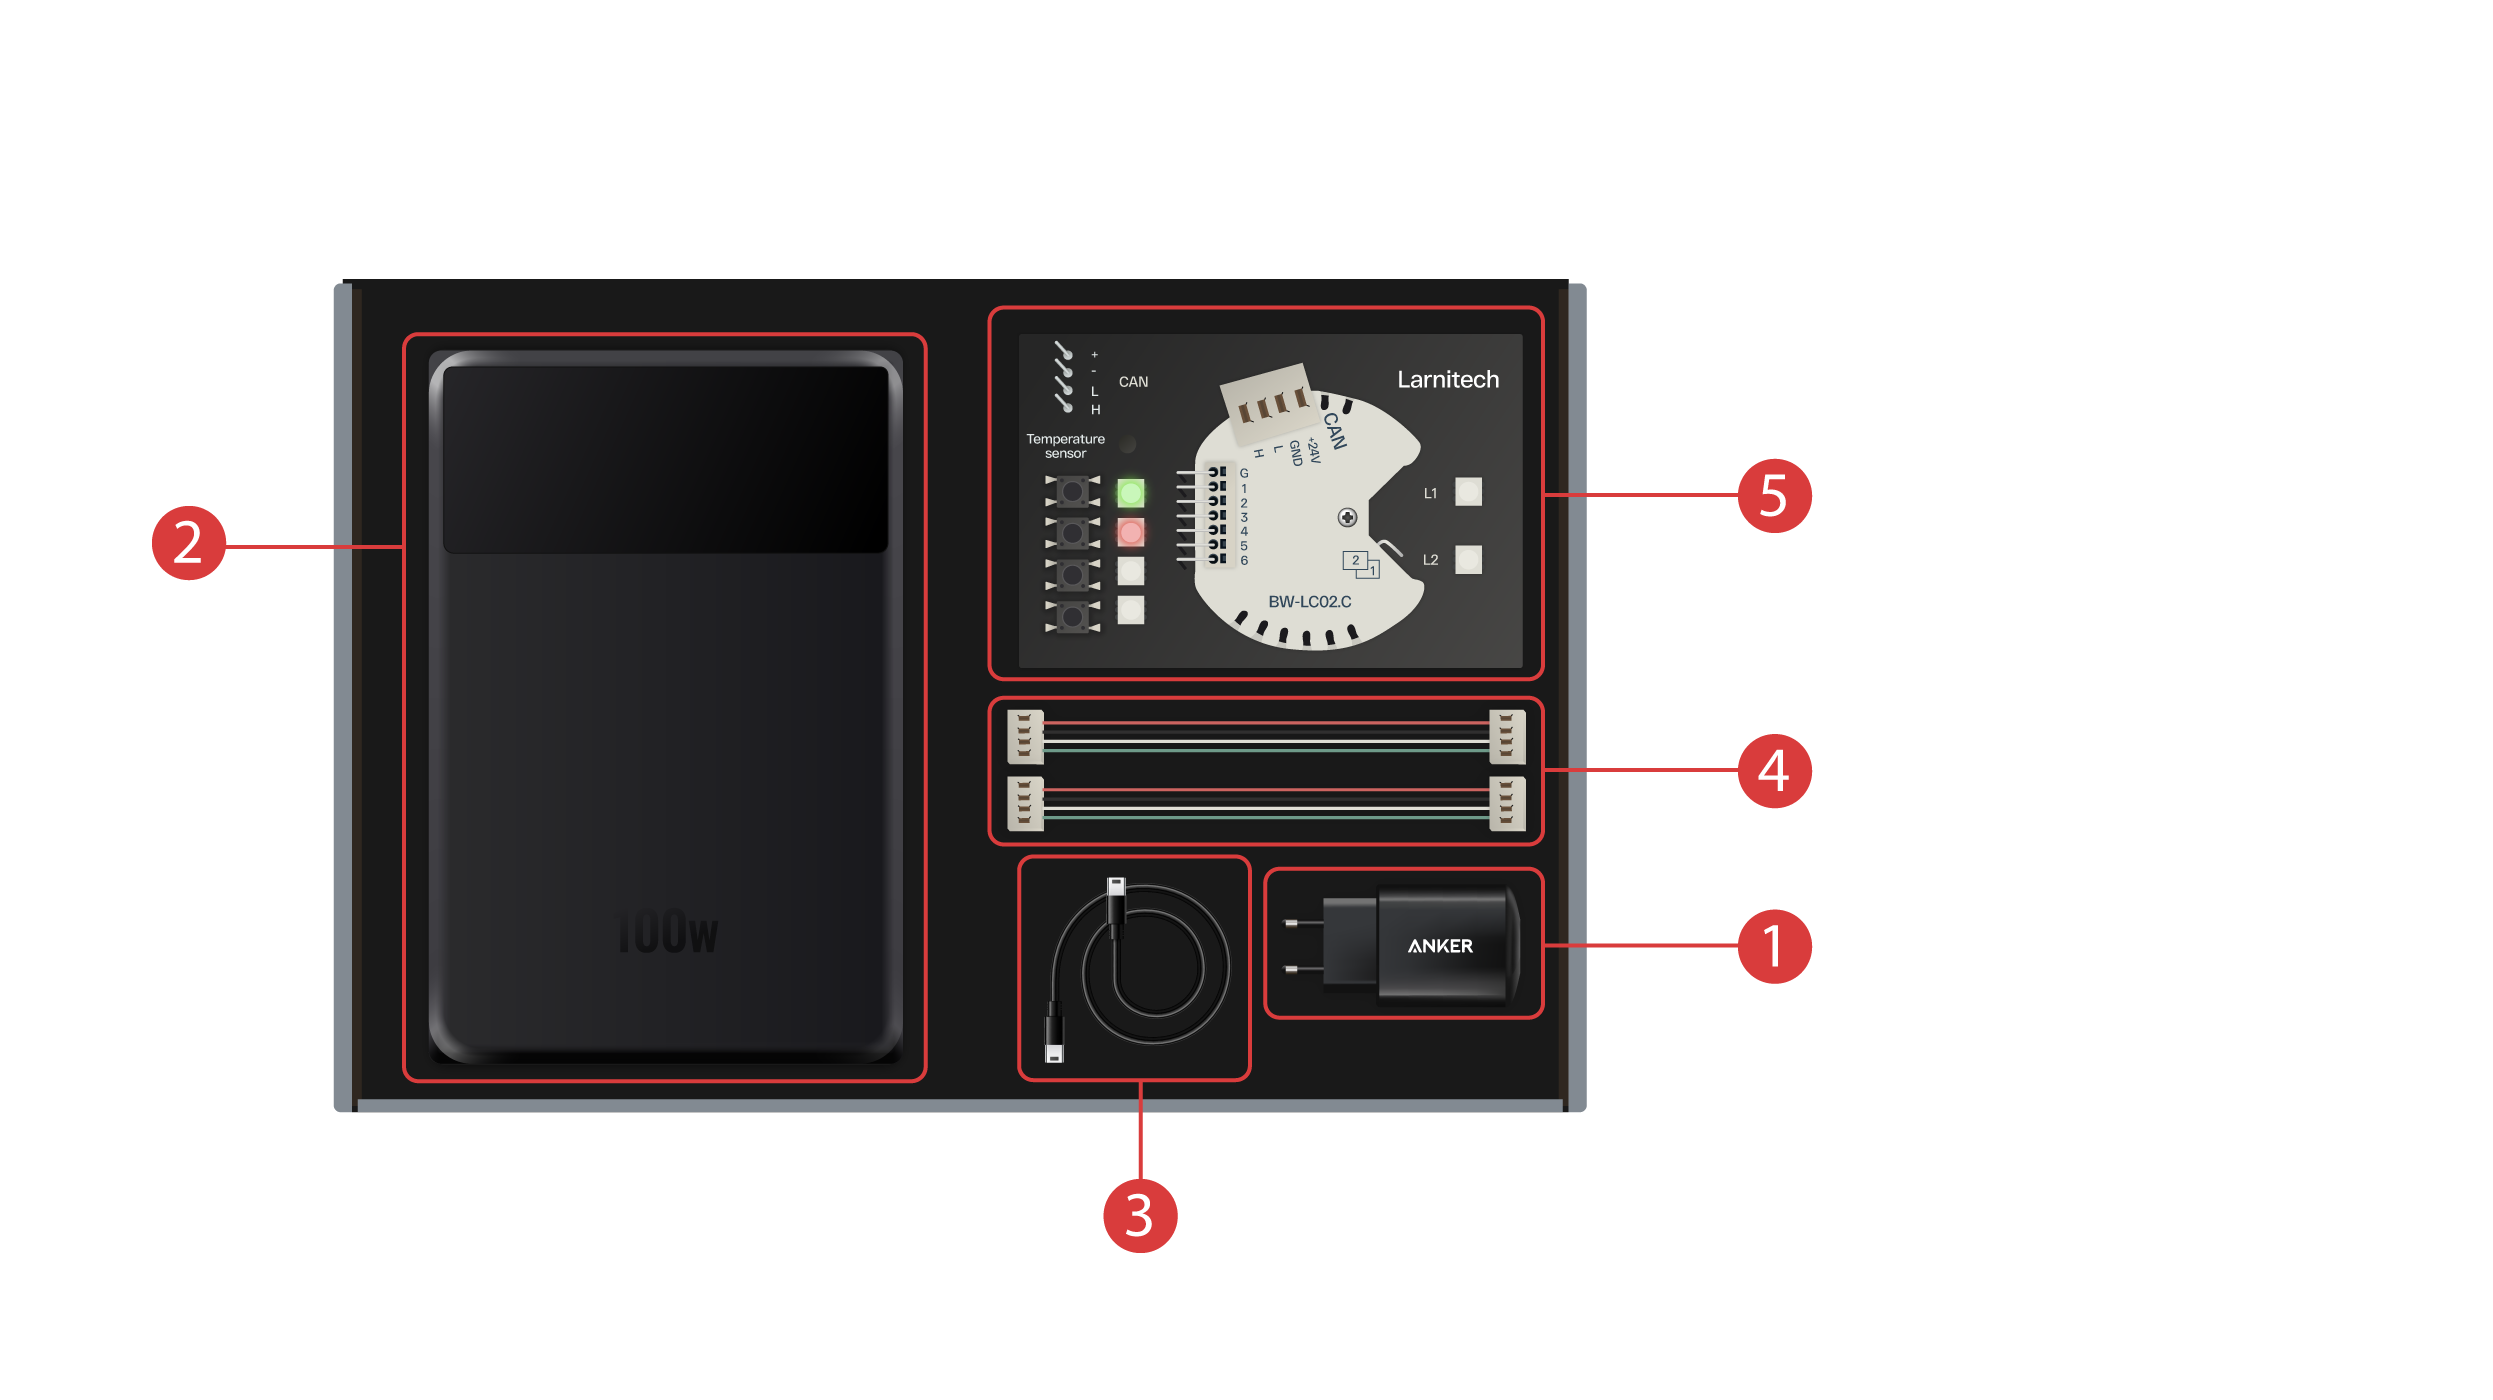
Škatuľa obsahuje nasledujúce komponenty:
① - Napájacia jednotka s USB portom typu C, ktorá podporuje technológiu Power Delivery;
② - powerbanka s displejom a výstupným portom typu C, ktorú možno použiť na napájanie demonštračného kufríka;
③ - Kábel typu C s indikátorom spotreby energie;
④ - 2 káble zbernice CAN;
⑤ - Demonštračná doska obsahujúca modul BW-LC02 s 2 LED svetlami, 4 tlačidlami s podsvietením a pripojeným snímačom teploty.
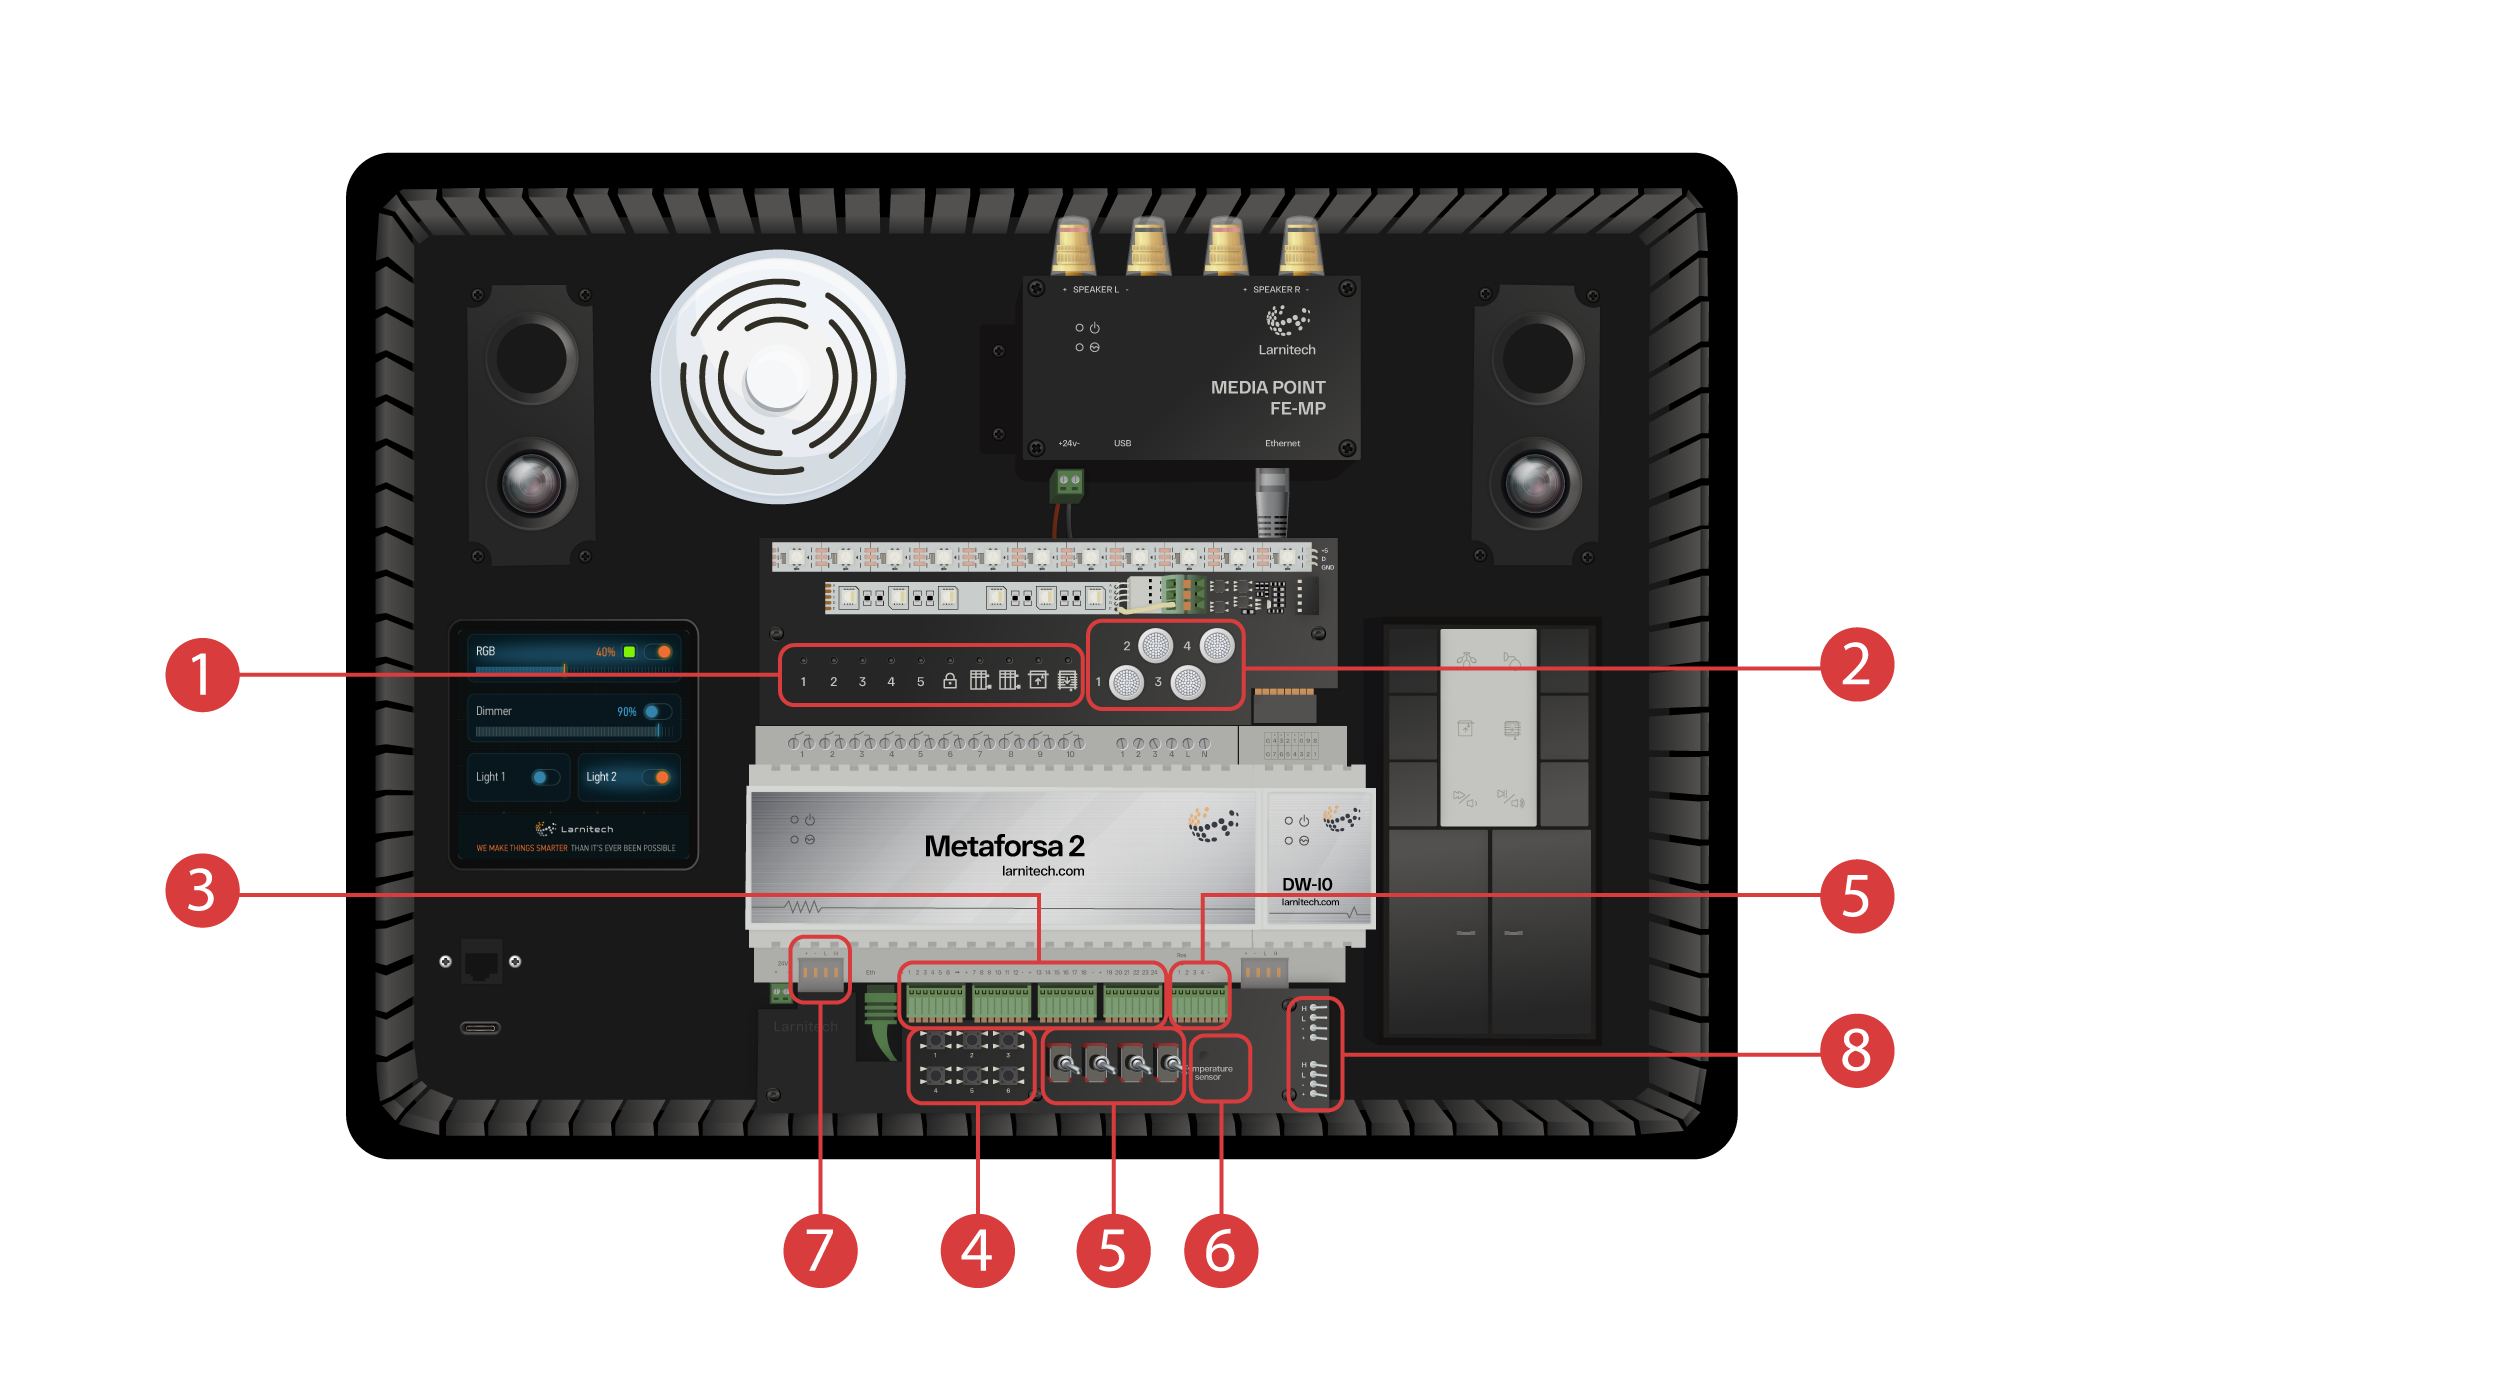
Ukážkový kufrík obsahuje nasledujúce komponenty: ‘Modul Metaforsa 2’.
‘Metaforsa 2’ obsahuje:
① - 10 kanálov relé s pripojenými kontrolkami LED, ktoré indikujú ich aktuálny stav;
② - 4 stmievateľné kanály s pripojenými stmievateľnými LED svetlami;
③ - 24 vstupných kanálov, ku ktorým je pripojených 6 tlačidiel ④ a 4 prepínače ⑤ na imitáciu rôznych senzorov;
⑥ - Vstupné kanály pre snímače teploty s jedným pripojeným snímačom;
⑦ - zbernica CAN na pripojenie ďalších zariadení. Sú k nej pripojené ďalšie moduly ukážkovej kazety, ako aj 2 porty ⑧ na pripojenie externých zariadení.
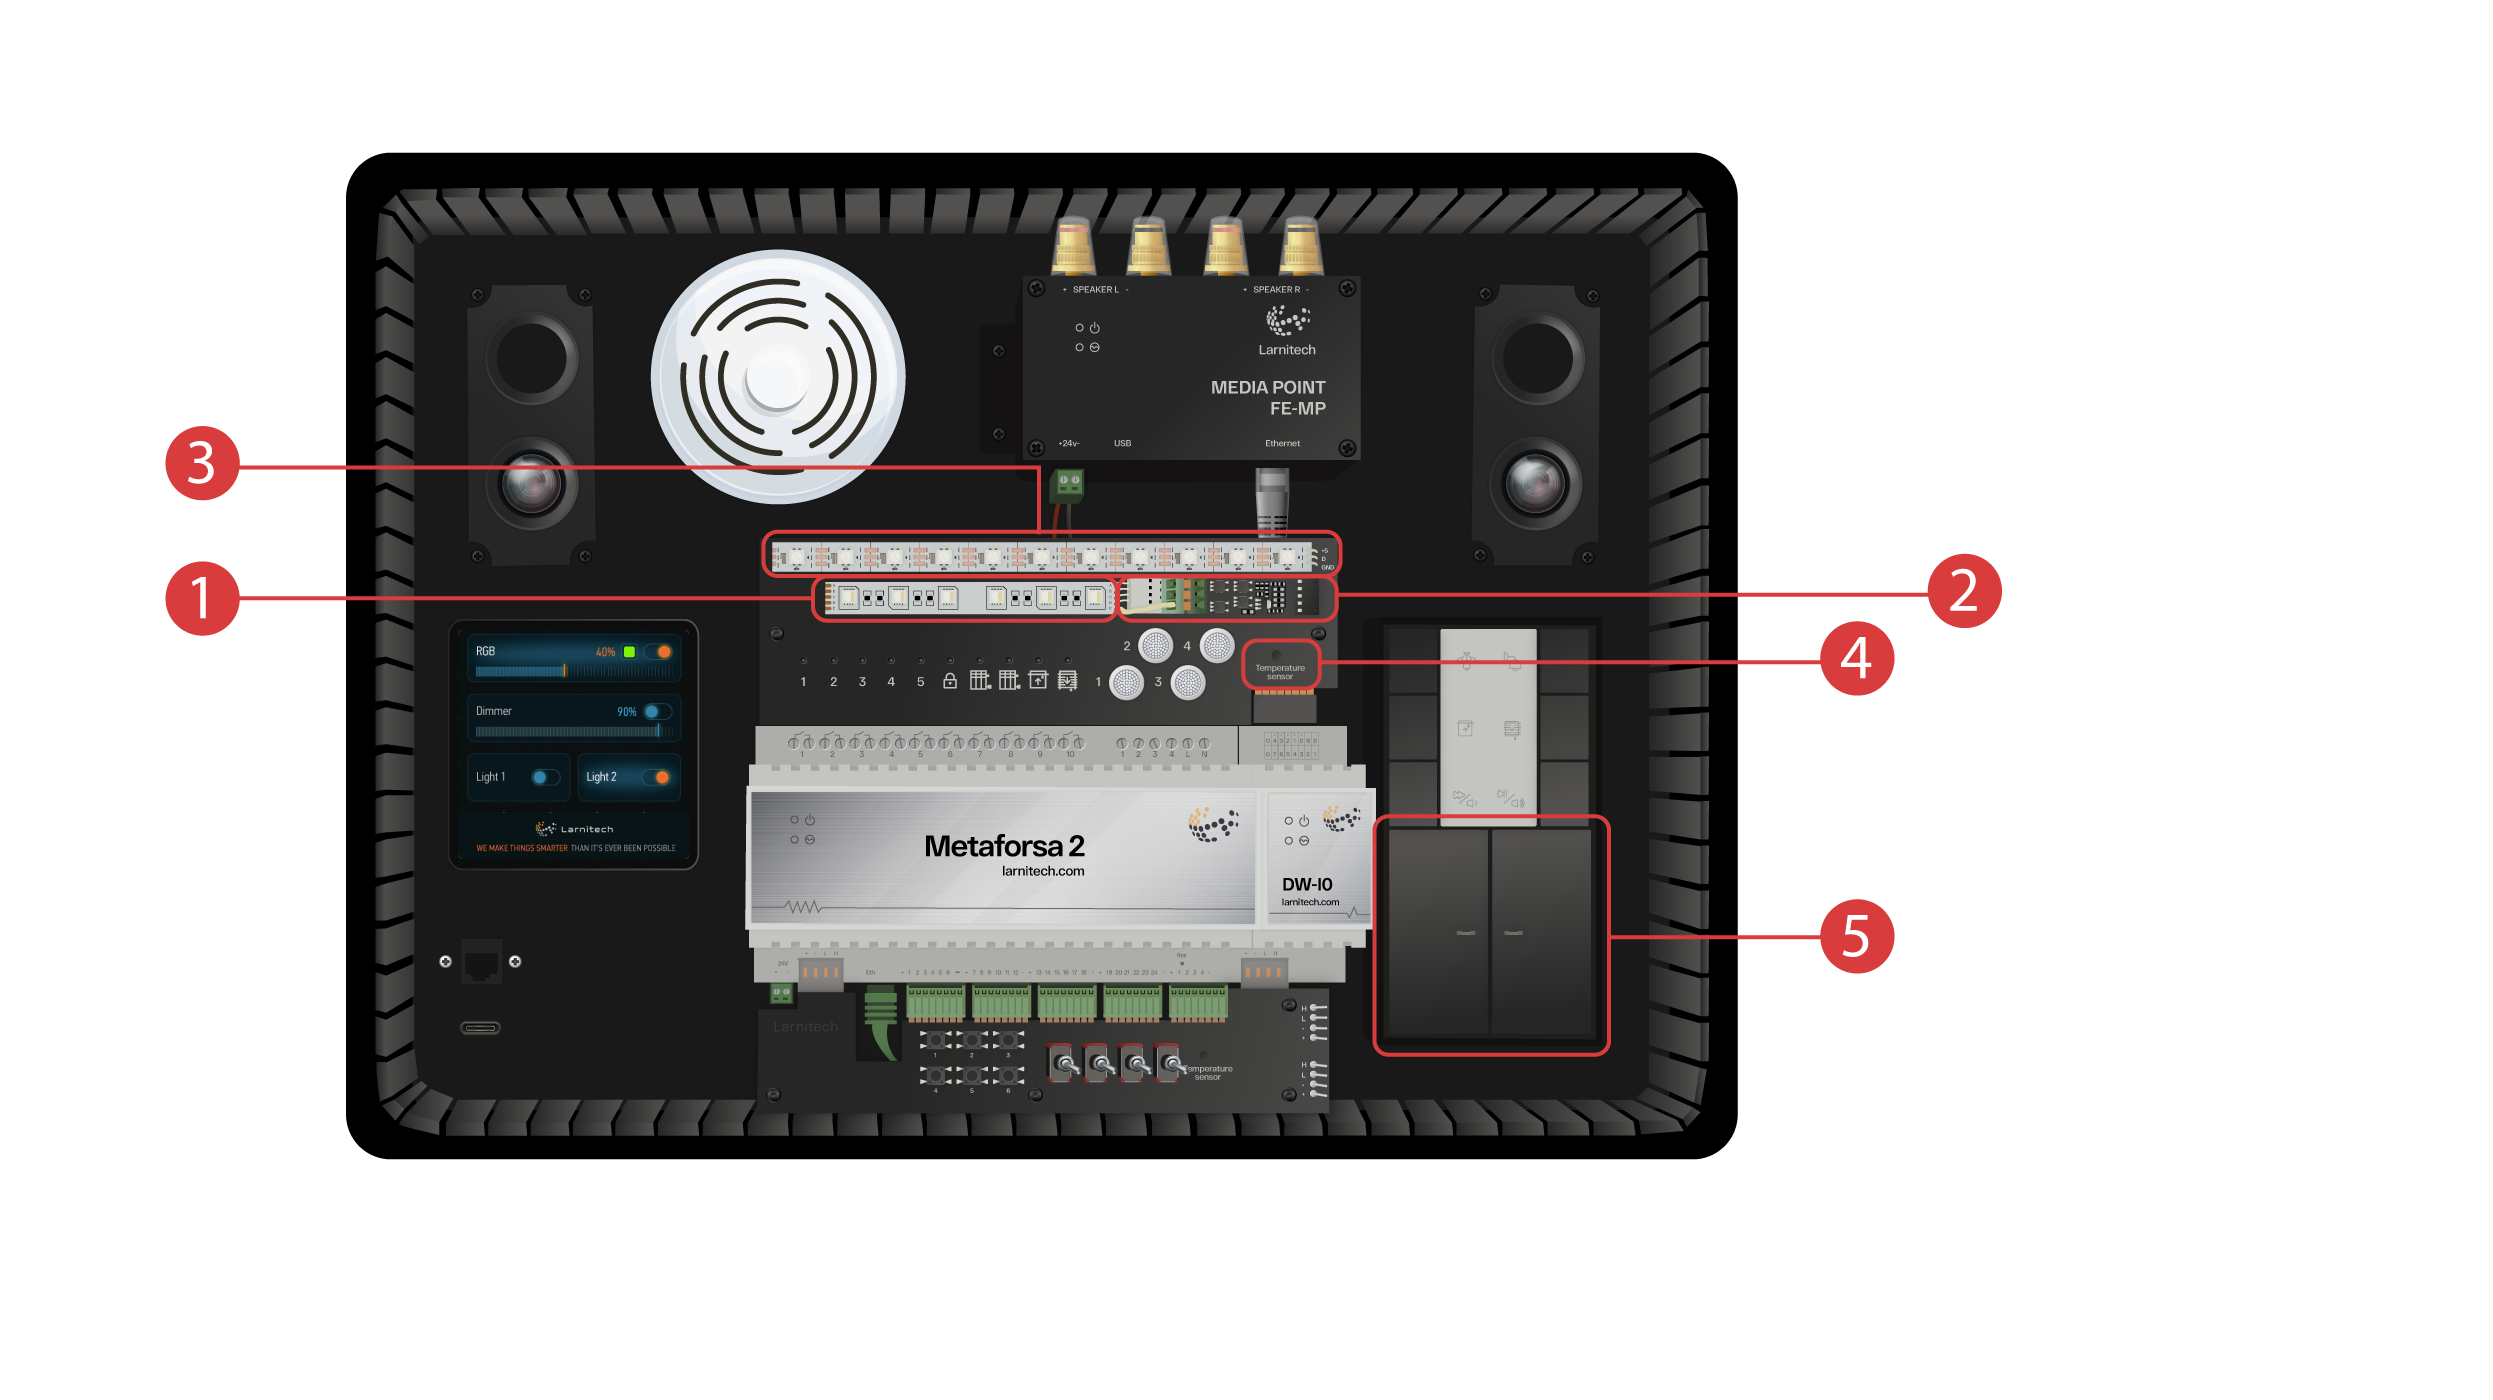
DW-IO modul
Tento modul má 14 univerzálnych vstupných/výstupných kanálov, ku ktorým sú pripojené tieto položky:
① - 4-kanálový pás RGBW, pripojený cez prúdový zosilňovač AMP5V-4②;
③ - Pásik s nasmerovanými svetlami LED. Každé z týchto LED svetiel môže svietiť vlastnou farbou;
④ - Snímač teploty;
⑤ - A dve tlačidlá s podsvietením.
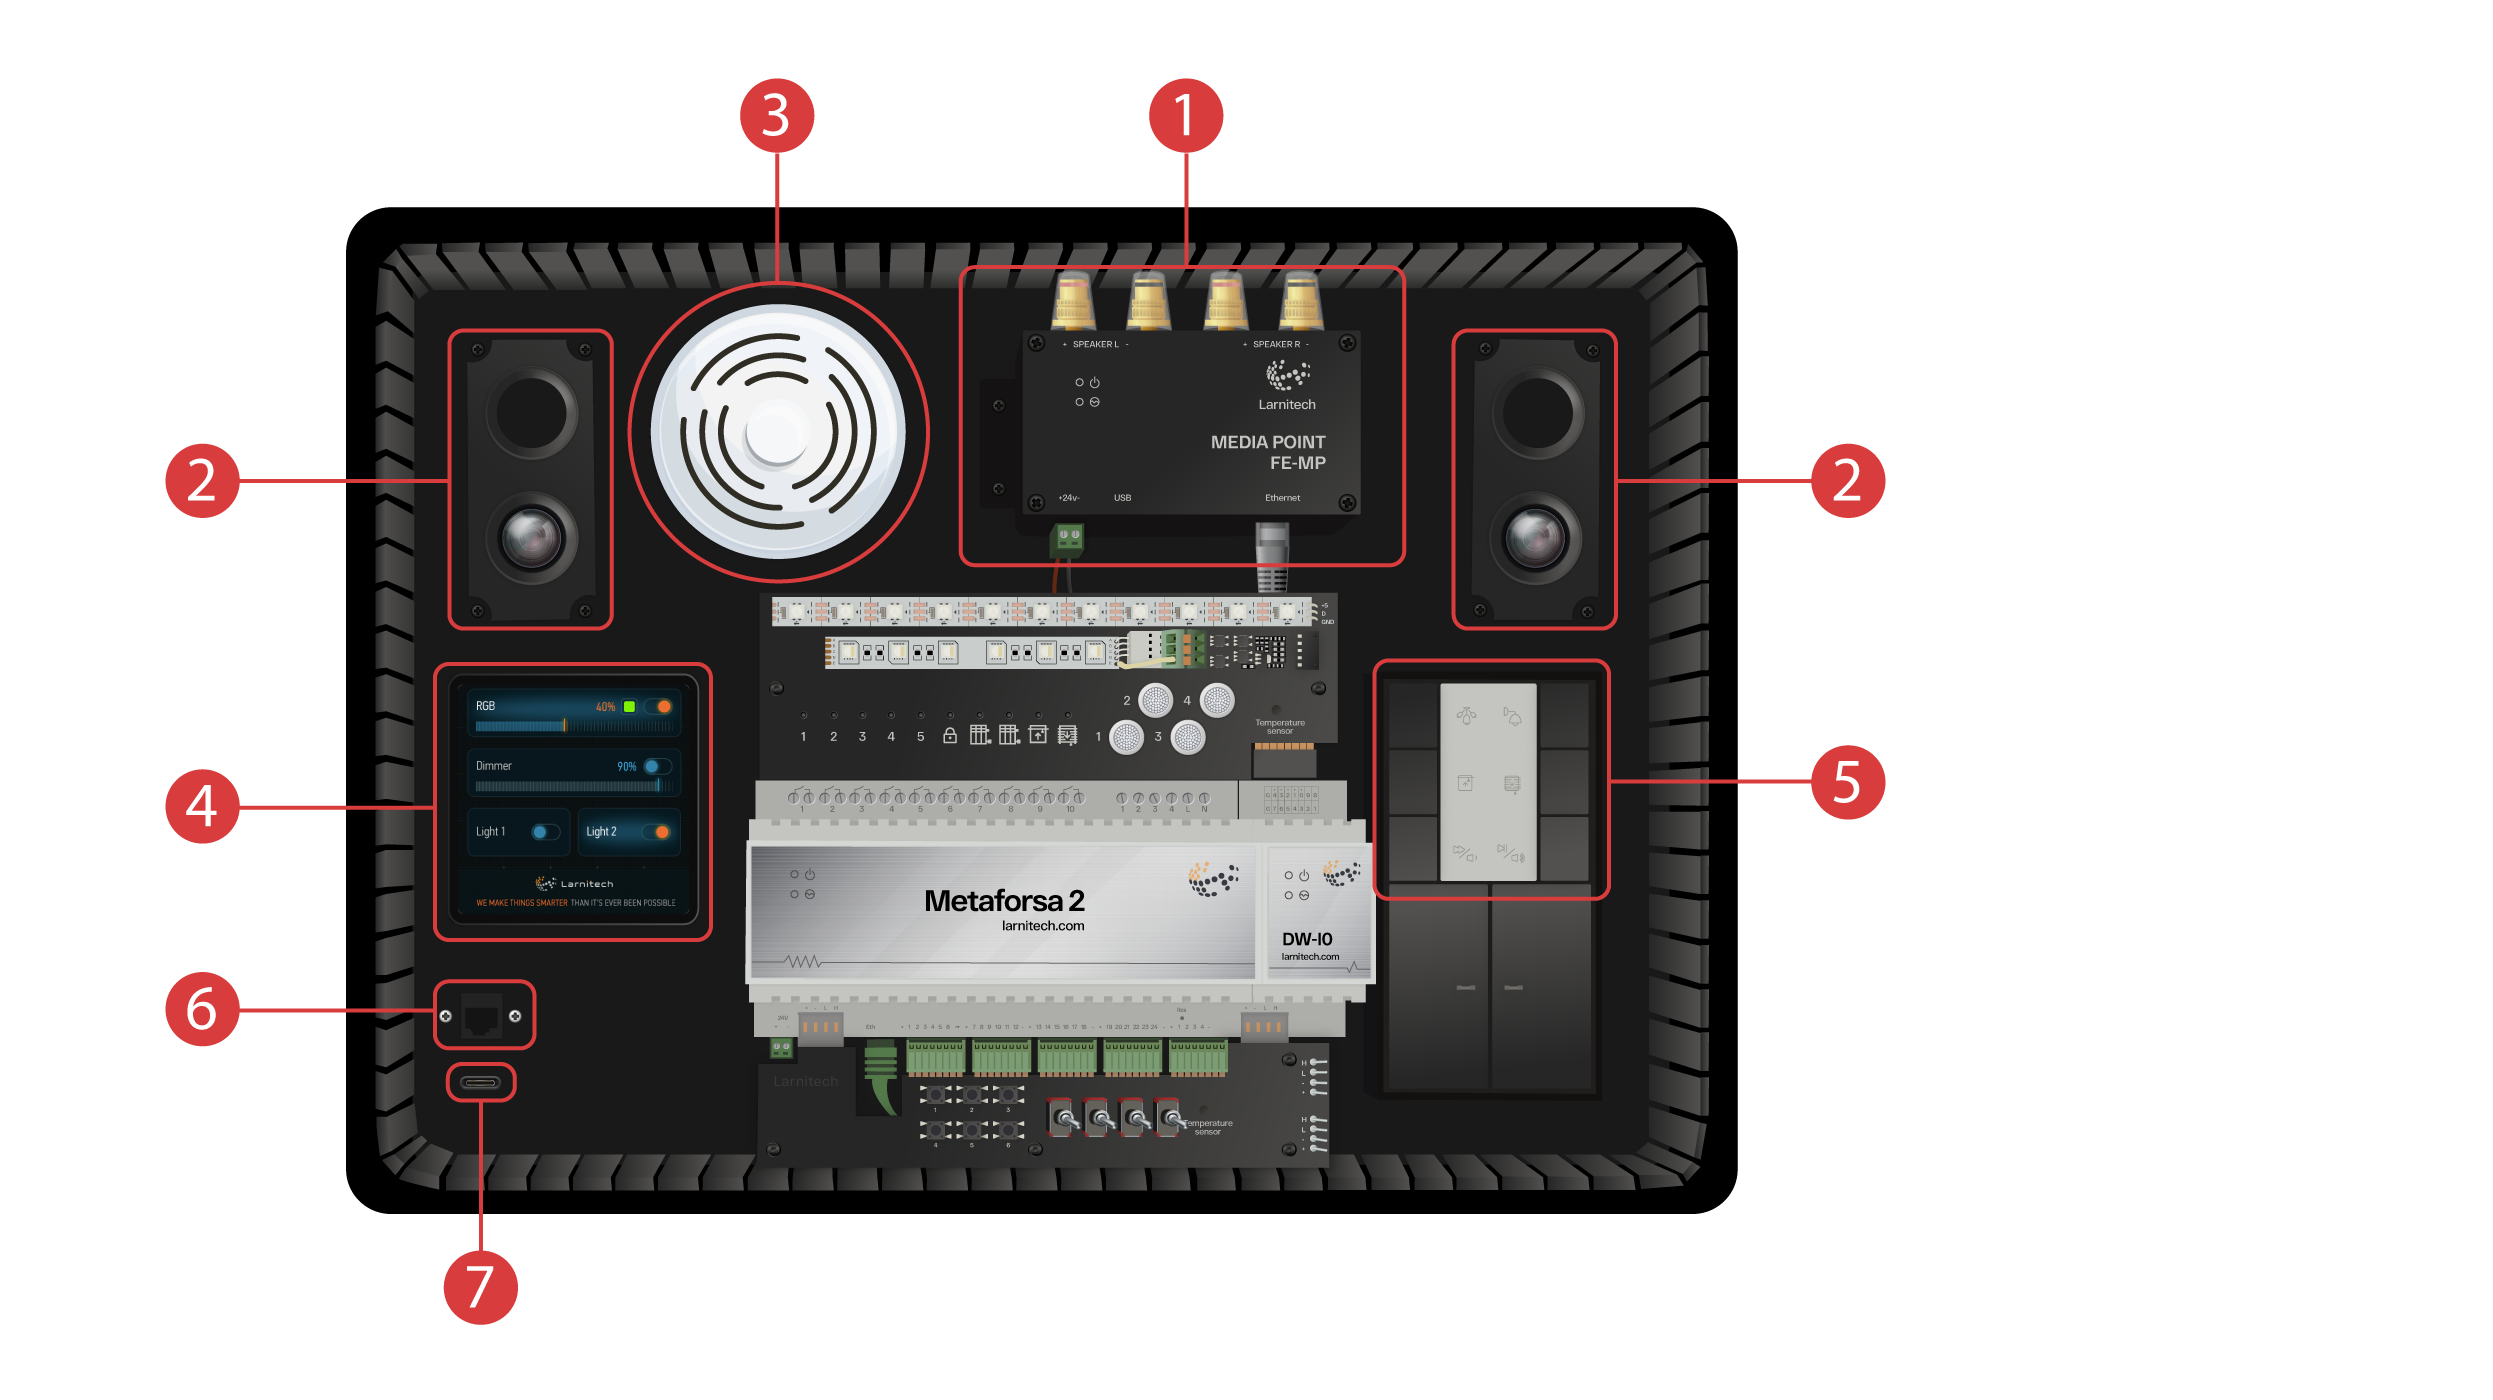
Ukážková kazeta obsahuje tiež tieto komponenty:
① - Media Point FE-MP s ② dvoma reproduktormi;
③ - Senzor typu "šesť v jednom" CW-CO2, ktorý meria: Úroveň pohybu, Osvetlenie, Teplotu, Vlhkosť, Úroveň CO2 a ktorý má infračervený vysielač;
④ - 4-palcový panel senzorov LCP4, ktorý môže zobrazovať bežné rozhranie alebo rozhranie prispôsobené pre nástenné panely;
Vo vnútri skrine sa nachádza ovládací modul BW-SW24, ku ktorému je pripojená šesťtlačidlová 24-voltová klávesnica JUNG ⑤;
A router Wi-Fi, ktorý sa dá pripojiť k internetu buď cez ethernetový port na prednom paneli skrinky ⑥, alebo cez dostupnú Wi-Fi sieť;
Na napájanie slúži port typu C ⑦, ktorý sa nachádza na prednom paneli.
Všetky zariadenia nainštalované v ukážkovej kazete sú napájané napätím 20 V, ktoré je pre používateľa absolútne bezpečné.
Pripojte napájací kábel a ethernetový kábel. Ak nemáte možnosť pripojenia cez sieť Ethernet, neskôr vám v tomto videu ukážeme, ako pripojiť vstavaný smerovač k Wi-Fi sieti.
Aby ste mohli pokračovať, je potrebné nainštalovať aplikáciu Larnitech do smartfónu alebo tabletu. Stačí naskenovať prvý QR kód z hornej časti kazety.
Ak sa po inštalácii a spustení aplikácie pripojenie nevytvorí automaticky, musíte sa pripojiť k sieti Wi-Fi "Larnitech_case_5G" pomocou mobilného zariadenia. Následne spustite aplikáciu a naskenujte prvý QR kód v časti "Pripojenia".
Ak ukážková súprava nie je pripojená k internetu, je možné, že bude potrebné vypnúť prenos údajov v mobilnom zariadení.

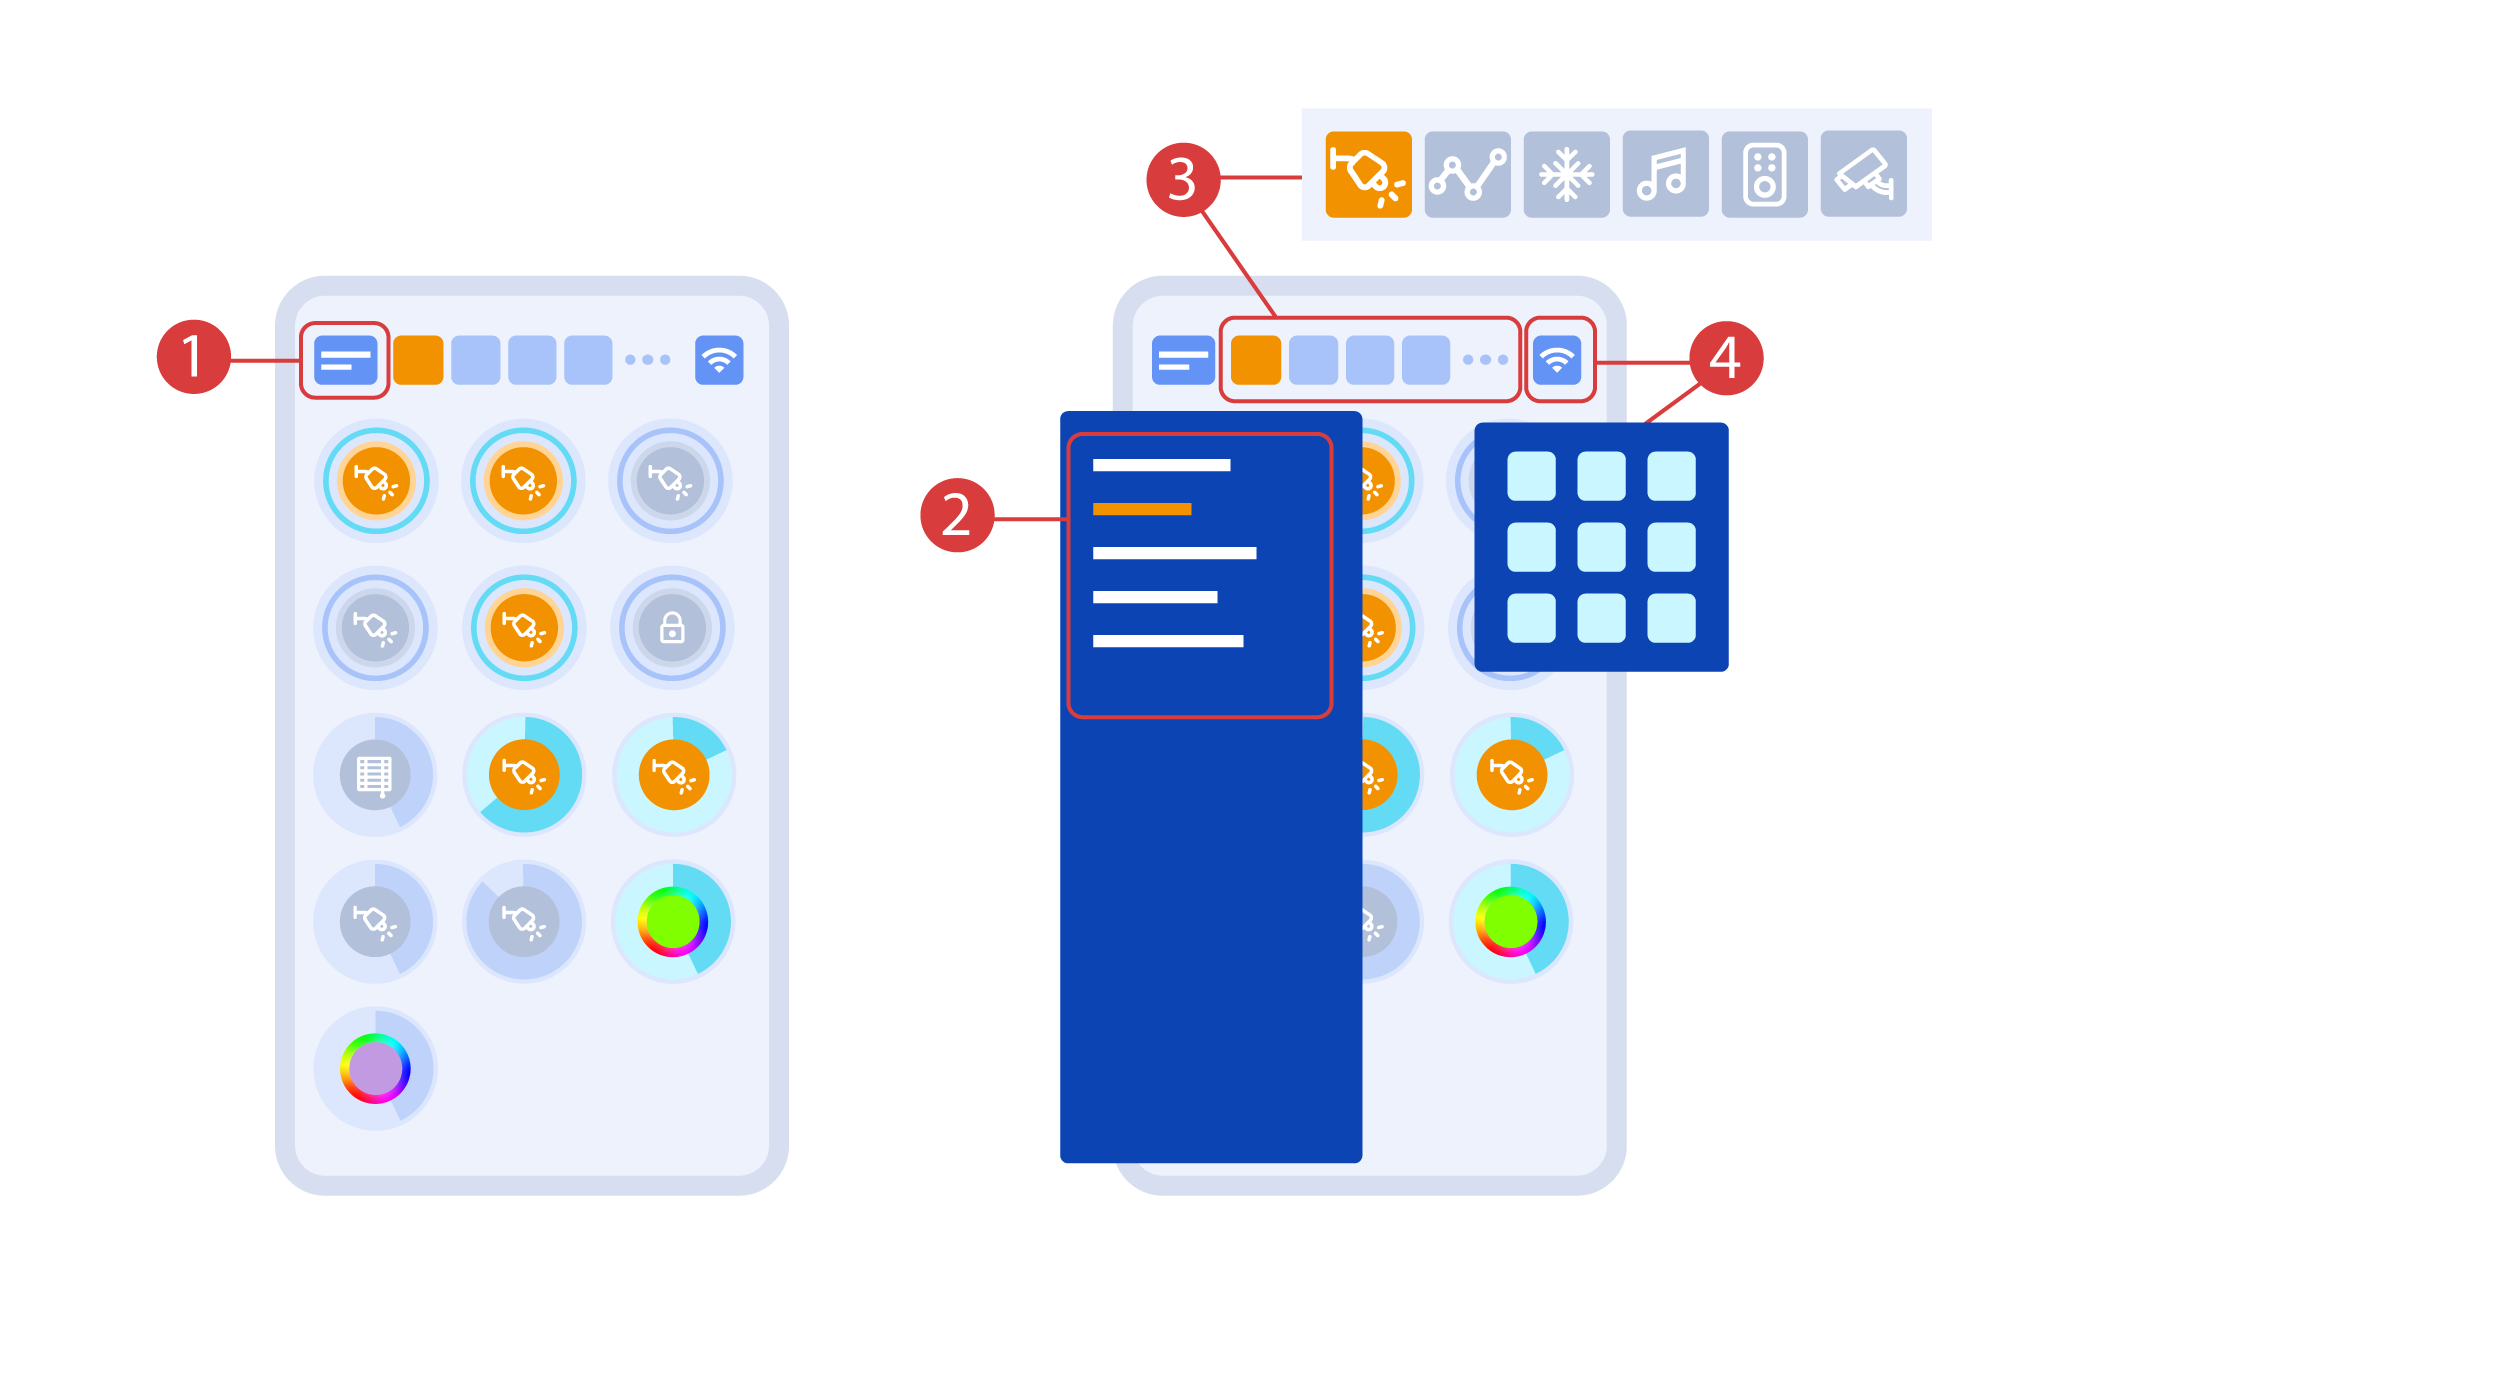
The main screen of the app has several key elements. In the upper left corner there is the ‘area select’ menu ①.
Just click one of the available areas in order to manage it ②.
Then there are icons which let you choose the executors, sensors, climate, multimedia, remote controls and cameras ③. In the right corner there is an icon for the additional menu ④. Inside the icon you can also see the status of the current connection.
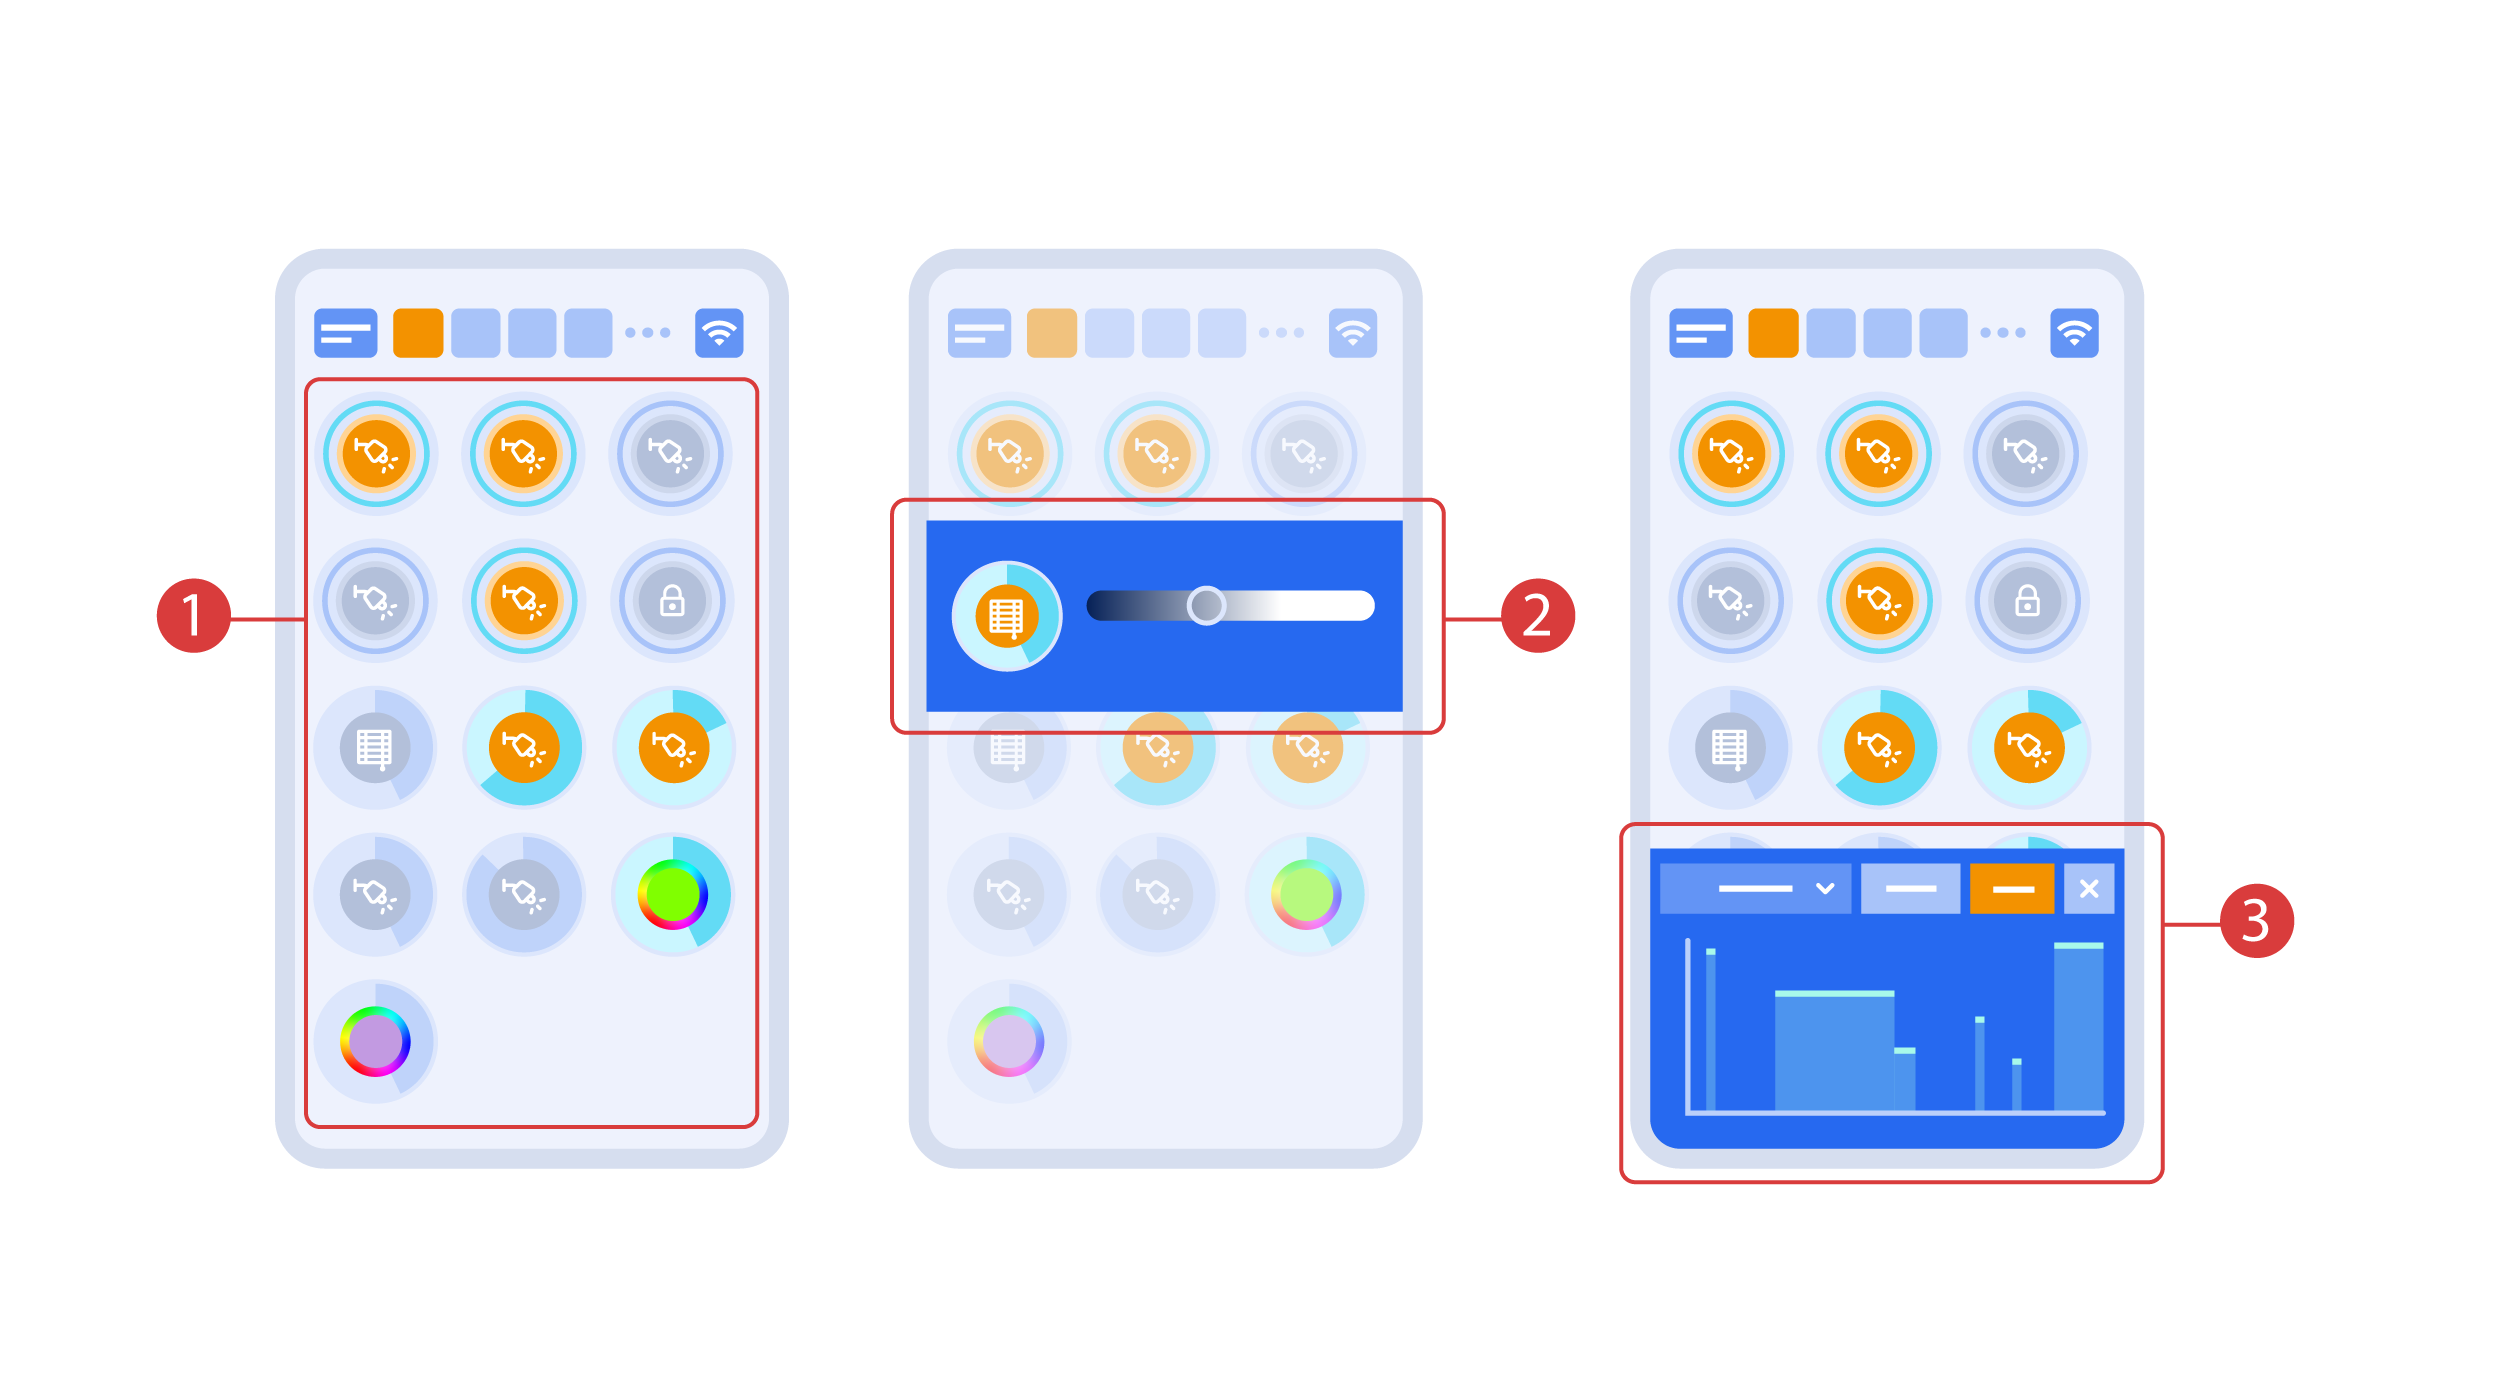
Turning the executors ① on or off is done with a simple click. In order to change the level of lighting ②, color of lights or the position of the blinds, use a double click. In order to access the status history ③ of this executor or sensor, press and hold the icon for one second.
A short press of the physical buttons on the panel turns the light on or off. Press and hold the button to change the light brightness.
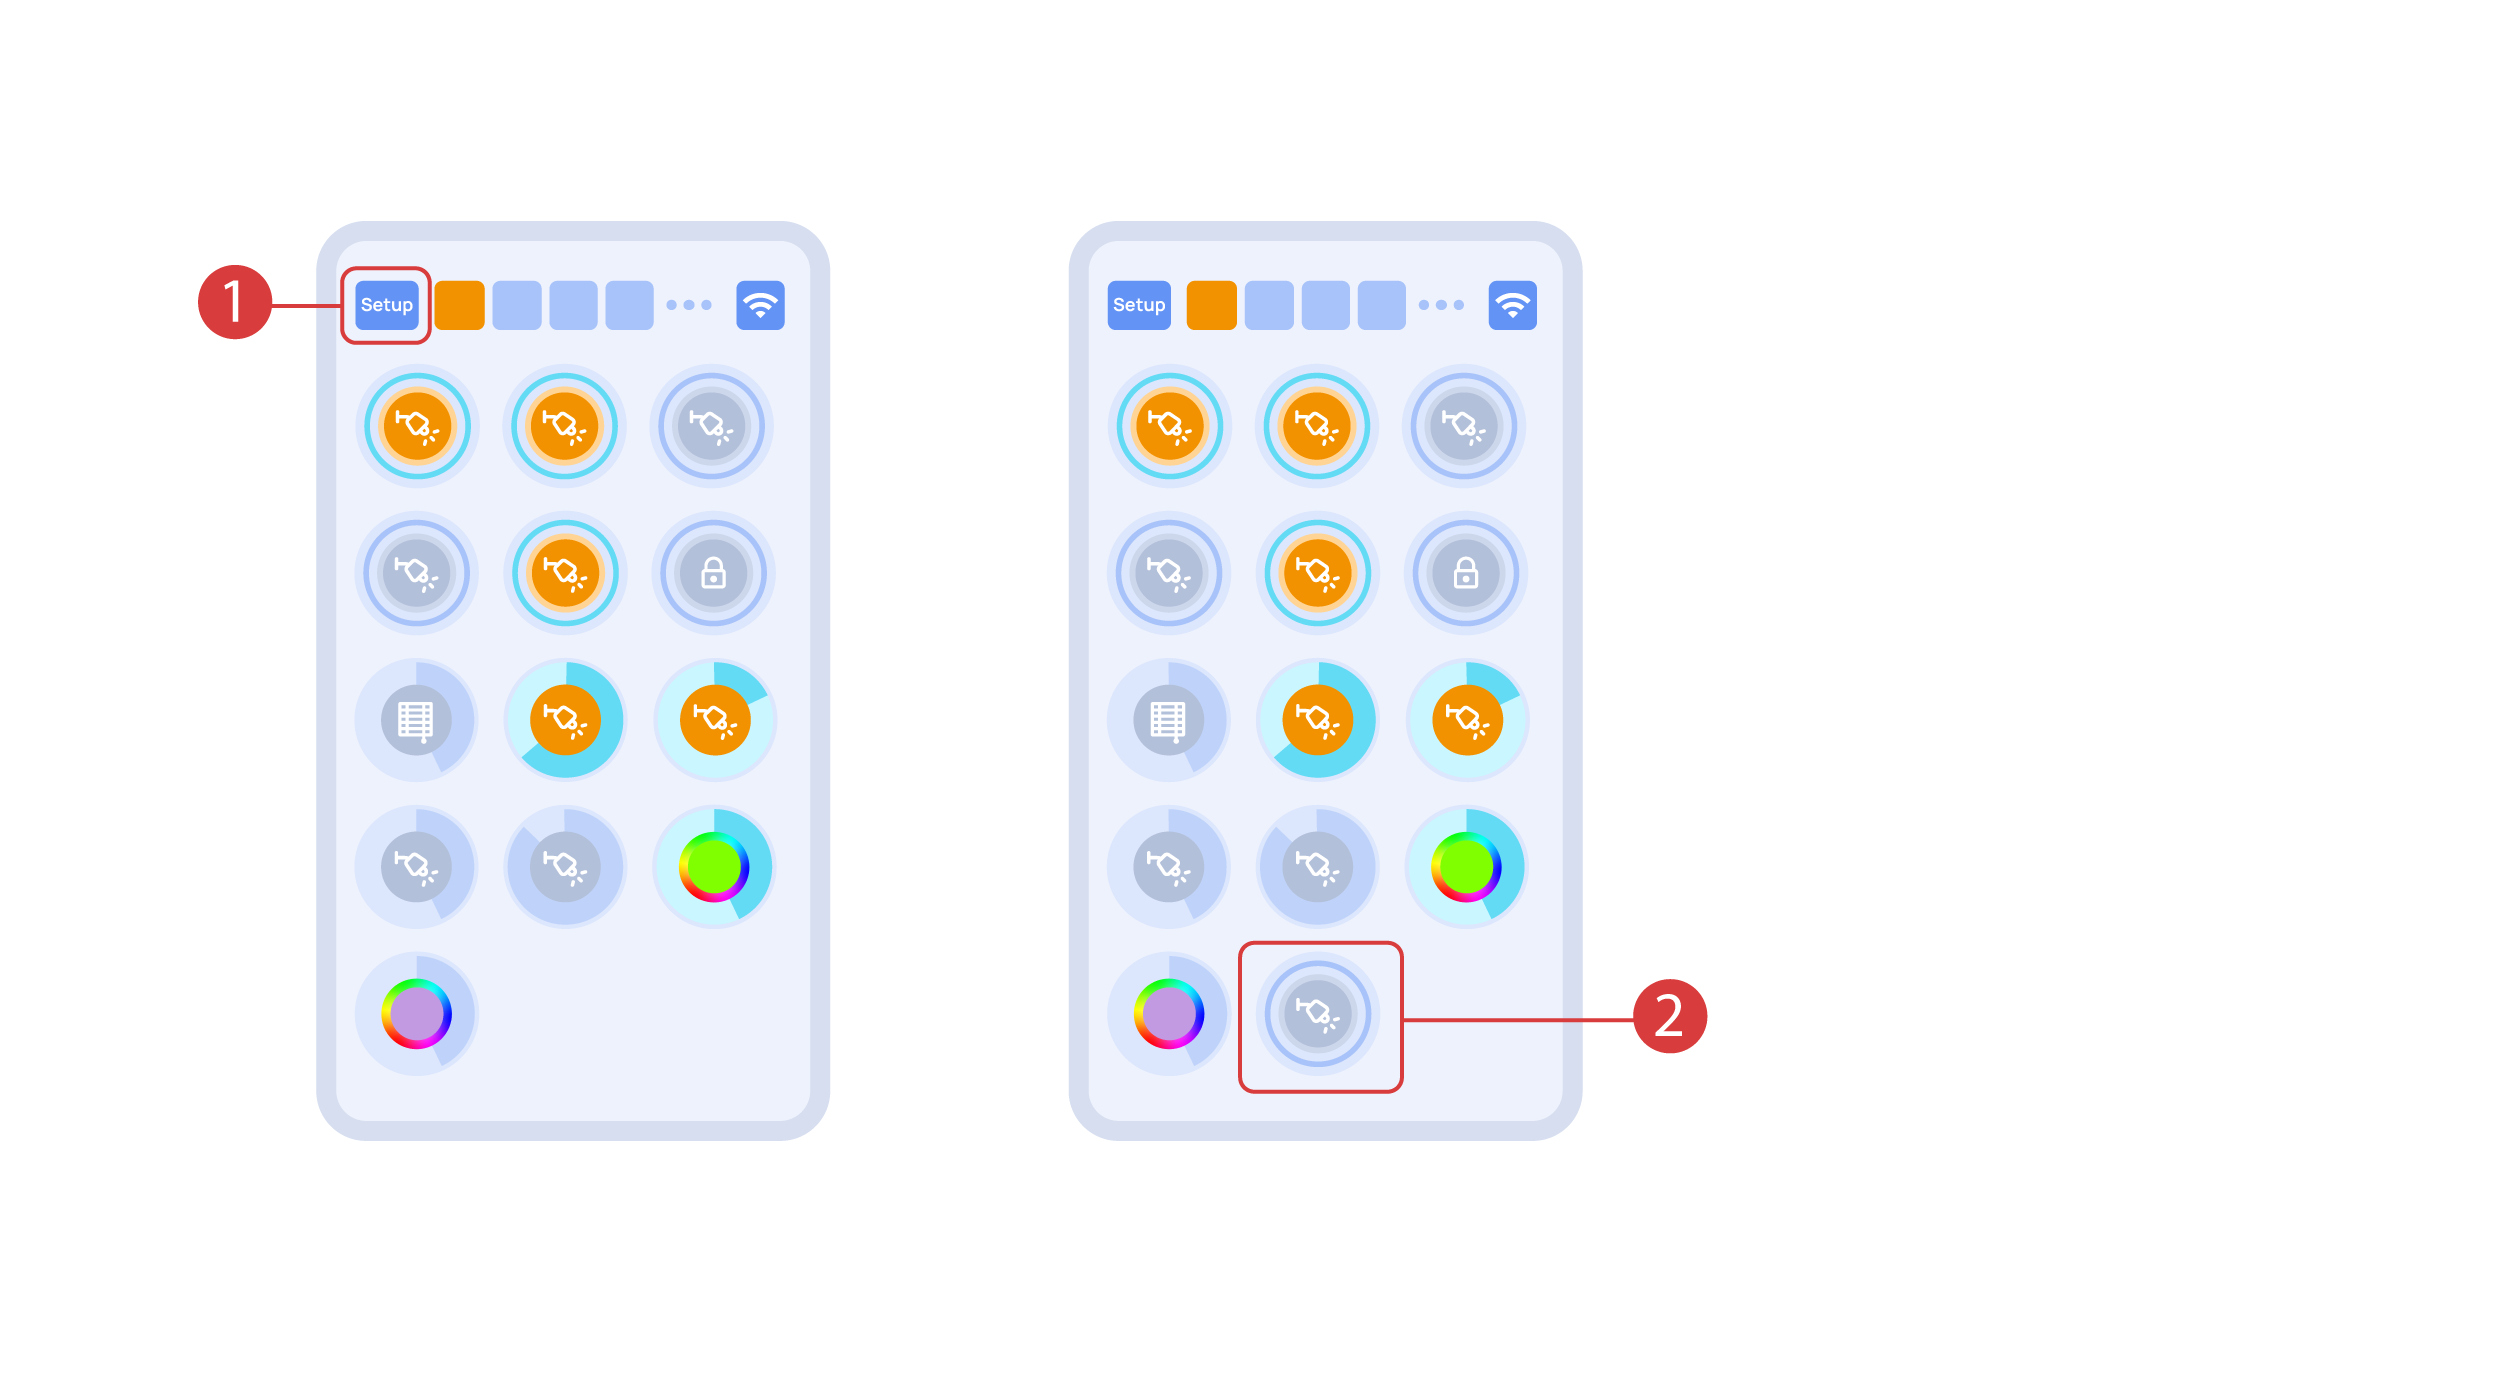
In order to demonstrate the Plug and Play function, we open the executors in the Setup area ① and connect the module to the CAN bus. The system automatically detects the new module and adds it to the ‘Setup’ area, ② where we are able to control the new module instantly.
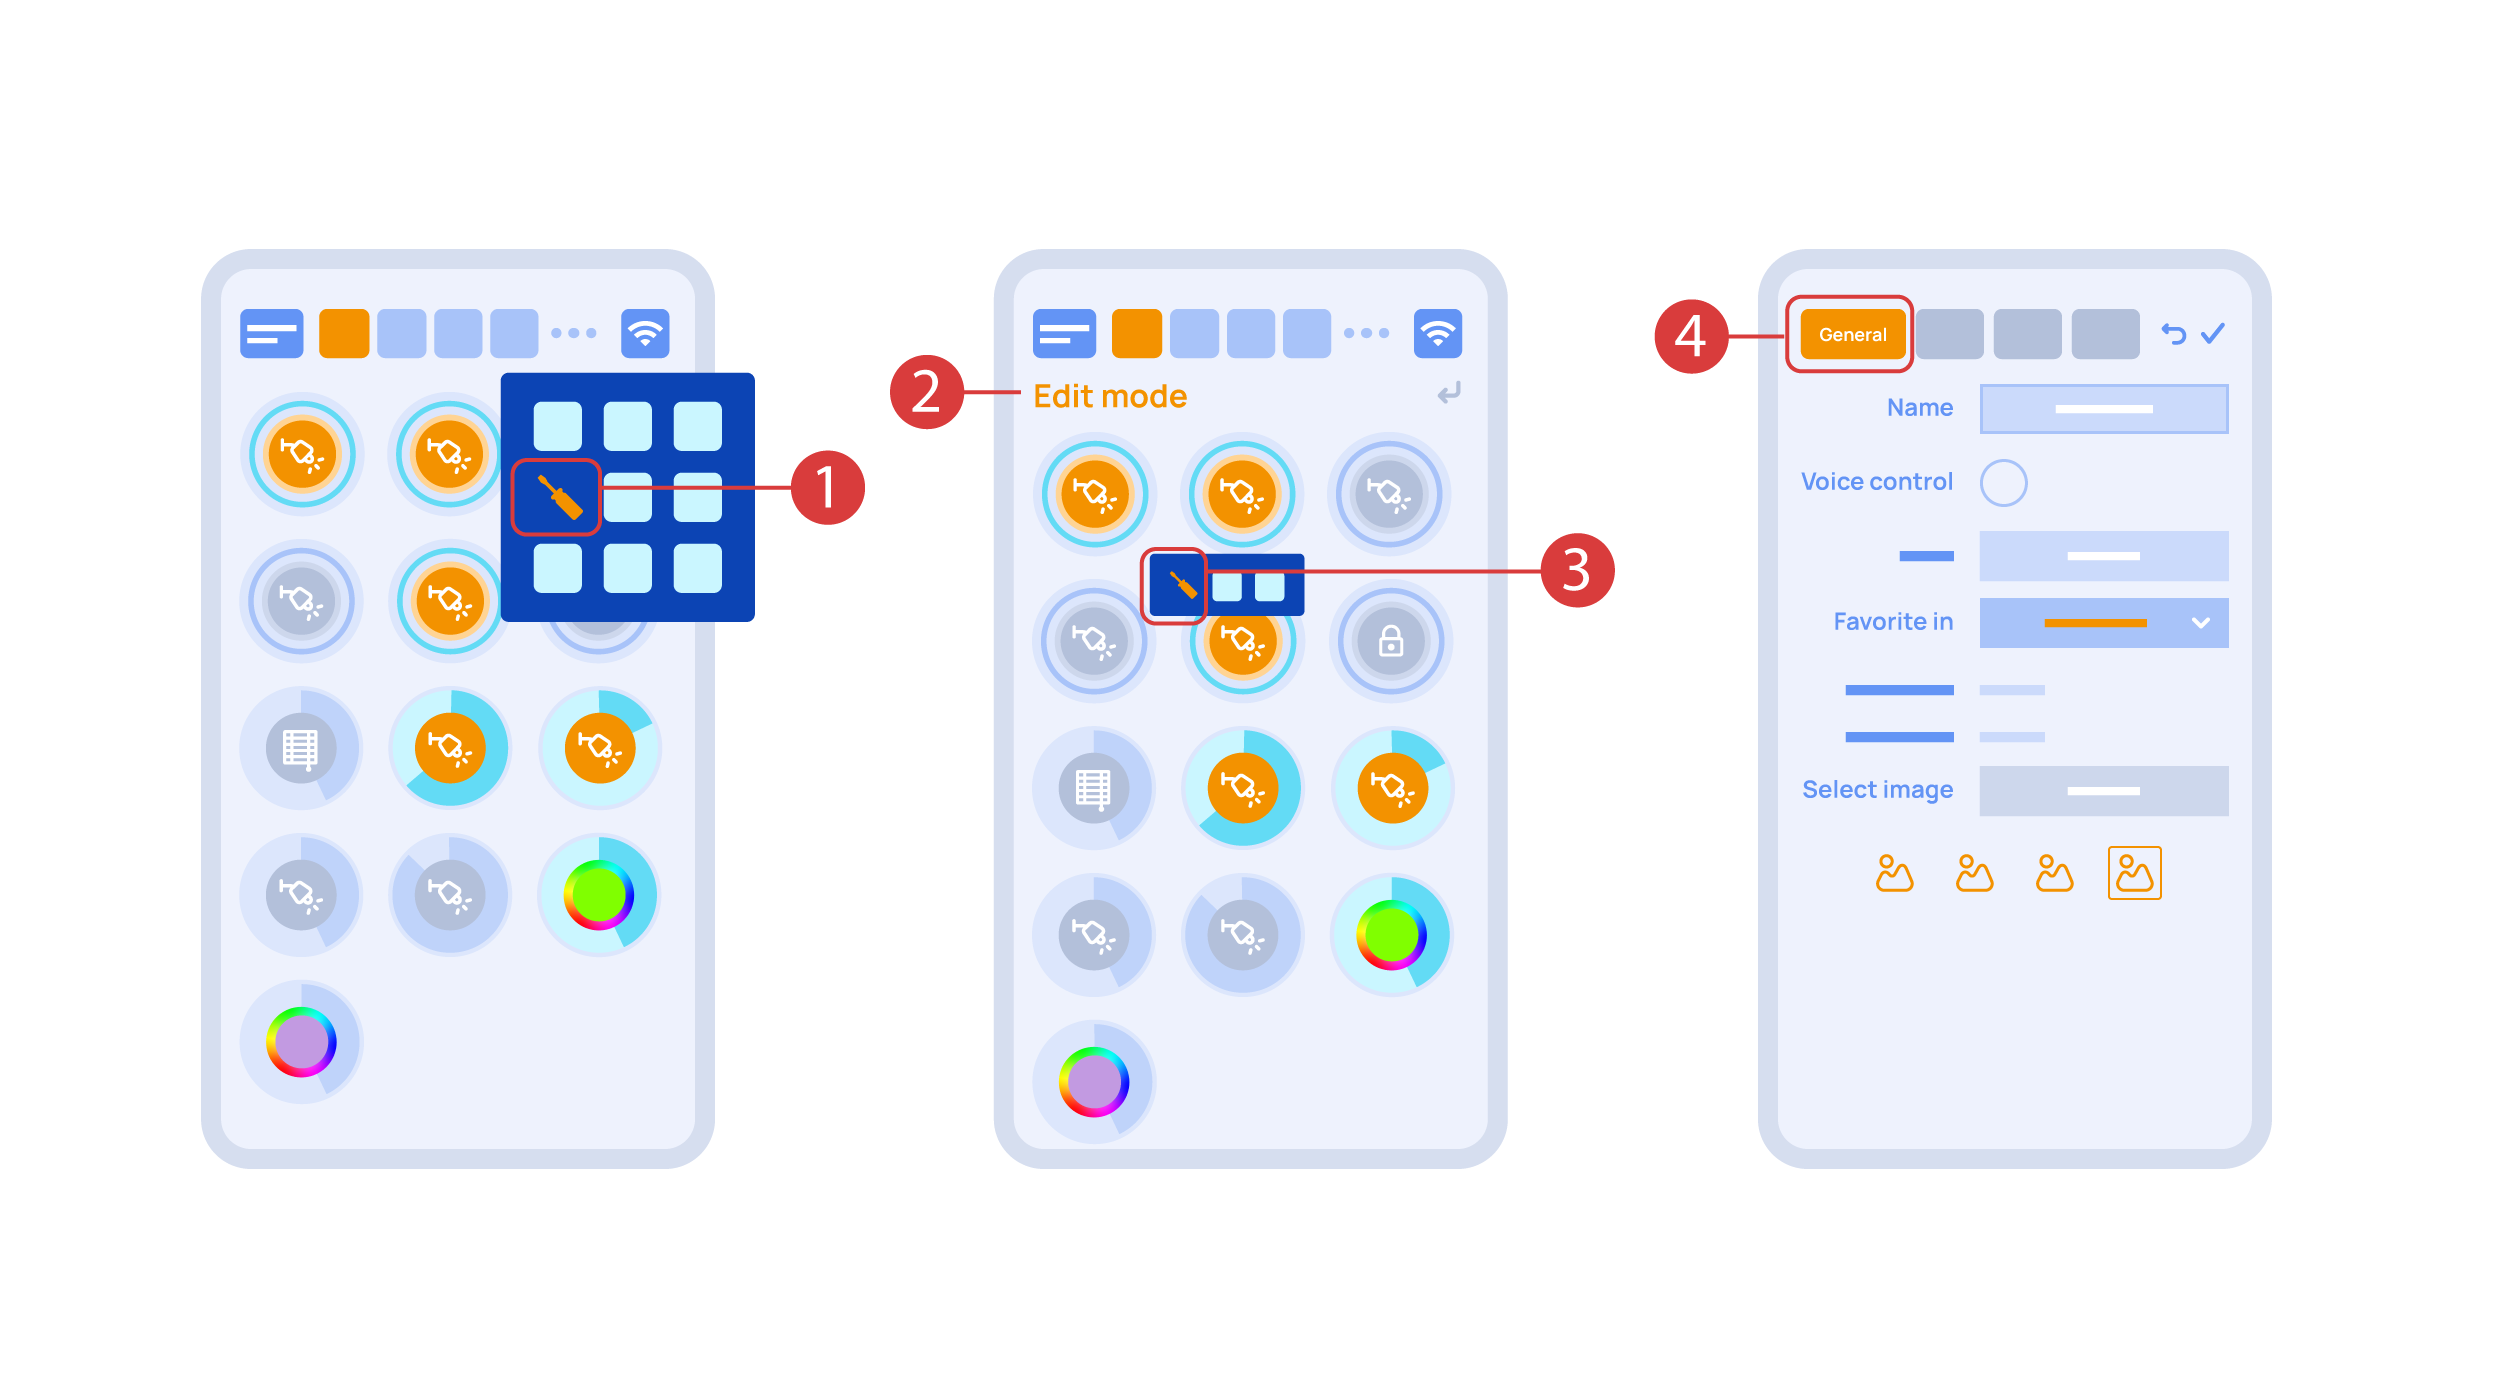
Now we can set up these executors. In order to do this, enter the additional menu ① and activate the edit mode, by pressing the appropriate icon .
Now we are in the edit mode ②, which can be seen from the appropriate notification in the top part of the screen. In this mode, when we press and hold an icon, we can move it among other elements and place it into another Room by placing it in the Area-choosing Menu and then choosing the area that we need. A long press ③ of the element starts the menu, from which we set up the current element.In the ‘General’ ④ section we can change the name of the element, add a voice command for it, change an icon or add the element to ‘Favorites’.
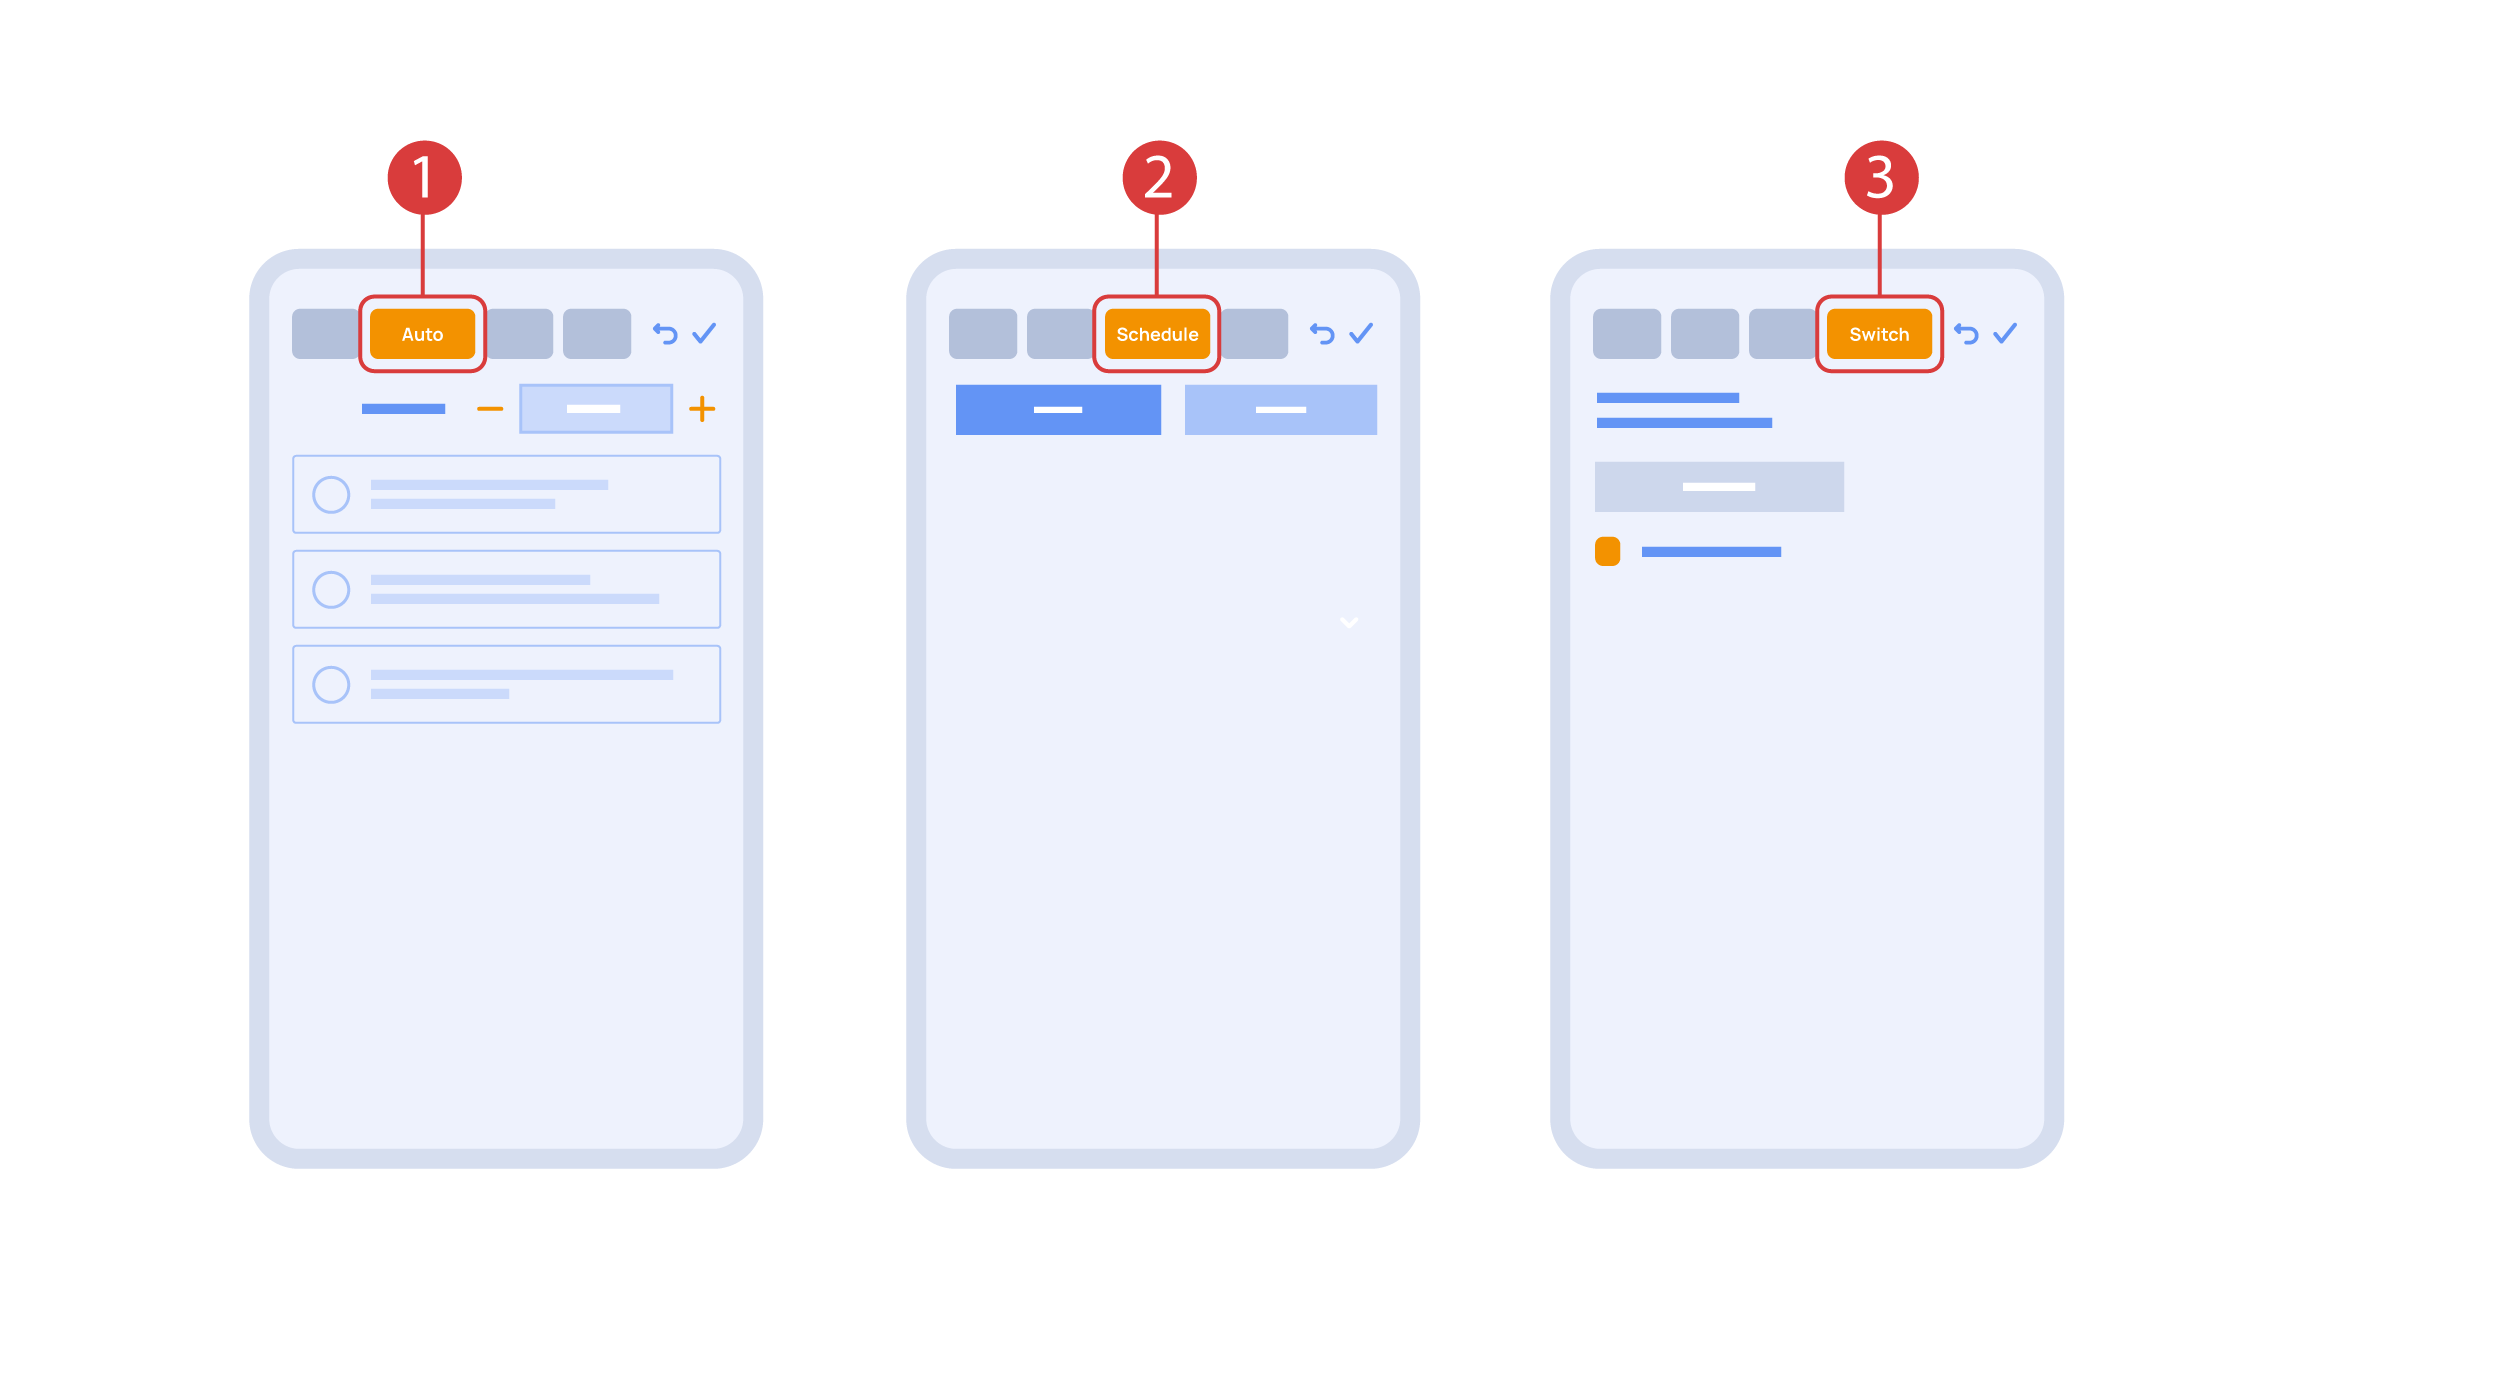
‘Auto’ section ① lets us activate the automation with a few clicks, as well as set up its parameters.
In the ‘schedule’ section ②, you can determine the schedule when the given element will turn on or off, including by using the time of the setting and rising of the sun.
The ‘Switches’ tab ③ lets you bind a button to control the executor.
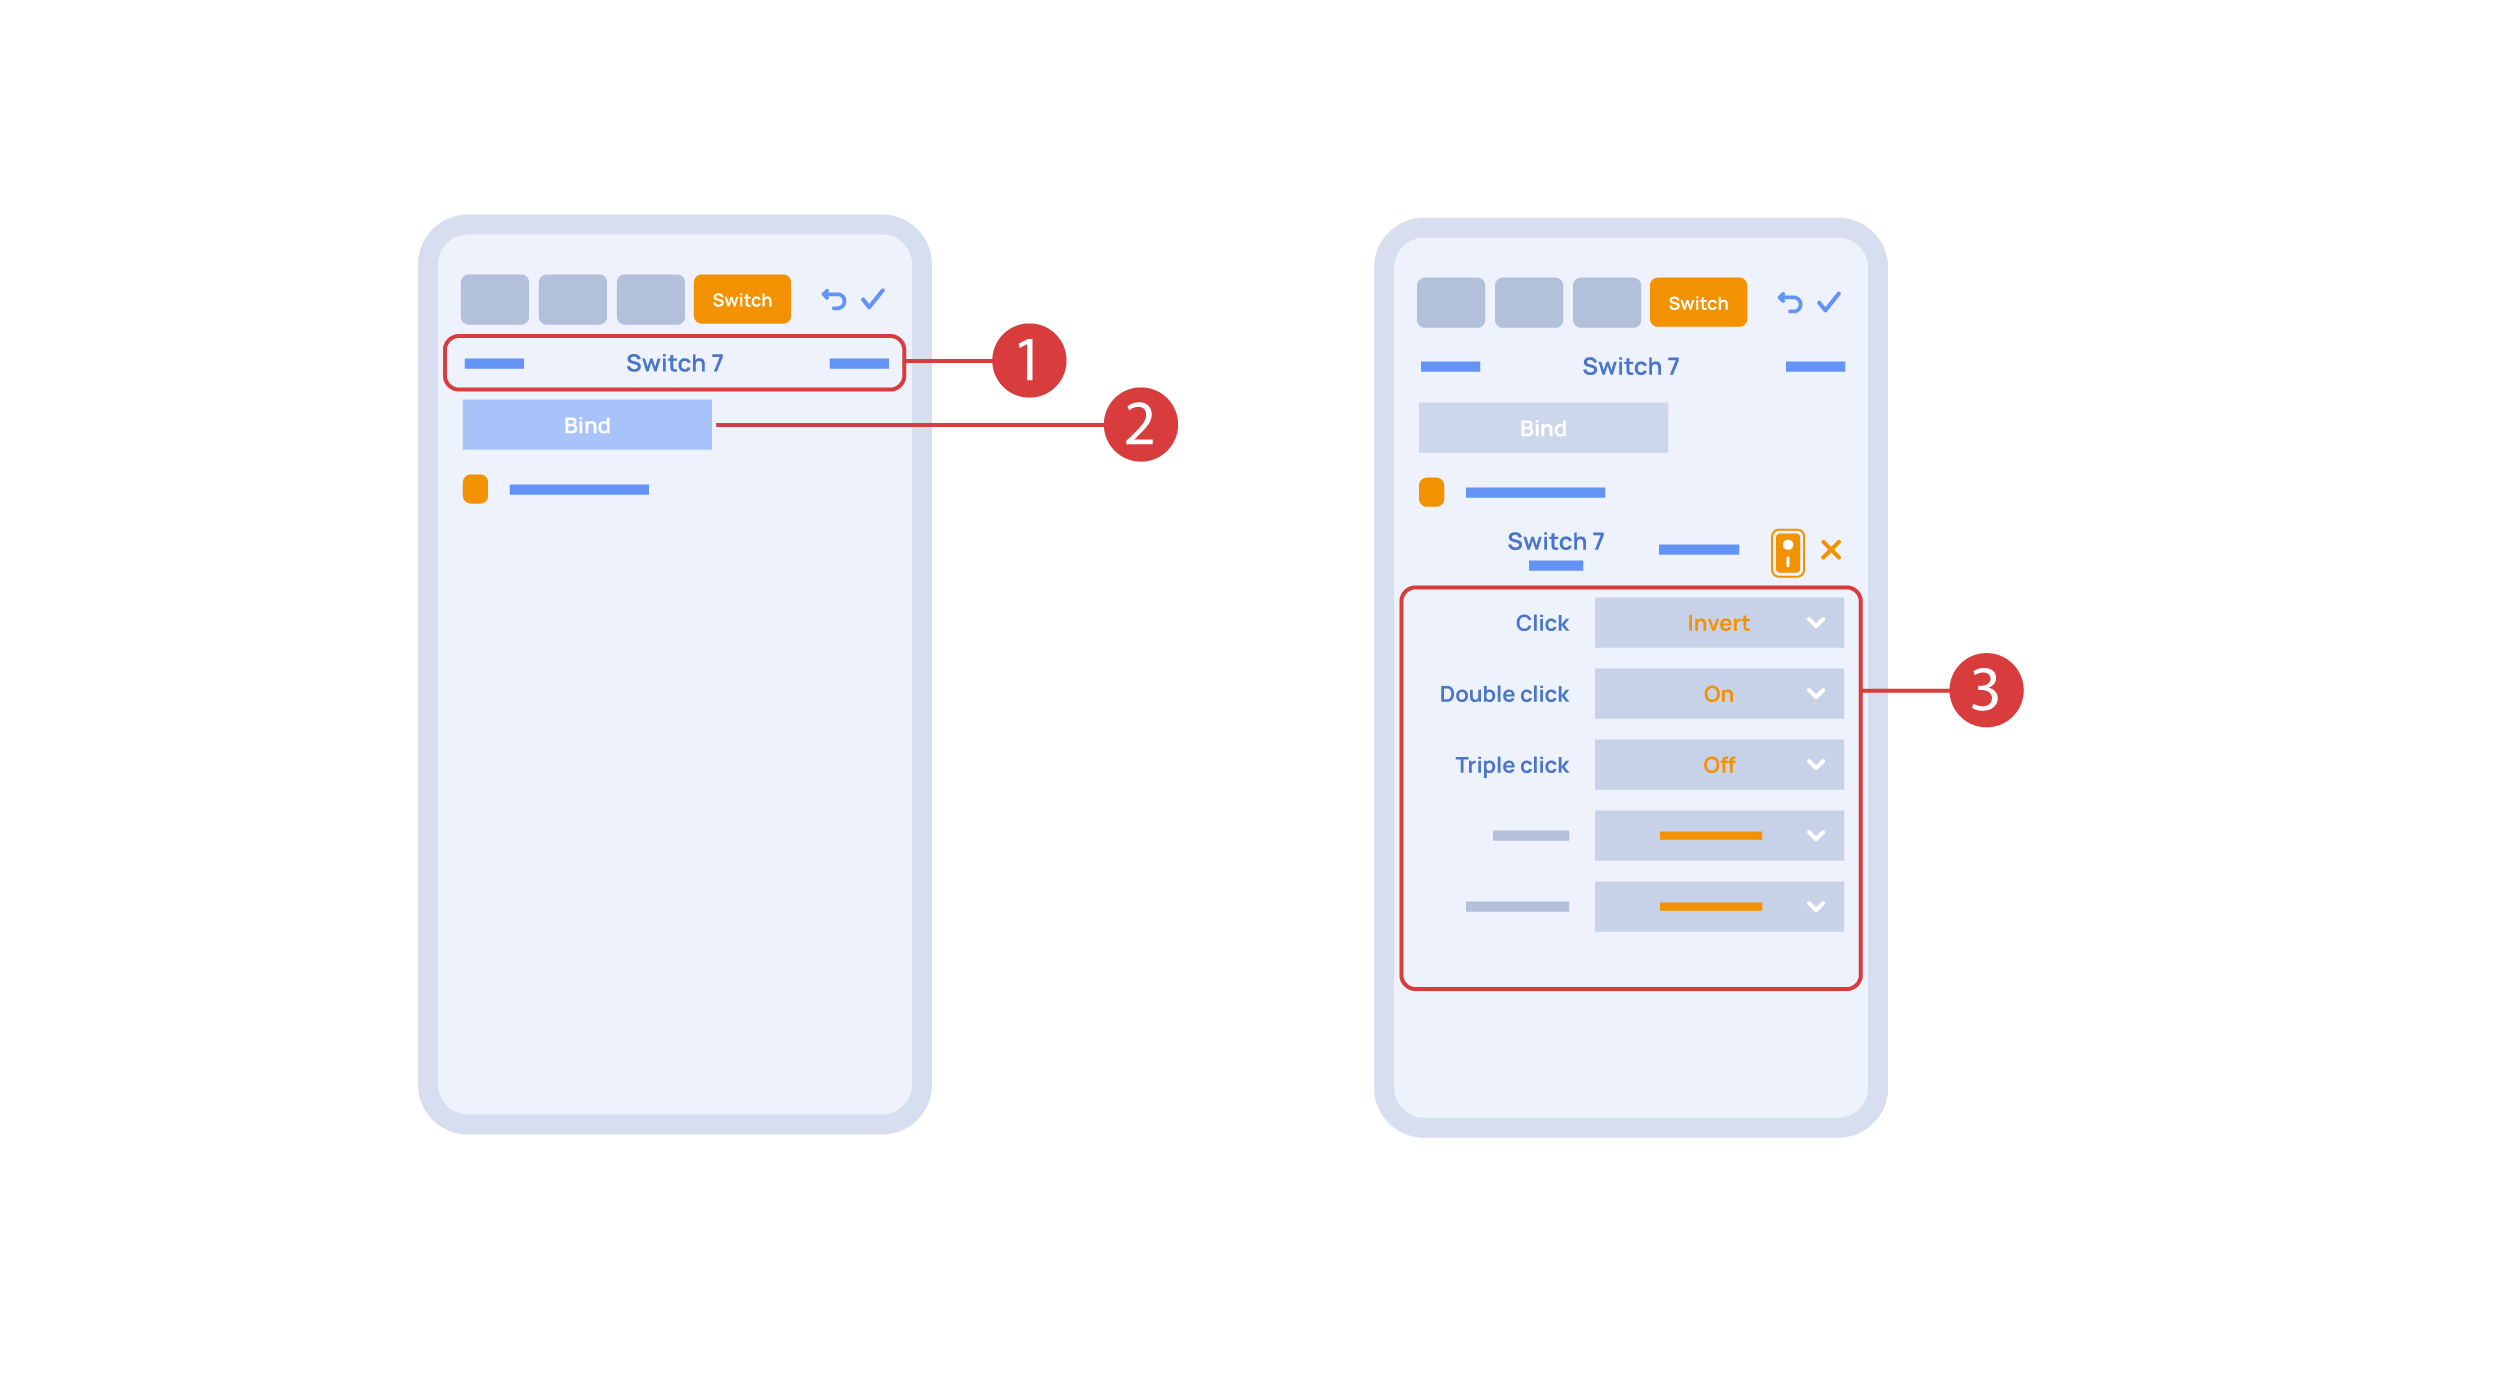
In order to do this, ① we press the button we need to bind. The system displays it, after which we press ‘Bind’② and save the changes. Now this button controls the executor
The ‘Switches’ tab ③ also features additional button setup options. For example, we can program the executor to be controlled with a double or triple click of a button, as well as define an action performed by this, for example ‘only turning on’ or ‘only turning off’ an executor. In this case we are setting up the button to do the following: one click will cause the lamp to toggle, a double click will turn it on and a triple click will turn it off. In this way a single button can perform up to five different actions.
Let’s also set up basic automation of turning an executor on or off with the help of a motion sensor.
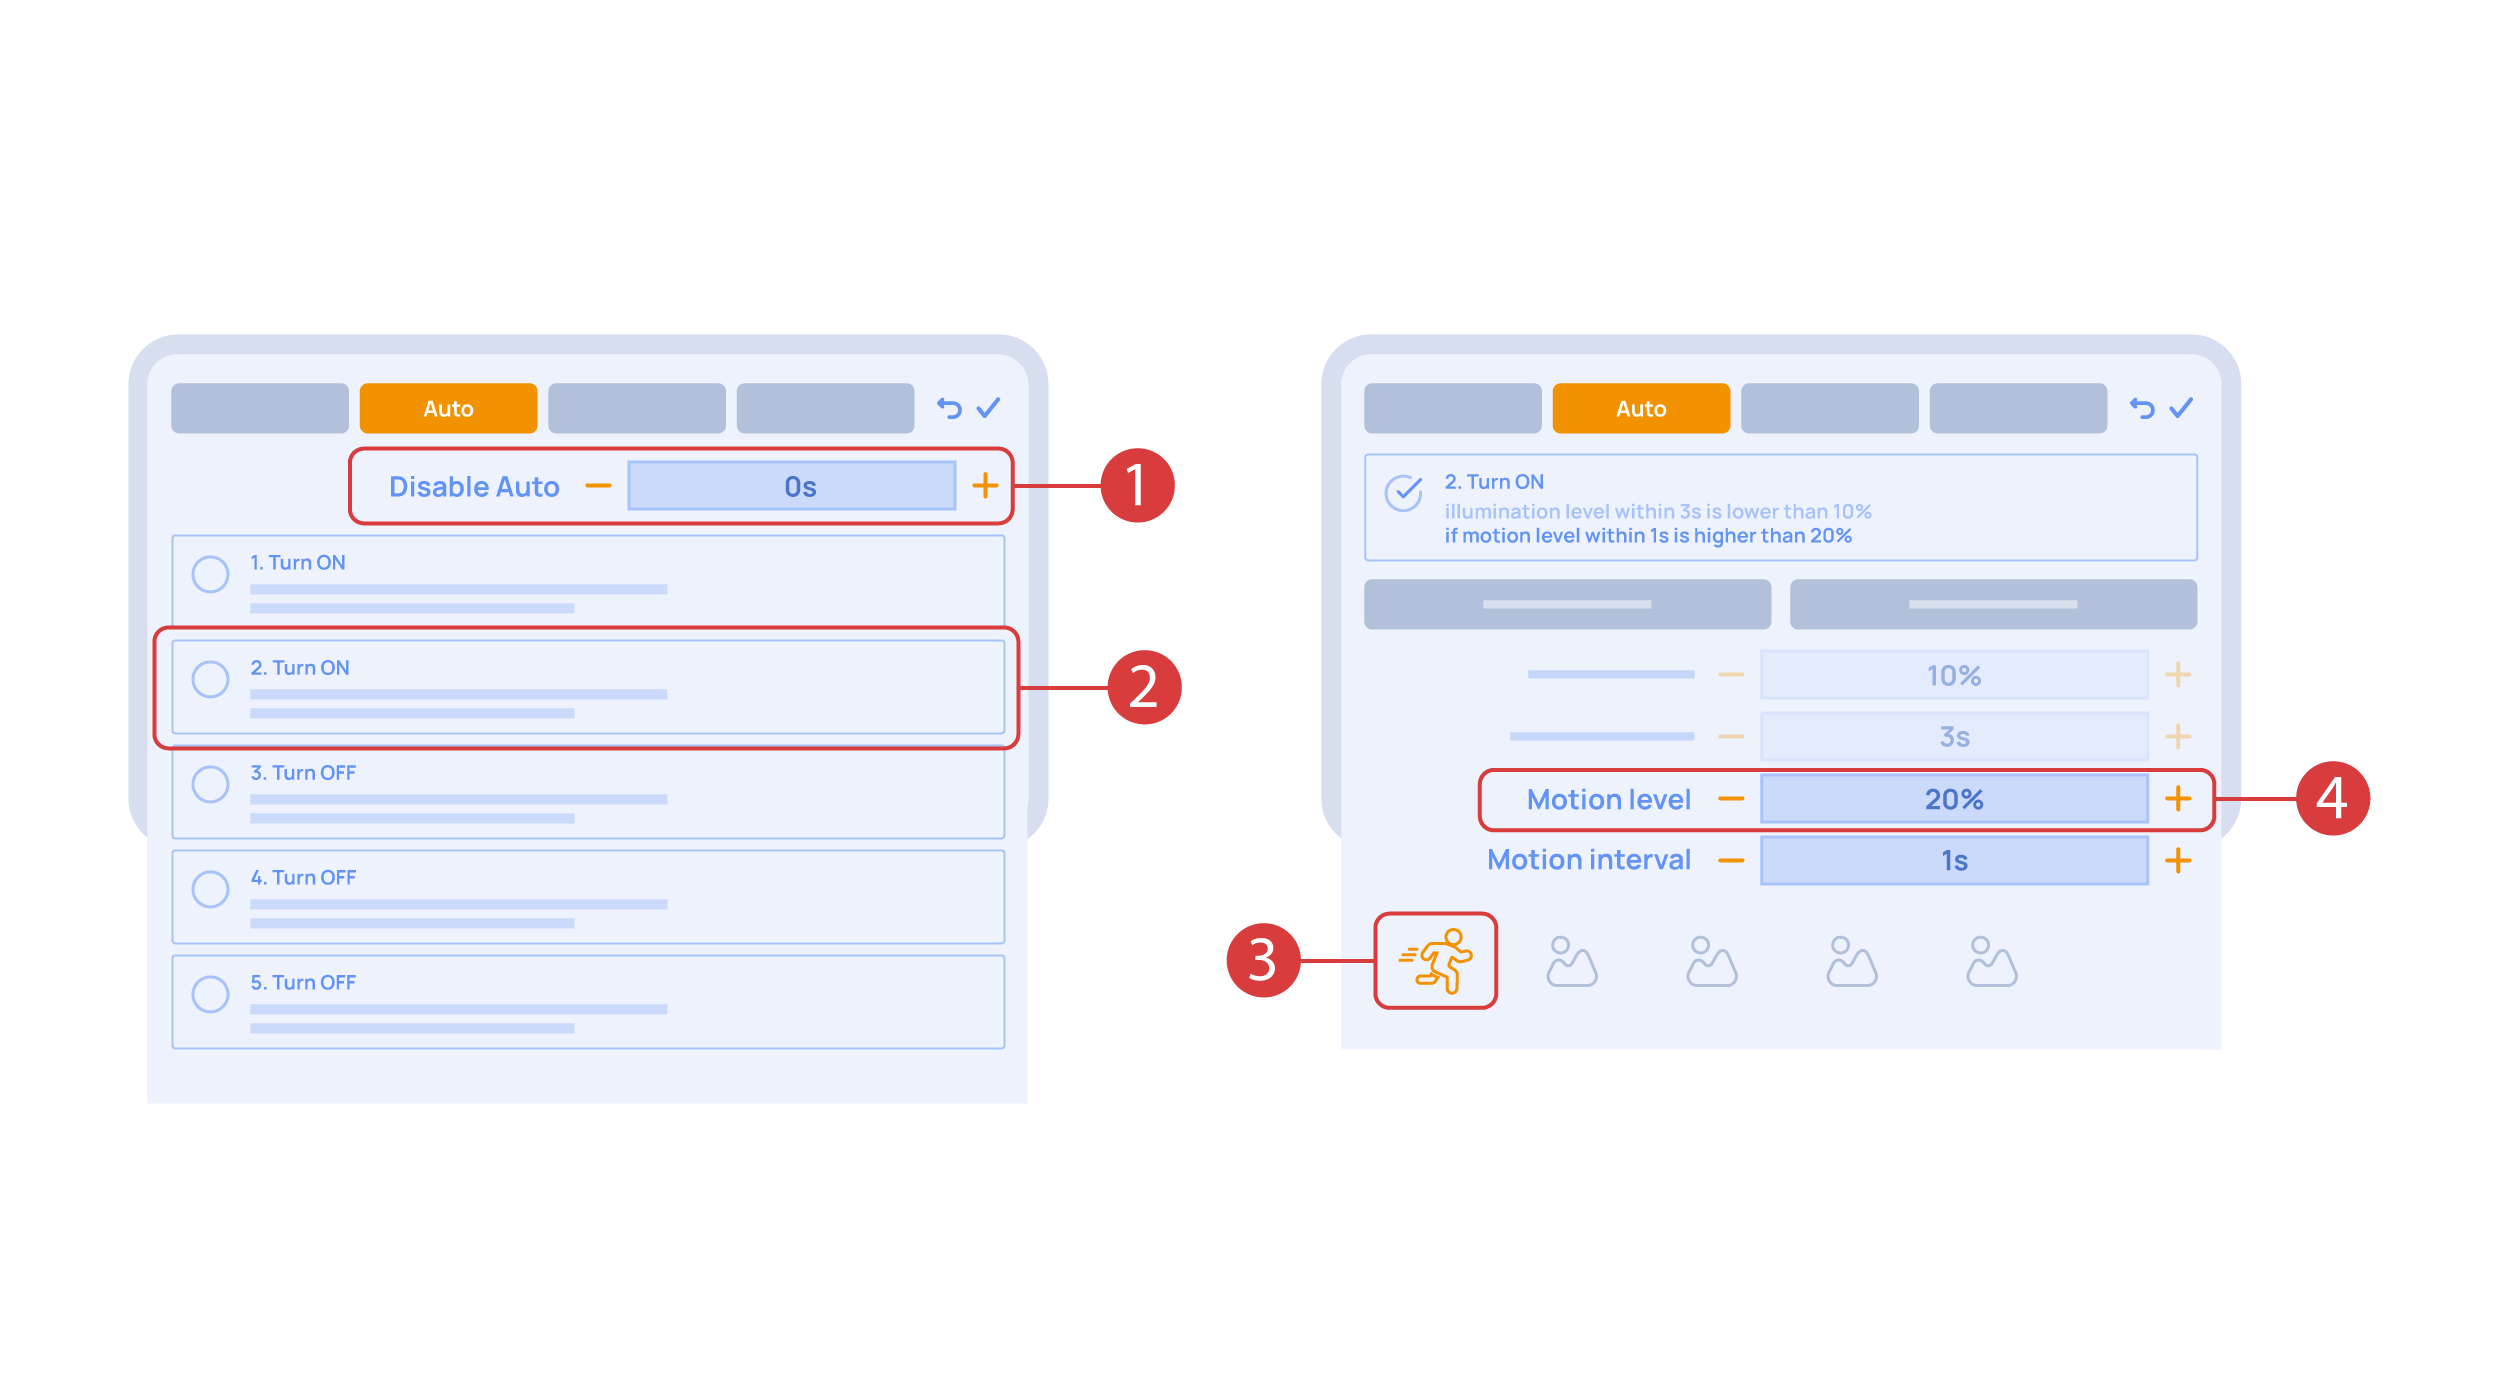
The ‘Auto period’ ① option sets the time for which the automation is disabled after an executor is manually controlled.For our demonstration purposes, we will set it to zero.
Then we will activate the automation ② to turn on the executor when motion is detected. We choose the motion sensor ③ and the level of motion ④. We can also choose a light sensor and its parameters.
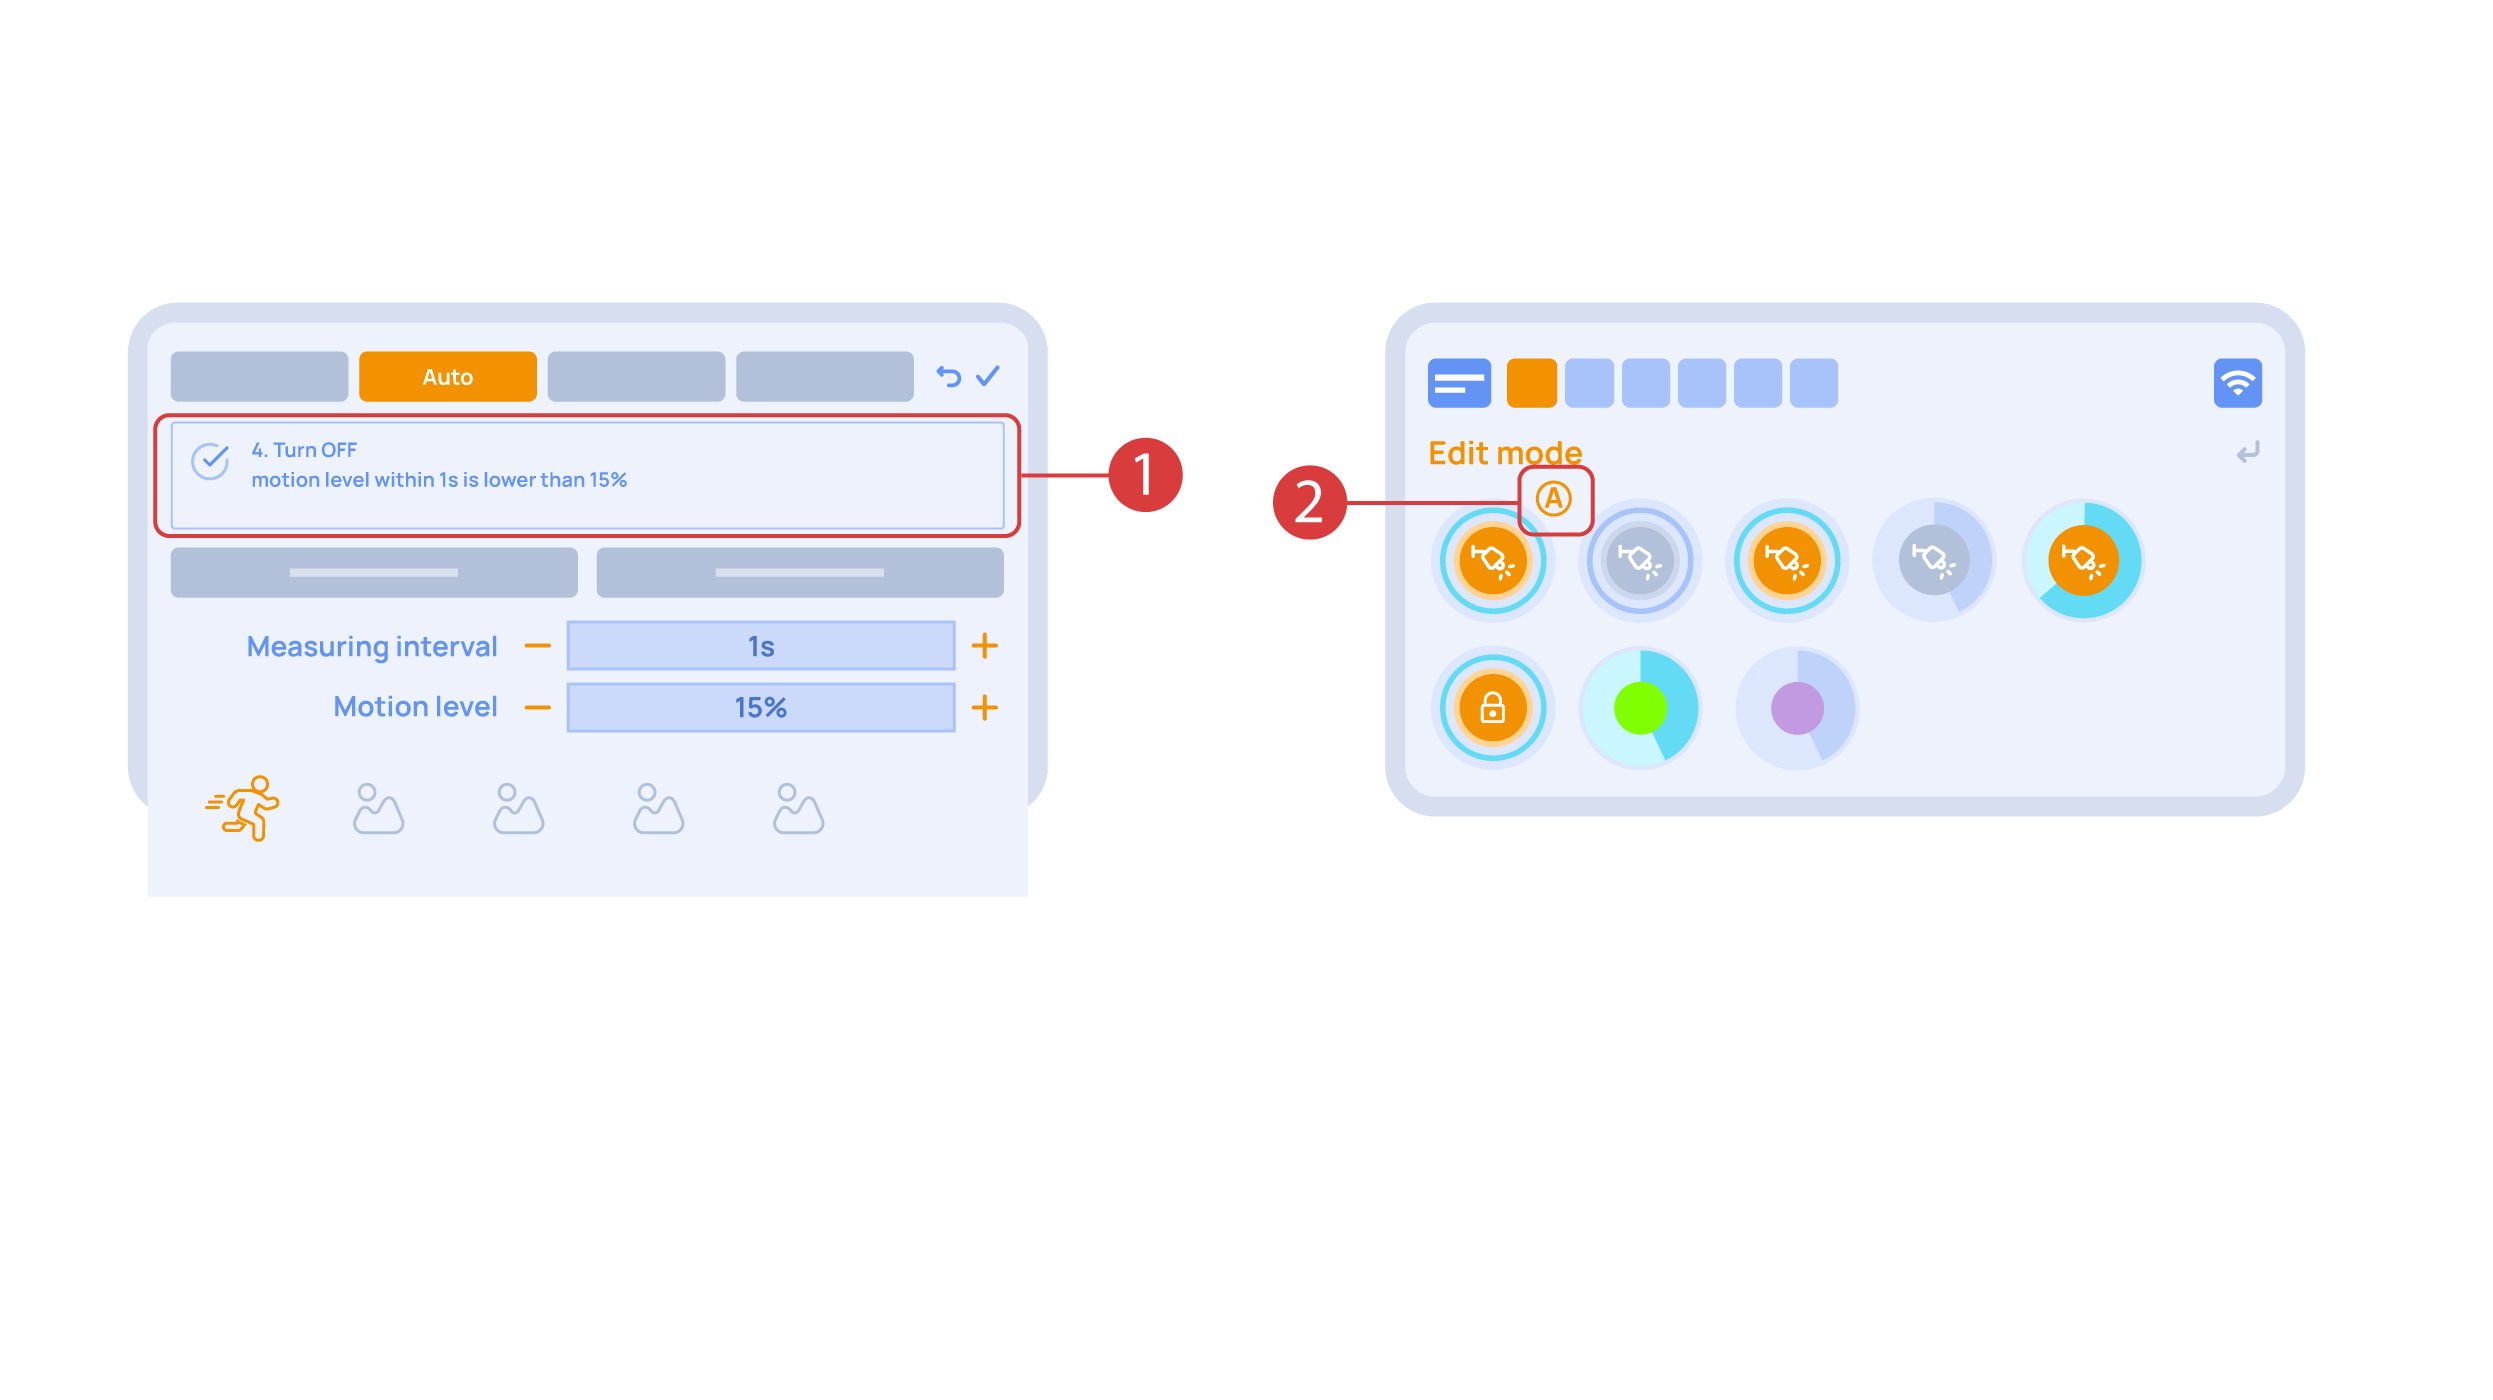
Now we will activate turning off ① of an executor if there is no motion: we choose the same sensor, set a lower threshold and a minimal time.Save the changes.
The extra ‘A’ icon ② will be added to the executor icon, meaning that automation has been set up for it. Now the lamp will be turned on when motion is detected and instantly turned off when no motion is detected.
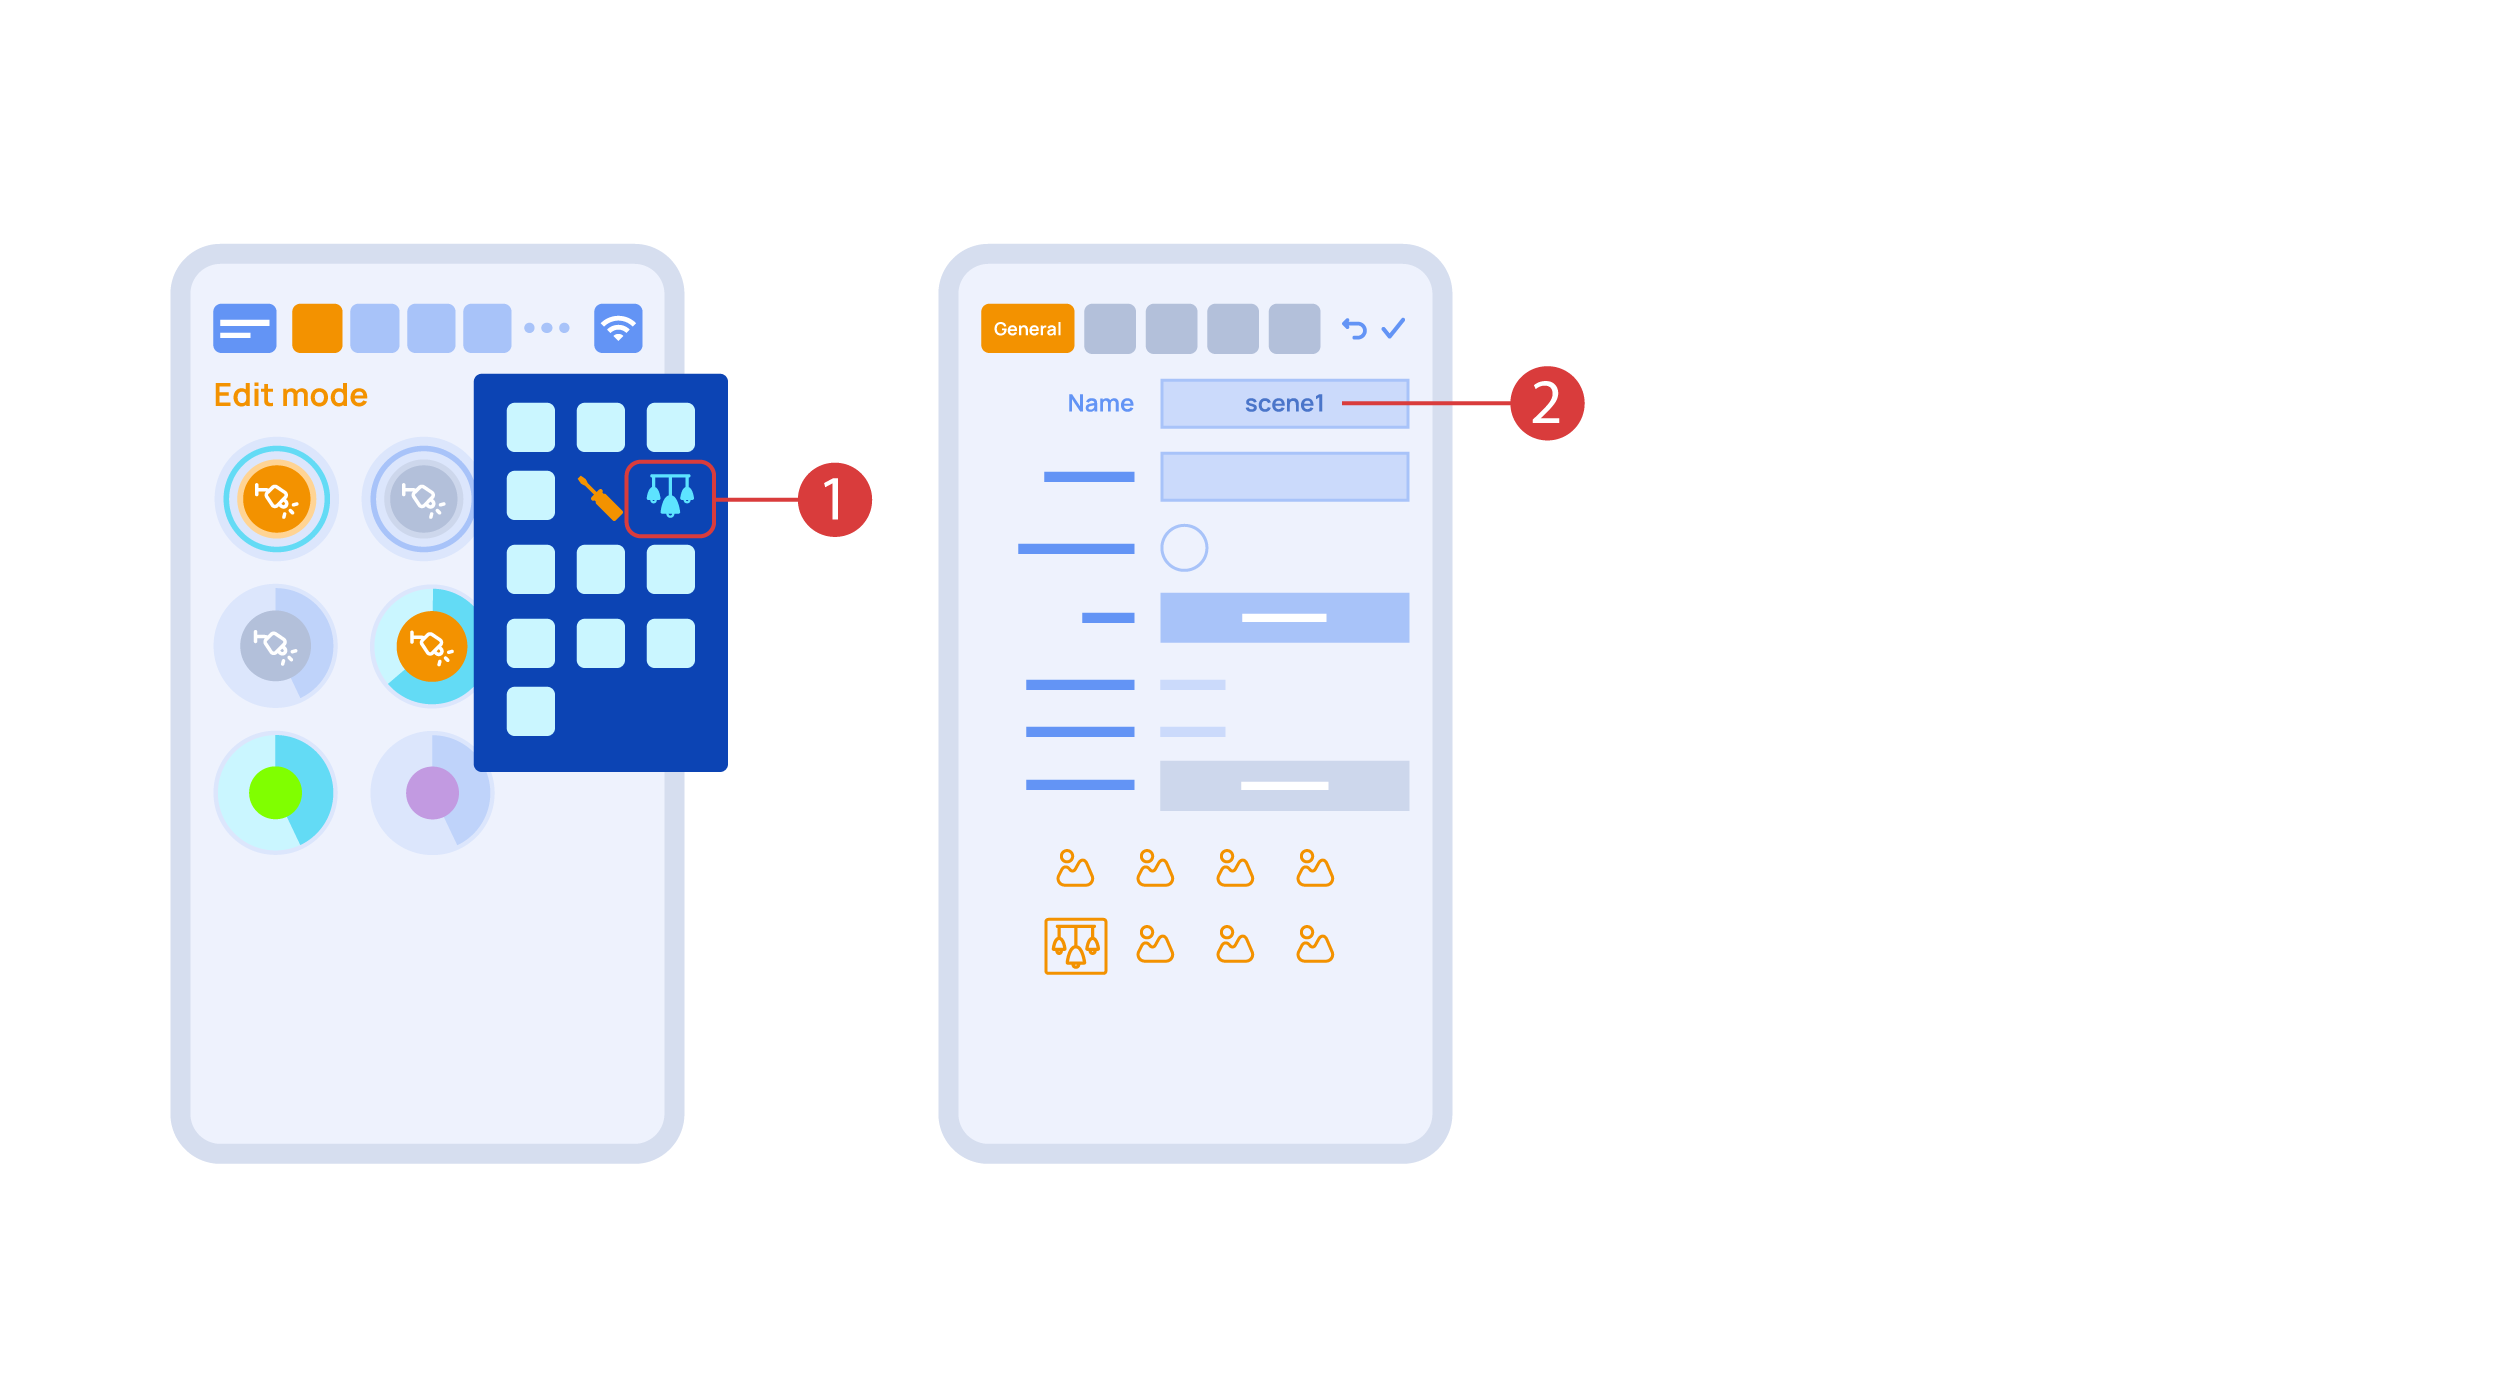
Let’s create a light scheme. For this we need to select the appropriate item in the additional menu ①. Give the light scheme a name ②.
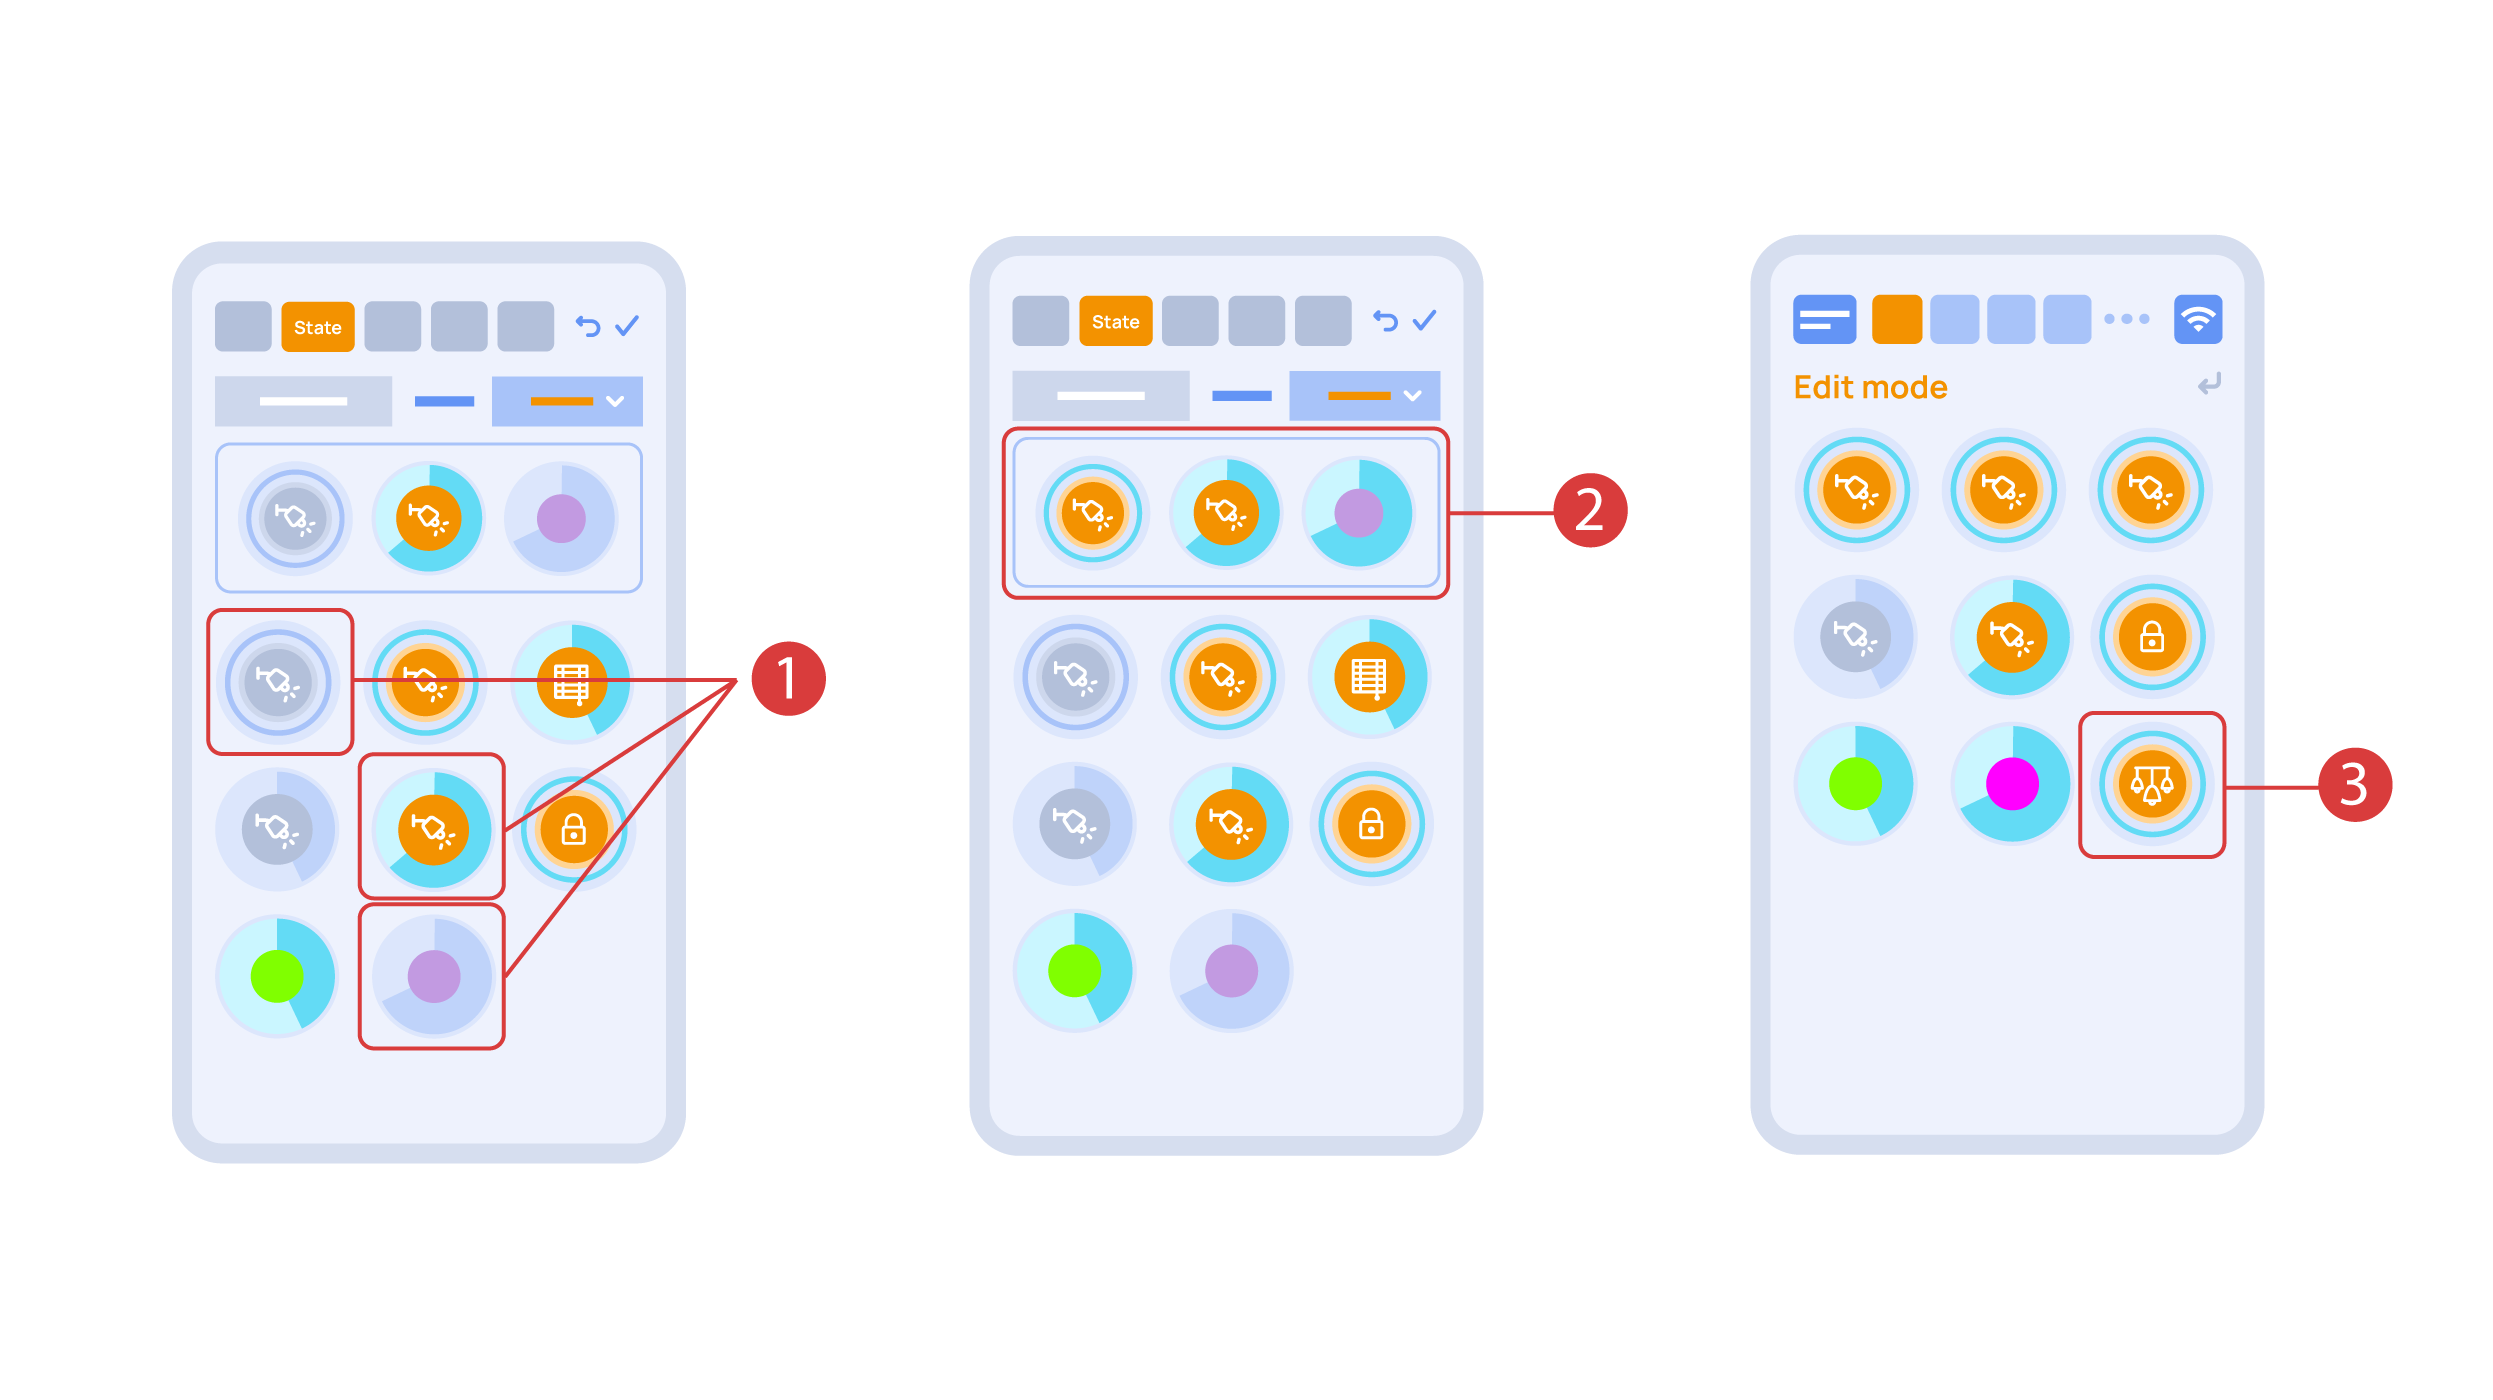
In the ‘State’ tab, use a long press to add the lights we want to use into the light scene ① and set up their state ②. ‘Auto’, ‘Schedule’, ‘Switch’ tabs are the same for all the executors.
Save the changes and we are able to use the newly-created light scheme ③ immediately.
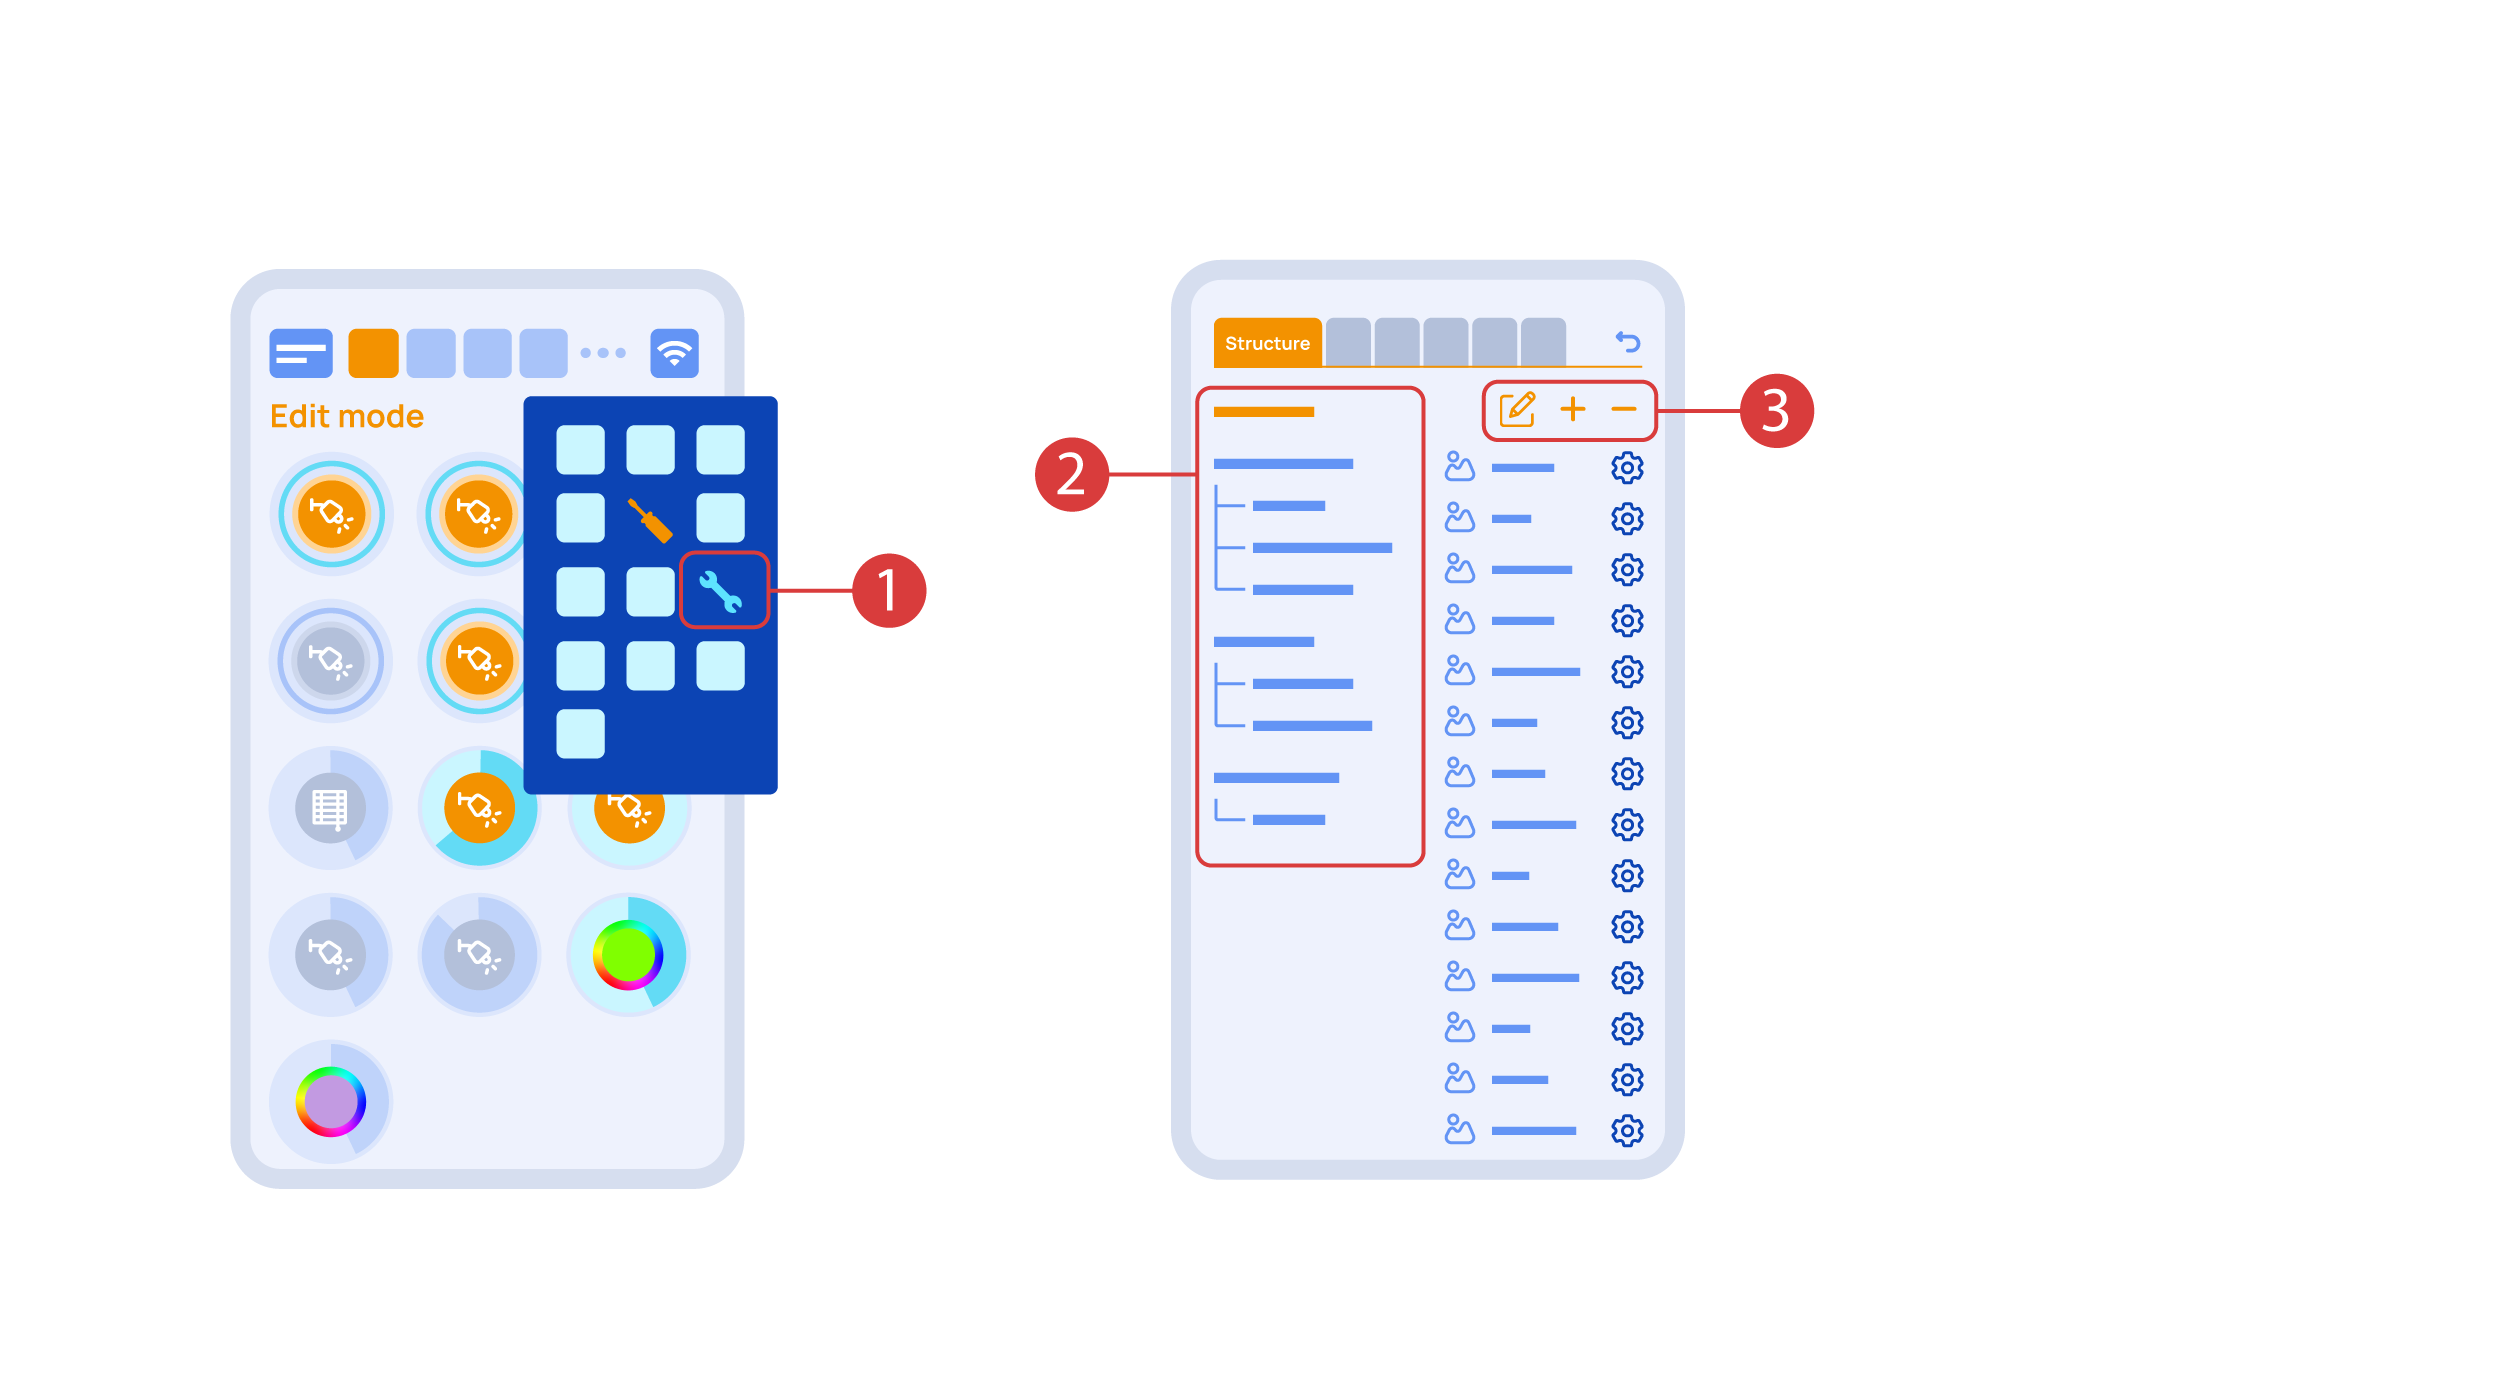
While you are in the Edit Mode, there is a ‘Setup’ ① icon in the additional menu.
Here in the ‘Structure’② tab we can see all the areas.
We can create new ones ④, rename them and move the elements around.
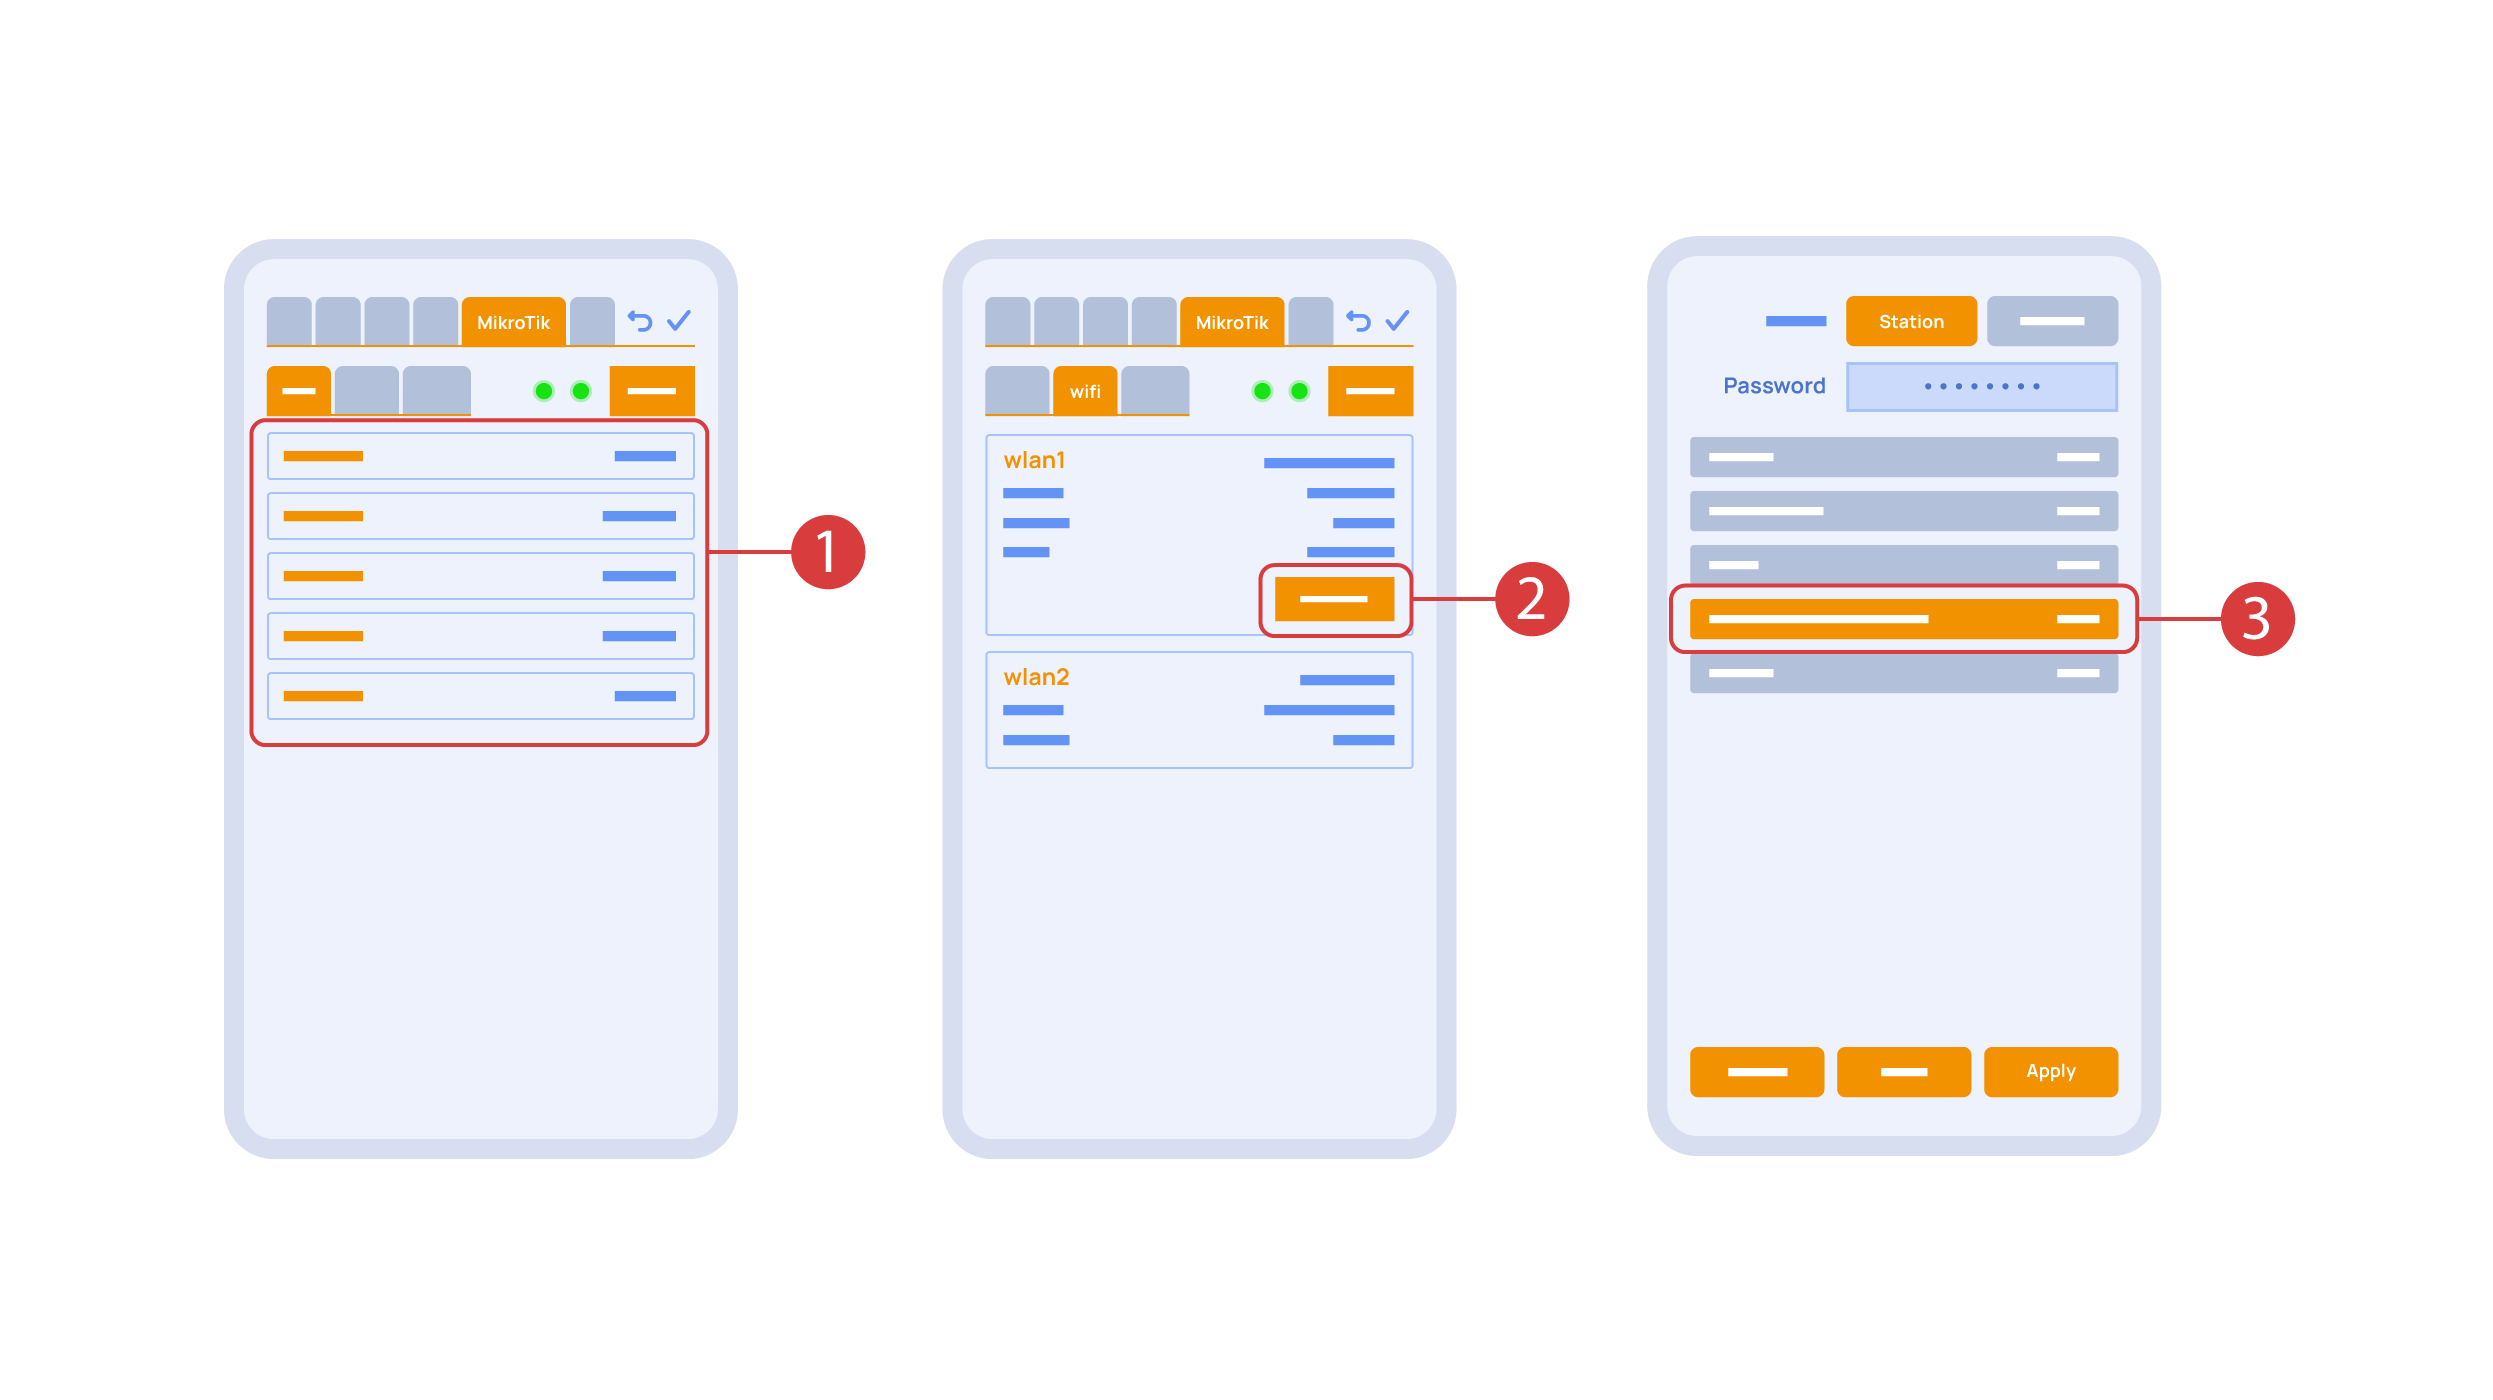
In the ‘Mikrotik’ tab ① you can see the current parameters of your router, which you can also connect to your local Wi-Fi network.
In order to do this, enter the Wi-Fi sub-menu, click the wlan1 interface configuration ②, after which choose the ‘station’ mode, choose a Wi-Fi network out of the list ③ of available ones and enter the connection password.
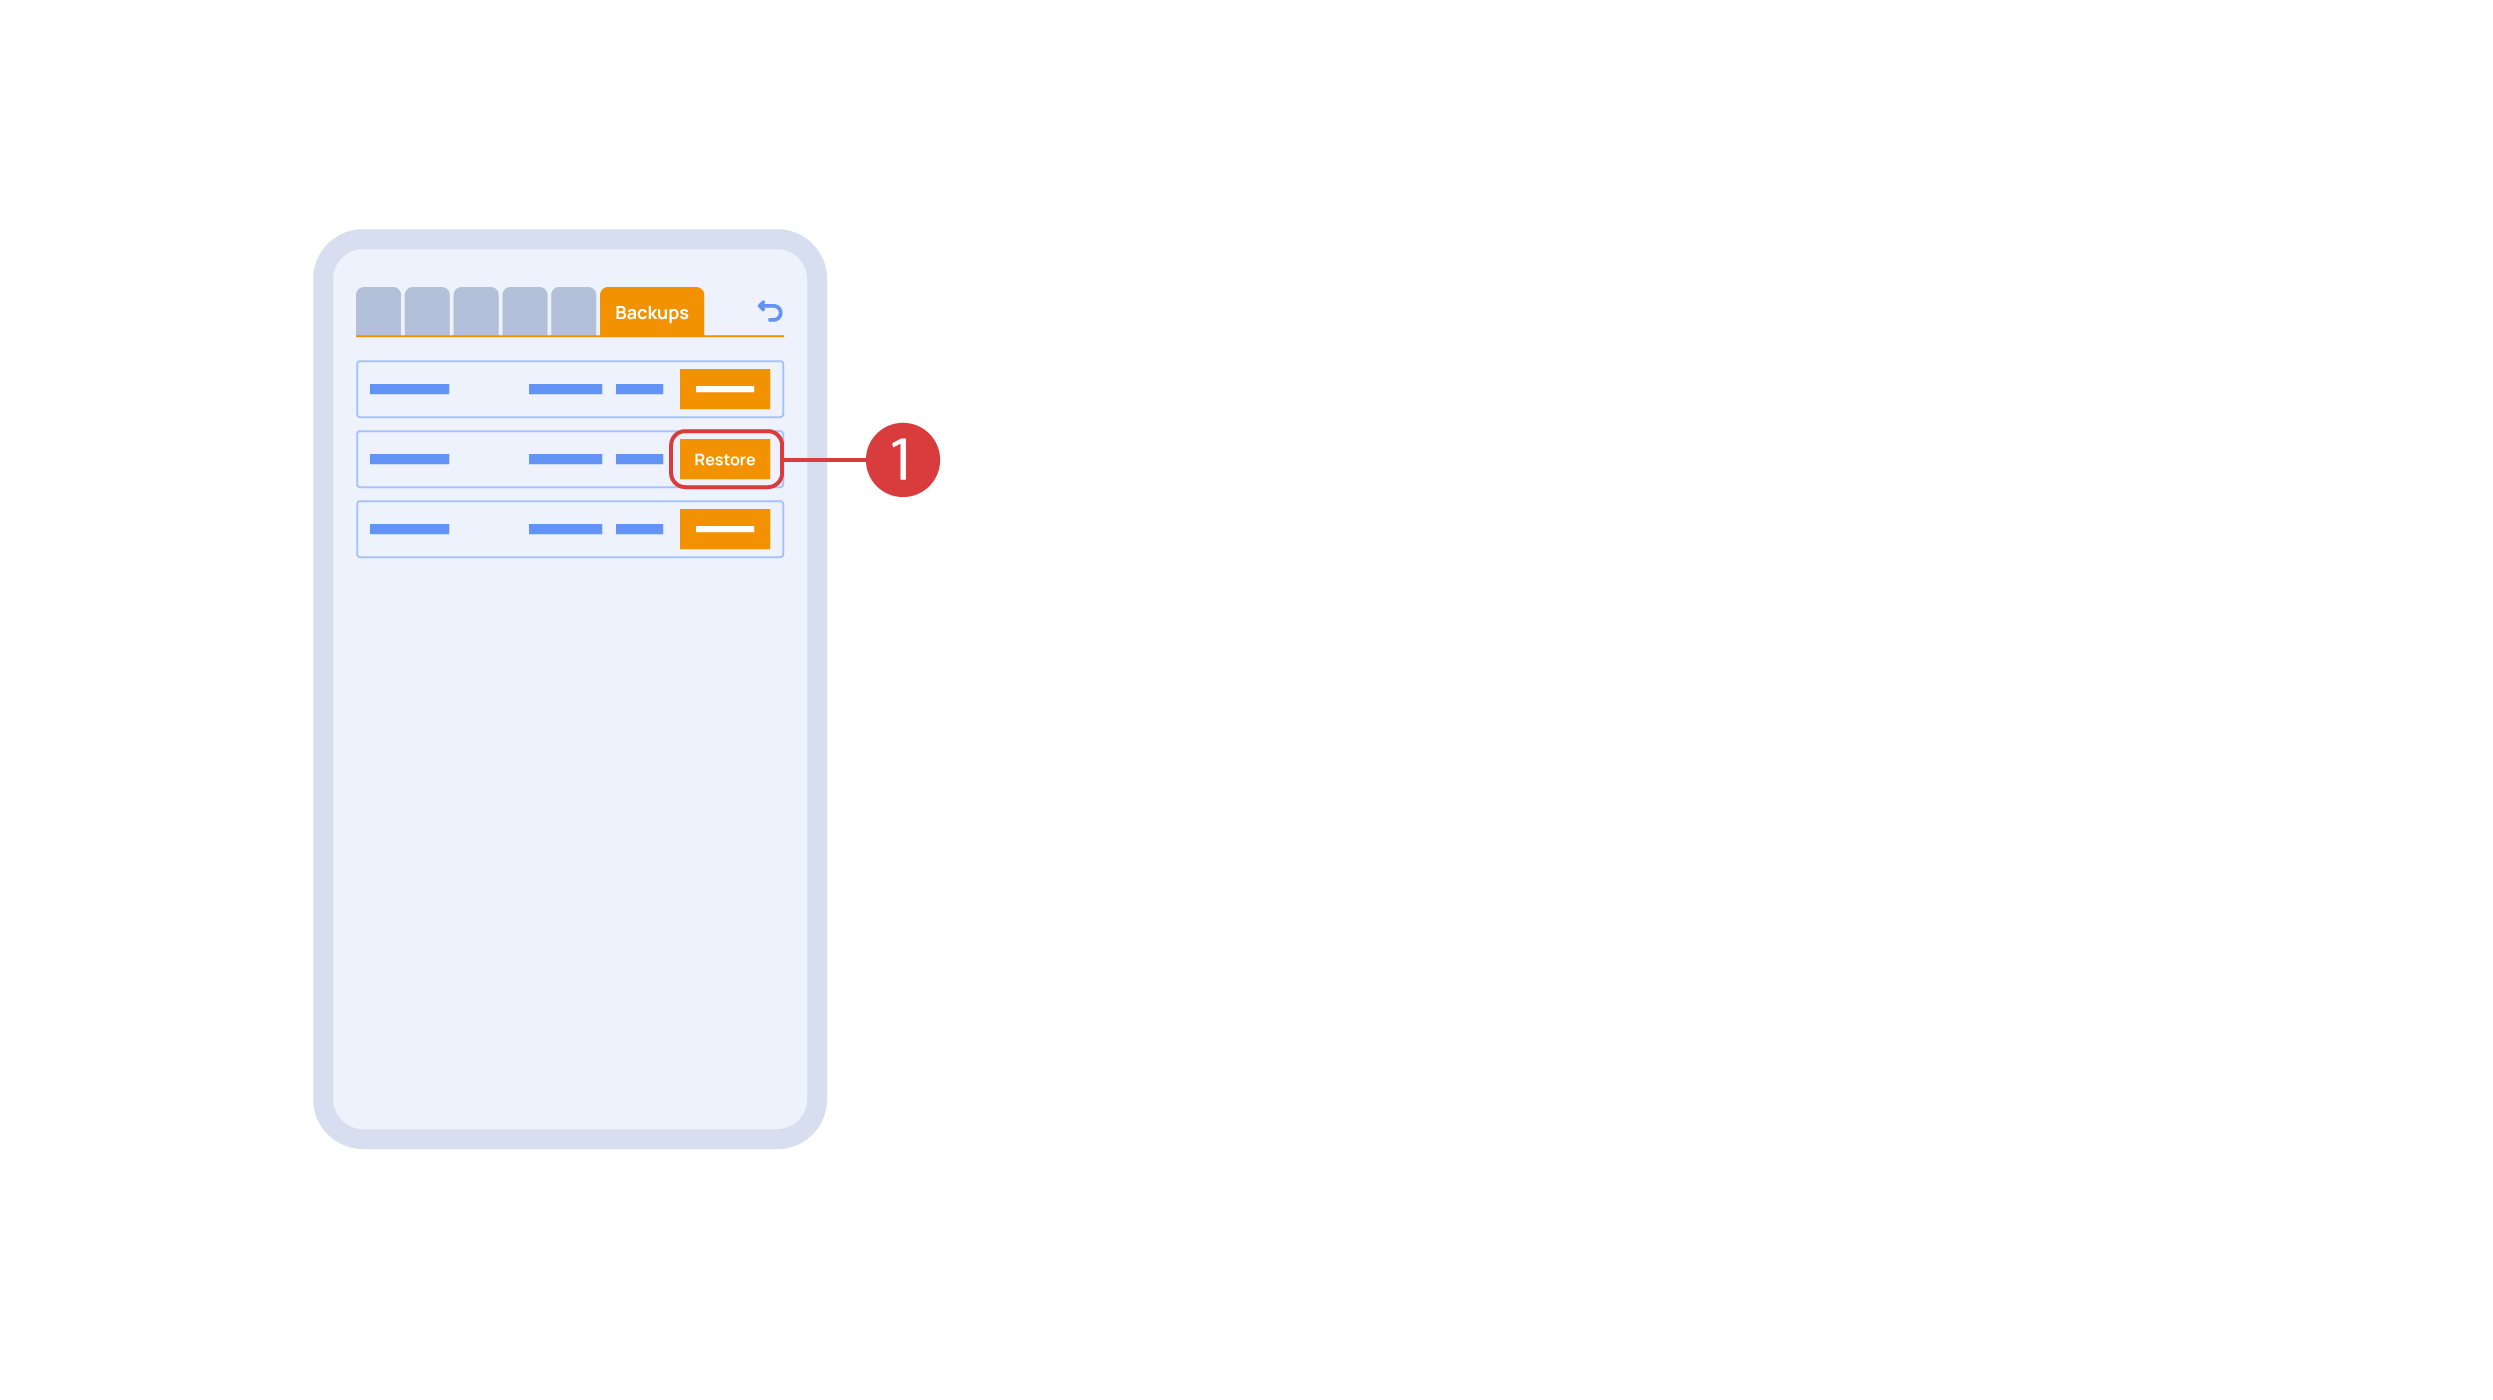
In the ‘Backups’ tab ① you can see the list of saved configurations, which can be restored if necessary.
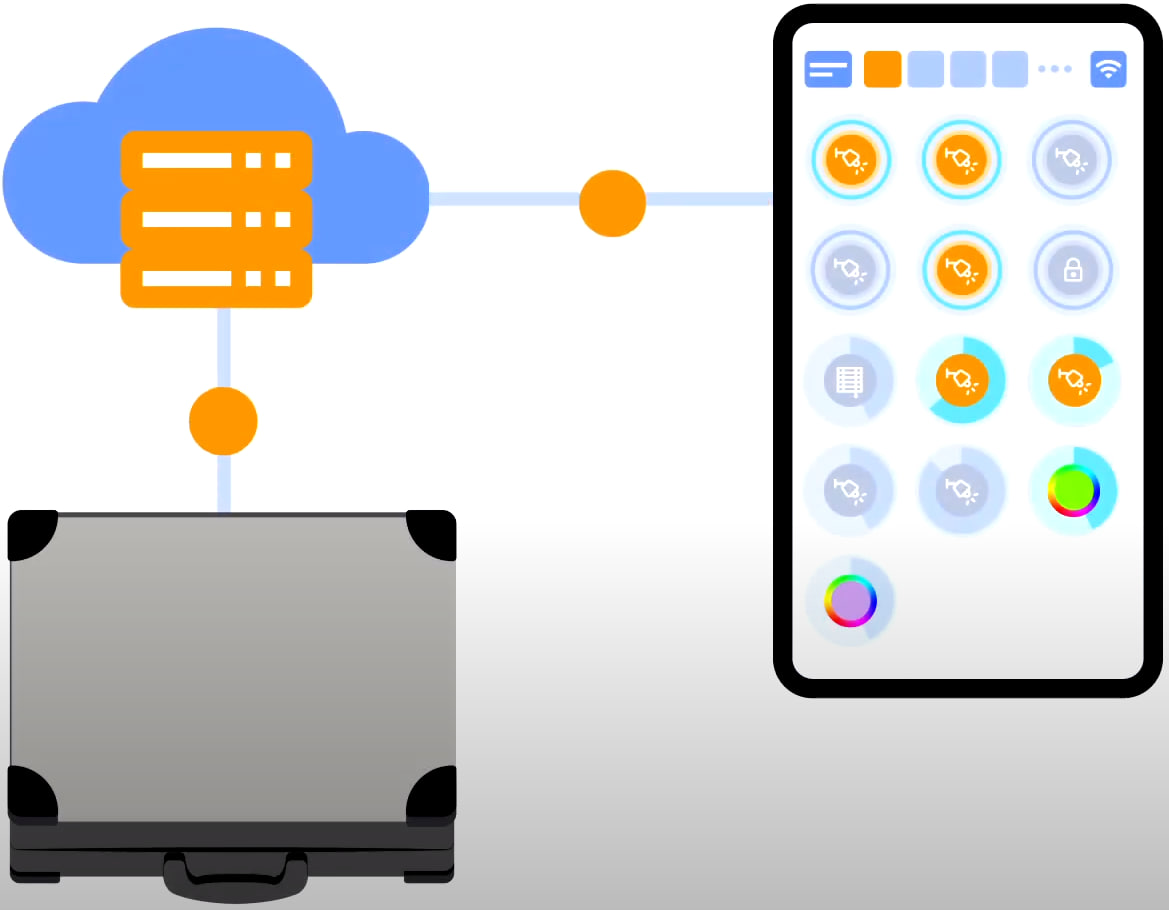
For cloud access to the device, you do not need any extra settings. The app detects the absence of the system in your local network and automatically establishes the connection via the cloud.
We thank you for watching this tutorial! If you have questions or need extra help, please do not hesitate to refer to our technical support team. See you in the next episodes!