Difference between revisions of "Edit Items/ru"
(Created page with "===Режим редактирования=== <p>Вы можете самостоятельно изменять настройки приводов, датчиков, эле...") |
|||
| Line 55: | Line 55: | ||
<li>двойной щелчок: включить;double click: turn on;</li> | <li>двойной щелчок: включить;double click: turn on;</li> | ||
<li>тройной щелчок: выключить;triple click: turn off;</li> | <li>тройной щелчок: выключить;triple click: turn off;</li> | ||
| − | <li>долгое нажатие: увеличение | + | <li>долгое нажатие: увеличение яркости на один шаг (4%);<li> |
| + | <li>короткое и длинное нажатие: уменьшение яркости на один шаг (4%).</li> | ||
| + | </ul> | ||
| + | <p>Для других типов элементов, к которым можно привязать кнопку, действия могут отличаться: например, ворота или жалюзи можно открывать и закрывать. Настройки кнопок для мультирума описаны в разделе [[#Switch_2|Edit Items -> Edit Multiroom -> Switch]]. | ||
| + | <p>Вы можете использовать метку X, чтобы отвязать кнопку от элемента. После внесения изменений необходимо подтвердить их, поставив галочку. | ||
| + | '''''' | ||
| + | ===Edit radiators=== | ||
| + | ====General==== | ||
| + | <p>The content of the '''General''' tab corresponds to the content on other items (see [[#General|Edit elements -> General]) | ||
| + | ====Auto==== | ||
| + | <p><br>[[File:instruction140.png|500px]]<br> | ||
| + | <p>The '''Auto''' tab for radiators contains additional settings. You can add and configure heating modes, as well as specify intervals for their activation. | ||
| + | <p>The following presets for heating modes are available: | ||
| + | <ul> | ||
| + | <li>'''Manual''' – manually controlled mode;</li> | ||
| + | <li>'''Always off''' – while the mode is active, the radiator is turned off;</li> | ||
| + | <li>'''Eco''' – it sets the temperature to 16 degrees;</li> | ||
| + | <li>'''Comfort''' – it sets the temperature to 22 degrees;</li> | ||
| + | <li>'''Hot''' – it sets the temperature to 25 degrees. </li> | ||
| + | </ul> | ||
| + | <p>'''Manual''' and '''Always off''' modes cannot be changed, others can be configured or deleted. For example, in the screenshot below, we change the temperature of the '''Eco''' mode and set 20 degrees. | ||
| + | <p><br>[[File:instruction141.png|500px]]<br> | ||
| + | <p>Modes are changed only for a given radiator. By clicking on the plus, you can add your own modes and set the desired temperature for them. By default, the new mode is assigned the name Mode -. To change the name, press and hold it until the cursor appears. | ||
| + | <p>For each mode, except '''Manual''' and '''Always off''', you can configure the work schedule. By default, each mode is designed to maintain the specified temperature. | ||
| + | <p><br>[[File:instruction142.png|500px]]<br> | ||
| + | <p>In the screenshot on the right, we have created the “December” mode and configured the following intervals for it: | ||
| + | <ul> | ||
| + | <li>from 6:00 to 17:00 from Mon to Fri the radiator maintains an indoor temperature of 18 degrees;</li> | ||
| + | <li>from 17:00 to 6:00 from Mon to Fri the radiator maintains an indoor temperature of 24 degrees;</li> | ||
| + | <li>entire weekend the radiator maintains an indoor temperature of 24 degrees. </li> | ||
| + | </ul> | ||
| + | <p>You can use the '''Clone interval''' button to copy the selected interval, and the '''Delete''' - button to delete it. In all time intervals outside the specified intervals, the default temperature will be maintained. | ||
| + | ====Sensors==== | ||
| + | <p>On the '''Sensors''' panel you can see sensors from the current room (the screenshot on the left) and sensors from all rooms (the screenshot on the right). To see all the sensors in the home, click the '''Show all sensors''' button. To connect the sensor, click on it – it will be highlighted in orange. If several sensors are connected, the temperature received from them is averaged. | ||
| + | <table> | ||
| + | <tr> | ||
| + | <td><br>[[File:instruction143.png|500px]]<br></td> | ||
| + | <td><br>[[File:instruction144.png|500px]]<br></td> | ||
| + | </tr> | ||
| + | </table> | ||
| + | ===Edit Multiroom=== | ||
| + | <p>When the edit mode is enabled the wrench icon appears in the right upper corner of the multimedia panel. Click it to open the edit menu. | ||
| + | ====General==== | ||
| + | <p>The '''General''' tab (see [[#General">Edit elements -> General]]) in the multiroom has two additional functions: | ||
| + | <ul> | ||
| + | <li>'''Soft Start''' – it allows you to set the period (in seconds) used to increase the start volume from 0 to the specified level. </li> | ||
| + | <li>'''Turn OFF parameters''' – it allows you to set the period in seconds or the number of tracks which will pass before the playback stops. </li> | ||
| + | </ul> | ||
| + | ====Color Music==== | ||
| + | <p>In this section you can choose RGB backlights, which will be used in color music. By default, those backlights are displayed that are in the same room with a multiroom. Click on the Show All button, and you can see all RGBs in the home (the left screenshot). Click on the desired backlights, and you will add them to the color music; selected backlights are highlighted in orange (the right screenshot). | ||
| + | <table> | ||
| + | <tr> | ||
| + | <td><br>[[File:instruction145.png|500px]]<br></td> | ||
| + | <td><br>[[File:instruction146.png|500px]]<br></td> | ||
| + | </tr> | ||
| + | </table> | ||
| + | ====Auto==== | ||
| + | <p>The contents of the '''Auto''' tab correspond to the contents on other items (see [[#Auto|Edit Items -> Auto]]). | ||
| + | ====Schedule==== | ||
| + | <p>The contents of the '''Schedule''' tab correspond to the contents on other items (see [[#Schedule|Edit Items -> Schedule]]). | ||
| + | ====Switch==== | ||
| + | <p>The algorithm of binding a button to multiroom corresponds to the binding algorithm for other items (see [[#Switch|Edit Items -> Switch]]), but other actions can be performed when you click buttons: | ||
| + | <ol> | ||
| + | <li>'''Play/Pause''' – playback start or stop (it starts the music when it is stopped, and stops it when it plays);</li> | ||
| + | <li>'''Pause''' – playback stop (when the music is stopped, it will not work);</li> | ||
| + | <li>'''Play''' – playback start (when the music plays, it will not work);</li> | ||
| + | <li>'''Next track''' – go to the next track;</li> | ||
| + | <li>'''Previous track''' – go to the previous track;</li> | ||
| + | <li>'''Cyclic volume change''' – the volume increases and decreases in turn. A long press causes smooth change of the volume until the button is released, and a short press causes its change by 5%;</li> | ||
| + | <li>'''Volume up''' – increasing the volume by 5% with a single click. A long press causes increasing the volume within the entire period of pressing;</li> | ||
| + | <li>'''Volume down''' – decreasing the volume by 5% with a single click. A long press causes decreasing the volume within the entire period of pressing.</li> | ||
| + | </ol> | ||
| + | ===Saving changes=== | ||
| + | <p><br>[[File:instruction147.png|80px]]<br>After editing the item, click the tick mark in the right upper corner to save the changes. | ||
| + | <p><br>[[File:instruction148.png|80px]]<br>To exit without saving the specified parameters, click on the arrow in the right upper corner of the screen. | ||
Revision as of 12:52, 23 January 2022
Режим редактирования
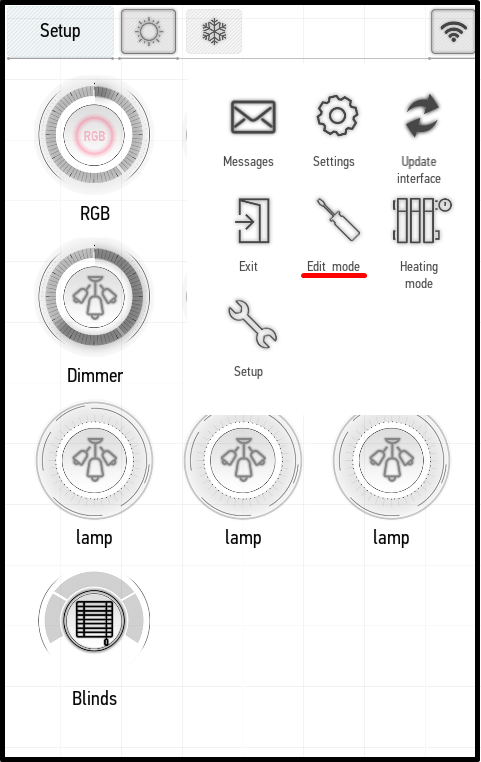
Вы можете самостоятельно изменять настройки приводов, датчиков, элементов отопления и вентиляции, мультирума и дистанционного управления. Для этого вам нужно открыть меню приложения и нажать кнопку Режим редактирования.
При включении режима редактирования на главной панели появляется соответствующая надпись:

Режим редактирования позволяет открыть меню редактирования для каждого элемента. Для этого просто нажмите и удерживайте значок элемента, пока не откроется меню. В примерах мы открываем меню редактирования освещения.
Меню редактирования

Меню редактирования представлено несколькими вкладками (до 4, в зависимости от пункта):
- Общие (General) – общие настройки;
- Авто (Auto) – настройки автоматизации;
- Расписание (Schedule) – настройка расписания;
- Выключатель (Switch) — привязка к кнопкам.
Общие (General)
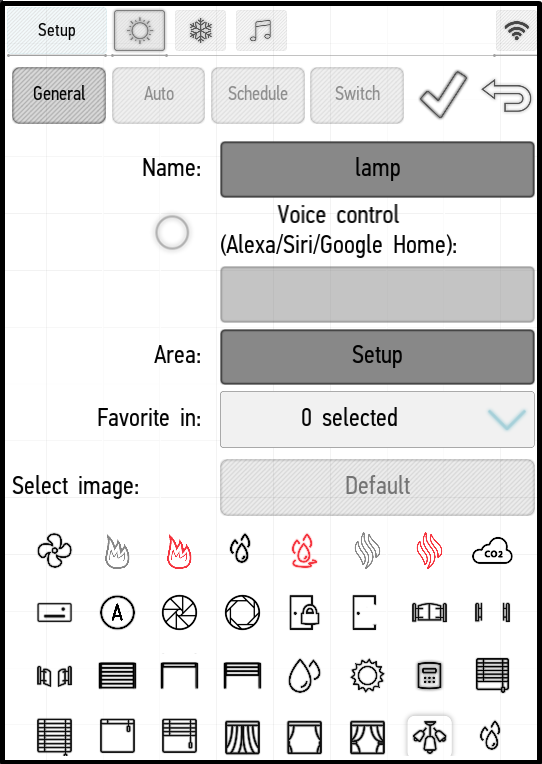
- Название (Name) — позволяет изменить название элемента.
- Система (System) — показывает системный статус элемента. ВНИМАНИЕ! После изменения статуса элемента он больше не будет отображаться на главной панели. Не изменяйте этот параметр, если не уверены, что это необходимо. Элемент виден только в инженерном режиме (см. Дополнительные функции -> Редактировать системные элементы) (Additional Functions -> Edit System Items).
- Голосовое управление (Voice control) — позволяет управлять элементом с помощью плагинов Alexa, Siri или Google Home. Для активации поставьте галочку и введите название элемента, который будет использоваться для голосового управления.
- Область (Area) – указывает место элемента в структуре системы. Нажав на эту кнопку, вы сможете переместить элемент в любое доступное помещение.
- Избранное в (Favorite in) – позволяет добавить элемент в Избранное в нужных помещениях (см. Избранное) (Favorites).
- Выбрать изображение (Select image) — позволяет изменить значок на кнопке элемента (нажатие кнопки По умолчанию (Default) возвращает значок по умолчанию).
В зависимости от типа элемента часть перечисленных функций может быть недоступна.
Авто (Auto)
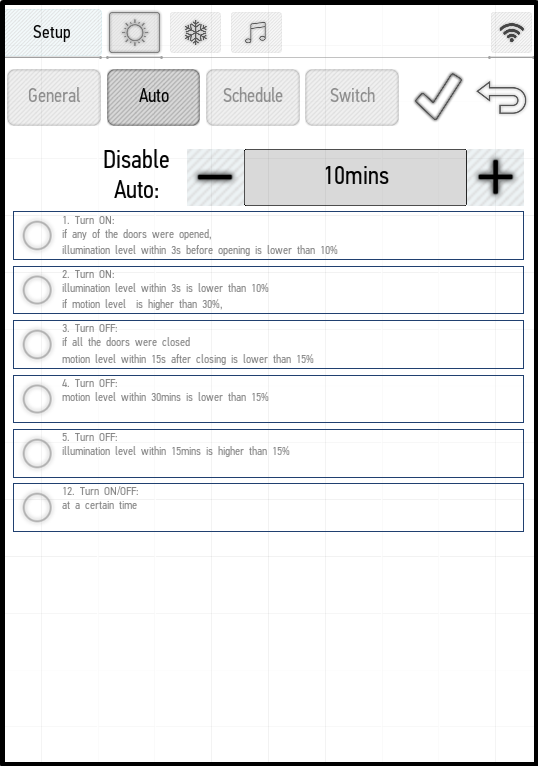
Вы можете использовать меню Авто (Auto) для выбора настроек автоматизации элемента. В нем есть 13 предварительных настроек автоматизации, и для каждого элемента доступен свой определенный набор. Подробнее см. в инструкциях по настройке автоматизации.
Расписание
Это меню используется для указания включения и выключения элемента по определенному расписанию. Чтобы создать расписание, нажмите кнопку Добавить (Add). На экране появится следующая панель.
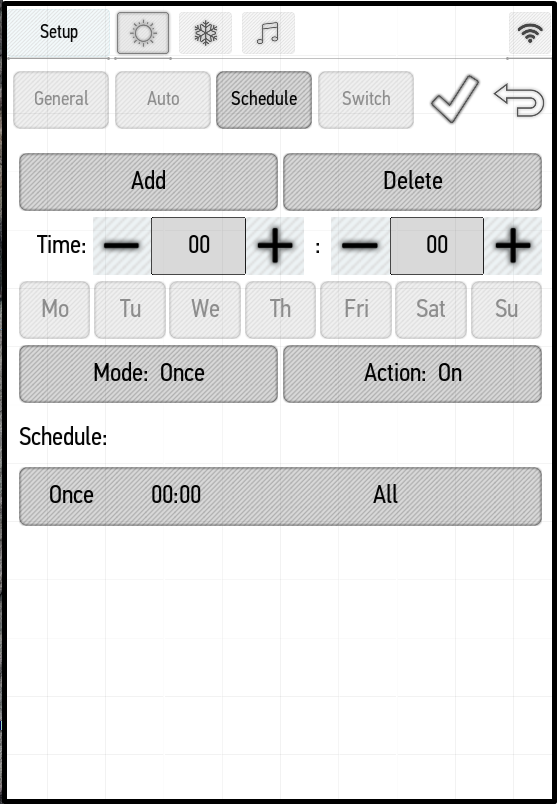
В поле Время (Time) вы можете использовать стрелки, чтобы выбрать время, когда будет происходить действие. Кнопки с днями недели расположены внизу — вы можете выбрать нужные действия, и они будут выполняться в выбранное время этих дней.
Используйте кнопку Режим (Mode), чтобы выбрать частоту повторения действий. Значение Один раз (Once) означает, что действие будет выполнено один раз, в выбранное время выбранного дня. Значение Период (Period) означает, что действие будет повторяться в выбранное время каждый выбранный день. Значение Выкл. (Off) отключает указанное расписание.
Используйте кнопку Действие (Action), чтобы выбрать действие, которое должно быть выполнено в указанное время. Есть два значения: Вкл. (On) и Выкл. (Off). Соответственно элемент можно включать и выключать.
В приведенном ниже примере мы добавили расписание для периодического включения лампы каждый будний день в 22:00, периодического выключения в те же дни в 23:00 и однократного включения в воскресенье в 19:00.
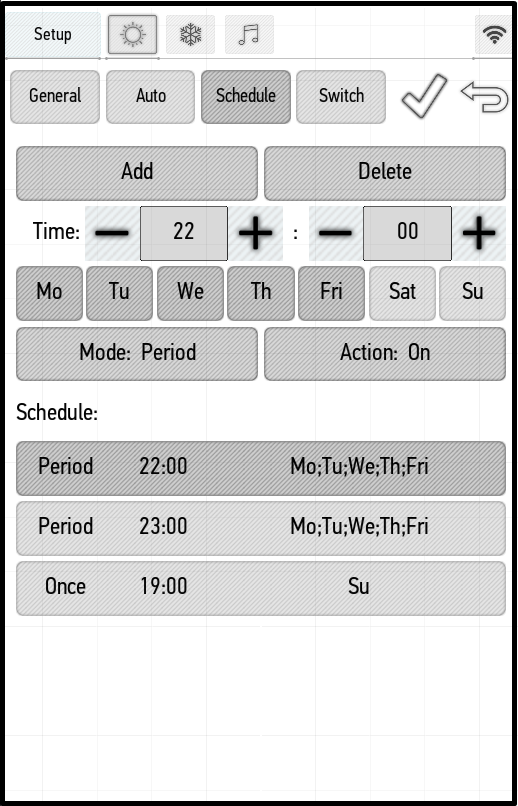
Чтобы удалить выбранное расписание, нажмите кнопку Удалить (Delete).
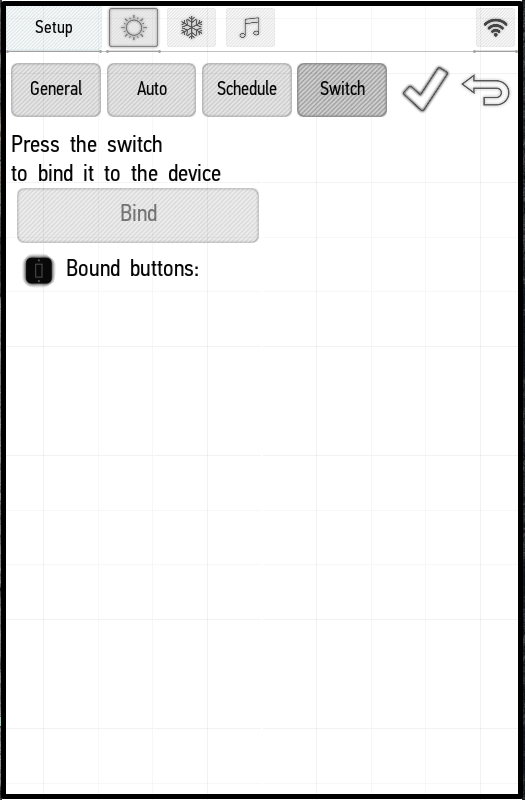
Выключатель (Switch)
Вы можете использовать меню Выключатель (Switch) для привязки кнопки выключателя к элементу и дальнейшего управления элементом с помощью этой кнопки. Привяжем кнопку к диммеру. Нажмите кнопку выключателя, чтобы программа распознала его. Используемый выключатель отобразится на экране (правый скриншот).
 |
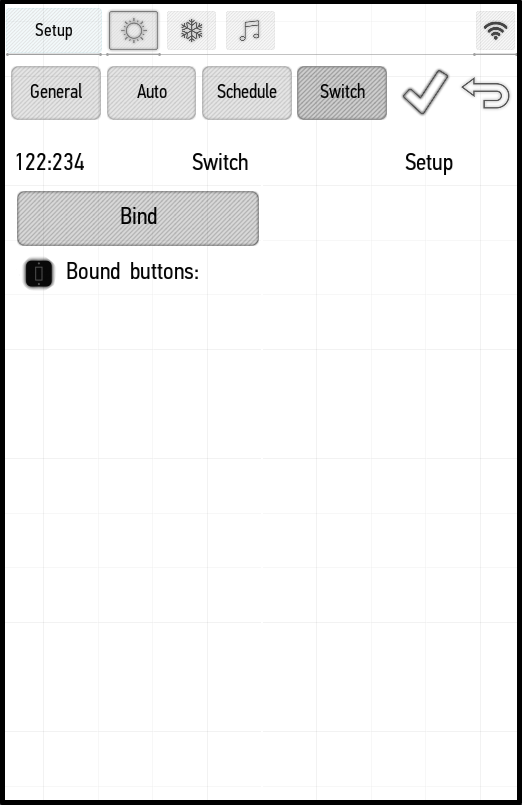 ' |
Нажмите кнопку Привязать (Bind), чтобы привязать кнопку к элементу. Привязанная кнопка будет отображаться под ним. Таким образом можно привязать несколько кнопок к одному приводу.
По умолчанию привязанная кнопка переключает состояние элемента. Если вы хотите изменить эти настройки, щелкните значок гаечного ключа.
Вы можете связать различные действия с одинарным нажатием (Click), двойным нажатием (Double click), тройным нажатием (Triple click), длительным нажатием (Long click), комбинации последовательных коротких и длинных нажатий - Длинный 2-й клик(Long 2-nd click).
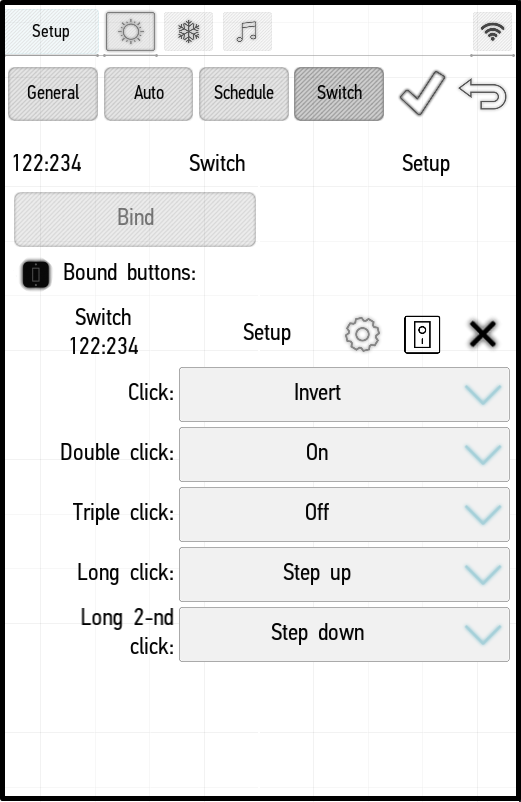
На примере слева мы настроили кнопку для управления диммером и установили следующие параметры:
- один щелчок: инвертировать состояние;single click: invert state;
- двойной щелчок: включить;double click: turn on;
- тройной щелчок: выключить;triple click: turn off;
- долгое нажатие: увеличение яркости на один шаг (4%);
- короткое и длинное нажатие: уменьшение яркости на один шаг (4%).
Для других типов элементов, к которым можно привязать кнопку, действия могут отличаться: например, ворота или жалюзи можно открывать и закрывать. Настройки кнопок для мультирума описаны в разделе Edit Items -> Edit Multiroom -> Switch.
Вы можете использовать метку X, чтобы отвязать кнопку от элемента. После внесения изменений необходимо подтвердить их, поставив галочку. '
Edit radiators
General
The content of the General tab corresponds to the content on other items (see [[#General|Edit elements -> General])
Auto
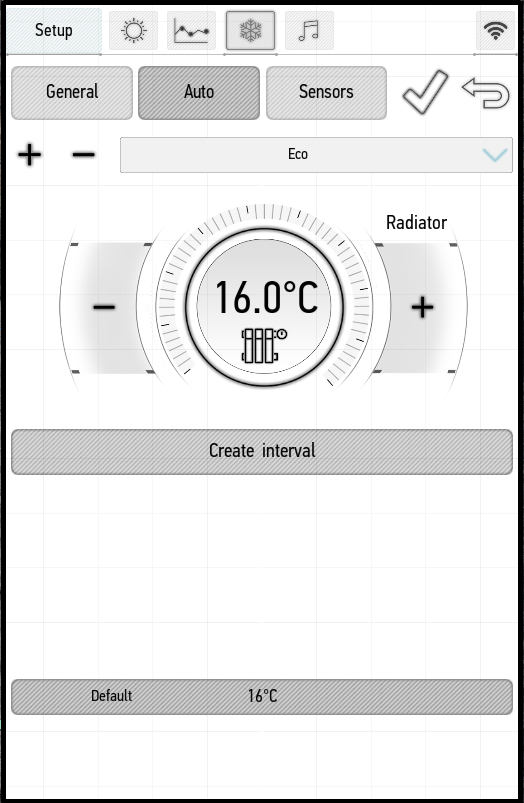
The Auto tab for radiators contains additional settings. You can add and configure heating modes, as well as specify intervals for their activation.
The following presets for heating modes are available:
- Manual – manually controlled mode;
- Always off – while the mode is active, the radiator is turned off;
- Eco – it sets the temperature to 16 degrees;
- Comfort – it sets the temperature to 22 degrees;
- Hot – it sets the temperature to 25 degrees.
Manual and Always off modes cannot be changed, others can be configured or deleted. For example, in the screenshot below, we change the temperature of the Eco mode and set 20 degrees.
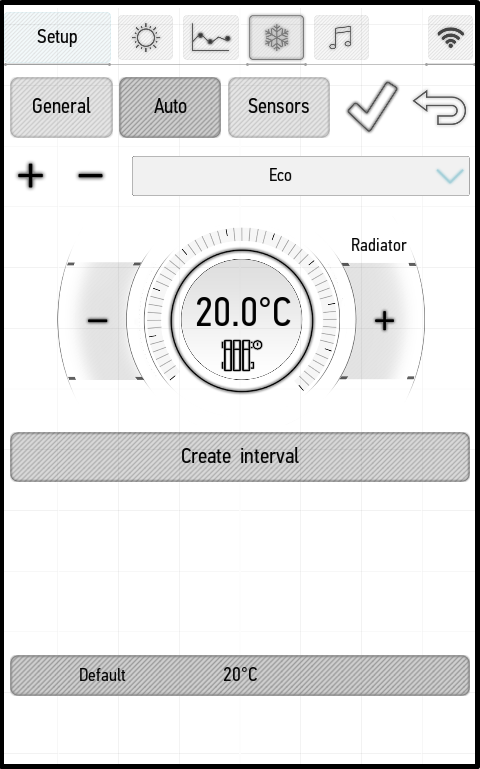
Modes are changed only for a given radiator. By clicking on the plus, you can add your own modes and set the desired temperature for them. By default, the new mode is assigned the name Mode -. To change the name, press and hold it until the cursor appears.
For each mode, except Manual and Always off, you can configure the work schedule. By default, each mode is designed to maintain the specified temperature.
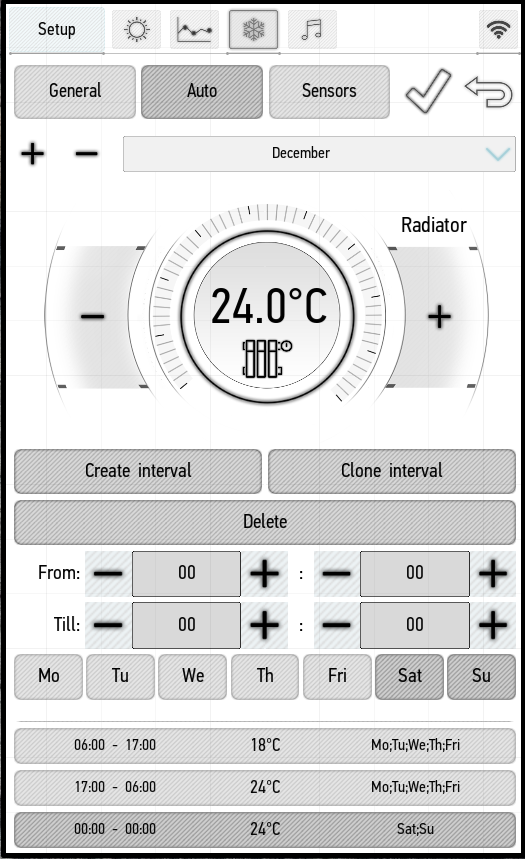
In the screenshot on the right, we have created the “December” mode and configured the following intervals for it:
- from 6:00 to 17:00 from Mon to Fri the radiator maintains an indoor temperature of 18 degrees;
- from 17:00 to 6:00 from Mon to Fri the radiator maintains an indoor temperature of 24 degrees;
- entire weekend the radiator maintains an indoor temperature of 24 degrees.
You can use the Clone interval button to copy the selected interval, and the Delete - button to delete it. In all time intervals outside the specified intervals, the default temperature will be maintained.
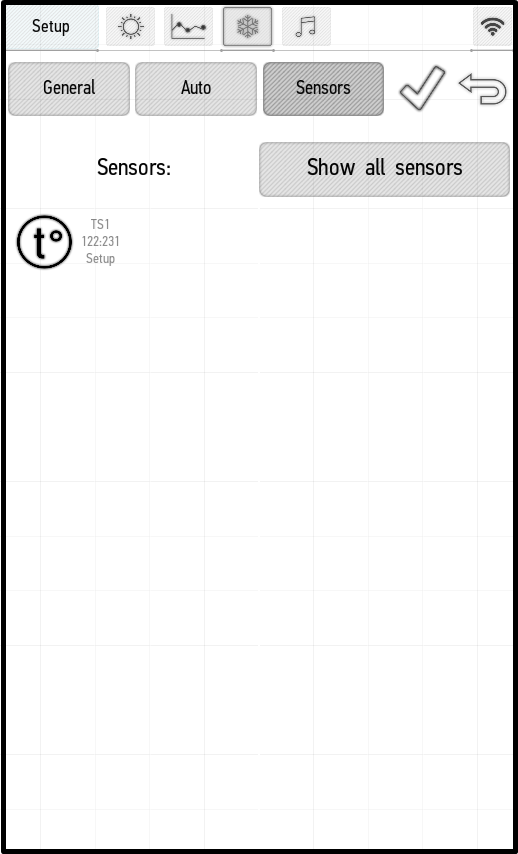
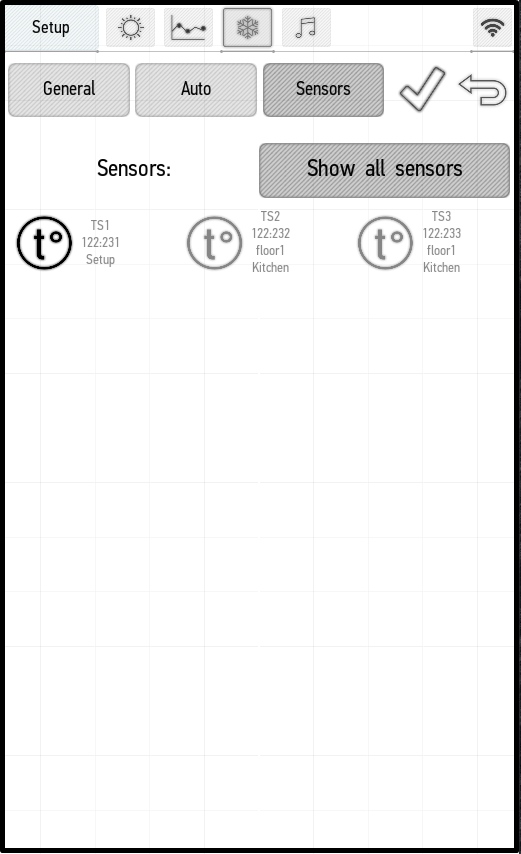
Sensors
On the Sensors panel you can see sensors from the current room (the screenshot on the left) and sensors from all rooms (the screenshot on the right). To see all the sensors in the home, click the Show all sensors button. To connect the sensor, click on it – it will be highlighted in orange. If several sensors are connected, the temperature received from them is averaged.
 |
 |
Edit Multiroom
When the edit mode is enabled the wrench icon appears in the right upper corner of the multimedia panel. Click it to open the edit menu.
General
The General tab (see #General">Edit elements -> General) in the multiroom has two additional functions:
- Soft Start – it allows you to set the period (in seconds) used to increase the start volume from 0 to the specified level.
- Turn OFF parameters – it allows you to set the period in seconds or the number of tracks which will pass before the playback stops.
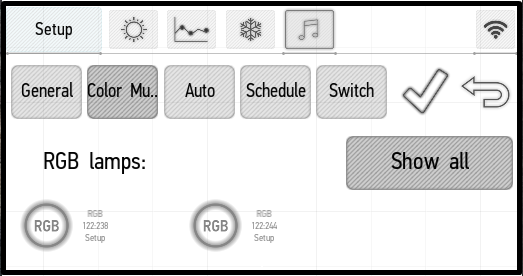
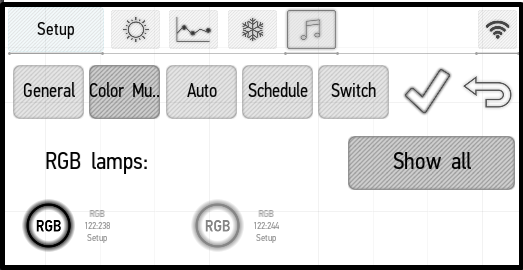
Color Music
In this section you can choose RGB backlights, which will be used in color music. By default, those backlights are displayed that are in the same room with a multiroom. Click on the Show All button, and you can see all RGBs in the home (the left screenshot). Click on the desired backlights, and you will add them to the color music; selected backlights are highlighted in orange (the right screenshot).
 |
 |
Auto
The contents of the Auto tab correspond to the contents on other items (see Edit Items -> Auto).
Schedule
The contents of the Schedule tab correspond to the contents on other items (see Edit Items -> Schedule).
Switch
The algorithm of binding a button to multiroom corresponds to the binding algorithm for other items (see Edit Items -> Switch), but other actions can be performed when you click buttons:
- Play/Pause – playback start or stop (it starts the music when it is stopped, and stops it when it plays);
- Pause – playback stop (when the music is stopped, it will not work);
- Play – playback start (when the music plays, it will not work);
- Next track – go to the next track;
- Previous track – go to the previous track;
- Cyclic volume change – the volume increases and decreases in turn. A long press causes smooth change of the volume until the button is released, and a short press causes its change by 5%;
- Volume up – increasing the volume by 5% with a single click. A long press causes increasing the volume within the entire period of pressing;
- Volume down – decreasing the volume by 5% with a single click. A long press causes decreasing the volume within the entire period of pressing.
Saving changes

After editing the item, click the tick mark in the right upper corner to save the changes.

To exit without saving the specified parameters, click on the arrow in the right upper corner of the screen.