Difference between revisions of "Quick Start Guide/grc"
(Created page with "Μπορείτε να ενεργοποιήσετε ή να απενεργοποιήσετε <span style="font-size: 30px; vertical-align: middle;">①</span> τους εκ...") |
(Created page with "Για να κάνετε επίδειξη της λειτουργίας Plug and Play, ανοίγουμε τους εκτελεστές στην περιοχή Εγκατάσ...") |
||
| Line 85: | Line 85: | ||
<hr> | <hr> | ||
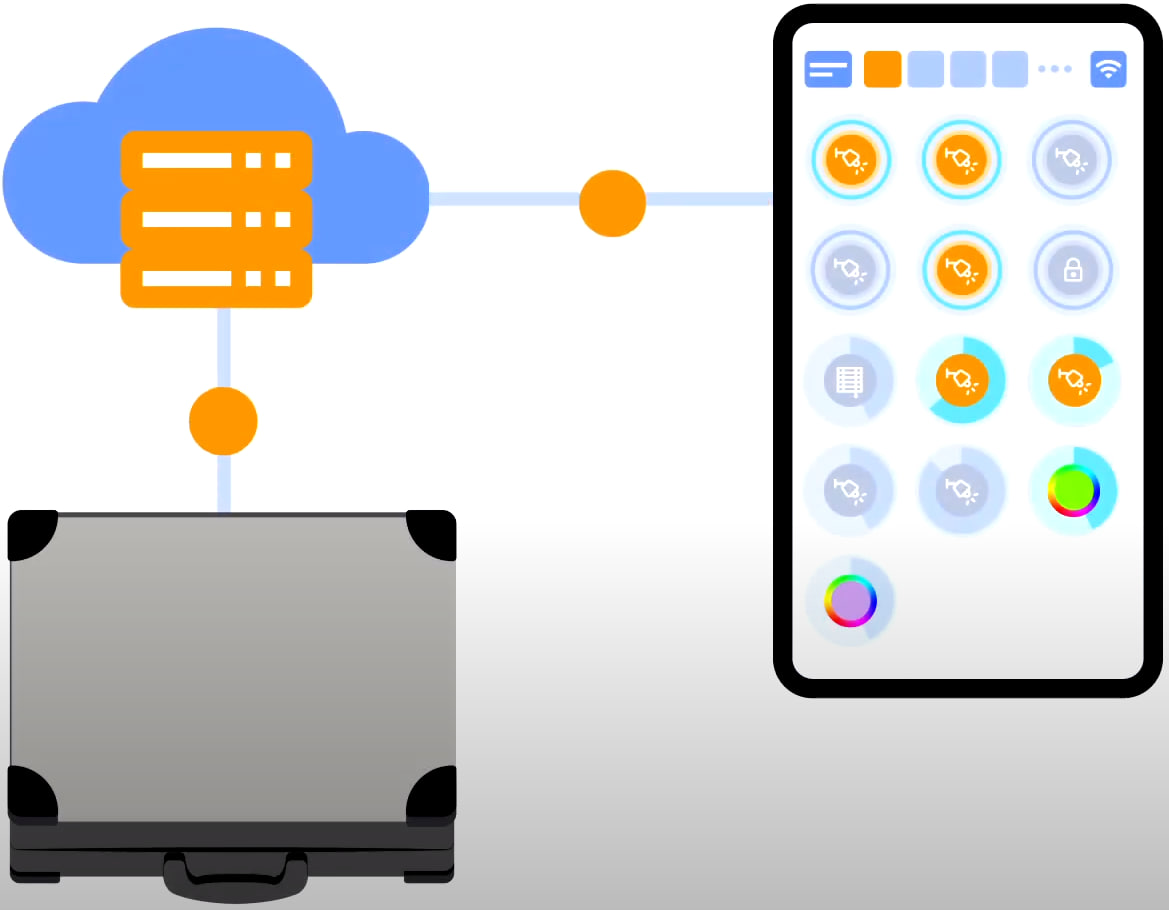
| − | + | Για να κάνετε επίδειξη της λειτουργίας Plug and Play, ανοίγουμε τους εκτελεστές στην περιοχή Εγκατάστασης <span style="font-size: 30px; vertical-align: middle;">①</span> και συνδέουμε τη μονάδα στον δίαυλο CAN. Το σύστημα αυτόματα εντοπίζει τη νέα μονάδα και την προσθέτει στην περιοχή ‘Εγκατάσταση’ <span style="font-size: 30px; vertical-align: middle;">②</span>, όπου μπορούμε να ελέγξουμε τη νέα μονάδα αμέσως. | |
[[File:DemoCase9.png|1000x800px]] | [[File:DemoCase9.png|1000x800px]] | ||
<hr> | <hr> | ||
Revision as of 15:05, 3 November 2023
Γρήγορη εκκίνηση/unboxing.
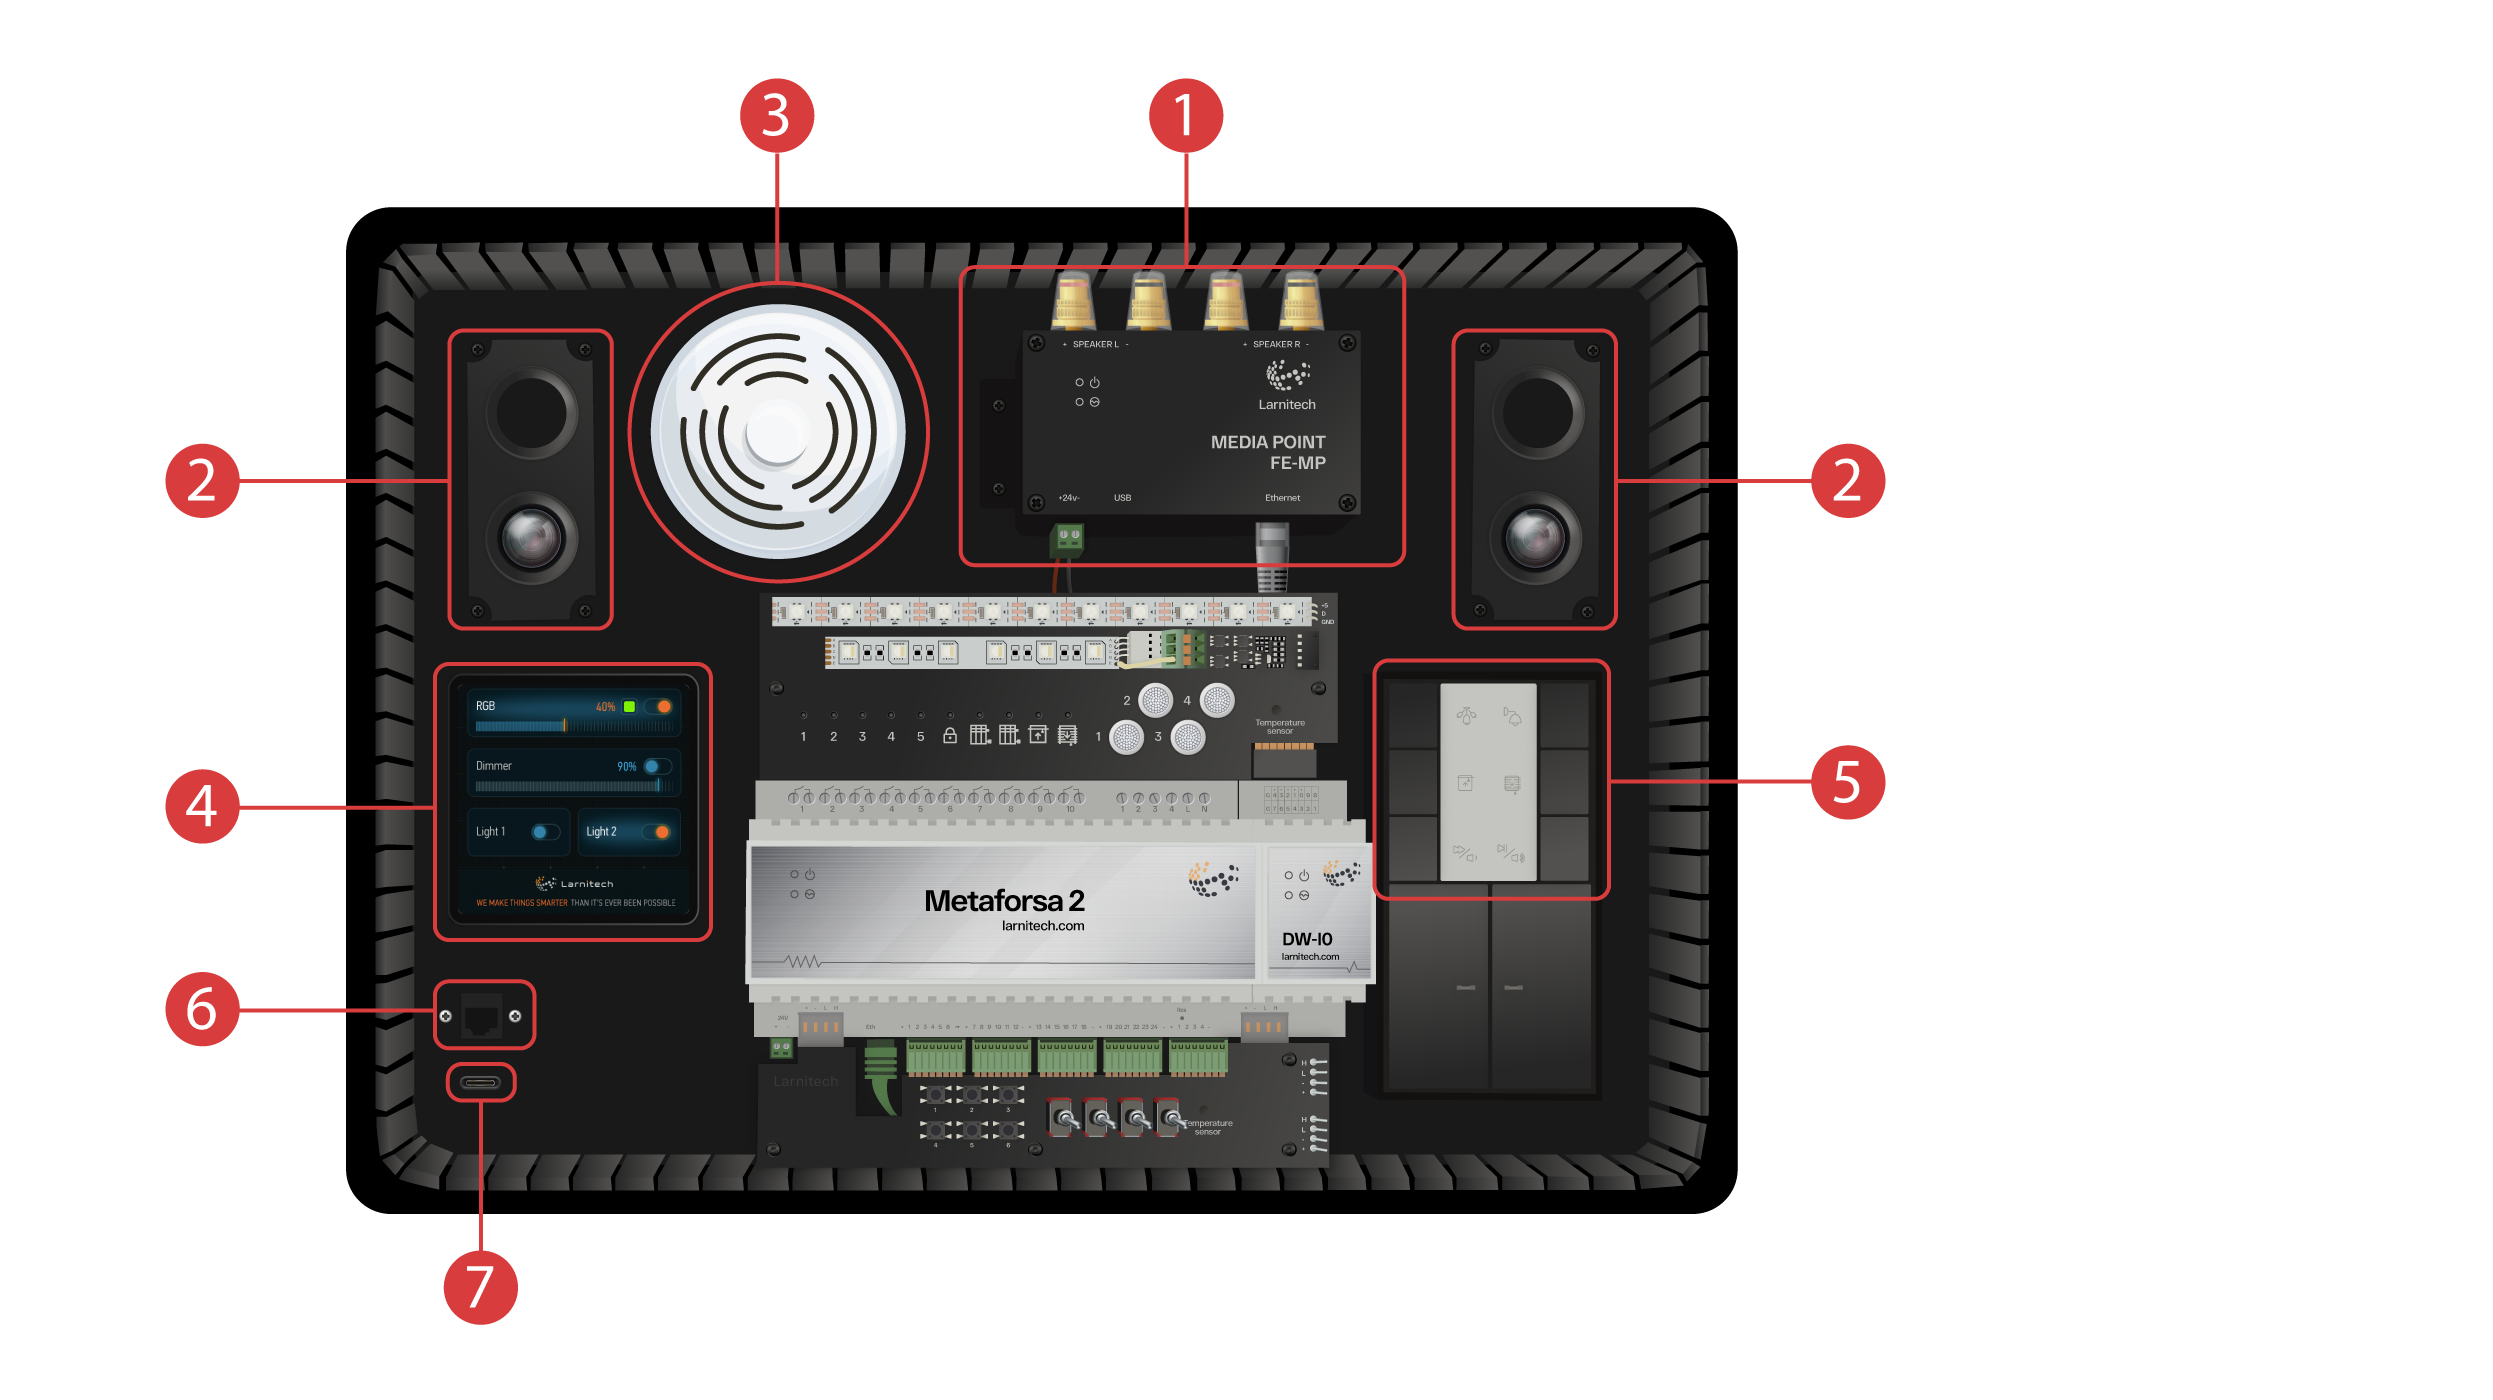
Καλωσήρθατε όλοι και όλες στο κανάλι μας! Σε αυτό το βίντεο θα σας καθοδηγήσουμε ώστε να εγκαταστήσετε το σύστημα της Larnitech γρήγορα και εύκολα. Η εγκατάσταση θα γίνει με τη χρήση μιας βαλίτσας επίδειξης. Το εκπαιδευτικό τεστ περιλαμβάνει μία βαλίτσα επίδειξης ① και ένα κουτί με μερικά έξτρα αντικείμενα ②.
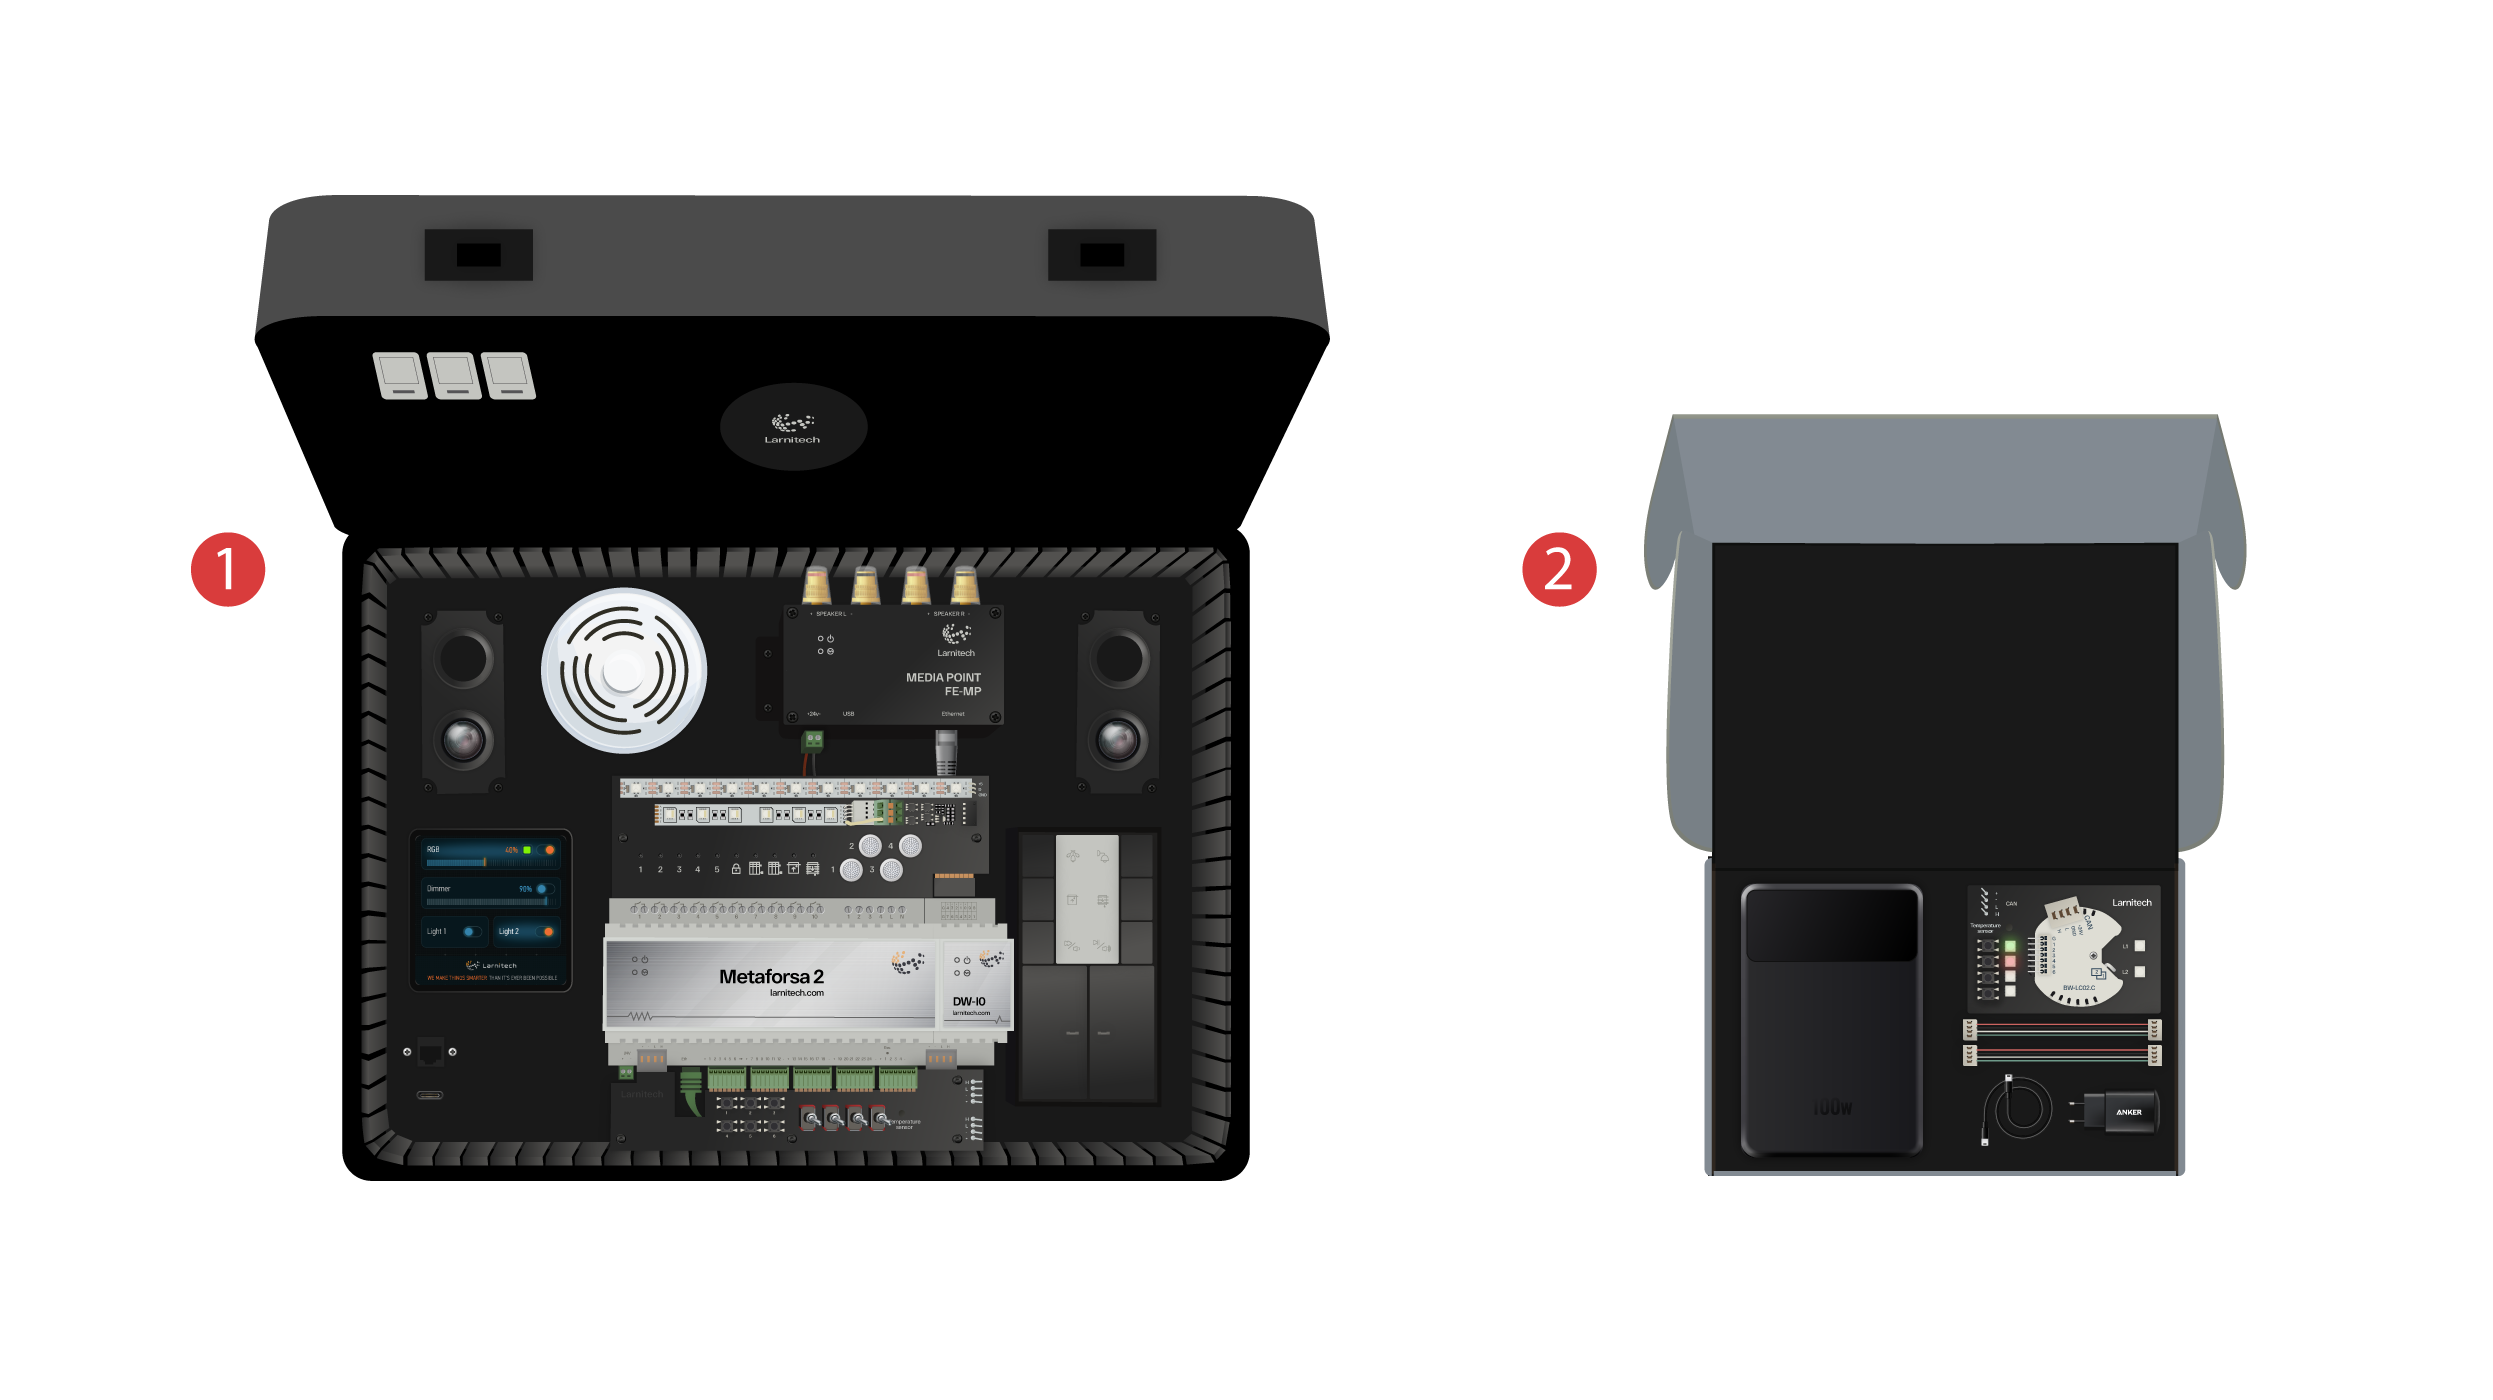
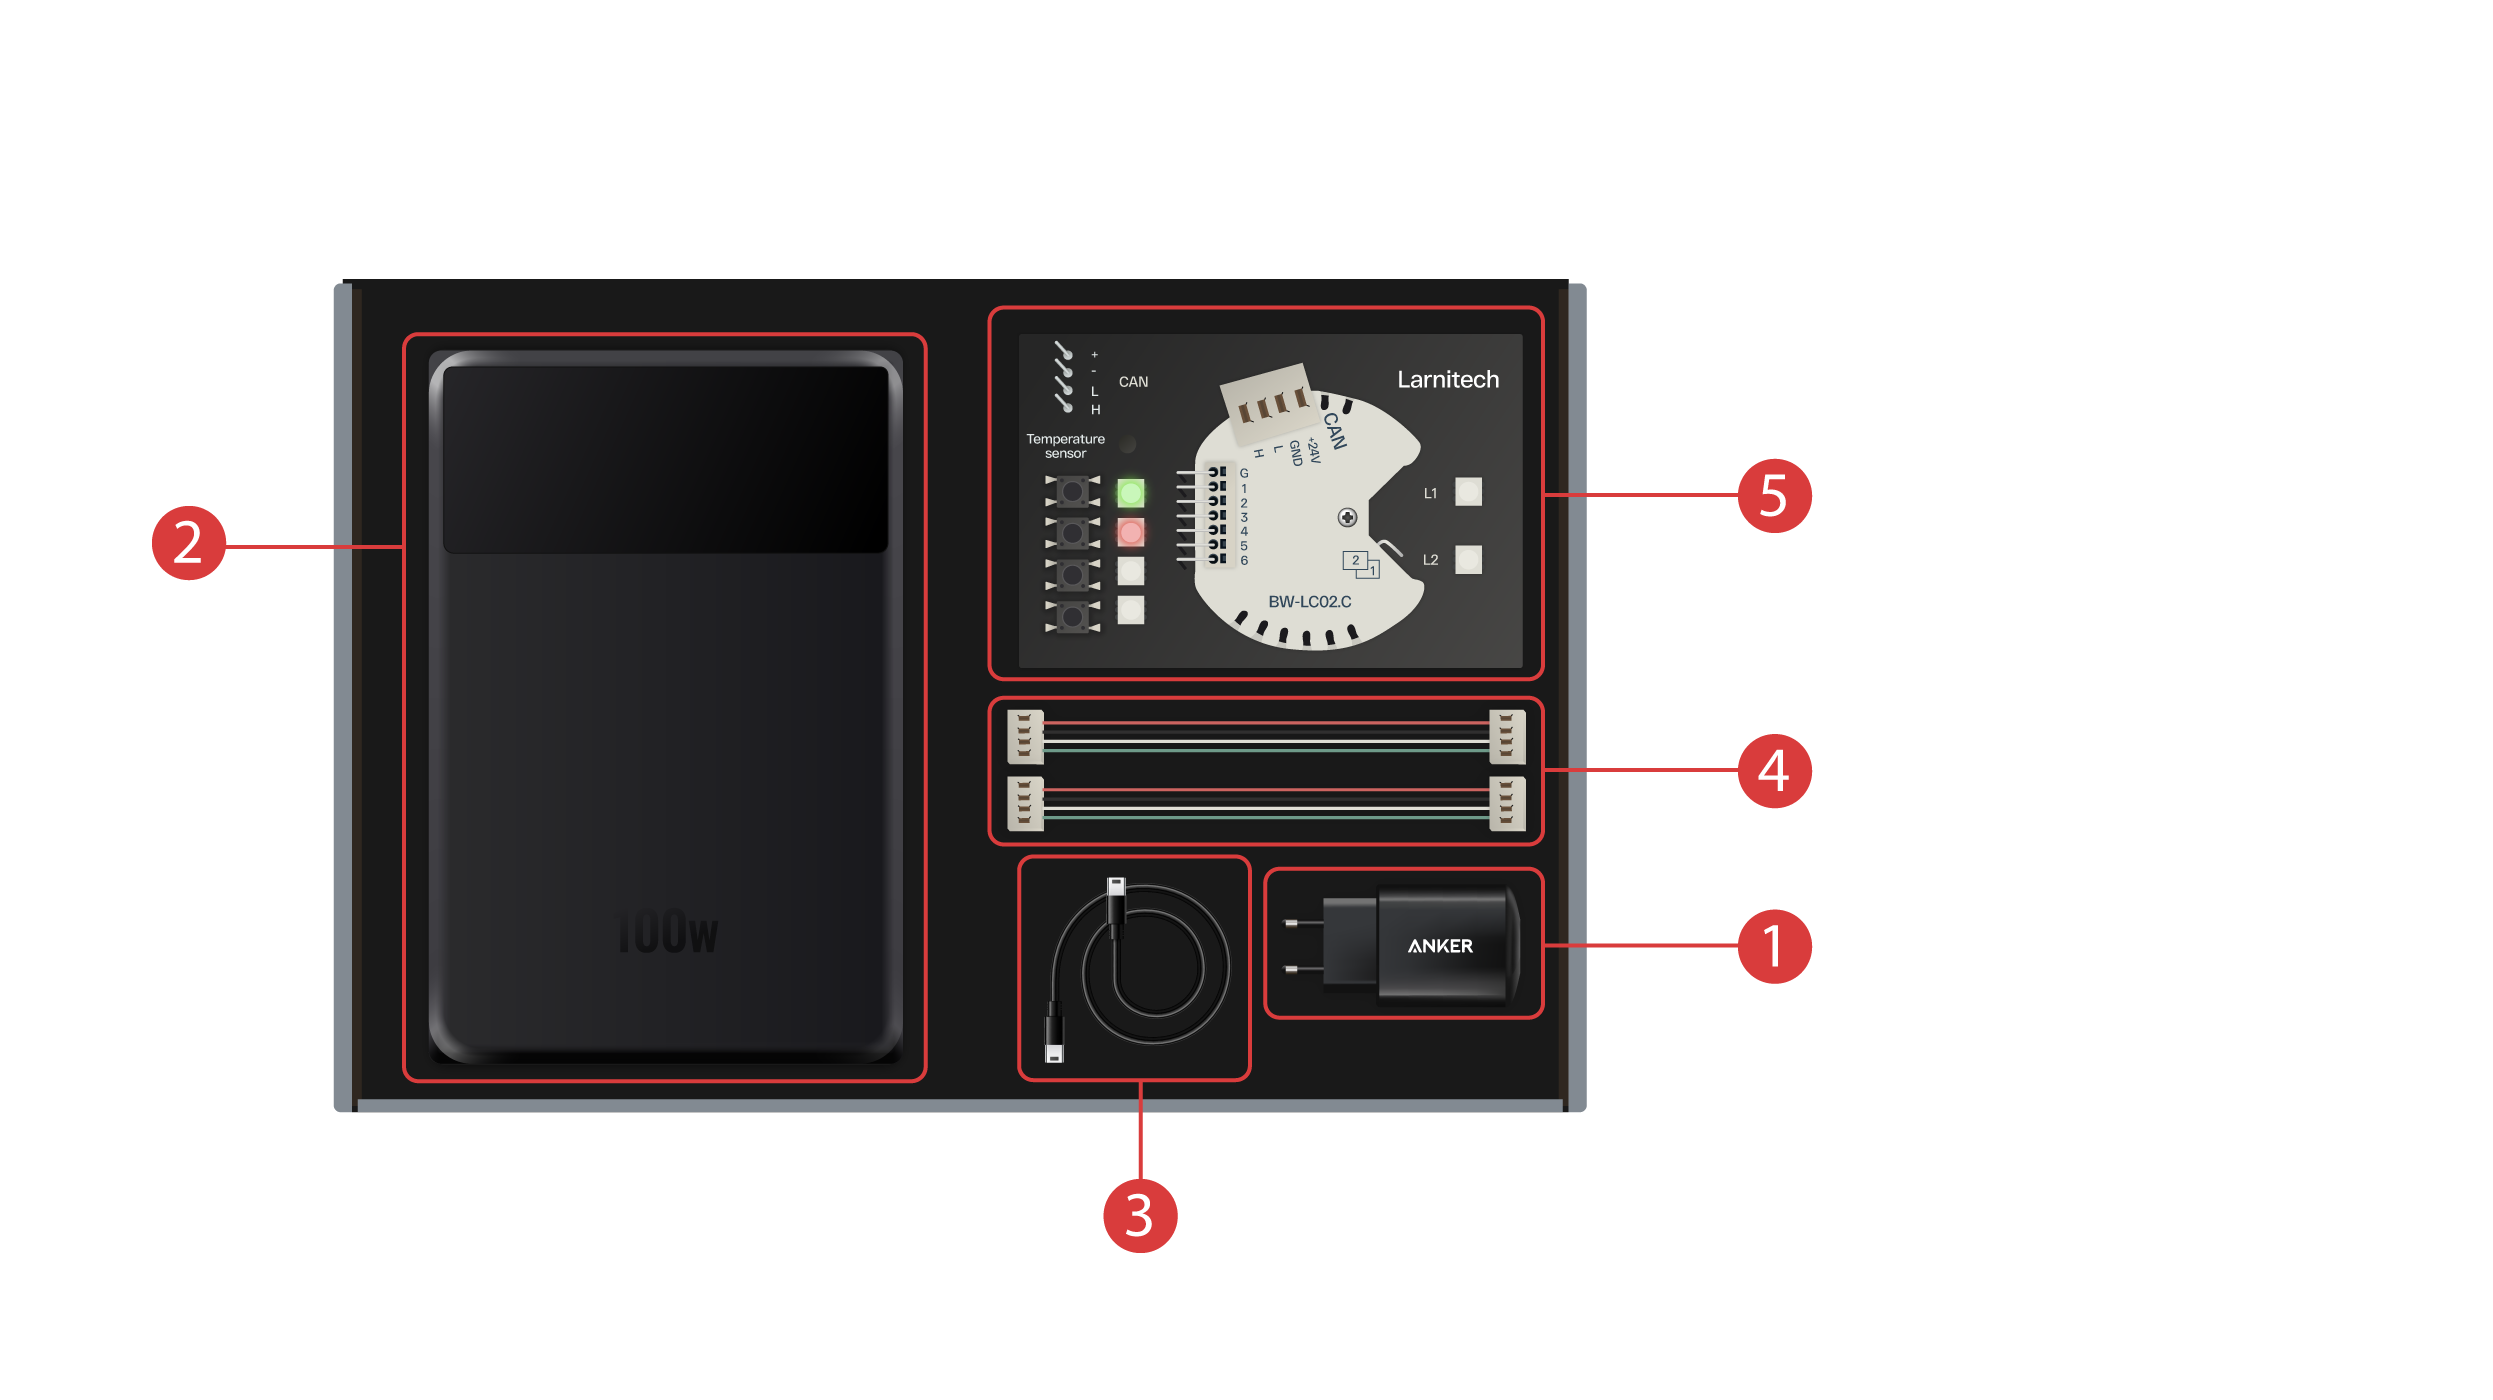
Στο κουτί θα βρείτε τα παρακάτω:
① - Ένα τροφοδοτικό με θύρα USB Type-C, που υποστηρίζει την τεχνολογία Power Delivery;
② - Έναν φορητό φορτιστή (power bank) με οθόνη και θύρα εξόδου Type-C, που μπορείτε να χρησιμοποιήσετε για να φορτίσετε τη βαλίτσα επίδειξης;
③ - Καλώδιο Type-C με ένδειξη κατανάλωσης ενέργειας;
④ - 2 καλώδια διαύλων CAN;
⑤ - Πίνακα επίδειξης που περιλαμβάνει μονάδα BW-LC02 με δύο λαμπτήρες LED, 4 πλήκτρα με οπίσθιο φωτισμό και συνδεδεμένο αισθητήρα θερμοκρασίας.
Η βαλίτσα επίδειξης περιλαμβάνει τα ακόλουθα: Μονάδα ‘Metaforsa 2’.
Η ‘Metaforsa 2’ έχει:
① - 10 κανάλια ρελέ με συνδεδεμένους λαμπτήρες LED, που δείχνουν την τρέχουσα κατάστασή τους;
② - 4 αυξομειούμενα κανάλια, με συνδεδεμένους λαμπτήρες LED αυξομειούμενης φωτεινότητας;
③ - 24 κανάλια εισροής, με 6 πλήκτρα ④ και 4 διακόπτες ⑤ συνδεδεμένους με αυτά για να μιμηθούν διάφορους αισθητήρες;
⑥ - Κανάλια εισροής για αισθητήρες θερμότητας με έναν συνδεδεμένο αισθητήρα;
⑦ - Έναν δίαυλο CAN για να συνδεθούν επιπλέον συσκευές. Άλλα τμήματα της θήκης επίδειξης είναι συνδεδεμένα σε αυτό, όπως και 2 θύρες ⑧ για σύνδεση εξωτερικών συσκευών·
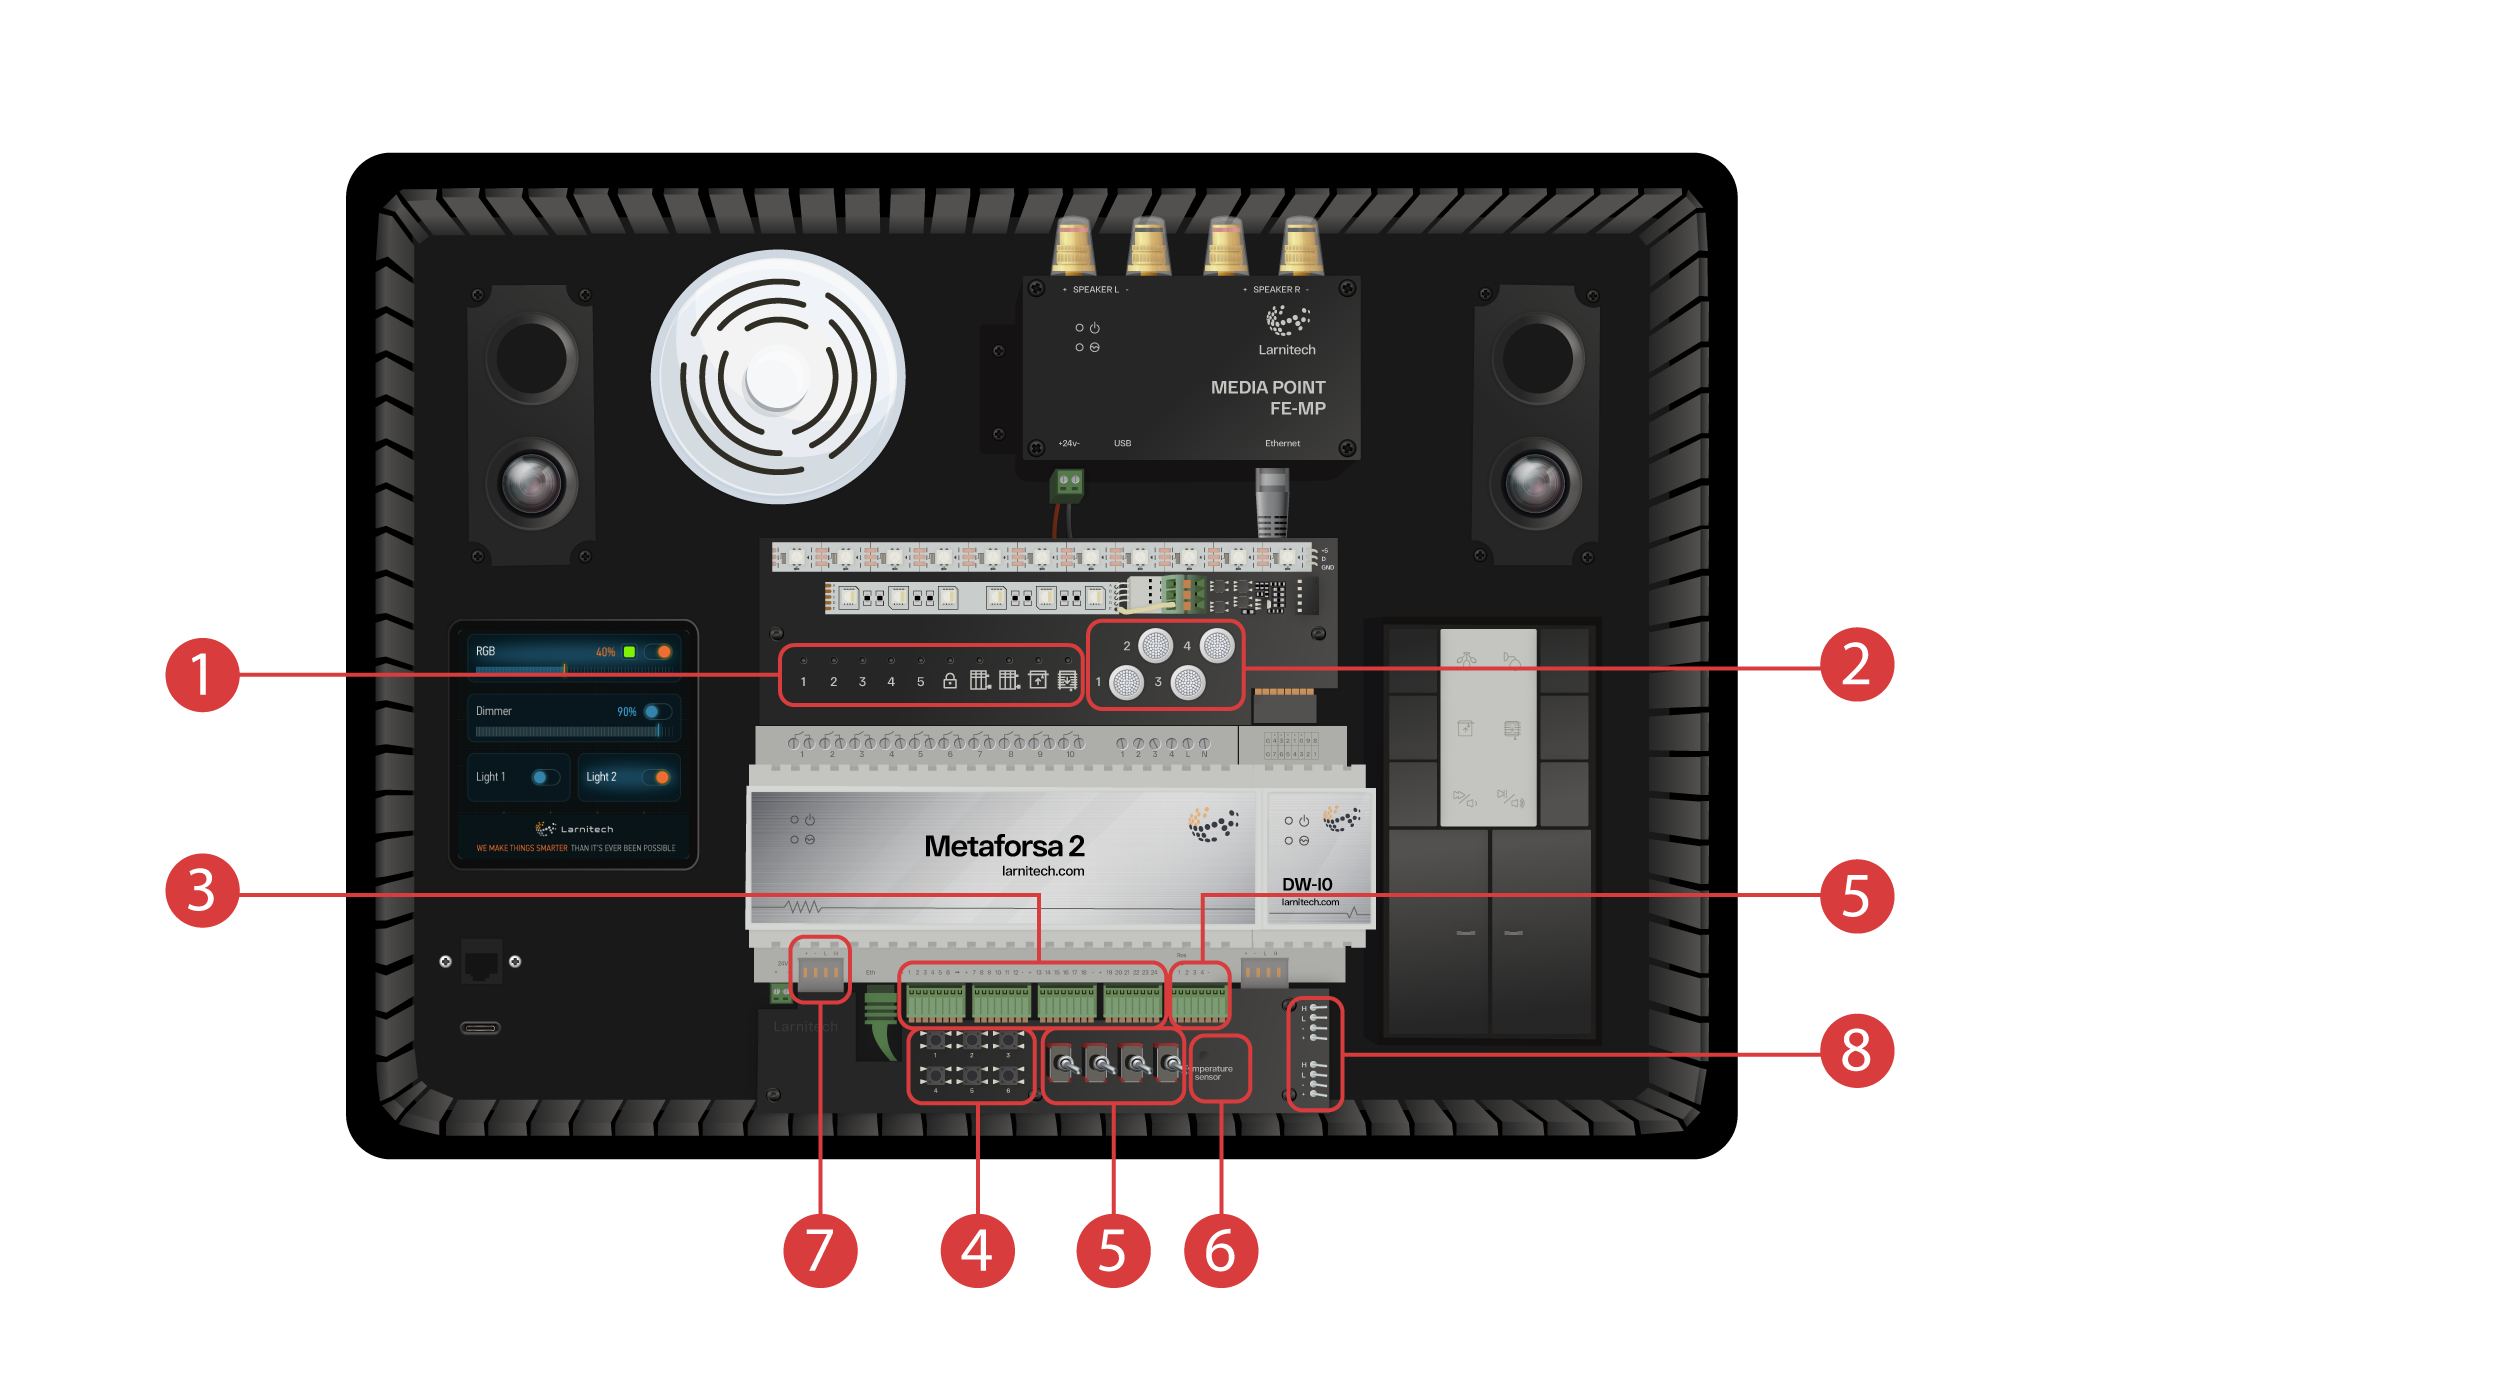
Η μονάδα DW-IO
Αυτή η μονάδα έχει 14 ενιαία κανάλια εισροής/εκροής, με τα παρακάτω τμήματα συνδεδεμένα:
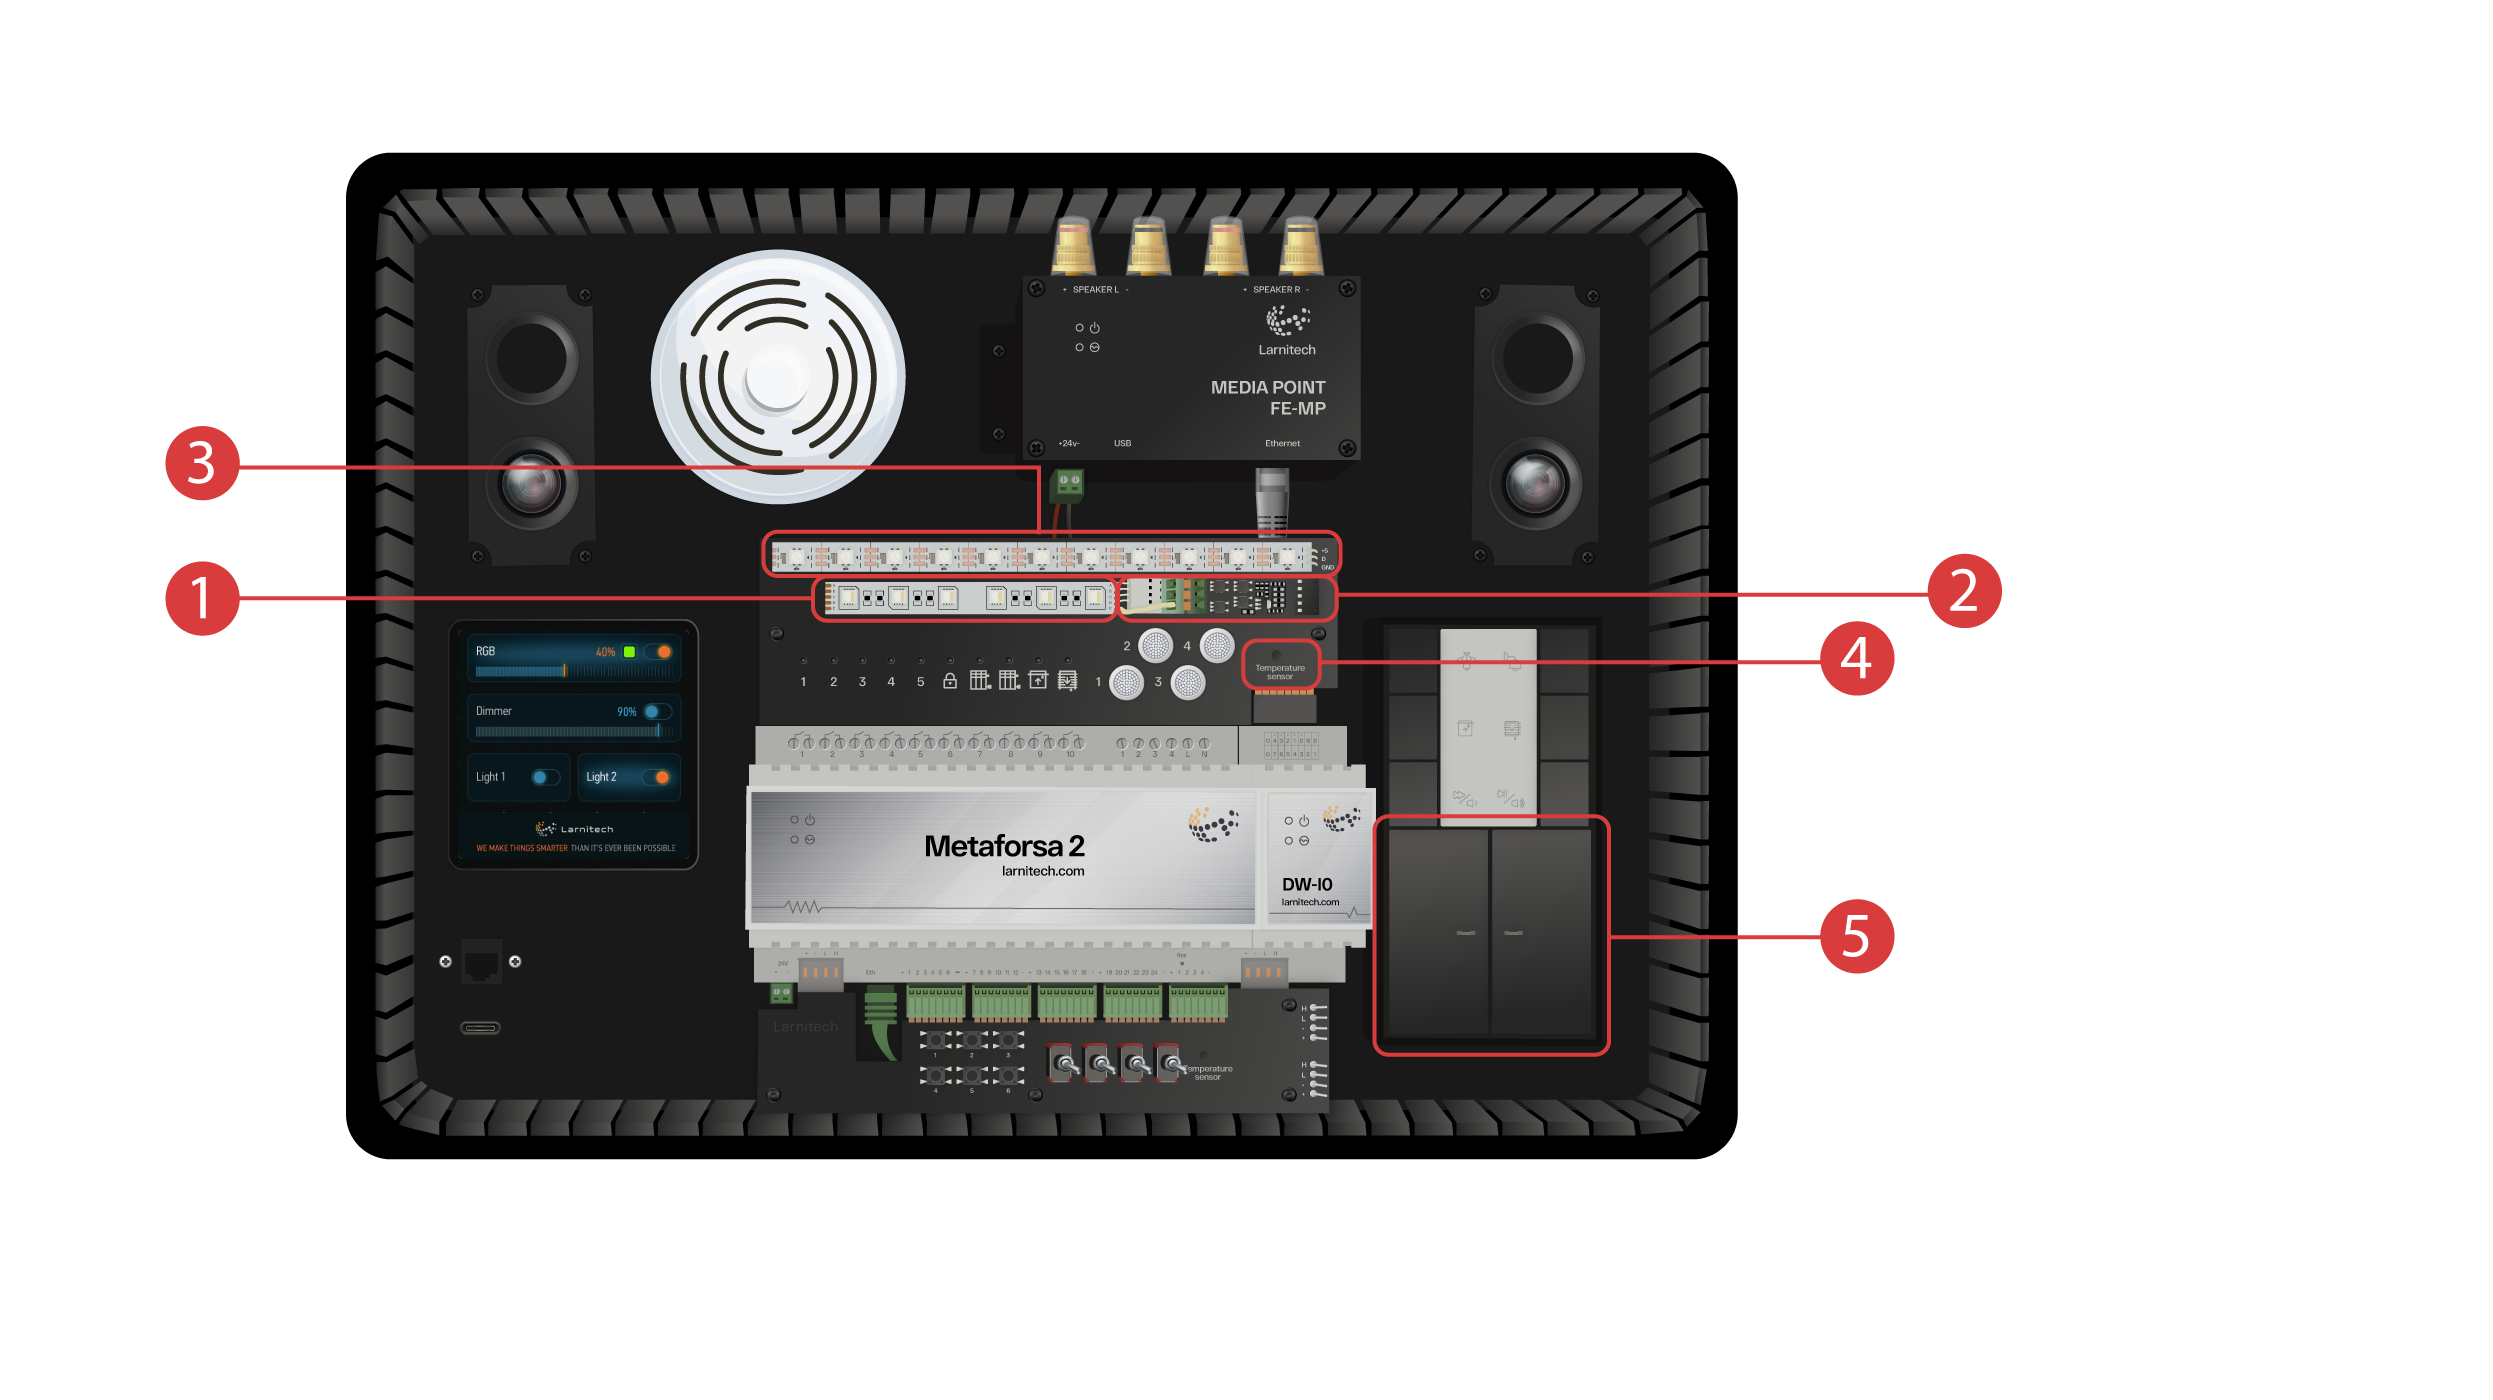
① - Μια λωρίδα RGBW 4 καναλιών, συνδεδεμένη με τον ενισχυτή τάσης AMP5V-4②;
③ - Μια λωρίδα με ελεγχόμενους λαμπτήρες LED. Κάθε ένας από αυτούς τους λαμπτήρες LED μπορεί να εκπέμψει το δικό του μοναδικό χρώμα;
④ - Αισθητή θερμότητας;
⑤ - Και δύο πλήκτρα με οπίσθιο φωτισμό.
Η θήκη επίδειξης περιλαμβάνει επίσης τα ακόλουθα:
① - ένα FE-MP Media Point με ② δύο ηχεία;
③ - Έναν αισθητήρα έξι-σε-ένα CW-C02, ο οποίος μετράει: Επίπεδο κίνησης, Φωτισμό, Θερμοκρασία, Υγρασία, Επίπεδο διοξειδίου του άνθρακα και ο οποίος έχει υπέρυθρο πομπό;
④ - μια οθόνη αισθητήρα LCP4 τεσσάρων ιντσών που μπορεί να προβάλει είτε ένα κανονικό περιβάλλον διεπαφής, ή περιβάλλον διεπαφής προσαρμοσμένο για οθόνες τοίχου;
Μέσα στη θήκη υπάρχει μια μονάδα BW-SW24 ελεγχόμενη με πλήκτρα, η οποία έχει ένα πληκτρολόγιο JUNG έξι πλήκτρων και 24 βολτ ⑤ συνδεδεμένο;
Και ένα ρούτερ Wi-Fi, που μπορεί να συνδεθεί στο διαδίκτυο είτε μέσω της θύρας ethernet ⑥ στην μπροστινή οθόνη της θήκης, είτε μέσω ενός διαθέσιμου δικτύου Wi-Fi;
Για τροφοδοσία, υπάρχει μια θύρα Type-C ⑦, που βρίσκεται στην μπροστινή οθόνη.
Όλος ο εξοπλισμός που είναι εγκατεστημένος στη βαλίτσα επίδειξης τροφοδοτείται με ένταση 20 Volt, που είναι απολύτως ασφαλή για το χρήστη.
Συνδέστε το καλώδιο τροφοδοσίας και το καλώδιο Ethernet. Αν δεν έχετε τη δυνατότητα να συνδεθείτε μέσω Ethernet, αργότερα στο βίντεο θα δείξουμε πώς μπορείτε να συνδέσετε το ενσωματωμένο ρούτερ στο δίκτυο Wi-Fi σας.
Για να προχωρήσετε, πρέπει να έχετε εγκατεστημένη την εφαρμογή της Larnitech στο smartphone ή το tablet σας. Απλώς σκανάρετε τον πρώτο κωδικό QR στο πάνω μέρος της βαλίτσας σας.
Αν αφού εγκαταστήσετε και εκκινήσετε την εφαρμογή η σύνδεση δεν ολοκληρωθεί αυτόματα, θα χρειαστεί να συνδεθείτε στο δίκτυο Wi-Fi ‘Larnitech_case_5G’ χρησιμοποιώντας τη συσκευή κινητού τηλεφώνου σας. Έπειτα εκκινήστε την εφαρμογή και σκανάρετε τον πρώτο κωδικό QR στην ενότητα ‘Συνδέσεις’.
Μπορεί να χρειαστεί να κλείσετε τη χρήση δεδομένων στη συσκευή κινητού τηλεφώνου σας αν το σετ επίδειξης δεν συνδέεται στο Διαδίκτυο.

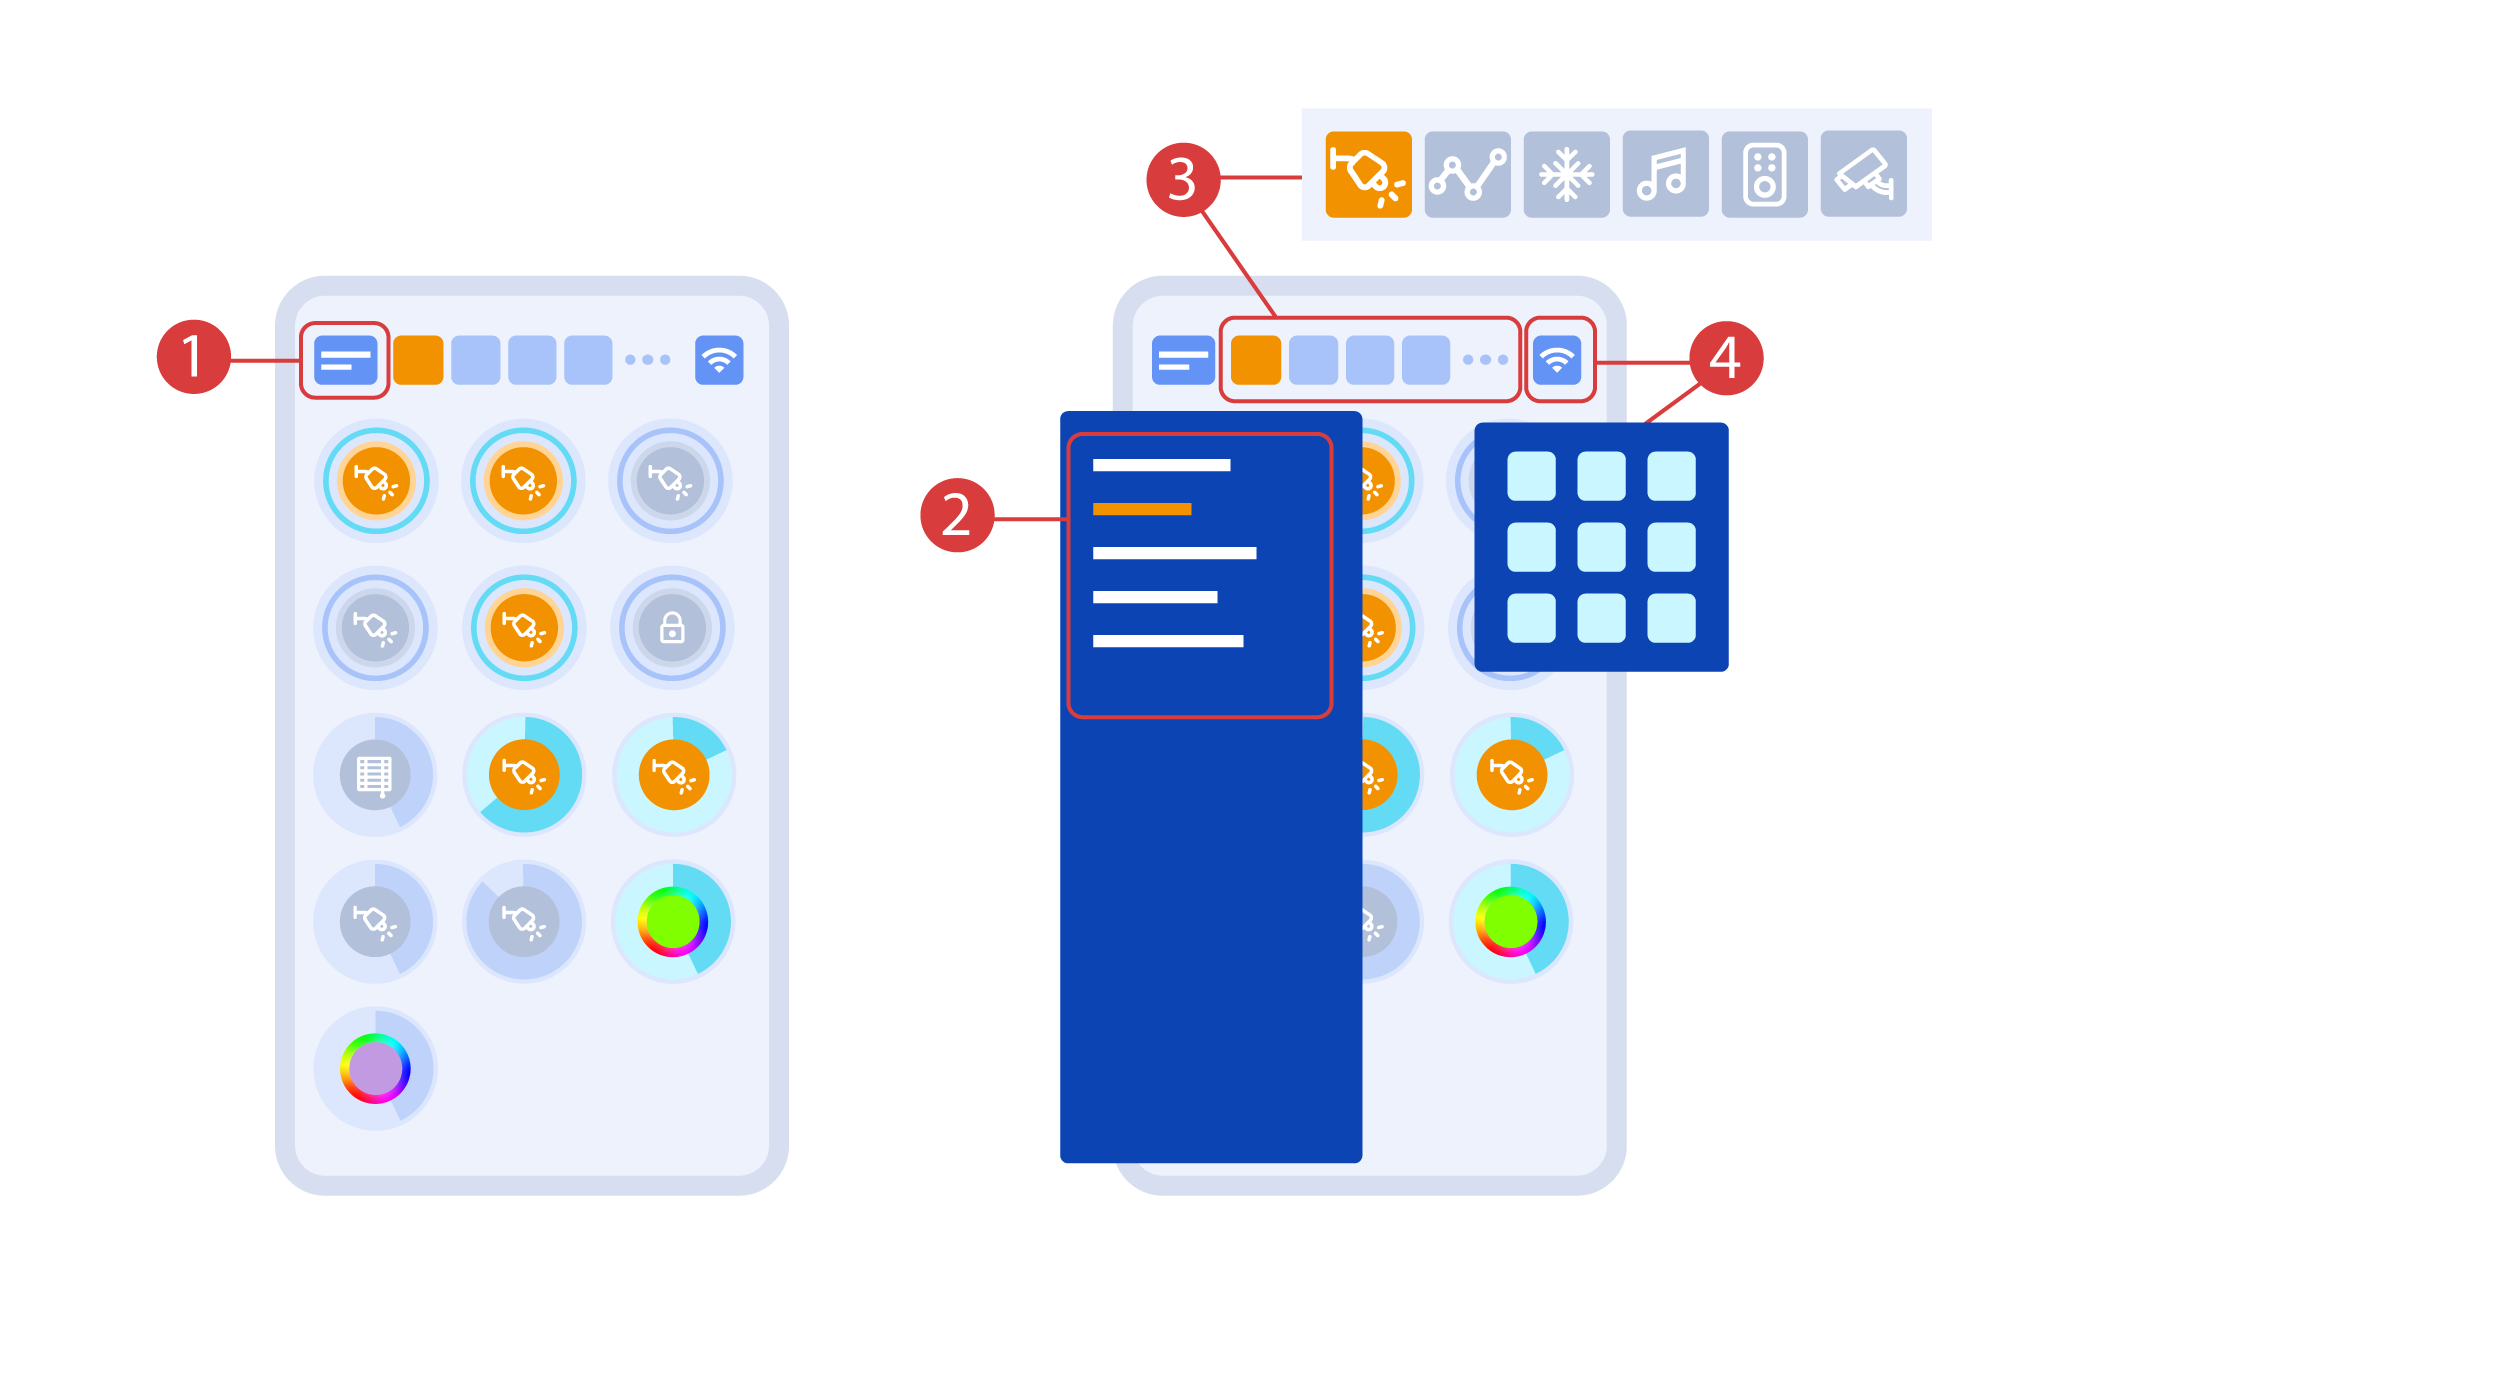
Η κύρια οθόνη της εφαρμογής έχει μερικά βασικά σημεία. Στην πάνω αριστερά γωνία υπάρχει το μενού ‘επιλογή περιοχής’ ①.
Απλώς επιλέξτε μια από τις διαθέσιμες περιοχές για να το διαχειριστείτε ②.
Έπειτα υπάρχουν εικονίδια που σας επιτρέπουν να επιλέξτε τους εκτελεστές, τους αισθητήρες, το κλίμα, τα πολυμέσα, την τηλεχείριση και τις κάμερες ③. Στη δεξιά γωνία υπάρχει ένα εικονίδιο για το μενού περισσότερων επιλογών ④. Μέσα στο εικονίδιο μπορείτε επίσης να δείτε την τρέχουσα κατάσταση της σύνδεσης.
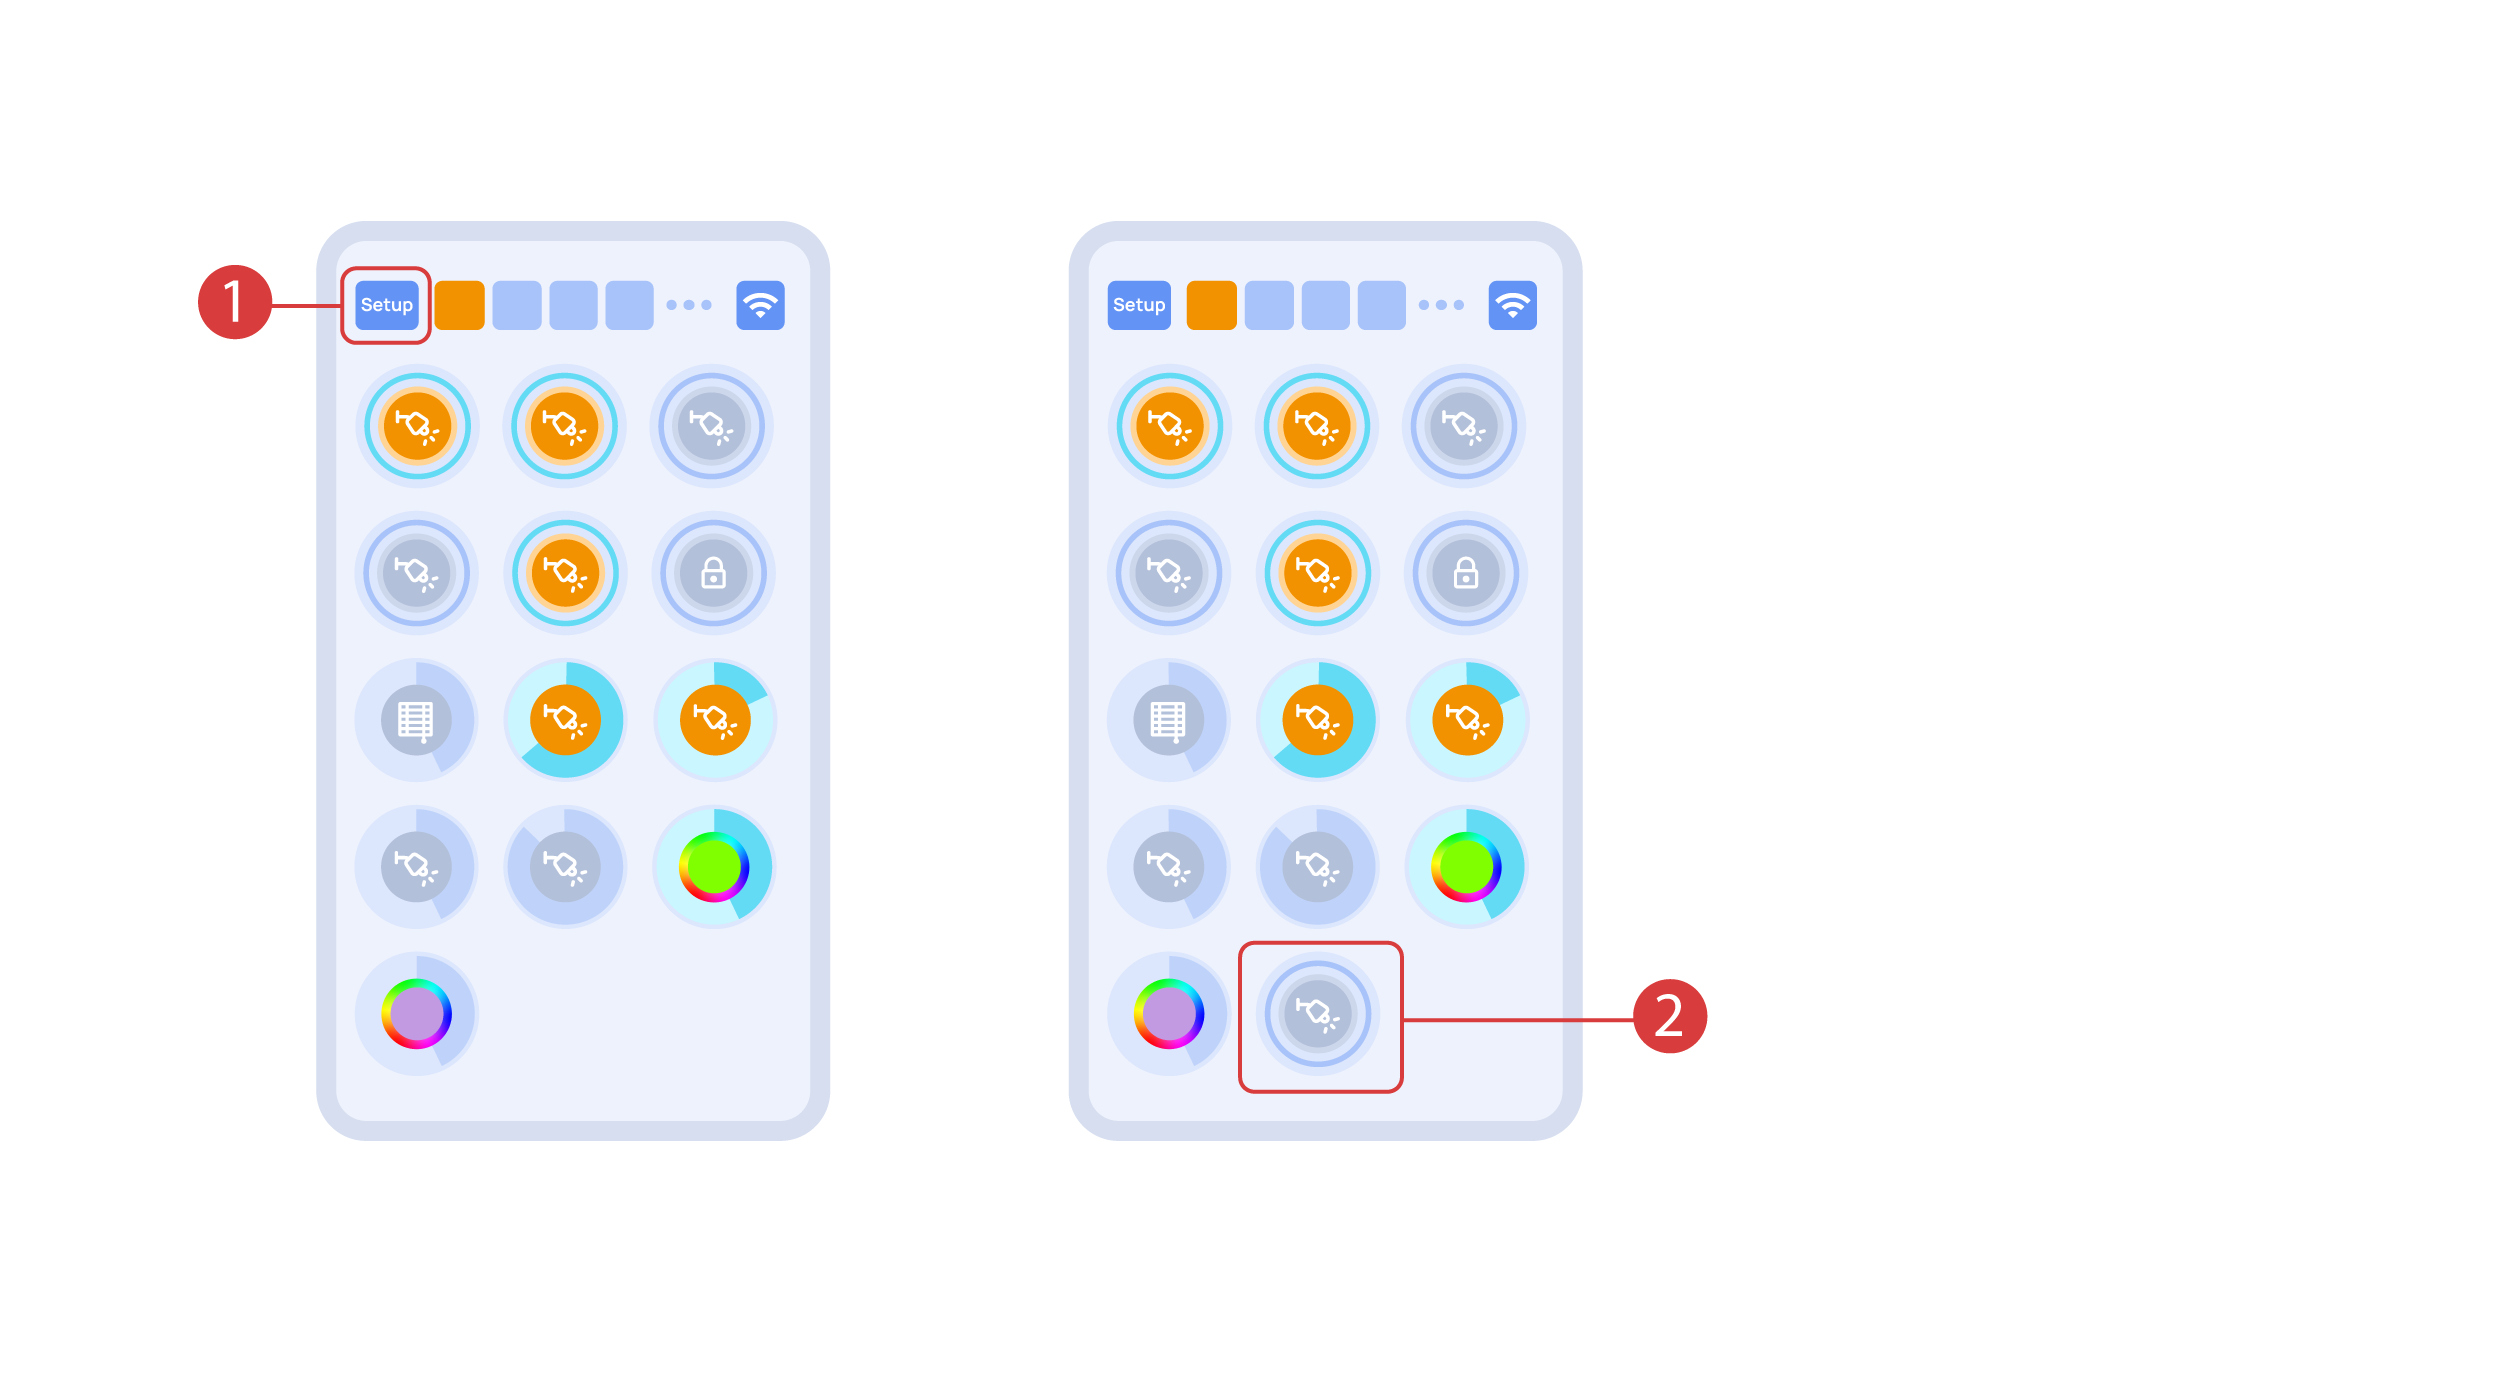
Μπορείτε να ενεργοποιήσετε ή να απενεργοποιήσετε ① τους εκτελεστές με ένα απλό κλικ. Για να αλλάξετε το επίπεδο του φωτισμού ②, του χρώματος των λαμπτήρων ή τη θέση των σκιάστρων, κάνετε διπλό κλικ. Για να έχετε πρόσβαση στο ιστορικό ③ κατάστασης κάποιου εκτελεστή ή αισθητήρα, κρατήστε πατημένο το εικονίδιο για ένα δευτερόλεπτο.
Μια σύντομη πίεση των φυσικών πλήκτρων στην οθόνη ανάβει και σβήνει τον λαμπτήρα. Κρατήστε πατημένο το πλήκτρο για να αλλάξετε τη φωτεινότητα του λαμπτήρα.

Για να κάνετε επίδειξη της λειτουργίας Plug and Play, ανοίγουμε τους εκτελεστές στην περιοχή Εγκατάστασης ① και συνδέουμε τη μονάδα στον δίαυλο CAN. Το σύστημα αυτόματα εντοπίζει τη νέα μονάδα και την προσθέτει στην περιοχή ‘Εγκατάσταση’ ②, όπου μπορούμε να ελέγξουμε τη νέα μονάδα αμέσως.
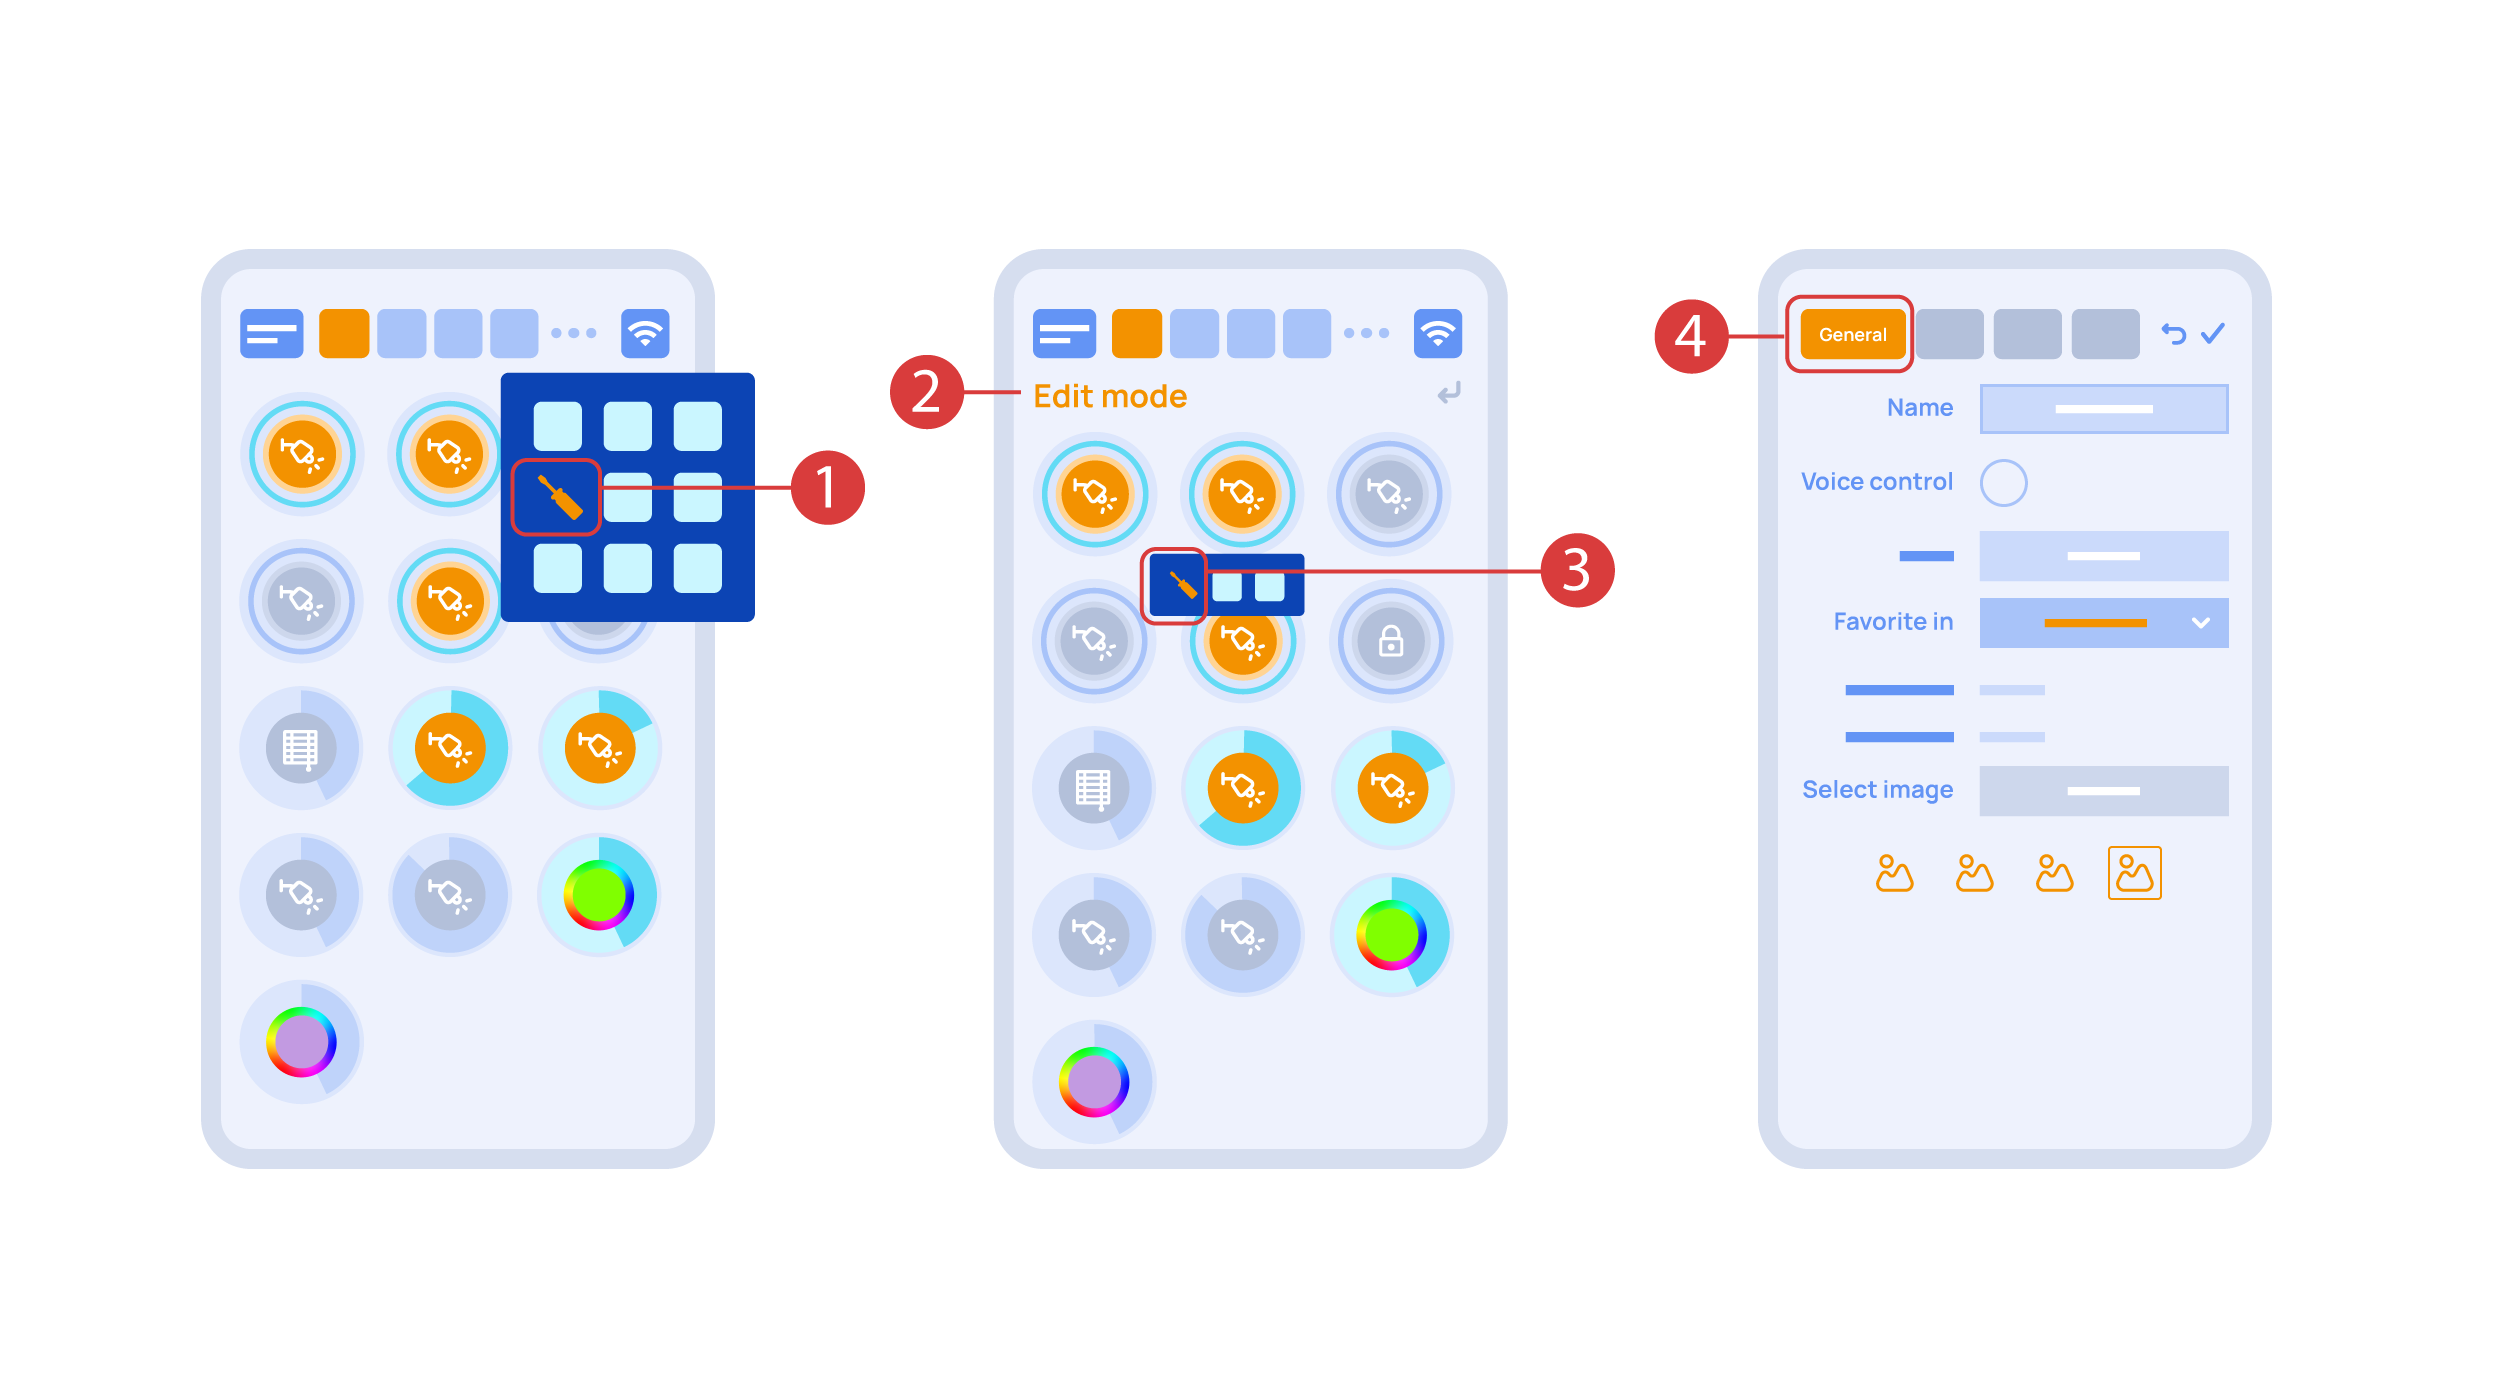
Now we can set up these executors. In order to do this, enter the additional menu ① and activate the edit mode, by pressing the appropriate icon.
Now we are in the edit mode ②, which can be seen from the appropriate notification in the top part of the screen. In this mode, when we press and hold an icon, we can move it among other elements and place it into another Room by placing it in the Area-choosing Menu and then choosing the area that we need. A long press ③ of the element starts the menu, from which we set up the current element.In the ‘General’ ④ section we can change the name of the element, add a voice command for it, change an icon or add the element to ‘Favorites’.
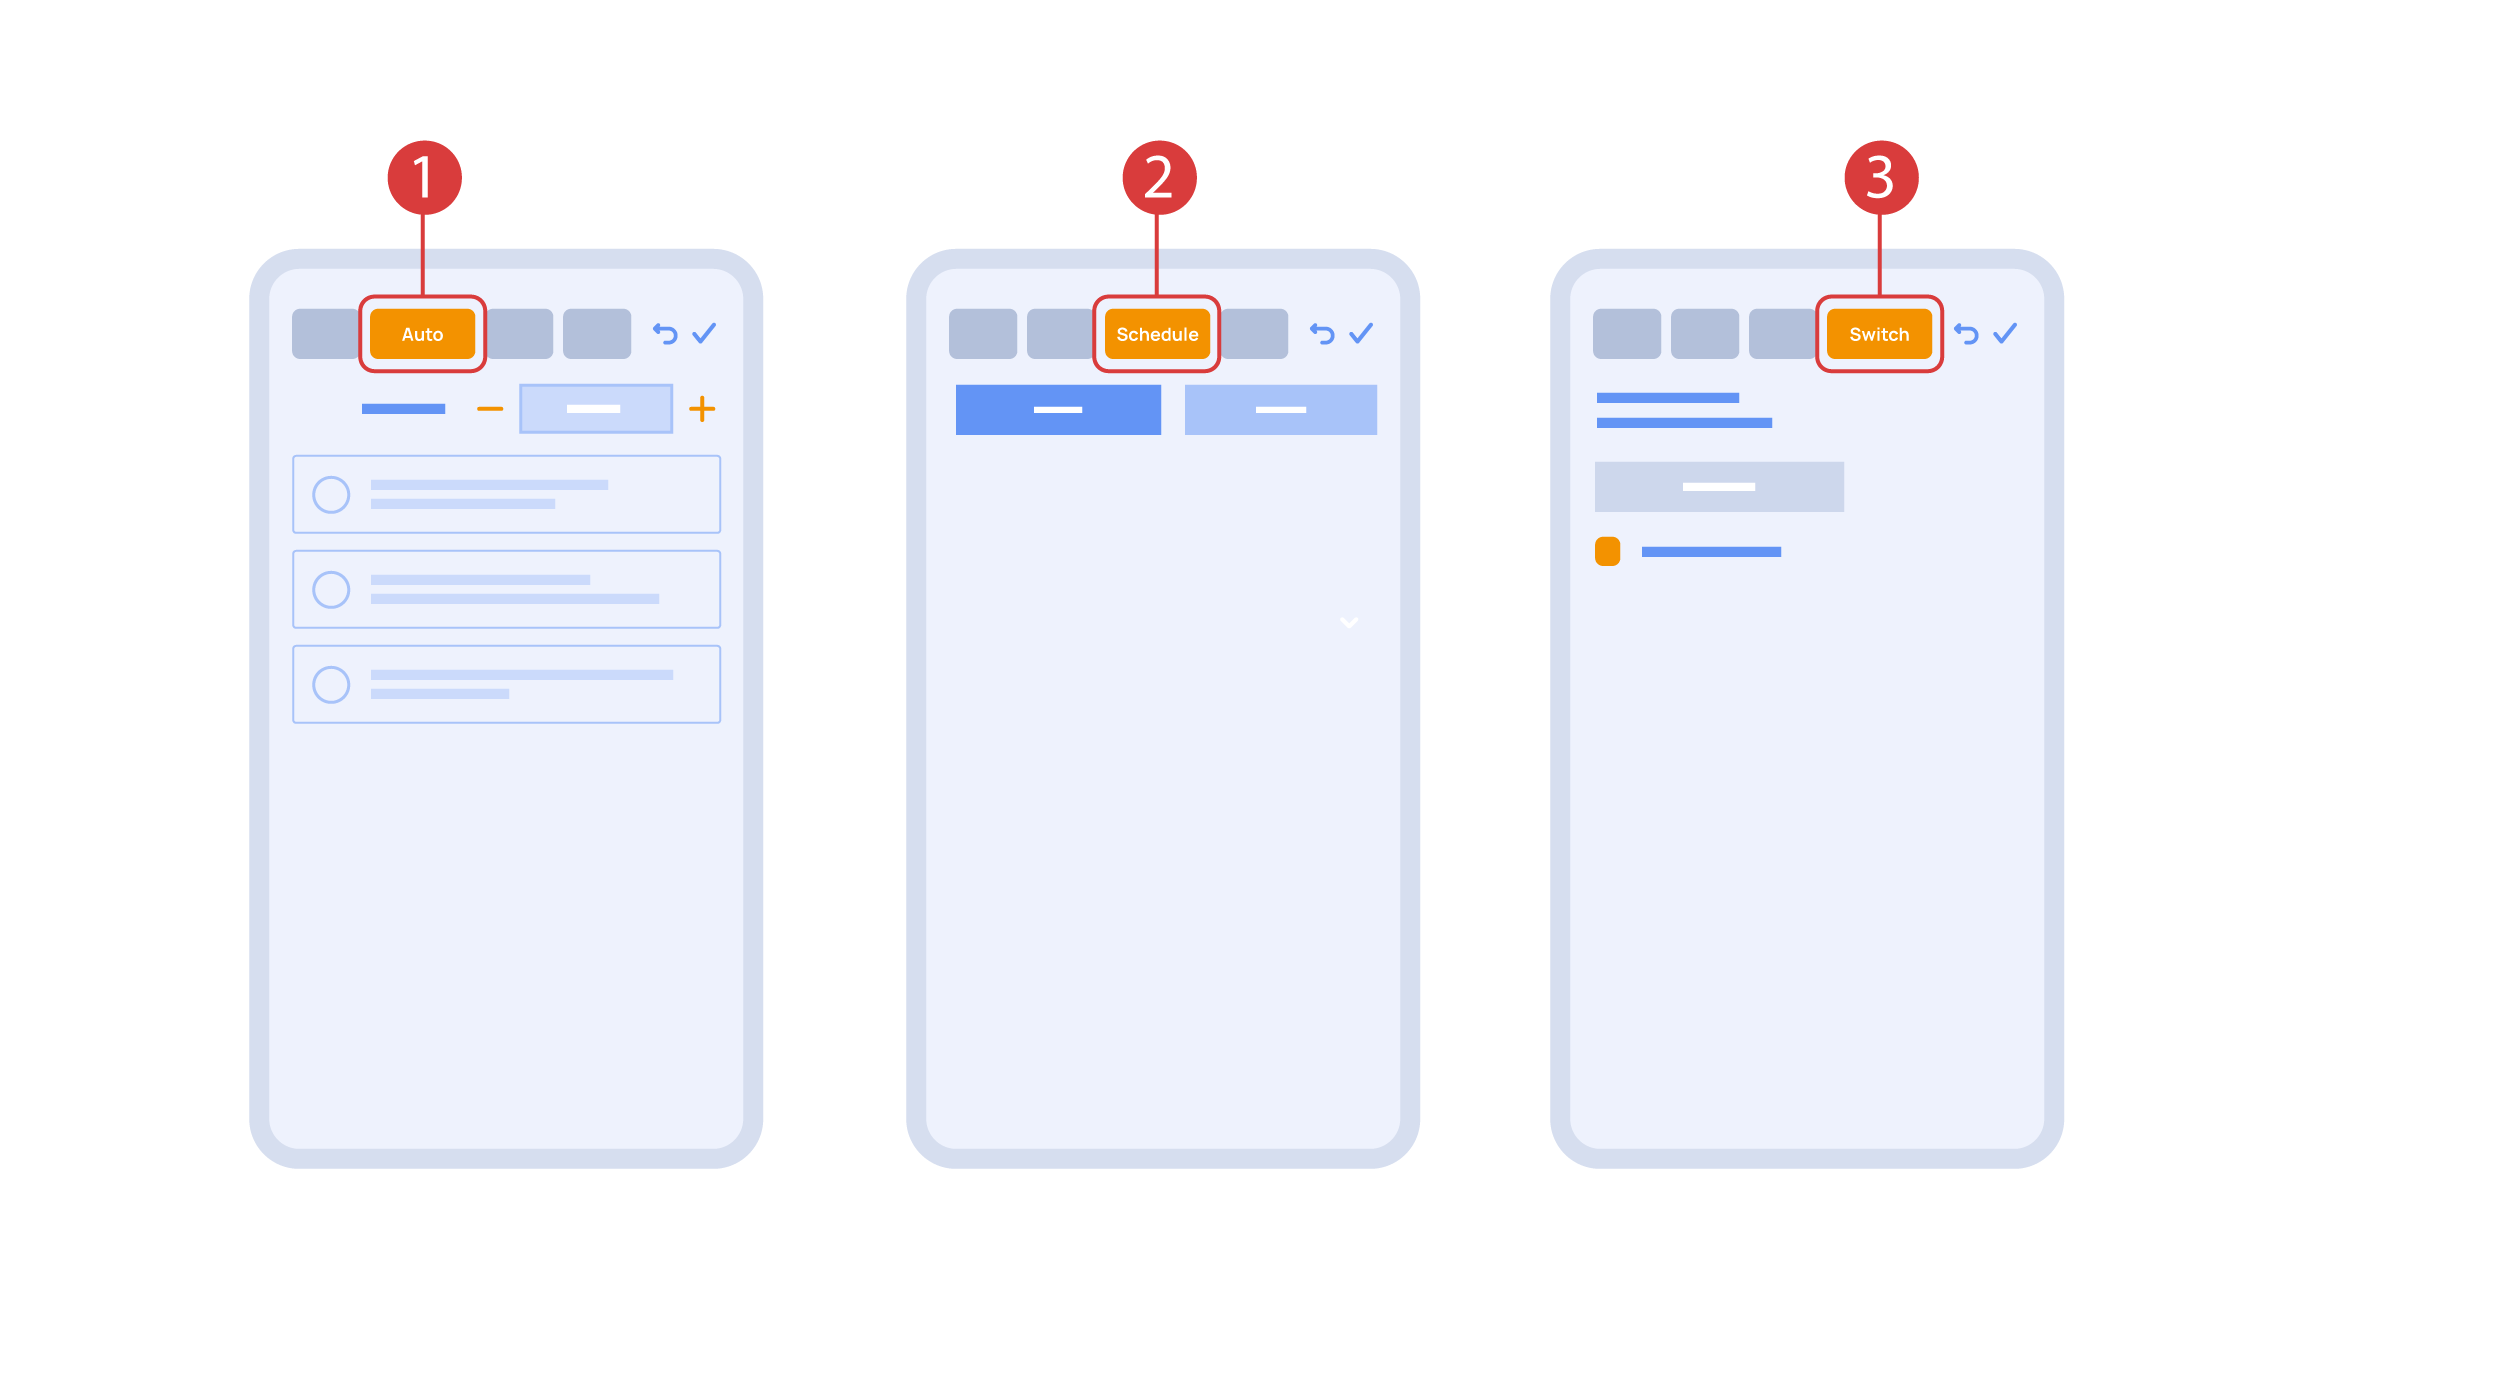
‘Auto’ section ① lets us activate the automation with a few clicks, as well as set up its parameters.
In the ‘schedule’ section ②, you can determine the schedule when the given element will turn on or off, including by using the time of the setting and rising of the sun.
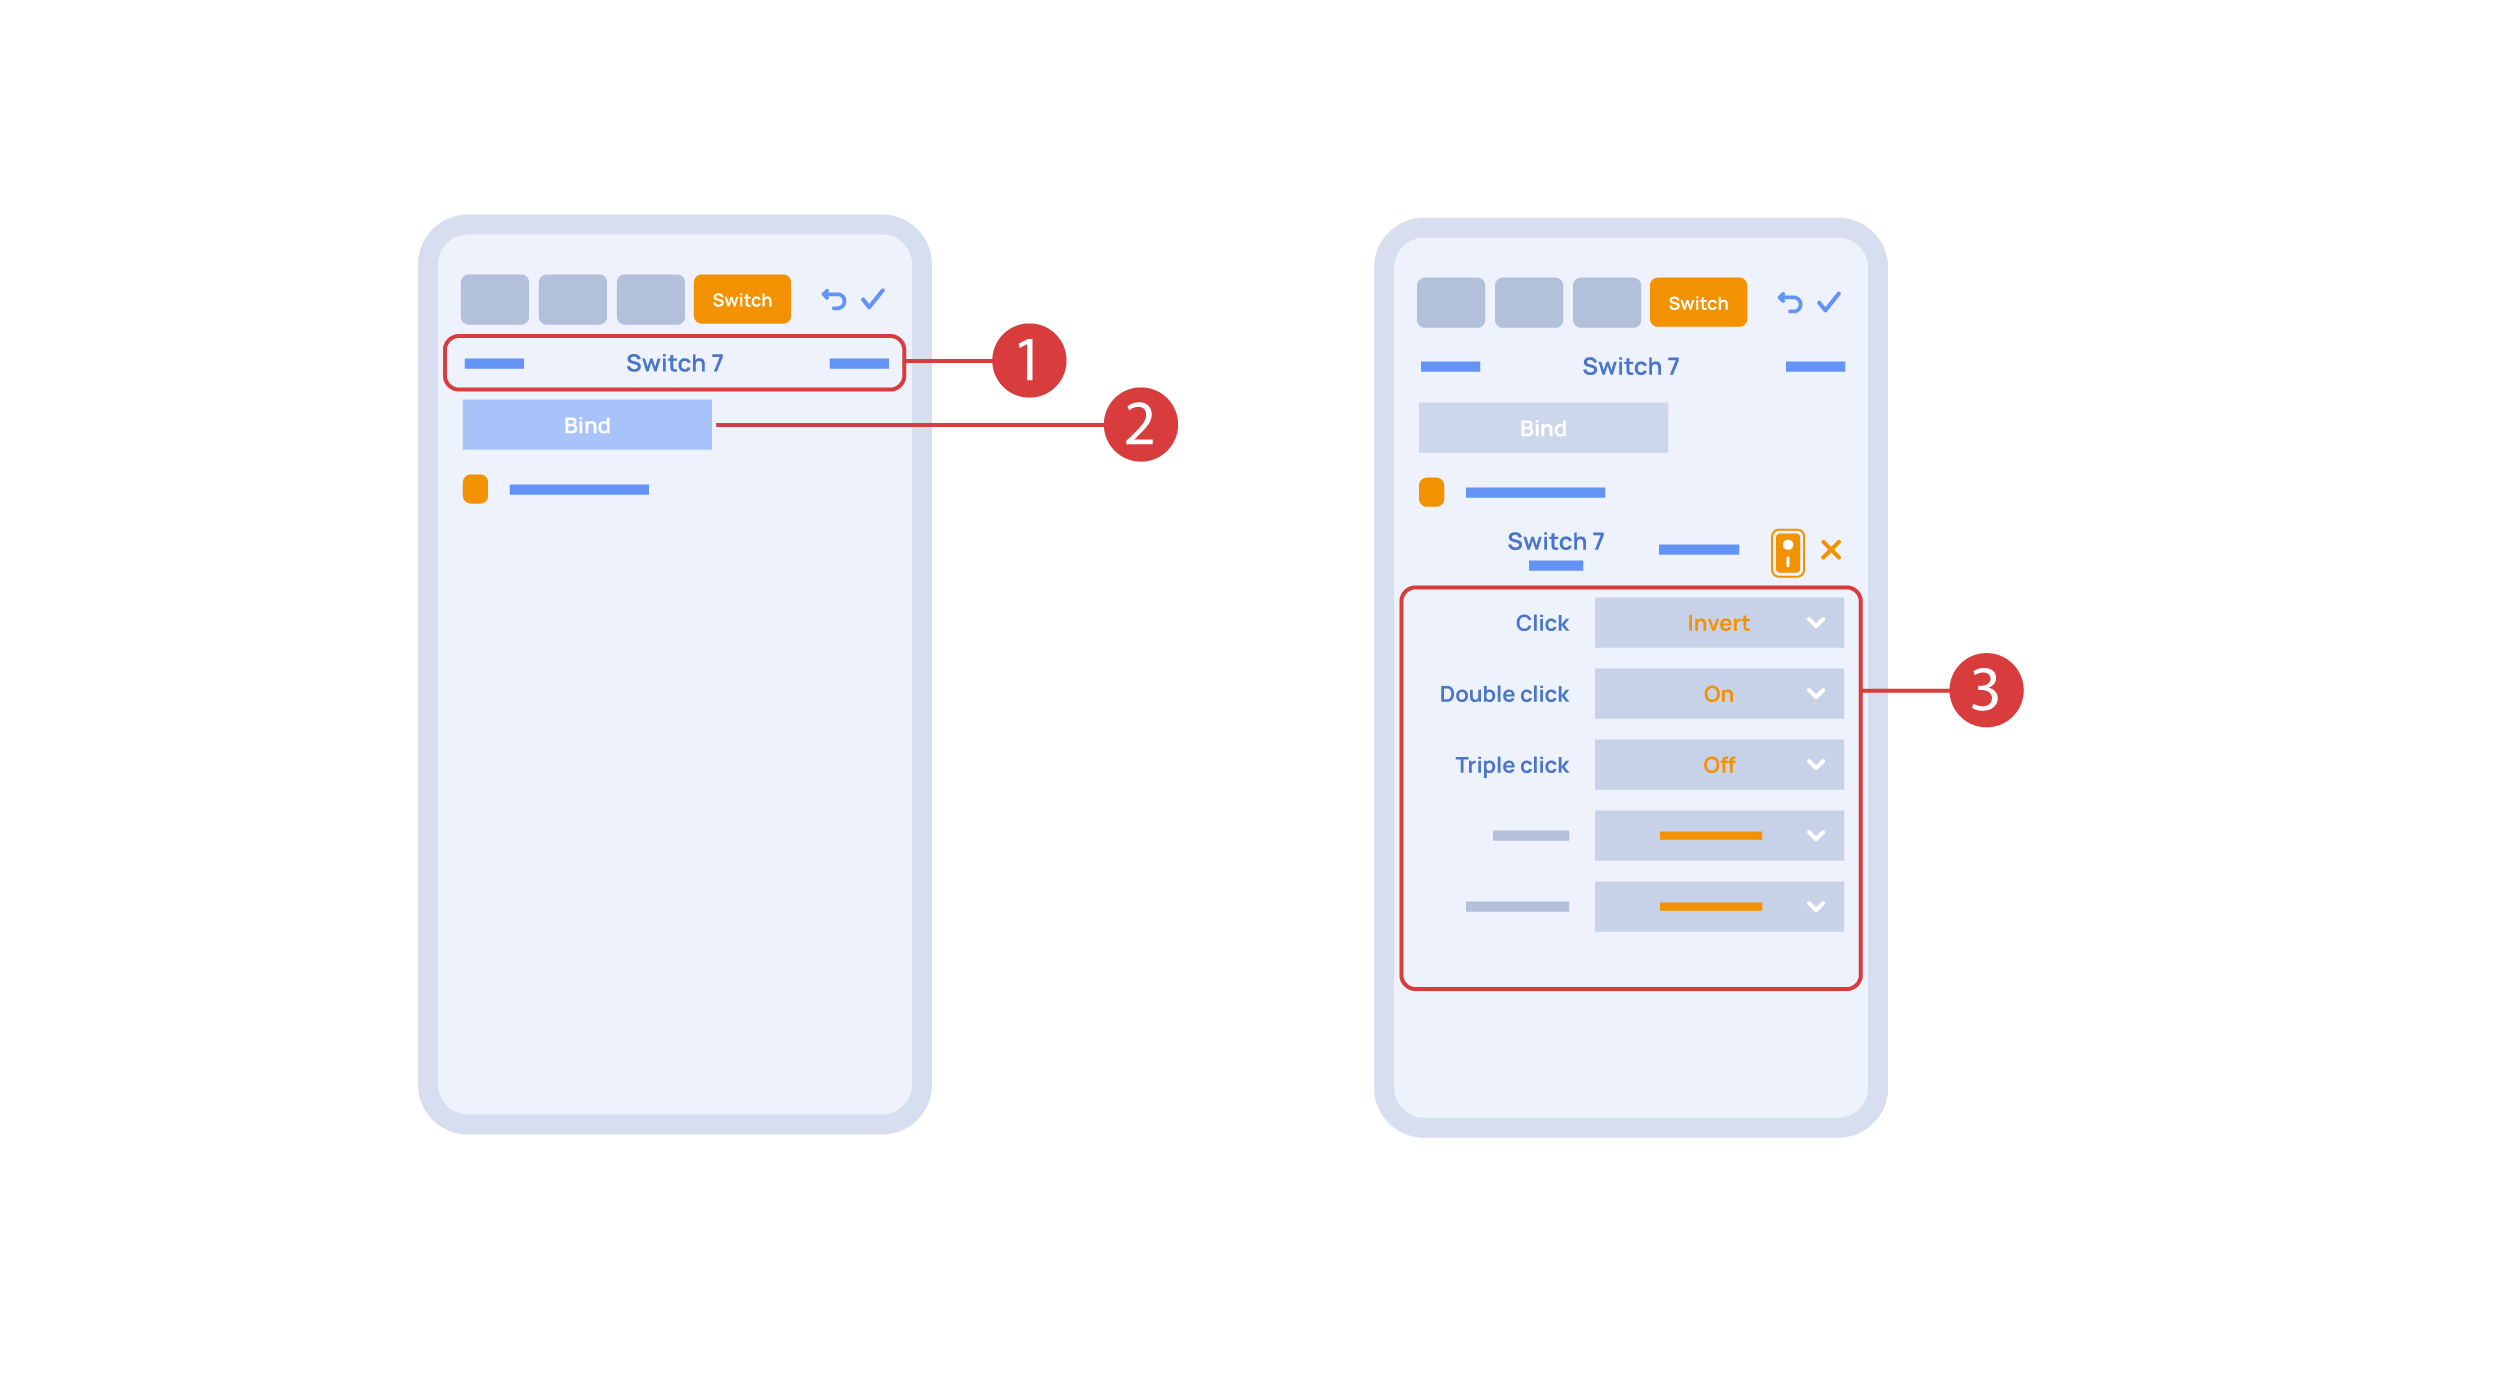
The ‘Switches’ tab ③ lets you bind a button to control the executor.
In order to do this, ① we press the button we need to bind. The system displays it, after which we press ‘Bind’② and save the changes. Now this button controls the executor
The ‘Switches’ tab ③ also features additional button setup options. For example, we can program the executor to be controlled with a double or triple click of a button, as well as define an action performed by this, for example ‘only turning on’ or ‘only turning off’ an executor. In this case we are setting up the button to do the following: one click will cause the lamp to toggle, a double click will turn it on and a triple click will turn it off. In this way a single button can perform up to five different actions.
Let’s also set up basic automation of turning an executor on or off with the help of a motion sensor.
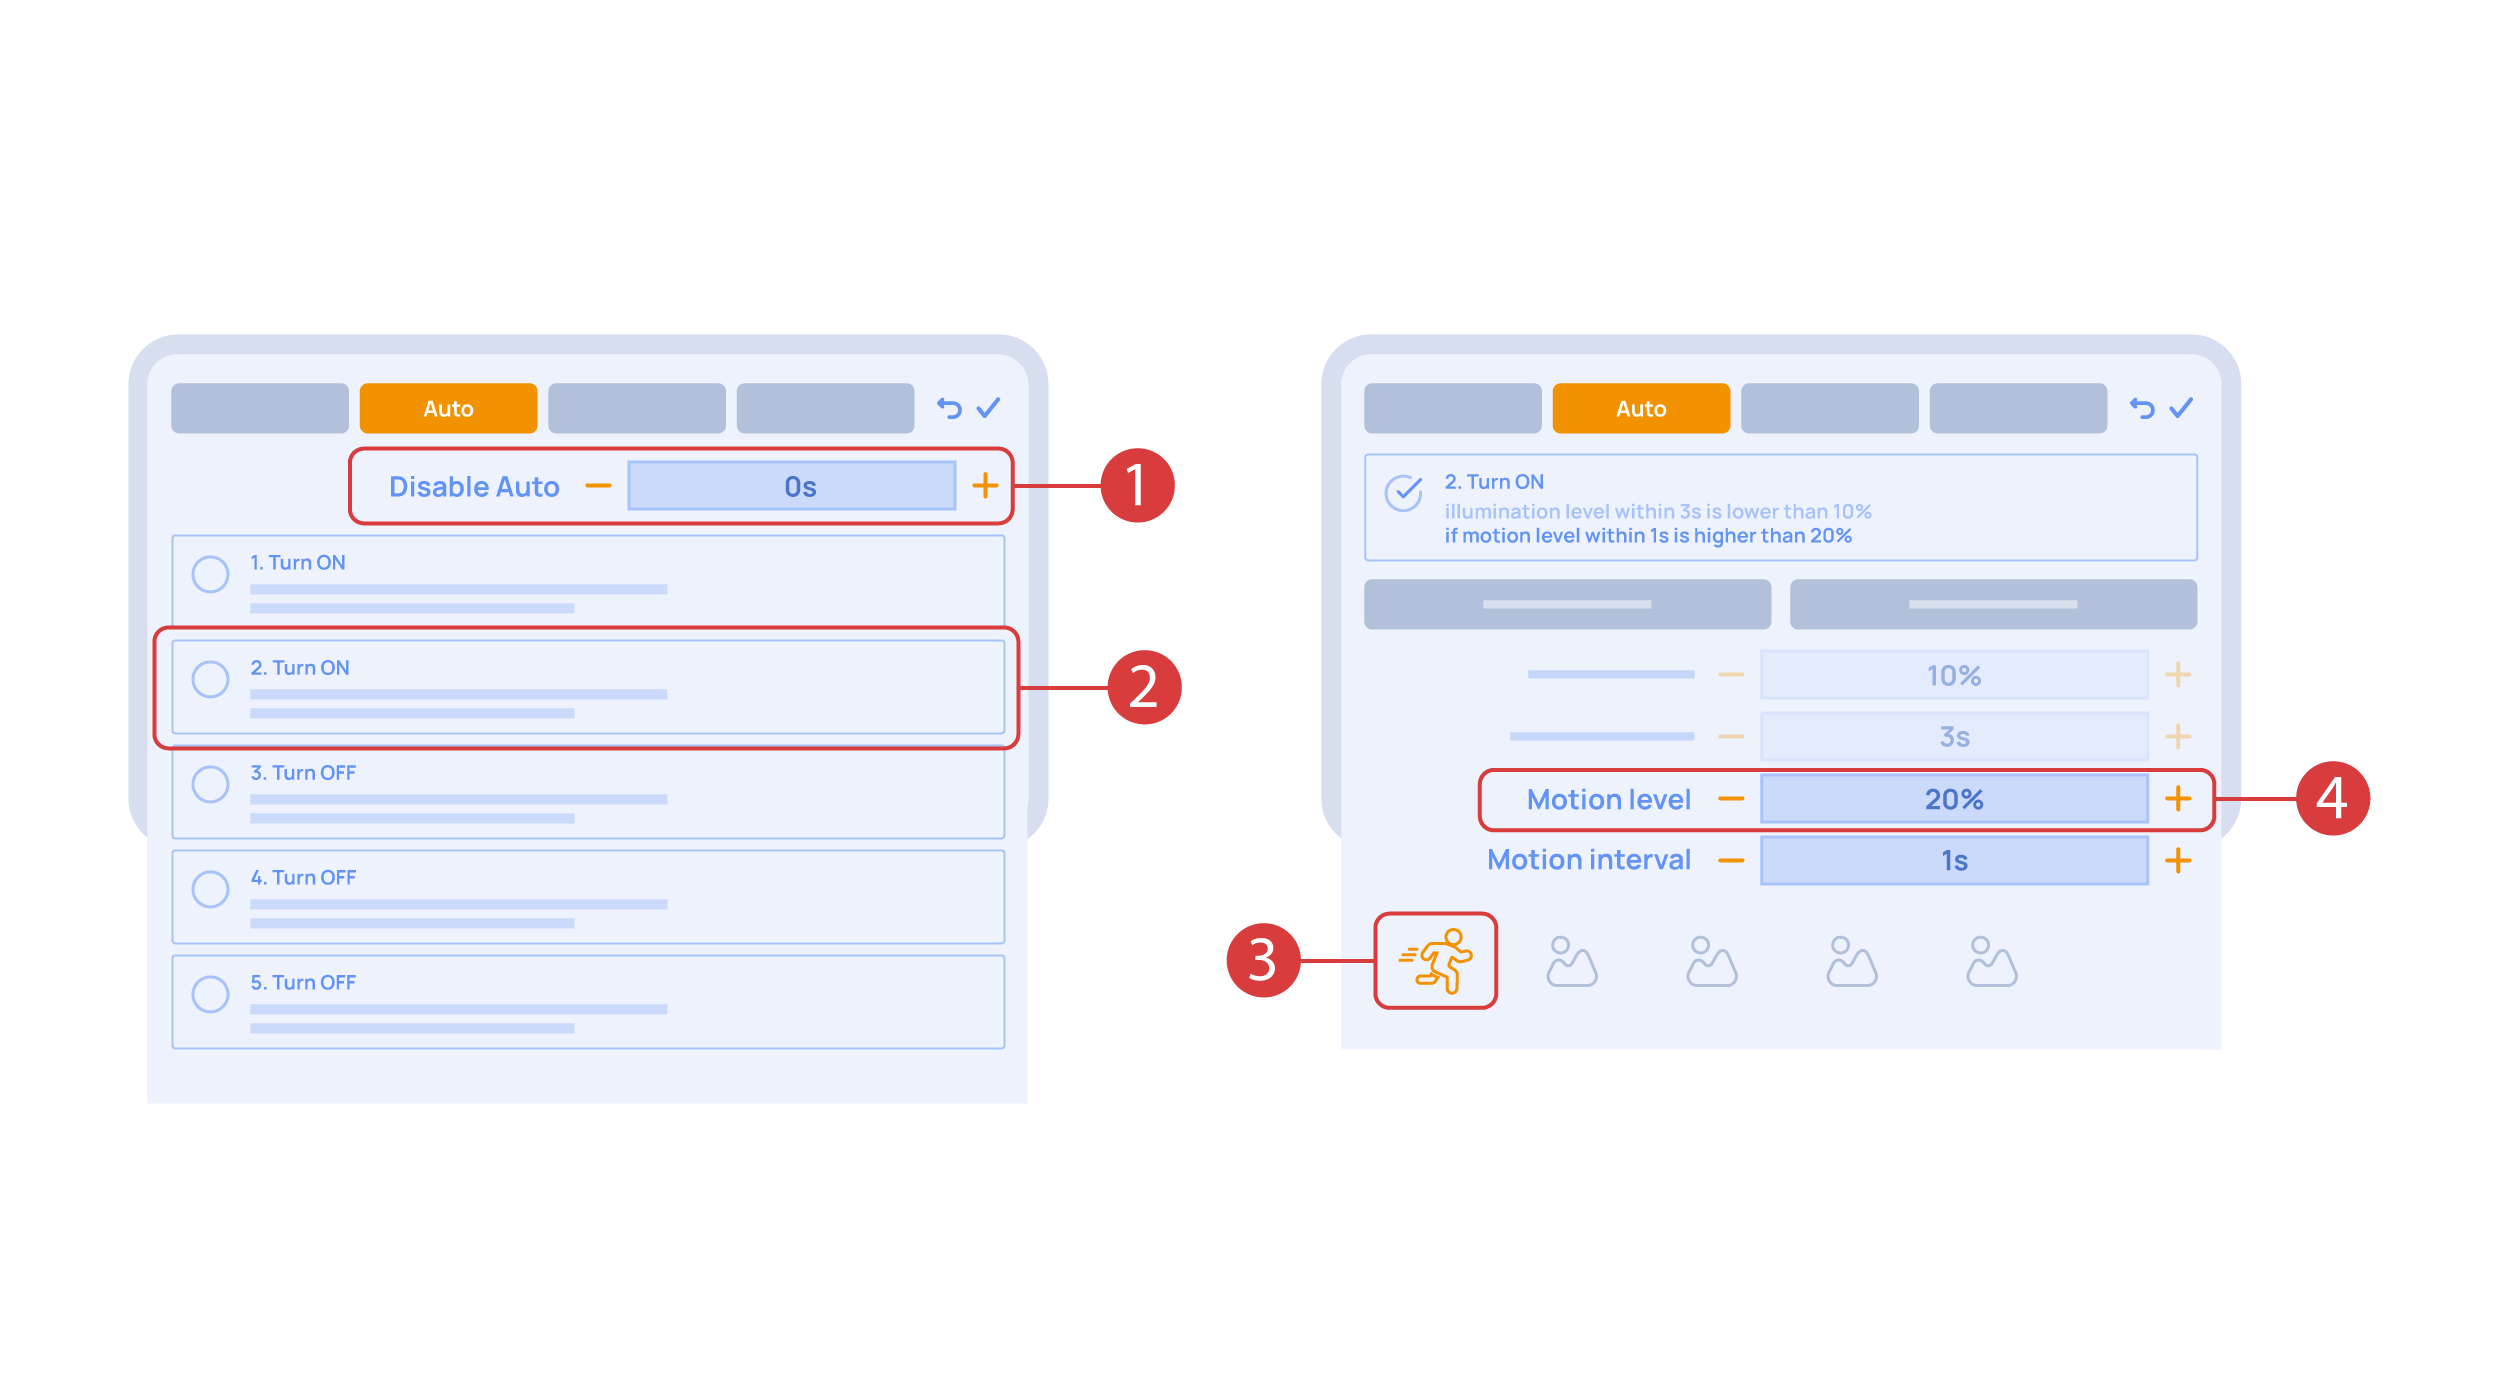
The ‘Auto period’ ① option sets the time for which the automation is disabled after an executor is manually controlled.For our demonstration purposes, we will set it to zero.
Then we will activate the automation ② to turn on the executor when motion is detected. We choose the motion sensor ③ and the level of motion ④. We can also choose a light sensor and its parameters.
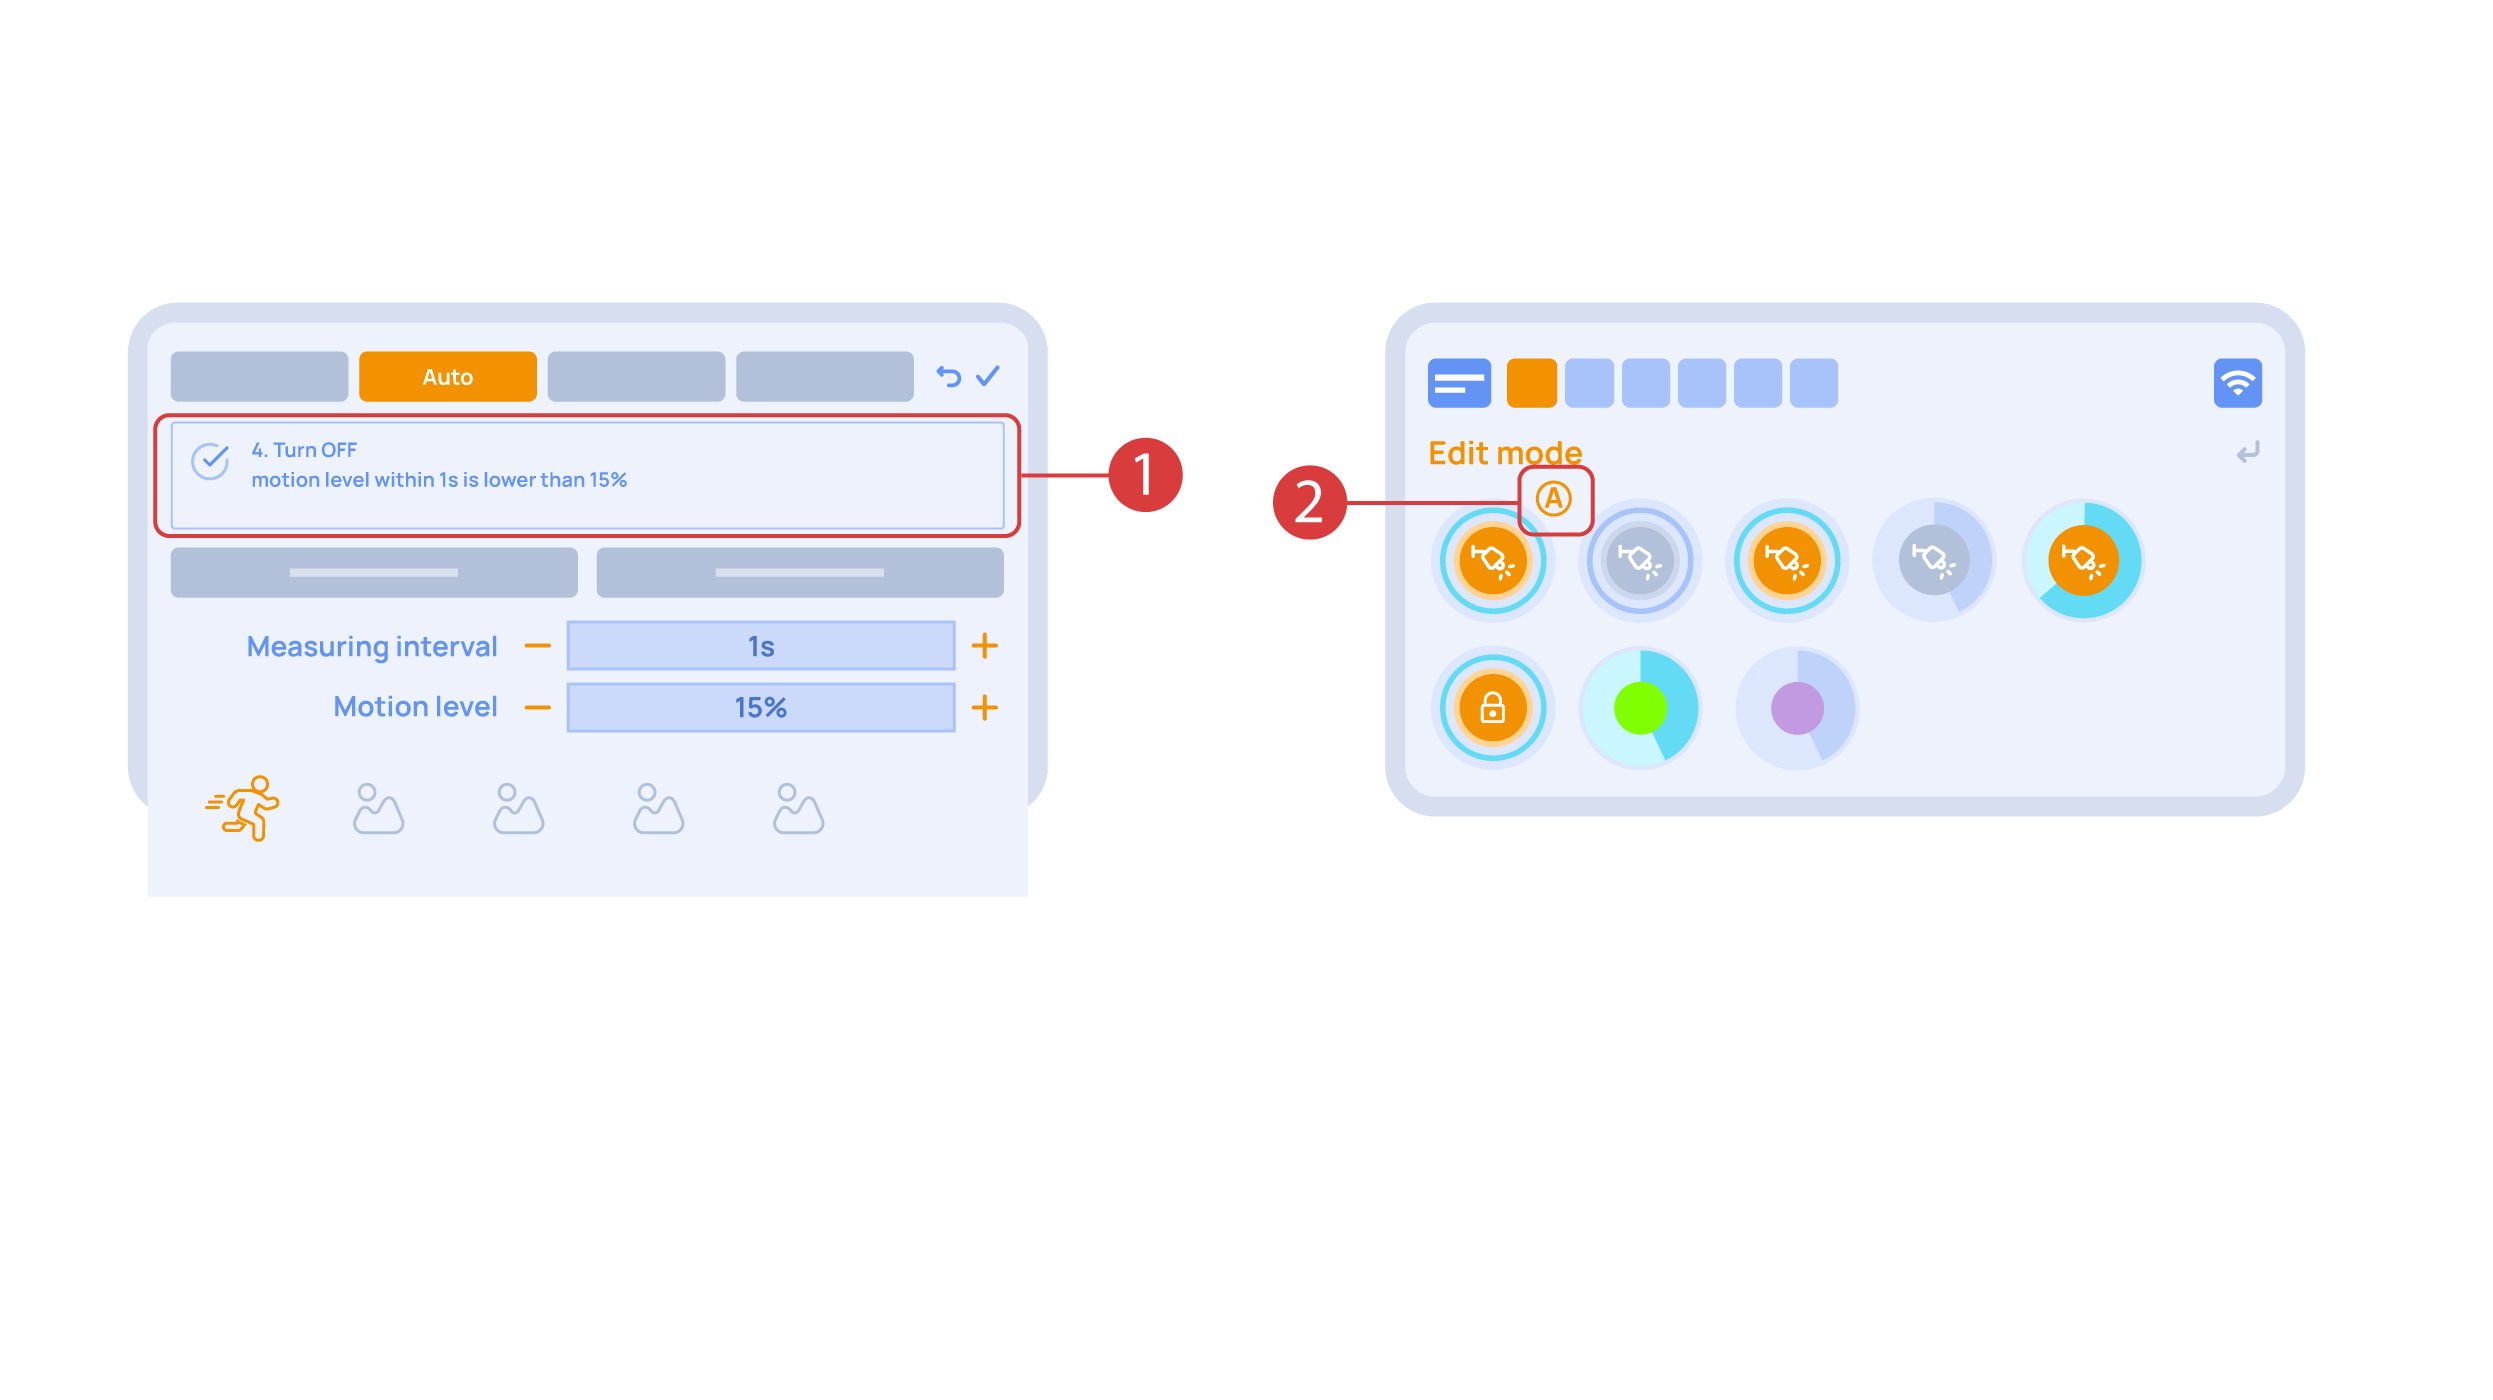
Now we will activate turning off ① of an executor if there is no motion: we choose the same sensor, set a lower threshold and a minimal time.Save the changes.
The extra ‘A’ icon ② will be added to the executor icon, meaning that automation has been set up for it. Now the lamp will be turned on when motion is detected and instantly turned off when no motion is detected.
Let’s create a light scheme. For this we need to select the appropriate item in the additional menu ①. Give the light scheme a name ②.
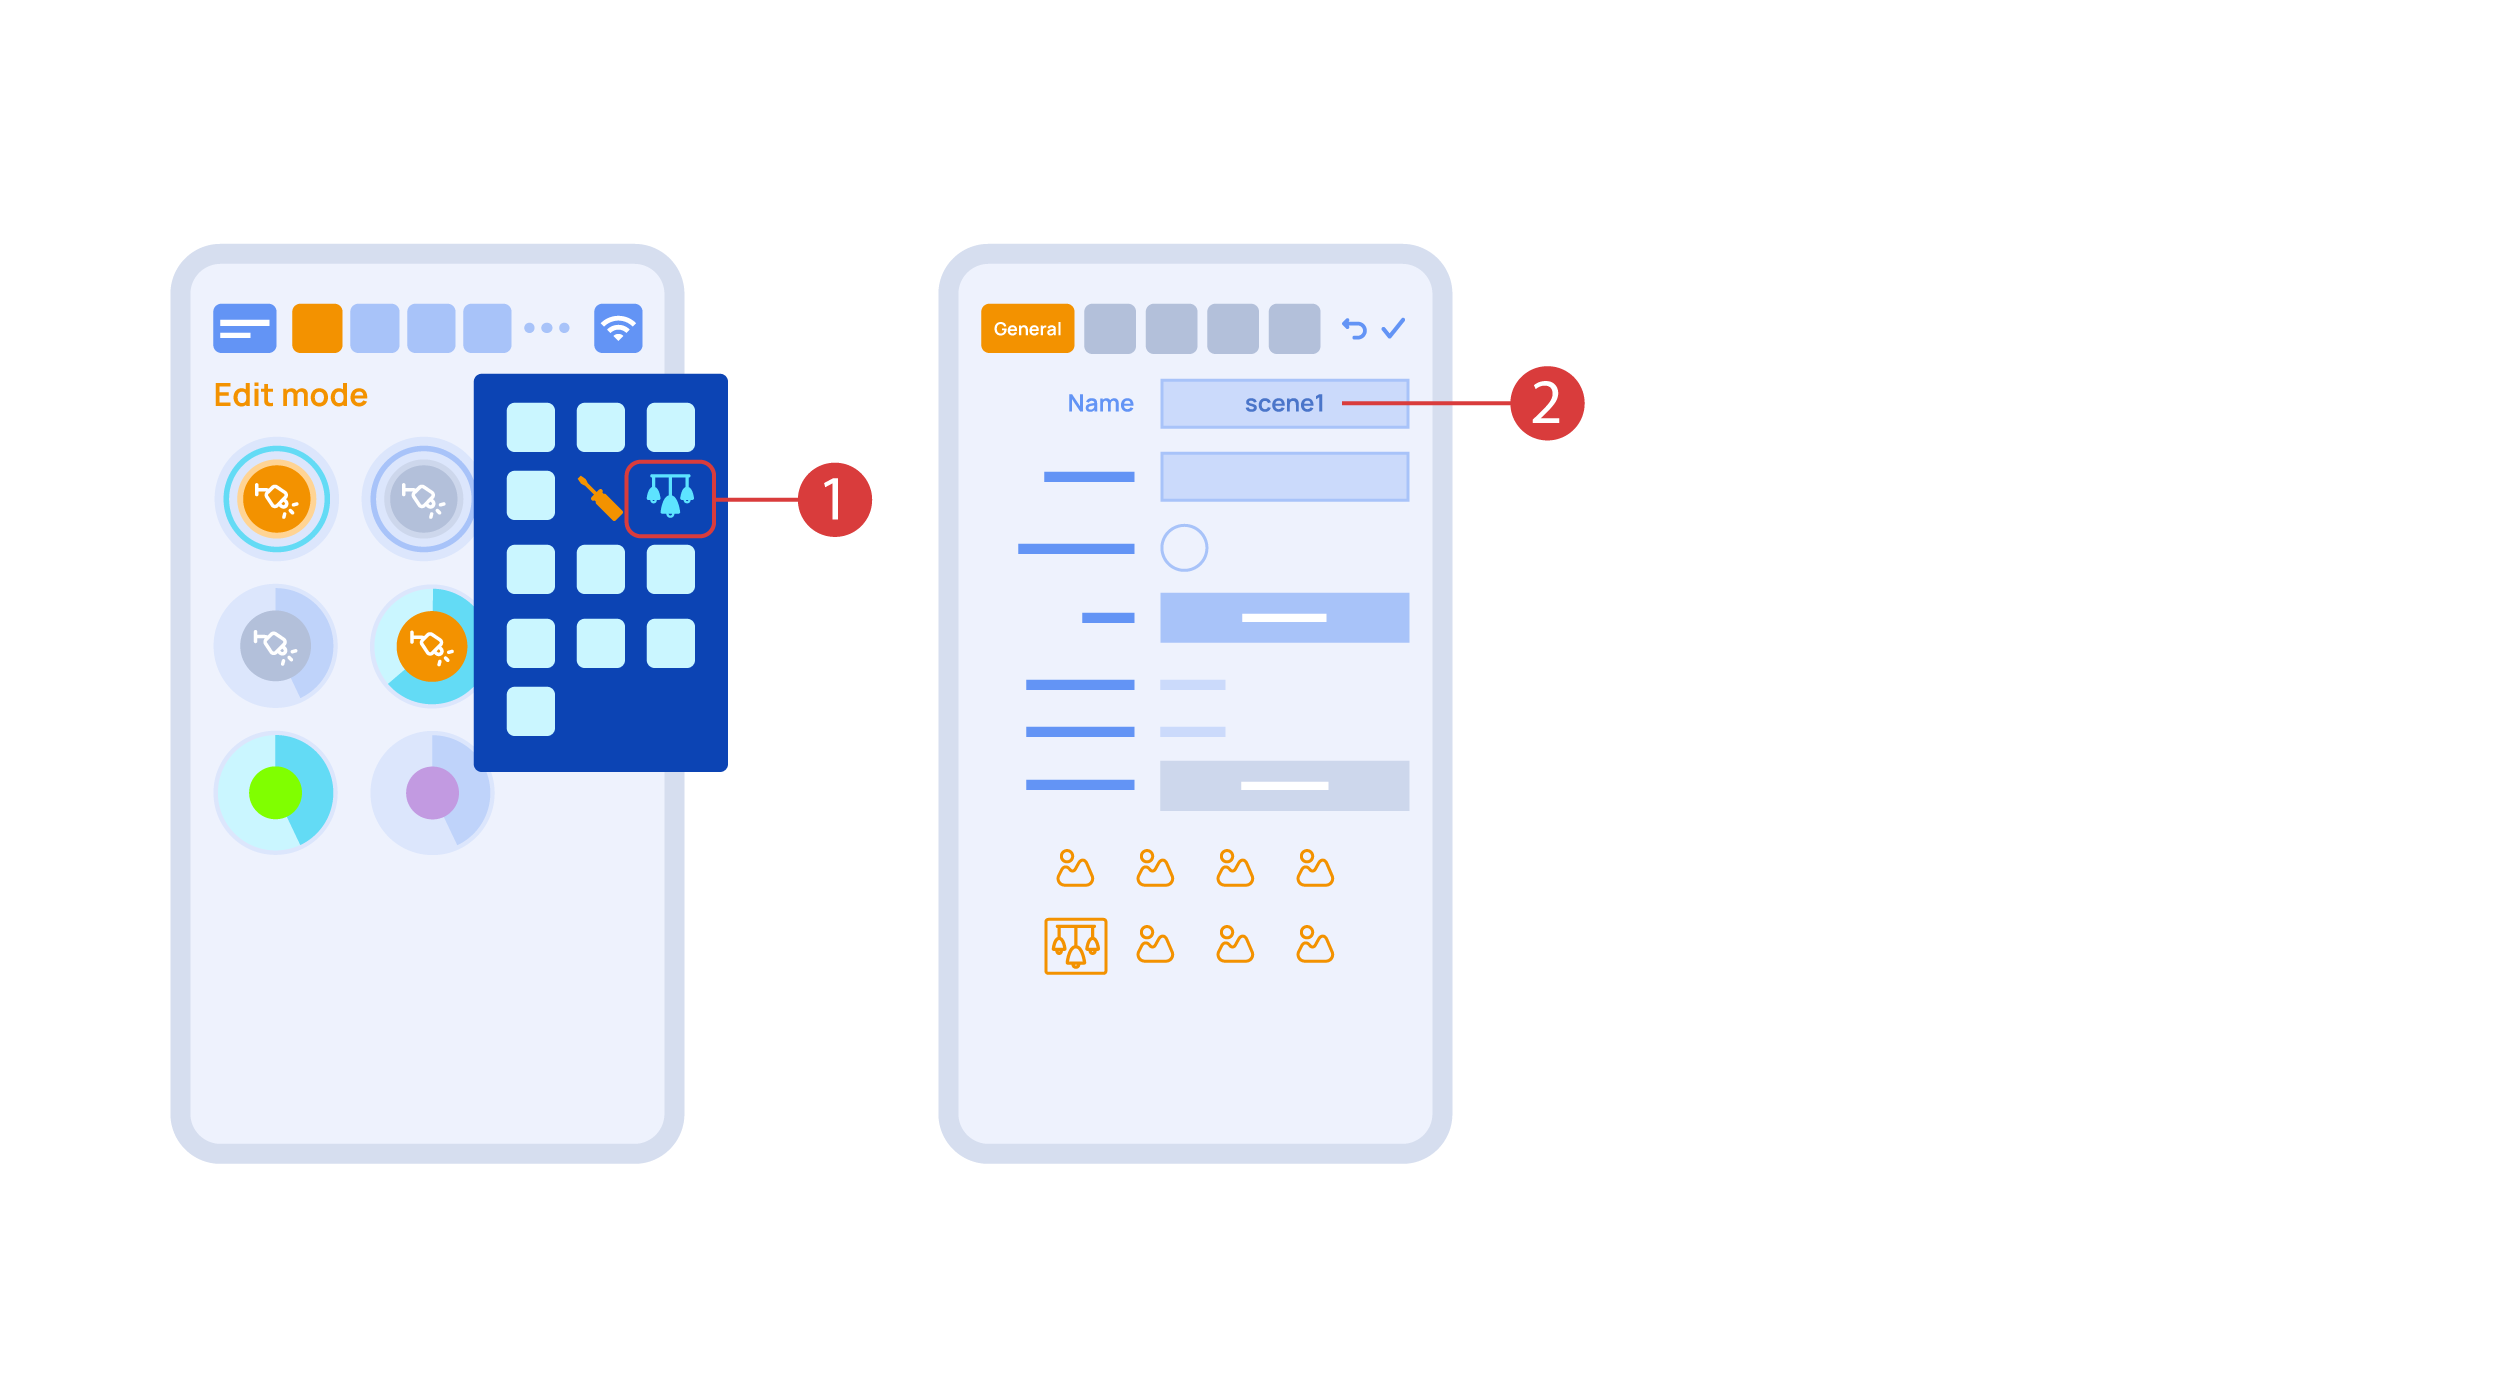
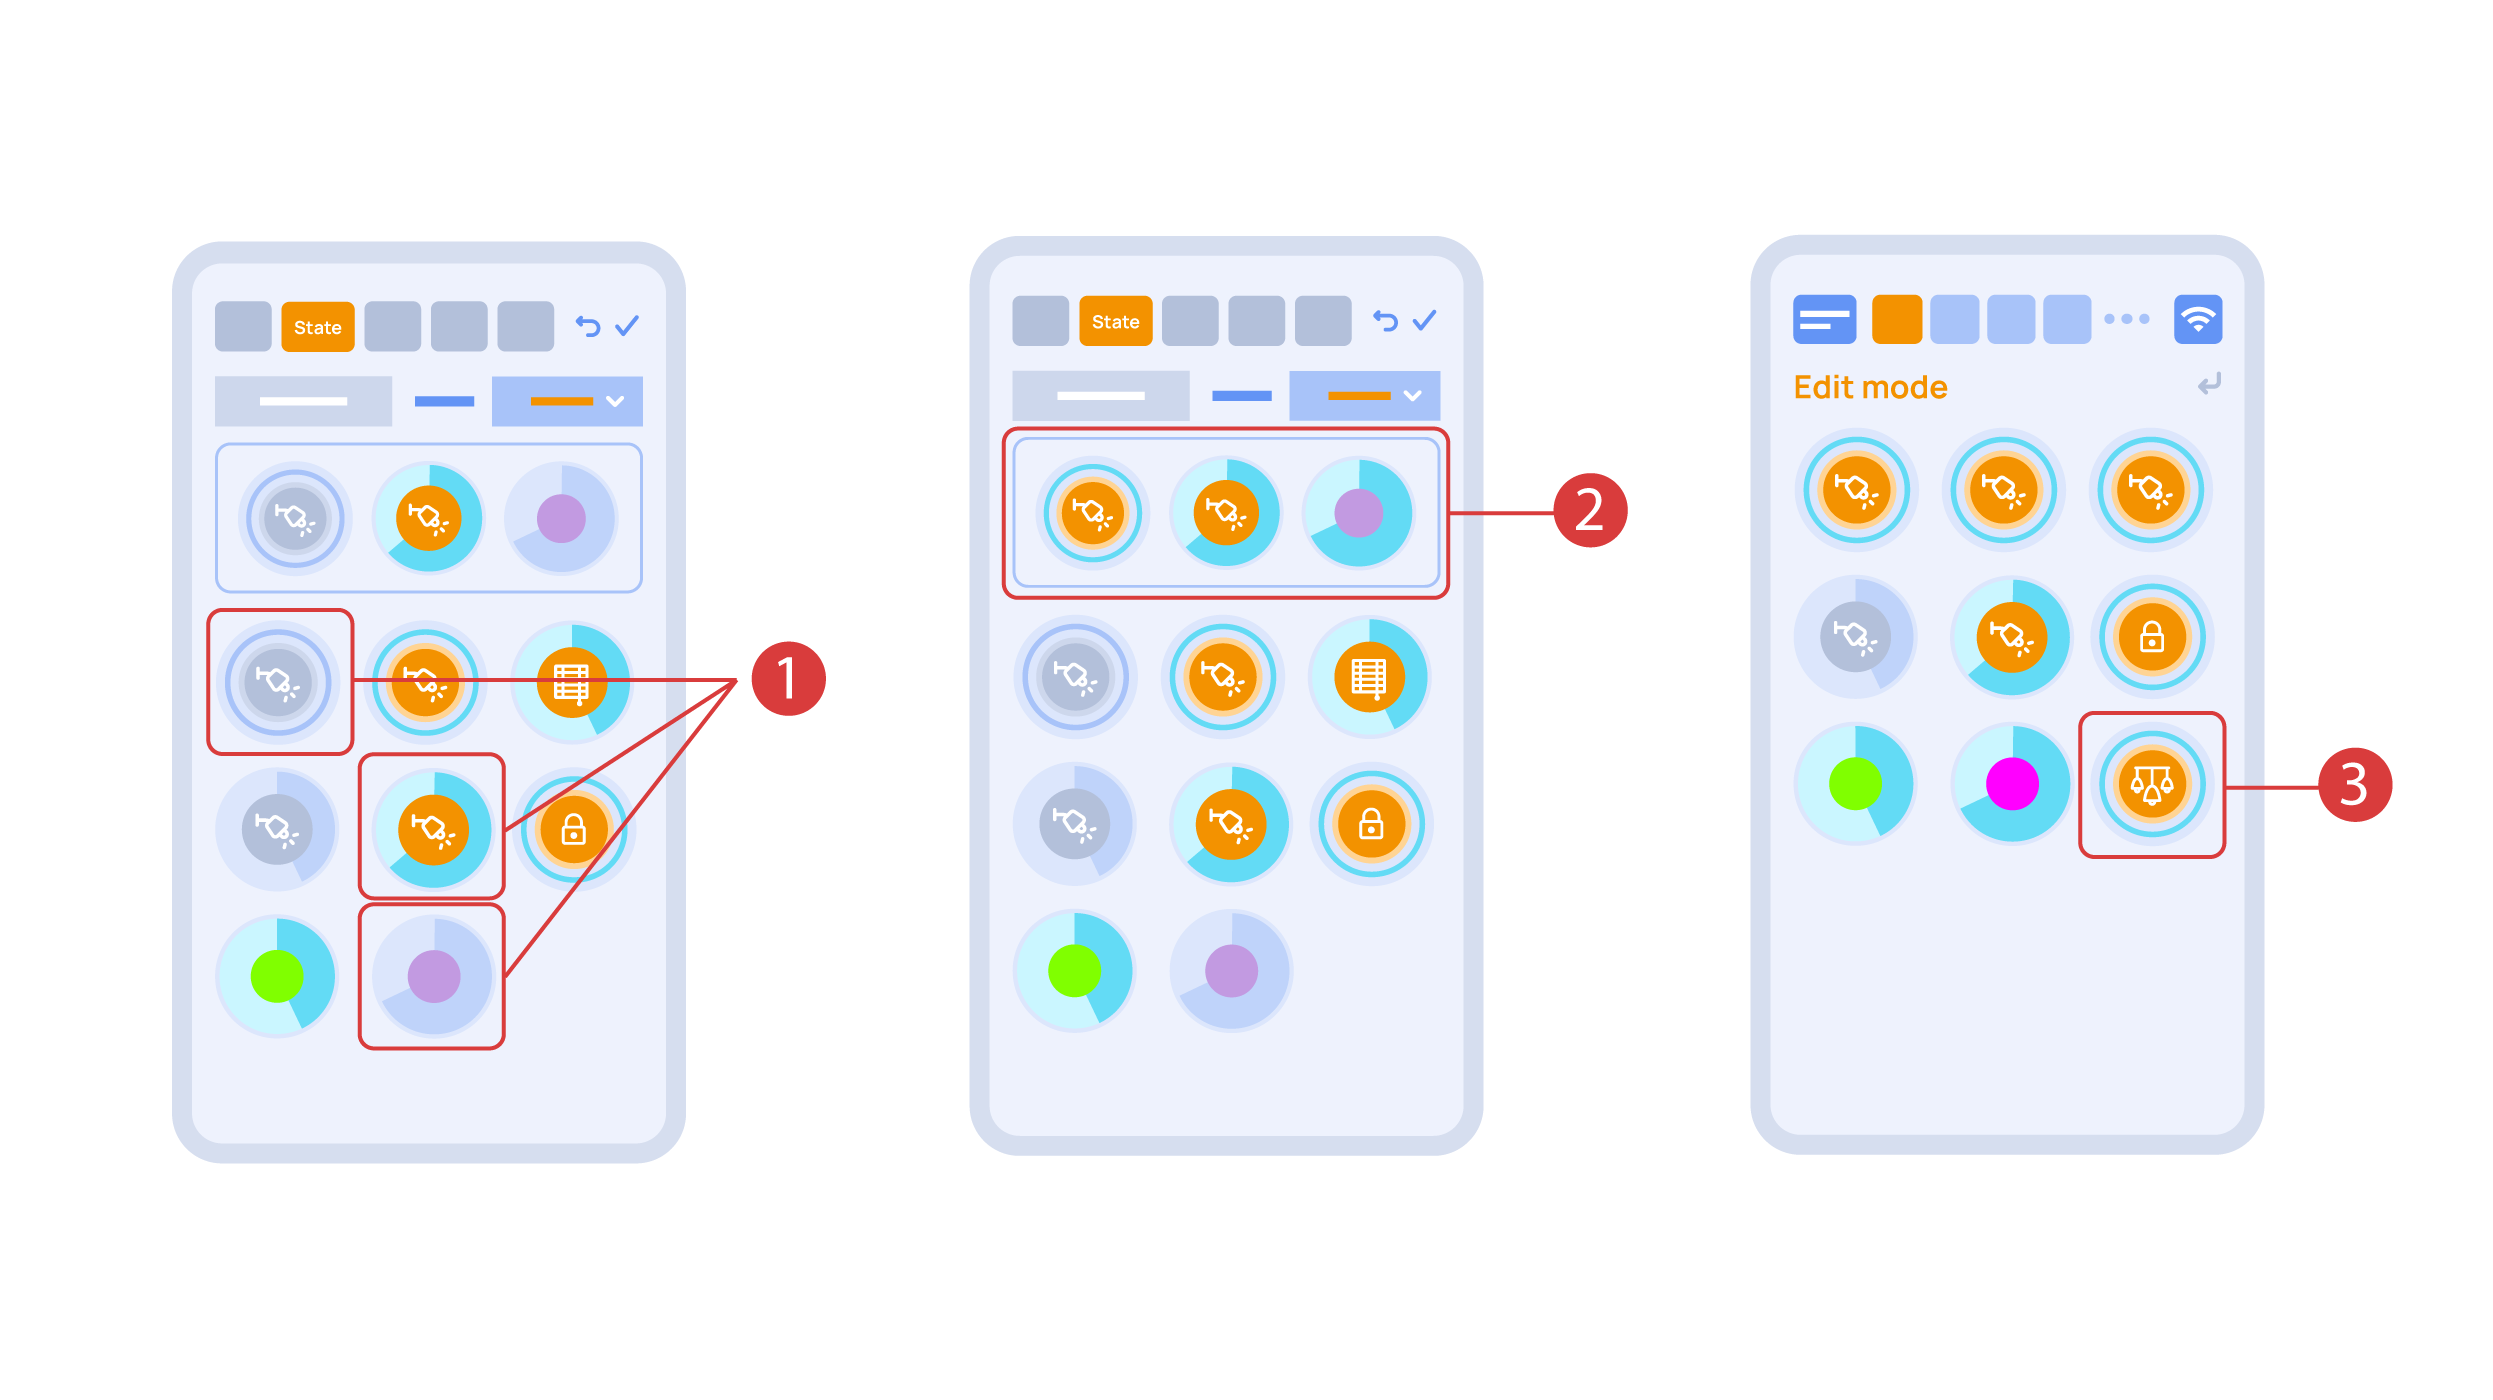
In the ‘State’ tab, use a long press to add the lights we want to use into the light scene ① and set up their state ②. ‘Auto’, ‘Schedule’, ‘Switch’ tabs are the same for all the executors.
Save the changes and we are able to use the newly-created light scheme ③ immediately.
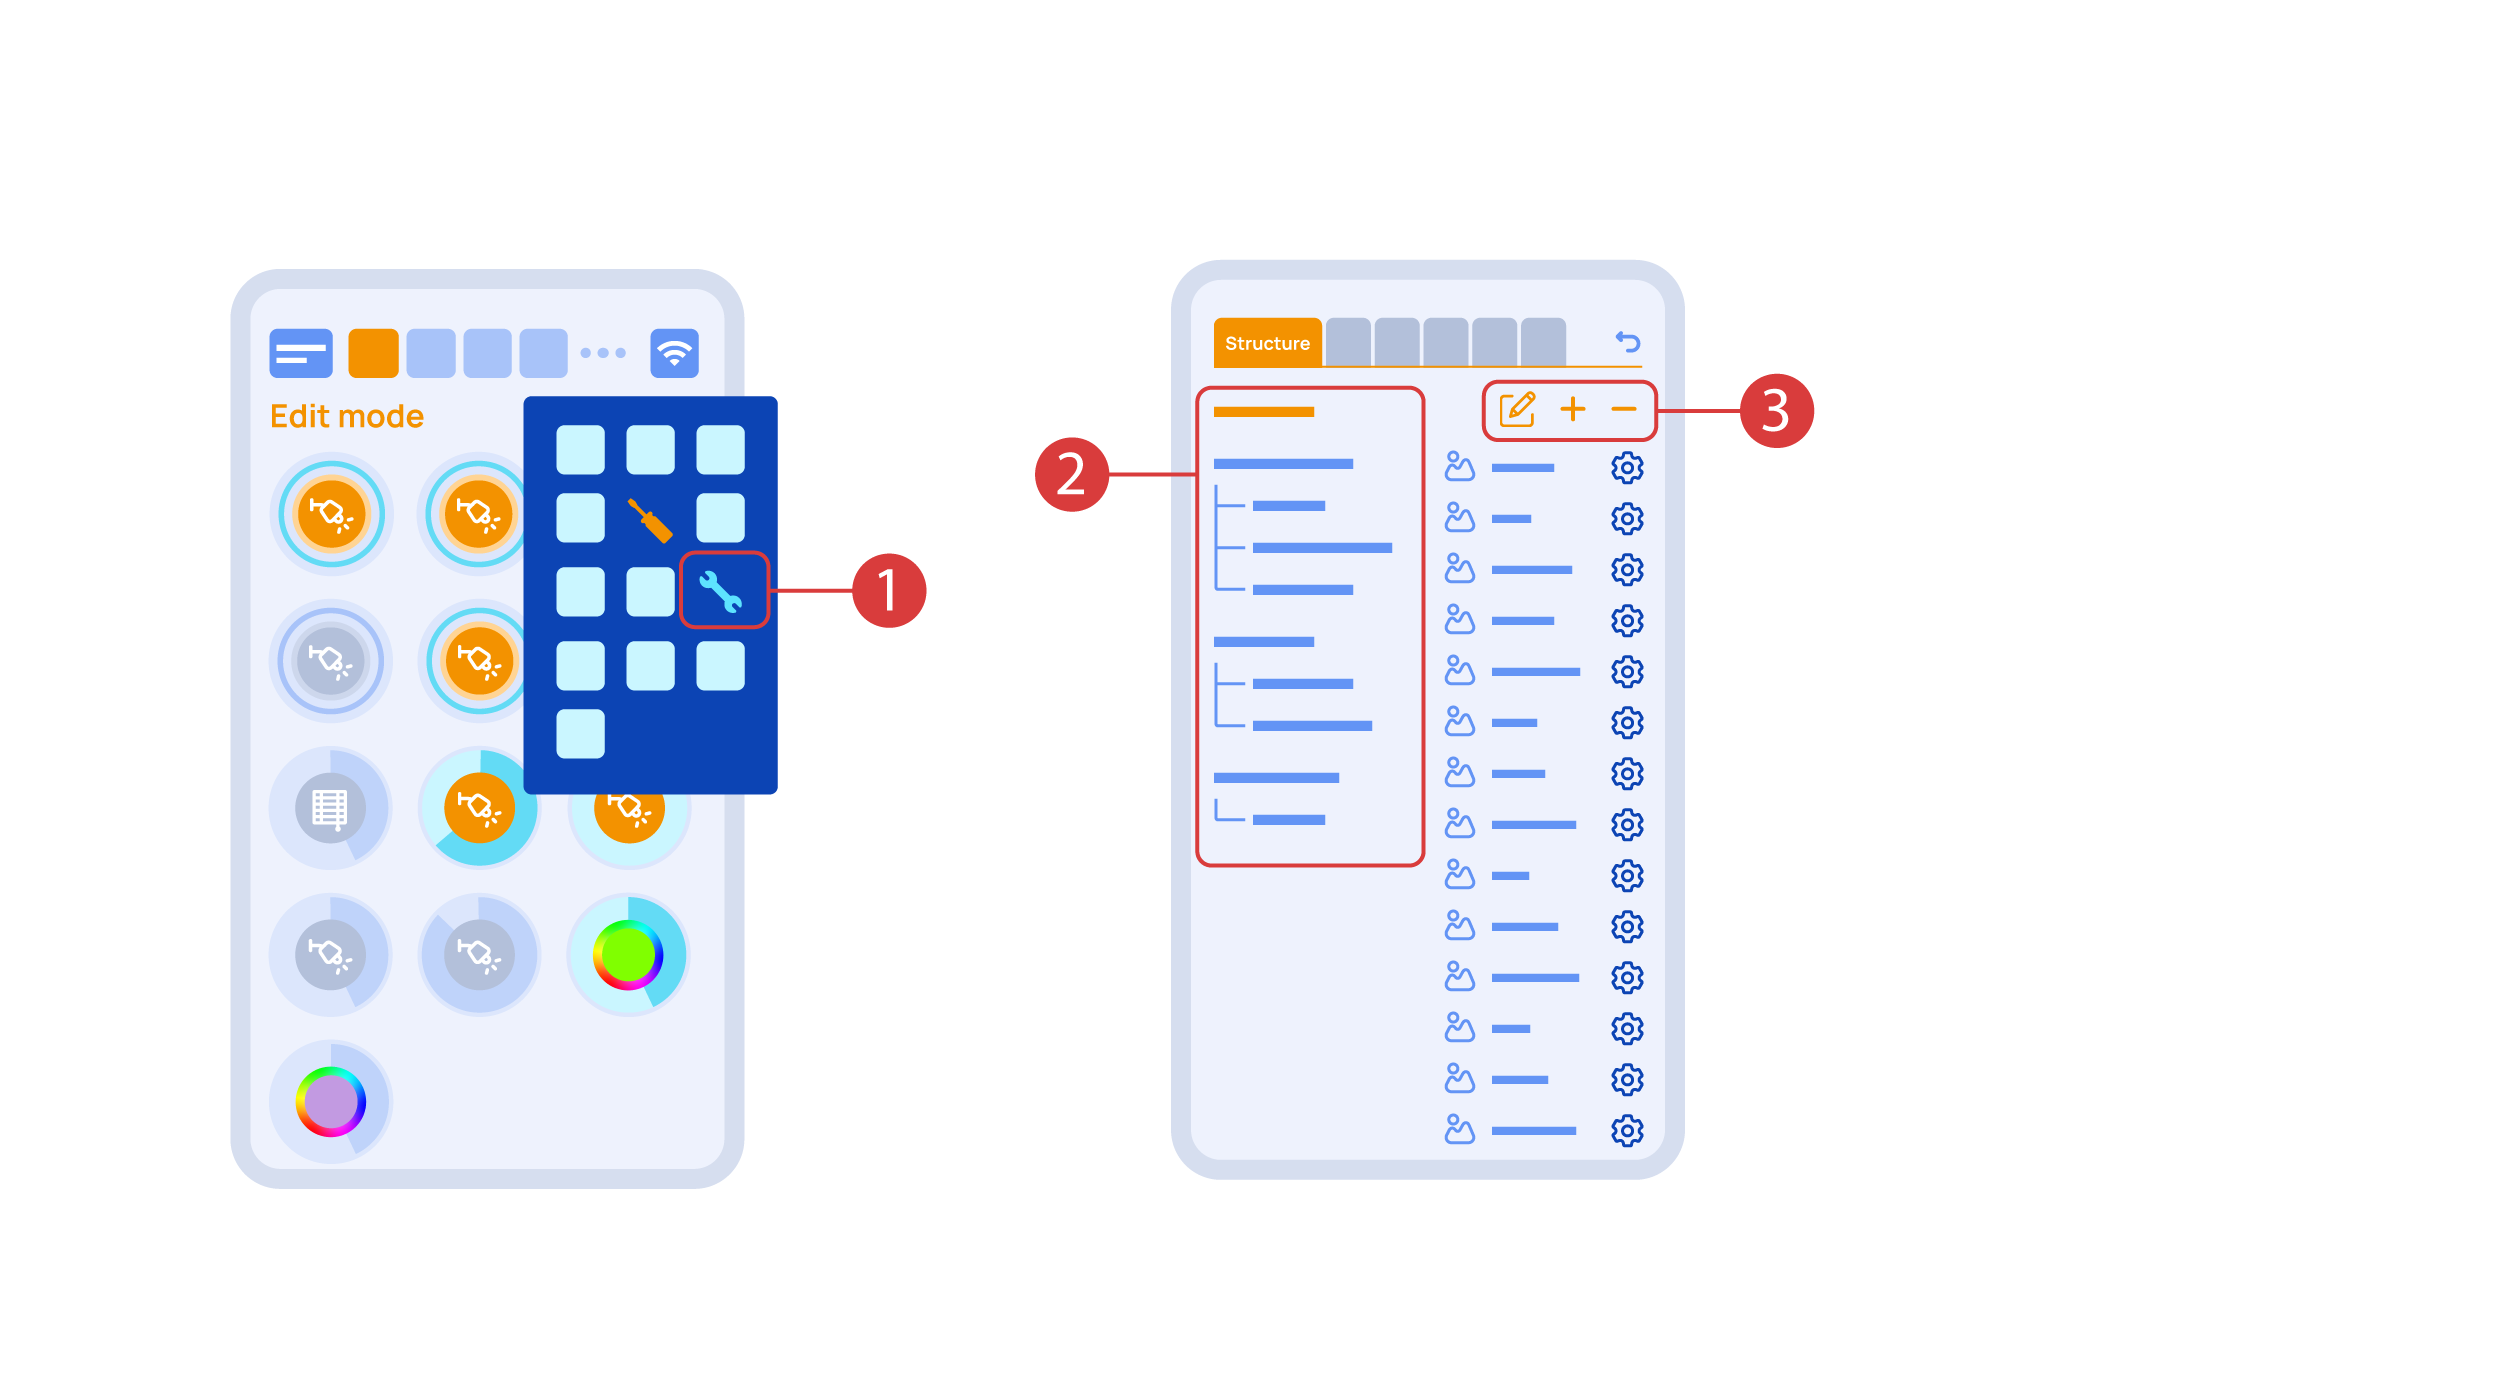
While you are in the Edit Mode, there is a ‘Setup’ ① icon in the additional menu.
Here in the ‘Structure’ ② tab we can see all the areas.
We can create new ones ③, rename them and move the elements around.
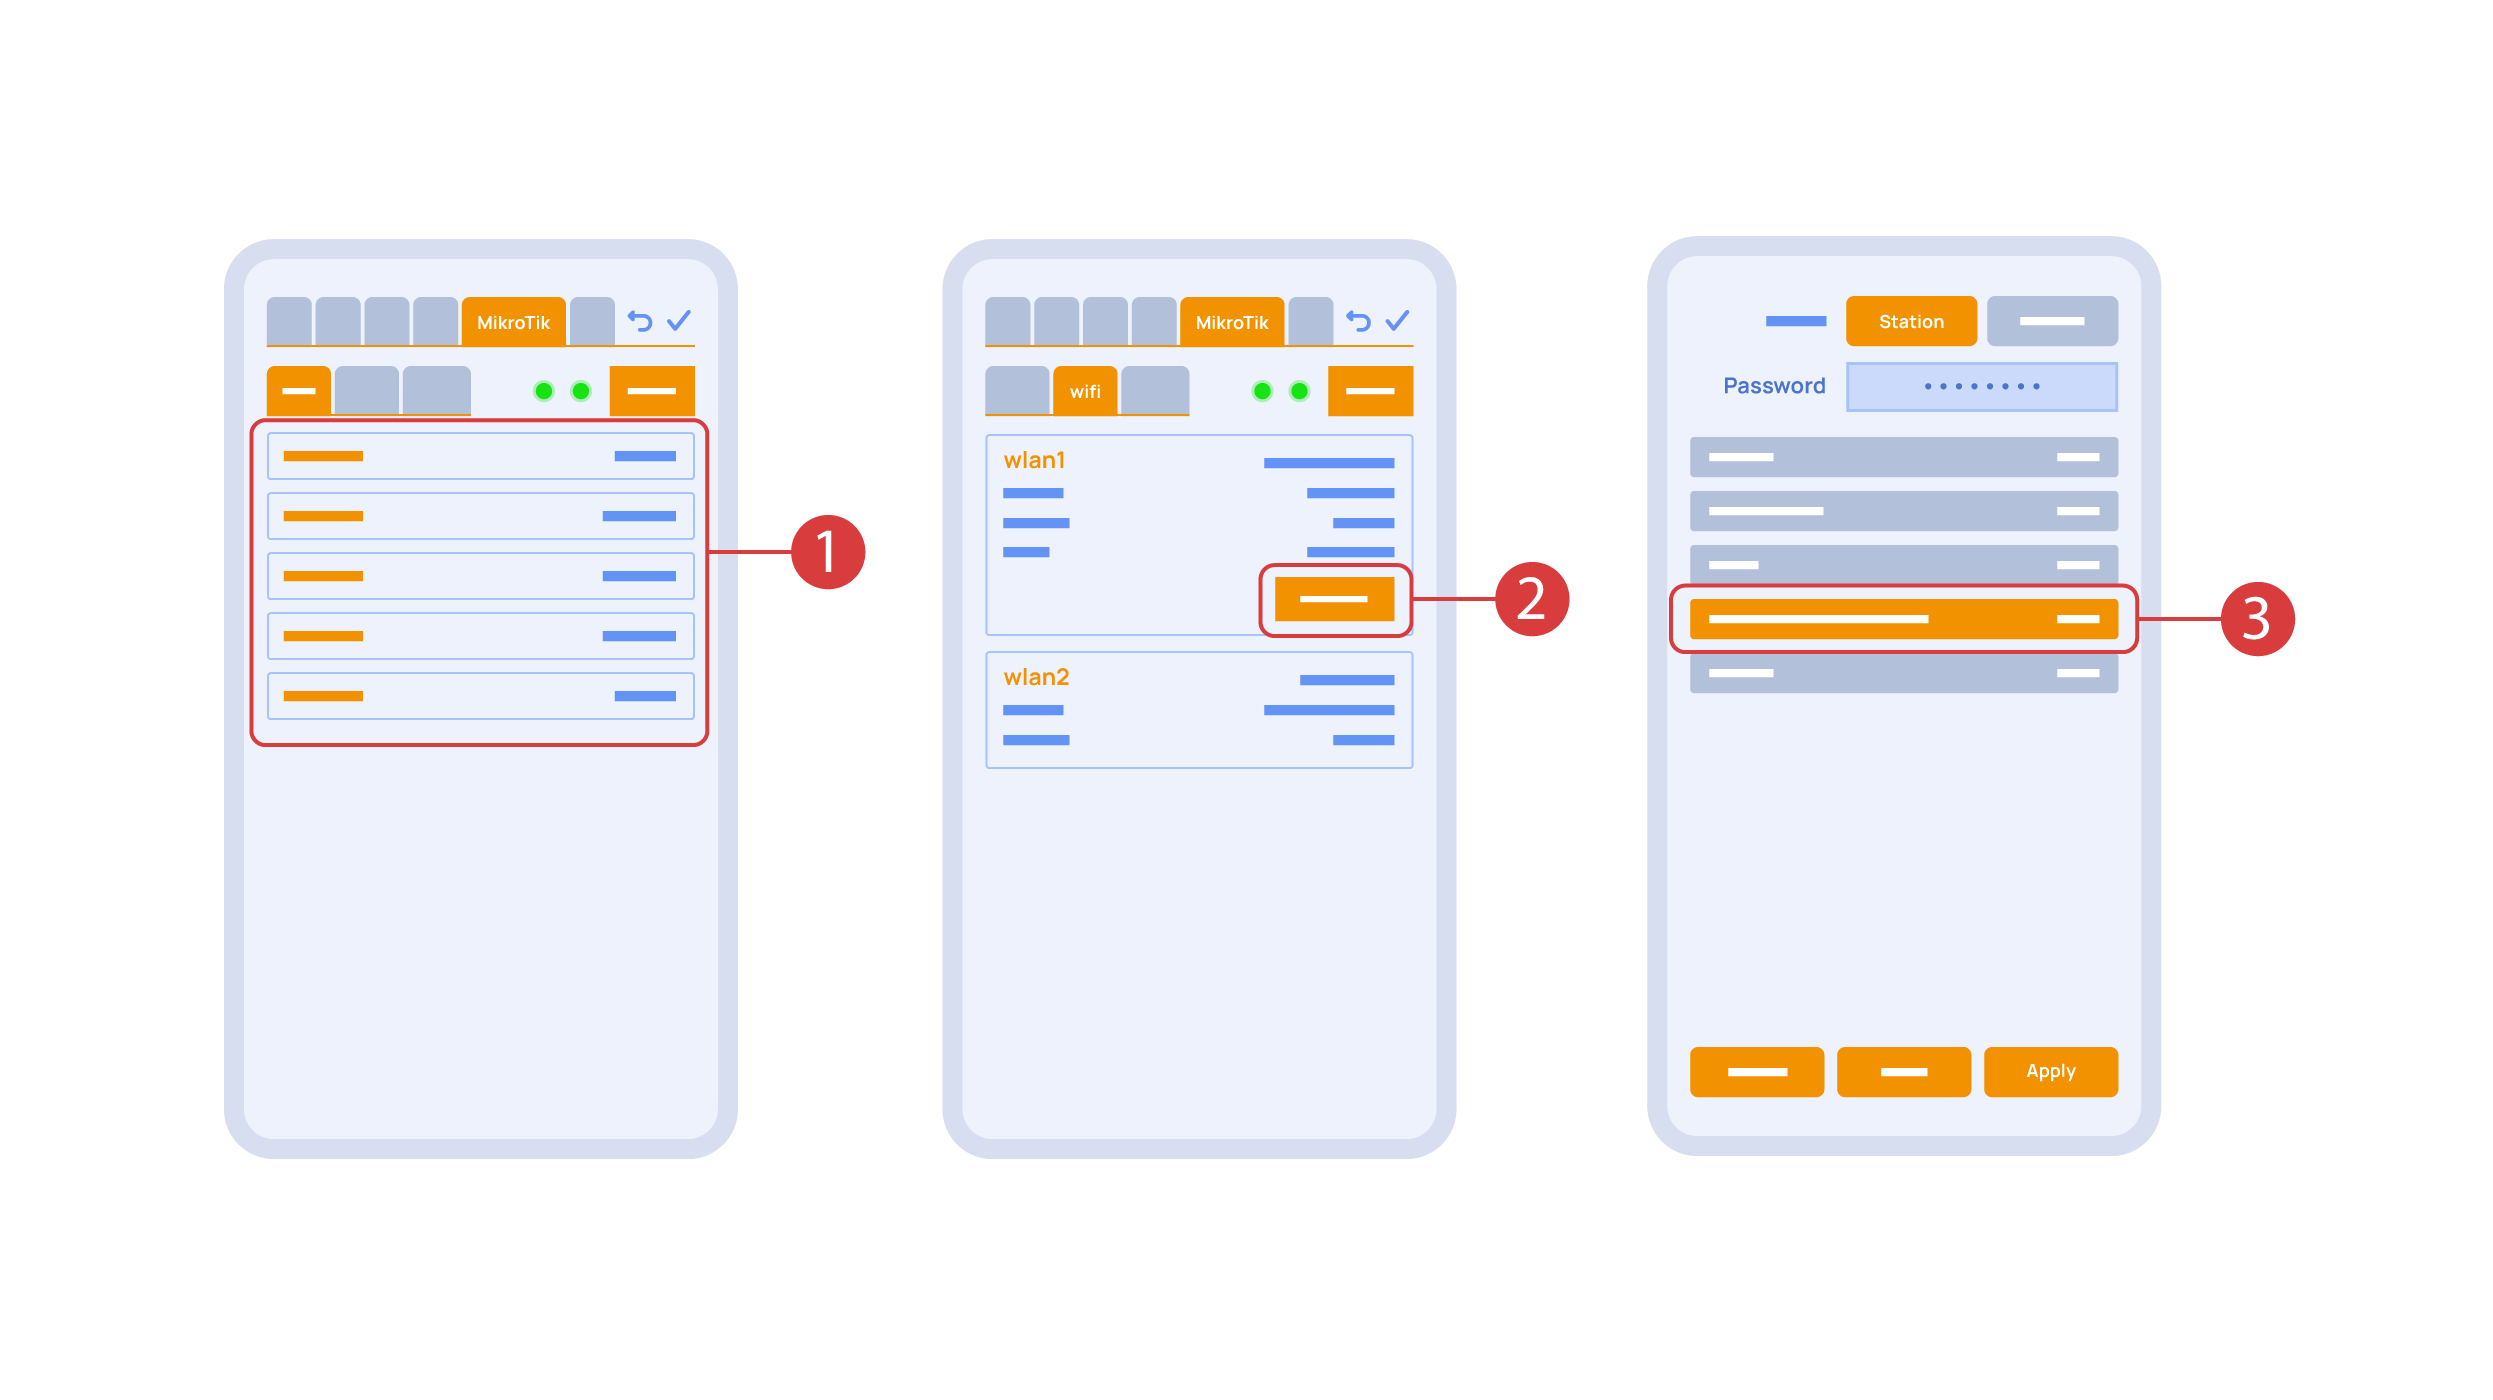
In the ‘Mikrotik’ tab ① you can see the current parameters of your router, which you can also connect to your local Wi-Fi network.
In order to do this, enter the Wi-Fi sub-menu, click the wlan1 interface configuration ②, after which choose the ‘station’ mode, choose a Wi-Fi network out of the list ③ of available ones and enter the connection password.
In the ‘Backups’ tab ① you can see the list of saved configurations, which can be restored if necessary.

For cloud access to the device, you do not need any extra settings. The app detects the absence of the system in your local network and automatically establishes the connection via the cloud.
We thank you for watching this tutorial! If you have questions or need extra help, please do not hesitate to refer to our technical support team. See you in the next episodes!