Metaforsa 3/3.plus
| MF3/MF3.plus | |||||||||||||
|---|---|---|---|---|---|---|---|---|---|---|---|---|---|
 | |||||||||||||
| |||||||||||||
| |||||||||||||
| |||||||||||||
Вступ
Інструкція з монтажу METAFORSA SMART HOUSE описує процедуру встановлення, збирання, експлуатації та налаштування системи. Під час роботи з системою обов'язково дотримуйтеся всіх вимог, викладених у цьому посібнику. Невиконання цих вимог може призвести до пошкодження пристрою, його відмови, ураження електричним струмом, пожежі та інших непередбачених ситуацій. Виробник залишає за собою право вносити зміни до цієї інструкції без попереднього повідомлення. Цей посібник є невід'ємною частиною системи і повинен знаходитися у кінцевого користувача.
Особливості
- Підтримка 10 універсальних виходів:
- Світло
- Клапани опалення NC/NO
- жалюзі
- 1 або 2-полюсні ворота
- 1 або 2-полюсні клапани
- Замки НЗ/НЕТ
- Блоки вентиляторних котушок
- 4 виходи дімування
- 28 підтримуваних входів:
- Кнопки
- Світлодіодні кнопки
- перемикачі
- швидкісні перемикачі
- Датчики витоку
- Датчики руху
- Датчики температури
- Світлодіодні стрічки
- 3-4-5 канальна RGB стрічка
- Стрічки WS2812B
- Пристрій RS485 (тільки для Metaforsa 3.plus)
- Порт розширення
- Реле з контактами AgSnO2, розрахованими на пусковий струм 80 А 20 мс
- Підключення до хмари та керування всіма системами будинку
- Голосове керування (Siri, Alexa, Google Home)
Вимоги техніки безпеки
Щоб уникнути ризику пожежі, ураження електричним струмом, пошкодження системи та/або отримання травми, установку й збірку системи слід виконувати відповідно до наведених нижче інструкцій:
- всі роботи по підключенню повинні виконуватися без електроживлення;
- використовуйте відповідні інструменти та засоби індивідуального захисту від ураження електричним струмом;
- не використовуйте пошкоджені кабелі, дроти та роз'єми;
- не допускайте згинання кабелів та проводів;
- не перетискайте та не перегинайте кабелі та дроти, застосовуючи надмірну силу. В іншому випадку внутрішні провідники кабелю та проводів можуть бути оголені або зламані;
- не використовуйте для підключення розетку з поганими контактами;
- не перевищуйте граничні параметри навантаження, зазначені в цьому посібнику;
- переріз жил кабелю живлення повинен відповідати технічним вимогам щодо граничної густини струму, типу ізоляції та матеріалу жил. Малий переріз може призвести до перегріву кабелю та пожежі.
При роботі з системою після подачі напруги НІКОЛИ:
- підключати/відключати роз'єми;
- розкривати модулі та датчики.
Конфігурація та призначення системи
Призначення системи
METAFORSA SMART HOUSE - це готове рішення для автоматизації житлових і комерційних приміщень, готельних комплексів, яке включає в себе найбільш необхідні функції "розумного будинку".
Пристрій має 10 каналів керування, 4 канали регулювання яскравості та 28 вхідних каналів.
| Універсальні виходи можна використовувати для керування: | Універсальні входи дозволяють підключати: |
|---|---|
| Освітлення | Кнопки / світлодіодні кнопки / перемикачі |
| | Магнітні герконові вимикачі | |
| Датчики протікання | |
| Датчики руху | |
| | Датчики температури | |
| |Світлодіодні стрічки/3-4-5-канальні RGB стрічки/WS2812B стрічки | |
| | Пристрій RS485* |
* - Тільки для Metaforsa 3.plus
Порт розширення
The expansion port allows you to upgrade the system by connecting auxiliary equipment, such as the control module for LED lighting, dimming, metering devices and other elements.
The package, which is completely ready-to-install, includes the basic hardware and software.
Вміст пакування
У комплект поставки входить
| Мейнфрейм METAFORSA 3/3.plus | 1 шт |
| Блок живлення MEANWELL DR-15-12 | 1 шт |
| Датчик руху CW-MSD 3 шт. | |
| Датчик протікання FW-WL.B | 2 шт |
| Термочутливий елемент FW-TS 4 шт. | |
| Магнітний геркон (датчик положення вікна/дверей) | 4 шт. |
| Завадозахисний фільтр для Ethernet-кабелю | 1 шт |
| Шнур живлення | 1 шт |
Основні технічні характеристики системи
Основні технічні характеристики та характеристики модуля METAFORSA 3/3.plus наведені в таблиці 1
| Специфікація | Значення |
|---|---|
| 'Вихідні порти' | |
| Кількість комутованих каналів | 10 |
| Кількість переключених груп | 10 |
| Кількість каналів затемнення | 4 |
| Напруга комутації | 0-250 В змінного/постійного струму |
| Пікове навантаження (один канал) | 16А |
| Пікове навантаження (прилад) | 160А |
| Максимальне навантаження на канал диммування | 0,5 A (110 Вт при 220 В) |
| Тип диммера | MOSFET |
| Тип навантаження диммера | R,C |
| Тип затемнення | задній край |
| Тип підключення кабелю живлення | роз'єм |
| Допустимий перетин кабелю живлення для підключення до розетки: одножильний кабель багатожильний кабель багатожильний кабель з наконечником |
0,5 … 4 мм2 0,5 … 4 мм2 0,5 … 2,5 мм2 |
| 'Вхідні порти' | |
| Кількість дискретних входів | 28 |
| Максимальний струм на роз'ємах постійної напруги | 5 мА* |
| 'Інше' | |
| Робоча температура навколишнього середовища | 0 … +45°С |
| Температура зберігання/транспортування | -10 … +50°С |
| Допустима вологість | 0 … 95% (без конденсації) |
| Електропостачання | 11,5 … 27,5 В постійного струму 24 В, 0,75 А Рекомендовано |
| Максимальний попит | 0,5А |
| Доступні інтерфейси | Ethernet, CAN |
| Тип автобуса | CAN (4-провідний) |
| CAN (4-провідний) | 800 м** (кручена пара CAT5e) |
| Тип проводу CAN | FTP Cat 5E |
| Тип підключення CAN | Роз'єм |
| Максимальна довжина цифрової лінії | 30 м |
| Цифрова лінія Wirde типу | UTP/FTP Cat 5E |
| максимальна довжина локальної мережі | 100 м |
| Тип проводу LAN | UTP/FTP Cat 5E |
| Тип підключення LAN | Роз'єм RJ-45 |
| Кількість портів RS485 | 1*** |
| Швидкість передачі даних | 1200-115200 б/с*** |
| Габаритні характеристики | 9U, 156x90x58 мм |
| Матеріал оболонки | ABS |
| Обшивка | IP40 |
| Тип установки обладнання | DIN-рейка (EN 60715) |
| Вага | 400 г |
* – Вихідні канали слід підключати лише за допомогою підсилювача, який використовує сигнал 5 В ШІМ від виходу IO як вхід
** – для довгих ліній потрібна установка додаткових блоків живлення; максимальна довжина лінії може бути зменшена різними факторами перешкод
*** – Лише для Metaforsa 3.plus
Загальна структура Системи
Загальний вигляд модуля показано на 'мал. 1
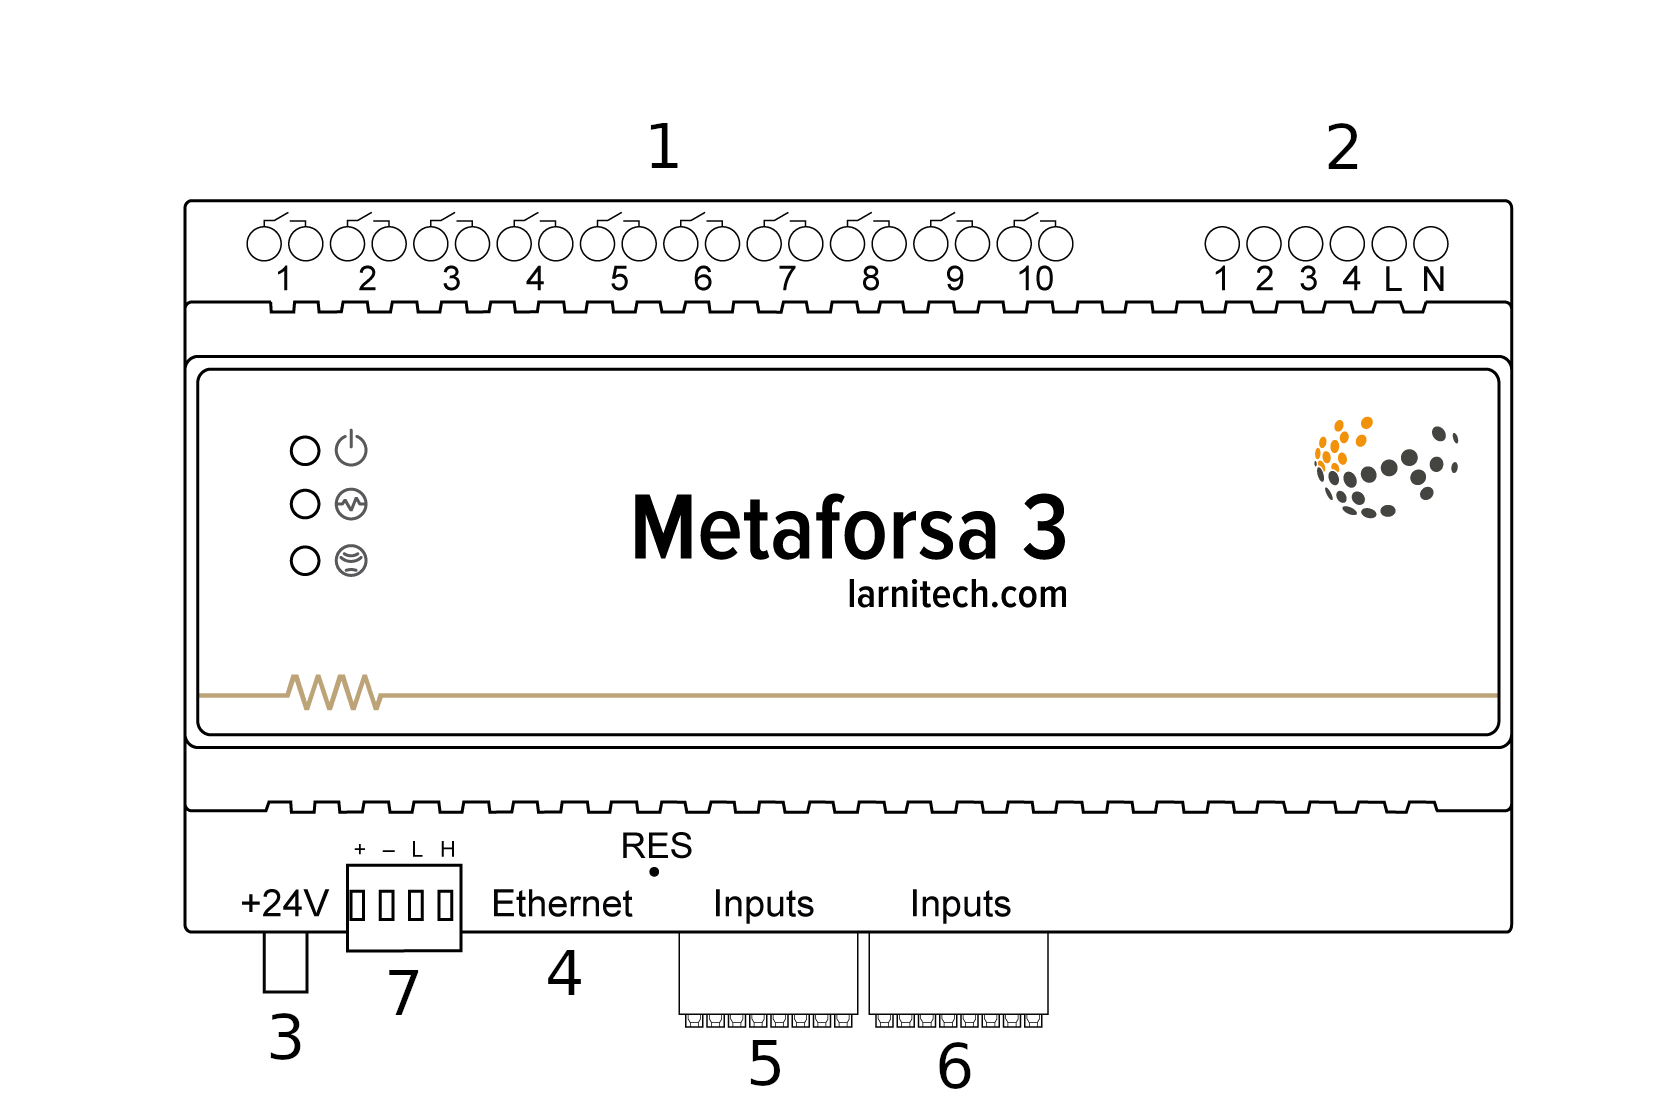
| 1 | — роз'єм для додатка навантаження |
| 2 | — роз'єм для підключення диммерів |
| 3 | — роз’єм живлення |
| 4 | — Мережевий роз'єм Ethernet |
| 5-6 | — роз'єми для універсальних каналів введення/виведення |
| 7 | — роз'єм для модуля розширення. |
Огляд зовнішніх роз'ємів пристрою METAFORSA:
У верхній частині корпусу (мал. 1) є:
- роз'єм (1) — для підключення пристроїв;
- роз'єм (2) — для підключення диммованих ламп;
У нижній частині корпусу (рис. 1) є:
- роз'єм (3) — підключення блоку живлення;
- роз'єм (4) — підключення до мережі Ethernet;
- роз’єми (5-6) — підключення універсальних каналів вводу/виводу – кнопки, геркони, світлодіодні кнопки, датчики протікання, датчики руху, датчики температури, світлодіодні стрічки, 3-4-5 канальні стрічки RGB, стрічки WS2812B, пристрій RS485 (Тільки для Metaforsa 3.plus);
- роз'єм (7) — підключення модуля розширення.
Фізична конфігурація та призначення контактних точок кожного роз’єму показані в таблиці 2.
| З'єднувач | Контакт | Призначення |
|---|---|---|
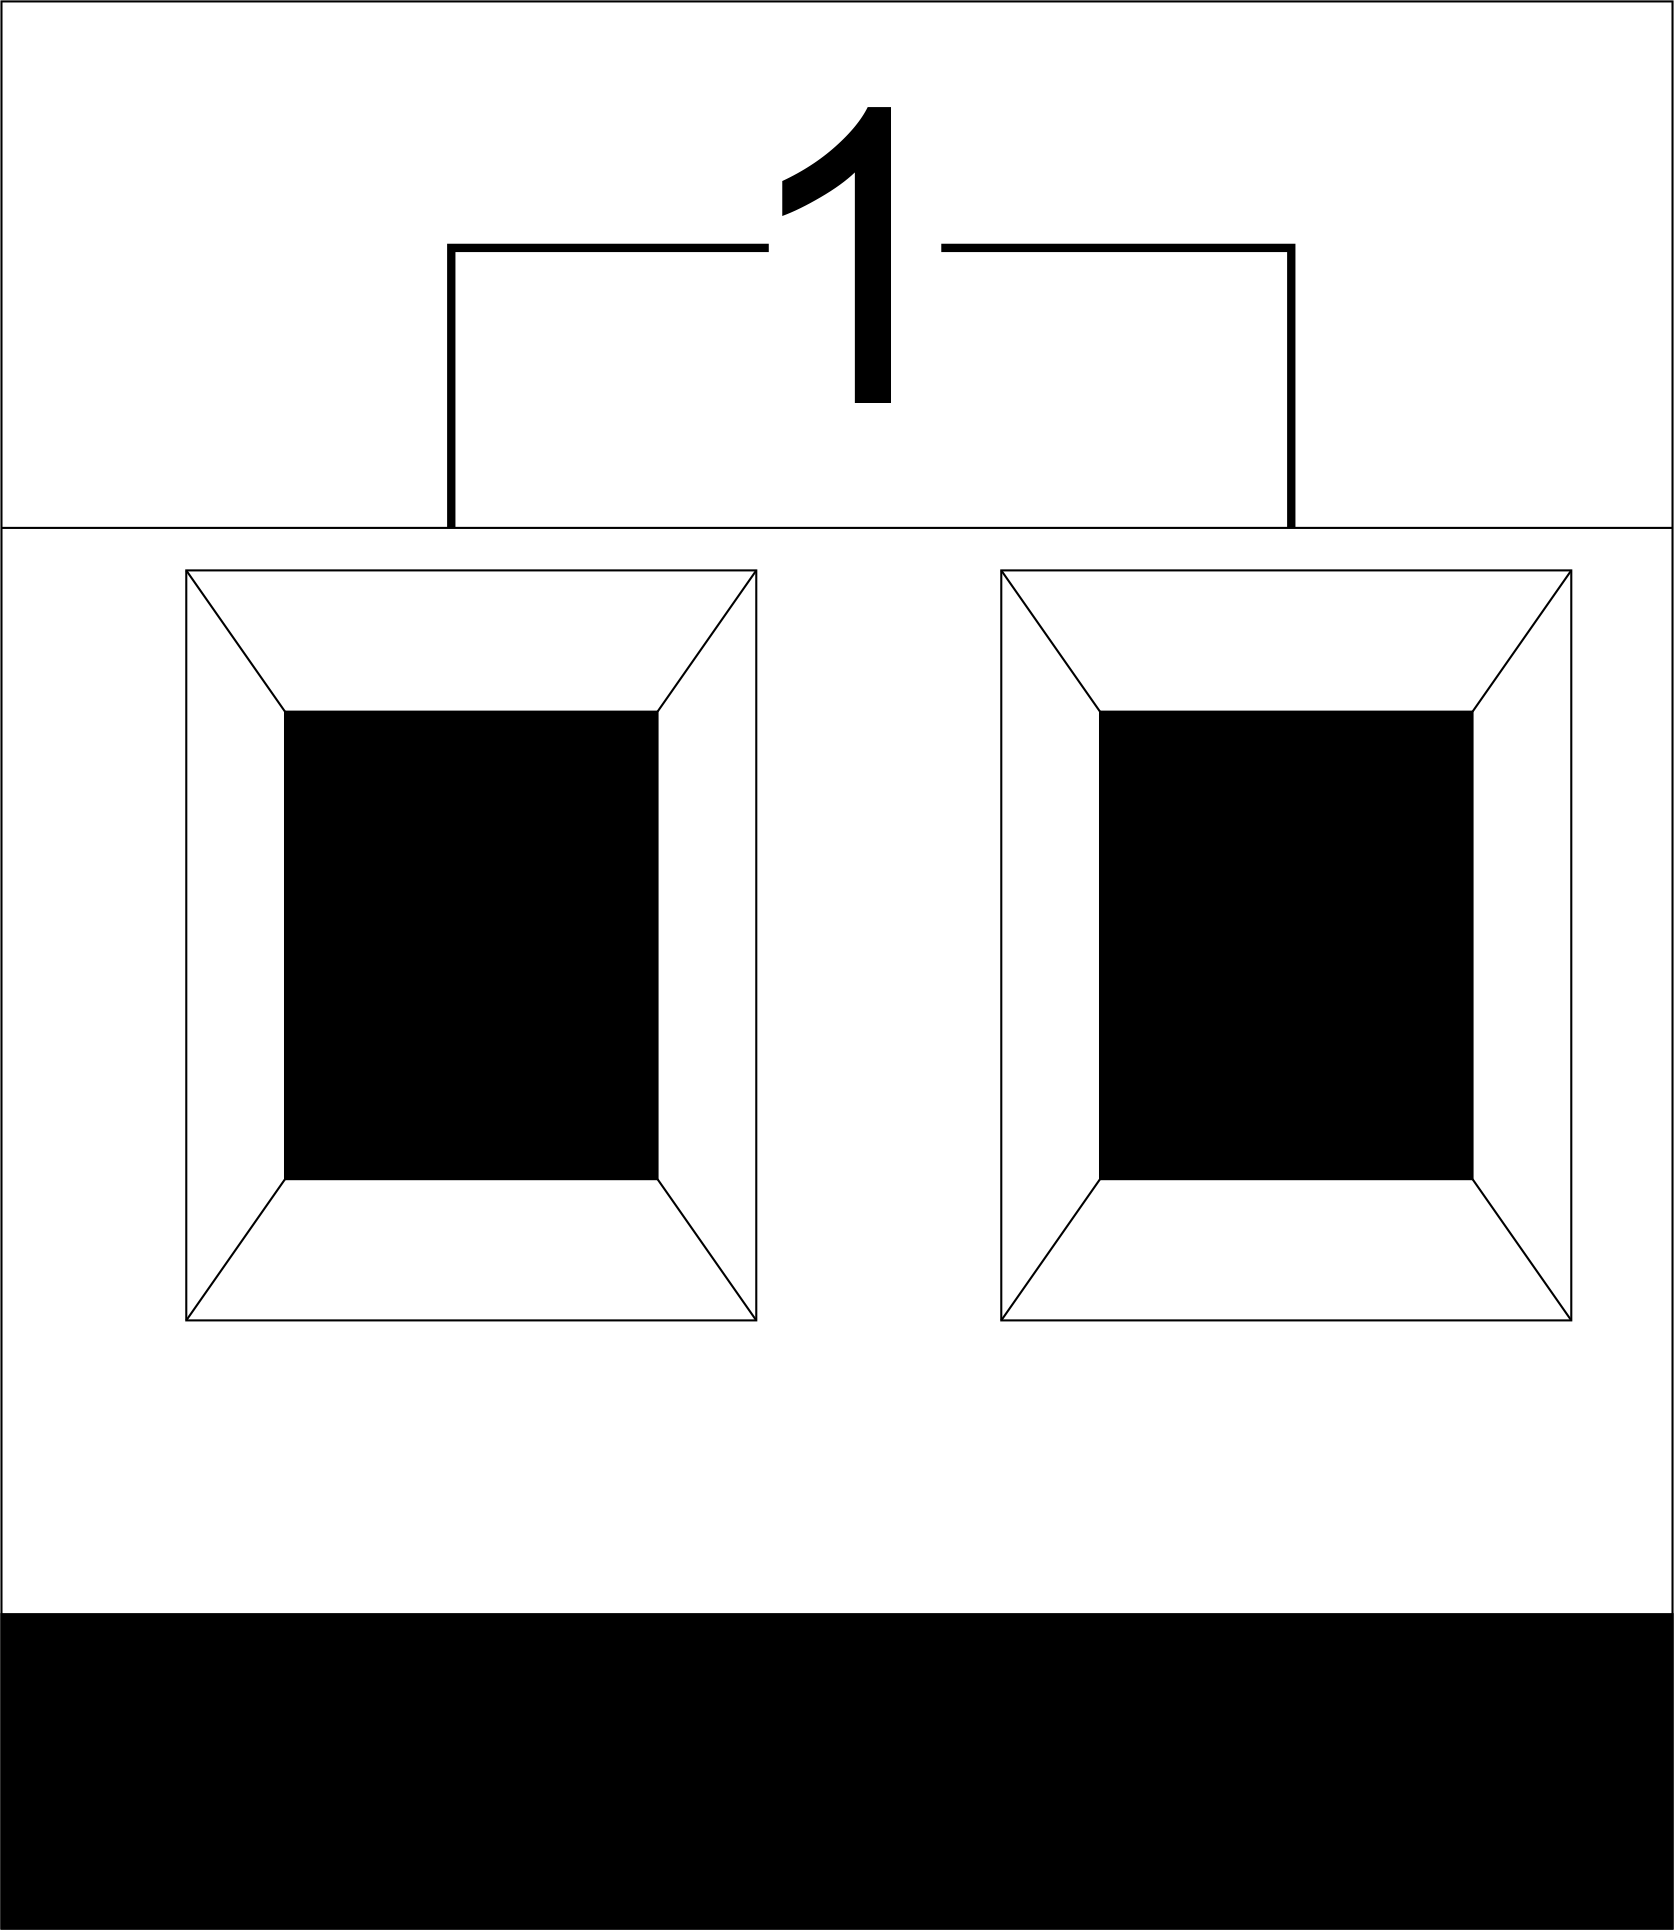 |
1-10 | Застосування навантаження (світлові лампи, термоприводи тощо) |
| 80px|frameless | D1-4, L, N | Застосування навантаження (регулювання ламп) |
| Індикатори стану пристрою | Індикатори стану модуля описані в таблиці 3 | |
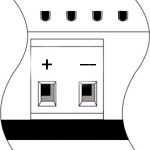 |
+24V GND |
+24V — живлення модуля від зовнішнього джерела живлення 24V GND — загальний |
| 80px|frameless | RJ45 | Роз'єм для підключення до локальної мережі |
| 80px|frameless | In1-14, In15-28 GND | Підключення контрольних пристроїв (кнопки, світлодіодні кнопки, магнітні геркони, датчики руху, датчики протікання, датчики температури та ін.): In1 … In28 — логічні входи GND — загальний |
| 80px|frameless | VCC GND L H |
Підключення зовнішніх модулів для CAN-шини VСС — вихід 24В для живлення зовнішніх пристроїв GND — загальний L — шина даних CAN-L H — шина даних CAN-H |
| Indicator | Status | Description |
|---|---|---|
| Power | Power | |
| Power not available | ||
| Activity | Data communication | |
| Data communication not available | ||
| Error | No errors | |
| Communication error | ||
| Module overheat | ||
| Dimmer outputs module overload | ||
| Absence of power on dimmers, if in configuration |
Установка та збірка системи
Перед підключенням системи необхідно:
- Встановіть датчики та виконавчі механізми (якщо вони не встановлені), налаштуйте датчики та виконавчі механізми;
- встановіть модуль і блок живлення.
Примітка: Модуль повинен бути встановлений поблизу джерела живлення.
- 'Потужність вузла автоматичного вимикача повинна відповідати навантажувальній здатності;
- 'До модуля не можна підключати нічого, крім фазних проводів, нульовий провід підключається окремо.'
Типова схема підключення модуля METAFORSA 3/3.plus наведена на мал. 3
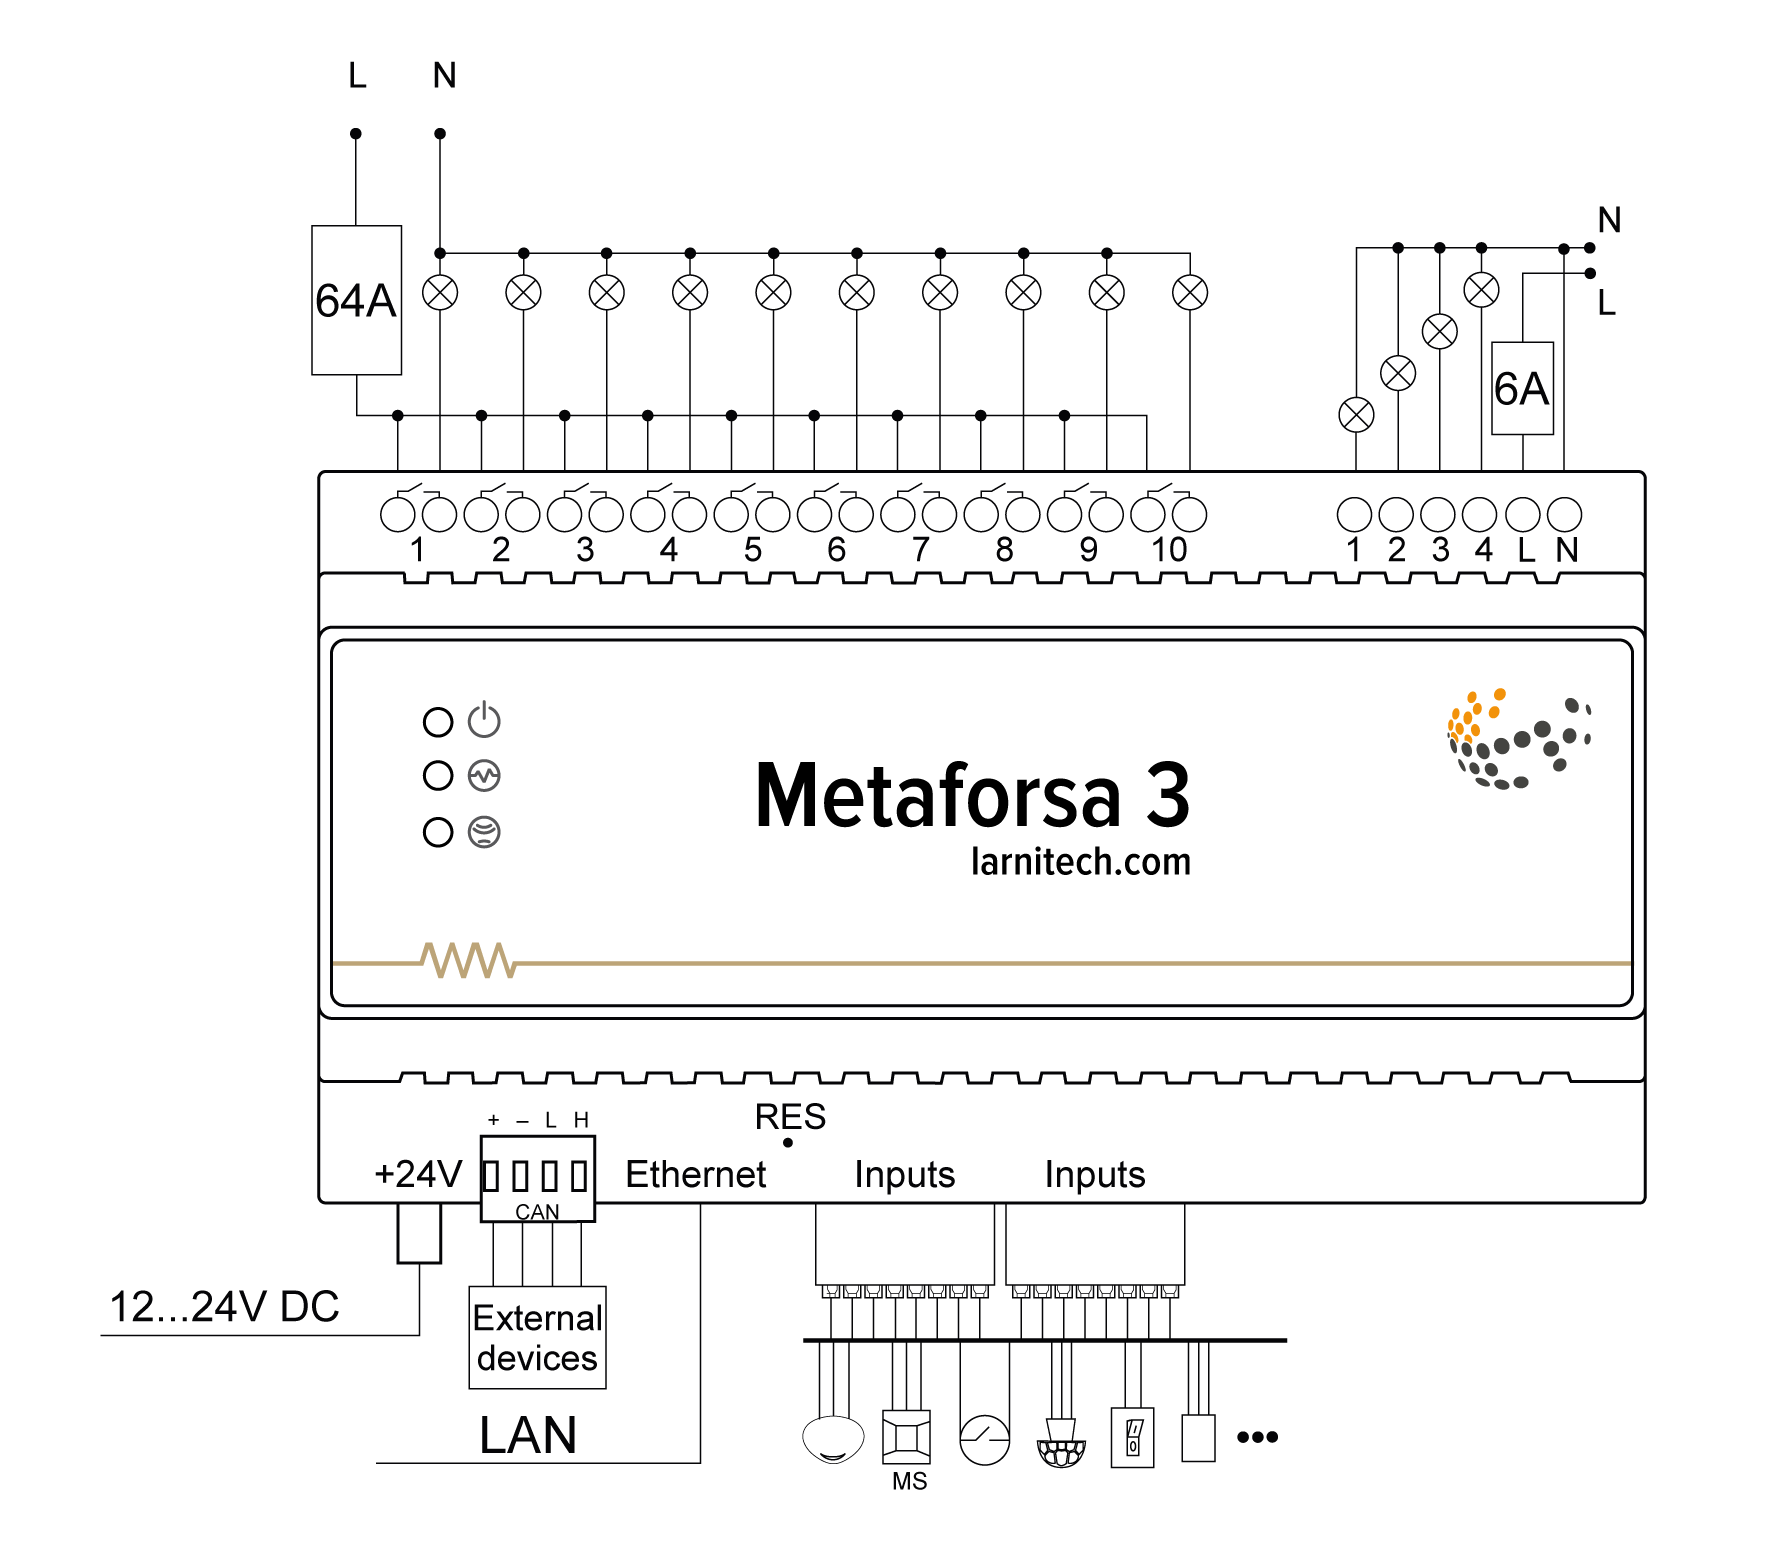
Підключення приводів
Connection of the lights/electric contactor/heating thermal actuator
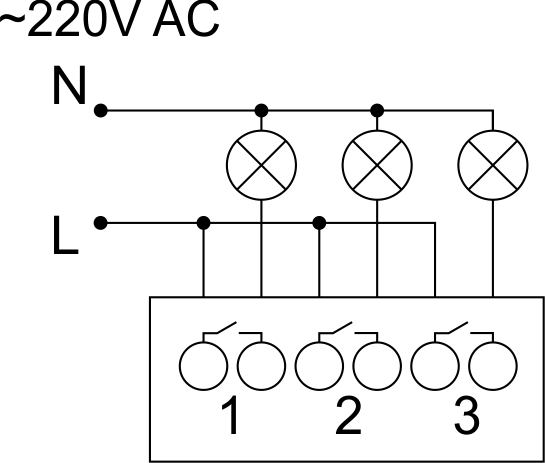 Fig. 4 |
Such actuators as light, electric contactor, heating thermal actuator should be switched on any of the outputs 1 – 10, the neutral wire and the ground wire should be connected directly to the switchboard. The example of connection is shown in Fig.4. |
Connection of high load device
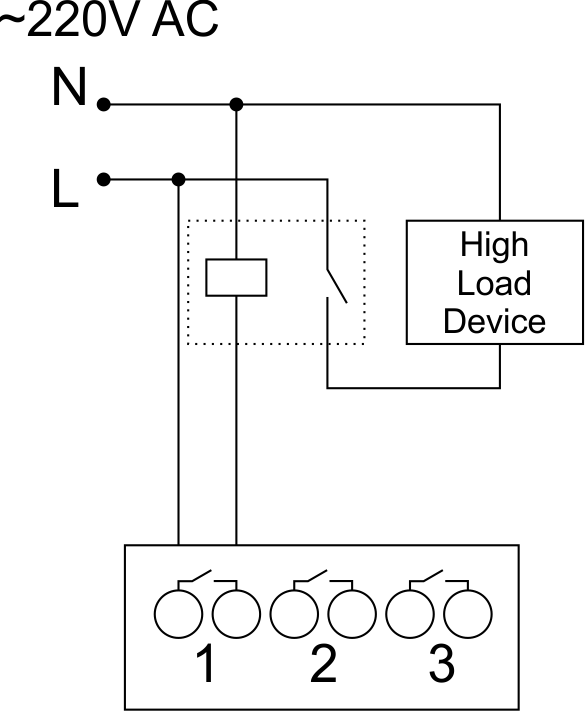 |
Recomended contactors:
|
Connection of single-pole water/gas supply valve
| Caution: Before applying power to the load, make sure that the output configuration of METAFORSA module is correct. The incorrect configuration or incorrect connection can cause the module failure and/or failure of the equipment connected to it, and even a fire. | |
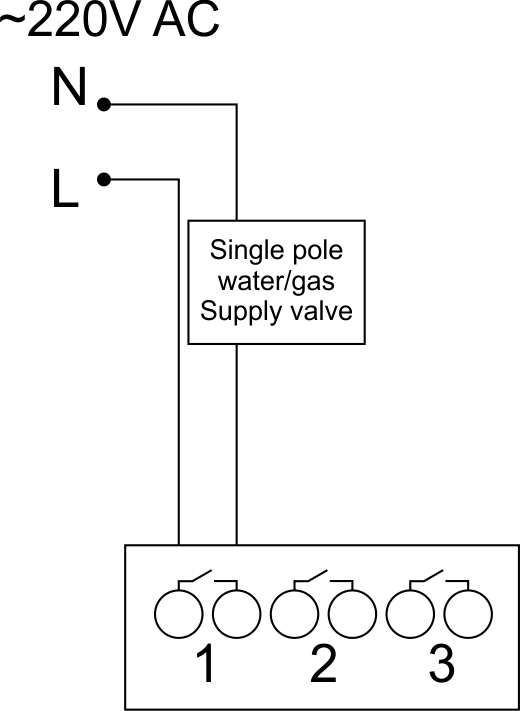 Fig. 5 |
The single pole water/gas supply valve is connected to any of the outputs of 1 – 10, the (neutral wire and the ground wire are connected directly to the switchboard. The example of connection is shown in Fig.5. |
Connection of double-pole water/gas supply valve
| Caution: Before applying power to the valve, it is necessary to ensure the output configuration of METAFORSA module is correct. The incorrect configuration can cause the voltage application simultaneously to both channels of the valve, which may result in the module failure and/or failure of the equipment connected to it, and even a fire. | |
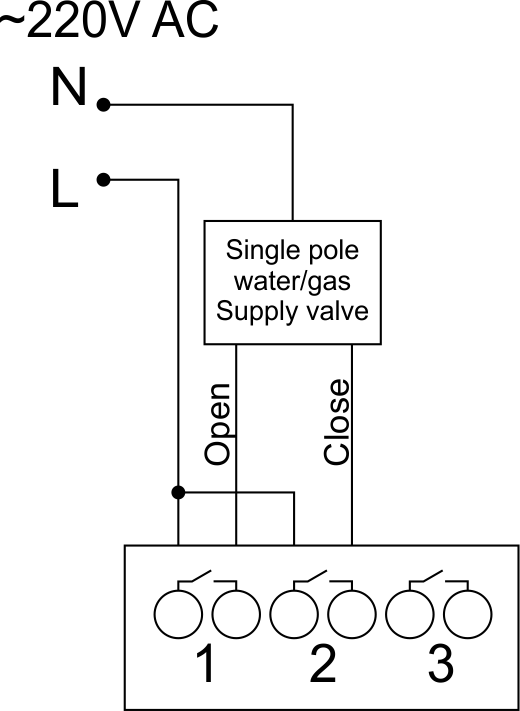 Fig. 6 |
Two adjacent contact points (for example, 3, 4) are used to connect the double-pole water/gas supply valve; in these conditions the neutral wire and the ground wire are connected directly to the switchboard. The example of connection is shown in Fig.6. |
Connection of single-pole gate actuator
| Caution: Before applying power to the module, you should properly configure access to the application. The contacts incorrectly configured can result in the module failure and/or failure of the equipment connected to it, and even a fire.
| |
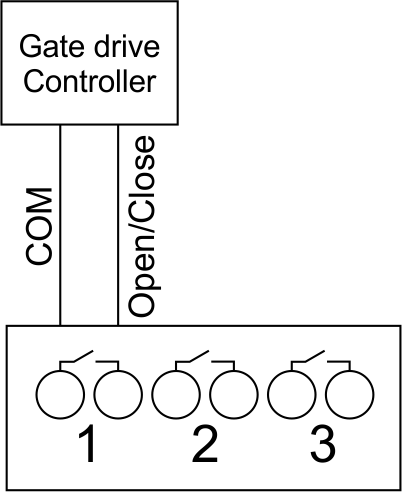 Fig. 7 |
Any contact point (for example, 3) is used to connect the single-pole gate drive controllers. The example of connection is shown in Fig.7. |
Connection of double-pole gate actuator
| Caution: Before applying power to the module, you must properly configure the outputs in the application. The contacts configured incorrectly can lead to simultaneous power supply to both channels, resulting in the module failure and/or failure of the equipment connected to it, and even a fire.
| |
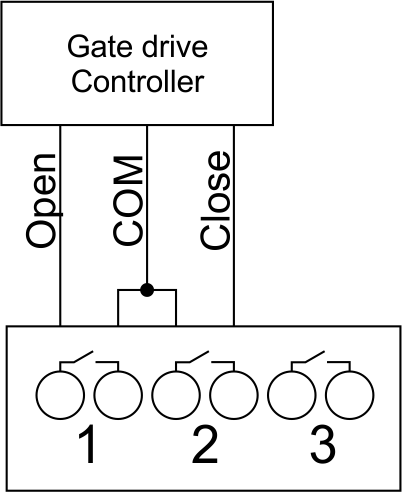 Fig. 8 |
Two adjacent contact points (for example, 3, 4) should be used to connect the double-pole gate drive controller. The example of connection is shown in Fig.8. |
Connection of curtain/jalousie/shutter actuator with 220V force control
| Caution: Before applying power to the module, you must properly configure the outputs in the application. The contacts configured incorrectly can lead to simultaneous power supply to both channels, resulting in the module failure and/or failure of the equipment connected to it, and even a fire.
| |
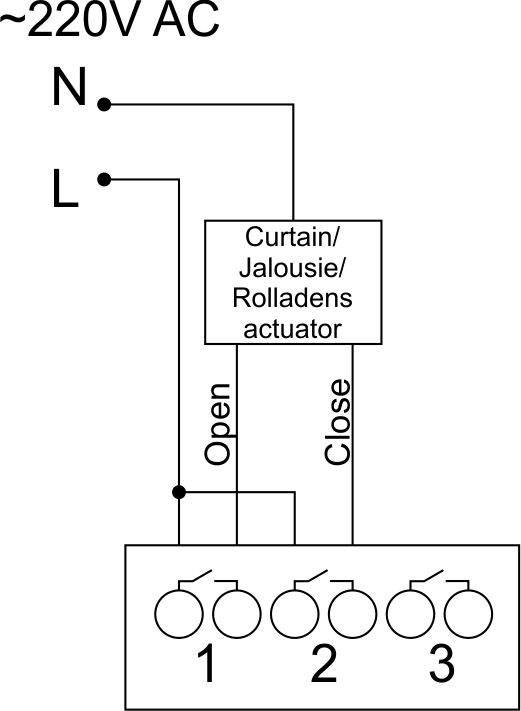 Fig. 9 |
Two adjacent contact points (for example, 3, 4) should be used to connect the curtain/jalousie/rolladens actuator, in these conditions the neutral wire and the ground wire are connected directly to the switchboard. The example of connection is shown in Fig.9. |
Connection of curtain/jalousie/shutter actuator with low-voltage control
| Caution: Before applying power to the module, you must properly configure the outputs in the application. The contacts configured incorrectly can lead to simultaneous power supply to both channels, resulting in the module failure and/or failure of the equipment connected to it, and even a fire.
| |
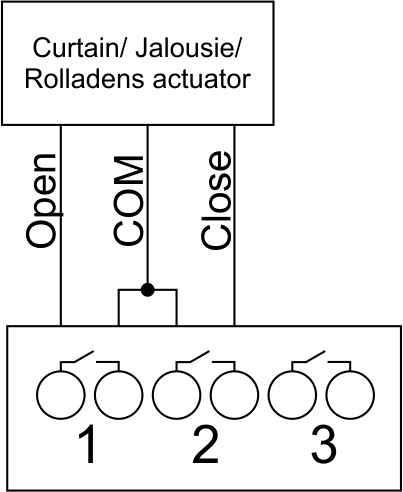 Fig. 10 |
Two adjacent contact points (for example, 3, 4) should be used to connect the curtain/jalousie/rolladens actuator with low-voltage control. The example of connection is shown in Fig.10. |
Connection of sensing elements/switches/buttons
Connection of motion sensors/leakage sensors
The motion sensors/leakage sensors should be connected to any free input in1-in28; in these conditions their power is connected to the contact points of +12V and GND of the relevant group. The example of connection is shown in Fig.11.
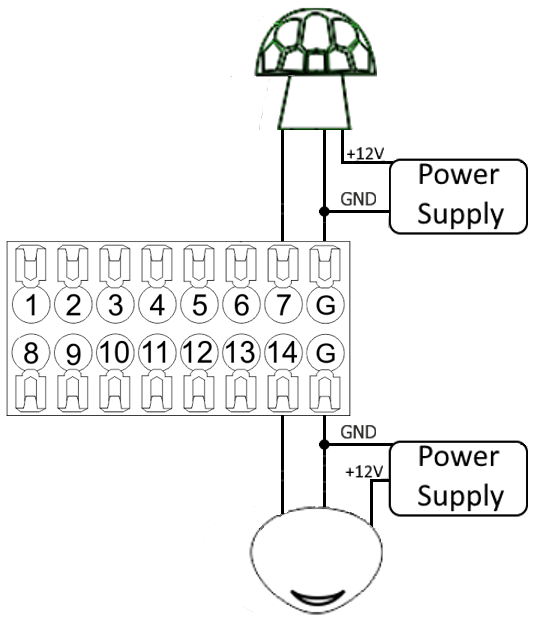
Fig. 11 connection of motion sensors/leakage sensors
Connection of buttons/switches/magnetic reed switches
Buttons and reed switches are connected to any free input in1-in28, while their second contact point is connected to GND point of the relevant METAFORSA module group. The example of connection is shown in Fig. 12-13.
 Fig. 12 connection of buttons/switching units |
 Fig. 13 connection of the magnetic reed switches (window/door position sensors) |
Connection of temperature sensors
Temperature sensors are connected to any free input in1-in28, while their second contact point is connected to GND point of the relevant METAFORSA module group. The example of connection is shown in Fig. 14.
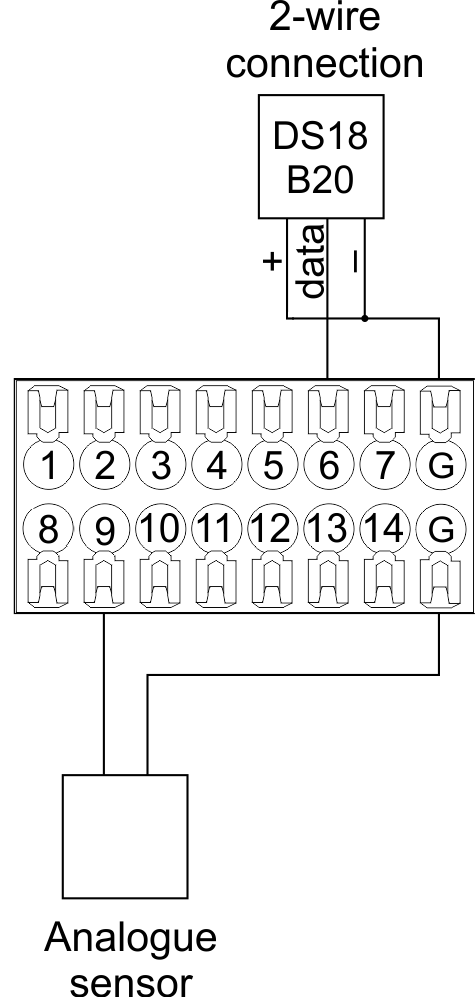
Fig. 14 connection of temperature sensors
RGB connection scheme

Fig. 15 RGB connection
WS2812B connection scheme
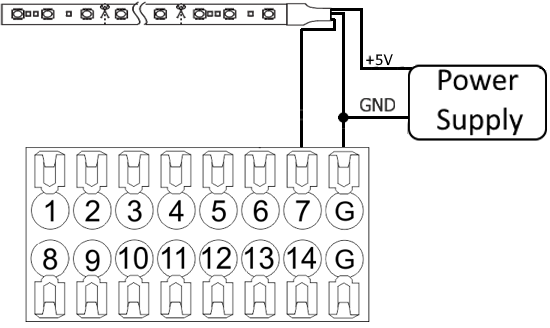
Fig. 16 WS2812B connection
RS485 connection scheme
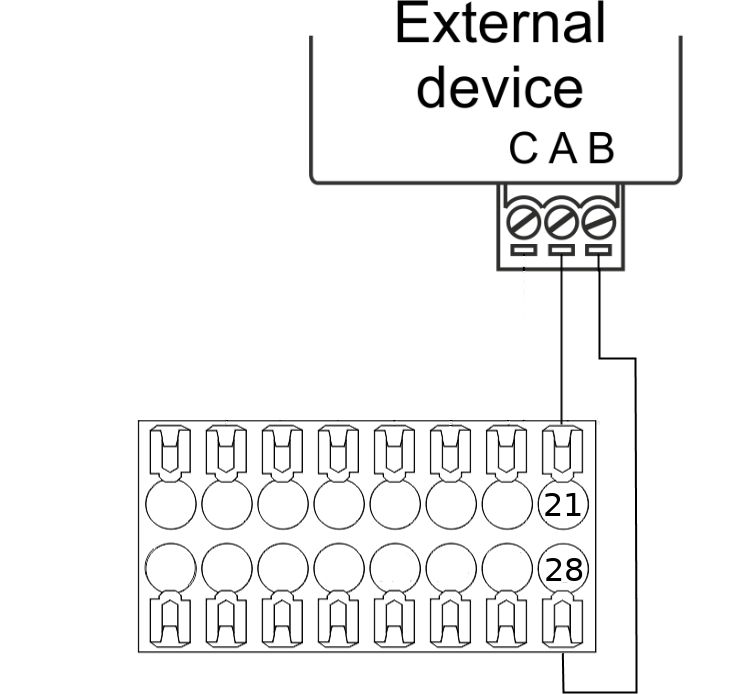
Fig. 17 RS485 connection
Connection of auxiliary equipment.
Expansion modules include Larnitech equipment connected through the CAN-bus. Such equipment includes: dimmers, RGB-backlit control modules, multimode sensors, etc. The equipment connected to the expansion port is defined automatically and does not require any preset tuning. Connector contact pin assignment is defined in Table 4. The example of connection is shown in Fig. 18.

|
| Caution! The 120 ohm terminating resistors should be installed at the end connectors between L and H contact points of CAN-bus. Ensure the connection is correct. The incorrect connection may cause sensor and/or module malfunction. |
Module installation and connection procedure
- Install the module in the switchboard on the DIN-rail and fix it with the special latch on the module base.
- Fasten the supply unit on the left side of the module.
- Connect the connector (4) having the noise filter pre-installed which is supplied complete with the module.
- Connect the connectors (5), (6).
- Connect the connectors (1), (2).
- Connect the connector (3).
- Apply power to the supply unit of METAFORSA module.
- Wait until the module is loaded, then configure it in accordance with the System Setup Instructions.
- Apply power to the connectors (1), (2).
- Check all equipment for proper operation.
METAFORSA module shut-off and deinstallation procedure
- De-energize the module by disconnecting the circuit breaker assembly of the load power supply and METAFORSA module supply unit. Verify the voltage is absent on the terminals (1), (2) of the connector wires and on the input terminals of the supply unit.
- Disconnect the load power supply connectors (1), (2).
- Disconnect the connector (3).
- Disconnect the connectors (4)-(6).
- Remove the module from the DIN-rail, releasing the latch at the bottom of the module base.
Hardware setup
To configure and control METAFORSA SMART HOUSE, you must install Larnitech software on your smartphone or tablet, which is available in App Store and Play Market. After installation, follow the System Setup Instructions.
Fault diagnostics and handling
The following are some possible faults and ways of fault handling. If you have any difficulty, or face the fault undeclared here, please contact the Technical Support: [1] or [support@larnitech.com]. There are also some tips in the FAQ section at our website [2].
The actuators do not operate:
- ensure the outputs are properly configured in the application (see System Setup Instructions);
- check the connection is correct in accordance with table 2 and paragraph 3.6;
- ensure the power is supplied to the input power contact , i.e. all circuit breaker assembly are ON.
- verify the operability of the connected equipment.
The module is off, indication absent:
- check the connection to 24V supply unit as shown in table 2 (contacts pin assignment);
- check the connection of the supply unit to 220V power mains, the indicator should be ON.
Network connection fault:
- ensure the Ethernet cable is properly wired and connected to the connector;
- ensure the LED status indicators are ON on the Ethernet connector;
- check the LAN configuration is correct, Ethernet cable loops are absent;
- METAFORSA module and the device you are connecting from are in the same network.
hold integer 0-10000 1-10 by default hold is the same as runtime hold is the bridging time in miliseconds, is used for gate and jalousie, lock; Example: hold=3500
The sensors do not operate:
- ensure the inputs are properly configured in the application (System Setup Instructions);
- check the connection is correct in accordance with table 2 and paragraph 3.7;
- ensure the METAFORSA module is ON: circuit breaker assembly is closed, indication on the supply unit is ON, the module indication corresponds to the operating status – table 3;
- check the power supply availability on the sensors;
- check the integrity of lines laid to the sensors.
The auxiliary equipment does not operate:
- check the connection is correct in accordance with table 2 and paragraph 3.8-9;
- ensure the METAFORSA module is ON: circuit breaker assembly is closed, indication on the supply unit is ON, the module indication corresponds to the operating status – table 3;
- check the integrity of the CAN lines, voltage supply on the modules.
HW Settings
| Name | Type, range | SUBID | Default | Description |
|---|---|---|---|---|
| runtime | integer 0-100 | 1-10 | 15 | runtime is the open/close time in seconds, is used for jalousie, gate, valve(2 pole);
|
| runtimeopen | integer 0-60000 | Blinds subId | Runtimeopen is the open time in milliseconds, is used for blinds; Example: runtimeopen=15000 | |
| runtimeclose | integer 0-60000 | Blinds subId | Runtimeclose is the close time in milliseconds, is used for blinds; Example: runtimeclose=15000 | |
| hold | integer 0-10000 | 1-10 | 500 | hold is the bridging time in milliseconds, is used for gate and jalousie (by default hold is the same as runtime for jalousie and gate), lock; Example: hold=3500 |
| def | string 'ON' | 1-10 | 'OFF' | def is the element status is set after restart, is used for lamp, heating, valve(1 pole); Example: def='ON' |
| stop | Char ‘R’ | 1-7 | – | (for 2-pole gate and blinds) If it is declared then by Stop command during the motion, the same impulse appears as it was at the beginning of the motion. Pole, an which the stop-impules is formed, is defined by the parameter Stop value. If it is ‘r’ or ‘R’ then stop-impulse is produced on the opposite to the start-impulse pole. If any other value is delcared (e.g., ‘d’ ) then the stop-impulse is on the same pole. If a Runtime passed after the beginning of the motion then the stop-impulse is not formed. Example: stop=’r’ |
| out | char[10] | 98 | 'LLLLHHHHP-' | Each char is responsible for the type of a particular channel
Example: out='LLB-G-V-W-' |
| dm | char[4] | 98 | ‘LLLL’ | Each char is responsible for the type of a particular channel
Example: dm=’skl-‘ |
| def | integer 0-250 | 11-14 | 100 | The default brightness level in case of a power reset (1..250). Example: def=250 |
| min | integer 0-100 | 11-14 | 0 | Minimum dimming level, example: min=10 |
| max | integer 0-100 | 11-14 | 100 | Maximum dimming level, example max=95 |
| start | integer 0-100 | 11-14 | 0 | The Start function is used for lamps that lack the minimal voltage to get turned on. If the set value is lower than the start value, the lamp is turned on at the start value and them the light is dimmed down to the set level. Example: start=60 |
| force | integer 0-100 | 11-14 | 10 | Time duration of the starting value (measured in milliseconds). Example: force=20 |
| runtime | integer 0-60000 | 11-14 | 1000 | Runtime is the speed of changing the brightness from ‘min’ to ‘max’ (measured in milliseconds). Example: runtime=1000 |
| offset | integer (+/- 0…39) | 39-46 | '0' | sensor values offset; For example, offset is -3.8 :
Example: hw="offset='-3.8'" |
| io | char[28] | 98 | io='KKKKKKKKKKKKKKKKKKKKKKKKKKKK' | Each char is responsible for the type of a particular channel
Example: io='KKKKKKKKKKKKKKKKKKKKKKKKKKKK' |
| Only for Metaforsa 3.plus | ||||
| cfg | string | 98 | 9600/8N1 | cfg='SPEED/BPS', where
Example: 1hw="cfg='9600/8N1'"
|
| [Protocol] | string | 98 | — | Protocol setting is described by protocol parameter. The following
protocols are supported:
Example: 1hw="cfg='9600/8N1' modbus"
|
| echo | on; off | 98 | 'off' | For settings check out and testing echo parameter can be used. Module
echo-reply can be turned on or off with the help of this parameter.Echo parameter value:
Example: 1hw="cfg='9600/8N1' echo='off'"
|
 1		<item addr="349:1" auto-period="600" cfgid="197" name="Lamp 1" type="lamp"/>
 2		<item addr="349:2" auto-period="600" cfgid="197" name="Lamp 2" type="lamp"/>
 3		<item addr="349:3" auto-period="600" cfgid="197" name="Lamp 3" type="lamp"/>
 4		<item addr="349:4" auto-period="600" cfgid="197" name="Lamp 4" type="lamp"/>
 5		<item addr="349:5" auto-period="600" cfgid="197" name="Lamp 5" type="lamp"/>
 6		<item addr="349:6" cfgid="197" name="Radiator" temperature-lag="0.2" type="valve-heating">
 7			<automation name="Eco" temperature-level="16"/>
 8			<automation name="Comfort" temperature-level="22"/>
 9			<automation name="Hot" temperature-level="25"/>
10		</item>
11		<item addr="349:7" cfgid="197" name="Radiator" temperature-lag="0.2" type="valve-heating">
12			<automation name="Eco" temperature-level="16"/>
13			<automation name="Comfort" temperature-level="22"/>
14			<automation name="Hot" temperature-level="25"/>
15		</item>
16		<item addr="349:8" cfgid="197" name="Radiator" temperature-lag="0.2" type="valve-heating">
17			<automation name="Eco" temperature-level="16"/>
18			<automation name="Comfort" temperature-level="22"/>
19			<automation name="Hot" temperature-level="25"/>
20		</item>
21		<item addr="349:9" cfgid="197" name="Jalousie" sub-type="120" type="jalousie"/>
22		<item addr="349:11" auto-period="600" cfgid="197" name="Dimmer 1" type="dimmer-lamp"/>
23		<item addr="349:12" auto-period="600" cfgid="197" name="Dimmer 2" type="dimmer-lamp"/>
24		<item addr="349:13" auto-period="600" cfgid="197" name="Dimmer 3" type="dimmer-lamp"/>
25		<item addr="349:14" auto-period="600" cfgid="197" name="Dimmer 4" type="dimmer-lamp"/>
26		<item addr="349:16" cfgid="197" name="Door 1" type="door-sensor"/>
27		<item addr="349:17" cfgid="197" name="Door 2" type="door-sensor"/>
28		<item addr="349:18" cfgid="197" name="Door 3" type="door-sensor"/>
29		<item addr="349:19" cfgid="197" name="Door 4" type="door-sensor"/>
30		<item addr="349:20" cfgid="197" name="Door 5" type="door-sensor"/>
31		<item addr="349:21" cfgid="197" name="Door 6" type="door-sensor"/>
32		<item addr="349:22" cfgid="197" name="Door 7" type="door-sensor"/>
33		<item addr="349:23" cfgid="197" name="Door 8" type="door-sensor"/>
34		<item addr="349:24" cfgid="197" name="Door 9" type="door-sensor"/>
35		<item addr="349:25" cfgid="197" name="Door 10" type="door-sensor"/>
36		<item addr="349:26" cfgid="197" name="Door 11" type="door-sensor"/>
37		<item addr="349:27" cfgid="197" name="Door 12" type="door-sensor"/>
38		<item addr="349:28" cfgid="197" name="Door 13" type="door-sensor"/>
39		<item addr="349:29" cfgid="197" name="Door 14" type="door-sensor"/>
40		<item addr="349:30" cfgid="197" name="Door 15" type="door-sensor"/>
41		<item addr="349:31" cfgid="197" name="Door 16" type="door-sensor"/>
42		<item addr="349:32" cfgid="197" name="Door 17" type="door-sensor"/>
43		<item addr="349:33" cfgid="197" name="Door 18" type="door-sensor"/>
44		<item addr="349:34" cfgid="197" name="Door 19" type="door-sensor"/>
45		<item addr="349:35" cfgid="197" name="Door 20" type="door-sensor"/>
46		<item addr="349:36" cfgid="197" name="Door 21" type="door-sensor"/>
47		<item addr="349:37" cfgid="197" name="Door 22" type="door-sensor"/>
48		<item addr="349:38" cfgid="197" name="Door 23" type="door-sensor"/>
49		<item addr="349:39" cfgid="197" name="Door 24" type="door-sensor"/>
50		<item addr="349:40" cfgid="197" name="Door 24" type="door-sensor"/>
51		<item addr="349:41" cfgid="197" name="Door 25" type="door-sensor"/>
52		<item addr="349:43" cfgid="197" name="IR receiver" type="ir-receiver"/>
53		<item addr="349:44" cfgid="197" name="RS485" type="com-port"/>
54		<item addr="349:90" cfgid="197" name="Current" system="yes" type="current-sensor"/>
55		<item addr="349:95" cfgid="197" name="Temperature" system="yes" type="temperature-sensor"/>
56		<item addr="349:96" cfgid="197" name="Temperature" system="yes" type="temperature-sensor"/>
57		<item addr="349:97" cfgid="197" name="Temperature" system="yes" type="temperature-sensor"/>
58		<item addr="349:98" cfgid="197" hw="out='LLLLLHHHB-' dm='LLLL' io='KKKKKKKKKKKKKKKKKKKKUKKKKKK-'" logic-ver="19" name="Temperature" sn="2533726919" system="yes" type="temperature-sensor"/>
59		<item addr="349:100" cfgid="197" name="RS232" type="com-port"/>